1
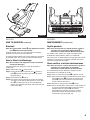
Lightweight Upright
Vacuum Cleaner
Household Type
Owner’s Guide Model 400-409
Aspiradora vertical liviana
Tipo doméstico
Guía del Propietario –
Modelo 400-409
IMPORTANT
Do not return this product to the store.
For assembly problems or questions, for replacement of
broken or missing items, or to order replacement parts and
accessories to be shipped directly to you contact: Eureka
Customer Service toll free at 1-800-282-2886*, 8 a.m. to
7:30 p.m. (CST), Monday - Friday and 10 a.m. to 6:30 p.m.
Saturday. Or visit our web site, www.eureka.com.
*In Mexico call (55) 5343-4384.
IMPORTANTE
No devuelva este producto a la tienda.
Si tiene problemas con el ensamblaje o cualquier pregunta,
para reemplazar piezas faltantes o dañadas o para hacer
pedidos directos de piezas de repuesto y accesorios, póngase
en contacto con: Servicio al cliente Eureka al número gratuito
1-800-282-2886* de lunes a viernes de 8:00 a.m. a 7:30 p.m.
(hora del centro) y los sábados de 10:00 a.m. a 6:30 p.m.
También puede visitar nuestro sitio en Internet:
www.eureka.com.
*En México llame al (55) 5343-4384.
Part No. 77481 (3/06)
©2006 Electrolux Home Care Products Ltd.
Printed in China
ENGLISH
ESPAÑOL
Please Retain
We suggest you record the model, type and serial numbers
below. They are located on the back of your cleaner. For
prompt and complete service information, always refer to
these numbers when inquiring about service.
Model & Type
Serial No.
It is also important to keep your receipt as proof of date
of purchase.
Por favor guarde esta información
Le sugerimos que registre los números de modelo, tipo y
serie a continuación. Los mismos están ubicados en la parte
trasera de la aspiradora. Para obtener información de
servicio rápida y completa, siempre mencione estos
números cuando solicite dicha información.
Modelo y Tipo
No. de serie
También es importante guardar el recibo de compra
como comprobante de la fecha de compra.
Index
Índice
Important Safeguards . . . . . . . . . . . . . . . . . . . . . . . . . . . . . . . 3
Parts List . . . . . . . . . . . . . . . . . . . . . . . . . . . . . . . . . . . . . . . . . 5
How to Assemble . . . . . . . . . . . . . . . . . . . . . . . . . . . . . . . . . . 5
How to Use . . . . . . . . . . . . . . . . . . . . . . . . . . . . . . . . . . . . . . . 6
How to Maintain . . . . . . . . . . . . . . . . . . . . . . . . . . . . . . . . . . 7-9
Problem Solving . . . . . . . . . . . . . . . . . . . . . . . . . . . . . . . . . . 10
Customer Order Form . . . . . . . . . . . . . . . . . . . . . . . . . . . 11-12
Warranty . . . . . . . . . . . . . . . . . . . . . . . . . . . . . . . . . . . . . . . . 13
Precauciones importantes . . . . . . . . . . . . . . . . . . . . . . . . . . . . 4
Lista de partes . . . . . . . . . . . . . . . . . . . . . . . . . . . . . . . . . . . . . . 5
Armado . . . . . . . . . . . . . . . . . . . . . . . . . . . . . . . . . . . . . . . . . 5
Modo de uso . . . . . . . . . . . . . . . . . . . . . . . . . . . . . . . . . . . . . 6
Mantenimiento . . . . . . . . . . . . . . . . . . . . . . . . . . . . . . . . . . 7-9
Resolución de problemas . . . . . . . . . . . . . . . . . . . . . . . . . . . 10
Formulario de pedido del cliente . . . . . . . . . . . . . . . . . . . . . 11
Garantía . . . . . . . . . . . . . . . . . . . . . . . . . . . . . . . . . . . . . . . . 14
General Information
Información general
Use the cleaner to pick up dirt and dust particles. Avoid picking
up hard or sharp objects that could damage the vacuum cleaner.
Use la aspiradora para aspirar tierra y partículas de polvo. Evite
aspirar objetos duros o filosos que puedan dañarla.
DO NOT OIL the motor or the brushroll at any time. The
motor and brushroll are permanently sealed and lubricated.
Service Information
The instructions in this booklet serve as a guide to routine
maintenance. For additional service information, telephone our
toll free number for the nearest Eureka Authorized Warranty
Station. You should know the model, type and serial number
or date code when you call:
USA: 1-800-282-2886
Mexico: (55) 5343-4384
Canada: 1-800-282-2886
www.eureka.com
If you prefer, you can write to Electrolux Home Care Products
North America, Customer Service, P.O. Box 3900, Peoria, Illinois,
61612, USA. In Canada, write to Electrolux Home Care Products
Canada, 5855 Terry Fox Way, Mississauga, Ontario L5V 3E4. Refer
to the Eureka Warranty for complete service information.
2
NO LUBRIQUE el motor o el cepillo giratorio en ningún
momento. Ambos están permanentemente sellados y
lubricados.
Información del servicio
Las instrucciones de este folleto sirven como guía para el
mantenimiento de rutina. Para información adicional sobre el
servicio, llame a nuestro número telefónico gratuito a fin de
conocer la dirección del Centro de Garantía Autorizado de Eureka
más cercano. Cuando llame, debe tener a mano el modelo,
tipo y número de serie o el código de fecha:
EE.UU.: 1-800-282-2886
México: (55) 5343-4384
Canadá: 1-800-282-2886
www.eureka.com
Si lo prefiere, puede dirigirse por escrito a Electrolux Home Care
Products North America, Customer Service, P.O. Box 3900,
Peoria, Illinois, 61612, USA. En Canadá, diríjase a Electrolux
Home Care Products Canada, 5855 Terry Fox Way, Mississauga,
Ontario L5V 3E4. Para obtener la información completa sobre el
servicio, refiérase a la Garantía de Eureka.
ENGLISH
IMPORTANT SAFEGUARDS
When using an electrical appliance, basic precautions should always be followed, including the following:
READ ALL INSTRUCTIONS BEFORE USING THIS VACUUM CLEANER.
WARNING
To reduce the risk of fire, electric shock, or injury:
• Do not use outdoors or on wet surfaces.
• Do not leave vacuum cleaner when plugged in. Turn off the switch and unplug the electrical cord when not in
use and before servicing.
• Do not allow to be used as a toy. Close attention is necessary when used by or near children.
• Use only as described in this manual. Use only manufacturer’s recommended attachments.
• Do not use with damaged cord or plug. If vacuum cleaner is not working as it should, has been dropped, damaged,
left outdoors, or dropped into water, return it to a service center before using.
• Do not pull or carry by cord, use cord as a handle, close a door on cord, or pull cord around sharp edges or
corners. Do not run vacuum cleaner over cord. Keep cord away from heated surfaces.
• Do not use extension cords or outlets with inadequate current carrying capacity.
• Turn off all controls before unplugging.
• Do not unplug by pulling on cord. To unplug, grasp the plug, not the cord.
• Do not handle plug or vacuum cleaner with wet hands.
• Do not put any object into openings. Do not use with any opening blocked; keep free of dust, lint, hair, and anything
that may reduce airflow.
• This vacuum cleaner creates suction and contains a revolving brushroll. Keep hair, loose clothing, fingers, and all
parts of body away from openings and moving parts.
• Do not pick up anything that is burning or smoking, such as cigarettes, matches, or hot ashes.
• Do not use without dust cup filter in place.
• Use extra care when cleaning on stairs.
• Do not use to pick up flammable or combustible liquids such as gasoline, or use in areas where they may be present.
• Store your cleaner indoors in a cool, dry area.
• Keep your work area well lighted.
• Unplug electrical appliances before vacuuming them.
SAVE THESE INSTRUCTIONS
To reduce the risk of electrical shock, this appliance has a polarized plug (one blade is wider then the other). This
plug will fit in a polarized outlet only one way. If the plug does not fully fit into the outlet, reverse the plug. If it still
does not fit, contact a qualified electrician to install the proper outlet. Do NOT change the plug in any way.
CE Rating System (Cleaning Effectiveness)
This is not an Amp rating. Amps do not measure dirt removal, only the amount of electricity used. CLEANING
EFFECTIVENESS is the average ASTM F608 cleanability score.
3
ESPAÑOL
PRECAUCIONES IMPORTANTES
Cuando utilice un electrodoméstico, deberá tener ciertas precauciones básicas, incluyendo las siguientes:
LEA TODAS LAS INSTRUCCIONES ANTES DE UTILIZAR ESTA ASPIRADORA.
ADVERTENCIA
Para reducir el riesgo de incendios, electrocución o lesiones:
• No utilice la aspiradora a la intemperie ni en superficies húmedas.
• No deje la aspiradora enchufada. Apáguela y desenchúfela cuando no la utilice o antes de realizar el
mantenimiento.
• No permita que se utilice la aspiradora como juguete. Preste especial atención cuando es utilizada por o cerca de niños.
• Utilícela solamente según se indica en este manual. Utilice solamente los accesorios recomendados por el fabricante.
• No utilice la aspiradora si el cable o el enchufe está dañado. Si la aspiradora no funciona de manera adecuada, se
ha caído, dañado, dejado a la intemperie, o mojado, devuélvala a un centro de servicios antes de utilizarla..
• No jale la aspiradora ni la transporte jalando del cable, no utilice el cable como mango, no cierre la puerta sobre el
cable, ni lo jale alrededor de bordes o esquinas cortantes. No pase la aspiradora sobre el cable. Mantenga el cable
lejos de superficies calientes.
• No utilice cables alargadores ni tomacorrientes con capacidad de conducción incorrecta.
• Apague todos los controles antes de desenchufarla.
• No jale el cable para desenchufar la aspiradora. Para desenchufar la aspiradora, jale el enchufe, no el cable.
• No toque los enchufes o la aspiradora con las manos húmedas.
• No coloque ningún objeto en las aberturas. No la utilice si alguna abertura se encuentra obstruida. Manténgala sin
polvo, pelusas, cabellos u otros objetos que puedan reducir la circulación de aire.
• Esta aspiradora crea succión y contiene un cepillo cilíndrico giratorio. Mantenga el cabello, la ropa suelta, los dedos
y todas las partes de su cuerpo lejos de las aberturas y de las partes móviles.
• No recoja objetos calientes o humeantes, como cigarrillos, fósforos o cenizas calientes.
• No utilice la aspiradora si el filtro no está colocado en su sitio.
• Tenga extremada precaución cuando aspire en escaleras.
• No utilice la aspiradora para recoger líquidos inflamables o combustibles, como gasolina, ni la utilice en lugares en
los que puedan estar presentes estos líquidos.
• Guarde su aspiradora en un lugar fresco, seco y bajo techo.
• Mantenga el área de trabajo bien iluminada.
• Desenchufe todos los electrodomésticos antes de limpiarlos con la aspiradora.
CONSERVE ESTAS INSTRUCCIONES
Para reducir el riesgo de descargas eléctricas, este electrodoméstico tiene un enchufe polarizado (una espiga es
más ancha que la otra). Este enchufe encajará en un tomacorriente polarizado de una sola manera. Si el enchufe no
encaja hasta el fondo del tomacorriente, invierta la posición del mismo. Si aún así no encaja, póngase en contacto con
un electricista calificado para que instale el tomacorriente apropiado. NO modifique el enchufe de ninguna manera.
Sistema de clasificación CE (Efectividad de limpieza)
Ésta no es una clasificación por amperaje. Los amperios no miden la eliminación de la suciedad, sino sólo la
cantidad de electricidad usada. La EFECTIVIDAD DE LIMPIEZA es el puntaje promedio de la facilidad de limpieza
según el estándar ASTM F608.
4
C
●
C
●
G
●
D
●
F
●
E
●
●I
A
●
●I
A
●
J
●
H
●
B
●
FIG. 1
ENGLISH
PARTS LIST
A Body
●
B Floor nozzle
●
C Handle
●
D Power switch
●
E Dust cup latch
●
F Dust cup
●
G Filter assembly
●
H Stair cleaning hand grip
●
●I Handle button
J Electrical cord
●
ESPAÑOL
LISTA DE PARTES
A Cuerpo
●
B Boquilla para pisos
●
C Mango
●
D Interruptor de encendido
●
E Traba del recipiente para polvo
●
F Recipiente para polvo
●
G Conjunto de filtro
●
H Agarradera para limpieza de escaleras
●
●I Botón del mango
J Cordón eléctrico
●
HOW TO ASSEMBLE
Attach Handle (FIG. 1)
C up with the hole in the top of the
Step 1: Align the handle ●
A . Flat side of handle and loop forward.
body ●
C down into body while pressing the
Step 2: Push handle ●
I on back of the body ●
A . Handle will
handle button ●
ARMADO
Fije del mango (FIG. 1)
C con el orificio de la parte superior
Paso 1: Alinee el mango ●
A . Lado plano y bucle del mango hacia
del cuerpo ●
click into place.
Step 3: There are two handle positions available. Handle all the
way up and handle all the way down.
I needs to be depressed to raise and
Step 4: Handle button ●
C.
lower the handle ●
adelante.
C hacia abajo y adentro del cuerpo
Paso 2: Presione el mango ●
I de la parte
mientras presiona el botón del mango ●
A . El mango calzará en su sitio con
trasera del cuerpo ●
un clic.
Paso 3: El mango tiene dos posiciones. Totalmente hacia arriba y
totalmente hacia abajo.
I para subir o bajar el
Paso 4: Es necesario presionar el botón ●
C.
mango ●
5
D
●
●I
C
●
D
●
●I
H
●
FIG. 3
FIG. 2
ENGLISH
HOW TO USE
ESPAÑOL
MODO DE USO
D is in the
CAUTION: Moving parts, make sure power switch ●
OFF position before plugging into electrical outlet.
PRECAUCIÓN: Partes móviles, asegúrese de que el
D esté en posición
interruptor de encendido ●
de apagado antes de enchufar la aspiradora
en el tomacorriente.
To Clean Bare Floors and Rugs (FIG. 2)
Note: Experiment with your hard floor surface, sometimes it
is best to have the brushroll turning. (Switch in the
“carpet” position).
I to release the lock and slide
Step 1: Push the handle button ●
C up until fully extended. The handle will lock
handle ●
in place.
J and plug into an
Step 2: Unwrap the electrical cord ●
appropriate outlet.
D to floor setting to clean bare
Step 3: Push power switch ●
floors. Use the carpet setting for carpets or rugs.
To Clean Stairs (FIG. 3)
I release the lock and slide
Step 1: Push the handle button ●
C down until fully collapsed. The handle will
handle ●
lock in place.
J and plug into an
Step 2: Unwrap the electrical cord ●
appropriate outlet.
D floor setting to clean bare floors.
Step 3: Push power switch ●
Use the carpet setting for carpets or rugs.
H
Step 4: It may be beneficial to use the stair cleaning grip ●
while cleaning stairs.
6
Para limpiar pisos desnudos o felpudos (FIG. 2)
Nota: Experimente con la superficie dura de su piso – a veces
es mejor con el cepillo giratorio girando. (Interruptor en
la posición para “alfombra”).
I para liberar la traba y
Paso 1: Presione el botón del mango ●
C hasta que quede totalmente
deslice el mango ●
extendido. El mango quedará trabado en su sitio.
J y enchúfelo en un
Paso 2: Desenrolle el cordón eléctrico ●
tomacorriente apropiado.
D a la posición de
Paso 3: Presione el interruptor de encendido ●
piso para limpiar pisos desnudos. Use la posición para
alfombras para limpiar alfombras o felpudos.
Para limpiar escaleras (FIG. 3)
I para liberar la traba y
Paso 1: Presione el botón del mango ●
C hasta que quede totalmente
deslice el mango ●
deprimido. El mango quedará trabado en su sitio.
J y enchúfelo en un
Paso 2: Desenrolle el cordón eléctrico ●
tomacorriente apropiado.
D a la posición de
Paso 3: Presione el interruptor de encendido ●
piso para limpiar pisos desnudos. Use la posición para
alfombras para limpiar alfombras o felpudos.
H para
Paso 4: Puede ser beneficioso usar la agarradera ●
limpiar escaleras.
G
●
F
●
F
●
F
●
E
●
A
●
FIG. 4
FIG. 6
FIG. 5
ENGLISH
HOW TO MAINTAIN
ESPAÑOL
MANTENIMIENTO
The instructions given in this booklet serve as a guide to routine
maintenance. Keep the cleaner operating at top efficiency. Empty
the dust cup after each use.
Las instrucciones de este folleto sirven como guía para el
mantenimiento de rutina. Mantenga la aspiradora funcionando
a máximo rendimiento. Vacíe el recipiente para polvo después
de cada uso.
D and unplug the electrical
Note: Turn off the power switch ●
J to service.
cord ●
Empty Dust Cup
E up.
Step 1: Pull dust cup latch ●
F out from body and up off the dust
Step 2: Swing dust cup ●
cup hook on the body (FIG. 4).
G from the dust cup ●
F , shake
Step 3: Remove dust cup filter ●
contents of dust cup into a waste container (FIG. 5).
F , fit dust cup down onto hook
Step 4: To replace dust cup ●
(FIG. 6).
A until dust cup
Step 5: Swing down and push gently into body ●
F clicks into place (FIG. 6).
●
(CONTINUED)
Nota: Para realizar el servicio, apague la aspiradora con el
D y desenchufe el cordón
interruptor de encendido ●
J del tomacorriente.
eléctrico ●
Vacíe el recipiente para polvo
E hacia arriba.
Paso 1: Jale la traba del recipiente para polvo ●
F alejándolo del cuerpo y hacia arriba
Paso 2: Gire el recipiente ●
para extraerlo del gancho del cuerpo (FIG. 4)
G del recipiente para polvo ●
F y sacuda
Paso 3: Retire el filtro ●
el contenido del recipiente para vaciarlo en el recipiente
de residuos (FIG. 5).
F,
Paso 4: Para volver a instalar el recipiente para polvo ●
colóquelo en el gancho (FIG. 6).
Paso 5: Gírelo hacia abajo y presiónelo suavemente hacia el
A hasta que el recipiente ●
F encaje en su sitio
cuerpo ●
con un clic (FIG. 6).
(CONTINUACIÓN)
7
L
●
A
●
G
●
F
●
FIG. 8
FIG. 7
ENGLISH
ESPAÑOL
HOW TO MAINTAIN
MANTENIMIENTO
Clean Dust Cup Filter
G as necessary.
Clean the dust cup filter ●
F.
Step 1: Remove dust cup ●
Limpie el filtro del recipiente para polvo
G según sea
Limpie el filtro del recipiente para polvo ●
Step 2: Grasp handle inside filter and pull filter out of dust cup
F (FIG. 7).
●
G.
Step 3: Shake and brush the dust and dirt from filter ●
G , push filter into dust cup ●
F so that
Step 4: To replace filter ●
flexible rim of filter fits securely into dust cup.
Step 5: If desired, launder the filter by hand in warm water using
a mild detergent.
Step 6: Air dry thoroughly.
G in dust cup ●
F.
Step 7: Reinstall filter ●
Replace a dirty or torn filter. Order additional dust cup filter,
part number 60958.
Note: The dust cup filter is not dishwasher safe.
Do not put in dishwasher.
necesario.
F.
Paso 1: Retire el recipiente ●
Paso 2: Tome la manija del interior del filtro y jale para extraerlo
F (FIG. 7).
del recipiente ●
Paso 3: Sacuda y cepille el filtro para eliminar el polvo y la
G.
suciedad ●
G , presiónelo en el
Paso 4: Para volver a colocar el filtro ●
F de modo que el
interior del recipiente para polvo ●
reborde del mismo encaje firmemente en el recipiente.
Paso 5: Si lo desea, lave el filtro a mano con agua tibia y un
detergente suave.
Paso 6: Séquelo completamente al aire.
G en el recipiente para polvo ●
F.
Paso 7: Reinstale el filtro ●
Reemplace el filtro si estuviera sucio o desgarrado. Para ordenar
un filtro de recipiente para polvo adicional, el número de parte
es 60958.
Nota: El filtro del recipiente para polvo no es apto para lavar
en el lavavajilla. No lo ponga en dicho electrodoméstico.
8
(CONTINUED)
(CONTINUACIÓN)
F
●
M
●
FIG. 9
ENGLISH
HOW TO MAINTAIN
FIG. 10
ESPAÑOL
(continued)
MANTENIMIENTO
(continuación)
Brushroll
Cepillo giratorio
D and unplug the electrical
Note: Turn off the power switch ●
J before inspecting brushroll.
cord ●
Nota: Antes de inspeccionar el cepillo giratorio, apague la
D y
aspiradora con el interruptor de encendido ●
J del tomacorriente.
desenchufe el cordón eléctrico ●
Long hair, thread, string, etc. can wrap around the revolving
brushroll and result in reduced performance.
To check brushroll for debris turn cleaner nozzle over and inspect
for wrapped matter. Use scissors to cut debris from brushroll.
Los cabellos, hilos, cuerdas, etc., largos se pueden arrollar
alrededor del cepillo giratorio y reducir su rendimiento.
How to Check for Blockages
Para verificar que el cepillo giratorio no tenga desechos, invierta
la boquilla e inspeccione si hay objetos arrollados. Use tijeras
para cortar los desechos del cepillo.
Note: Turn off switch and unplug the electrical cord before
checking for blockages.
Cómo verificar si existen obstrucciones
If suction performance diminishes, check for blockages in
suction path.
Nota: Antes de verificar si existen obstrucciones, apague la
aspiradora con el interruptor de encendido y
desenchufe el cordón eléctrico del tomacorriente.
F and set aside.
Step 1: Remove dust cup ●
L at base of
Step 2: Inspect for blockages inside hole area ●
A opening. Use tool or coat hanger to remove
body ●
blockage (FIG. 8).
F (FIG. 9).
Step 3: Reinstall dust cup ●
Step 4: Flip vacuum over and inspect dirt channel in brushroll
area. Open access door by pulling back on access door
M and lifting up (FIG. 10), check for blockage.
latch ●
Remove any blockages with tool or coat hanger (FIG. 10).
Close access door.
Si el rendimiento de succión disminuye, verifique si existen
obstrucciones en el conducto de succión.
F y déjelo a un lado.
Paso 1: Retire el recipiente para polvo ●
Paso 2: Inspeccione para detectar posibles obstrucciones dentro
L en la base de la abertura del
del área del orificio ●
A . Use una herramienta o una percha para
cuerpo ●
extraer la obstrucción (FIG. 8).
F (FIG. 9).
Paso 3: Reinstale el recipiente para polvo ●
Paso 4: Invierta la aspiradora e inspeccione el canal de polvo en
el área del cepillo giratorio. Abra la puerta de acceso
M hacia atrás y
jalando la traba de la puerta ●
levantándola (FIG. 10) para verificar que no haya
obstrucciones. Retire las obstrucciones con una
herramienta o una percha (FIG. 10).
9
ENGLISH
PROBLEM SOLVING
Note: Turn off the switch and unplug the electrical cord before servicing.
For additional information call 1-800-282-2886 or visit our website at www.eureka.com
Problem
Motor will not start
Cause
Electric plug
Solution
• Push plug securely into outlet
• Try another outlet
• Check circuit breaker
Reduced suction
General questions
Power switch not turned “ON”
• Make sure power switch is “ON”
Full dust cup
• Empty dust cup
Filter clogged
• Clean filter
Nozzle clogged
• Remove any clogs from nozzle that restrict airflow,
then try again
Assembly or related attachments
• Call 1-800-282-2886 between 8:00 a.m.-7:30 p.m.
CST Monday through Friday and 10:00 a.m.-6:30 p.m.
CST on Saturday. Know the model number and serial
number when you call.
ESPAÑOL
RESOLUCIÓN DE PROBLEMAS
Nota: Antes de realizar el servicio, apague la aspiradora con el interruptor de encendido y desenchufe el cordón eléctrico.
Para información adicional, llame al 1-800-282-2886 o visite nuestro sitio web en www.eureka.com
Problema
El motor no arranca
Succión reducida
Preguntas generales
10
Causa
Solución
Enchufe eléctrico
• Introduzca firmemente el enchufe en el tomacorriente
• Pruebe en otro tomacorriente
• Verifique el disyuntor
Interruptor eléctrico no conectado
• Asegúrese de que el interruptor de encendido esté
conectado (en posición “ON”)
Recipiente para polvo lleno
• Vacíe el recipiente para polvo
Filtro obstruido
• Limpie el filtro
Boquilla obstruida
• Retire las obstrucciones de la boquilla que restringen
el flujo de aire y pruebe nuevamente
Armado o accesorios relacionados
• Llame al 1-800-282-2886 de lunes a viernes, de
8:00 a.m. a 7:30 p.m. CST y los sábados de
10:00 a.m. a 6:30 p.m. CST. Cuando llame, tenga a
mano el número de modelo y el número de serie.
4)0/
490%
4ELEPHONEEVE
4ELÏFONONOCHE
4ELEPHONEDAY
4ELÏFONODÓA
$#
-#
!-%8
(/2!3 ,LAME DE LUNES A VIERNES AM PM HORA ESTÈNDAR CENTRAL 3ÈBADO
AM PM HORA ESTÈNDAR CENTRAL0ORFAVOR LLAME A ESE MISMO NÞMERO EN CASO
DEPROBLEMASOPREGUNTASENLOS%STADOS5NIDOSY#ANADÈ
%N-ÏXICOLLAMEAL
0ORTELÏFONO (/523 #ALL -ONDAY&RIDAY AM PM #34 3ATURDAY AM PM #34
0LEASECALLTHESAMENUMBERFORANSWERSTOPROBLEMSORQUESTIONSINTHE53!AND#ANADA
"Y0HONE 4//2$%2n0!2!/2$%.!2
???????????????????????????????????????????
3)'.!452%FULLNAMEASSHOWNONACCT
&)2-!NOMBRECOMPLETOCOMOAPARECEENLACUENTA
%80)2!4)/.$!4%
&%#(! 6%.#)-)%.4/
!##4.5-"%2n.Á-%2/#5%.4!
6)3!
#HECKORMONEYORDER$ONOTSENDCURRENCY
YORDE
Y
0AYABLETO%LECTROLUX(OME#ARE0RODUCTS.ORTH!MERICA
#HECQUEOGIROPOSTAL.OENVÏEDINEROENEFECTIVO
#HECQUEOGIROPOSTAL
0AGADEROA%LECTROLUX(OME#ARE0RODUCTS.ORTH!MERICA
0!9-%.4NO#/$/RDERS
0!'/NOSEACEPTANORDENESCONTRAREEMBOLSO
&AX
&AX
#ITY
#IUDAD
3TATE
%STADO
#ITY
#IUDAD
76487
$534#50
2%#)0)%.4%0!2!0/,6/
A 36
"Y&!8
0OR&!8
©6%LECTROLUX(OME#ARE0RODUCTS,TD
SURETOINCLUDEDAYANDEVENINGPHONENUMBERS
0ORCORREO 3IMPLEMENTELLENEEL&ORMULARIODE0EDIDO
0ORFAVORINCLUYANÞMEROSDETELÏFONOPARALLAMARDURANTEEL
DÓAOENLANOCHE
"Y-AIL 3IMPLYlLLOUTTHISORDERFORM0LEASEBE
4/4!,
PRICESSUBJECTTOCHANGEWITHOUTNOTICE
4/4!, LESPRIXPEUVENTÐTREMODIl
LESP IXPEU
ÏSSANSPRÏAVIS
ÏSSANSPRÏ VIS
4!8 ADDSTATETAXLOCALTAXESASREQUIREDBYLAW
4!8% TAXESLOCALESETAUTRESREQUISESPARLALOI
TA ESLOCALESETAUTRESREQUISESPARLALOI
0/34!'%(!.$,).'#(!2'%
&2!)3$%-!.54%.4)/.%4$%.6/)
4/4!,%.#,/3%$
4/4!,#)*/).4
0ART.O
0ARTE.O
:IP#ODE
#ODIGOPOSTAL
0RINTEDIN#HINAn)MPRESOEN#HINA
/.,).%
0ORINTERNET
WWWEUREKACOM
1TY 0RICE53$
#ANT 0RECIO53$
4OTAL
4ELEPHONEEVE
4ELÏFONONOCHE
3TATE
%STADO
$534#50&),4%2$#&
&),42/$%,2%#)0)%.4%0!2!0/,6/$#&
'ENUINE%UREKA"AGS"ELTSAND&ILTERS
"OLSAS#ORREASY&ILTROS'ENUINOSDE%UREKA
4ELEPHONEDAY
4ELÏFONODÓA
!DDRESS
$IRECCION
!DDRESS
$IRECCION
:IP#ODE
#ODIGOPOSTAL
)-0/24!.4 "ESURETOINCLUDEYOURMODELTYPEANDSERIALNUMBERS4HESE
YOURMODELTYP
NUMBERSMAYBEFOUNDONTHERATINGPLATE
)-0/24!.4% !SEGÞRESEDEINCLUIRLOSNÞMEROSDEMODELOTIPOYSERIE%STOS
NÞMEROSSEENCUENTRANENLAPLACADEDATOS
%LECTROLUX(OME#ARE0RODUCTS ,TD
0/"OXs0EORIA),
3()04/n%.6)!2!
.AME
.OMBRE
3%2)!,
.5-"%2
.Á-%2/
3%2)%
.AME
.OMBRE
3/,$4/n6%.$)$/!
-/$%,
.5-"%2
.Á-%2/
-/$%,/
11
:IP#ODE
#ODE0OSTAL
$#
-#
!-%8
(%52%3$ULUNDIAUVENDREDIENTREHETHHEURENORMALEDE#ENTRELE
SAMEDIENTREHËHHEURENORMALEDE#ENTRE0OUROBTENIRDESRÏPONSESËVOS
QUESTIONSOU PROBLÒMESAUX²5ETAU#ANADAVEUILLEZCOMPOSERLEMÐMENUMÏRO
0ARTÏLÏPHONE (/523 #ALL-ONDAY&RIDAYAMPM#343ATURDAYAM
PM#340LEASECALLTHESAMENUMBERFORANSWERSTOPROBLEMSORQUESTIONS
INTHE53!AND#ANADA
"Y0HONE 4//2$%2n0/52#/--!.$%2
???????????????????????????????????????????
3)'.!452%FULLNAMEASSHOWNONACCT
NOMCOMPLETCOMMESURLECOMPTE
%80)2!4)/.$!4%
$!4%$%80)2!4)/.
!##4.5-"%2n.5-²2/$%#/-04%
6)3!
#HECKORMONEYORDER$ONOTSENDCURRENCY
YORDE
Y
0AYABLETO%LECTROLUX(OME#ARE0RODUCTS#ANADA
#HÒQUEOUMANDAT.ENVOYEZPASDESPÒCES
#HÒQUEOUMANDAT
NVOYEZPASDESPÒCE
EZPASDESPÒCE
0AYABLEË%LECTROLUX(OME#ARE0RODUCTS#ANADA
0!9-%.4NO#/$/RDERS
0!)%-%.4 PASDECOMMANDESENPORTDß
76487
$534#50
#/,,%#4%52®0/533)µ2%
A 36
800-361-4731
"Y&!8
0ARTÏLÏCOPIEUR
©6%LECTROLUX(OME#ARE0RODUCTS,TD
SURETOINCLUDEDAYANDEVENINGPHONENUMBERS
0AR LA POSTE 2EMPLISSEZ SIMPLEMENT CE BON DE
COMMANDE !SSUREZVOUS DE MENTIONNER VOS NUMÏROS DE
TÏLÏPHONEJOURETSOIR
"Y-AIL 3IMPLYlLLOUTTHISORDERFORM0LEASEBE
4/4!,
PRICESSUBJECTTOCHANGEWITHOUTNOTICE
4/4!, PRECIOSSUJETOSACAMBIOSINPREVIOAVISO
PRECIOSSUJETOSACAMBIOSINPR
VISO
4!8 ADDSTATETAXLOCALTAXESASREQUIREDBYLAW
)-05%34/3 AGREGUEIMPUESTOESTATALEIMPUESTOSLOCALESSEGÞNEXIGELALEY
AGREGUEIMPUESTOESTATALEIMPUESTOSLOCALESSEGÞN XIGELAL Y
0/34!'%(!.$,).'#(!2'%
'!34/3$%%.6¶/DENTRODELOS%%55
DENTRODELOS%%5 4 / 4! , % . # , / 3 % $
4 / 4! , ) . # , 5 ) $ /
0ART.O
. PIÒCE
3TATE
0ROVINCE
4ELEPHONEEVE
4ÏLÏPHONESOIR
$534#50&),4%2$#&
&),42%$5#/,,%#4%52®0/533)µ2%
'ENUINE%UREKA"AGS"ELTSAND&ILTERS
3ACS#OURROIESET&ILTRES%UREKA!UTHENTIQUES
!DDRESS
!DRESE
#ITY
6ILLE
4ELEPHONEDAY
4ÏLÏPHONEJOUR
!DDRESS
!DRESE
#ITY
6ILLE
4ELEPHONEDAY
4ÏLÏPHONEJOUR
&AX
4ÏLÏCOPIEUR
3TATE
0ROVINCE
4ELEPHONEEVE
4ÏLÏPHONESOIR
.AME
.OM
0RINTEDIN#HINAn)MPRIMÏAUX#HINA
/.,).%
%N,IGNE
WWWEUREKACOM
1TY 0RICE#$.
1TÏ 0RIX#$.
4OTAL
:IP#ODE
#ODE0OSTAL
)-0/24!.4 "E SURE TO INCLUDE YYOUR MODEL TYPE AND SERIAL NUMBERS4HESE
NUMBERSMAYBEFOUNDONTHERATINGPLATE
)-0/24!.4 !SSUREZVOUSDINCLURELETYPELESNUMÏROSDEMODÒLEETDESÏRIEQUE
VOUSTROUVEREZSURLAPLAQUESIGNALÏTIQUE
3()04/n%.6/9%:®
3%2)!,
.5-"%2
. $%
3²2)%
.AME
.OM
490%
490%
%LECTROLUX(OME#ARE0RODUCTS#ANADA
4ERRY&OX7AY
-ISSISSAUGA/NTARIO,6%
3/,$4/n 6%.$5®
-/$%,
.5-"%2
. $%
-/$µ,%
12
ENGLISH
THE EUREKA LIMITED WARRANTY
What This Warranty Covers
Your Eureka cleaner is warranted to be free from all defects in material and workmanship in normal household use for a period of one year.
The warranty is granted only to the original purchaser and members of his or her immediate household. The warranty is subject to the
following provisions:
What This Warranty Does Not Cover
• Parts of the cleaner that require replacement under normal use, such as disposable dust bags, filters, drive belts, light bulbs, brushroll
bristles, impellers and cleaning.
• Damages or malfunctions caused by negligence, abuse, or use not in accordance with the Owner’s Guide.
• Defects or damages caused by unauthorized service or the use of other than Genuine Eureka parts.
What Eureka Will Do
Eureka will, at its option, repair or replace a defective cleaner or cleaner part that is covered by this warranty. As a matter of warranty
policy, Eureka will not refund the consumer’s purchase price.
Warranty Registration
Please fill out and return the warranty registration card accompanying your cleaner.
Obtaining Warranty Service
To obtain warranty service you must return the cleaner or cleaner part along with proof of purchase to any Eureka Authorized
Warranty Station.
For the location of the nearest Eureka Authorized Warranty Station or for service information visit www.eureka.com, or telephone toll free:
USA: 1-800-282-2886
Mexico: 55-5343-4384
Canada: 1-800-282-2886
www.eureka.com
If you prefer, you can write to Electrolux Home Care Products North America, P.O. Box 3900, Peoria, Illinois 61612, USA. In Canada
write to Electrolux Home Care Products Canada, 5855 Terry Fox Way, Mississauga, Ontario L5V 3E4.
If it is necessary to ship the cleaner outside your community to obtain warranty repair, you must pay the shipping charges to the
Eureka Authorized Warranty Station.
Return shipping charges will be paid by the Warranty Station. When returning parts for repair, please include the model, type, and
serial number from the data plate on the cleaner.
Further Limitations and Exclusions
Any warranty that may be implied in connection with your purchase or use of the cleaner, including any warranty of Merchantability or
any warranty for Fitness For A Particular Purpose is limited to the duration of this warranty. Some states do not allow limitations on
how long an implied warranty lasts, so the above limitations may not apply to you.
Your relief for the breach of this warranty is limited to the relief expressly provided above. In no event shall the manufacturer be liable
for any consequential or incidental damages you may incur in connection with your purchase or use of the cleaner. Some states do
not allow the exclusion or limitation of incidental or consequential damages, so the above limitation or exclusion may not apply to you.
This warranty gives you specific legal rights. You may also have other rights, which may vary by state.
Questions & Answers about Genuine Eureka Products
Q:
A:
Why should I use only Genuine Eureka paper bags, belts, and parts in my Eureka vacuum cleaner?
Using Genuine Eureka Products, which are made to our exacting specifications and engineered with emphasis on
quality, performance, and customer satisfaction, ensures the long life and cleaning efficiency of your vacuum cleaner.
Overall, this saves you money and helps keep your home clean.
Q:
A:
How can I be sure I am using only genuine Eureka products in my vacuum cleaner?
Typically, packaged products and paper bags can be identified by a “Genuine Eureka Product” symbol (see
illustration above). For further identification assistance, you may call our toll-free number, 1-800-282-2886, for the
location of a nearby Eureka Authorized Warranty Station.
Q:
A:
Are there any differences between “made to fit” or “imitation” and Genuine Eureka paper bags, belts, and parts?
Yes, there are some very important differences in materials, quality, and reliability. Many customers have mistakenly
purchased “imitation” paper bags and parts while thinking they purchased genuine. Unfortunately, many of these
customers discovered the differences after they experienced related difficulties.
For Genuine Eureka Value, Accept No Imitations!
ELECTROLUX HOME CARE PRODUCTS NORTH AMERICA
Bloomington, Illinois 61701
13
ESPAÑOL
GARANTÍA LIMITADA DE EUREKA
Qué cubre esta garantía
Se garantiza su aspiradora Eureka contra todos los defectos de material y mano de obra durante el uso doméstico normal por un período
de un año La garantía se otorga solamente al comprador original y a los miembros inmediatos de su hogar. La garantía está sujeta a las
siguientes estipulaciones:
Qué no cubre esta garantía
• Partes de la aspiradora que es necesario reemplazar durante el uso normal, tales como bolsas para polvo descartables, filtros, correas
motrices, bombillas de luz y cerdas del cepillo giratorio.
• Partes de la aspiradora que es necesario reemplazar durante el uso normal, tales como bolsas para polvo descartables, filtros, correas
motrices, bombillas de luz y cerdas del cepillo giratorio.
• Defectos o daños causados por servicios no autorizados o el uso de repuestos que no sean partes Eureka legítimas.
Qué hará Eureka
La compañía Eureka, a opción de la misma, reparará o reemplazará una aspiradora o parte defectuosa que esté cubierta por esta
garantía. En cumplimiento de la política de la garantía, Eureka no reembolsará al consumidor el precio de compra.
Registro de la garantía
Llene y envíe en devolución la tarjeta de registro de garantía que acompaña a su aspiradora.
Cómo obtener el servicio de garantía
Para obtener el servicio de garantía, debe devolver la aspiradora o la parte de la misma junto con el comprobante de compra a
cualquier Centro de Garantía Autorizado de Eureka.
Para conocer la dirección del Centro de Garantía Autorizado de Eureka más cercano o para obtener información sobre el servicio,
visite www.eureka.com o llame gratuitamente al:
EE.UU.: 1-800-282-2886
México: 55-5343-4384
Canadá: 1-800-282-2886
www.eureka.com
Si lo prefiere, puede dirigirse por escrito a Electrolux Home Care Products North America, Customer Service, P.O. Box 3900, Peoria,
Illinois, 61612, USA. En Canadá, diríjase a Electrolux Home Care Products Canada, 5855 Terry Fox Way, Mississauga, Ontario L5V 3E4.
Si fuera necesario despachar la aspirador afuera de su comunidad para obtener la reparación por garantía, debe pagar los cargos de
despacho al Centro de Garantía Autorizado de Eureka.
El Centro de Garantía pagará los cargos de despacho de devolución. Cuando envíe partes para reparación, incluya el modelo, el tipo y
el número de serie que figuran en la placa de datos de la aspiradora.
Limitaciones y exclusiones adicionales
Cualquier garantía implícita relacionada con su compra o uso de la aspiradora, incluida cualquier garantía de comerciabilidad o de
aptitud para un propósito determinado se limita a la duración de esta garantía. En algunos estados no se permiten limitaciones a la
duración de las garantías implícitas, por lo tanto las limitaciones anteriores pueden no aplicarse en su caso.
Su compensación por el incumplimiento de esta garantía se limita a la compensación descrita anteriormente. Bajo ninguna
circunstancia el fabricante será legalmente responsable por los daños y perjuicios consecuentes o incidentales que usted pueda sufrir
debido a la compra o uso de esta aspiradora. En algunos estados no se permite la exclusión o limitación de daños y perjuicios
consecuentes o incidentales, por lo tanto la limitación o exclusión anterior puede no aplicarse en su caso.
Esta garantía le otorga derechos legales específicos. Usted puede tener además otros derechos que varían de un estado a otro.
Preguntas y respuestas acerca de los productos legítimos Eureka
P: ¿Por qué debo usar sólo bolsas para polvo, correas y partes legítimas Eureka en mi aspiradora Eureka?
R: El uso de productos legítimos Eureka, fabricados según nuestras exigentes especificaciones y diseñados con énfasis en
la calidad, el rendimiento y la satisfacción del cliente, asegura la larga vida útil y la eficiencia de su aspiradora en la
limpieza. En conjunto, esto le permite ahorrar dinero y contribuye a mantener limpio su hogar.
P:
R:
¿Cómo puedo estar seguro de que estoy usando sólo productos legítimos Eureka en mi aspiradora?
Típicamente, los productos envasados y las bolsas de papel se pueden identificar por el símbolo “Genuine Eureka
Product” (vea la ilustración de arriba). Para obtener asistencia adicional en la identificación, puede llamar a nuestro
número telefónico gratuito, 1-800-282-2886, a fin de conocer la dirección del Centro de Garantía Autorizado de
Eureka más cercano.
P:
R:
¿Hay diferencias entre las bolsas de papel, correas y partes “fabricadas especialmente” o “imitaciones” y las legítimas Eureka?
Sí, hay varias diferencias importantes en materiales, calidad y confiabilidad. Muchos clientes han comprado
equivocadamente bolsas de papel y partes “de imitación” pensando que adquirían las legítimas. Lamentablemente,
muchos de ellos descubrieron las diferencias después de experimentar dificultades por esa causa.
Para mantener el valor legítimo de Eureka, ¡no acepte imitaciones!
ELECTROLUX HOME CARE PRODUCTS NORTH AMERICA
Bloomington, Illinois 61701
14