1
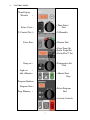
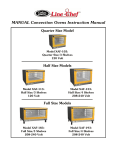
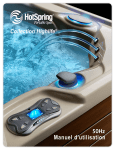
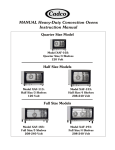
Combination Ovens Instructions
Welcome to Cadco!
We want you to have immediate success with your new Cadco LineChefTM
Combination Oven.
These state of the art ovens are manufactured to strict Cadco, Ltd.
specifications by Unox SPA of Padua, Italy . By following the guidelines and
reading the tips contained in this instruction manual you will be combi cooking
like an “ol’Pro” in no time. Cadco will help you find the perfect oven for your
needs, and provide customer support after the purchase. We don’t succeed
unless you succeed.
The Cadco website, at www.cadco-ltd.com, provides a wealth of information
relating to service and food issues.
All our Cadco staff e-mail addresses will be listed on the website.
The Cadco toll free number gives you access to our on-taff Certified Executive
Chef. Most calls are answered within 24 hours. To reach any of the Cadco
professionals, call 877.603.7393.
This booklet is divided into sections outlining proper installation and proper
use of the Cadco LineChefTM Combination Oven.
Cadco, Ltd.
145 Colebrook River Road,
Winsted, CT 06098
Phone: 860-738-2500
Fax: 860-738-9772
E-mail: [email protected]
Installation of the Cadco LineChefTM Combination Oven.
• Installation should only be performed by certified professionals, following all local codes.
Improper installation could result in injury or void the warranty.
Data Plate:
• The data plate is positioned on the right side panel.
• The technical characteristics are identified in the enclosed “technical data” page.
2. CERTIFICATIONS
CSA C-US BRAND
SERIE XAB - XAV
Certificate of Compliance
N.202281-1008284
Applicable Requirements:
CAN/CSA-C22.2 No. 100-1995 - Motors and Generators.
CSA Std C22.2 No. 109-M1981 – Commercial Cooking Appliances.
UL Std No. 197 - Commercial Electric Cooking Appliances.
UL Std No. 1004 - Electric Motors
The “C” and “US” indicator adjacent to the CSA Mark signifies that the product has been evaluated to
the applicable ANSI/UL and CSA Standards, for use in the U.S. and Canada. This includes products
eligible to bear the NRTL indicator. NRTL, i.e. Nationally Recognized Testing Laboratory, is a
designation granted by the U.S. Occupational Safety
and Health Administration (OSHA) to laboratories which have been recognized to perform certification
to U.S. Standards.
NSF BRAND
SERIE XAB - XAV
Certificate N. 79610/79610B
N. 79610/79611/B
NSF International recognizes UNOX SPA products as complying with ANSI/NSF 04. Standard 004 Commercial Cooking, Rethermalization and Powered Hot Food.
2
3.1
Check the installation location
Before placing the appliance, please verify the overall measurements and the exact position of the
electrical connections looking at the pictures on the attached file "TECHNICAL DATA".
3.2 Feet assembly
CAPO 203 (XAV 203)- CAPO 303( XAV 303) –CAPO 403 (XAV 403)
You find the metal feet inside the appliance, in the carton box. They must absolutely be assembled in the
oven.
Do not ever use the appliance without its feet.
Screw the support feet with the relative washer in the bottom of the appliance
CAPO 603 (XAV 603)
The CAPO 603 must be installed with the rack provided. The plastic feet that you find inside the oven
must be installed . These feet are “insertion elements” for the racks.
3.3
Positioning
Make sure you have the correct power supply for the oven model you have purchased. Check the
technical data sheets attached if you are in doubt.
Do not install any Cadco Combination Oven directly on the floor.
If the oven must be placed near walls, dividers, or moldings Cadco recommends they be made of noncombustible materials. Be sure to observe all safety and fire codes when positioning your Combi Steam
Convection oven.
All of our Combi Steam Convection ovens have a vapor vent in the back of the unit. When installing your
convection oven, leave a space of 4” [minimum] between the back of the oven and the wall, and 2”
minimum on the top and sides.
Where applicable, ventilation hood requirements vary according to local codes.
We do not suggest using the Cadco-Unox Combi Steam Convection Ovens for built in applications.
Measure to make sure that your new oven will fit in your available space.
3.4
Remove the protective film
Carefully remove all the protective film from the external walls of the appliance. Pay attention not to
leave any residue of glue on the sides.
If there should be any residue, remove it with an appropriate solvent.
4.
INSTALLATION
4.1 – ELECTRICAL CONNECTION
4.2 – WATER CONNECTION
4.1
Electrical connection
a-The connection to the electrical power supply system must be done according to all governing codes.
Before connecting the appliance, make sure that the voltage and the frequency correspond to those stated
on the data plate of the appliance. The appliance must be placed so that the connection plug to the
network can be easily reached.
3
Place an omni-polar switch between the appliance and the network so that it is easily accessible. The
contacts of this switch must have a minimum opening distance of 3 mm and the switch must have an
appropriate input (for example, magneto-thermal switch).
When the appliance is working the power supply voltage must not diverge from the value of the nominal
voltage, written on the technical data plate, by more than ± 10%.
b- The appliance must be connected to the ground line of the network.
Power supply cable connection
The appliance is provided with approved cable and plug.
All the electrical connections and installations and all the electrical modifies must be done by qualified
personnel according to actual laws.
4.2 Water connection
Connection to the water system
This equipment is to be installed to comply with the applicable federal, state or local plumbing codes.
It is necessary to place a mechanical filter between the water system and the water connection of the
oven.
Before connecting the water pipe to the oven, please let a certain quantity of water flow to clean the duct
from any eventual remainder.
The water used in the oven must have a nominal pressure of 2 bars.
The water must have a hardness included between 0.5° and 5°F ( this in order to avoid formation of
limestone deposits inside the electric valve and inside the cooking chamber).
We suggest you to us a decalcification appliance in order to avoid fan balancing. You can find this part
by the supplier facilities.
Condensation water drain:
The drain of the steam condensation water is placed on the back of the oven and must be connected to an
open drain with a rigid or a flexible pipe. The diameter of the pipe cannot be smaller to the diameter of
the drain connection. The length of the pipe cannot be longer than one meter.
Please avoid narrow passages and elbows for metal ducts on flexible ducts along the whole run of the
drain pipe.
The drain pipe must remain at least 20 cm below the drain connection so that the down-flow of liquids is
much easier.
END OF MAINTENANCE PORTION OF THE BOOKLET.
4
We are going to assume that you have followed all of your local codes and your new Cadco All-Purpose
Oven is installed according to the procedures outlined in the installation section of this manual. Since you
are all hooked up and ready to go, let’s talk about your new oven, and how it works.
Remember! This manual contains important information relating to your Cadco Combination Oven!
KEEP IT IN A SAFE PLACE!
You have a one year parts and labor warranty on your new oven, keep it valid. Your Cadco Combinatione
Oven was designed to prepare food, don’t abuse it by using it for any other purpose.
General Maintenance;
• All maintenance operations must be done by qualified personnel.
• Before starting any maintenance operation, disconnect the oven from the electrical power supply
and wait for it to cool down.
• The parts that need ordinary maintenance can be reached by removing the front control panel and
the back of the oven.
Replacing the oven light;
• Disconnect the appliance from the power supply system and let it cool down.
• Remove the lateral rack supports.
• Unscrew the glass cover and replace the lamp with an identical bulb.
• Screw the glass cover back in.
• Replace the lateral rack supports.
Replacing a fuse;
If the control panel is not functioning but there is still power to the oven you may need a new fuse.
To replace the fuse;
• lightly press on the cover of the fuse holder and rotate it about 20° counter clockwise.
• remove the cover of the fuse holder.
• remove the fuse from the cover of the fuse holder.
• replace the fuse with the one of the same size.
• replace the cover of the fuse holder.
• lightly press the cover and rotate it about 20° clockwise.
2.3
Recovery of the safety thermostat
The appliance is supplied with a safety thermostat with manual recovery. This safety thermostat is needed
to protect the appliance from overheating. In case it is needed, it turns the appliance off.
This safety thermostat can be reached removing the black cap you find on the bottom part of the back of
the oven: in case you need to recover it, push the key you have on the center of the thermostat so that it
starts working again.
Cadco Combination Ovens have some features that are common to all models.
Cadco All-Purpose Oven Features
• A tone will indicate the end of the cooking cycle.
• A light in the cooking cavity to easily monitor the food as it cooks.
• Cool glass doors to minimize danger in the work place.
• Easy clean glass doors reduce clean-up time.
• Compact footprint to save valuable space in the kitchen.
• Electronic probe for precise product cooking, insures safe temperatures.
• Memory for up to 70 preset programs.
• Automatically reversing fans for even cooking.
• No boiler for simple maintenance.
• Full one year warranty on parts and labor
5
•
•
•
220v single phase power supply.
Thermostat accurate +-5f.
Temperatures up to 500°F.
Your “CAPO” Oven can be used to:
• bake all types of bread and pastry, both fresh and frozen.
• Proof bakery products.
• oven grill steaks.
• cook meats, fresh or frozen.
• retherm frozen entrees.
• regeneration of refrigerated meals for banquet service.
• steam meat, fish and all types of vegetables.
• cook foods in multi step operations.
• cook foods overnight, taking advantage of off peak power.
Your operation has unique needs and methods of food preparation. Explore the different possibilities for
food preparation with your new CAPO oven. Let us know the unique ways you are using your Cadco AllPurpose Oven to prepare better food, at a lower cost, with less effort. You could even have your operation
featured on the Cadco website!
Cooking principles
Accurate times and temperatures assure perfectly cooked foods. Cooking is an art not a science, and
therefore, very subjective. People will never agree on the meaning of “done”, or “perfectly cooked”.
Here are some tips that will help ensure success with your combi oven cooking.
• The temperature of the food going into the oven will affect the cooking time. Frozen foods take
longer to cook than refrigerated foods.
• Three trays of chicken will take longer to cook than three pieces of chicken.
• To convert your conventional oven recipes to combi oven production simply reduce the cooking
temperature by 25°F-30°F.
• Most recipes can be converted by having shorter cooking times and/or reducing your cooking
temperatures.
• We suggest that you use an instant read probe or the oven probe to help you determine the actual
internal temperature of your foods. This will help you safely determine correct cooking times and
temperatures.
• Preheat before you put product in the oven.
• The oven operates between room temperature and 500°F.
Proper air circulation is necessary for successful food preparation in all ovens. We suggest you allow a
proper clearance of 1-3 inches between pans when cooking for best results.
Never salt foods while they are in the oven. Salt can damage the interior surfaces of your oven and affect
the efficiency of the electrical components.
First use of the oven
• Before cooking food product in the oven: wipe down the inside cooking cavity with hot water and
soap. Never clean the cooking cavity with acids or corrosive chemicals.
• Run the oven through a 20 minute steam cycle [212°F] to break in all of the new components.
• The Cadco Combination Oven is now ready to begin cooking.
6
3.
CONTROL PANEL
Time Display
Window
•
Select Cycle •
• Time Select
Dial
% Venturi [Dry] •
•% Humidity
Pause Fan •
•Climate Dial
•Oven Temp Set
•Probe Target Set
• Probe Plus™ Set
Temp set •
•Temperature Set
Dial
Light on
•
Add a Minute •
• Manual Start
Stop
Program Number•
Program Start •
•Select Program
Dial
Prog. Memory •
•Activate Controls
7
TIME SECTION
Cooking time control.
• The time is displayed in hours and minutes. You can program it, in up to four cycles by pressing
the touch pad and turning the “Time Dial” at the top.
• The oven starts by pressing the “Start/Stop” touch pad and stops if when you press the touch pad
again.
• The digital control allows you to regulate cooking time up to a maximum of 9 hours and 59
minutes for each cycle by turning the knob.
• You can set all the values, such as temperature, steam, etc., for each cycle.
• To switch from one cycle to another, you have to press the touch pad on the left side of the time
knob.
• The time you see displayed is the total of the cooking time set in each of the four cycles ( when
the probe is being used the display will read “Prb” ).
• The time you see displayed will be the time left until the product is done cooking.
• At the end of the cooking process you’ll hear a continuous tone, and the “Time” window will
blink.
• Press the “Manual start/stop” touch pad to stop the tone and reset the oven.
• If you read "000" on the time display and you turn the knob counter clockwise one click, the
display will read “InF”. This sets the oven for infinite time.
• In the 4th or final cycle, you can program a “Hold” cycle by turning the “Time” dial from “000”
counter clockwise one click, to indicate “Hld” in the “Time” window. The oven will now “Hold”
at your chosen temperature until you change the setting.
Climate Control;
• This allows you to set the % of steam or the % of drying inside the cooking chamber.
• Turning the knob clockwise you will set the % of steam you want inside the cooking chamber.
Every green light indicates a 10% increase of humidity inside the cooking chamber, up to 100%.
• Turning the knob counter clockwise will set the percentage of drying in the cooking chamber.
Every red light means an increase of 10% up to 100%.
Pause on;
• If you push the "Pause on" key, you turn off the fans, the heating elements, the electric water
valve and the Venturi system.
• When this function is working, the red light above the “Pause on” touch pad is illuminated.
• This function can be used to let yeast products rise inside the cooking chamber.
Temperature Control;
• You can set the temperature of the cooking cavity up to 500°F.
• Turn the “Temperature” knob to set the cooking temperature inside the cooking cavity.
• The “Set Temp” light shows the desired set cooking cavity temperature. The “Current Temp” is
the actual oven cavity temperature
• While the oven is working, the display continuously switches from the “Set Temp” to the
“Current Temp” every 4 seconds.
To set the convection oven using time cooking;
• Activate the oven using the “On/Off touch pad” at the bottom of the control panel.
• Press the “Change set mode” touch pad to illuminate the “set temp” light next to the “Cavity”
icon.
• Turn the “Time dial” to the desired cooking time.
• Check that the “Climate % lights” are not illuminated.
• Set the “Temperature” dial to your desired cooking temperature.
• Press “Manual start/stop” touch pad to start cooking.
• The oven will automatically turn off when the cooking time has elapsed.
8
To set the oven for combi cooking using time;
• Activate the oven using the “On/Off touch pad” at the bottom of the control panel.
• Press the “Change set mode” touch pad to illuminate the “set temp” light next to the “Cavity”
icon.
• Turn the “Time dial” to the desired cooking time.
• Set the “Climate % dial” to the desired % steam.
• Turn the “Temperature” dial to set the desired cooking temperature.
• Press “Manual start/stop” to start cooking.
• The oven will automatically turn off when the cooking time has elapsed.
The Probe;
• You can set any internal product temperature between 32°F and 212°F ( 0°C and 100°C).
• When the probe is active you’ll see the “Prb” message on the time display.
• Turn the knob clockwise to set the temperature of the core temperature control probe.
• Position “Set Temp” shows the set temperature.
• The position “Actual Temp” shows the internal temperature of the food you are cooking.
• While the oven is working, the display continuously switches from the “Set Temp” to the
“Current Temp” every 4 seconds.
• When the core temperature reaches the “Set Temp” the oven automatically goes to the next cycle
if, one has been programmed in. If no other cycle has been programmed, the tone will sound and
the oven will then end the cooking process.
• The probe will always be used with Delta T.
To set the convection oven using the probe cooking;
• Activate the oven using the “On/Off touch pad” at the bottom of the control panel.
• Press the “Change set mode” touch pad to illuminate the “set temp” light next to the “Cavity”
icon.
• Turn the “Temperature” dial to set the desired cooking temperature.
• Press the “Change set mode” touch pad to light the “Probe” icon.
• Insert the probe into the thickest part of the product being steamed.
• Set the desired finished internal product temperature.
• Press “Manual start/stop” to start cooking.
• The oven will automatically turn off when the set internal product temperature has been reached.
[or go to the next programed cycle]
To set the CAPO for combi cooking using the probe;
• Activate the oven using the “On/Off touch pad” at the bottom of the control panel.
• Press the “Change set mode” touch pad to light the “Probe” icon.
• Insert the probe into the thickest part of the product.
• Set the desired finished internal product temperature.
• Press the “Change set mode” touch pad to illuminate the “set temp” light next to the “Cavity”
icon.
• Set the “Climate % dial” to the desired % steam.
• Turn the “Temperature” dial to set the desired cooking temperature.
• Press “Manual start/stop” to start cooking.
• The oven will automatically turn off when the set internal product temperature has been reached.
To set the CAPO for steaming using the probe;
• Activate the oven using the “On/Off touch pad” at the bottom of the control panel.
• Press the “Change set mode” touch pad to light the “Probe” icon.
• Insert the probe into the thickest part of the product being steamed.
• Set the desired finished internal product temperature.
9
•
•
•
•
•
Press the “Change set mode” touch pad to illuminate the “set temp” light next to the “Cavity”
icon.
Set the “Climate % dial” to 100% steam.
Set the “Temperature dial” to 212°F.
Press “Manual start/stop” to start cooking.
The oven will automatically turn off when the set internal product temperature has been reached.
What is Delta T?
• The Delta T feature will always be used with the probe.
• Delta T reduces shrinkage by cooking with lower more gentle heat.
• The Delta T maintains a constant temperature differential between the foods internal
temperature and the temperature in the cooking cavity of the oven.
• As the internal product temperature rises, the Delta T raises the oven cooking temperature.
• We don’t set cooking time or cooking temperature with Delta T; we simply set the Delta T
differential.
Chef Loren….I still don’t understand Delta T.
Let’s use roast beef, a common example, to clairify our point about the Delta T and how it works.
• Our target temperature for our finished roast beef is 130f. We set the probe for 130f.
• Our beef roast has an internal temperature right out of the cooler, of 40 f.; we set our Delta T
differential at 100°F. This means that the oven will begin cooking at a temperature of 140°F.
[100°F + 40°F = 140°F].
• As the internal product temperature rises so does our oven temperature. When our beef cooks to
an internal temperature of 80°F. the oven temperature has been raised, by Delta T, to 180°F
[100°F+ 80°F = 180°F]
• When our beef is done, at an internal temperature of 130°F, the oven’s highest roasting
temperature was 230°F [130°F+ 100°F = 230°F]
• The oven automatically turns off at the end of the cooking cycle unless the hold mode is
programed.
To set the Delta T following our example;
• Press the “Change set mode” touch pad to light the “Probe” icon.
• Set the probe to the desired finished product temperature. [130°F]
• Insert the probe into the thickest part of the product being cooked.
• Press the “Change set mode” touch pad to illuminate the “set” light next to the “Delta T” icon.
• Turn the temperature dial to show the desired Delta T differential temperature in the temperature
window. [100°F]
• Press “Manual start/stop” to start cooking.
• Or enter it as a saved program for use at another time.
"MANUAL START / STOP" key
The "START / STOP" key is used when you want to start the cooking cycle. It can be used when you
want to pause the cooking cycle. To continue the cooking cycle after it has been stopped, press START /
STOP again.
When the oven is functioning in a cook cycle the light above the “MANUAL START/STOP” touch pad
is illuminated. When the oven is turned on, but it is not in a cook cycle, the led is turned off.
"+ Minute" touch pad
When the oven is working in the manual mode, the operator can press the “+ MINUTE” touch pad to add
one additional minute of cooking time.
10
When using the oven in a preset program mode, this touch pad can be used only at the end of the last time
period. Each time the touch pad is pressed, you add one minute of cooking time with the same
characteristics (temperature, steam, etc.) as the last time period programmed.
"LIGHT on /off" touch pad
When you briefly press this touch pad, you turn the oven light on for 30 seconds. Once the 30 seconds
have passed, the light turns off.
If you press the touch pad for 3 seconds, you turn the oven light on and it remains on until you press the
touch pad again. After you press the touch pad the second time, the light turns off.
Program the Oven;
To set a multi step program [up to 4 cycles];
This example is a multi step program used for rethermalizing frozen entrees such as Lasagna.
• Press the “Change set mode” touch pad to illuminate the “set temp” light next to the “Cavity”
icon.
• Press the touch pad next to the “Time” dial to indicate “Cycle 1”.
• Program, for example, a steam cycle of 20 minutes.
• Press the touch pad next to the “Time” dial to indicate “Cycle 2”.
• Program in a combi cycle of 35 minutes, at 325°F and 30% humidity.
• Press “Manual start/stop” to start cooking. Or, you can save this program in memory for use at
another time.
To set a program into the memory;
• Before you start programming the oven, turn the “Program” dial to an unused number. Unused
numbers will show zero’s in the time and temperature windows.
• The program number will appear in the window next to the “Number” dial.
• Repeat all the steps as shown in our multi step program example above.
• Press and hold the “Prog Mem” touch pad by the number dial until you hear the tone. The tone
indicates that your new program has been accepted into memory.
• Review the values in the cycles you have chosen by pressing the touch pad and moving the light
to illuminate the various cycles you wish to check.
To remove a program from memory;
• Dial the number of the program you wish to eliminate into the “Program” window.
• Zero out all values in each cycle of the memorized program.
• Press and hold “Prog mem” until the tone sounds in each cycle of the program you wish to
remove.
• When the program number is dialed in, the indicator windows should all read zero, and only the
cycle first light should be illuminated. This indicates a vacant program.
Your Cadco Combination Oven has a memory bank that will store up to 70 cooking programs for one
touch cooking.
Procedure to save a program:
• Using the “Program Selector Dial” on the lower part of the control panel, choose a vacant number
for the program you are saving. The vacant/available numbers will show zeros in the “Time” and
“Temperature” windows.
• Set all the values to be used in each of the chosen [up to 4] cooking cycles.
• Save the program by pressing the "PROG MEM" key [for 5 seconds] until you hear a continuous
tone.
• Your new program has now been saved in memory.
11
Procedure to use a saved program:
• Using the “Program Selector Dial” find the number of the program you have decided to use. The
number will be displayed in the “Program” window.
• Start the chosen program by pressing the "manual START /STOP" touch pad.
Procedure to change a saved program:
• Using the “Program Selector Dial” choose the number of the program you’d like to modify.
• Change the values you’d like to modify in each mode.
• Save the new program by pushing and holding the “PROG MEM" touch pad in each mode. After
the changes have been made in each mode hold the “PROM MEM” touch pad for 5 seconds [until
you hear the continuous tone].
• The revised program is now ready for use.
Automatic pre-heating;
• The pre-heating function works only when you are using your preset programs.
• The “PROG START” touch pad is located below the “PROGRAM” number window.
• When you start the oven with “PROG START” touch pad, it preheats the cooking chamber but
you do not see your program values in the display windows. When the oven reaches the pre-heat
temperature, it lets you know with a continuous tone.
• When you hear this tone you can put your product in the oven, close the door, and the selected
program is preheated and will automatically start.
• All the windows will show the active program values.
"ON / OFF" power touch pad;
• The "ON / OFF" touch pad located at the bottom of the control panel activates the ovens controls.
When the control panel is off, the light is still illuminated and shows you there is power going to
the oven.
• When you activate the control panel, the light above the “On/Off” touch pad will go off and the
control panel lights will illuminate.
• The oven is now ready to operate.
Venturi controls the % of dry air in the oven;
• When you are cooking full loads or well done meats and you want to control the humidity level in
the oven with venturi
• In some bakery applications you want to create a dry cooking environment with venturi.
• When switching cycles you may want to use the “Venturi” to go from moist air to dry air quickly.
• Use venturi to brown products more quickly.
Combi facts;
• Steam retards browning. The higher the percentage of steam in the cooking cavity the longer your
product will take to brown.
• Steam reduces shrinkage when roasting meats.
• Steam makes heat hotter.
• Steam makes foods, generally, cook faster.
• Foods retain more moisture when cooked with steam.
Cooking chamber cleaning;
At the end of each day or at established intervals, clean the cooking chamber using only non-caustic and
non-abrasive products. Never clean the stainless steel with acids, aggressive detergents, or products
containing corrosive agents that will cause pitting. Scrubbies and steel wool type products will scratch the
surface of the oven, make it harder to clean and more prone to collect cooking residue.
• Spray the warm cooking chamber with a non-abrasive solvent.
12
•
•
•
Allow the solvent to work for about 10 minutes.
Program the oven to steam for 20 minutes, and activate.
Wipe away the grease and residue with a cloth or paper towel. The operator may also spray the
cooking chamber clean with the optional hose.
Cleaning of the outside of the oven;
Never use a jet of water or the hose to clean any external part of the oven. Stainless steel cleaner or a mild
detergent and a cloth are all you will ever need to keep the outside of your oven in “Like New” condition.
IN CASE OF MALFUNCTION;
If there is a mechanical or electrical problem, turn off the oven immediately.
• disconnect the electrical power supply.
• consult a service center authorized by Cadco, Ltd.
Rev. 8-14-07
13