1
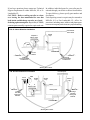
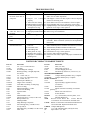
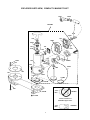
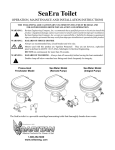
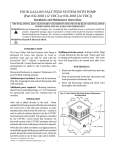
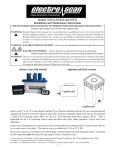
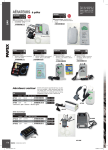
COMPACT II MARINE TOILET
Installation & Maintenance Instructions
THE FOLLOWING ARE CAUTIONARY STATEMENTS THAT MUST BE READ AND FOLLOWED
DURING BOTH INSTALLATION AND OPERATION
WARNING:
Raritan Engineering Company, Inc. recommends that a qualified person install this product.
Equipment damage, injury to personnel or death could result from improper installation. Raritan
Engineering Company, Inc. accepts no responsibility or liability for damage equipment, or injury
or death to personnel, that may result from improper installation or operation of this product.
WARNING:
Hazard of Flooding - Any installation made below the waterline must have vented loops positioned
properly and all hose connections should be double-clamped. Both intake and discharge seacocks
should always be in the closed position when the toilet is not in use. Failure to do so may result in
flooding, property damage and loss of life.
INTRODUCTION
MAINTENANCE
The Compact II is a manually operated marine
toilet. Its vertically mounted double-action piston
type pump can be changed from right hand to left
hand operation. Its size and simple installation make
it best suited where space is limited. Space requirements are:
Height 13 3/4"(34.9cm)
Width 17 1/2"(44.5cm)
Depth: 17"(43.2cm)
With normal use very little maintenance is required
other than inspection and periodic replacement of
rubber parts. Using C.P., a bio-enzymatic toilet bowl
cleaner (available from Raritan Engineering), will
keep the bowl clean and fresh smelling. Introducing
Raritan Concentrate into the flush water through a
Toilet Water Kit (#TWK) will deodorize and lubricate the unit.
The Compact II is suitable for use with Raritan's
Lectra/San® MCTM, U.S. Coast Guard certified Type
I Marine Sanitation Device (MSD) and/or holding
tank installations.
Super Lube® (#SL) applied to the piston rod will
prolong the life of the seal. This should be done every
spring and fall or more regularly if the head is used
frequently.
OPERATION
CAUTIONS: Using improper deodorants or
cleaners can result in damage to rubber and
plastic parts. DO NOT USE pine oil, formaldehyde, ammonia, ethyl acetate, phosphoric acid,
chlorine bleach or solvent based products.
1. With the shutoff handle in the wet bowl position,
pump the handle up and down. This will allow
water to be pumped into the bowl and forced
through the discharge at the base of the pump. It
is advisable to flush the toilet briefly before
using, to minimize staining of the bowl.
2. The pump is designed to pump in rinse water and
pump out waste water at the same time. If the
water level in the bowl rises, move the shutoff
handle to the dry bowl position, then pump for
several strokes as needed. After doing this, flush
the toilet several strokes with the intake valve in
the wet bowl position to clear all lines.
CAUTIONS: Hard objects or stringy substances
(paper towels, feminine hygiene products, filter
tip cigarettes, etc.) thrown into the toilet will cause
damage. These objects MUST NOT BE PLACED
IN THE TOILET.
Before attempting repairs, refer to the Troubleshooting section of this manual.
STORAGE
Short Term Storage
If the toilet is not going to be used for up to one week,
flush the toilet several strokes with the shut off
handle in the wet bowl position to clear all lines, then
switch to the dry bowl position.
Long Term Storage
If the toilet is not going to be used for over a week,
follow the short term storage, then switch to the dry
bowl position and purge the toilet with at least two
gallons of fresh water added to the bowl.
Super Lube® is a registered trademark of Synco Chemical Corp.
Lectra/San® is a trademark of Exceltec.
™
1LST/MC is a trademark of Raritan Engineering Co., Inc.
4. A nominal 1 1/2" (38mm) discharge thru-hull
fitting with seacock may be required, depending
on the specific installation.
WINTERIZING
Improper winter lay up is a major cause of marine
toilet failures.
1. Close the intake and discharge seacock.
Disconnect and drain the intake and discharge
hoses. Winterize seacocks and hoses.
MOUNTING
The Compact II may be mounted above (Fig. #1) or
below (Fig. #2) the waterline. For below waterline
2. You will need two buckets, three feet (9M) of installations, vented loops (#VL3/4 and #VL1 1/2)
3/4" (19mm) hose, three feet (9M) of 1 1/2" are required and hose connections must be double
(38mm) hose and a quart (.95liter) of non-toxic clamped. Mount the unit securely on a flat solid deck
using stainless steel bolts backed up with nuts and
antifreeze.
3. Prepare one half gallon (1.9 liters) of non-toxic large washers or stainless steel lag screws long enough
antifreeze/water mixture in a bucket (refer to the not to pull out.
PLUMBING
antifreeze instructions for antifreeze/water ratio).
Place intake hose in this bucket. Place discharge WARNING: Below waterline installations require
hose into the empty bucket. Pump toilet until vented loops. The top of the loops must be above
antifreeze has circulated and is being discharged. the waterline at the greatest angle of heel. Intake
4. Antifreeze should remain in the toilet until vented loops must be installed between the pump
recommissioning. This will protect both intake and the back of the bowl. Discharge vented loops
and discharge sides of the pump. Pouring must be installed between the discharge of the
antifreeze into the bowl will only protect the toilet and the seacock. See Fig. #1 and #2.
discharge side of the pump, allowing the intake 1. Route the discharge hose above the discharge
side to possibly freeze.
outlet with a vented loop. This will enable the
NOTE: Holding tanks, seacocks and treatment
toilet to discharge more efficiently and will help
systems need to be independently winterized,
to prevent backflow.
stored and recommissioned (see manufacturer’s 2. A In-Line Strainer (#163000) or equivalent is
instructions).
recommended. This will help minimize odors
and help prevent clogging.
RECOMMISSIONING
®
3. Intake and discharge thru-hull fittings should be
1. Lubricate piston rod with Super Lube (#SL).
located far enough apart and in such a manner as
2. Using the buckets, hoses and a gallon (3.8 liters)
to prevent discharge water from being drawn
of clean water, flush the antifreeze out of the
through the intake. One means of accomplishing
toilet. Dispose of antifreeze properly, in
this is to place them on opposite sides of the hull.
accordance with local and federal regulations.
Intake thru-hull should be located so that during
3. Reconnect the hoses and open both seacocks.
shallow water conditions sand and other debris
4. Check all connections for leaks with several test
are not drawn into thru-hull fitting.
flushes.
4. The optional Raritan Toilet Water Kit (#TWK)
permits use of Raritan Concentrate (#CON22)
INSTALLATION
with the Compact II toilets. Raritan Concentrate
To install the Compact II marine toilet several
deodorizes the bowl and lubricates internal parts.
installation accessories are required:
1. A nominal 3/4" (19mm) thru-hull fitting and 5. Test flush and check for leaks.
TROUBLESHOOTING
seacock (shutoff valve).
2. 3/4" (19mm) I.D. reinforced intake hose and Before attempting repairs be sure you have studied
hose clamps.
this manual and parts list thoroughly and have checked
3. 1 1/2" (38mm) I.D. reinforced sanitation the terms of the Limited Warranty.
discharge hose (#SH) and hose clamps.
2
If you have questions please contact our Technical
Support Department in either Millville, NJ or Ft.
Lauderdale, FL.
CAUTION: Before working on toilet or whenever leaving the boat unattended be sure that
both intake and discharge seacocks are closed.
Ordering replacement parts: Repair Kit (#CPRKII)
contains parts normally required to repair each unit.
In addition, individual parts for your toilet may be
ordered through your dealer or direct from Raritan.
To speed delivery, please specify part number and
description.
Units requiring extensive repairs may be returned to
Millville, N.J. or Fort Lauderdale, FL. office. Instructions, including name, address and phone number must accompany units to ensure proper handling.
FIG. #1: Above Waterline Installation
Vent Outside
Hull or Deck
Vented
Loop
Compact II
Marine Toilet
TWK
Lectra/San MC
In-Line
Strainer
Waterline
Waterline
Discharge
Thru-Hull Fitting
and Seacock
Intake
Thru-Hull Fitting
and Seacock
*Drawing Not To Scale
FIG. #2: Below Waterline Installation
In-Line
Strainer
Deck Pumpout
TWK
Vented
Loop
Vented
Loop
Vented
Loop
Y Valve
Compact II
Marine Toilet
Holding Tank
Waterline
Intake
Thru-Hull
Fitting and
Seacock
Waterline
Discharge
Thru-Hull
Fitting and
Seacock
Lectra/San MC
*Drawing Not To Scale
3
TROUBLESHOOTING
PROBLEM
POSSIBLE CAUSE
A. Water accumulates in A1. Lodged debris.
the bowl faster than it
pumps out.
A2. Flapper not seating
properly.
A3. Joker Valve not closing.
A4.Holding Tank is pressurized.
A5. Scored pump housing or
worn piston "O" ring.
B. Water rises in the bowl B1. Clogged vented loop.
when the boat is at B2. Improperly installed vented
dockside.
loop.
C. Intake water flow is C1. Intake line clogged.
poor.
D. Leak around piston D1. Seal leaking.
shaft.
E. A persistent odor comes E1.
from the toilet bowl.
E2.
E3.
E4.
E5.
E6.
CORRECTION
A1. Check discharge lines for obstructions. Clear any lodged
debris. See #2 under "Operation".
A2. If the flapper is worn or swollen, replace it. Be sure improper
cleaners are not being used.
A3. Check Joker Valve for wear and debris. Clean or replace.
A4. Clogged holding tank vent or vented loop; clean vent(s).
A5. If pump housing is scored both housing and "O" ring must be
replaced. If "O" ring is worn, replace it.
B1. Clean vented loop.
B2. Refer to Fig. #2 in installation.
C1. Clear intake line, check for build up in hose. Clean strainer.
D1. Replace piston U-Cup seal (#1357) or Seal Cartridge Assy.
(#1356W). Refer to literature (#L190) for seal replacement
instructions.
Organic material lodged in E1. Connect a garden hose to the spud at the back of the bowl and
bowl rim.
flush it out under pressure. Install In-Line Strainer (#163000).
Foul intake water.
E2. Add a Raritan (#TWK) to deodorize intake water.
Full holding tank.
E3. Empty Holding tank, be sure vents are clean and functional.
Worn piston "O" ring.
E4. If the Piston "O" ring is worn, replace it.
Discharge line clogged.
E5. Clear any debris lodged in discharge.
Improper or contaminated E6. If hose has foul odor, replace with proper sanitation hose
discharge hose.
(#SH).
PARTS FOR COMPACT II MARINE TOILETS
Part No.
1115
1214B
1222AW
1222B
1223B
1226A
1226B
1226C
1228CW
1301PW
1316MS
1343
1346
1347
1348
1349W
1350W
1353
1354
1355
1356W
1357
1359W
C253
Part Name
3/8 - 16 x 1 1/2 Hex HD S/S
"O" Ring
90o Discharge Ell w/flange
Discharge Fitting - Straight (Optional,
not shown)
3/8 - 16 S/S Nut (2)
1/4 - 20 x 1 1/4", RH S/S Screw(4)
1/4 - 20 Nut, S/S (8)
Plastic Spacer Washer (4)
Flapper Valve Assembly
Toilet Base Assembly (w/drain plug)
Piston "O" Ring
Plastic Drain Plug, 1½" NPT
Check Valve Housing
Separator Plate
Cam
Shutoff Handle w/seal
Check Valve Assy. (1350,1351 & 1352)
Bumper Washer (2)
Flushing Handle
Pump Housing, Compact II
Seal Cartridge Assy. (1214B & 1357)
U-Cup Seal (2)
Piston Rod Assy.(1316MS, 1353 & 1359A)
Joker Valve
Part No.
Part Name
CH42
Hose (3/4" I.D.)
CH43P
Hose Clamp, Nylon (2)
F020
#10 Self-Tapping Screw (6)
F081
Hex head Cap S/S Screw (1/4-20 x 2") (4)
MAJOR SUBASSEMBLIES
CPIILBA
Compact II Pump and Base Assy, Complete
CPIIPUMP
Compact II Pump Assy. Complete
BOWL AND SEAT
1234
Bowl Gasket
1236AW
Spud Assembly (supplied w/bowls)
(not shown)
1236E
Bowl Elbow
1237W
Marine-size Bowl Assembly (w/1236AW
spud assy.)
1238A
Marine-size Seat and Cover
163000
In-Line Strainer
1PCP22
C.P., Cleans Potties, Bio-enzymatic, 22 oz.
RNI
Shoulder Washer (4)
TWK
Raritan Toilet Water Kit. Allows Raritan
"Concentrate" to be metered into the flush water.
CON22 Raritan "Concentrate" head deodorant and lubricant.
Used with TWK. Replacement bottle 22oz.
CPRKII Compact II Repair Kit
SH
1 1/2" I.D. Sanitation Hose (sold by the foot)
SL
Super-Lube 1/2 oz. tube
4
EXPLODED PARTS VIEW, COMPACT II MARINE TOILET
1236E
CH43P
CPIIPUMP
1354
CH42
CH43P
1353
1346
1350W
1356W
1357
1347
F020
1214B
1348
1115
1357
1355
1226B
1222AW
C253
RNI
1349W
1226A
1359W
1353
1234
1343
1226C
1223B
1316MS
1228CW
F081
1301PW
Toilet
Base
WRONG!
1226B
Correct Orientation of
#1228CW Flapper Valves
Toilet
Base
5
CORRECT!
SPECIFICATIONS
Space Requirements: height 13 3/4"(34.9cm), width
17 1/2" (44.5cm) and depth 17" (43.2cm)
Manually Flushed Toilet: salt water or fresh water
Fitting Sizes: 3/4" (19mm) intake and 1 1/2"
(38mm) discharge
Maximum Intake Hose Lift: 36" (1m)
Maximum Intake Hose Length: 15' (4.6m)
Maximum Discharge Hose Lift: 5' (1.5m)
Maximum Discharge Hose Length: 15' (4.6m)
LIMITED WARRANTY
Raritan Engineering Company warrants to the original purchaser that this product is free of defects in
materials or workmanship for a period of one year from the product’s date of purchase. Should this product
prove defective by reason of improper workmanship and/or materials within the warranty period , Raritan
shall, at its sole option, repair or replace the product.
1. TO OBTAIN WARRANTY SERVICE, Consumer must deliver the product prepaid, together with a
detailed description of the problem, to Raritan at 530 Orange St., Millville, N.J. 08332, or 3101 SW 2nd ave
Ft. Lauderdale, FL 33315. When requesting warranty service, purchaser must present a sales slip or other
document which establishes proof of purchase. THE RETURN OF THE OWNER REGISTRATION CARD
IS NOT A CONDITION PRECEDENT OF WARRANTY COVERAGE. However, please complete and
return the owner Registration Card so that Raritan can contact you should a question of safety arise which
could affect you.
2. THIS WARRANTY DOES NOT COVER defects caused by modifications, alterations, repairs or
service of this product by anyone other than Raritan; defects in materials or workmanship supplied by others
in the process of installation of this product; defects caused by installation of this product other than in
accordance with the manufacturer’s recommended installation instructions or standard industry procedures;
physical abuse to, or misuse of, this product. This warranty also does not cover damages to equipment caused
by fire, flood, external water, excessive corrosion or Act of God.
3. ANY EXPRESS WARRANTY NOT PROVIDED HEREIN, AND ANY REMEDY FOR BREACH
OF CONTRACT WHICH BUT FOR THIS PROVISION MIGHT ARISE BY IMPLICATION OR
OPERATION OF LAW, IS HEREBY EXCLUDED AND DISCLAIMED. ALL IMPLIED WARRANTIES SUCH AS THOSE OF MERCHANTABILITY AND OF FITNESS FOR A PARTICULAR
PURPOSE, IF APPLICABLE, AS WELL AS ANY IMPLIED WARRANTIES WHICH MIGHT ARISE
BY IMPLICATION OF LAW, ARE EXPRESSLY LIMITED TO A TERM OF ONE YEAR. SOME
STATES DO NOT ALLOW LIMITATIONS ON HOW LONG A LIMITED WARRANTY LASTS, SO
THE ABOVE LIMITATION MAY NOT APPLY TO YOU.
4. UNDER NO CIRCUMSTANCES SHALL RARITAN BE LIABLE TO PURCHASER OR ANY
OTHER PERSONS FOR ANY SPECIAL OR CONSEQUENTIAL DAMAGES, WHETHER ARISING
OUT OF BREACH OF WARRANTY, THE EXCLUSION OR LIMITATION OF INCIDENTAL OR
CONSEQUENTIAL DAMAGES, SO THE ABOVE LIMITATION OR EXCLUSION MAY NOT APPLY
TO YOU.
5. No other person or entity is authorized to make any express warranty, promise or affirmation of fact
or to assume any other liability on behalf of Raritan in connection with its products except as specifically
set forth in this warranty.
6. This warranty gives you specific legal rights, and you may also have other rights which vary from state
to state.
530 Orange Street, P.O. Box 1157, Millville, NJ 08332 USA
Telephone: 856-825-4900
FAX: 856-825-4409
www.raritaneng.com
Southern Office and Plant:
3101 SW Second Avenue, Fort Lauderdale, FL 33315 USA
Telephone: 954-525-0378
FAX: 954-764-4370
L219 0502wmr
6
Specifications subject to change without notice
Printed in USA