1
Printed in Japan / !"=/ !=
2004/5 (Abe.k)
284-9967-00
Installation/Wire Connection Guide
!
/
/
==
English
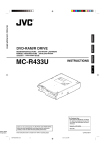
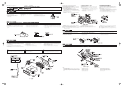
2. Secure the mounting brackets to the chassis as shown in Figure 5. When the
source unit is installed without the universal mounting bracket, holes exist;
modification, such as drilling new holes, of the mounting brackets may be required
for other models.
1. BEFORE STARTING / 2. R !"#$%&'()*+,(-./0/"#$%12345"67
!"#$%&'()*+,-./012%3456789':(
3. 7 !"#$
4. !"#$%&'()*+,-.
%&'/01'2
3. Wire as shown in Installation (Section 7).
! / =E
!
F
■ ==
=E
=E
!== !
!== = !
!==
F
== !== = = = !"K=== =
= = !I===EF== = = = !"#K
E5F
= = != !== !I== = = ==
= = !"#K
1. = == != !"=E=6FK
2. =5===== != = !"#K== =
== = =I= === X=== !
I== ==== != = == !K
3. E=7F=
4. !=
===
=
K
= !=I= !==
== !"#K
4. Secure the unit in the dashboard, and then reassemble the dashboard and the
center panel.
1. This set is exclusively for use in cars with a negative
ground, 12 V power supply.
1. !"#$%&'12V
2. !"#$%&'
2. Read these instructions carefully.
3. !"#$%&'()v
!"#1F
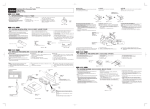
3. Be sure to disconnect the battery “v” terminal before
starting. This is to prevent short circuits during
installation. (Figure 1)
■ !
!E
'ISO/DN
E !"#$%&'
F
!"#$%&'()*+
!"#$%&'(")*+,-./0123E★F !"#$%&'%()
5
!"#$%&'(#)*+,-./0(#12345678(#,9#:;
1. !"#$%&'()*S
■ Fixed Mount (Using the bracket originally equipped in vehicle)
This unit is designed for fixed installation in the dashboard.
If the vehicle is equipped with a factory-installed radio, install the source unit with the
parts and screws marked (★). (Figure 5)
If the vehicle is not equipped with a factory-installed radio, obtain an installation kit to
install the source unit in the following procedure.
1. Remove the springs at both sides of the source unit (Figure 6).
1. = =12VI=negative ground==
= !"K
!"#$%&'
2. =
!"#$%&'(
!"#===
==
!"#K
3. != = !=“v”= = !"#K=
= = = != = K=E=1F
★
★
★
Figure 1 / 1 / 1
English
★
2. CAUTIONS ON INSTALLATION / !"#$% / = !
1. Prepare all articles necessary for installing the source unit before starting.
1. !"#$%&'()*(+,-./0123
1. !==
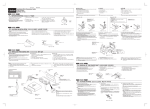
2. Install the unit within 30° of the horizontal plane. (Figure 2)
2. !"#$%&'()*+,-30° E2F
2. 3. If you have to do any work on the car body, such as drilling holes, consult your car
dealer beforehand.
3. !"#$%&'()*+,-.,/01#234567
4. !"#$%&'()*
3. =
K
4. Use the enclosed screws for installation. Using other screws can cause damage.
(Figure 3)
+,$%-./012*E3F
=
= !=30°=
=
★
★
== !"#K
= !"#K=E=2F
====
=
=I=
4. = = != !"#K==
= !K=E=3F
==
=
= !==
!
=
∗ : The parts and SCREW with this mark are used to install radio or included in the
installation kit.
★ : The screws with this mark are originally attached to the vehicle.
Note 1: In some cases, the center panel may require some modification (trimming, filling,
etc.).
Note 2: If a hook on the installation bracket interferes with the unit, bend and flatten it
with a nipper or a similar tool.
English
∗ : !"#$%&'()*+,-./012*+3456
★ : !"#$%&'()"*
1
!"#$%&'()* !E !"#F
2
!"#$%&'()*!+ !"#$%&'()*+,-.
∗ : = = = = = = = !I== = !
!K
★ : = = = = != != !== !K
=1 : = == == = = !K=EI==F
=2 : = === = =I= == = !=
= !K
4. REMOVAL OF THE SOURCE UNIT / !"# / ==
1. When removing the source unit, disassemble it in the reverse of the order in
Section “3. INSTALLING THE SOURCE UNIT”.
1. !"#$%&'()33. !"#$%&'()*+,
1. 2. !"#$%&'()* 7
2. = != !=
2. Press the outer escutcheon upward and remove it. (Figure 7)
3. !"#$%&= 8
3. = !"== !K=E 8F
3. Insert and lock the hook plates. (Figure 8)
4. 4. = !"=
!"#$%&'()*
=
=I==“3. =”== != !"#K
= !"K=E 7F
=
= !"K
DC-DC !===
= !"K
4. Pull the hook plates to remove the source unit.
Figure 2 / 2 / 2
English
Figure 3 / 3 / 3
3. INSTALLING THE SOURCE UNIT / !" / ==
■ Universal Mount
■ !"#
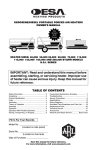
1. Place the universal mounting bracket into the instrument panel, use a screwdriver to
bend each stopper of the universal mounting bracket inward, then secure the stopper
as shown in Figure 4.
1. !"#$%&'()*+
4 !"#$%
■ =
2. 7 !"#$
2. =7=
2. Wire as shown in Section 7.
3. !"#$%&!'()*+,-./
3. 3. Insert the source unit into the universal mounting bracket until it locks.
4. !"#$%&'(&)*+,-.$/012345
4. = !==
,-.
!"#$/012345678+9
1. = = != ==I= !"== = !=
== != !==4==== != !"#K
===
== !==
=
K
= !K
= !=
== != !"#K
4. Take care of the top and bottom of the outer escutcheon and mount it so that all the
hooks are locked.
Notes:
1) Some car models require special mounting kits for proper installation. Consult
your Clarion dealer for details.
2) Fasten the front stopper securely to prevent the source unit from coming loose.
1) !"#$%&'()*+,-.&/012345Clarion
2) !"#$%&'()*"+
!"#
English
5. INSTALLING THE DC-DC CONVERTER / DC-DC
Install the DC-DC converter under a seat, etc.
!"#$%&'DC-DC
W
1) = =I= = = = == = ==
K= ==`ä~êáçå= = !"#K
2) = !==
!=
= !"==
!"#K
Note:
When drilling the installment panel, the wiring on the car, the air conditioner ducts,
etc. are sometimes scratched.
During installation, sufficiently check the rear side of the panel and its strength, and
prevent the tips of the mounting screws from touching the wiring or air conditioner
ducts.
Figure 4 / 4 / ==4
/ DC-DC =
!"#$%&'()*+,!"#$%&'()*+
!"#$%&'( )*
!"#$%&'()*+,
!"#$%&'()*+,
W
= = ==I= != !
!=== === !K
!"= = = = = !I
= == != != =
= = !K
English
6. CAUTIONS ON WIRING / English
2. Be particularly careful where you route the wires. Keep them well away from the
engine, exhaust pipe, etc. Heat may damage the wires.
3. If the fuse should blow, check that the wiring is correct.
If it is, replace the fuse with a new one with the same amperage rating as the
original one. (Figure 10)
Note:
There are various types of fuse holder. Do not let the battery side touch other metal parts.
4. Connect the CeNET extension cable fully and securely until it locks. When the
CeNET extension cable is pulled, hold the slide cap part and pull it towards you.
∗ When the CeNET extension cable is extended or branches, use extension cable
CCA-520 (2.5m) or CCA-521 (0.6m), or Y-adapter CCA-519 (each of them is sold
separately).
∗ Use the CeNET extension cable made by Clarion.
5. Insert the black connector securely into the digital signal connector until it locks.
(Figure 11)
When disconnecting an optical digital cable, squeeze the tabs at the right and left
sides of the connector, and pull gently. (Figure 12)
■ 1. 2. !"#$%&'
■ 1. !"#$%&'()$*+,-./0123'456789)$'
PK== !"#$%&'()*+,-./
!"#$%&'()*+,-./0123456+,-789E=NMF
!"#$%&'()*+,-./012%3456789:;<=*
4. !"`Ékbq !"#$%&'()`Ékbq !"#$%&'()*
!"#$%&
∗ CeNET !"#$%&'()*+ !CCA-5202.5 CCA-521
0.6 !v !CCA-519 !"#$
∗ Clarion CeNET !"
5. !"#$%&'()*+,-."#$/0123415678=NN
!"#$%&'()*+,-./01234(567789:;<=NO
!"#$%&'()*+,-./NKRÅã
!"##$%&'()*+ ,-.
Note:
The optical digital cable should not be bent with a gentle arc radius of 1.5 cm or
less. If it is bent sharper than this, the performance of the cable will be greatly
reduced and the cable may be damaged.
8. DIGITAL WIRING / !"#$% / !
!== !
■ 1. Be sure to turn the power off when wiring.
!"#$%&'()*+,-
===
=
== !K
2. !== == = !"K= !=I= = !
= = ==I=== == == !K
3. = =I= = == = !"#K
= = I= = == = !==
!K=E=10F
W
= ==
= = !K
! / =
= !K= !==
Switch Adjust mode "D-OUT" to match the model you are connecting. For details, see
"Setting the digital output (D-OUT)" in the Owner's Manual.
The factory default setting is "OFF".
!"#$D-OUT !"#$%&'()*+,-./012345678%
!"#$(D-OUT)
!"#$%&'lcc
===
!"#$%
Example of Digital Output Wiring
When connecting to a 5.1ch surround decoder, switch Adjust mode "D-OUT" on this set to
"ON".
RKNÅÜ=
=
=
=
== =
!"#$%&'()*+,-./0D-OUT
4. CeNET== != = == != !"= K
CeNET== = = I= !== == !=
K
∗ CeNET== !=== === !=CCA-520 (2.5m)
=CCA-521 (0.6m) =Y- =CCA-519= = !=E=FK
∗ Clarion CeNET = != !"#K
!"ON
5.1= != !=
!K
=I==
== “D-OUT” “ON” =
Note:
When a 5.1ch surround decoder is connected, switch the set to direct mode. For details on settings, see "Selecting the audio mode (MODE)"
in the Owner's Manual.
:
!RKNÅÜ !"#$%&'()*+,-./0123(45678$9:;<=>?@4ABCDE./FMODE
:
5.1= != != !==I= = !"#$= !"K
== = == ! “===EMODEF” == !K
5. = != === !=== !"= K=E=11F
= = != == = = = == !
== !K=E=12F
W
= = != = =1.5cm= = = !"= !K
=== != =I= != == != == !K
!"#$%
Example of Digital Input Wiring
!K=
=
When the digital input of a CD/DVD changer is wired, performing a system check fixes
input to digital input. For this reason, the Adjust mode "D-OUT" item on this set is not
displayed.
English
= “D-OUT” = != !== =
! “ ===ED-OUTF” == !K
= !== =“OFF” K
=
== =
!`aLasa !"#$%&'()*+,-./$%012"#$%345(
!"#$%&'D-OUT !"#$%
Notes:
∗ When the optical digital cable is connected to or disconnected from this set later, press the function button while holding down direct
buttons [1] and [6] with the power OFF to perform a system check.
Though pressing the reset button also performs a system check, the contents of memory will be erased completely in this case.
∗ When the digital input of a DVD changer is connected, read the Owner's Manual provided with the DVD changer, and change "AUDIO
OUT" in the "GENERAL SET UP" menu to "SPDIF/PCM".
When "AUDIO OUT" is set to "SPDIF/RAW", DIGITAL/dts audio is not output. Also, noise is sometimes output.
:
∗ !"#$%&'()*+,-.)/012345 6xNz=xSz !"#$%&'()*+,
!"#$%&'()*+,-./0123456789:;<=>?@A
∗ asa !"#$%&'()*asa !"#$%&'()*+,-GENERAL SET UP !"#$%&'(AUDIO
OUT !"#$%&'SPDIF/PCM
AUDIO OUT !SPDIF/RAW !"#DIGITAL/dts !"#$%&'()*
:
∗ = = != !"#= == != !"=I= != = !"= == != !
=x1z=x6z= !== = !K
= = = != = !"#I=== != != = = = K
∗ DVD != = != =I DVD !== == !=I “GENERAL SET UP” “AUDIO
OUT” “SPDIF/PCM” = !"K
“AUDIO OUT” “SPDIF/RAW” = !I= /dts = != !K=I== = !"= K
7. WIRE CONNECTIONS / / English
9. SYSTEM EXAMPLE / / =
■ Connecting an External Amplifier and Speakers
This set is provided with three modes matched to the speaker configuration, and outputs
audio or the source according to each speaker configuration. Select the Adjust Mode
"MODE" and switch to the mode matched to the speaker configuration. For details on
settings, see "Selecting the audio mode (MODE)" in the Owner's Manual.
The factory default setting is "STANDARD".
Standard Mode
!
==
Compatibility with general speakers
• RCA 8ch configuration: HIGH (2ch) + FRONT (2ch) + REAR (2ch) +
SUB-WOOFER (2ch)
!"#$%
• RCA 8 !"HIGH2 !FRONT2 !REAR2 !SUBWOOFER2
= !"=
• RCA 8=W=HIGH=E2F=H=FRONT E2F=H=REAR E2F=H=SUBWOOFER=E2F
English
1. Do not open the case. There are no user serviceable parts inside. If you drop
anything into the unit during installation, consult your dealer or an authorized
CLARION service center.
2. Use a soft, dry cloth to clean the case. Never use hard cloth, thinner, benzen, alcohol,
etc. For tough dirt, apply a little cold or warm water to a soft cloth and wipe off the dirt
gentry.
IMPORTANT:
Improper installation may cause damage to your unit or car. If you do not have the
appropriate experience, consult a qualified installer. Cutting chassis wire leads voids
the warranty.
■ !"#$%&'$
!"#$%&'()* +*,-./012345'()* 6789:;9
!"#$%&MODE !"#$%&'()*(+,-./01)+234
!"#$%&'()*+,-./0MODE
!"#$%&'STANDARD
Multi Mode
!
==
■ == = !
!==
= = = = !=3= = I== != ==
== = !"K== “MODE” = == = =
= = !"K= == = == ! “==
EMODEF” == !K
= !== =“STANDARD” K
Direct Mode
!
!"#
Compatibility with multi-speakers
• RCA 8ch configuration: HIGH (2ch) + MID (2ch) + LOW (2ch) + SUB-WOOFER (2ch)
The source is played back as it is without sound quality adjusted.
• RCA 6ch configuration: FRONT (2ch) + REAR (2ch) + NON-FADER (2ch)
!"#$
• RCA 8 !"HIGH2 !MID2 !LOW2 !SUB-WOOFER
2
!"#$%&'!()
• RCA 6 !"FRONT2
= !"=
• RCA 8=W=HIGH E2F=H=MID E2F=H=LOW E2F=H
SUB-WOOFER E2F
!REAR2
!NON-FADER2
= = = !!== = !"K
• RCA 6=W=FRONT E2F=H=REAR E2F=H=NON FADER=E2F
10. GENERAL CAUTIONS / English
CD/DVD != = != =I= != = != =
= != !"#K== I== == “D-OUT” =
= !K
!"# / !
!== !
!"#$%&'()*+,-./0&1$23456789:;3<%=
!"#$%CLARION !"#$%&
OK !"#$%&'()*+,#-./0-123456(789:;<=>
!"#$%&'%(()*+
NK
!"#$%&'()*+,-./0123456789:;<=>
!"#$%&'()*+
1. !== !K= !"= !=== == !K=
= = !"=I= = !"= !=CLARION== =
= !"#K
2. != !== !=== !"#K== =I=
I==== != !K= !"= !I== !"=
==== === !K
W
W
!= = !== != === !K===
== == = == != !"#K= =
= == !"= == !K
■ Connection Check List
After finishing wiring, check each RCA pin cable and speaker terminal, and power cord
connections.
Do not forget to connect the remote ON cord.
* To prevent miswiring, use the Connection Check List for the external power amplifier.
■ !"
!"#$%&'(RCA !"#$%&'()*+,-./
!"#ON
* !"#$%&'()*+,-./012"3456
■ == !"
====RCA = != =I= == = =
K
=ON = !=== !K
* = = !=I=== !== !"#= =
K
Clarion Co., Ltd.