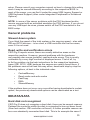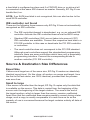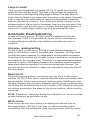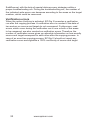
1
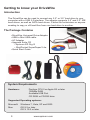
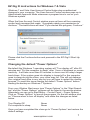
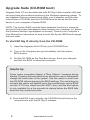
DriveWire
UNIVERSAL HARD DRIVE ADAPTER
User’s Guide
Attention:
If your DriveWire shipped with a previous version
of EZ Gig II, you can download the new EZ Gig III
from Apricorn’s website at:
http://www.apricorn.com/ezgig
Review the most current DriveWire FAQ’s at:
http://www.apricorn.com/support.php
TABLE OF CONTENTS
Getting to know your DriveWire 4
4
4
4
Connecting your DriveWire 5
5
Before Running the Software 6
6
7
7
Upgrade Suite (CD-ROM boot) 8
8
9
Introduction The Package Contains System Requirements Device Installation Before running EZ Gig III we recommend EZ Gig III instructions for Windows 7 & Vista Changing the default “Power Options” To start EZ Gig III directly from the CD-ROM Connecting Your Hard Drive EZ Gig III Start Up Options 9
10
Cloning your hard drive with EZ Gig III 11
12
13
Speed Test 13
Drive Verification 14
Advanced Options 15
15
15
15
15
More Advanced Options 16
16
16
16
16
16
17
17
Creating a Bootable EZ Gig III CD Selecting the Source Drive Selecting the Destination Drive Verify Copy Copy Free Areas SmartCopy Media Direct (Dell) FastCopy SafeRescue CachedMemory SharedMemory Animation HotCopy / LiveImage Avoid exclusive read access Partitions 18
19
Start Clone 20
21
21
21
Congratulations your Clone is Complete 22
SuperDuper! Backup Software for Mac 23
After the Clone 24
24
25
DriveWire FAQs 26
EZ Gig III FAQs 29
29
29
29
General problems 30
30
30
IDE/ATA/SATA 30
30
31
Source & Destination Size Differences 31
31
31
32
Automatic troubleshooting 32
32
32
32
33
Contacting Technical Support 34
34
35
Resizing your partitions manually Interupting the Cloning Process Aborting the Cloning Process Interupting the Verification process Using the DriveWire as a external backup drive Device Removal (Windows) Load errors Error #5002 and ‘Disk error’ Keyboard and mouse Slowed down system Read, write and verification errors Hard disk not recognized IDE controller not found Equal Size Small to large Large to small Intensive reading/writing Read errors Write errors Verification errors RMA Policy Warranty Conditions Getting to know your DriveWire
Introduction
The DriveWire can be used to connect any 2.5” or 3.5” hard drive to your
computer with a USB 2.0 interface. The adapter supports 2.5” and 3.5” IDE
hard drives, as well as SATA hard drives. Perfect for technicians or anyone
needing to copy or off-load files from one hard drive to another.
The Package Contains
•DriveWire Universal Drive Adapter
•USB to Mini USB cable
•AC Adapter
•Upgrade Suite CD
• Apricorn EZ Gig III
• ShirtPocket SuperDuper! Lite
•Quick Start Guide
System Requirements
Hardware:
Pentium CPU II or Apple G3 or later
128MBs RAM
Available USB Port
CD ROM or CD-RW drive
Supported Operating systems:
Microsoft: Windows 7, Vista, XP and 2000
Mac:
OS 9.2 or later
OS X 10.2 or later
4
www.apricorn.com
Connecting your DriveWire
1. If connecting to 3.5” IDE/PATA Hard Drives confirm device jumpers are
set to master mode.
Note: See FAQs for more information about master mode
2. Connect your hard drive to the appropriate SATA or PATA connection on
the DriveWire (see diagram below)
Note: When connecting PATA 2.5” or 3.5” drives to DriveWire, it is
necessary to align the polarizing pins in the DriveWire’s connector up with
the open space on the hard drive to avoid breaking pins on the hard drive.
3. Connect the AC power adapter to DriveWire. For 3.5” PATA hard drives,
plug the AC adapter directly into the hard drive.
CAUTION: Power adapter must be properly alligned to prevent
damage.
4. Connect DriveWire to your computer using the Mini USB Cable.
DriveWire
Connectors
40-pin
Connects to 3.5” IDE HDD
44-pin
Connects to
2.5” IDE HDD
Connects to
SATA HDD
Mini USB
Connector
AC Adapter
Connector
Connects with any USB
enabled notebook or
desktop PC
www.apricorn.com
5
Before Running the Software
After many years of use, hard drives can become cluttered with unusable
file fragments and other file-system errors. Most file system errors are not
immediately obvious to the user, but can be identified and repaired with a
few simple steps. Although the steps below are not absolutely necessary to
run EZ Gig, it’s best to try and clean-up disk errors BEFORE they are copied
over to the new drive.
Before running EZ Gig III we recommend
1) Clean up any file-system errors by running Windows
ScanDisk (or a similar disk cleanup utility) on your internal
hard drive.
2) Defragment your hard drive using the Windows DiskDefragment Utility (or a similar disk defragment utility) on
your internal hard drive.
3) Backup any critical files or data.
4) Attach the AC adapter to your laptop, and make sure it is not
running on battery power.
5) Attach the USB cable from your computer to the DriveWire.
6) If you plan on running EZ Gig III from the Bootable CD-ROM:
You may need to change your laptop’s BIOS boot order. You
will find these options inside the laptop’s BIOS Boot Option
Menu. The BIOS Boot Options menu allows the user to
select the preferred boot device when the laptop starts up.
EZ Gig III can boot directly from the CD-ROM but you must
check the BIOS Boot settings to make sure that “CD-ROM”
is higher in the boot order than the C: drive.
6
www.apricorn.com
EZ Gig III instructions for Windows 7 & Vista
Windows 7 and Vista User Account Control helps stop unauthorized
changes to your computer. The User Account Control window pops up in
Administrator Approval Mode whenever a program tries to run on your
Windows system.
When the User Account Control window pops up there will be a warning
symbol and message that reads, “A program needs your permission to
continue.” The instructions will read “If you started this program, Continue.”
Please click the Continue button and proceed to the EZ Gig III Start-Up
screen.
Changing the default “Power Options”
Be default the Windows 7 operating system will “Turn display off” after 20
minutes and “Put the computer to sleep” after 1 hour of keyboard or mouse
inactivity. It will take more than 20 minutes to clone most of today’s larger
hard drives. If the system goes into display is turned off or the computer
goes to sleep during the clone, your clone may fail. This will not damage
your original hard drive in any way but you will have to restart the cloning
process. To avoid this issue change the default “Power Options” before
starting the backup on Windows 7 Systems.
From your Window Start menu type “Power Options” in the “Start Search
bar” and the “Power Options” program will be listed in the results window.
Alternately you can go to Start Menu – Control Panel – Power Options.
Click on “Power Options” to launch the program. On the left window click
on “Choose when to turn off display” and make the changes as listed
below.
Turn Display Off
Put computer to sleep Never
Never
Once you have completed the clone go to “Power Options” and restore the
default settings.
www.apricorn.com
7
Upgrade Suite (CD-ROM boot)
Upgrade Suite CD is a bootable disk with EZ Gig III data transfer utility that
can copy hard drives without booting to the Windows operating system. To
use Upgrade Suite as a stand-alone utility, your Computer must be able
to boot from a CD-ROM, and the CD-ROM must be set as the first boot
device in your computer’s System BIOS.
NOTE: The System BIOS controls basic hardware functions in computer,
and is the first screen that appears when booting your computer (i.e. before
the Windows Startup Logo appears on screen). Consult your Computer’s
User Manual for instructions on how to enter the System BIOS and change
the boot order.
To start EZ Gig III directly from the CD-ROM
1) Insert the Upgrade Suite CD into your CD-ROM Drive.
2) Turn on the Computer and go immediately into the system
BIOS screen.
3) Set the CD-ROM as the First Boot device. Save your changes
and Exit the BIOS to reboot the computer.
Helpful tip:
Some newer computers display a “Boot Options” message during
startup. Pressing the boot options key allows the user to temporarily
change the boot-order of the system. Use this option to boot from
the CD-ROM without changing the BIOS settings. The actual keys to
activate this option will depend upon the manufacturer (some BIOS
use the <F12> key, others use the <ESC> key), and the boot option
is only available for a few seconds at startup before the BIOS falls
back into the normal boot order.
4) Once the BIOS is set correctly, the CD-ROM should boot-up the
computer and start the EZ Gig III software.
8
www.apricorn.com
Connecting Your Hard Drive
Before starting the EZ Gig III software,
please ensure that your new hard
drive is connected to your notebook’s
USB port via the DriveWire. EZ Gig III
automatically verifies which Apricorn
upgrade product is being used. If used
without one of Apricorn’s upgrade
products, EZ Gig III will not work.
EZ Gig III
Start Up Options
Depending on how you received EZ Gig III, you have two options.
1. If you have EZ Gig III on a CD, please choose the Start option
(proceed to page 7 of this manual to continue).
2. If you downloaded EZ Gig III from Apricorn’s website, you can either
choose the Start option (go to page 11) or create a bootable EZ Gig III
CD to use in the future (go to page 10 for instructions).
www.apricorn.com
9
Creating a Bootable EZ Gig III CD
If you downloaded EZ Gig III from Apricorn’s website, you have the
option of creating a bootable EZ Gig III CD, floppy disk or thumb drive to
use in the future.
To create a bootable media disk follow the appropriate directions below:
•
If you want to create a bootable floppy disk, choose the desired
drive at ‘Floppy drive’ and click “Create floppy”.
•
To create a bootable CD/DVD, choose the desired drive at ‘CD/
DVD writer’ and click “Create CD/DVD”.
•
To create a bootable USB key, choose the desired drive at ‘USB
medium’ and click “Make bootable”.
Follow the instructions and wait until the installation program reports
successful creation of the bootable medium.
Once you have created you bootable media device, click “Exit” and then
choose “Start EZ Gig III”.
10
www.apricorn.com
Cloning your hard drive with EZ Gig III
1. Click the “Let’s Get Started” button to proceed.
2. EZ Gig will then scan for connected drives. This may take a few
moments.
www.apricorn.com
11
Selecting the Source Drive
Once EZ Gig III has scanned for connected drives, you will be asked to
select your Source Drive. This is the drive you would like to copy from and
in most cases is the internal drive in your notebook.
NOTE: Your computer’s internal drive will usually be denoted by the
prefix IDE
Select the appropriate drive from the menu and click “Next” to continue.
12
www.apricorn.com
Selecting the Destination Drive
Once you have selected your Source Drive, EZ Gig will ask you to select
your Destination Drive. This is the drive you would like to copy to and in
most cases is the external drive connected to your notebook’s USB port.
NOTE: Your external drive will be denoted by the prefix USB
Select the appropriate drive from the menu and click “Next” to continue.
Speed Test
Click the Speed Test icon
on either the Source or
Destination drive for an
estimate of the drive’s read
speed.
From this estimate, a rough
estimate of the clone time
may be gauged
www.apricorn.com
13
Drive Verification
You are almost ready to start your clone, but before you do, EZ Gig III asks
that you verify that the choosen drives are correct.
If they are click “Next” to continue (go to page 20 to continue)
If you need to change your drive selection, click the “Back” button
At this point you can also modify the default options for your clone using
the “Advance Options” button. Only select this option if you would like
to change your options from the default (go to page 15 for more info on
Advanced Options).
14
www.apricorn.com
Advanced Options
Verify Copy
Compares the data of source and target after copying. If verify copy is
chosen, the free areas between partitions will also be copied. This option
has no influence on the copying performance itself, but offers the possibility
to synchronize the data of the source and target after the copying process.
However, the whole process of copying and verifying then normally takes
approximately the double amount of time. Choose this option according to
your needs of copying and your time available.
Copy Free Areas
This option is off when doing a default clone, but when selected allows
you to copy free space between partitions from your internal drive to your
external drive.
SmartCopy
SmartCopy enables you to clone your file systems in a fraction of time
usually required - this option is chosen by default
Media Direct (Dell)
Used to deactivate MediaDirect software on the Destination drive. Check
your Dell notebook specs to see if you have Media Direct on your system.
www.apricorn.com
15
More Advanced Options
To access additional advanced options, click on the Apricorn logo in the
bottom right corner of the “Advanced Options” window
FastCopy
Special copy algorithm. Can increase the regular copy speed up to double.
SafeRescue
Special algorithm for data recovery. Tries to recover as large areas on the drive
as possible. Can also stay turned on for normal copies.
CachedMemory
Use fast intermediate memory.
SharedMemory
Use fast data transfers.
Animation
Switch off copy animation, may lead to a slight speed increase.
16
www.apricorn.com
HotCopy / LiveImage
Allows or denies EZ Gig III access to the Windows shadow copy
mechanism. If this option is deselected, EZ Gig III is not able to create
copies or file images of the system volume or of volumes, which are used
by other programs at the same time.
Avoid exclusive read access
Usually, EZ Gig III when running on Windows, at first tries to reserve the
source drive for exclusive access. This is the most reliable way for creating
an identical copy, but it may interfere with other programs running at the
same time. If this option is selected, EZ Gig III tries to create a HotCopy or
a LiveImage at first.
www.apricorn.com
17
Partitions
When used in the Default mode, EZ Gig III will automatically resize your
partitions according to the new hard drive space.
However, EZ Gig III also gives the option of keeping your partition sizes the
same or allows you to resize your partition sizes manually.
18
www.apricorn.com
Resizing your partitions manually
To resize your partition manually:
1. Choose the “Manually” radio button on the “Advanced Options”
window.
2. Once this radio button is selected, click the “Apply Changes” button.
The “Adjust Partitions” window (shown left) will pop up.
Positions and sizes of the partitions to be copied to the Destination
drive are displayed graphically in a bar. The original size of the
partition is displayed in dark green, while the additionally assigned
space is displayed in light green. The size of partitions displayed in
black cannot be altered. Free space not yet assigned to any partition
is displayed in white.
3. To resize, click the desired partition’s extended space (light green
portion) and drag with your mouse. You can also use the [+] and [-]
cursor keys to the same effect.
4. Once you have resized the partitions to the desired size, choose “Apply
Adjustment” which will then close the window.
5. Once the “Adjust Partition” window is closed, close the “Advanced
Options” window by clicking the “Close Window” button.
www.apricorn.com
19
Start Clone
Now you’re ready!
Press the “Start Clone” button to start the cloning process.
EZ Gig III will keep you up-to-date with the status of the clone throughout
the entire process with a progress bar and percentage completed.
Depending on your system size a clone can take anywhere from several
minutes to a couple of hours.
20
www.apricorn.com
Interupting the Cloning Process
The cloning process can be stopped at anytime using the “Stop” button.
Continue cloning by clicking “Continue copying”. To stop the clone
completely, select “Abort copying.”
Aborting the Cloning Process
If the cloning process aborted, a new clone must be commenced.
Interupting the Verification process
If you chose the “Verify Copy” option before starting the clone, EZ
Gig III will automatically compare the information on the “Source” and
“Destination” drives once the clone is complete. If this process is interupted
or stopped at anytime, the aborted verification run will have no influence on
the copied data. The copy itself is already finished at that point of time.
When the final report is read, EZ Gig III will report that the clone is only
partially verified.
www.apricorn.com
21
Congratulations your Clone is Complete
Once your clone is complete, EZ Gig III will let you know with a pop up
window. To get a report of the cloning process, click the “Details” button.
The final report will outline
the number of sector
copied, read errors, write
errors and if verified, will
also report verification
errors.
Once you have finished
your clone, click “Quit
EZ Gig”. You will then
be prompted to turn
your computer off and
disconnect the attached
hard drive.
22
www.apricorn.com
SuperDuper! Backup Software for Mac
1. Insert Apricorn CD into your CD-ROM drive
2. When the Apricorn CD appears on your desktop, double click to open.
3. Double click on the SuperDuper!.dmg icon
4. This will open the package and mount a drive on your desktop.
5. Open this drive by clicking on the newly created disk icon. The below
window will open on your screen.
6. To install SuperDuper! drag SuperDuper! icon to Applications and
run.
7. Follow the instructions included on the SuperDuper! User’s Guide to
setup.
www.apricorn.com
23
After the Clone
Once the transfer is complete, you are ready to install your new hard drive.
Turn off the laptop and disconnect the DriveWire with hard drive. Disconnect
the Laptop’s AC adapter, and remove the laptop battery to reduce the risk of
damage or electrical shock.
Consult the Computer’s User Manual for instructions on how to remove the
original hard drive from your computer. Some laptops may have the disk
drive mounted under a cover. Other laptops may have the original drive
mounted inside a “drive caddy” to allow quick removal of the drive from the
laptop (although it might appear that the drive caddy and the DriveWire drive
are not the same, once you open-up the drive caddy you will find an identical
hard drive inside). If the hard drive is mounted inside a drive caddy, carefully
remove the hard drive from the caddy. Be careful not to damage the hard
drive pins or any custom connectors. The hard drive may have a connector
covering the pins. Please take note of all connectors and their orientation.
Remove the original drive and replace it with the new one. If the laptop drive
is mounted inside a caddy, install the new drive into the caddy and then
insert the assembled caddy back into the computer. For specific instructions,
please refer to your computer’s User Manual or manufactures’ web site.
Boot the laptop from your new hard drive. The new hard drive should boot up
as though it was the old drive.
Using the DriveWire as a external backup drive
WARNING: Formatting a Hard Drive will erase everything on the drive!
Please do not reformat the original drive until you have verified that your new
drive is working properly.
After successfully copying everything over to your new drive, the DriveWire
with old hard drive can be used as an external USB backup drive. At this
point we recommend that you wait until you are certain that your new hard
drive is working properly. When you are certain that your system is working
properly, follow these basic steps listed below to use the DriveWire with old
drive as a backup drive.
1. Install the old hard drive into the DriveWire. (Please refer to Page 5 for
hard drive installation instructions.)
2. Connect the DriveWire to your system.
3. Reformat the old hard drive (See FAQ #4 on page 26 of this manual for
a link to the Microsoft website with complete instructions for both XP,
Vista & 7)
4. Follow instructions in the appropriate section of this manual for cloning to
create a full bootable backup or just use as an external storage device.
24
www.apricorn.com
Device Removal (Windows)
Windows 2000, XP, Vista and 7
1) Locate the system tray on your Windows Desktop (the system
tray is the part of the taskbar that displays the date and time).
2) Click on the “Safely Remove Hardware” icon
(2000, XP)
or (Vista, 7) in the system tray. A dialog box will appear.
Please note that in Windows Vista and 7 the “Safely Remove
Hardware” icon is different.
3) Click ‘Safely Remove Mass Storage Device – Drive (D:) in the
dialog box. (Your drive letter may differ).
4) Wait for few seconds until the system prompts ‘The hard disk
storage device can now be safely removed from the system.”
Click OK, and then unplug the DriveWire.
NOTE: To protect against unexpected data loss, Windows checks that all
files on the disk are closed before allowing the USB device to be removed. If
you receive an error message that says “The device cannot be stopped right
now. Try stopping the device again later.” Close all Windows and Programs
that are using files from the Drive, then repeat the procedure.
www.apricorn.com
25
DriveWire FAQs
1. Why does my new drive or connector look different from my old
drive or connector?
The first thing you need to do is to determine if you bought the right
drive. There are now two standards for 2.5” laptop hard drives, Serial
ATA (SATA) and Parallel ATA (PATA). Check with your manufacturer
for the drive specifications and compare it to the specifications on the
drive you purchased. All SATA drive connectors should look exactly the
same. Use Apricorn’s hard drive configurator at www.apricorn.com to
make sure you are getting the correct drive for your laptop or notebook
computer.
The most frequent question about hard drive connectors involve PATA
hard drives. If your laptop uses a PATA hard drive, it may have a translation
board or adapter on the connector. All 2.5” laptop PATA hard drives use
the same type of connector (male 44 pins). Laptop manufacturers may
use a translation board or adapter to connect the drive to the computer.
This adapter can be removed and placed on the new drive. It will look
like it is actually part of the old drive, but it can be removed.
Removing the translation board or adapter
Take the old drive and turn it upside down so the board is face up and
the connector end is away from you, using your fingernail or fingertips,
work the one side of the connector up slightly and then the other. Be
patient you want to make gradual progress until you start to see the gold
pins (between the drive and the connector), at that point you can pull the
connector “straight” off the end of the pins. Once you have removed it,
you can then place it carefully onto the new drive in the same location.
Please note: there are 4 pins separated by 1 pin space and those 4 pins
will not be covered by the adapter or connector.
2. What is Serial ATA (SATA)?
Serial ATA is the next generation interface for the high-speed transfer
of data in PCs, workstations, and laptops. SATA allows an increase in
bandwidth from PATA’s 100 MBps to 150 MBps and higher down the
road. SATA cable connectors are much smaller than PATA connectors
and have no pins to be bent or broken. SATA connectors are more stable
and require very little pressure to attach the hard drive making them much
easier to use than PATA connectors. If your laptop requires a SATA hard
drive you must replace it with a SATA hard drive. Use Apricorn’s hard
drive configurator at www.apricorn.com to make sure you are getting the
correct drive for your laptop or notebook computer.
26
www.apricorn.com
3. How do I format my drive?
For Windows 2000 and XP cut & paste or type the URL below into your
Internet browser or click the link below:
http://support.microsoft.com/?kbid=313348
For Windows Vista & 7 cut & paste or type the URL below into your
Internet browser or click the link below:
http://windows.microsoft.com/en-US/windows7/Create-and-format-ahard-disk-partition
4. What is USB 2.0?
USB 2.0 represents the next generation of PC peripherals and connectivity.
USB 2.0 is the first major evolution of the Universal Serial Bus standard,
which was originally designed to bring low cost connections and “plugand-play” consumer devices to the PC world. USB 2.0 adds new
functionality to your laptop, by allowing faster connections and greater
flexibility without the need for upgrading your existing USB devices.
5. Why USB 2.0?
Modern PC peripherals can run faster and do more than the original
USB designers ever dreamed. The USB standard was upgraded to keep
pace with the rapid advances in technology, and the explosion of new
consumer devices. USB 2.0 host controllers add the faster speeds and
greater flexibility than these new devices require. USB 2.0 will allow your
computer to connect to the newest USB devices: High-Speed Video and
Ethernet, ultra-fast scanners and disk drives, etc.
6. How much faster is USB 2.0?
USB 1.1 devices can communicate at about 12 Megabits/sec. USB 2.0
devices can communicate at speeds of up to 480 Megabits/sec.
7. The DriveWire is connected, but the drive is not automatically
detected by the operating system.
The mass storage device drivers are not installed correctly or there is a
resource conflict in the system. Use the Windows Add New Hardware
Wizard to detect the drive, or, if the drive has already been installed,
use the Windows Update Device Driver Wizard. Be sure that there are
no resource conflicts in the Windows Device Manager before installing
the drive.
www.apricorn.com
27
8. What software is included with my DriveWire?
PC Software Includes: EZ Gig III and SMART-ER
EZ Gig III for Windows is one of the most powerful yet easy to use
backup utilities available. EZ Gig III is the third generation of the award
winning EZ Gig Data Transfer Utility.
SMART-ER polls the S.M.A.R.T. data from a hard drive, giving the user
advanced warning of a hard drive failure with a pop up message or
e-mail to the IT administrator. Using less than 1MB of system resources,
SMART-ER also monitors the hard drive free space. SMAT-ER is
compatible with both SATA and PATA/IDE hard drives.
MAC Software Includes: ShirtPocket SuperDuper! for Mac
SuperDuper! is the wildly acclaimed program that makes recovery
painless, because it makes creating a fully bootable backup painless.
Its incredibly clear, friendly interface is understandable, easy to use.
And it runs beautifully on both Intel and Power PC Macs! SuperDuper’s
interface confirms all your actions in simple, clear language to ensure
that the end result is exactly what you intended.
9. Can I make a clone of my drive and put it in a different machine?
A clone is for disaster recovery purposes (i.e. when your drive fails and
you need to get back up and running). You should not make a clone of
your drive and put it in another or multiple machines. There are licensing
issues for the software on your machine.
10. Is it possible to restore a single file from the clone stored on my old
drive?
Yes. EZ Gig III allows you to mount an image as a “virtual” hard drive.
You can access this “virtual” drive as if it were a physical hard drive. You
would use your Windows Explorer or My Computer and copy the file
or folder and paste it on to your hard drive.
11. I am unable to format my 80GB or larger DriveWire with FAT 32 in
Windows 2000 or XP?
Windows 2000 and XP limit a FAT32 partition to 32GB. If you choose to
format the drive in a larger partition, you will need to use the NTFS file
system.
28
www.apricorn.com
12. Can I boot Windows to my USB Device?
No. Because of limitations (both hardware and software) Windows is
currently prevented from booting and running off a USB drive.
13. What is master mode?
Master mode is a jumper setting that only applies to 3.5” IDE/PATA hard
drive or CD/DVD Optical Drives and determines which hard drive or CD/
DVD optical drive is the main boot device on the primary ATA bus, or if
it is to be the master device on the secondary ATA bus of an enhanced
ATA controller.
14. How do I set my hard drive to master mode?
Setting your hard drive to master mode will vary from one hard drive
manufacturer to another. In most cases there will be a diagram on
top of your hard drive that shows the location and proper settings to
configure the drive as the Master. If it is not obvious, please refer to the
manufacturers support website for more information.
15. Why can’t I connect my 2.5 or 3.5 hard drive?
When connecting PATA 2.5” or 3.5” drives to DriveWire, it is necessary
to align the polarizing pins in the DriveWire’s connector up with the
open space on the hard drive to avoid breaking pins on the hard drive.
www.apricorn.com
29
EZ Gig III FAQs
The below FAQs refer to cloning your hard drive with EZ
Gig III only. For information on issues using Shirt Pocket
SuperDuper! software for Mac, please go the ShirtPocket’s
website at www.ShirtPocket.com
Load errors
During the start of the program, before EZ Gig III is loaded itself, a
message and a progress bar will appear on the boot screen. In case of an
error, one of the following error codes will be indicated here.
Error #5002 and ‘Disk error’
This error will be displayed if the boot medium is not readable when
booting the program. The error is reported by the BIOS of the computer
and points to a defective data carrier or a problem with the used boot
drive. In many cases, in particular when booting from a floppy disk, an
incompatibility between drive and data carrier is the cause. Principally
this problem can be fixed. Please try the following steps, at best in the
indicated order:
•
Try again to boot the program, perhaps with/without cold start.
•
Create once again a bootable disk (page 10).
•
Floppy disk: format the floppy disk (no quick format) before
creating a new one.
•
Floppy disk: use another floppy disk.
•
Use (if possible) another boot drive.
NOTE: If you didn’t receive EZ Gig III as an installation package but on a
bootable disk and if a disk shows this problems also after multiple trials on
different devices, please contact Support.
Keyboard and mouse
EZ Gig III supports keyboards and mice with PS/2 standard or USB
connector. This also includes many wireless mice, given they are
connected as a true USB device. Input devices connected with Bluetooth
are currently not supported. In this case, please connect a separate USB
device. If keyboard or mouse (or both) do not function with EZ Gig III, this
is usually due to a wrong legacy emulation setting in BIOS setup. On most
computers, you can fix this problem by changing (activating or deactivating,
depending on the current setting) the emulation for PS/2 devices in BIOS
30
www.apricorn.com
setup. Please consult your computer manual on how to change this setting
since it may be named differently according to the respective BIOS. In
most of the cases, you can find it under the name USB Legacy Support or
USB Keyboard Support (often under Integrated Peripherals or Advanced
Options).
NOTE: In some of the cases, problems with the PS/2 keyboard and/or
mouse occurred with an activated emulation for PS/2 devices. If you do not
use any USB input de-vices, please switch off the PS/2 emulation in the
BIOS setup.
General problems
Slowed down system
If you think the speed of the total system or the copying speed – also with
IDE and SCSI devices – is too slow, a USB controller can be the cause,
even if it is not used.
Read, write and verification errors
If EZ Gig III reports errors, these are usually defective areas on the
respective medium. However, general problems with the hardware
can possibly also cause (putative) read and write errors. This is mostly
noticeable by a very high number of displayed errors. First of all, try
to fix the problem via the help instructions for the respective hardware
types (IDE, SCSI, USB) because the causes are usually found there. If
the problems cannot be fixed this way either, deactivate step by step the
following options, at best in the indicated order:
•
•
•
•
•
CachedMemory
Read cache and write cache
FastCopy
DMA
SharedMemory
If the problem does not occur any more after having deactivated a certain
option, the previously deactivated options can be reactivated as a test.
IDE/ATA/SATA
Hard disk not recognized
If EZ Gig III does not recognize a hard disk, there can be several reasons.
Perhaps the controller which the disk is connected to has not been found
(See next section: IDE controller not found). A further possible reason can
be a non-standardly connected hard disk. This is for example the case if
www.apricorn.com
31
a hard disk is configured as slave and if a CD/DVD drive or no drive at all
is connected at the same IDE channel as master. Normally, EZ Gig III can
handle that, too.
NOTE: If an SATA hard disk is not recognized, this can also be due to the
used SATA controller.
IDE controller not found
There are the following three reasons why EZ Gig III has not automatically
recognized an IDE controller:
•
The IDE controller/channel is deactivated, e.g. on an onboard IDE
controller. Activate the IDE controller/channel via the BIOS setup.
•
Standard IDE controllers (ISA) are not taken into account if PCI
IDE controllers are available. Connect the respective hard disk to a
PCI IDE controller in this case or deactivate the PCI IDE controller
or controllers.
•
The used controller does not correspond to the PCI IDE standard.
Although most controllers support this standardized programming
interface, there are some controllers which have only a proprietary
programming interface. Connect the corresponding drives to
another controller (PCI IDE controller).
Source & Destination Size Differences
Equal Size
If source and target are of the same size, EZ Gig III creates an absolutely
identical copy(clone). On this clone, all sectors on source and target, from
the first to the last sector, are 100% identical, provided that the process
was error-free.
Small to large
If the source is smaller than the target, EZ Gig III copies only the data that
is available on the source. This data is copied from the beginning of the
source onto the beginning of the target medium. The area at the end of
the target medium, which is larger than the source, remains unaffected.
Apart from that the unaffected area remains possibly unused during a later
usage, such a copy is usually comparable to a real clone as far as the
capacity of use is concerned because the target contains entirely all data of
the source
32
www.apricorn.com
Large to small
If the source is bigger than the target, EZ Gig III copies only the data
which also fits onto the target. This data is copied from the beginning
of the source to the beginning of the target medium.The data which is
larger than the target is not copied and is missing on the target. Generally,
such a copy can only restrictedly be used because possibly necessary
data can be missing. However, if you make sure before copying (e.g. by
defragmentation) that all valid or necessary data is in the front part of the
source medium and that this area is not larger than the target medium, a
copy onto a smaller target medium can also be successfully used.
Automatic troubleshooting
In case of occurring errors, EZ Gig III tries to troubleshoot them the
best possible. If this is not possible, the errors will be mentioned in a
corresponding error statistic in the detailed report after the clone is
complete.
Intensive reading/writing
In case of read or write errors, EZ Gig III uses different strategies in
order to still be able to read or write this data, if possible. The time used
for defective areas depends to a large extent on the respective medium.
According to the medium and its state, several seconds up to minutes can
be needed for the recovery trials. Therefore, it is recommended to always
activate the option SafeRescue because then handling defective sectors
takes place after the copying of all intact areas has been finished. The
process can then be aborted if it takes too long without losing the data of
the intact areas.
Read errors
During the copying process, read errors can only occur on the source
medium. EZ Gig III then tries to read the defective areas immediately after
the termination of the copying process (with the option SafeRescue) with
the help of special data recovery strategies within a single troubleshooting
run. During the troubleshooting run, the number of the indicated read errors
can reduce according to the areas on the source medium, which could be
recovered.
NOTE: Read errors, that occur during the verification run, are not counted
as read errors but as verification errors.
Write errors
Write errors can only occur during the copying process and only on
the target medium. EZ Gig III then tries to read the defective areas
immediately after the termination of the copying process (with the option
www.apricorn.com
33
SafeRescue) with the help of special data recovery strategies within a
proper troubleshooting run. During the troubleshooting run, the number of
the indicated write errors can decrease according to the areas on the target
medium, which could be recovered.
Verification errors
When the option Verifying is activated, EZ Gig III executes a verification
run after the copying process. A verification error is counted if the data of
two sectors on source and target do not correspond. Furthermore, read
errors, which occur during the verification run in one or both of the areas
to be compared, are also counted as verification errors. Therefore, the
number of verification errors gives you absolute information on how exactly
source and target correspond to each other after the copying process. In
case of an error-free copying process, EZ Gig III should not report any
verification errors and signalize a 100% conformity of source and target.
34
www.apricorn.com
Contacting Technical Support
Apricorn provides the following helpful resources for you:
1. DriveWire User’s Guide and Quick Start Guide
2. Apricorn’s Website (http://www.apricorn.com)
This gives you the ability to check for up-to-date information.
3. E-mail us at [email protected].
4. Or call the Technical Support Department at 1-800-458-5448.
Apricorn’s Technical Support Specialists are available from 8:00 a.m.
to 5:00 p.m., Pacific Standard Time from Monday through Friday.
RMA Policy
An RMA (Return Merchandise Authorization) tracking number must be issued
by Apricorn. If you need to return or replace your upgrade kit, Apricorn
requires that you perform the following steps:
1. Find your original receipt.
2. Simply call Apricorn’s technical support department with your upgrade kit
part number and a description of the problem(s) you are experiencing.
3. If the Apricorn representative finds cause for a return, they will issue an
RMA number. Please write this number down.
4. Fill out an RMA authorization form with your package. The RMA form is
available on-line at http://www.apricorn.com/support/rma.php.
5. Please send the prepaid package including RMA form and receipt to the
following address, make sure the RMA# is written on the exterior of the
package:
Apricorn
RMA#: __________
12191 Kirkham Road
Poway, CA 92064
The purchaser shall be responsible for any loss or damage to the returned
product until it is received by Apricorn. Purchaser should consider obtaining
insurance with respect to shipping the product.
www.apricorn.com
35
Warranty Conditions
Warranty:
Apricorn offers a 1 year warranty on DriveWire against defects in materials
and workmanship under normal use. The warranty period is effective from
the date of purchase (validated by your original receipt) either directly from
Apricorn or an authorized reseller.
Disclaimer and terms of the warranties:
The warranty becomes effective on the date of purchase and must be verified
with your sales receipt or invoice displaying the date of product purchase.
Apricorn will, at no additional charge, repair or replace defective parts with
new parts or serviceable used parts that are equivalent to new in performance.
All exchanged parts and products replaced under this warranty will become
the property of Apricorn.
This warranty does not extend to any product not purchased directly from
Apricorn or an authorize reseller or to any product that has been damaged or
rendered defective: 1. As a result of accident, misuse, Neglect, abuse or failure
and/or inability to follow the written instructions provided in this instruction guide: 2. By the use of parts not manufactured or sold by Apricorn; 3. By
modification of the product; or 4. As a result of service, alternation or repair
by anyone other than Apricorn and shall be void. This warranty does not cover
normal wear and tear.
No other warranty, either express or implied, including any warranty or merchantability and fitness for a particular purpose, has been or will be made by
or on behalf of Apricorn or by operation of law with respect to the product
or its installation, use, operation, replacement or repair.
Apricorn shall not be liable by virtue of this warranty, or otherwise, for any
incidental, special or consequential damage including any loss of data resulting from the use or operation of the product, whether or not Apricorn was
apprised of the possibility of such damages.
Copyright © Apricorn, Inc. 2010. All rights reserved.
Windows is a registered trademark of Microsoft Corporation. All other trademarks and copyrights
referred to are the property of their respective owners. Distribution of substantively modified
versions of this document is prohibited without the explicit permission of the copyright holder.
Distribution of the work or derivative work in any standard (paper) book form for commercial
purposes is prohibited unless prior permission is obtained from the copyright holder.
DOCUMENTATION IS PROVIDED AS IS AND ALL EXPRESS OR IMPLIED CONDITIONS,
REPRESENTATIONS AND WARRANTIES, INCLUDING ANY IMPLIED WARRANTY OF
MERCHANTABILITY, FITNESS FOR A PARTICULAR PURPOSE OR NON-INFRINGEMENT,
ARE DISCLAIMED, EXCEPT TO THE EXTENT THAT SUCH DISCLAIMERS ARE HELD TO
BE LEGALLY INVALID.
36
www.apricorn.com
12191 Kirkham Road
Poway, CA, U.S.A. 92064
1-858-513-2000