1
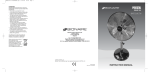
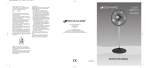
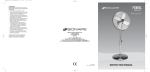
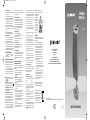
BFH3520IUK06EM2 V new.qxd
6/16/06
15:13
Setting the Off Timer:
1. Select the Mode and/or temperature you wish
the heater to run in.
2. While the heater is running, press and hold
the up (+) and down (-) buttons simultaneously.
3. By pressing the up (+) and down (-) buttons,
program the heater to turn off in up to 16 hours
from the current time, in increments of 1 hour.
4. After setting the timer, the LCD display will
return to show the current room temperature.
An LED will illuminate to show that the timer is
activated.
5. After the predetermined length of time has
passed, the heater will automatically shut off.
Setting the On Timer:
1. While the heater is off, press and hold the up
(+) and down (-) buttons simultaneously.
2. By pressing the up (+) and down (-) buttons,
program the heater to turn on up to 16 hours in
advance of current time, in increments of 1 hour.
3. After the preset length time of time has passed,
the heater will automatically turn on to auto mode
HI power at 24°C for a preset time of 2 hours.
OSCILLATION INSTRUCTIONS
Press (
) button J to start and (
) button J
again to stop oscillation.
REMOTE CONTROL INSTRUCTIONS
Before operation, insert 2 “AAA” batteries (not
included) into the back of the remote control. Remove
batteries before discarding the remote control.
• Do not mix old and new batteries.
• Do not mix alkaline, standard (carbon-zinc), or
rechargeable (nickel-cadmium) batteries.
The remote control for this unit has the capability
of operating all control panel functions (see Fig.
3, 4).
POWER: To turn the unit on press the
Mode (
) button. To turn the unit off press the
Mode (
) button.
MODES: To scroll through the various modes
FA, HI, LO, AH, AL and AF press the Mode (
)
Button until you reach your desired setting.
OSCILLATION: To start oscillation, press the
Oscillation (
) Button once. To stop oscillation
press the button again.
TEMPERATURE: The temperature can be
adjusted only when the unit is set on the Auto
Mode Hi (AH) and Auto Mode Lo (AL).To
increase the temperature setting, press the (+)
button. To decrease the temperature setting that
you desire press the (-) button.
TIMER: To activate the timer from the remote
control, press the Timer Button (
). From there
you can press the (+) or (-) button, which will
give you the ability to program the heater to turn
Page 1
on or off in 1 hour increments, up to 16 hours.
For more information see Using Programmable
Timer instructions above.
AUTO SAFETY SHUT-OFF
This heater is equipped with a technologically
advanced, safety system that requires the user
to reset the heater if there is a potential overheat
situation. When a potential overheat temperature
is reached, the system will automatically shut
the heater off. It can only resume operation
when the user resets the unit.
To reset the heater
1. Press the MODE (
) button.
2. Unplug the heater and wait for 30 minutes for
the unit to cool down.
3. After the 30 minutes, plug the unit in again
and operate normally.
Tip Over Protection
When the unit is accidentally knocked over, it will
instantly shut off. To reset, simply place the
heater in an upright position.
Safety Back-Up Fuse
In the unlikely case the heater does not respond
to an overheat situation, the safety back-up fuse
will engage. In this case, the heater will not
reset. Please contact your local service number
for advice.
PLEASE READ AND SAVE THESE
IMPORTANT INSTRUCTIONS
When using electrical appliances, basic safety
precautions should always be taken including
the following:
1. Before connecting the heater, check that the
voltage indicated on the rating plate
corresponds to the main voltage in your
home/office.
2. WARNING: In order to avoid overheating,
do not cover the heater (
).
3. DO NOT position the heater directly under a
power socket.
4. Do not use this heater in the immediate
surroundings of a bath, a shower or a
swimming pool.
5. If the supply cord or plug is damaged, it must
be replaced by the manufacturer or its
service agent or similarly qualified person in
order to avoid hazard. The heater contains
no user serviceable parts. Should the
product suffer damage or breakdown, it must
be returned to the manufacturer or their
service agent.
6. Under the environment with electrical fast
transient, the product may malfunction and
require user to reset the product.
7. Do not use this heater with a programmer,
timer or any other device that switches the
heater on automatically, since a fire risk exists if
the heater is covered or positioned incorrectly.
8. Only touch the heater with dry hands.
9. DO NOT position where it can be touched by
children, especially the very young.
10. DO NOT use this heater outdoors.
11. Allow a safe area around the heater away
from furniture or other objects; at least 50 cm
from the top and sides and 200 cm at the
front.
12. Do not use this heater when it is lying on its
side.
13. DO NOT use the heater in rooms with
explosive gas (e.g. petrol) or while using
inflammable glue or solvent (e.g. when
gluing or varnishing parquet floors, PVC etc.)
14. DO NOT insert any objects into the heater.
15. Keep the mains cord at a safe distance from
the main body of the heater.
16. If overheating should occur, the built-in
overheating safety device will switch off the
heater.
17. Do not place the cord under a rug.
18. The heater is to be installed so that switches
and other controls cannot be touched by a
person in the bath.
19. Avoid the use of an extension cord because
it may cause the heater to overheat.
For U.K. and Ireland only:
If the plug is not suitable for the socket outlets in
your home, it can be removed and replaced by a
plug of the correct type. Please refer to
"Installation of a plug" below.
Installation of a plug
Applicable to U.K. and Ireland
The wires in the mains lead are coloured as such:
BROWN
LIVE
BLUE
NEUTRAL
Please note that the colour of these mains wires
may not correspond with the colour markings
that identify the terminals in your plug. Please
proceed as follows:
The BROWN coloured wire must be connected
to the terminal, which is marked with the letter
"L" or is coloured RED.
The BLUE coloured wire must be connected to
the terminal, which is marked with the letter "N"
or is coloured BLACK.
DO NOT CONNECT either of these wires to the
earth terminal in the plug. The earth terminal plug
is marked with the letter "E", or with the earth
symbol
or coloured GREEN and YELLOW.
NOTE: If the terminals in the plug are not
marked or if you are unsure or in doubt about
the installation of the
plug please contact a
qualified electrician.
If a 13A 3-pin plug is
13 amp
fitted, it must be an
ASTA approved plug,
conforming to
BS1363 standard.
Replacement 13A
fuses must be BSI or
ASTA BS1362
approved.
GUARANTEE
PLEASE KEEP YOUR RECEIPT AS THIS WILL
BE REQUIRED FOR ANY CLAIMS UNDER THIS
GUARANTEE.
• This product is guaranteed for 2 years.
• In the unlikely event of breakdown, please take
it back to the place of purchase, with your till
receipt and a copy of this guarantee.
• The rights and benefits under this guarantee
are additional to your statutory rights which
are not affected by this guarantee.
• The manufacturer undertakes within the
specific period, to repair or replace free of
charge, any part of the appliance found to be
defective provided that:
• We are promptly informed of the defect.
• The appliance has not been altered in any
way or subjected to misuse or repair by a
person other than a person authorised by
the manufacturer.
• No rights are given under this guarantee to a
person acquiring the appliance second hand
or for commercial or communal uses.
• Any repaired or replaced appliance will be
guaranteed on these terms for the remaining
portion of the guarantee.
®
2.4KW digital
TOWER heater
BFH3520
Holmes Products (Europe) Ltd
1 Francis Grove
London SW19 4DT
England
Fax: +44 (0)20 8947 8272
Email: [email protected]
Website address: www.bionaire.com/europe
UK - Free phone Customer Service Helpline – 0800 052 3615
THIS PRODUCT IS MANUFACTURED TO
COMPLY WITH THE E.E.C. DIRECTIVES
73/23/EEC, 89/336/EEC AND 98/37/EEC.
Waste electrical products should
not be disposed of with
Household waste. Please recycle
where facilities exist. Check on
the following website for further
recycling and WEEE information:
www.bionaire.com/europe or
e-mail [email protected]
©2006 JCS/THG, LLC
Bionaire®, the Bionaire logoTM and AccuTemp PlusTM are trademarks of JCS/THG, LLC.
9100020007277
BFH3520IUK06EM2
INSTRUCTION MANUAL
BFH3520IUK06EM2 V new.qxd
6/16/06
15:13
Page 5
Fig. 2
BFH3520
U.K. and IRELAND
Fig. 4
DESCRIPTIONS:
A. Heater Housing
B. Neck
C. Pedestal Pole with 2 Halves
D. Base
E. Locking Nut
F. Power Cord
G. Remote Control Sensor
H. Power Light
I. Mode Button
J. Oscillation Button
K. Set Temperature/Timer Buttons
+ for Up
- for Down
L. Timer Button
Fig. 1
G
B
H
C
A
D
I
K
B
J
Fig. 3
C
I
L
D
J
E
F
K
ASSEMBLY INSTRUCTIONS (SEE FIG. 1
AND 2)
If you are planning on using the pedestal, start
with Step 1
Step 1 – Turn the heater housing (A) upside
down and place on a firm, level surface
Step 2 – Unscrew the locking nut (E) by turning
counterclockwise. Slide the locking nut (E)
and base (D) to the end of the power cord.
Step 3 – Unclip the two halves of the pedestal
pole (C) and re-clip the two halves (C)
around the power cord (F), insert the 2
fixing screws. (see Fig. 1)
Step 4 - Screw the pedestal pole (C) clockwise
onto the neck (B) threaded end on the
bottom of the heater housing (A) until
you feel resistance. (see Fig. 2)
Step 5 – Slide the base (D) and the locking nut
(E) up the cord, smooth surface facing
up. Make sure to align the dot on the
back of the base to the dot on the
pedestal pole (C) (See Fig. 2).
Step 6 – Hold base (D) straight while tightening
the locking nut (E) by turning
clockwise.
Step 7 – Insert the power cord into the notch at
the rear of the base.
Step 8 – Carefully turn the heater upright, place
on a firm, level surface.
OPERATING INSTRUCTIONS
Frost Guard
This special setting is automatically activated
when the (AF) mode is selected. In this mode,
the heater is off until the room's temperature
reaches freezing and the heater automatically
turns on HI power. The heater will cycle ON and
OFF as it maintains the temperature between
5°C to 8°C.
Setting the Fan
Press the Mode Button (
the fan only (FA).
) once to operate
Setting the Digital Thermostat:
Your heater is equipped with a Digital
Thermostat that allows you to set your heater to
your precise comfort level.
1. Press the Mode Button (
) twice for manual
HI power. The heater will run continuously on
HI.
2. Press the Mode Button again for manual LO
power. The heater will run continuously on LO.
3. Press the Mode Button for a fourth time for Auto
Mode HI Power (AH) or press again for Auto
Mode LO Power (AL). In either of these modes
you may then press the up (+), and down (-)
buttons to set your desired temperature.
4. Once you have set your desired temperature,
the display will return to current room
temperature and gradually increase until the
room has reached the preset temperature.
5. If the unit will not start in the digital thermostat
mode, please make sure the “set temperature” is
higher than the current room temperature.
NOTE: It is normal for the heater to cycle ON
and OFF as it maintains the preset
temperature. To prevent the unit from cycling,
you need to raise the thermostat setting.
When the preset temperature is reached, the
fan will run for 30 seconds without heat. This
cool down process ensures an accurate and
consistent temperature reading.
6. Press the Mode Button one more time to turn
the heater to (AF) mode and one final time to
turn the heater off. When the heater is off, the
room temperature will only be displayed.
NOTE: The Mode Button can be pressed and
held for 3 seconds at any time to turn the
heater off.
NOTE: AccuTemp PlusTM has memory. The
digital thermostat will remember the previous
temperature setting after the unit has been
turned off. However, if the unit is unplugged, the
digital thermostat will be reset and will no longer
remember the previous temperature setting. If
you unplug the heater, you will have to reset the
digital thermostat again by following the above
instructions.
USING THE PROGRAMMABLE TIMER
AccuTemp PlusTM allows the user to program the
heater to turn on at a preset time, or turn off
after a set amount of time.
NOTE: At any time, the timer can be turned off
by selecting 0 hours.