1
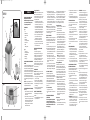
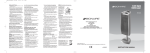
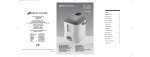
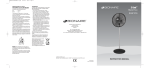
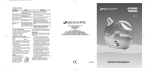
BWM401IUK06EM1.qxd
9/18/06
9:13 AM
Page 1
18. DO NOT attempt to repair or adjust any
electrical or mechanical functions on this
unit. The inside of the unit contains no user
serviceable parts. All servicing should be
performed by qualified personnel only.
19. If the supply cord is damaged, it must be
replaced by the manufacturer or its service
agent or a similarly qualified person.
20. Should the humidifier stop working, first
check the fuse in the plug (UK only) or
fuse/circuit breaker at the distribution board
is operating, before contacting the
manufacturer or service agent.
Please note that this is an electrical
appliance, and requires attention when
in use.
FOR U.K. AND IRELAND ONLY:
If the plug is not suitable for the socket outlets in
your home, it can be removed and replaced by
a plug of the correct type. Please refer to
"Installation of a plug" below.
Installation of a plug Applicable to
U.K. and Ireland
WARNING - THIS APPLIANCE MUST BE
EARTHED
The wires in the mains lead are coloured as
such:
GREEN AND YELLOW
- EARTH
BROWN
- LIVE
BLUE
- NEUTRAL
Please note that the colour of these mains wires
may not correspond with the colour markings
that identify the terminals in your plug. Please
proceed as follows:
The wire which is coloured GREEN AND
YELLOW must be connected to the terminal
which is marked with the letter 'E' or by the
earth
symbol or coloured GREEN or GREEN
AND YELLOW.
The BROWN coloured wire must be connected
to the terminal, which is marked with the letter
"L" or is coloured RED.
The BLUE coloured wire must be connected to
the terminal, which is marked with the letter "N"
or is coloured BLACK.
NOTE: If the terminals in the plug are not
marked or if you are unsure or in doubt about
the installation of the plug please contact a
qualified electrician.
If a 13A 3-pin plug is fitted, it must be an ASTA
approved plug, conforming to BS1363 standard.
Replacement 5A fuses must be BSI or ASTA
BS1362 approved.
Warm Mist
Humidifier
BWM401
GUARANTEE
PLEASE KEEP YOUR RECEIPT AS THIS WILL
BE REQUIRED FOR ANY CLAIMS UNDER
THIS GUARANTEE.
• This product is guaranteed for 2 years.
• In the unlikely event of breakdown, please
take it back to the place of purchase, with
your till receipt and a copy of this guarantee.
• The rights and benefits under this guarantee
are additional to your statutory rights which
are not affected by this guarantee.
• The manufacturer undertakes within the
specific period, to repair or replace free of
charge, any part of the appliance found to be
defective provided that:
• We are promptly informed of the defect.
• The appliance has not been altered in any
way or subjected to misuse or repair by a
person other than a person authorised by
the manufacturer.
• No rights are given under this guarantee to a
person acquiring the appliance second hand
or for commercial or communal uses
• Any repaired or replaced appliance will be
guaranteed on these terms for the remaining
portion of the guarantee.
Holmes Products (Europe) Ltd
1 Francis Grove
London SW19 4DT
England
Fax: +44 (0)20 8947 8272
Email: [email protected]
Website address: www.bionaire.com
UK - Free phone Customer Service Helpline – 0800 052 3615
THIS PRODUCT IS MANUFACTURED TO
COMPLY WITH THE E.E.C. DIRECTIVES
73/23/EEC, 89/336/EEC AND 98/37/EEC.
Waste electrical products
should not be disposed of
with Household waste.
Please recycle where
facilities exist.
Check on the following
website for further recycling
and WEEE information:
www.bionaire.com or e-mail
[email protected]
© 2006 JCS/THG, LLC
Bionaire®, the Bionaire logo™ and AccuSet™ are trademarks of JCS/THG, LLC.
INSTRUCTION MANUAL
9100030003801
BWM401IUK06EM1
BWM401IUK06EM1.qxd
9/18/06
9:13 AM
Page 5
ENGLISH
BWM401
PLEASE READ AND SAVE THESE
IMPORTANT INSTRUCTIONS.
NOTE: Before reading these instructions,
please unfold the back page for the
corresponding illustrations
Fig.1
C
A
DESCRIPTION
Fig.1
A. Lid
B. Medication cup
C. Moisture Outlet
D. Handle
E. Water Tank
F. Air Inlet (Not Shown)
G. Control Panel
H. Base
I. Misting Chamber
B
D
F
E
E
A
G
H
I
Fig.2
J
K
L
M
N
Fig.2
J. Display Lens
K. Humidity Set Button
L. Mode/Off Button
M. Refill Light
N. Power Light
HOW YOUR WARM MIST HUMIDIFIER
WORKS
Your Bionaire™ Warm Mist Humidifier is designed
to allow the proper amount of water to flow out
of the tank and into the Heating Chamber where
the Electronic Thermal Control Heating Element
warms the water. Air is drawn in through the grill
openings located in the back of the unit and
mixed with steam in the misting chamber. The
warm mist is then dispersed out of the top of the
misting chamber through the outlet grill and into
the room.
NOTE: A humidity level below 20% can be
unhealthy and uncomfortable. The recommended
humidity level is between 40%-50%.
PRE-OPERATING INSTRUCTIONS(SEE
FIGS.1 - 2)
1. Be sure the Humidifier is switched to OFF
and the unit is disconnected from the
electrical outlet.
2. Select a location for your Humidifier, on a flat
surface, about 10cm (4") away from the wall.
DO NOT place the Humidifier on a finished
floor on or near furniture which can be
damaged by moisture or water. Place on a
moisture-resistant surface.
Filling the Water Tank
NOTE: This humidifier holds about 4.2 litres of
water in the tank and humidifier base. The
humidifier will produce up to 11 litres of moisture
over a 24-hour period, depending on the room
humidity and temperature.
1. If not already removed, remove the Tank
from the base of the Humidifier and take it to
the cold water tap. Turn the Tank upside
down and twist off the Tank Cap by turning
counter clockwise. Fill Tank with cool, fresh
tap water. DO NOT fill with warm water as
this may cause leaking. Replace the Cap on
the Tank FIRMLY but do not overtighten.
2. When full, carry Tank to the Humidifier and
place onto the Base. The water will
immediately begin to flow into Base.
3. Please wait for five minutes for water
chamber to fill with water from water tank.
4. Plug the power cord into a convenient 220/
240V AC electrical outlet.
OPERATING INSTRUCTIONS (SEE
FIGS.1 - 2)
Your Humidifier is equipped with a
technologically advanced AccuSet™ Digital
Humidistat. You can set the Humidifier to run
continuously in manual mode or set the
AccuSet™ Digital Humidistat to your desired
humidity setting. The AccuSet™ Digital
Humidistat will automatically turn the humidifier
ON or OFF, depending on the preset comfort
level. The comfort level ranges from 35% to
65% relative humidity.
MANUAL MODE
NOTE: After starting the unit from cold, it will
take 5–10 minutes before any noticeable steam
is emitted from the Outlet Grill.
1. When plugged in, the Display will show the
current room humidity.
2. To start the unit, press the MODE/OFF
Button for the HIGH (HI) manual setting.
3. Press the Button again for the LOW (LO)
manual setting.
4. To stop the unit, keep pressing the Button
until the Display reads OFF (OF).
ACCUSET™ HUMIDISTAT MODE
To take advantage of the AccuSet™ Digital
Humidistat:
1. Press the MODE/OFF button until you reach
AU (Automatic) Accuset.
2. Adjust the set humidity by using the
Humidity Set Button. The Display will show a
setting in the range 35% – 65% and the
humidity can be increased/decreased in
increments of 5%. When the room humidity
level rises above the set humidity, the
Humidifier will stop. When the humidity level
drops below the set humidity, the Humidifier
will turn on automatically.
NOTE: The AccuSet™ Humidifier has memory.
This means that when you turn the unit back on
to AccuSet™ mode, it will remain at the setting
the Humidifier was previously set at, unless the
unit has been unplugged.
REFILL PROCEDURE
NOTE: When the Water Tank is empty and the
water in the Heating Chamber is almost empty,
the Red REFILL light will illuminate, the panel
will display "FILL" and the Automatic Shut Off
will activate.
The unit will not operate again until you refill the
Water Tank and reset the Humidifier as follows.
1. Remove and refill the Water Tank, being
sure to follow the Maintenance Instructions.
Replace the Tank onto the Base.
2. After 5 minutes, turn the unit on. The
REFILL light should now be off (if not repeat
steps 1 through to 2)). In about 5 minutes,
the Humidifier will begin to produce
moisture.
3. If you do not plan to use the Humidifier for
two or more days, make sure any residual
water is drained from the Water Tank and
Base to prevent algae or bacteria growth.
AUTO SAFETY SHUT OFF
This humidifier is equipped with a
technologically advanced, safety system that
requires the user to reset the humidifier if there
is a potential overheat situation. When a
potential overheat temperature is reached, the
system will automatically shut the humidifier off.
It can only resume operation when the user
resets the unit.
To reset the humidifier
1. Unplug unit, wait 15 minutes.
2. Press the reset button on the bottom of the
unit.
CLEANING AND MAINTENANCE
INSTRUCTION
The following maintenance procedures
must be routinely followed in order to
ensure proper, efficient operation of your
humidifier. The unit WILL FAIL if it is not
cleaned properly.
Regular cleaning prevents scale build-up on the
heating element and tray. It also prevents
microorganisms from growing on the tray and
tank. This ensures that maximum efficiency will
be achieved. We cannot over-emphasize how
essential proper cleaning is to the maintenance
and continued use of your unit and the
avoidance of algae or bacteria build-up.
Regular Maintenance
1. Be sure the unit is OFF and is disconnected
from the electrical outlet.
2. Remove the Water Tank.
3. Empty water and minerals from the Base.
4. Drain the water from the Tank into the sink
and rinse tank thoroughly. Leave to dry.
5. Wipe the Heating Element clean with a soft
cloth after it has had a chance to cool. The
Electronic Thermal Control Heating Element
is lined with a non stick coating that is
designed to provide the easiest cleaning and
prolong the operating efficiency of the
Humidifier. DO NOT use any metal or hard
objects to clean the Heating Element
6. Re-place the tank and lid onto the base.
7. Follow Operating Instructions.
NOTE: Never use detergents, gasoline,
kerosene, glass cleaner, furniture polish,
paint thinner or and other household solvent
to clean any part of the Humidifier.
De-scaling Maintenance
Scale needs to be removed as it becomes
noticeable. We recommend using Bionaire™.
Clean Away - Humidifier cleaning solution. Apply
Solution with a plastic brush to scale surfaces.
Let it soak until residue is softened. For cleaning
the tank, mix 2 capsules of solution with 2 litres
of water. Let mixture stand for several minutes,
swishing every few minutes. Drain solution and
THOROUGHLY RINSE the tank.
1. Repeat steps 1-3 in the Maintenance section.
2. Clean the water chamber in the base by
adding 200ml of undiluted white vinegar,
then use a soft cloth to clean this part. If the
element is heavily scaled, add the vinegar
as explained above and plug the humidifier
into an electrical socket and turn it ON for no
longer than 15 seconds. After this time turn
the humidifier OFF and unplug it from the
electrical outlet.
Disinfect tank:
1. Fill tank with 1 teaspoon of bleach and 3.5
litres of water.
2. Let the solution stand for 20 minutes, shaking
every few minutes. Wet all surfaces.
3. Empty the tank after 20 minutes, and rinse
well with water until the bleach smell is
gone. Leave to dry
4. Refill the water tank with cool water; replace
the water tank. Repeat Operating Instructions.
STORAGE INSTRUCTIONS
If your humidifier will not be in use for two days
or more, or at the end of the season follow
these instructions.
1. Clean, rinse and thoroughly dry the
humidifier as directed in the De-scaling
Maintenance section. DO NOT leave any
water inside the base.
2. Remove the tank cap. Do not store with the
tank cap in place.
3. Place the humidifier in the original carton
and store in a cool, dry place.
4. Clean the humidifier before the next season
begins.
SERVICE INSTRUCTIONS
1. Do NOT attempt to repair or adjust any
electrical or mechanical functions on this
unit. Doing so will void the warranty. The
insides of the unit contain no user
serviceable parts. Only qualified personnel
should perform all servicing.
2. If you need to exchange the unit, please
return it in its original carton, with a sales
receipt, to the store where you purchased it.
PLEASE READ AND SAVE THESE
IMPORTANT INSTRUCTIONS
When using electrical appliances, basic safety
precautions should always be followed to
reduce the risk of fire, electric shock, and injury
to persons, including the following:
1. Read all instructions before using the
appliance.
2. To avoid fire or shock hazard, plug the
appliance directly into an electrical outlet and
fully insert the plug.
3. Keep the cord out of heavy traffic areas. To
avoid fire hazard, NEVER put the cord under
rugs, or near radiator, stoves, or heaters.
4. DO NOT place humidifier near heat sources
such as stoves, radiators, and heaters. The
humidifier should be at least 10cm/4" away from
the wall for best results.
5. WARNING: This humidifier produces hot
steam and therefore should not be placed in
an area where it is accessible to children.
Never use a humidifier in a closed room.
(i.e.: doors and windows closed) as it may
result in dew locate your humidifier on an
inside wall near excessive humidity.
6. WARNING: Do not attempt to refill
humidifier without first unplugging the unit
from its electrical outlet. Failure to heed this
warning may cause personal injury. Be sure
to pull by the plug and not the cord.
7. NEVER drop or insert any object into any
openings. DO NOT place hands, face, or
body directly over or near Moisture Outlet
while unit is in operation. DO NOT cover
Moisture Outlet or place anything over it
while the unit is operating.
8. DO NOT operate any appliance with a
damaged cord or plug, after the appliance
malfunctions, or if it has been dropped or
damaged in any manner. Return appliance
to manufacturer for examination, electrical or
mechanical adjustment, or repair.
9. Use appliance only for intended household
use as described in this manual. Any other
use not recommended by the manufacturer
may cause fire, electric shock, or injury to
persons. The use of attachments not
recommended or sold by the manufacturer,
may cause hazards.
10. DO NOT use outdoors.
11. Always place humidifier on a firm, flat, level
surface. A waterproof mat or pad is
recommended for use under the humidifier.
NEVER place it on a surface that may
become damaged by exposure to water and
moisture (i.e. finished floor).
12. DO NOT allow the Moisture Outlet to directly
face the wall. Moisture could cause damage,
particularly to wallpaper.
13. Humidifier should be unplugged when not in
use.
14. NEVER tilt, move, or attempt to empty unit
while it is operating. Shut off and unplug
before removing the water tank and moving
the unit. DO NOT attempt to remove the
water tank within 15 minutes after the
humidifier is turned off and unplugged.
Serious injury may result because of the
high temperature of the water.
15. This humidifier requires daily and weekly
maintenance to operate appropriately. Refer
to daily and weekly cleaning procedures.
16. NEVER use detergents, petrol, glass
cleaner, furniture polish, paint thinner, or
other household solvents to clean any part
of the humidifier.
17. Excessive humidity in a room can cause
water condensation on windows and some
furniture. If this happens, turn the humidifier
OFF.