1
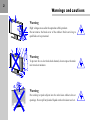
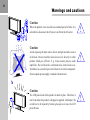
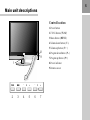
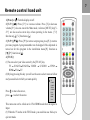
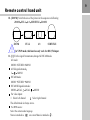
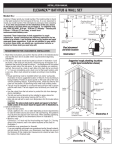
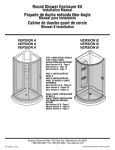
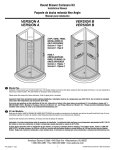
Contents
Introduction
.................................................................................................1
Warnings and cautions ..................................................................................2
Main unit descriptions ...................................................................................5
Remote control hand unit ..............................................................................7
The OSD menus .........................................................................................13
The DVB OSD menus ..................................................................................23
Television installation .................................................................................30
Battery installation & replacement for remote control unit ...............................31
Troubleshooting .........................................................................................32
Specifications
............................................................................................33
Attention: DVB function for LTV-3203HT model only.
1
Introduction
Thank you very much for your purchase of our Digital LCD TV . It serves as a Digital TV. To
enjoy your set to the full from the very beginning, read this manual carefully and keep it
handy for ready reference.
1. Installation
!
!
!
!
!
!
Locate the receiver in the room where direct light does not strike the screen.
Total darkness or a reflection on the picture screen can cause eyestrain.
Soft and indirect lighting is recommended for comfortable viewing.
Allow enough space between the receiver and the wall to permit ventilation.
Avoid excessively warm locations to prevent possible damage to the cabinet or
premature component failure.
This TV receiver can be connected to AC sources from 100-240 Volts,50/60 Hz. Never
connect to DC supply or any other power supply.
Do not install the receiver in a location near heat sources such as radiator, air ducts,
direct sunlight, or in a place some where like close compartment and close area.
Do not cover the ventilation openings when using the set.
2. Caution
Never tamper with any components inside your set, or any other adjustment controls not
mentioned in this manual.
The LCD panel is a very high technology product with over 900000 thin film transistors.
Occasionally, a few non-active pixels may appear on the screen as a fixed point of blue,
green or red. Please note that this does not affect the performance of your product.
2
Warnings and cautions
Warning
High voltages are used in the operation of this product.
Do not remove the back cover of the cabinet. Refer servicing to
qualified service personnel.
Warning
To prevent fire or electrical shock hazard, do not expose the main
unit to rain or moisture.
Warning
Do not drop or push objects into the television cabinet slots or
openings. Never spill any kind of liquid on the television receiver.
3
Warnings and cautions
Minimum distances
Caution
If the television is to be built into a compartment or
similarly enclosed, the minimum distances must be
maintained.
Heat build-up can reduce the service life of your
television, and can also be dangerous.
10cm
20cm
Caution
Never stand on, lean on, push suddenly the product or its stand.
You should pay special attention to children.
Caution
Do not place the main unit on an unstable cart stand, shelf or table.
Serious injury to an individual, and damage to the television, may
result if it should fall.
10cm
5cm
4
Warnings and cautions
Caution
When the product is not used for an extended period of time, it is
advisable to disconnect the AC power cord from the AC outlet.
Caution
Avoid exposing the main unit to direct sunlight and other source
of the heat. Do not stand the television receiver directly on other
product which give off heat. E. g. video cassette players, audio
amplifiers. Do not block the ventilation holes in the back cover.
Ventilation is essential to prevent failure of electrical component.
Do not squash power supply cord under the main unit.
Caution
The LCD panel used in this product is made of glass. Therefore, it
can break when the product is dropped or applied with impact. Be
careful not to be injured by broken glass pieces in case the LCD
panel breaks.
5
Main unit descriptions
Control location
1.Power button
2.TV/AV button (TV/AV)
3.Menu button (MENU)
4.Volume down button ( V -)
5.Volume up button ( V + )
8
9
1
6.Program down button ( P- )
7.Program up button ( P+ )
8.Power indicator
9.Remote sensor
TV/AV
MENU
-
2
3
4
V
+
-
5
6
P
+
7
6
Main unit descriptions
Caution
1.VIDEO,S-VIDEO share audio input R1,L1.
2.VIDEO,S-VIDEO can not be inserted together.
DVB-T
COMMON
INTERFACE
3.VGA, YPbPr share audio input R2,L2.
4.YPbPr can also accepts signal of YCbCr format.
5.DVB function for LTV-3203HT model only,
LTV-3203H is without DVB-T ANTENNA.
6.DVB-T Antenna can receive digital video
broadcast signal.
7.Do not switch the Main Switch to on until the light of
the Power Indicator disappears.
Mains switch AC cord socket
S-VIDEO
HDMI
VGA
Pr/Cr Pb/Cb
Y
L2
R2
L1
R1 VIDEO
EARPHONE
SERVICE
ANTENNA
SCART 1
SCART 2
DVB-T
ANTENNA
7
Remote control hand unit
1.[Power] or : Turn the display on/off.
2.[V-/V+],[ / ]: Press [V+] to increase volume. Press [V-]to decrease
volume.[V+] also can cancel the Mute mode, reference [MUTE] key.[V/V+] are also used as arrow keys when operating in the menu . [V+]
function as [ ] ,[V-] function as [ ].
3. [P-/P+],[ / ]: Press [P+] to turn to next program, press [P-] to turn to
previous program. A program number can be skipped if the skip mark is
turned on for this program in the installation menu.[P-] function as
[ ],[P+] function as [ ].
4.[TV/AV]:
(1)You can select your video source by the [TV/AV] key.
TV
SCART1 SCART2 VIDEO
S-VIDEO
YPbPr
HDMI VGA TV.
(2)By long pressing this key you will see the source select menu as follow
and you could select which you want quickly.
TV
Press
press
to move the cursor,
to select the source.
SCART1
SCART2
VIDEO
S-VIDEO
DVB
YPbPr
HDMI
VGA
This menu can not be called out in VGA HDMI mode when no signal is
Input.
(3) When the TV works in the TEXT mode ,you could also use this key to
quit text mode.
8
Remote control hand unit
Mute
1
04:20:10
User
Personal
INCR MONO
SLEEP 80
5.[MUTE]: Press this key, the sound is cut; Press key again or [ ]
key, mute is cancelled.
6.[CALL]: Display the following information:
(1) The current program number or signal source.
(2) The picture mode
(3) The sound effects mode
(4) The mode of sleep
(5) The stereo mode
7. [0]-[9]:Digit keys is used to directly call a TV channel by
program number. The valid number are from 0 to99. It can also
be used in time setup in feature menu and frequency input in
installation menu.
8. [-/--]:Numeric digits select.
1 digit mode
2 digit mode
Each time after selecting a program, it will not automatically
turn back to one digit mode until the TV restart.
In the state of two digits entering, the program will come back to
the present one, only when the second number is not entered
within 3 seconds after the first number's entering, or restart the
TV.
9. [QV]: Switch to the previous program number
Switch to the previous source
9
Remote control hand unit
10. [ZOOM]: Switch the size of the picture in the sequence as following
ZOOM FULL 4:3 SUBTITLE ZOOM
ZOOM
FULL
4:3
SUBTITLE
In YPbPr mode, this function only work for 480i ,576i input.
11. [|/||]:For the signal from antenna,change A2\NICAM mode
A2 mode:
MONO STEREO MONO
A2 bilingualism mode
I
MONO
NICAM mode:
MONO STEREO MONO
NICAM bilingualism mode:
MONO DUAL
DUAL
MONO
For video inputs:
I Select left channel
Select right channel
The default mode is always stereo.
For DVB source:
Select the current audio language.
Stereo is marked as
on screen.Mono is marked as
.
10
Remote control hand unit
04:28:18
12. |P| : By repeatedly pressing this key, picture effects will
change as follows:
USER STANDARD MOIVE VIVID USER
13.
|S| : By repeatedly pressing this key, sound effects will
change as follows:
PERSONAL VOICE MUSIC THEATER
14. [Time]: Call time out. This televison automatically obtain time
from transmitted teletext information in program 0. If teletext is not
available in this region, the time still can be set in RTC item in
feature menu. Otherwise only display the time accumulated from AC
power turned on.
Preset program
0
with a TV channel which contains
teletext if possible.
SLEEP 80
15. [SLEEP]:Control the auto time of turn off.
Press [SLEEP], then the auto turn-off time will change as following:
5 10 15 20 25 30 35 40 45 50 55 60 65 70
75 80 85 90 95 100 105 110 115 120 OFF among
which OFF means to cancel this function.
16. [TEXT]: Switch TV into text mode. Press again to quit from
text.
In DVB mode, press this key to call the MHEG menu out, or close
the MHEG menu.
11
Remote control hand unit
17 . [TV MENU]: Call the main menu out, or quit to previous menu.
18. [SUBTITLE]:This is a multiplexed key of subtitle and subcode. Directly press this key in
TV mode , the key functions is subtitle, which calls out the subtitle page.
If already entered text mode via [TEXT] key, this key functions is subcode . Subcode pages are
subsections of long teletext pages that can only be displayed on the screen one section at a time.
After pressing this key,4 digit keys of subpage number should be entered next. If subpage is not
displayed in a short time, you can press cancel key to back to the picture. System will
automatically display the subpage if it is found lately. Press this key again to back to normal text
mode.
In DVB mode, press this key to open or close the DVB subtitles.
Teletext keys:
19. [MIX]: The function of this key is to enter the mix display of TV picture and TELETEXT or
quit the mode. The mixed display means that the TELETEXT with a transparent background
cover over the TV picture.
20. [INDEX]: Display the index of the TELETEXT.
21. [SIZE]: Change the size of the character of the current title of text.
22. [HOLD]: Keep the current text display away from been refreshed, press it again to cancel the
protection.
23. [CANCEL]: When a page is selected in the mode of text, it may take some time before it
becomes available, pressing the [CANCEL] key will return to the TV mode. When the required
page is found ,the page number will appear at the top of the TV picture, press the [CANCEL] key
to return to the mode of text for you to see this page .
12
Remote control hand unit
24. [REVEAL]: Open or close some hidden information of the current text page.
25.[DVB MENU]: Press [DVB MENU] can select the DVB source. In the DVB source, press
[DVB MENU] to call the DVB main menu out or close the DVB menu.
In the DVB source , [-/--] is not available; [V-/V+] [P-/P+] are not available when operating
the DVB menu; Four color keys are not same functions when operating DVB menu; Some
keys are only available only in the DVB source, they are introduced in the below:
26.[ESC]:Quit to the previous DVB menu.
27.[PgUp]:If there're more than 10 programs in DVB source,press [PgUp] to turn to the next
10th program.
28.[PgDn]:If there're more than 10 programs in DVB source,press [PgUp] to turn to the
previous 10th program.
29.[SELECT]:To carry out the orders.
30.[i]:Use this key to display or conceal the information of the current program and help menu .
31.[GUIDE]:Open or close EPG menu.
13
The OSD menus
OSD main menu is called out by first time pressing menu key.
The main menu contains 3 parts: a icon column, a menu title
and a menu item box. At first time the menu is called out, the
upper icon pops out and the menu title indicates as picture menu. icon column
Using
[P+/P-] key browse through five menus:
!
!
!
!
!
menu title
Picture menu
Sound menu
Feature menu
Installation menu
Edit menu
Each menu can be entered by pressing
[V+/V-] key. After
that, the first menu item in the menu item box will be
highlighted, and then
can be used to choose from items.
Use
to change the menu item, or enter to a submenu if a menu
item is followed with
only.(back to previous menu by
pressing TV menu key)
menu item box
14
The OSD menus
A.In the state of that the input source is TV, VIDEO,
S-VIDEO YPbPr SCART DVB
1.The picture menu
a.The following picture is the sketch map of the picture menu.
b. The definition of each option:
1.Brightness: Change the value of brightness with the key
in the rang of 0 to 100.
2.Contrast: Change the value of contrast with the key
in
the rang of 0 to 100.
3.Color: Change the value of color with the key
in the rang
of 0 to 100.
4.Sharpness: Change the value of sharpness with the key
in
the rang of 0 to 100.
5.Tint: Change the value of Tint with the key
in the rang of
-50 to 50,usually 0 is recommended.
6.Set the function of Dynskin Tone on or off by using the key .
7.Set the color temp to cool, warm or normal by using the key .
8.Set the 3D Noise Reduction to low, mid or high by using the
key
.
9.Set the picture preset to user, vivid, movie or standard by
using the key
.
*TINT will only show when the color system is NTSC
15
The OSD menus
2. The sound menu
a. The following picture is the sketch map of the sound menu.
b. The definition of each option:
1.Volume: Change the value of volume with the key
in the
rang of 0 to 100.
2.Balance: Change the value of balance with the key
from
-50 to 50,usually 0 is recommended.
3.Bass: Change the value of bass with the key
in the rang of
0 to 100.
4.Treble: Change the value of treble with the key
in the rang
of 0 to 100.
5.Set the function of AVL on or off by using the key
.
Setting AVL to on will limit the abruptly sound increasing
usually caused by advertising time.
6.Set the function of Loudness on or off by using the key
.
Setting Loudness on can make bass a little bit enhanced when
the volume is small.
7.Set the sound preset to Music, Theatre, Personal or Voice.
8.Effect: Change the EFFECT in the sequence as
INCR STEREO NORMAL INCR STEREO
16
The OSD menus
9.The advance option including:
(1). DUB.DBE: Select a bass enhancement mode from DUB,
DBE or BBE and also could cancel the function of bass
enhancement.
* Some models do not have choice of BBE.
(2) HP volume: Change the value of head phone volume with
the key
in the rang of 0 to 100.
(3) HP balance: Change the value of head phone balance with
the key
in the rang of -50 to 50.
(4). EQUALIZER: enter equalizer submenu.
17
The OSD menus
3. The feature menu
a. The following picture is the sketch map of the feature menu.
b. The definition of each option:
1.Source OSD: Set the function of source OSD on or off. If set
to on, source is always indicated on the left top.
2.Language: Select the language of the OSD menu from
English French, German, Italian, Spanish and Russian.
3.Child lock: In order to avoid children to watch the program
which is not suitable,a children lock could be set. If a program
is locked, it will be skipped when use the key [P+/P-].when the
program is selected by the key [-/--] and number .the locked
information will be noted on the screen.
The lock will be unavailable until restart, if you successfully
set the password.
18
The OSD menus
4.Timer: Some options about auto shut down could be set in this
item. Including sleep timer on or off, shut down time, power on
time and the power on program. On/off timer could be set by
directly pressing digit keys or canceled by pressing -/--. While
RTC is set to mode AM/PM,
could be used to change on/off
timer between AM and PM. On/off timer only take effect when
the RTC is set to on in Real Time Clock submenu.
5.TXT Language: The Teletext language could be selected in
this item. You could select Pan European Cyrillic or Greek.
6.TXT E/W: In this item you could select EAST or WEST for
the TXT mode.
7.Real time clock: In this item you could set the time mode 24
hours or AM/PM and you also could cancel this function. If the
RTC is off, off time and switch time does not work. Time can be
edited by directly press digit keys, and
can transfer AM or
PM.
19
The OSD menus
8.PIC MISC:Advanced picture settings which respectively
improve picture quality. Settings in this menu may take
significant effects only for some particular picture. Sometimes
dis-professinal user can not find difference to toggle functions
on off.
To switch on LTI(luminance transient improvement) usually
makes picture a little bit sharper, while CTI(chrominance
transient improvement) clarify edge of coloured area.
In MACE1 submenu, while ICE enabled, some pure color can
be individually stressed without influence to other colors.
In MACE2 submenu, black level and white level can be
expanded to make picture dark and bright areas gradeful.
9.Blue Screen: Set the function of blue background on or off.
20
The OSD menus
4. The installation menu
a. The following picture is the sketch map of the installation
menu.
b. The definition of each option:
1.Program NR: switch the program by the sequence of program
number increase or Decrease by using the key
.
2.Color system: select the color system from Pal-443, SECAM,
UNKNOWN, AUTO and NTSC-443 by using the key
.
3.Sound System: select the sound system from AUTO, BG, I,
DK L and BG NICAM by using the key
.
4.Auto Store: auto search programs start with the key
, and
quit with the key menu or . SECAM/L signal will be searhed
only when Sound System is set to L .
5.Frequency: Show the frequency of the current program.
Frequency can be edited by directly press digit keys. This is the
convenient way to tune to a program ,if you know the exact
frequency, instead of auto searching.
6.AFC: select the function of Auto frequency control with the
key
.
21
The OSD menus
7.Skip: When it is ON, the current program would be skipped
while changing channel with [P+/P-] keys; but it still could be
achieved through digit keys. A skipped program number
displays in red. You can set those weak signals or certain
programs not likely to watch to skip on.
8.Lock: Only when the lock is on , the children lock is available.
5. The edit menu
a. The following picture is the sketch map of the edit menu.
b.The definition of each option:
1.Program A: Input one of the two programs number which you
want to edit.
2.Program B: Input another one of the two programs number
which you want to edit.
3.SWAP: the program number in the program A and program B
exchange the program they point to.
4.MOVE: the program, which have the number in the Program
A get a new number in the Program B.
22
The OSD menus
B.In the state of that the input source is VGA, HDMI
NO SYNC
1.Display NO SYNC in the middle screen without signal input.
The blue light glitters. [TV menu]and number key is
unavailable. Switch to other source by [TV/AV],[V-/V+],[QV].
System goes to standby after 15 minutes of no signal waiting.
2.Only PICTURE SOUND and FEATURE menu can work
when there's signal input. When using other signal the
PICTURE menu is different as below.
Description:
1.Brightness Adjust the brightness of pictures.
2.Contrast Adjust the contrast of pictures.
3.H-POS Adjust the Horizon position.
4.V-POS Adjust the Vertical position.
5.CLOCK Adjust the Sampling frequence.
6.PHASE Adjust the Sampling phase.
7.COLOR MODE Setting for color temperature as below:
Color Temp Transfer color temperature mode by
, and
it works in turn: USER
NORMAL WARM
COOL
sRGB
USER. User-R,User-G,User-B can only work under
the USER mode.
8.AUTO Press
to automatically adjust
H-POS,V-POS,CLOCK,PHASE.
23
The DVB OSD menus
DVB First Time Installation
A For the first time installation:
1.When entering DVBT source for the first time system will
run this installation guide. Firstly, system will guide users to
start automatic search.
Do you want to start automatic search?
Yes
No
Automatic search
Rowridge: BBC ONE
Rowridge: BBC TWO
Rowridge: BBC THREE
2.Choose [Yes] and press [OK] to enter the auto search page as
the following sketch map shows. After the auto search, the TV
goes to the first channel and play this program. All the
searched programs are listed in the gray window. The white
belt indicates the rate of progress.
Searching UHF Channel:35
Please wait. This will take a few minutes.
0%
menu
Canc el search.
100%
24
The DVB OSD menus
Main Menu
DVB OSD MENUS
Channel List
Favourites
Press [DVB MENU] to enter the main menu page as the
following sketch map shows:
Guides
Settings
Common Interface
Choose the Channel List menu and press [SELECT] to enter
the next level menu in which lists all the channels that have
been searched. The current program will be played in the right
window while the name of it is displayed below. Use [ ] to
select channel and [
] to switch among functional options,
together with [SELECT] to carry out the switch delete
rename of the channels, child lock function and the turning to
the Favourites menu and etc. Press [i] to see help information.
25
The DVB OSD menus
Select the Favourites menu in the main menu and press
[SELECT] to enter the menu page. Use [
] to select
channels, and [ ] to select List. Press [SELECT] to enter or
delete the selected channel into or out of the selected List. As
the following sketch map shows:
In the main menu, select Guides option and press [SELECT] to
enter the Guides menu page as the following sketch map
shows:
26
The DVB OSD menus
Now/Next EPG
Wednesday 30/10 14:13
Channels
Current Event
Next Even t
1.BBC ONE
2.BBC TWO
7. BBC THREE
30. CBBC
40.BBC NEWS 24
51.BBCi
Doctors
Tall in the Saddle
This is BBC CHOICE
Julia Jekyll And Harrie t H
BBC News
BBCi
Quincy
Westminster Live
Welcome to BBC CHOICE
Stitch Up
BBC news
BBCi
Navigate
Schedule
List Schedule EPG
SELECT
Watch
Event
Select Now/Next EPG option and press [SELECT] to enter the
next level submenu, as the following sketch map shows. The
following column presents the current selected program and
its time period type and related information; names of the
current and next programs of all channels are also given. User
can switch the channels through [ ] key, and use [
] key to
switch between the current and next program of the selected
channel. Use the yellow key or the blue key to enter the List
Schedule EPG menu page.
Wednesday 30/10 14:11
BBC TWO
Wednesday 30/10 14:00-16:00
1.BBC ONE
2.BBC TWO
7.BBC THREE
30.CBBC
40.BBC NEWS 24
51.BBCi
No information Available
Navigate
Change Time
In Guides menu select List Schedule EPG option and press
[SELECT] to enter the next level submenu as the following
sketch map shows. Use [
] and [
] to switch between each
other . Press [i] can see more event information of the
program.
Advance Day
Event
27
The DVB OSD menus
In Guides menu, select Timeline Schedule EPG option and
press [SELECT] to enter the next level submenu as the
following sketch map shows. Use [ ] and [
] to see the
program parade.
Timeline Schedule EPG
Wednesday 30/10
14:45
15:30
1. BBC ONE
2.Eins Extra
7. BBC THREE
30.CBBC
40. BBC NEWS 24
51.BBCi
Navigate
In main menu, select Settings option and press [SELECT] to
enter Settings menu page, as the following sketch map shows.
Wednesday 30/10 14:05
14:00
Zoom
Advance Day
Event
28
The DVB OSD menus
In Settings menu, select Configuration option and press
[SELECT] to enter configuration menu as the following
sketch map shows.
DST: Set DST(daylight saving time) on/off.
Subtitles: Open and close the subtitle.
Banner: set the banner display time except you press [i].
Favorite mode: close favorite mode or select the favorite list.
Channel list: select the program range.
Parental Settings: press [SELECT] enter the sub menu, set the
menu lock, and modify the parental setting password , the
original password is 0000.
In Settings menu, select Language option and press [SELECT]
to enter the language settings menu, as the following sketch
map shows.
System: select the OSD language.
Preferred: press [SELECT] enter the sub menu, select the
preferred audio language and the preferred subtitle language,
press [SELECT] to confirm.
Current: press [SELECT] to modify the current program
language.
29
The DVB OSD menus
In Settings menu, select Installation option and press
[SELECT] to enter the Installation menu, as the following
sketch map shows.
Automatic Search sub menu and First Time Installation sub
menu have been introduced above. In Installation menu, select
Manual Search option and press [SELECT] to enter the
Manual Search menu, as the following sketch map shows. Use
[0]-[9] to input the channel number and press [SELECT] to
confirm.
Manual Search
Channel Number: 21
Signal Quality: Very Good
Signal Level:
0
9
Select channel
SELECT
Search
MENU
Exit
The main menu last option Common Interface is used for system updating ,CA and so on.
Attentions:Don't switch between DVB source and other source frequently.
More
30
Television installation
Connect antenna or video facility
1.Use 75
coaxial cable plug or 300-75
impedance
converter to plug in antenna input terminal on the rear of the
cabinet.
2.Connect the video facility to the audio, video in jack on the
rear of the cabinet.
VHF antenna
UHF antenna
Input terminal of antenna
75 W Co-axis cable
Co-axis antenna plug
Mixer
Antenna in jack
75 W Co-axis cable
31
Battery installation & replacement for remote control unit
The remote control uses two 1.5V AA batteries. For battery
installation and replacement are as following:
1. Turn the remote control unit upside down. Press down the
grip of battery compartment and slide the color in the direction
of the arrow.
2. Install two new batteries, make sure that battery polarity
matches with the
marks inside the battery. Or
not it could damage the unit.
3. Close the battery compartment covers.
32
Troubleshooting
Before arranging for service, firstly know the status and then check simply as follows:
Problems
No picture or sound.
Picture is OK, no sound.
Check
Check if the power supply is plugged in and the power switch is on.
Check if the volume control is set to the minimum or mute.
Remote control does not work.
Check if the batteries are out of use or not connected well. Make sure that
there is no strong light strike the se nsor window of remote control uni t and
there are no obstacles between the sensor window and remote control unit.
No TV signal.
Check if the TV is not set to TV status and the antenna is well connected.
No external video signal.
Check if you installed the TV correctly and the TV is set to AV position.
Picture lacks color or picture too
Check color, br ightness and contra st controls are correctly adjusted.
dark.
All channels lose col or intermittently. Check if the antenna is broken, disconnected or damaged.
Picture has snow .
Poor reception, loss of color with Check if channels are correctly tuned (see
Fine tuning ).
certain channels.
Diagonal stripes appear on picture.
The receiver may be affected by interf erence (e.g. from nearby ra dio
broadcasting transmitter or from another TV receiver).
Ghost images appear.
Check if the antenna direction has been changed by a storm or strong wind,
etc.
33
Specifications
34
Specifications
Note: All specifications are subject to change without notice. Different country marketed item,
it is the few function with use manual content maybe is differential. All quality and size are
approximate value.