1
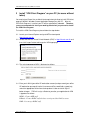
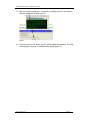
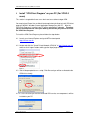
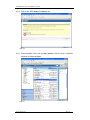
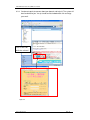
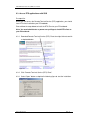
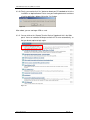
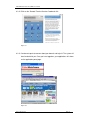
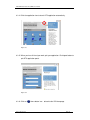
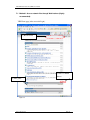
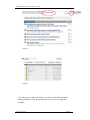
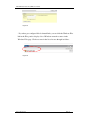
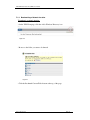
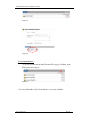
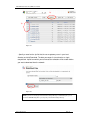
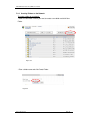
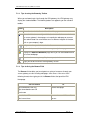
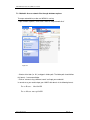
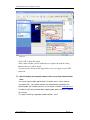
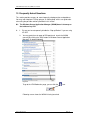
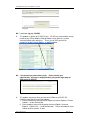
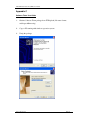
Issue
Revision
Date
3
4
19-Apr-2011
Prepared by
Issued by
ITSD/ITS
ITSD/ITS
Virtual Private Network (VPN) User Guide
Table of Content
Content
Page
1
Introduction
2
2
Prerequisite
2
3
Install “VPN Client Program” on your PC (for users without token)
4
4
Install “VPN Client Program” on your PC (For VPN 2.0 users)
7
5
Access Network Resources via VPN.
10
6
Browsing Single Sign On -Enabled Applications
11
7
Access network files via VPN.
23
8
Tips for access applications via RTS client
45
9
Sign out VPN Connection
45
10
Frequently Asked Questions
47
11
Getting Help
56
Appendix A
57
Appendix B
60
Appendix C
63
Issue: 3 Revision: 4
Page 1
Virtual Private Network (VPN) User Guide
1
Introduction
Virtual Private Network (VPN) lets remote users establish a secure tunnel (using SSL
technology) between remote user’s PC and MTR Corporation network over un-trust
Internet as if the user was accessing network resources within corporate private
network. All network traffics flowing via this secure tunnel are encrypted and
protected.
Before you can use this service, you need to follow Section 3 (for users without token)
or Section 4 (for users with token) of this user guide to setup your PC. Token is a
hardware device assigned to you, and it can generate a one-time passcode for you to
logon VPN.
2
Prerequisite
Before you use this service, following prerequisites must be met:
-
Your PC must running OS either Windows 2000 Professional (SP4) , Windows
2003, Windows XP SP2, Windows Vista or Windows 7. Both 32-bit and 64-bit
windows version is supported.
If you are using Windows XP SP2, please ensure your XP has KB884020 applied.
You can download KB884020 hotfix from “Virtual Private Network Hotfix for
Windows XP SP2 (KB884020)” of http://info.mtr.com.hk
(http://info.mtr.com.hk/download/VPN/WindowsXP-KB884020-x86-enu.exe)
-
Internet Explorer version 6.0 or above with 128-bit Cipher Strength, and ensure
the Internet Explorer is configured to accept singed ActiveX (Tools -> Internet
Option -> Security -> Custom Level -> Download signed ActiveX controls).
-
Apply to ITSD for VPN service beforehand.
use VPN.
-
Broadband connection to Internet.
-
You need Power User or Administrator privilege of your PC to install VPN client
program.
-
If you are using Windows Vista , Windows 7 or IE 7 or above, please ensure the
check-box of “Enable Protected Mode of Trusted Sites” of Internet Explorer is
cleared (unchecked) and add following URLs to the Trusted Sites of your Internet
Explorer. To add following URLs to Trusted Sites, you have to open Internet
Explorer -> go to “Tools” menu -> select “Internet Options” -> go to “Security” tab
-> click “Trusted Sites” and then add following URLs one-by-one.
Only registered users are allowed to
https://ive.mtr.com.hk
https://info.mtr.com.hk
http://portal.mtr.com.hk
http://login.mtr.com.hk
http://*.corp.mtrc.com
Issue: 3 Revision: 4
Page 2
Virtual Private Network (VPN) User Guide
https://*.corp.mtrc.com
http://*.mtrc.com
https://*.mtrc.com
http://*.corp.kcrc.com
https://*.corp.kcrc.com
http://*.kcrc.com
https://*.kcrc.com
For VPN2.0 Users, your PC must satisfy the following security requirements before
allowing access to VPN service.
-
1. Specified antivirus software is operating with updated virus signature pattern
(not older than 10 update version). Please refer to Appendix A
-
2. The firewall software is operating, please refer to Appendix B
-
3. The remote PC has any one of the following Operating System service packs:
Windows XP SP2 or above
Windows 2000 SP4 or above
Windows 2003 SP1 or above
Windows Vista or above
Windows 7 or above
-
4. The remote PC has the following security patch installed:
KB958644
-
5. The remote PC does not have the following peer-to-peer sharing programs
running:
Foxy
eDonkey2000
Emule
Blubster
LimeWire
BearShare
Kazaa
Issue: 3 Revision: 4
Page 3
Virtual Private Network (VPN) User Guide
3
Install “VPN Client Program” on your PC (for users without
token)
You require local Power User or Administrator equivalent privilege to install VPN client
program (WSAM - Windows Secure Application Manager) on your PC. After the
VPN Client Program is installed, your PC will be automatically rebooted. Therefore,
you are recommended to close your working files before you proceed to install
the VPN Client Program.
To install the VPN Client Program, please follow the steps below.
3.1 Launch your Internet Explorer and go to MTR extranet portal
http://info.mtr.com.hk
3.2 Locate and click the “Virtual Private Network (VPN)” in http://info.mtr.com.hk and
then click “Logon” button to bring up the VPN logon page.
Figure 1
3.3 The main logon page of VPN is displayed as follows.
Figure 2
3.4 Enter your LAN id (your office XP workstation account) and password (your office
XP workstation password) into the Username and Password fields respectively,
select the appropriate Realm from the drop down list box and click “Sign In”
button to logon. ITSD will assign a Realm to you after your application for VPN
is approved as follows:
MTRC – Former MTR staff
DKAuth – Former KCRC staff who have not migrated their LAN accounts
PMK – Post merger KCRC staff
Issue: 3 Revision: 4
Page 4
Virtual Private Network (VPN) User Guide
Figure 3
3.5 During your first logon to VPN, a setup screen appears and starts to download
VPN client program to your PC automatically as depicted below.
Figure 4
3.6 After a while, the VPN client program (Windows Secure Application Manager)
installation screen appears as depicted below.
Figure 5
Issue: 3 Revision: 4
Page 5
Virtual Private Network (VPN) User Guide
3.7 After the VPN client program is successfully installed on your PC, you need to
click the “OK” button to reboot your PC.
Figure 6
3.8 Once you click the “OK” button, your PC will be rebooted immediately. The VPN
client program installation is completed after rebooting your PC.
Issue: 3 Revision: 4
Page 6
Virtual Private Network (VPN) User Guide
4
Install “VPN Client Program” on your PC (For VPN 2.0
users)
This section is targeted for those users who have to use token to logon VPN.
You require local Power User or Administrator equivalent privilege to install VPN client
program (WSAM - Windows Secure Application Manager) on your PC. After the
VPN Client Program is installed, your PC will be automatically rebooted. Therefore,
you are recommended to close your working files before you proceed to install
the VPN Client Program.
To install the VPN Client Program, please follow the steps below.
4.1 Launch your Internet Explorer and go to MTR extranet portal
http://info.mtr.com.hk
4.2 Locate and click the “Virtual Private Network (VPN)2.0” in http://info.mtr.com.hk
and then click “Logon” button to bring up the logon page of VPN.
Figure 7
4.3 You will be prompted to run a script. Click Run and you will be re-directed to the
VPN2.0 site shortly.
4.4 If it is the first time you use the enhanced VPN service, new component s will be
installed to your PC.
Issue: 3 Revision: 4
Page 7
Virtual Private Network (VPN) User Guide
4.5 Your PC will be scanned for the security posture. If your PC failed the security
test, you will be redirected to a remediation page where you can find specific
information on how to remediate your PC. For details of the specific security
requirements, please refer to appendix A. Please contact IT Help Desk for
assistance on how to make your PC compliant with the security requirements.
4.6 If the PC complies with security requirements, you will be re-directed to the VPN
login page.
Figure 8
4.7 Enter your LAN id (your office desktop Windows XP workstation account) and
password (your office desktop Windoows XP workstation password) into the
Username and Password fields respectively, press the token to generate a
passcode and then enter the passcode into the “SafeWord PassCode” field.
Select OTP_M if your LAN ID belongs to the MTRCORP domain and OTP_K if
your LAN ID belongs to the DKCRC domain. Then click the “Sign In” button to
logon the VPN.
Token Passcode
Press this button to obtain the Passcode
Some users may be distributed with a software token instead of a physical hardware
token. For the use of software OTP token, please refer to Appendix C.
Issue: 3 Revision: 4
Page 8
Virtual Private Network (VPN) User Guide
4.8 During your first logon to VPN, a setup screen appears and starts to download
VPN client program to your PC automatically as depicted below.
Figure 9
4.9 After a while, the VPN client program (Windows Secure Application Manager)
installation screen appears as depicted below.
Figure 10
4.10 After the VPN client program is successfully installed on your PC, you need to
click the “OK” button to reboot your PC.
Figure 11
4.11 Once you click the “OK” button, your PC will be rebooted immediately.
The
VPN client program installation is completed after rebooting your PC.
Issue: 3 Revision: 4
Page 9
Virtual Private Network (VPN) User Guide
5
Access Network Resources via VPN.
This section guides you to access MTR Corporation network resources via VPN.
Before proceed, you are presumed to have completed Section 3 or 4 above,
otherwise, please go back and complete them.
To access network resources via VPN, please follow.
5.1 Follow steps 3.1 – 3.8 to logon VPN for users without token, or follow steps 4.1 –
4.8 for token user.
5.2 Following “Bookmarks” page is displayed after logon to VPN.
Figure 12
5.3 The content of Bookmarks page displayed varies from user to user and depends
on the access right you have.
5.4 Meanwhile, you should be able to locate a “Windows Secure Application
Manager” (WSAM) icon at the right bottom corner of the taskbar of your PC as
depicted below.
Figure 13
Issue: 3 Revision: 4
Page 10
Virtual Private Network (VPN) User Guide
6
Browsing Single Sign On -Enabled Applications
A Single Sign On (SSO) bookmark is a link that opens a Web application and
automatically passes it your credentials (username and password) and any other
required data so that you do not have to sign in to the application manually. The
following Single Sign On links are added to your VPN home page:
1.Enterprise Information Portal (EIP)
You can browse EIP portal and enjoy SSO with most of the internal links including
knowledge mall, e-forms and information system.
2.MTR Webmail
You can access your Webmail with single-click without re-login.
3.Remote Terminal Services (RTS) Portal
You can access your RTS applications with single-click without re-login.
(This link may be available for Non-RTS users)
2)
1)
3)
Figure 14
Note: The order of bookmark links may differ from each other.
Issue: 3 Revision: 4
Page 11
Virtual Private Network (VPN) User Guide
6.1 Browsing Enterprise Information Portal with SSO
6.1.1
You can click on the “Enterprise Information Portal (EIP)” bookmark link in the
Web panel. Your user credential will be passed to the web server
automatically, so that you do not require to login again.
Figure 15
6.1.2
Click on the “Enterprise Information Portal (EIP)” bookmark link to start.
Figure 16
Issue: 3 Revision: 4
Page 12
Virtual Private Network (VPN) User Guide
6.1.3
If you need to access IS applications, you can browse through EIP and locate
the “Information System” tab. You can click on the IS application links with
SSO. (remark: Some applications may be compatible with SSO or work over
VPN connection)
Figure 17
6.1.4
You can browse through EIP and access knowledge mall or Information
system with SSO.
Figure 18
Issue: 3 Revision: 4
Page 13
Virtual Private Network (VPN) User Guide
6.2 Browsing MTR Webmail with SSO
6.2.1
You can click on the “MTR Webmail” bookmark link in the Web panel. Your
user credential will be passed to the Outlook Web Access server automatically,
so that you do not require to login again.
Figure 19
Issue: 3 Revision: 4
Page 14
Virtual Private Network (VPN) User Guide
6.2.2
Click on the “MTR Webmail” bookmark link
Figure 20
6.2.3
Check the option “Don’t warn me about problems with this server’s certificate”
and click the Continue Button.
Figure 21
Issue: 3 Revision: 4
Page 15
Virtual Private Network (VPN) User Guide
6.2.4
You do not require to concern about your domain and login id. The system will
do all on behalf of you. You just need to click the bookmarks link and enjoy
your email.
Click on the URL
inside the webmail
Figure 22
Issue: 3 Revision: 4
Page 16
Virtual Private Network (VPN) User Guide
6.2.5
Since the SSO ability is inheritable, your credential will also carry forward to
new URL which opened from the webmail content.
Issue: 3 Revision: 4
Page 17
Virtual Private Network (VPN) User Guide
6.3 Access RTS applications with SSO
Pre-requisite:
Before you can access the Remote Terminal Service (RTS) application, you should
have RTS client installed on your PC/notebook.
Please follow the steps below to install the RTS Client on your PC/notebook.
Note: You need administrator or power user privilege to install RTS client on
your PC/notebook.
6.3.1
Download Remote Terminal Service (RTS) Client from http://info.mtr.com.hk
as depicted below.
Figure 23
6.3.2
Click “Remote Terminal Service (RTS) Client”.
6.3.3
Select “Open” button as depicted in following figure to start the installation.
Figure 24
Issue: 3 Revision: 4
Page 18
Virtual Private Network (VPN) User Guide
6.3.4
After you click the “Open” button, following screen appears.
Figure 25
6.3.5
After a while, following screen appears and asks for your confirmation before
proceed to install the RTS client.
Figure 26
6.3.6
Click “Yes” button to install RTS client.
6.3.7
Click “Yes” button to accept the license agreement as depicted below.
Figure 27
6.3.8
The RTS client installation starts.
6.3.9
After a while, you will be prompted to restart your browser (e.g. Internet
Explorer) as depicted in following figure.
Figure 28
Now click “OK” button to proceed.
Issue: 3 Revision: 4
Page 19
Virtual Private Network (VPN) User Guide
6.3.10 Finally, you need to click “Yes” button to reboot your PC/notebook to finish the
installation as depicted below. Please save your working documents and close
all active applications before clicking the “Yes” button.
Figure 29
After reboot, you can now logon VPN as usual.
6.3.11 You can click on the “Remote Terminal Services” bookmark link in the Web
panel. Your user credential will be passed to the RTS server automatically, so
that you do not require to login again.
Figure 30
Issue: 3 Revision: 4
Page 20
Virtual Private Network (VPN) User Guide
6.3.12 Click on the “Remote Terminal Services” bookmark link
Figure 31
6.3.13 You do not require to concern about your domain and login id. The system will
do all on behalf of you. Once you have logged on, your applications will shown
on the application portal page.
Figure 32
Issue: 3 Revision: 4
Page 21
Virtual Private Network (VPN) User Guide
6.3.14 Click the application icon to launch RTS application automatically.
Figure 33
6.3.15 When you have finished your work, quit your application. Click logout button to
quit RTS application portal.
Figure 34
6.3.16 Click on “
Issue: 3 Revision: 4
” Home button icon
to back to the VPN homepage.
Page 22
Virtual Private Network (VPN) User Guide
7
Access network files via VPN.
There are two recommended methods to access network files via VPN connection.
Method 1: Access network files through Web interface (Highly recommended)
-VPN Users are allowed to access network files through Web Brower. It is a simple
and easy way to access internal file resources. With single sign on solution
provided by VPN homepage, users are not required to re-authenticate again to
access their files. Also users can bookmark their own network folder in the VPN
Home page.
WSAM(Windows secure applications manager) is not required to run, hence this
method is work for non-windows machine like. MAC and Linux platform.
Method 2: Access network files through windows explorer
-VPN users can map their own network drive in windows explorer once they have
connected VPN and launched WSAM (Windows secure applications manager)
applications.
Issue: 3 Revision: 4
Page 23
Virtual Private Network (VPN) User Guide
7.1 Method 1: Access network files through Web interface (Highly
recommended)
VPN Home page (after successful login):
1) Brower Field
3) Files bookmark
button
2) Files panel
Figure 35
Issue: 3 Revision: 4
Page 24
Virtual Private Network (VPN) User Guide
7.1.1
Browsing and Working with Network Files
The Files panel on the VPN home page provides a centralized location for links to
files that reside on an internal corporate network. You can create your own links in
the Files panel.
Here is a summary of the icons in the Files panel:
Icon
7.1.2
Name
Description
Panel Preferences
Opens the Panel Preferences page where you can manage
bookmarks for the panel.
Add a Windows
Directory
Adds a bookmark for a Windows directory to the Files
panel
Collapse Panel
Collapses a panel and hides the bookmarks
Expand Panel
Expands a panel and shows the bookmarks
Windows Folder
Indicates a bookmark to a Windows folder
Item Properties
Opens the Edit Bookmark page where you can change
the properties of the bookmark
Browsing Windows Network Files:
In the Browse field at the top of the VPN Homepage, enter the path (\\server\share)
to the folder you want to access and then click Browse.
For example: if you want to access network path: \\hqsfile01\install, Type in the
path in the browse field and check browse button. Your user credential will be
passed to the network folder automatically, so that you do not require to login
again.
Issue: 3 Revision: 4
Page 25
Virtual Private Network (VPN) User Guide
1)
2)
Figure 36
Figure 37
- If you have access right to the folder, you can browse the files through the
webpage. Otherwise, login prompt will be shown to ask you to input new
credential.
Issue: 3 Revision: 4
Page 26
Virtual Private Network (VPN) User Guide
Figure 38
- If you have pre-configured files bookmark links, you can click the Windows Files
link in the Files panel to display a list of Windows network resources in the
Windows Files page. Click a resource in the list to browse through its folders.
Figure 39
Issue: 3 Revision: 4
Page 27
Virtual Private Network (VPN) User Guide
7.1.3
Bookmarking a Network Location
To bookmark a network location:
- On the VPN Homepage, click the Add a Windows Directory icon
Figure 40
- Browse to the folder you want to bookmark.
Figure 41
- Click the Bookmark Current Folder button at the top of the page.
Issue: 3 Revision: 4
Page 28
Virtual Private Network (VPN) User Guide
Figure 42
- Enter a bookmark name and description (optional).
Figure 43
- Click Add Bookmark to add the bookmark to the Files panel.
Figure 44
To edit a user bookmark:
- Click the Item Properties icon next to the bookmark you want to modify, make
changes, and then click Save Changes.
Issue: 3 Revision: 4
Page 29
Virtual Private Network (VPN) User Guide
Figure 45
Figure 46
To manage bookmarks:
- You can sort information in the Windows Files page by clicking on the
Panel preferences button.
Figure 47
- You can click the Move Up / Down button to sort your bookmarks.
Issue: 3 Revision: 4
Page 30
Virtual Private Network (VPN) User Guide
Figure 48
Issue: 3 Revision: 4
Page 31
Virtual Private Network (VPN) User Guide
7.1.4
Uploading Files and/or Folders to the Network
To upload files and/or folders to a network:
- Browse to the network directory where you want to save the files and/or folders.
Click Upload File to access the upload page.
Figure 49
- On the upload page, click Browse to locate and select the files you want to save
on the network:
o
You can specify up to five individual files using the fields available
and specify names for them on the network by entering their names
in the respective Save As fields.
Issue: 3 Revision: 4
Page 32
Virtual Private Network (VPN) User Guide
Up to 5 files
can be selected
Figure 50
NOTE: You cannot upload folders without first creating a .zip file in a local directory containing
the folder(s) you want to upload. After creating the .zip file, you can upload the zipped file
containing the folder(s).
o
If you want to upload more than five files and/or folders, you can
create a .zip file in a local directory, browse to it, and upload it to the
network. You can even have the contents of the .zip file you create
automatically decompressed during the upload process by turning
on the Uncompress .zip option when you browse to the .zip file.
Issue: 3 Revision: 4
Page 33
Virtual Private Network (VPN) User Guide
Figure 51
Step1: select multiple files which you want to upload, compress the files
with .zip extension in your local computer.
Issue: 3 Revision: 4
Page 34
Virtual Private Network (VPN) User Guide
Figure 52
Step2: upload the .zip file in the Upload pages and remember to select
“uncompress .zip” checkbox.
Figure 53
Issue: 3 Revision: 4
Page 35
Virtual Private Network (VPN) User Guide
Figure 54
Step3: after upload, your .zip file will automatic decompress in the
remote network folder.
NOTE: You can only upload a maximum of 500 MB of data at a time.
- Click Upload. The files you selected are uploaded and saved using the names you
specified on the Save As fields or the names displayed in your local directory.
NOTE: If a file or folder with the same name already exists in the directory and you do not specify a name,
the uploaded file is saved with the name: filename.timestamp.ext. To overwrite an existing file or folder, you
must enter the name in the Save As field. For example, to overwrite a file named hello.txt, you must enter
hello.txt in the Save As field.
- After the files are uploaded, click Close in the Upload Status window.
Issue: 3 Revision: 4
Page 36
Virtual Private Network (VPN) User Guide
Figure 55
Issue: 3 Revision: 4
Page 37
Virtual Private Network (VPN) User Guide
7.1.5
Downloading Files and/or Folders from the Network
To download a single file from the network:
- Browse to and click the name of the file you want to download.
1)
2)
Figure 56
- In the Save As dialog box, browse to the directory on your computer where you
want to save the file, enter a name in the File name field, and click Save.
To download multiple files and/or folders from the network:
- Browse to and select the files and/or folders you want to download by
clicking on their respective checkboxes and click Download.
Issue: 3 Revision: 4
Page 38
Virtual Private Network (VPN) User Guide
2)
1)
Figure 57
- Specify a name for the .zip file that the secure gateway saves in your local
directory and click Download. The data you request is transferred as a single
compressed .zip file from which you can extract the collection of files and/or folders
you want to download from the network.
Figure 58
NOTE: If you have not already specified a default local target directory for downloading files, you are
presented a Save As dialog where you can specify a local download target directory.
Issue: 3 Revision: 4
Page 39
Virtual Private Network (VPN) User Guide
7.1.6
Creating Folders on the Network
To create a folder on a network:
- Browse to the folder in which you want to create a new folder and click New
Folder.
Figure 59
- Enter a folder name and click Create Folder.
Figure 60
Issue: 3 Revision: 4
Page 40
Virtual Private Network (VPN) User Guide
7.1.7
Deleting Files and Folders from the Network
To delete a file or folder from a network:
- Browse to the file or folder you want to delete and select the check box next to it.
2)
1)
Figure 61
- Click Delete Selected. After you confirm file deletion, the selected files and
folders are permanently deleted from the network server.
Figure 62
Issue: 3 Revision: 4
Page 41
Virtual Private Network (VPN) User Guide
7.1.8
Tips for using the Browsing Toolbar
When you are browsing to sites through the VPN gateway, the VPN gateway may
display the standard toolbar. The following buttons are appearing on the standard
toolbar:
Button
Description
Moves the standard toolbar to either side of the page
Your administrator can configure this button to return the browser window to
the secure gateway’s home page, or to a particular web page or resource.
Your administrator can also choose to use a different image for this button,
such as your company’s logo.
Collapses and expands the standard toolbar
Returns the browser window to the secure gateway’s home page
Displays the Add Web Bookmark page where you can add a bookmark for
the current web page
Launches the secure gateway Help in a separate window
Signs you out of the current secure gateway session
7.1.9
Tips for Using the Browse Field
The Browse field enables you to navigate to a variety of resources through your
secure gateway session including web pages & file servers. You can use the
following formats when typing text in the Browse field at the top of the VPN
Homepage.
Use this format
http://www.domain.com OR
To
Browse web pages
https://www.domain.com OR
domain.com
\\server\share OR
Access shares on Windows file
smb://server/share
servers
Issue: 3 Revision: 4
Page 42
Virtual Private Network (VPN) User Guide
7.2 Method 2: Access network files through windows explorer.
To map a network drive, make sure WSAM is running.
- Open windows explorer, select “tools” and then “Map network drive”
1)
Figure 63
- Select a drive letter (i.e. W: ) and type-in folder path. The folder path should follow
this format : \\servername\folder
- Click on “connect using a different name” and input your credential.
In normal case, you need to input your LAN ID with domain in the following format:
For ex-K users:
dkcrc\LANID
For ex-M users: mtrcorp\LANID
Issue: 3 Revision: 4
Page 43
Virtual Private Network (VPN) User Guide
2)
3)
4)
Figure 64
- Click “OK” to finish the setting.
- Please make sure that you have sufficient access right to the network folders,
otherwise the access will be denied.
- You may need to disconnect the mapped drive once you logged-out your VPN
connection.
7.3 Special handling for corporate network share using virtual network folder
name
-
You cannot map the folder path directly if the folder name is virtual. (format:
\\mtrcorp\rfs\XX ). You need to map the real network folder according to the
following table. (for example, please use \\server\path instead of \\mtrcorp\rfs\v1\)
-
To obtain the full virtual network folder mapping table, please contact IT helpdesk
for assistant.
-
This special handling is applicable to both method 1 and 2.
Issue: 3 Revision: 4
Page 44
Virtual Private Network (VPN) User Guide
8
Tips for access applications via RTS client
Previously, You may need to install Remote Terminal Service (RTS) client and access
the RTS application weblink in the VPN bookmark page in order to access Corporate
Budgeting System (CBS), Room Booking System and Metro Recreation Club (MRC).
Due to the application redevelopment, you can access such applications via EIP portal.
Please follow the procedures stated in section 6 to access such IS applications.
9
Sign out VPN Connection
There are two ways to sign out from VPN.
9.1 Click the icon (
depicted below.
To sign out from VPN, please follow.
) shown on your screen anytime to sign out VPN connection as
Figure 65
Or you can click the “Sign Out” button of the Bookmarks page of VPN portal as
depicted below.
Figure 66
Issue: 3 Revision: 4
Page 45
Virtual Private Network (VPN) User Guide
9.2 Wait a while for VPN to logout. When you see the following screen, you can
then close the Internet Explorer.
Figure 67
Issue: 3 Revision: 4
Page 46
Virtual Private Network (VPN) User Guide
10 Frequently Asked Questions
This section provides answers to some frequently asked questions and problems.
You may seek help from ITSD by going to “9. Getting Help” of this user guide after
exhausting the possible solutions provided in this section.
Q1: The Windows Secure Application Manager (WSAM) doesn’t show up on
the taskbar of my PC?
A:
1.
Ensure you have temporarily disable the “Pop-up Blocker” if you are using
XP SP2.
2.
You may go to the main page of VPN portal and launch the WSAM
manually by clicking the “Start” button of “Windows Secure Application
Manager” as depicted below.
Figure 68
To go to the VPN Bookmarks page, you can click the
icon.
Following screen shows the WSAM is being launched.
Issue: 3 Revision: 4
Page 47
Virtual Private Network (VPN) User Guide
Figure 69
Q2: I can’t run .jsp (e.g. CN/CGI).
A:
This problem is specific to XP SP2 PC only. XP SP2 has enhanced the security
control of your PC by adopting “Pop-up Blocker” which prevents .jsp from
executing without your awareness. To run .jsp via VPN, you have to
temporarily disable “Pop-up Blocker” as depicted below.
Figure 70
Q3: “You do not have permission to login. Please contact your
administrator.” message is displayed when going to the logon page of
VPN from a XP SP2 PC.
Figure 71
A:
This problem may occur when you connect to VPN from a XP SP2 PC.
Following steps help to resolve the problem:
1. Clear the cookies by going to Internet Options of Internet Explorer-> Delete
Cookies… (under General tab).
2. Clear temporary internet files by going to Internet Options of Internet
Explorer -> Delete Files… (under General tab). Please remember to select
“Delete all offline content” as well.
Issue: 3 Revision: 4
Page 48
Virtual Private Network (VPN) User Guide
3. Go to Internet Options of Internet Explorer -> Security tab.
4. Click “Trusted Sites” as depicted below.
Figure 72
5. Click “Sites…” and then enter https://ive.mtr.com.hk into the “Add this Web
site to the zone:”
Figure 73
6. Click “Add” to add this site.
7. Click “OK” button to save and exit.
8. Restart Internet Explorer and re-logon VPN.
Issue: 3 Revision: 4
Page 49
Virtual Private Network (VPN) User Guide
Q4: How can I change the VPN logon password?
A:
To change the password, please follow the steps below.
1. Logon VPN as usual.
2. Click the “Preferences” as depicted below.
Figure 74
3. Click the “General” tab as depicted below.
Figure 75
4. Enter your current password into the “Old Password” field, and then enter
the new password into the “New Password” and “Confirm Password:” fields.
5. Click “Change Password” button to change the password.
6. If the change is successful, a successful message will be returned and
displayed.
Q5: How to distinguish alphabets from numbers such as O and 0, I and 1, etc
displayed on token?
A
Apart from numbers 0 to 9, only alphabets “A”, “C”, “E”, “F”, “H” and “P” are used.
So, it is very rare for you to mix up alphabets and numbers displayed on the
SafeWord token.
Issue: 3 Revision: 4
Page 50
Virtual Private Network (VPN) User Guide
Q6: Abnormal EIP logon page is displayed as follows and I cannot logon EIP
ever after entering correct credentials.
Figure 76
A:
It may be caused by disabling the “Enable Integrated Windows Authentication”
option of IE. To enable the option, please follow the steps below.
1.
2.
3.
Launch IE.
Go to Tools -> Internet Options -> Advanced tab.
Scroll down the list and find the “Enable Integrated Windows
Authentication (requires restart)” check-box as depicted below and select
it.
Figure 77
4.
5.
Restart your IE.
Logon VPN as usual and retry EIP again.
Q7: I was prompted with an authentication box as depicted below to
authenticate against “Connect to login.mtr.com.hk” when opening either
“Enterprise Information Portal – Text Mode” or “Enterprise Information
Portal – Full Graphical Mode”.
Issue: 3 Revision: 4
Page 51
Virtual Private Network (VPN) User Guide
Figure 78
A:
To solve the problem, you have to follow steps below to enable “Automatic logon
with current username and password” of your IE.
1. Launch IE.
2. Go to Tools -> Internet Options -> Security tab -> Internet as depicted below.
Figure 79
3. Click “Custom Level”.
4. Scroll down the list box and then select “Automatic logon with current
username and password” as depicted below.
Figure 80
5. Click “OK” button to save and close it.
6. Close your IE and retry.
Q8: I was prompted with error “The Web site cannot be found” when
connecting to Enterprise Information Portal (EIP) as depicted below.
Issue: 3 Revision: 4
Page 52
Virtual Private Network (VPN) User Guide
Figure 81
A:
This problem usually happens when the user is connecting to EIP from the
location where proxy server is being used. The user has to enter following Fully
Qualified Domain Name (FQDN) of Enterprise Information Portal (EIP) into the
Exception list of his/her Internet Explorer (IE) by following the steps below.
1.
2.
Launch Internet Explorer (IE).
Select “Internet Options” from “Tools” of IE as depicted below.
Figure 82
3.
Go to “Connection” tab of “Internet Options”, and then click “LAN Settings”
as depicted below.
Figure 83
4.
Click “Advanced” button as depicted below.
Issue: 3 Revision: 4
Page 53
Virtual Private Network (VPN) User Guide
Figure 84
5.
Append login.mtr.com.hk and portal.mtr.com.hk into the Exception box
as depicted below.
Figure 85
6.
7.
Click “OK” button to save and return to IE.
Restart IE and try to access Enterprise Information Portal again.
Q9: Why do I fail to access majority of IS applications via VPN from Vista.
A:
Successful formation of VPN session between your Vista and Corporate network
does not mean that all network services are fully certified or tested on Microsoft
Vista. If you fail to access a specific IS application, you may need to contact IT
Help Desk to check if that IS application has been certified (or tested) to run on
Microsoft Vista platform. When this version of user guide is released, all IS
applications have not been tested on Microsoft Vista yet.
Q10: There are some problem when access IS application with Single Sign On.
A:
Since weblink rewriting will be required to facilitate SSO function. If the specific
pages or objects which don’t support weblink rewriting will generate problem.
For workaround, you can open a new IE browser and enter the EIP link
http://portal.mtr.com.hk by yourself (instead of click on EIP link from Bookmark
page). This is a normal mode with no SSO function.
Q11: How to install or upgrade VPN client (WSAM) without local-administrative
right on my PC?
Issue: 3 Revision: 4
Page 54
Virtual Private Network (VPN) User Guide
A:
There are two scenarios which need to install or upgrade your VPN client,
1: Login VPN for the first time VPN or
2: VPN firmwire version has been updated in server side.,
you must need local-administrative right to install the program. Otherwise,
VPN Client (Windows secure Application manager) will not be able to be
installed.
If you don’t have the administrative privilege on your PC (i.e. you are running a
managed PC within your company), please consult your PC administrator to
install the “Juniper installer service” to your PC. You many download the file
in here
Then, you can update your VPN client though next VPN login.
Once Juniper installer service is installed, you will be able to install or upgrade
the VPN client automatically without administrative privilege in future.
Q12: Can I download the VPN client files for manual installation?
A:
Yes, you can download the files in http://info.mtr.com.hk , under “Download
Applications” Section
Issue: 3 Revision: 4
Page 55
Virtual Private Network (VPN) User Guide
11 Getting Help
If you come across any problem in accessing MTR Corporation network resources via
VPN, you may call IT Help Desk at (852) 29932993 to log the fault for follow-up, or
you can go to MTR extranet portal (http://info.mtr.com.hk) for quick reference and
suggestion to commonly asked technical questions and problems.
http://info.mtr.com.hk is a central information portal for internet users to get user guide,
troubleshooting tips, etc. for the internet services provided. From this portal, you
may find useful information and resolution to your problem.
Issue: 3 Revision: 4
Page 56
Virtual Private Network (VPN) User Guide
Appendix A
Specified Antivirus Software
AhnLab V3 Internet Security 2008 Platinum (7.x)
AhnLab V3 Internet Security 7.0 Platinum Enterprise (7.x)
AntiVir PersonalEdition Classic Windows (7.x)
AntiVir/XP (6.x)
AntiVirusKit 2006 (2006.x)
avast! Antivirus (4.8.x)
avast! Antivirus (4.x)
avast! Antivirus Professional (4.8.x)
AVG Anti-Virus Free (8.x)
Avira AntiVir Personal – Free Antivirus (8.x)
Avira AntiVir PersonalEdition Premium (7.x)
Avira AntiVir Premium (8.x)
Avira AntiVir Premium (9.x)
Avira AntiVir Professional (8.x)
Avira Premium Security Suite (9.x)
BitDefender Antivirus 2008 (11.x)
BitDefender Antivirus 2009 (12.x)
BitDefender Internet Security 2008 (11.x)
BitDefender Internet Security 2009 (12.x)
BitDefender Total Security 2008 (11.x)
BitDefender Total Security 2009 (12.x)
CA Anti-Virus (9.x)
CA eTrust Antivirus (7.x)
CA eTrust Internet Security Suite AntiVirus (7.x)
ClamWin Antivirus (0.x)
ClamWin Free Antivirus (0.x)
COMODO Internet Security (3.5.x)
ESET NOD32 Antivirus (3.x)
ESET NOD32 Antivirus (4.x)
ESET Smart Security (3.x)
ESET Smart Security (4.x)
F-Secure Anti-Virus (7.x)
F-Secure Anti-Virus (8.x)
F-Secure Anti-Virus Client Security (6.x)
F-Secure Internet Security (7.x)
F-Secure Internet Security (8.x)
Issue: 3 Revision: 4
Page 57
Virtual Private Network (VPN) User Guide
Kaspersky Anti-Virus 2009 (8.x)
Kaspersky Anti-Virus 7.0 (7.x)
Kaspersky Internet Security 7.0 (7.x)
Kaspersky Internet Security 8.0 (8.x)
Kaspersky Internet Security (9.x)
Kingsoft AntiVirus 2007 Free (2007.x)
McAfee VirusScan (11.x)
McAfee VirusScan (12.x)
McAfee VirusScan (13.x)
McAfee VirusScan Enterprise (7.0.0.x)
McAfee VirusScan Enterprise (7.1.0.x)
McAfee VirusScan Enterprise (7.5.0.x)
McAfee VirusScan Enterprise (8.0.0.x)
McAfee VirusScan Enterprise (8.7.x)
McAfee VirusScan Enterprise (8.x)
McAfee VirusScan Home Edition (7.x)
McAfee VirusScan Professional (8.x)
McAfee VirusScan Professional (8xxx)
McAfee VirusScan Professional (9.x)
McAfee VirusScan Professional Edition (7.x)
Norton 360 (Symantec Corporation) (1.x)
Norton 360 (Symantec Corporation) (2.x)
Norton 360 (Symantec Corporation) (3.x)
Norton AntiVirus (10.x)
Norton AntiVirus (14.x)
Norton AntiVirus (15.x)
Norton AntiVirus (16.x)
Norton AntiVirus 2004 Professional (10.x)
Norton AntiVirus 2004 Professional Edition (10.x)
Norton AntiVirus Corporate Edition (7.x)
Norton AntiVirus Corporate Edition 7.0 for Windows NT (7.x)
Norton Internet Security (16.x)
Norton Internet Security (7.x)
Norton Internet Security (8.0.x)
Norton Internet Security (8.x)
Norton Internet Security (9.x)
Norton Internet Security (Symantec Corporation) (10.x)
Panda Antivirus + Firewall 2008 (7.x)
Issue: 3 Revision: 4
Page 58
Virtual Private Network (VPN) User Guide
Panda Antivirus 2008 (3.x)
Panda Antivirus Platinum (7.06.01.x)
Panda Antivirus Pro 2009 (8.x)
PC Tools AntiVirus 2008 (5.x)
PC Tools Internet Security [Antivirus] (6.x)
PC Tools Spyware Doctor [Antivirus] (6.x)
Rising Antivirus Network Edition (20.x)
Rising Antivirus Software AV (17.x)
Rising Antivirus Software AV (18.x)
Rising Antivirus Software AV (19.x)
Rising Antivirus Software AV (20.x)
Rising Antivirus Software AV (21.x)
Symantec AntiVirus (10.x)
Symantec AntiVirus (9.x)
Symantec AntiVirus Client (8.x)
Symantec AntiVirus Server (8.x)
Symantec AntiVirus Win64 (10.x)
Symantec AntiVirus 用戶端 (8.x)
Symantec Client Security (10.x)
Symantec Client Security (9.x)
Symantec Endpoint Protection (11.x)
ZoneAlarm (AntiVirus) (8.x)
ZoneAlarm Anti-virus (8.x)
ZoneAlarm Extreme Security Antivirus (8.x)
ZoneAlarm Security Suite (6.x)
ZoneAlarm Security Suite Antivirus (7.x)
ZoneAlarm Security Suite Antivirus (8.x)
卡巴斯基全功能安全軟件 2009 (8.x)
卡巴斯基反病毒 6.0 (6.x)
卡巴斯基反病毒 6.0 Windows 工作站 (6.0.x)
卡巴斯基反病毒 Personal (5.0.x)
卡巴斯基反病毒 Personal (5.0.x)
江民殺毒軟件 KV2008 (11.x)
江民殺毒軟件 KV2009 (12.x)
瑞星殺毒軟件網絡版 AV (19.x)
金山毒霸 2008 (2008.x)
金山毒霸 2009 (2009.x)
Issue: 3 Revision: 4
Page 59
Virtual Private Network (VPN) User Guide
Appendix B
Firewall Software
AhnLab V3 Internet Security 2007 (7.x)
AhnLab V3 Internet Security 2007 Platinum (7.x)
AhnLab V3 Internet Security 2008 Platinum (7.x)
AVG 8.0 [Firewall] (8.x)
AVG Firewall (7.x)
Avira Premium Security Suite (7.x)
Avira Premium Security Suite (9.x)
BitDefender 8 Professional Plus (8.x)
BitDefender 9 Internet Security (9.x)
BitDefender Internet Security 2008 (11.x)
BitDefender Internet Security 2009 (12.x)
BitDefender Total Security 2008 (11.x)
BitDefender Total Security 2009 (12.x)
COMODO Firewall Pro (3.x)
COMODO Internet Security (3.x)
ESET Smart Security (3.x)
ESET Smart Security (4.x)
F-Secure Anti-Virus Client Security - Internet Shield (6.x)
Kaspersky Internet Security (7.x)
Kaspersky Internet Security (8.x)
McAfee Desktop Firewall (8.0.x)
McAfee Desktop Firewall (8.5.x)
McAfee Host Intrusion Prevention (7.x)
McAfee Personal Firewall (10.x)
McAfee Personal Firewall (8.x)
McAfee Personal Firewall (9.x)
McAfee Personal Firewall Express (5.x)
McAfee Personal Firewall Plus (5.x)
McAfee Personal Firewall Plus (6.x)
McAfee Personal Firewall Plus (7.x)
Microsoft Windows Firewall (7)
Microsoft Windows Firewall (Vista)
Microsoft Windows Firewall (XP SP2+)
Microsoft Windows Internet Connection Firewall (XP SP1)
Microsoft Windows TCP/IP Packet Filtering (Windows 2000)
Norton 360 (Symantec Corporation) (1.x)
Issue: 3 Revision: 4
Page 60
Virtual Private Network (VPN) User Guide
Norton 360 (Symantec Corporation) (2.x)
Norton 360 (Symantec Corporation) (3.x)
Norton AntiVirus (14.x)
Norton AntiVirus (Symantec Corporation) (15.x)
Norton Internet Security (16.x)
Norton Internet Security (Symantec Corporation) (10.x)
Norton Internet Security (Symantec Corporation) (7.x)
Norton Internet Security (Symantec Corporation) (15.x)
Norton Internet Security 2006 (Symantec Corporation) (9.x)
Norton Personal Firewall (Symantec Corporation) (7.x)
Norton Personal Firewall 2006 (Symantec Corporation) (8.x)
Panda Antivirus + Firewall 2007 (6.x)
Panda Antivirus + Firewall 2008 (7.x)
Panda Endpoint Protection Firewall (5.x)
Panda Internet Security 2007 (11.x)
Panda Internet Security 2008 (12.x)
Panda Internet Security 2009 (14.x)
PC Tools Firewall Plus (3.x)
PC Tools Firewall Plus (4.x)
PC Tools Firewall Plus (5.x)
PC Tools Internet Security [Firewall] (3.x)
PC Tools Internet Security [Firewall] (4.x)
PC-cillin 2002 (9.x)
PC-cillin 2003 (10.x)
Symantec Client Security (10.x)
Symantec Client Security (9.x)
Symantec Endpoint Protection (11.x)
Trend Micro Internet Security (11.x)
Trend Micro Internet Security (16.x)
Trend Micro Internet Security (17.x)
Trend Micro PC-cillin Internet Security 2007 (15.x)
Windows Live OneCare (1.x)
Windows Live OneCare (2.x)
ZoneAlarm (6.x)
ZoneAlarm Anti-Spyware Firewall (7.x)
ZoneAlarm Anti-virus (6.x)
ZoneAlarm Anti-virus Firewall (7.x)
ZoneAlarm Anti-virus Firewall (8.x)
Issue: 3 Revision: 4
Page 61
Virtual Private Network (VPN) User Guide
ZoneAlarm Extreme Security FW (8.x)
ZoneAlarm Firewall (8.x)
ZoneAlarm Pro (5.x)
ZoneAlarm Pro (6.x)
ZoneAlarm Pro Firewall (7.x)
ZoneAlarm Pro Firewall (8.x)
ZoneAlarm Security Suite (5.x)
ZoneAlarm Security Suite (6.x)
ZoneAlarm Security Suite FW (7.x)
ZoneAlarm Security Suite FW (8.x)
ZoneAlarm with Antivirus (5.x)
卡巴斯基互聯網安全套裝(6.x)
Issue: 3 Revision: 4
Page 62
Virtual Private Network (VPN) User Guide
Appendix C
Software Token User Guide
1.
Obtain a Software Token package from IT Helpdesk (file name format:
mobilepass400xxxx.zip)
2.
Copy to PC running with windows operation system.
3.
Unzip the package.
Issue: 3 Revision: 4
Page 63
Virtual Private Network (VPN) User Guide
4.
There are two files inside the software token folder.
-
Mobilepass.exe (software token program)
-
Mpconfig.ini (parameter file)
5.
Dobule-click the mobilepass.exe to launch software token.
6.
Press the soft-button to generate new OTP passcode. The operation is exactly the
same as hardware token.
Issue: 3 Revision: 4
Page 64
Virtual Private Network (VPN) User Guide
7.
To obtain detail software token information for further troubleshooting (if
necessarey). Right-click and select “about”
Issue: 3 Revision: 4
Page 65