1
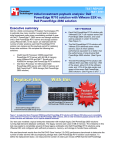
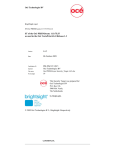
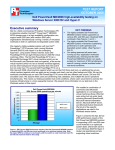
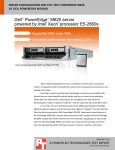
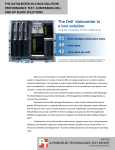
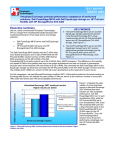
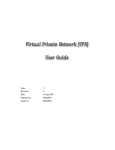
TEST REPORT
MAY 2009
Initial investment payback analysis: Dell
PowerEdge R710 solution with Hyper-V vs. HP
ProLiant DL385 solution
Executive summary
Dell Inc. (Dell) commissioned Principled Technologies (PT)
to estimate how many months it would take to recapture
initial investment costs when consolidating multiple 4-yearold HP ProLiant DL385 server and storage solutions onto a
Dell™ PowerEdge™ R710 server and storage solution using
Microsoft® Windows Server® 2008 with Hyper-V™
technology (Hyper-V). In this report, we estimate both the
number of older solutions each Dell PowerEdge R710
solution can replace and the payback period for replacing
those older solutions. We compare the following two
solutions:
•
•
Intel® Xeon® Processor X5550-based Dell
PowerEdge R710 server with 96 GB of memory
using Hyper-V and Dell™ EqualLogic™ PS6000XV
storage (Dell PowerEdge R710 solution)
AMD Opteron 254-based HP ProLiant DL385 server
with 4 GB of memory and HP StorageWorks MSA30
storage (HP ProLiant DL385 solution)
KEY FINDINGS
z
Each Dell PowerEdge R710 solution with
Microsoft® Windows Server® 2008 with
Hyper-V™ technology can replace up to
seven HP ProLiant DL385 solutions, and
could yield a payback in around 16
months. (See Figure 1.)
z
The Dell PowerEdge R710 solution with
Hyper-V delivered seven virtual servers,
each of which yielded performance
equivalent to or better than the
performance of one physical HP
ProLiant DL385 solution. (See Figure 4.)
z
The Dell PowerEdge R710 solution with
Hyper-V used little more than 1/5th of
the power, just under 1/2 of the software
costs, and 1/7th of the data center rack
space of the seven HP ProLiant DL385
solutions. (See Figures 3 and 7.)
Figure 1: A single Intel Xeon Processor X5550-based Dell PowerEdge R710 solution with Hyper-V allows you to consolidate
seven AMD Opteron 254-based HP ProLiant DL385 solutions, with an initial investment payback period of around 16 months.
We base this estimation on our specific database workload.
Our test case modeled a typical enterprise datacenter with multiple legacy Dell PowerEdge 2850 solutions
running high-demand database workloads. The legacy servers each used 4 GB of memory. The enterprise in this
test case seeks to consolidate several of these legacy workloads onto Dell PowerEdge R710 solutions using
Hyper-V and configured with sufficient processors, memory, and storage to handle these workloads.
We used benchmark results from the Dell DVD Store Version 2.0 (DS2) performance benchmark to determine the
number of older servers with accompanying storage that a Dell PowerEdge R710 solution could replace. To
define the replacement factor, we measured the number of orders per minute (OPM) that the HP ProLiant DL385
solution could perform when running a demanding DS2 workload. We then ran DS2 in virtual machines (VMs) on
the Dell PowerEdge R710 solution and measured how many VMs this newer solution could run, while obtaining
OPM in each VM equivalent to that of the HP ProLiant DL385 solution. The total number of VMs the Dell
PowerEdge R710 solution could handle determines the replacement factor. Based on our specific workload, the
replacement factor is seven. Figure 1 depicts this replacement factor for replacing seven AMD Opteron 254based HP ProLiant DL385 solutions with a single Intel Xeon Processor X5550-based Dell PowerEdge R710
solution, as well as the initial investment payback time of around 16 months.
Figure 2 graphs the payback period and the cost savings of the Dell PowerEdge R710 solution. Savings continue
after the initial investment payback period. By the end of year two, we project a savings of $20,379. The line
representing the Dell PowerEdge R710 solution accumulates the initial investment cost and the monthly costs of
the solution. The initial investment cost includes the list price of the server and half of the cost of the shared
storage, as well as the costs of migrating from the seven HP ProLiant DL385 solutions to the newer Dell
PowerEdge R710 solution. The line for the seven HP ProLiant DL385 solutions shows the accumulated monthly
costs of seven HP ProLiant DL385 solutions. The lines cross at the end of the payback period. Appendix C
describes the payback period calculation.
$140,000
Dell PowerEdge R710 solution can pay back the initial investment in around 16
months
$120,000
$100,000
$80,000
$44,319
$60,000 initial investment
Break even at
$56,122
in 16.4 months
$20,379
savings at 2 years
$40,000
$52,728
savings at 3 years
$20,000
$0
1 2 3 4 5 6 7 8 9 10 11 12 13 14 15 16 17 18 19 20 21 22 23 24 25 26 27 28 29 30 31 32 33 34 35 36
Seven HP ProLiant DL385 solutions
Dell PowerEdge R710 solution
Payback period
Initial investment
2nd year savings
3rd year savings
1
Figure 2: The payback period and cumulative estimated costs for the seven HP ProLiant DL385 solutions and the Dell PowerEdge
R710 solution with Hyper-V. Lower costs and higher savings are better.
Costs for the Dell PowerEdge R710 solution include the initial investment of $44,319 plus annual costs of $8,615,
for a total year-one and -two cost of $61,549 for the solution. This solution could save approximately $20,379 by
year two over the $81,928 two-year costs for the seven HP ProLiant DL385 servers and HP StorageWorks
MSA30 storage arrays that this solution can replace. Figure 3 shows the specific areas of savings. Specifically, it
shows that the investment costs of buying the server and storage hardware and of migrating from the older to the
newer solution are offset by savings for the Dell PowerEdge R710 solution in hardware support costs, software
support agreements, facility costs (including switch costs), energy costs, and management costs.
1
We divide annual costs by 12 and do not adjust for inflation.
Principled Technologies, Inc.: Initial investment payback analysis: Dell PowerEdge R710
solution with Hyper-V vs. HP ProLiant DL385 solution
2
Estimated year-one and -two costs for the Dell PowerEdge
R710 solution and the HP ProLiant DL385 solutions
$90,000
$81,928
$80,000
$70,000
$61,549
Cost
$60,000
$50,000
$40,000
$30,000
$20,000
$10,000
$0
Seven HP ProLiant DL385
solutions
Dell PowerEdge R710 solution
with Hyper-V
Server and storage hardware
$0
$43,652
Sof tware licenses
$0
$998
Migration costs
$0
$667
Management costs
$39,200
$5,300
Energy costs
$13,608
$1,904
Facility costs
$4,046
$450
Hardware support agreements
$11,452
$2,466
Sof tware support agreements
$13,622
$6,112
Total
$81,928
$61,549
Figure 3: Estimated year-one and -two costs for the seven HP ProLiant DL385 solutions and the single Dell PowerEdge R710
solution with Hyper-V. Lower costs are better.
Principled Technologies, Inc.: Initial investment payback analysis: Dell PowerEdge R710
solution with Hyper-V vs. HP ProLiant DL385 solution
3
Four benefits of the Dell PowerEdge R710 solution contribute significantly to the cost savings for this solution:
•
•
•
•
Replaces up to seven HP ProLiant DL385 servers with HP StorageWorks MSA30 storage arrays.
The increased I/O capacity, database performance, and memory efficient design of the Dell PowerEdge
R710 solution enables consolidation of multiple older systems for the specific workload we tested.2
Uses little more than one-fifth of the power of the seven HP ProLiant DL385 solutions it replaces.
The consolidated Dell PowerEdge R710 solution provides considerable energy savings because it
requires less than 22 percent of the power of the older HP ProLiant DL385 solutions that it replaces.3
(See Figure 7.) We gain additional savings in energy costs because the test workload requires at most
half the shared storage array.
Frees up five Windows Server® licenses. Consolidation provides software savings if the organization
maintains software assurance agreements or can reuse elsewhere the licenses that consolidation frees.
We do not include license costs for either solution, as the enterprise would already have paid for the
licenses used on the older solution and would transfer them to the new solution. We do include the costs
of ongoing software agreements. For the calculations in this paper, we assume that the target
organization maintains software agreements for OS and database software and that it can choose to
renew or cancel them at the time of consolidation.4
Requires approximately one-seventh of the data center rack space. The consolidated Dell
PowerEdge R710 solution requires 2u of rack space for the server and 3u for the storage array. The older
HP ProLiant DL385 solution requires 5u for each of the seven server-and-storage-array pairs, for a total
of 35u; by contrast, the single Dell R710 solution consumes only 5u.
Workload
We conducted our testing using DVD Store Version 2, an open-source application with a back-end database
component, a front-end Web application layer, and a driver layer that operates as the middle tier and actually
executes the workload. DS2 models an online DVD store. Simulated customers log in; browse movies by actor,
title, or category; and purchase movies. The workload also creates new customers. Browsing movies involves
select operations, some of which use SQL Server 2008 full-text search and some of which do not. The purchase,
login, and new customer stored procedures involve update and insert statements, as well as select statements.
The workload’s main reporting metric is orders per minute.
Because our goal was to isolate and test database server and storage, we did not use the Web application layer.
Instead, we ran the driver application on client machines directly via its command-line interface. To simulate a
heavily loaded environment, the load-generating systems ran with no think time, blasting requests as quickly as
the server could handle them. We used the default DS2 parameters and setup configuration, with the exceptions
we note in the DVD Store setup section in the Test methodology section of this report.
For client machines, we used high-end desktop systems running Windows Server 2003 R2 Enterprise Edition.
Each of these client machines ran a single instance of DS2, which spawned 32 threads. This simulated a heavily
loaded environment. Our goal was to represent the consolidation of older servers facing a demanding workload,
so we adjusted the DVD Store thread count to 12 on the older server in order to get the server to about 80
percent processor utilization throughout the test.
We tested the Dell PowerEdge R710 solution running Windows Server 2008 Enterprise Edition with Hyper-V for
x64-based systems and the HP ProLiant DL385 solution running Windows Server 2003 R2 Enterprise Edition. We
tested the Dell PowerEdge R710 solution with Microsoft SQL Server 2008 Enterprise Edition and the HP ProLiant
DL385 solution with Microsoft SQL Server 2005. We installed Windows Server 2008 Enterprise Edition and
2
The replacement factor is the number of VMs that ran on the Dell PowerEdge R710 solution, where on average each VM was equivalent to
or better than the performance of the HP ProLiant DL385 solution. The Test results section of this report details those results.
3
We multiply the replacement factor times the average power of the older server and storage solution and compare that result to the power of
a single Dell PowerEdge R710 server and Dell EqualLogic PS6000 storage array.
4
Our calculations include the costs for Windows Server 2003 R2 Enterprise Edition software assurance for the older solution and for the
upgraded Windows Server 2008 Enterprise Edition for the Dell PowerEdge R710 solution. We assume the licenses transfer between the
solutions. We base this savings claim on the seven licenses required for seven older solutions versus two licenses, each supporting four VMs,
for the Dell PowerEdge R710 server.
Principled Technologies, Inc.: Initial investment payback analysis: Dell PowerEdge R710
solution with Hyper-V vs. HP ProLiant DL385 solution
4
Microsoft SQL Server 2008 in each VM on the Dell PowerEdge R710. We tested the Dell PowerEdge R710
solution with 96 GB (8 GB x 12) of memory and the HP ProLiant DL385 solution with 4 GB of memory. We used
10GB databases for all tests.
We used four internal hard drives (two RAID1) on all servers, installing the OS on one volume and using the other
volume for DB logs. We configured the external storage as one large volume, which contained the database
without the logs.
The DS2 driver application creates an orders-per-minute performance counter on each client machine. While the
DVD Store client application visually outputs OPM at 10-second intervals, we chose to collect this OPM metric via
a performance monitor counter on each client machine at 1-second intervals.
We ran this workload on the Dell PowerEdge R710 server and the HP ProLiant DL385 server for 30 minutes.
For more details about the DS2 tool, see http://www.delltechcenter.com/page/DVD+Store.
Test results
Number of virtual machines
Microsoft SQL Server workload results
Higher numbers are better
8
7
6
HP ProLiant DL385 with
HP StorageWorks
MSA30 storage
5
4
Dell PowerEdge R710
with Dell EqualLogic
PS6000
3
2
1
Figure 4 illustrates the
number of virtual machines
the Dell PowerEdge R710
solution can sustain
compared to the HP
ProLiant DL385 solution.
The Dell PowerEdge R710
solution delivered seven
virtual servers that each
produced higher OPM
results than the single
physical HP ProLiant DL385
solution.
0
Figure 5 shows the specific
performance results, in both
OPM and CPU percentage,
for the Dell PowerEdge
Figure 4: Number of virtual machines for the Dell PowerEdge R710 solution and HP ProLiant
R710 server with the Dell
DL385 solution. Higher numbers are better.
EqualLogic PS6000 storage
solution and the HP ProLiant
DL385 server with the HP StorageWorks MSA30 storage solution while running the DVD Store tests. Results are
from the test run that produced the median of three OPM results. Lower CPU percentage and higher OPM
numbers are better.
Server and storage solution
We tested the legacy system with a single database instance running a 10 GB DS2 database, which alone nearly
fully utilized the system’s CPU; additional instances yielded unacceptable results. To achieve maximum DS2
results on the Dell PowerEdge R710 solution, we installed one instance of SQL Server 2008 on each of seven
VMs and ran one 10GB DS2 database on each. We show the number of OPM each solution achieved during our
measurement period, minutes 24 through 29 of the test. We calculated the scores by averaging the OPM for each
SQL instance during that period. For the Dell PowerEdge R710 solution, we show the OPM results for the lowest
performing of the seven VMs. This shows the Dell PowerEdge R710 solution delivered higher performance on
each of the seven VMs than the HP ProLiant DL385.
Principled Technologies, Inc.: Initial investment payback analysis: Dell PowerEdge R710
solution with Hyper-V vs. HP ProLiant DL385 solution
5
Performance
HP ProLiant DL385 solution
Dell PowerEdge R710 solution
Run 1
Minimum
OPM
15,864.5
18,985.9
Run 2
CPU
Minimum
percentage OPM
89.2
14,466.8
89.0
17,783.7
Run 3
CPU
Minimum
percentage OPM
84.5
15,849.3
89.2
17,738.3
CPU
percentage
88.8
89.3
Figure 5: Minimum per database OPM performance results per server or virtual server for the Dell PowerEdge R710 solution and the
HP ProLiant DL385 solution while running the DVD Store workload. Lower CPU percentage and higher OPM numbers are better.
Figure 6 shows the specific performance results, in both individual VM OPM scores and minimum OPM scores,
for the Dell PowerEdge R710 server with the Dell EqualLogic PS6000 storage array. Higher numbers are better.
Dell PowerEdge R710
solution
VM 1 OPM
VM 2 OPM
VM 3 OPM
VM 4 OPM
VM 5 OPM
VM 6 OPM
VM 7 OPM
Minimum OPM
Run 1
Run 2
Run 3
19,855.5
18,985.9
20,111.3
20,035.6
21,351.4
21,036.9
19,639.6
18,985.9
19,077.3
17,783.7
19,056.0
19,307.2
19,475.9
20,038.3
19,234.8
17,783.7
19,391.6
18,223.1
19,473.2
19,109.1
20,442.9
19,320.0
17,738.3
17,738.3
Figure 6: Individual VM scores and the minimum VM score for the Dell PowerEdge R710 solution. Higher OPM numbers are better.
Figure 7 shows the specific power results during the median run of the Dell PowerEdge R710 server with the Dell
EqualLogic PS6000 storage solution and the HP ProLiant DL385 server with the HP StorageWorks MSA30
storage solution. Lower numbers are better.
To calculate the power, we average the power we recorded during our workload measurement period, minutes 24
through 29 of the test, for both server and storage, with total power the sum of both. For the idle power, we
averaged the server and storage power and then took the sum as total. For the idle power, we allowed the system
to sit for 10 minutes after booting to the desktop and then started 2 minutes of idle power capture.
Power (median results)
HP ProLiant DL385 solution
Dell PowerEdge R710 solution
Workload
Server
314
386
Storage
257
492
Total
571
878
Idle
Server
287
218
Storage
254
477
Total
541
695
Figure 7: Median power results, in watts, for the Dell PowerEdge R710 solution and the HP ProLiant DL385 solution while running
the DVD Store workload and while idle. Results shown are from the runs that produced the OPM scores in Figure 5. Lower numbers
are better.
Principled Technologies, Inc.: Initial investment payback analysis: Dell PowerEdge R710
solution with Hyper-V vs. HP ProLiant DL385 solution
6
Test methodology
Adjusting BIOS settings
We used the default BIOS settings on the HP ProLiant DL385 server and enabled Virtualization Technology on
the Dell PowerEdge R710 server.
Setting up and configuring the Dell PowerEdge R710 storage and Dell EqualLogic
PS6000 storage
Dell PowerEdge R710 and Dell EqualLogic PS6000 storage configuration
We installed four internal drives in the Dell PowerEdge R710 server. We attached the server to a Dell EqualLogic
PS6000 containing 16 drives. We cabled the PS6000 to a Dell PowerConnect™ 6248 switch via its four available
ports, and we cabled the server to the switch using three of the four on-board ports. We installed the Host
Integration Toolkit (HIT) on the server for storage management and for multipath I/O support.
We configured the internal drives in two RAID 1 volumes, with two disks per volume. The PS6000 contained 16
450GB 15,000RPM drives. We configured the PS6000 in RAID 10 mode, and created 14 25GB LUNs to be used
for SQL Data pass-through disks (2 for each of our 7 VMs) and one larger LUN for VM operating system virtual
disks.
We installed Windows Server 2008 and SQL Server 2008 software on the first mirrored internal volume,
configured the virtual hard drives (VHDs) for SQL Server transaction logs on the second internal volume, and
placed the virtual machine operating system VHDs and SQL Server database data on the PS6000 volume.
We placed the VM operating system VHDs on a large 400GB LUN that we presented to the host OS. We
presented the SQL Server data LUNS, two per VM, each sized at 25 GB, to each virtual machine as Hyper-V
pass-through disks.
Setting up the internal storage for operating system installation and VHDs for SQL Server transaction
logs
1. Enter the RAID controller BIOS by pressing Ctrl+R at the prompt.
2. Highlight Controller 0, and press F2.
3. Select Create New VD.
4. Select the first two drives, select RAID level 1, tab to the OK button, and press Enter. Accept the warning
regarding initialization.
5. Select the new virtual drive, press F2, and select Initialization, Start Init.
6. Repeat steps 2 through 4 for the second internal volume.
7. Wait for the initialization operations to complete.
8. Press Escape, and choose to Save and Exit to return to the boot sequence.
Setting up the external storage
1. Using the command line, setup a storage group with the following RAID policies:
a. PS6000: RAID-10
2. Create a storage pool that you name database with the following members:
a. PS6000-1
3. Enable all network connections on the PS6000 using the following IP address scheme:
a. IP Address: 192.168.1.## (## being any number between 10 and 40)
b. Subnet Mask: 255.255.248.0
4. Create one 400GB volume in the storage pool with no snapshot reserve, and name it dvd-store
5. Create 14 25GB volumes in the storage pool with no snapshot reserve, and name each of them
dbdataVM#@ (where # is the number of the VM, and @ is the database volume – e.g., dbdata1A).
6. Enable shared access to the iSCSI target from multiple initiators on the volume.
7. Create an access control record for the volume without specifying any limitations.
8. Create a read-only SNMP community name to use for group monitoring.
Principled Technologies, Inc.: Initial investment payback analysis: Dell PowerEdge R710
solution with Hyper-V vs. HP ProLiant DL385 solution
7
Setting up the Dell PowerEdge R710 server
We installed a fresh copy of Windows Server 2008 Datacenter Edition x64 on the Dell PowerEdge R710.
Installing Windows Server 2008 Datacenter Edition x64 in the parent partition
1. Boot the server, and insert the Windows Server 2008 x64 installation DVD in the DVD-ROM drive.
2. At the Language Selection Screen, click Next.
3. Click Install Now.
4. Select Windows Server 2008 Datacenter (Full Installation) x64, and click Next.
5. Click the I accept the license terms check box, and click Next.
6. Click Custom.
7. Click Drive options (advanced).
8. Ensure the first drive is selected, and click New.
9. Click Apply.
10. Click Next.
11. At the User’s password must be changed before logging on warning screen, click OK.
12. Type Password1 as the new password in both fields, and click the arrow to continue.
13. At the Your password has been changed screen, click OK.
Setting up network configuration on the server
1. Click StartÆControl PanelÆNetwork and InternetÆNetwork Connections, and double-click the Local
Area Connection assigned to network traffic.
2. Select Internet Protocol Version 4 (TCP/IPv4), and click Properties.
3. In the Internet Protocol Version 4 (TCP/IPv4) Properties screen, select the Use the following IP address
radio button.
4. Enter a valid static IP address, subnet mask, and default gateway.
5. Select the Use the following DNS server addresses radio button, and enter at least one valid DNS server
address.
6. Click OK, and click Close to exit.
7. Repeat steps 1 through 6 for one of the remaining three Network Connections you will use for iSCSI,
modifying the subnet mask to match the storage subnet mask. Reserve the remaining two NICs for VM
iSCSI traffic.
Installing system updates in Windows Server 2008 x64
We installed the following updates on the system using the Microsoft Windows Update feature:
z
Update for Windows Server 2008 x64 Edition (KB956697)
z
Update for Windows Server 2008 x64 Edition (KB967902)
z
Microsoft .NET Framework 3.5 Service Pack 1 and .NET Framework 3.5 Family Update (KB951847) x64
z
Security Update for Windows Server 2008 x64 Edition (KB958687)
z
Update for Windows Server 2008 x64 (KB957388)
z
Security Update for Windows Server 2008 x64-based Systems (KB938464)
z
Update for Windows Server 2008 Server Manager x64 Edition (KB940518)
z
Update for Windows Server 2008 x64 Edition (KB949189)
z
Security Update for Windows Server 2008 x64 Edition (KB955069)
z
Security Update for Windows Server 2008 x64 Edition (KB954459)
z
Security Update for Windows Server 2008 x64 Edition (KB957097)
z
Security Update for Windows Server 2008 x64 Edition (KB958690)
z
Cumulative Security Update for Internet Explorer 7 for Windows Server 2008 x64 Edition (KB963027)
z
Security Update for Windows Server 2008 x64 Edition (KB960803)
z
Security Update for Windows Server 2008 x64 Edition (KB958623)
z
Update for Windows Server 2008 x64 Edition (KB959130)
z
Update for Windows Server 2008 x64 Edition (KB957200)
z
Security Update for Windows Server 2008 x64 Edition (KB953733)
z
Security Update for Windows Server 2008 x64 Edition (KB950762)
z
Windows Malicious Software Removal Tool x64 – April 2009 (KB890830)
z
Update for Windows Server 2008 x64 Edition (KB955839)
Principled Technologies, Inc.: Initial investment payback analysis: Dell PowerEdge R710
solution with Hyper-V vs. HP ProLiant DL385 solution
8
z
z
z
z
z
z
z
z
z
z
z
z
z
z
z
z
z
z
z
Security Update for Windows Server 2008 x64 Edition (KB958624)
Security Update for Windows Server 2008 x64 Edition (KB950974)
Update for Windows Server 2008 x64 Edition (KB951978)
Update for Windows Server 2008 for x64-based Systems (KB955020)
Security Update for Windows Server 2008 x64 Edition (KB956572)
Security Update for Windows Mail for Windows Server 2008 x64 Edition (KB951066)
Update Rollup for ActiveX Killbits for Windows Server 2008 x64 Edition (KB960715)
Security Update for Windows Server 2008 x64 Edition (KB960225)
Security Update for Windows Server 2008 x64 Edition (KB956802)
Update for Windows Server 2008 x64 Edition (KB957321)
Update for Windows Server 2008 x64 Edition (KB952287)
Security Update for Windows Server 2008 x64 Edition (KB958644)
Security Update for Windows Server 2008 x64 Edition (KB959426)
Security Update for Windows Server 2008 x64 Edition (KB952004)
Security Update for Windows Server 2008 x64 Edition (KB951698)
Update for Windows Server 2008 x64 Edition (KB950050)
Cumulative Security Update for ActiveX Killbits for Windows Server 2008 x64 Edition (KB950760)
Update for Windows Server 2008 x64 Edition (KB955302)
Windows Update Agent 7.2.6001.788
Installing the Host Integration toolkit on the Hyper-V server
1. Download the host integration toolkit (Setup64.exe).
2. Double click Setup64.exe.
3. Accept the security warnings, and choose to run the EXE.
4. Click Next.
5. Click Accept, then Next.
6. Click Typical, then Next.
7. You will see a Windows Firewall warning; leave it open for a minute.
8. Click the Start button, and choose Administrative ToolsÆWindows Firewall with Advanced Security.
9. In the left panel, click Inbound Rules.
10. In the center Inbound Rules panel, right-click iSCSI Service (TCP-In), and choose Enable Rule.
11. In the center Outbound Rules panel, right-click iSCSI Service (TCP-In), and choose Enable Rule.
12. Close the Windows Firewall dialog.
13. Clear the message box.
14. Click Install.
15. Click Yes to install multipath software automatically.
16. Choose to restart the server when the application prompts you to do so.
Connecting the storage to the host
We attached the volumes that we used for VHD storage on the Dell EqualLogic storage to the Dell PowerEdge
R710 server by connecting all four NICs available on the PS6000 array to a Dell PowerConnect 6248 switch. We
used three physical NICs in the server at the host level to connect the Microsoft iSCSI Initiator within the server to
the database pass-through disks and OS VHDs. We used the remaining NIC in the server for normal network
communication. iSCSI traffic used one subnet, while normal network communication used a separate subnet.
Adding the additional drives for VHD and pass-through usage in the parent partition via the iSCSI initiator
1. Click Start, Control Panel, and double-click iSCSI Initiator.
2. Click the Discovery tab.
3. Click Add Portal.
4. Add the IP address of the Dell EqualLogic storage group.
5. Click OK.
6. Click the Targets tab.
7. Find the relevant 400GB volume for VM OS VHDs, and select it. Click Log On…
8. Check the checkbox to allow automatic logon on reboot and to enable multipath.
9. Click OK.
Principled Technologies, Inc.: Initial investment payback analysis: Dell PowerEdge R710
solution with Hyper-V vs. HP ProLiant DL385 solution
9
10. Repeat steps 2 through 9 for the 14 SQL Server data LUNs. Later, we configure the VMs with passthrough disks that we assigned to these LUNs.
Configuring the additional internal drive and large external LUN in Disk Management
1. Click Start, Administrative Tools, Computer Management.
2. Click Disk Management.
3. Right-click the uninitialized internal volume, and choose Initialize Disk.
4. Choose MBR.
5. Right-click the volume, and choose New Simple Volume. Click Next.
6. Keep the default drive space, and click Next.
7. Keep the default drive letter assignment, and click Next.
8. Choose NTFS, 64KB allocation unit size, and check the Perform a quick format checkbox. Click Next.
9. Click Finish.
10. Create folders necessary for the VM VHD storage.
11. Repeat steps 1 through 10 for the external LUN assigned to hold VM OS VHDs. Leave the SQL data
LUNs unassigned, as you will configure them for pass-through usage later.
Installing the Hyper-V in Windows Server 2008
Note: Be sure you have installed all the latest critical and recommended updates for Windows Server 2008 from
Windows Update. Specifically, you must install the update that upgrades Hyper-V from beta to release software.
(As of this writing, this update is KB950050 on Windows Server 2008 Enterprise Edition x64.)
1.
2.
3.
4.
5.
6.
7.
8.
9.
10.
11.
Click StartÆAdministrative ToolsÆServer Manager.
Click Roles.
Click Add Roles.
Click Next.
Select the Hyper-V role by checking the box beside it, and click Next.
Check the box beside the Ethernet Card you wish to use, and click Next.
Click Install to begin the Hyper-V installation.
When the installation finishes, click Close.
When the installer prompts you to restart now, click Yes.
Follow the prompt to log onto the system.
Enter the password, and click the arrow to continue. The Resuming Configuration Wizard should start
automatically.
12. Once the Resuming Configuration Wizard completes, the installation results should appear with a
message that the installation succeeded.
13. Click Close.
Creating the Hyper-V virtual machine
1. Click Start.
2. Expand Administrative Tools, and click Hyper-V Manager.
3. From the Action menu, select Connect to Server.
4. Accept the default of Local Computer, and click OK.
5. From the Action menu, select NewÆVirtual Machine.
6. On the Before You Begin page, click Next.
7. On the Specify Name and Location page, enter the name for your new virtual machine. Accept the default
location to store the Virtual machine, and click Next.
8. On the Assign Memory page, enter 12,288 MB of RAM.
9. On the Configure Networking, choose Not Connected, and click Next.
10. Select 30GB for the OS VHD on the connect Virtual Hard Disk page. Accept the other defaults, and click
Next. You will be adding other hard disks later.
11. On the installation Options page, accept the default of Install an operating system later, and click Next.
12. On the Completing the New Virtual Machine Wizard page, click Finish.
13. Right-click the virtual machine, and choose Settings.
14. Click Processors, and choose 2 virtual processors.
15. Click Add Hardware.
Principled Technologies, Inc.: Initial investment payback analysis: Dell PowerEdge R710
solution with Hyper-V vs. HP ProLiant DL385 solution
10
16.
17.
18.
19.
20.
21.
22.
23.
Choose SCSI Controller, and click Add.
Click New to add the SQL Server transaction log VHD.
Click Next.
Choose Fixed Size, and click Next.
Specify the location as the second internal volume.
Choose 5 GB for the VHD size.
Click Finish.
Click the SCSI Controller again, and click the Physical hard disk radio button to configure your SQL Data
pass-through disks. You may wish to do this step after cloning VMs.
24. Choose the appropriate LUN.
25. Repeat steps 23 and 24 for the remaining SQL Data LUN assigned to this VM.
Installing the guest operating system
1. Insert the installation DVD for Windows Server 2008 x64 into the DVD drive.
2. In Hyper-V Manager, right-click the virtual machine, and choose connect.
3. On the media menu, choose DVD DriveÆCapture D:
4. On the Action menu, choose Start.
5. Choose the language, time and currency, and keyboard input. Click Next.
6. Click Install Now.
7. Choose Windows Server Enterprise (Full Installation). Click Next.
8. Accept the license terms, and click Next.
9. Click Custom.
10. Click the Disk, and click Drive options (advanced).
11. Click New, Apply, Format, and then click Next.
12. Let the installation process continue. The VM will reboot several times.
13. After the installation completes, click OK to set the Administrator password.
14. Enter the administrator password twice, and click OK.
15. When the operating systems finishes booting, choose ActionÆInsert Integration Services Setup Disk.
16. Shut down the VM after Integration Services install completes.
17. Right-click the VM, and choose Edit Settings.
18. Click Add hardware, and choose to add a new Network Adapter. Choose External network, and attach it
to the virtual switch.
19. Boot the VM, and login.
20. Click Start, Control Panel, and double-click System.
21. Click Change Settings.
22. Click Change.
23. Enter the new computer name, and click OK.
24. Click OK to restart, click Close, and click Restart Now.
Configuring networking in the VM
1. Power on the VM, and open the console.
2. Click Start, Control Panel, Network Connections, and click Manage Network Connections.
3. Right-click the NIC, and choose properties.
4. Select TCP/IP (v4), and choose properties.
5. Set the IP address, subnet, gateway, and DNS server for this NIC, which will handle outgoing server
traffic (e.g., the public IP). Click OK, and click Close.
Installing SQL Server 2008 on virtual machines
1. Insert the DVD into the physical DVD drive.
2. Click Run SETUP.EXE on the AutoPlay menu.
3. If the application prompts you to install the .NET Framework, click OK.
4. Select the Accept radio button, and click Install.
5. When the installation finishes, click Exit.
6. If the application prompts you, click OK to install a hotfix for Windows (KB942288).
7. Click Restart now to restart the server upon completion.
8. After rebooting, log into the server.
Principled Technologies, Inc.: Initial investment payback analysis: Dell PowerEdge R710
solution with Hyper-V vs. HP ProLiant DL385 solution
11
9.
10.
11.
12.
13.
14.
15.
16.
17.
18.
19.
20.
21.
22.
23.
24.
25.
26.
27.
28.
29.
30.
31.
32.
33.
34.
35.
36.
37.
38.
39.
40.
41.
42.
43.
44.
45.
Click Start, and click Computer.
Double-click the CD/DVD drive.
Click Installation.
Click New SQL Server stand-alone installation.
On the Setup support rules screen, click OK.
Specify the Enterprise Evaluation free edition. Click Next.
Click the checkbox to accept the license terms. Click Next.
Click Install to install the setup support files.
You may see a Windows Firewall warning. For now, ignore this, and click Next.
On the Feature Selection screen, select Database Engine Services, Full-Text Search, Client Tools
Connectivity, Client Tools Backward Compatibility, Management Tools –Basic, and Management Tools –
Complete. Click Next.
On the Instance configuration screen, leave the default selection of default instance, and click Next.
On the Disk space requirements screen, click Next.
On the Server configuration screen, choose NT AUTHORITY\SYSTEM for SQL Server Agent, and
choose NT AUTHORITY\SYSTEM for SQL Server Database Engine. Click Next.
On the Database Engine Configuration screen, select Mixed Mode.
Enter a password for the system administrator account.
Click Add Current user. This may take several seconds.
Click Next.
On the Error and usage-reporting screen, click Next.
On the Installation rules screen, click Next.
On the Ready to Install screen, click Next.
After installation completes, click Start, All Programs, Microsoft SQL Server 2008, Configuration Tools,
SQL Server Configuration Manager.
Expand the Network Configuration node, and select the relevant instance.
In the right pane, right-click TCP/IP, and choose Enable.
In the left pane, click SQL Server Services.
In the right pane, right-click the relevant instance, and select Restart.
Repeat steps 9 through 33 for the second, third, and fourth SQL Server instances (on each instance
install, choose Database Engine Services and Full-Text Search on the feature selection screen, and
choose named instance on the instance configuration screen).
After all installations complete, open SQL Server Configuration Manager, right-click the SQL Browser
service, change the startup type to Automatic, and start the SQL Browser service.
Click Start, Administrative Tools, and Local Security Policy.
Double-click Perform Volume Maintenance Tasks, and add the System account.
Double-click Lock Pages in Memory, and add the System account.
Click Start, All Programs, Microsoft SQL Server 2008, and SQL Server Management Studio.
In the Object Explorer pane, choose ConnectÆDatabase Engine. Choose the default instance.
Right-click the instance, and choose properties.
Click Processors, and check the Boost SQL Server Priority checkbox. Click OK.
Create a SQL Server login for the ds2user (see the DVD Store setup section below for the specific script
to use).
Repeat steps 39 through 43 on the additional SQL Server instances.
Place the DVD Store backup file you prepared in the default location for SQL Server: C:\Program
Files\Microsoft SQL Server\MSSQL10.MSSQLSERVER\MSSQL\Backup.
Installing SQL Server 2008 SP1
Service Pack 1 is available for download from
http://www.microsoft.com/downloads/details.aspx?FamilyID=66ab3dbb-bf3e-4f46-9559ccc6a4f9dc19&displaylang=en.
1.
2.
3.
4.
Run SQLServer2008SP1-KB968369-x64-ENU.exe.
On the Welcome screen, click Next
On the License terms screen, accept the license terms, and click Next.
On the Features screen, select available features, and click Next.
Principled Technologies, Inc.: Initial investment payback analysis: Dell PowerEdge R710
solution with Hyper-V vs. HP ProLiant DL385 solution
12
5. On the Check files in use screen, click Next.
6. On the Update screen, click Next.
7. When the update completes, click Next, and click Close.
Installing system updates in Windows Server 2008 x64
We installed the following updates on the virtual machines using the Microsoft Windows Update feature:
z
Hotfix for Windows (KB942288)
z
Microsoft .NET Framework 3.5 Service Pack 1 and .NET Framework 3.5 Family Update (KB951847) x64
z
Security Update for Windows Server 2008 x64 Edition (KB958687)
z
Update for Windows Server 2008 x64 (KB957388)
z
Security Update for Windows Server 2008 x64-based Systems (KB938464)
z
Update for Windows Server 2008 Server Manager x64 Edition (KB940518)
z
Update for Windows Server 2008 x64 Edition (KB949189)
z
Security Update for Windows Server 2008 x64 Edition (KB955069)
z
Security Update for Windows Server 2008 x64 Edition (KB954459)
z
Security Update for Windows Server 2008 x64 Edition (KB957097)
z
Security Update for Windows Server 2008 x64 Edition (KB958690)
z
Cumulative Security Update for Internet Explorer 7 for Windows Server 2008 x64 Edition (KB963027)
z
Security Update for Windows Server 2008 x64 Edition (KB960803)
z
Security Update for Windows Server 2008 x64 Edition (KB958623)
z
Update for Windows Server 2008 x64 Edition (KB959130)
z
Update for Windows Server 2008 x64 Edition (KB957200)
z
Security Update for Windows Server 2008 x64 Edition (KB953733)
z
Security Update for Windows Server 2008 x64 Edition (KB950762)
z
Windows Malicious Software Removal Tool x64 – April 2009 (KB890830)
z
Update for Windows Server 2008 x64 Edition (KB955839)
z
Security Update for Windows Server 2008 x64 Edition (KB958624)
z
Security Update for Windows Server 2008 x64 Edition (KB950974)
z
Update for Windows Server 2008 x64 Edition (KB951978)
z
Update for Windows Server 2008 for x64-based Systems (KB955020)
z
Security Update for Windows Server 2008 x64 Edition (KB956572)
z
Security Update for Windows Mail for Windows Server 2008 x64 Edition (KB951066)
z
Update Rollup for ActiveX Killbits for Windows Server 2008 x64 Edition (KB960715)
z
Security Update for Windows Server 2008 x64 Edition (KB960225)
z
Security Update for Windows Server 2008 x64 Edition (KB956802)
z
Update for Windows Server 2008 x64 Edition (KB957321)
z
Update for Windows Server 2008 x64 Edition (KB952287)
z
Security Update for Windows Server 2008 x64 Edition (KB958644)
z
Security Update for Windows Server 2008 x64 Edition (KB959426)
z
Security Update for Windows Server 2008 x64 Edition (KB952004)
z
Security Update for Windows Server 2008 x64 Edition (KB951698)
z
Update for Windows Server 2008 x64 Edition (KB950050)
z
Cumulative Security Update for ActiveX Killbits for Windows Server 2008 x64 Edition (KB950760)
z
Update for Windows Server 2008 x64 Edition (KB955302)
z
Windows Update Agent 7.2.6001.788
z
Update for Windows (KB951634)
Configuring additional drives in Disk Management
1. Click Start, Administrative Tools, Computer Management.
2. Click Disk Management.
3. Right-click the uninitialized disks (if any), and choose Initialize Disk.
4. Choose MBR.
5. Right-click the volume, and choose New Simple Volume. Click Next.
6. Keep the default drive space, and click Next.
7. Keep the default drive letter assignment, and click Next.
8. Choose NTFS, 64KB allocation unit size, and check the Perform a quick format checkbox. Click Next.
Principled Technologies, Inc.: Initial investment payback analysis: Dell PowerEdge R710
solution with Hyper-V vs. HP ProLiant DL385 solution
13
9. Click Finish.
10. Create the folders necessary for the database. We used <driveletter>:\SQLData for the SQL Server
database volume and <driveletter>:\SQLLog for the SQL Server transaction log volume.
Setting up and configuring the HP DL385 server and HP Modular Smart Array 30 storage
We installed a fresh copy of Windows Server 2003 R2 Enterprise Edition with Service Pack 2 on the HP ProLiant
DL385.
We installed four internal drives in the HP DL385. We attached the server to a Modular Smart Array 30 (MSA30).
We cabled the MSA30 to the Smart Array 6400 storage adapter in the server via one SCSI cable. The I/O module
on the MSA30 was a single port I/O module, so all SCSI traffic flowed through the one cable.
We configured the internal drives in two RAID 1 volumes, with two disks per volume. The MSA30 contained 14
146GB 10,000 RPM drives. We configured MSA30 in a RAID 10 array for all 14 drives, resulting in approximately
a 1TB drive at the operating system level.
We installed Windows Server 2003 R2 Enterprise Edition and SQL Server 2005 software on the first mirrored
internal volume, configured the SQL Server transaction logs on the second internal volume, and placed the SQL
Server database data on the MSA30 volume.
Setting up the internal storage for operating system installation
1. Enter the RAID controller BIOS by pressing F8 at the HP Smart Array 6i Controller prompt.
2. Select Create Logical Drive.
3. Select the two drives to use for this RAID 1 volume.
4. Press F8 to save this configuration.
5. Press Enter to continue.
6. Press Escape to return to the boot sequence.
Setting up the external storage
We configured the MSA30 storage via the HP Array Configuration Utility after installing the operating system. See
the steps in Adding additional drives to the server via the HP Smart Array Configuration Utility, DISKPART utility,
and Disk Management Utility for details.
Installing Windows Server 2003 R2 Enterprise Edition with Service Pack 2
1. Boot the server, and insert the Windows Server 2003 R2 installation CD in the DVD-ROM drive.
2. At the Welcome to Set up screen, press Enter to begin the installation.
3. At the Windows Licensing Agreement screen, press F8 to agree to the terms.
4. Press Enter to install in the default location.
5. Select Format the partition using the NTFS file system (Quick), and press Enter to continue.
6. At the Regional and Language Options screen, click Next.
7. Enter Name and Organization, and click Next. Note: Organization is an optional field, while username is
required.
8. At the Your Product Key screen, enter your product key, and click Next.
9. At the Licensing Modes screen, click Next.
10. At the Computer Name and Administrator Password screen, type Password1 as the new password in
both fields, and click Next.
11. At the Date and Time Settings screen, change the Date & Time and Time Zone if appropriate, and click
Next.
12. After the system restarts automatically, follow the prompt to log into the server.
13. At the Windows Setup screen, the installer will prompt you to insert the second installation CD. Insert the
appropriate CD, and click OK.
14. At the Windows Server 2003 R2 Setup Wizard Welcome screen, click Next.
15. At the Windows Server 2003 R2 Setup Wizard Summary screen, click Next.
16. When the installer prompts you, click Finish to end the installation.
17. Click Start, Run, and type notepad c:\boot.init
Principled Technologies, Inc.: Initial investment payback analysis: Dell PowerEdge R710
solution with Hyper-V vs. HP ProLiant DL385 solution
14
18. To enable the 3GB switch, type this text at the end of the last line in the INI file: /3GB
Setting up network configuration on the server
1. Click StartÆControl PanelÆNetwork ConnectionsÆLocal Area Connection.
2. Click Properties.
3. Select Internet Protocol (TCP/IP), and click Properties.
4. In the Internet Protocol (TCP/IP) Properties screen, select the Use the following IP address radio button.
5. Enter a valid static IP address, subnet mask, and default gateway.
6. Select the Use the following DNS server addresses radio button, and enter at least one valid DNS server
address.
7. Click OK, and click OK to exit.
Installing system updates in Windows Server 2003 R2 Enterprise Edition
We installed the following updates on the virtual machines using the Microsoft Windows Update feature:
• Update for Windows Server 2003 (KB961118)
• Microsoft .NET Framework 3.5 Service Pack 1 and .NET Framework 3.5 Family Update (KB951847)
• Security Update for Microsoft XML Core Services 6.0 Service Pack 2 (KB954459)
• Security Update for Internet Explorer 7 for Windows Server 2003 (KB938127)
• Security Update for Windows Server 2003 (KB923561)
• Windows Malicious Software Removal Tool - April 2009 (KB890830)
• Cumulative Security Update for Internet Explorer 6 for Windows Server 2003 (KB963027)
• Security Update for Windows Server 2003 (KB959426)
• Security Update for Windows Server 2003 (KB960803)
• Security Update for Windows Server 2003 (KB952004)
• Security Update for Windows Server 2003 (KB956572)
• Security Update for Windows Server 2003 (KB961373)
• Update for Windows Server 2003 (KB967715)
• Security Update for Windows Server 2003 (KB958690)
• Security Update for Windows Server 2003 (KB938464)
• Security Update for Windows Server 2003 (KB960225)
• Update Rollup for ActiveX Kill Bits for Windows Server 2003 (KB960715)
• Security Update for Windows Server 2003 (KB958687)
• Security Update for Windows Server 2003 (KB956803)
• Security Update for Windows Server 2003 (KB925902)
• Update for Windows Server 2003 (KB955839)
• Security Update for Windows Server 2003 (KB956802)
• Security Update for Windows Server 2003 (KB954600)
• Security Update for Windows Server 2003 (KB952069)
• Security Update for Windows Server 2003 (KB957097)
• Security Update for Windows Server 2003 (KB955069)
• Security Update for Windows Server 2003 (KB958644)
• Security Update for Windows Server 2003 (KB944338)
• Security Update for Windows Server 2003 (KB950974)
• Security Update for Windows Server 2003 (KB952954)
• Security Update for Outlook Express for Windows Server 2003 (KB951066)
• Security Update for Windows Server 2003 (KB951748)
• Security Update for Windows Server 2003 (KB950762)
• Cumulative Security Update for ActiveX Killbits for Windows Server 2003 (KB950760)
• Security Update for Windows Server 2003 (KB945553)
• Update for Windows Server 2003 (KB948496)
• Security Update for Windows Server 2003 (KB943055)
• Security Update for Windows Server 2003 (KB946026)
• Security Update for Windows Server 2003 (KB941569)
Principled Technologies, Inc.: Initial investment payback analysis: Dell PowerEdge R710
solution with Hyper-V vs. HP ProLiant DL385 solution
15
•
•
•
•
•
•
•
•
•
•
•
•
•
•
Security Update for Windows Server 2003 (KB944653)
Security Update for Windows Server 2003 (KB943460)
Windows Internet Explorer 7 for Windows Server 2003
Security Update for Windows Server 2003 (KB933729)
Security Update for Microsoft .NET Framework, Version 1.1 Service Pack 1 (KB933854)
Security Update for Windows Server 2003 (KB938127)
Security Update for Windows Server 2003 (KB936782)
Security Update for Windows Server 2003 (KB926122)
Security Update for Windows Media Player 6.4 (KB925398)
Cumulative Security Update for Outlook Express for Windows Server 2003 (KB929123)
Security Update for Windows Server 2003 (KB924667)
Update for Windows Server 2003 (KB927891)
Security Update for Windows Server 2003 (KB932168)
Security Update for Windows Server 2003 (KB930178)
Connecting the storage to the host
We attached the database volume on the MSA30 storage to the HP ProLiant DL385 server by using a SCSI cable
connected from the Smart Array 6400 Controller in the server to the SCSI connector on the back of the MSA30.
Adding additional drives to the server via the HP Smart Array Configuration Utility, DISKPART utility, and
Disk Management Utility
1. Download and install the HP Smart Array Configuration Utility (ACU) from
http://h18000.www1.hp.com/products/servers/proliantstorage/softwaremanagement/acumatrix/index.html.
2. Open the ACU, and select the internal controller.
3. Click Create Array.
4. Select the remaining two available drives, and click OK.
5. Click Create Logical Drive.
6. Leave Fault tolerance at RAID 1+0, leave the default stripe size, and click OK.
7. Click Save.
8. Select the Smart Array 6400 external controller, then repeat steps 3 through 7, choosing all 14 drives on
the external MSA30 array.
9. Click Start, Run, type cmd and press Enter.
10. Type diskpart
11. Type list disk
12. Type select disk # (where # is the disk number of the internal volume).
13. Type create partition primary align=128 This aligns the partition with the default stripe size of
the RAID volume. The default stripe size when using the HP storage controller was 128 KB.
14. Repeat steps 11 through 13, substituting the disk number of the external MSA30 volume this time.
15. Exit the command prompt.
16. Click Start, Administrative Tools, Computer Management.
17. Click Disk Management.
18. Right-click the first unallocated volume, and choose Change Drive letter and path. Select the drive letter.
19. Right-click the volume, and select Format. Choose 64KB allocation unit size, NTFS file system, select
Perform Quick Format, and press OK.
20. Repeat steps 18 and 19 for the external MSA30 volume.
21. Create the folders necessary for the database. We used <driveletter>:\SQLData for the SQL Server
database volume and <driveletter>:\SQLLog for the SQL Server transaction log volume.
Installing SQL Server 2005 on the server
1. Navigate to the SQL Server 2005 DVD, and double-click. Choose the appropriate edition if the installer
prompts you with a menu.
2. Click the Server components link under the Install section to begin the installation.
3. At the End User License Agreement, accept the licensing terms, and click Next.
Principled Technologies, Inc.: Initial investment payback analysis: Dell PowerEdge R710
solution with Hyper-V vs. HP ProLiant DL385 solution
16
4.
5.
6.
7.
8.
9.
10.
11.
12.
13.
14.
15.
16.
17.
18.
19.
20.
21.
22.
23.
24.
25.
26.
27.
28.
29.
30.
After installing the prerequisites, click Next.
At the Welcome screen, click Next.
At the System Configuration Check, click Next.
At the Registration Screen, enter the appropriate name and company.
At the Components to Install screen, select SQL Server Database Services and Workstation components.
Click Advanced.
Uncheck Business Intelligent Development Studio, and uncheck Books Online & Sample Databases.
Click Next to start the installation.
At the Instance Name screen, click the Default instance radio button, and click Next.
At the Service Account screen, select the Use the built-in System account radio button.
Select Local system, and click Next.
At the Authentication Mode screen, select Mixed Mode.
Specify the “sa” logon password by entering a password in both fields, and click Next.
At the Collation Settings screen, click Next.
Accept the default Error and Usage Report Settings, and click Next.
At the Ready to Install screen, click Install to begin the installation.
At the end of the installation in the Setup Progress screen, click Next.
Click Finish to complete the installation.
Click Start, All Programs, Microsoft SQL Server, SQL Server Management Studio. Connect to the SQL
Server instance.
Right-click the instance in Object explorer, and choose Properties.
Click Processors, and select the Boost SQL Server Priority checkbox. Click OK.
Restart the SQL Server by right-clicking the instance and choosing restart.
Create a SQL Server login for the ds2user (see DVD Store setup section below for the specific script to
use).
Click Start, Administrative Tools, and Local Security Policy.
Double-click Perform Volume Maintenance Tasks, and add the System account.
Double-click Lock Pages in Memory, and add the System account.
Reboot the server before installing SQL Server SP3.
Installing Service Pack 3 for Microsoft SQL Server 2005
Service Pack 3 is available for download from
http://www.microsoft.com/downloads/details.aspx?FamilyID=ae7387c3-348c-4faa-8ae5949fdfbe59c4&displaylang=en.
1. Run SQLServer2005SP3-KB955706-x86-ENU.exe.
2. At the Welcome screen, click Next.
3. At Accept the License Agreement, click Next.
4. At the Feature Selection screen, keep the defaults, and click Next.
5. At the Authentication screen, click Next.
6. At the Error and Usage Reporting Settings screen, click Next.
7. At the Running Processes screen, click Next.
8. Click Install.
9. If a compatibility error occurs during the installation, click Run program.
10. Click Next.
11. At the Installation Complete screen, click Next.
12. Click Finish.
13. Reboot the server.
DVD Store setup
Data generation overview
We built the database schema using the scripts in the DS2 distribution package, though we made a few minor
modifications. The DS2 stress tool provides options to generate 10MB, 1GB, or 100GB datasets. To get the tool
to generate the 10 GB of user data we used in this test, we had to make a few straightforward changes to the
source code and to the DVD Store application’s scripts. Note: We created our test data on a Linux system to take
advantage of the larger RAND MAX.
Principled Technologies, Inc.: Initial investment payback analysis: Dell PowerEdge R710
solution with Hyper-V vs. HP ProLiant DL385 solution
17
Editing the ds2_create_orders.c module
The module ds2_create_orders.c defines constants that define the maximum values for the customer ID and the
product ID. The constants for the 10GB database size did not exist. We added the constants for this size.
On the command line for the ds2_create_orders.c module, we specified the size. The available options were S
(small), M (medium), and L (large). We added the case T for the 10GB database. In the switch statement that sets
the values for the variables max_cust_id and max_prod_id, we added cases that assigned them the proper values
for the 10GB database size.
We recompiled the ds2_create_orders.c module on Linux, following the instructions in the header comments. We
used the following command line:
gcc –o ds2_create_orders ds2_create_orders.c –lm
Editing the ds2_create_cust.c module
We had to make the same changes to the ds2_create_cust.c module that we made to the ds2_create_orders.c
module. On the command line for the ds2_create_cust.c module, we specified the size. The available options
were S (small), M (medium), and L (large). We added the case T for the 10GB database. In the switch statement
that sets the values for the variables max_cust_id and max_prod_id, we added cases that assigned them the
proper values for the 10GB database size.
We recompiled the ds2_create_cust.c module on Linux, following the instructions in the header comments. We
used the following command line:
gcc –o ds2_create_cust ds2_create_cust.c –lm
Generating the data for the 10GB database
We used shell scripts to run all four of the executables that generate the data. The distribution did not include
shell scripts for the 10GB size. We wrote shell scripts based on the ds2_create_cust_large.sh and
ds2_create_orders_large.sh scripts. The ds2_create_prod and ds2_create_inv executables did not ship with
associated shell scripts, so we created shell scripts using the instructions in the readme files. We ran the shell
scripts in the following order to generate the data for the 10GB database:
1.
2.
3.
4.
ds2_create_orders_10gb.sh
ds2_create_inv_10gb.sh
ds2_create_prod_10gb.sh
ds2_create_cust_10gb.sh
We waited until the processes finished before we moved onto the next step.
Creating the database
We modified the database creation SQL Server scripts in the DVD Store distribution package to build the
database schema, which includes the file structure, tables, indices, stored procedures, triggers, and so on. We
built a master copy of the 10GB database version for SQL Server 2005 and for SQL Server 2008, and then used
those master copies to restore our test database to the HP ProLiant DL385 solution and Dell PowerEdge R710
solution between each test run. We stored the backup file on the C: drive of each server for quick access.
We followed these steps to create the database:
1. We created the database and file structure using database creation scripts in the DS2 download. We
made size modifications specific to our 10GB database and the appropriate changes to drive letters.
2. We created database tables, stored procedures, and objects.
3. We set the database recovery model to bulk-logged to prevent excess logging.
4. We loaded the data we generated into the database. For data loading, we used the import wizard in SQL
Server Management Studio. Where necessary, we retained options from the original scripts, such as
Enable Identity Insert.
5. We created indices, full-text catalogs, primary keys, and foreign keys using the database-creation scripts.
Principled Technologies, Inc.: Initial investment payback analysis: Dell PowerEdge R710
solution with Hyper-V vs. HP ProLiant DL385 solution
18
6. We updated statistics on each table according to database-creation scripts, which sample 18 percent of
the table data.
7. On each SQL Server instance, we created a ds2user SQL Server login using the following Transact SQL
(TSQL) script:
USE [master]
GO
CREATE LOGIN [ds2user] WITH PASSWORD=N’’,
DEFAULT_DATABASE=[master],
DEFAULT_LANGUAGE=[us_english],
CHECK_EXPIRATION=OFF,
CHECK_POLICY=OFF
GO
8. We set the database recovery model back to full.
We made the following changes in the build scripts:
•
•
•
•
•
•
Because we varied the size of the datasets, we sized the files in our scripts to reflect the database size
and the number of files per filegroup. We allowed for approximately 40 percent free space in our
database files to ensure that filegrowth activity did not occur during the testing.
We followed Microsoft’s recommendation of having 0.25 to 1 file per filegroup per core. We used two files
per filegroup on the HP ProLiant DL385 server and in the virtual machines on the Dell PowerEdge R710
server.
We did not use the DBCC PINTABLE command for the CATEGORIES and PRODUCTS tables, both
because Microsoft recommends against this practice and because the commands do nothing in SQL
Server 2005 and SQL Server 2008.
In the case of SQL Server 2008, we added the FORCESEEK hint in the BROWSE_BY_ACTOR stored
procedure because in initial testing we found that SQL Server 2008 was choosing an index scan instead
of the preferred index seek, adding unnecessary overhead. This problem was not evident in SQL Server
2005.
We created a SQL Server login we called ds2user and mapped a database user to this login. We made
each such user a member of the db_owner fixed database role.
Using the DVD Store scripts as a reference, we created the full-text catalog and index on the PRODUCTS
table manually in SQL Server Management Studio.
We then performed a full backup of the database. This backup allowed us to restore the databases to a pristine
state relatively quickly between tests.
Editing the workload script - ds2xdriver.cs module
To use the 10GB database we created earlier, we had to change the following constants:
•
•
•
In the routine Controller(), we changed the string sizes. We added the T option for the 10GB database
size. DS2 uses the sizes string to interpret the db_size_str option.
In the class Controller, we changed the arrays MAX_CUSTOMER and MAX_PRODUCT. To each, we
added values specifying the bounds for the customer and product IDs. The Controller() routine uses these
arrays.
We added a command line parameter for the database name:
—database_name
Editing the workload script - ds2sqlserverfns.cs module
We changed the connection string to increase the number of available connections, to not use the default
administrator (“sa”) account, and to include a parameter for the database name. We raised the available
Principled Technologies, Inc.: Initial investment payback analysis: Dell PowerEdge R710
solution with Hyper-V vs. HP ProLiant DL385 solution
19
connections limit from the default of 100 to 200 to allow room for experimentation. We created a user account we
called ds2User and used that account.
The ds2connect routine in the ds2sqlserverfns.cs module defines sConnectionString. We used the following
string; the changes we made appear in bold:
string sConnectionString = “User ID=ds2User;Initial Catalog=“+dbname+”;Max
Pool Size=200;Connection Timeout=120;Data Source=“ + Controller.target;
Recompiling the ds2sqlserverdriver.exe executable
We recompiled the ds2xdriver.cs and ds2sqlserverfns.cs module in Windows by following the instructions in the
header comments. Because the DS2 instructions were for compiling from the command line, we used the
following steps:
1. Open a command prompt.
2. Use the cd command to change to the directory containing our sources.
3. Run the batch file C:\Program Files\Microsoft Visual Studio 9.0\Common7\Tools\vsvars32.bat. This sets
up the environment variables for us.
4. Execute the following command:
csc /out:ds2sqlserverdriver.exe ds2xdriver.cs ds2sqlserverfns.cs
/d:USE_WIN32_TIMER /d:GEN_PERF_CTRS
Conducting the test
To perform the test, we used a series of batch files. We stored batch files either under the C:\ServerShare folder
on each server or under the C:\ClientShare folder on the clients, and we used the PsExec utility to coordinate the
test procedures amongst the client machines, server machines, and controller. We used simple file sharing to
copy files from machine to machine, as we needed.
The testing procedure consisted of the following steps:
1.
2.
3.
4.
5.
6.
7.
8.
9.
10.
11.
12.
13.
Execute batch files to clean up prior outputs on client machines, the server machine, and the controller.
Drop the database on each SQL Server instance.
Restore the database on each SQL Server instance.
Pause briefly to wait for background tasks to complete before the scripts reboot the server.
The scripts reboot the client machines and server machine, and wait for a ping response from all test
machines.
Wait 10 additional minutes for any background tasks to complete.
Measure idle power for 2 minutes.
Start the counter logs on client machines, and start the data collector set on the server under test.
Start the workload connections.
Start the workload ramp-up period.
Start the workload on the server, and run it for 30 minutes.
Stop the workload.
Copy all output files to the controller.
Principled Technologies, Inc.: Initial investment payback analysis: Dell PowerEdge R710
solution with Hyper-V vs. HP ProLiant DL385 solution
20
Measuring power
To record each solution’s power consumption during each test, we used an Extech Instruments
(www.extech.com) 380803 Power Analyzer/Datalogger. We connected the power cord from the server under test
to the Power Analyzer’s output load power outlet. We then plugged the power cord from the Power Analyzer’s
input voltage connection into a power outlet. For the storage arrays, we used a second Power Analyzer, but
connected it the same way as we connected the server.
We used the Power Analyzer’s Data Acquisition Software (version 2.11) to capture all recordings. We installed the
software on a separate Intel processor-based PC, which we connected to the Power Analyzer via an RS-232
cable. We captured power consumption at one-second intervals.
To gauge the idle power usage, we recorded the power usage for 2 minutes while each system was running the
operating system, but otherwise idle, meaning the system was not running any test workload. To ensure the
system was idle, we allowed the system to sit for 10 minutes after booting to the desktop before starting the 2
minutes of idle power capture.
We then recorded the power usage (in watts) for each system during the testing at 1-second intervals. To
compute the average power usage, we averaged the power usage during the time the system was producing its
peak performance results. Because we measured the power of the server and storage separately, we added the
average power of both together to get the total power. We call this time the power measurement interval. See
Figure 7 (idle and workload power results) for the results of these measurements.
Principled Technologies, Inc.: Initial investment payback analysis: Dell PowerEdge R710
solution with Hyper-V vs. HP ProLiant DL385 solution
21
Appendix A – Test server information
Figure 8 presents detailed information for the test servers we used in this report.
Servers
General dimension information
Height (inches)
Width (inches)
Depth (inches)
U size in server rack (U)
Power supplies
Total number
Wattage of each (W)
Cooling fans
Total number
Dimensions (H x W) of each
Voltage (V)
Amps (A)
General processor setup
Number of processor packages
Number of cores per processor
package
Number of hardware threads
per core
System power management
policy
CPU
Vendor
Name
Stepping
Socket type
Core frequency (GHz)
L1 cache
L2 cache
L3 cache
Platform
Vendor and model number
Motherboard model number
Motherboard revision number
BIOS name and version
BIOS settings
Memory modules
Total RAM in system (GB)
Number of types of memory
modules
Vendor and model number
Dell PowerEdge R710
HP ProLiant DL385
3.5
17.0
27.0
2
3.4
17.5
26.0
2
2
870
2
575
5
2.5” x 2.5”
12
1.60
7
2.5” x 2.5”
12
1.10
2
2
4
1
2
1
Balanced
Always On
Intel
Xeon X5550
D0
LGA1366
2.66
32 KB + 32 KB (per core)
1 MB (4 x 256 KB)
1 x 8 MB
AMD
Opteron 254
E4
Socket 940
2.80
64 KB + 64 KB
1 MB
N/A
Dell PowerEdge R710
PWBYN967
X08
Dell 0.2.15
Enabled Virtualization Technology
HP ProLiant DL385 G1
4K0585
F01
HP A05
Default
96
4
1
1
Samsung M393B1K70BH1-CF8
MT18VDDF1282Y
Principled Technologies, Inc.: Initial investment payback analysis: Dell PowerEdge R710
solution with Hyper-V vs. HP ProLiant DL385 solution
22
Servers
Type
Speed (MHz)
Speed in the system currently
running @ (MHz)
Timing/latency (tCL-tRCD-iRPtRASmin)
Size (GB)
Number of RAM modules
Chip organization
Hard disk
Vendor and model number
Number of disks in system
Size (GB)
Buffer size (MB)
RPM
Type
Operating system
Name
Build number
File system
Language
Network card/subsystem
Dell PowerEdge R710
PC3-8500 DDR3
1,066
HP ProLiant DL385
PC-3200 DDR
400
800
400
6-6-6-18
3-3-3-8
96
12 x 8 GB
Double-sided
4
4 x 1 GB
Double-sided
Seagate ST973451SS
4
73
16
15,000
SAS
HP BD07285A25
4
72.8
8
15,000
SCSI
Windows Server 2008 Enterprise
Edition x64
6001
NTFS
English
Windows Server 2003 R2 Enterprise
3790
NTFS
English
Vendor and model number
Broadcom 5709c NetXtreme II
Type
Optical drive
Vendor and model number
USB ports
Number
Type
Integrated
Broadcom BCM5704 NetXtreme
Gigabit Ethernet
Integrated
TEAC DV-28S-VDB
Compaq SN-124
4
2.0
3
1.1
Figure 8: Detailed system configuration information for the two test servers.
Principled Technologies, Inc.: Initial investment payback analysis: Dell PowerEdge R710
solution with Hyper-V vs. HP ProLiant DL385 solution
23
Appendix B – Test storage information
Figure 9 presents detailed information for the test storage we used in this report.
Enclosure
General dimension information
Height (inches)
Width (inches)
Depth (inches)
U size in server rack
Power supplies
Total number
Wattage of each
Cooling fans
Total number
Dimensions (H x W) of each
Voltage (V)
Amps (A)
Hard disk
Dell EqualLogic PS6000XV
HP StorageWorks MSA30
5.25
19.0
21.5
3
5.20
19.0
20.5
3
2
450
2
499
4
4” x 4”
12
1.8
2
4” X 4”
12.5
2
Vendor and model number
Seagate ST3450856SS
Number of disks in system
16
Size (GB)
Buffer Size (MB)
RPM
Type
Storage connectivity (Fibre Channel,
SAS, SATA, iSCSI, SCSI)
Firmware revision
Storage cache (GB)
Number of storage controllers
Number of storage ports
Maximum Network bandwidth of
storage connectivity to host
450
16
15,000
SAS
HP BD1468856B, BD14686225,
BD146863B3
12 x BD1468856B, 1 x
BD14686225, 1 x BD146863B3
146
8
10,000
SCSI U320
iSCSI
SCSI U320
v4.1.1
1
2 (1 active)
4 per controller
Model/ N/A
N/A
1
1
1 Gb x 4
N/A
Dell PowerConnect 6248
v2.2.0.3
N/A
Switch type/model/firmware revision
Figure 9: Detailed system configuration information for the test storage.
Principled Technologies, Inc.: Initial investment payback analysis: Dell PowerEdge R710
solution with Hyper-V vs. HP ProLiant DL385 solution
24
Appendix C – Payback period calculation
In calculating the estimated payback period, we assume that investment costs occur at the beginning of the year
and we spread annual costs evenly throughout the year. Dell provided the components of the Dell PowerEdge
R710 solution. The investment costs include the following:
•
•
•
Intel Xeon Processor X5550-based Dell PowerEdge R710 server with 96 GB of memory and two fourcore processors. The list price for this server is $16,152.
Dell™ EqualLogic™ PS6000XV storage with 16 450GB 15,000 RPM disks. The list price of the storage
array is $55,000. We assign half ($27,500) of the storage array costs to this solution based on the
assumption that the array is a resource that can be shared with other workloads.
Migration costs. We assume a migration cost of $667, based on our estimate of 12 person hours required
for planning and migration tasks at a burdened hourly rate of $55.61.
Figure 10 shows the payback calculation for the Dell PowerEdge R710 solution and the seven HP ProLiant
DL385 solutions.
HP ProLiant
DL385 solutions
One-time initial investment (includes server,
storage hardware, and migration costs)
Monthly cost (annual costs divided by 12; includes
hardware support, maintenance and service
contracts, software support agreements, facility
costs, energy costs, and management costs)
Payback period
Dell PowerEdge
R710 solution
$0.00
$44,319.00
$3,413.67
$717.92
Difference
$44,319.00
(HP ProLiant
DL385 is lower)
$2,695.75
(Dell PowerEdge
R710 is lower)
16.4 months ($44,319.00/$2,695.75=16.4)
Figure 10: Payback calculation for the Dell PowerEdge R710 solution and the seven HP ProLiant DL385 solutions.
The server and storage hardware costs for the Dell PowerEdge R710 solution included the list price of the Dell
PowerEdge R710 server and the list price of the Dell EqualLogic PS6000 storage solution multiplied by the 50
percent of that solution that the test databases require. For the HP ProLiant DL385 solution server, these costs
included the replacement costs for failed disks. We made the following assumptions in estimating these costs:
•
•
•
•
•
The enterprise would dedicate the entire newer Dell PowerEdge R710 server to the tasks that the servers
it was replacing carried out; we therefore included the entire cost of the newer Dell PowerEdge R710
server in our analysis.
As they were in our tests, the log files would be on two internal disks on each server.
Other servers in the data center would share the storage in the Dell PowerEdge R710 solution and the
enterprise would apportion storage costs based on the percentage of the storage solution used. We
estimated that the high-demand DS2 workload we used in our cost calculations would use less than 10
percent of the storage capacity of the Dell EqualLogic PS6000 storage solution but would require most of
the IOPS capacity of the storage during peak load. Balancing the available storage and IOPS, we
estimated that half the storage capacity would be available for low-demand storage or for off-hours
processing.
The enterprise would dedicate both the HP ProLiant DL385 solution servers and storage enclosures to
the tasks our benchmark tests model.
The migration costs included an estimate of staff time to migrate software and data from the HP ProLiant
DL385 solution to the newer solution.
We made the following assumptions in estimating the support, maintenance, and service contract costs for
hardware:
Principled Technologies, Inc.: Initial investment payback analysis: Dell PowerEdge R710
solution with Hyper-V vs. HP ProLiant DL385 solution
25
•
•
•
The enterprise would typically select a 3-year support package with 7-day, 24-hour coverage and 4-hour
response time for newer hardware and would take over support internally after those agreements expire.
Therefore, for the Dell PowerEdge R710 solution, we included the costs for 3 Year ProSupport for IT and
Mission Critical 4HR 7x24 Onsite Pack in our cost estimates and divided those costs by 3 to show the
year-one cost.
For the HP ProLiant DL385 solution, we estimated an annual in-house support cost of $400 per server
and $300 per storage array, plus costs to replace failed disks based on PT estimates of a 4 percent
annual disk replacement rate.
Support agreements, the costs for which we include in the next category, would cover replacement of
failed disks for the Dell PowerEdge R710 solution.
We made the following assumptions in estimating the costs of software support agreements:
•
•
•
•
•
•
The HP ProLiant DL385 solution used Windows Server 2003 R2 Enterprise Edition with per-server
licenses and SQL Server 2005 Standard Edition with per-server licenses, and the enterprise kept up-todate software assurance agreements for that software.
The newer solution updated the operating system to Windows Server 2008 Enterprise Edition license by
upgrading some of the licenses used by the HP ProLiant DL385 solution.
The newer solution updated the SQL Server software to SQL Server 2008 Standard Edition by upgrading
some of the licenses used by the HP ProLiant DL385 solution.
The enterprise used their Software Assurance new version rights to upgrade the licenses they needed for
the newer solution. They saved the cost of the remaining software assurance agreements. These
agreements were due for renewal at the time of the solution acquisition.
The enterprise already owned the necessary CALS; thus, they fell outside the scope of the solution.
The enterprise would install Microsoft System Center Server Management Suite Enterprise on the server.
We include license and support costs for this product.
We made the following assumptions in estimating facility costs, which include rack-based space costs and
Ethernet port costs:
•
•
We estimated a fixed data center cost per rack, prorated by the percentage of the rack the solution used.
The older Dell PowerEdge 2850 solution requires 5u for each of the nine server-and-storage-array pairs,
for a total of 45u; by contrast, the single Dell R710 solution consumes only 5u.
We estimated an annual per-enclosure cost for data center ports of $179 based on PT experience.
We made the following assumptions in estimating energy costs:
•
•
•
•
We calculated energy costs for active and idle power consumption values (shown in Figure 7).
The server and storage array have an average year-round power utilization that is the average of the
active and idle power from the benchmark runs.
Average cost per kWh of power. Source: National commercial average for December 2008 from
http://www.eia.doe.gov/cneaf/electricity/epm/table5_6_a.html. The December average was $0.995. We
rounded up to $0.10 to allow for rising prices.
We estimated the energy cost of cooling the servers and storage arrays to be equal to the energy cost
required for running the solutions. The total energy cost was therefore twice the cost of running the
solution.
We used the following assumptions in estimating the management costs:
•
•
Each server administrator managed 40 servers.
We included an additional cost per storage array for storage array management. These costs were in
addition to the support costs under support, maintenance, and service contract costs for hardware.
Principled Technologies, Inc.: Initial investment payback analysis: Dell PowerEdge R710
solution with Hyper-V vs. HP ProLiant DL385 solution
26
About Principled Technologies
We provide industry-leading technology assessment and fact-based marketing services. We bring to every
assignment extensive experience with and expertise in all aspects of technology testing and analysis, from
researching new technologies, to developing new methodologies, to testing with existing and new tools.
When the assessment is complete, we know how to present the results to a broad range of target audiences. We
provide our clients with the materials they need, from market-focused data to use in their own collateral to custom
sales aids, such as test reports, performance assessments, and white papers. Every document reflects the results
of our trusted independent analysis.
We provide customized services that focus on our clients’ individual requirements. Whether the technology
involves hardware, software, Web sites, or services, we offer the experience, expertise, and tools to help you
assess how it will fare against its competition, its performance, whether it’s ready to go to market, and its quality
and reliability.
Our founders, Mark L. Van Name and Bill Catchings, have worked together in technology assessment for over 20
years. As journalists, they published over a thousand articles on a wide array of technology subjects. They
created and led the Ziff-Davis Benchmark Operation, which developed such industry-standard benchmarks as Ziff
Davis Media’s Winstone and WebBench. They founded and led eTesting Labs, and after the acquisition of that
company by Lionbridge Technologies were the head and CTO of VeriTest.
Principled Technologies, Inc.
1007 Slater Rd., Suite 250
Durham, NC 27703
www.principledtechnologies.com
[email protected]
Principled Technologies is a registered trademark of Principled Technologies, Inc.
All other product names are the trademarks of their respective owners.
Disclaimer of Warranties; Limitation of Liability:
PRINCIPLED TECHNOLOGIES, INC. HAS MADE REASONABLE EFFORTS TO ENSURE THE ACCURACY AND VALIDITY OF ITS
TESTING, HOWEVER, PRINCIPLED TECHNOLOGIES, INC. SPECIFICALLY DISCLAIMS ANY WARRANTY, EXPRESSED OR
IMPLIED, RELATING TO THE TEST RESULTS AND ANALYSIS, THEIR ACCURACY, COMPLETENESS OR QUALITY, INCLUDING
ANY IMPLIED WARRANTY OF FITNESS FOR ANY PARTICULAR PURPOSE. ALL PERSONS OR ENTITIES RELYING ON THE
RESULTS OF ANY TESTING DO SO AT THEIR OWN RISK, AND AGREE THAT PRINCIPLED TECHNOLOGIES, INC., ITS
EMPLOYEES AND ITS SUBCONTRACTORS SHALL HAVE NO LIABILITY WHATSOEVER FROM ANY CLAIM OF LOSS OR DAMAGE
ON ACCOUNT OF ANY ALLEGED ERROR OR DEFECT IN ANY TESTING PROCEDURE OR RESULT.
IN NO EVENT SHALL PRINCIPLED TECHNOLOGIES, INC. BE LIABLE FOR INDIRECT, SPECIAL, INCIDENTAL, OR
CONSEQUENTIAL DAMAGES IN CONNECTION WITH ITS TESTING, EVEN IF ADVISED OF THE POSSIBILITY OF SUCH DAMAGES.
IN NO EVENT SHALL PRINCIPLED TECHNOLOGIES, INC.’S LIABILITY, INCLUDING FOR DIRECT DAMAGES, EXCEED THE
AMOUNTS PAID IN CONNECTION WITH PRINCIPLED TECHNOLOGIES, INC.’S TESTING. CUSTOMER’S SOLE AND EXCLUSIVE
REMEDIES ARE AS SET FORTH HEREIN.
Principled Technologies, Inc.: Initial investment payback analysis: Dell PowerEdge R710
solution with Hyper-V vs. HP ProLiant DL385 solution
27