1
OBJ_DOKU-15148-005.fm Page 1 Wednesday, September 7, 2011 4:53 PM
Robert Bosch GmbH
Power Tools Division
70745 Leinfelden-Echterdingen
Germany
GHO 15-82 Professional
www.bosch-pt.com
2 609 140 740 (2011.09) O / 140 UNI
de
en
fr
es
pt
it
nl
Originalbetriebsanleitung
Original instructions
Notice originale
Manual original
Manual original
Istruzioni originali
Oorspronkelijke
gebruiksaanwijzing
da Original brugsanvisning
sv Bruksanvisning i original
no Original driftsinstruks
fi Alkuperäiset ohjeet
el
tr
pl
cs
sk
hu
ru
Ðñùôüôõðï ïäçãéþí ÷ñÞóçò
Orijinal işletme talimat
Instrukcja oryginalna
Původní návod k používání
Pôvodný návod na použitie
Eredeti használati utasítás
Îðèãèíàëüíîå ðóêîâîäñòâî ïî
ýêñïëóàòàöèè
uk Îðèã³íàëüíà ³íñòðóêö³ÿ ç
åêñïëóàòàö³¿
ro Instrucţiuni originale
bg Îðèãèíàëíà èíñòðóêöèÿ
sr
sl
hr
et
lv
lt
Originalno uputstvo za rad
Izvirna navodila
Originalne upute za rad
Algupärane kasutusjuhend
Instrukcijas oriģinālvalodā
Originali instrukcija
OBJ_BUCH-865-005.book Page 3 Wednesday, September 7, 2011 4:55 PM
3|
4
5
3
2
1
6
8
7
2
GHO 15-82
Professional
2 609 140 740 | (7.9.11)
Bosch Power Tools
OBJ_BUCH-865-005.book Page 4 Wednesday, September 7, 2011 4:55 PM
4|
A
B
6
13
13
12
6
9
C
10
11
D
15
6
16
Ø 35 mm
14
3
E
7
45°
2 609 140 740 | (7.9.11)
Bosch Power Tools
OBJ_BUCH-865-005.book Page 5 Wednesday, September 7, 2011 4:55 PM
5|
F
G
23
24
17
H
18
20
19
9 mm
max
18
19
22
82
ma mm
x
20
21
2 609 140 740 | (7.9.11)
Bosch Power Tools
OBJ_DOKU-27752-001.fm Page 11 Thursday, September 8, 2011 9:58 AM
English | 11
Entsorgung
Elektrowerkzeuge, Zubehör und Verpackungen sollen einer
umweltgerechten Wiederverwertung zugeführt werden.
Werfen Sie Elektrowerkzeuge nicht in den Hausmüll!
Nur für EU-Länder:
Gemäß der Europäischen Richtlinie
2002/96/EG über Elektro- und ElektronikAltgeräte und ihrer Umsetzung in nationales
Recht müssen nicht mehr gebrauchsfähige
Elektrowerkzeuge getrennt gesammelt und
einer umweltgerechten Wiederverwertung
zugeführt werden.
Änderungen vorbehalten.
English
Safety Notes
General Power Tool Safety Warnings
WARNING Read all safety warnings and all instructions. Failure to follow the warnings
and instructions may result in electric shock, fire and/or serious injury.
Save all warnings and instructions for future reference.
The term “power tool” in the warnings refers to your mainsoperated (corded) power tool or battery-operated (cordless)
power tool.
Work area safety
f Keep work area clean and well lit. Cluttered or dark areas
invite accidents.
f Do not operate power tools in explosive atmospheres,
such as in the presence of flammable liquids, gases or
dust. Power tools create sparks which may ignite the dust
or fumes.
f Keep children and bystanders away while operating a
power tool. Distractions can cause you to lose control.
Electrical safety
f Power tool plugs must match the outlet. Never modify
the plug in any way. Do not use any adapter plugs with
earthed (grounded) power tools. Unmodified plugs and
matching outlets will reduce risk of electric shock.
f Avoid body contact with earthed or grounded surfaces,
such as pipes, radiators, ranges and refrigerators.
There is an increased risk of electric shock if your body is
earthed or grounded.
f Do not expose power tools to rain or wet conditions.
Water entering a power tool will increase the risk of electric
shock.
f Do not abuse the cord. Never use the cord for carrying,
pulling or unplugging the power tool. Keep cord away
from heat, oil, sharp edges and moving parts. Damaged
or entangled cords increase the risk of electric shock.
Bosch Power Tools
f When operating a power tool outdoors, use an extension cord suitable for outdoor use. Use of a cord suitable
for outdoor use reduces the risk of electric shock.
f If operating a power tool in a damp location is unavoidable, use a residual current device (RCD) protected
supply. Use of an RCD reduces the risk of electric shock.
Personal safety
f Stay alert, watch what you are doing and use common
sense when operating a power tool. Do not use a power
tool while you are tired or under the influence of drugs,
alcohol or medication. A moment of inattention while operating power tools may result in serious personal injury.
f Use personal protective equipment. Always wear eye
protection. Protective equipment such as dust mask,
non-skid safety shoes, hard hat, or hearing protection
used for appropriate conditions will reduce personal injuries.
f Prevent unintentional starting. Ensure the switch is in
the off-position before connecting to power source
and/or battery pack, picking up or carrying the tool.
Carrying power tools with your finger on the switch or energising power tools that have the switch on invites accidents.
f Remove any adjusting key or wrench before turning
the power tool on. A wrench or a key left attached to a rotating part of the power tool may result in personal injury.
f Do not overreach. Keep proper footing and balance at
all times. This enables better control of the power tool in
unexpected situations.
f Dress properly. Do not wear loose clothing or jewellery. Keep your hair, clothing and gloves away from
moving parts. Loose clothes, jewellery or long hair can be
caught in moving parts.
f If devices are provided for the connection of dust extraction and collection facilities, ensure these are connected and properly used. Use of dust collection can reduce dust-related hazards.
Power tool use and care
f Do not force the power tool. Use the correct power tool
for your application. The correct power tool will do the
job better and safer at the rate for which it was designed.
f Do not use the power tool if the switch does not turn it
on and off. Any power tool that cannot be controlled with
the switch is dangerous and must be repaired.
f Disconnect the plug from the power source and/or the
battery pack from the power tool before making any
adjustments, changing accessories, or storing power
tools. Such preventive safety measures reduce the risk of
starting the power tool accidentally.
f Store idle power tools out of the reach of children and
do not allow persons unfamiliar with the power tool or
these instructions to operate the power tool. Power
tools are dangerous in the hands of untrained users.
f Maintain power tools. Check for misalignment or binding of moving parts, breakage of parts and any other
condition that may affect the power tool’s operation. If
2 609 140 740 | (8.9.11)
OBJ_DOKU-27752-001.fm Page 12 Thursday, September 8, 2011 9:58 AM
12 | English
damaged, have the power tool repaired before use.
Many accidents are caused by poorly maintained power
tools.
f Keep cutting tools sharp and clean. Properly maintained
cutting tools with sharp cutting edges are less likely to bind
and are easier to control.
f Use the power tool, accessories and tool bits etc. in accordance with these instructions, taking into account
the working conditions and the work to be performed.
Use of the power tool for operations different from those
intended could result in a hazardous situation.
Service
f Have your power tool serviced by a qualified repair person using only identical replacement parts. This will ensure that the safety of the power tool is maintained.
Planer Safety Rules
f Wait for the cutter to stop before setting the tool down.
An exposed rotating cutter may engage the surface leading
to possible loss of control and serious injury.
f Hold the power tool by insulated gripping surfaces only, because the cutter may contact its own cord. Cutting
a “live” wire may make exposed metal parts of the power
tool “live” and could give the operator an electric shock.
f Use clamps or another practical way to secure and support the workpiece to a stable platform. Holding the
work by your hand or against the body leaves it unstable
and may lead to loss of control.
f Use suitable detectors to determine if utility lines are
hidden in the work area or call the local utility company
for assistance. Contact with electric lines can lead to fire
and electric shock. Damaging a gas line can lead to explosion. Penetrating a water line causes property damage or
may cause an electric shock.
f Do not reach into the saw dust ejector with your hands.
They could be injured by rotating parts.
f Apply the machine to the workpiece only when
switched on. Otherwise there is danger of kickback when
the cutting tool jams in the workpiece.
f When working, always hold the planer in such a manner
that the planer base plate faces flat on the workpiece.
Otherwise the planer can become wedged and lead to injuries.
f Never plane over metal objects, nails or screws. The
planer blade and the blade shaft can become damaged and
lead to increased vibrations.
Products sold in GB only: Your product is fitted with an
BS 1363/A approved electric plug with internal fuse (ASTA
approved to BS 1362).
If the plug is not suitable for your socket outlets, it should be
cut off and an appropriate plug fitted in its place by an authorised customer service agent. The replacement plug should
have the same fuse rating as the original plug.
The severed plug must be disposed of to avoid a possible
shock hazard and should never be inserted into a mains socket elsewhere.
Products sold in AUS and NZ only: Use a residual current device (RCD) with a rated residual current of 30 mA or less.
2 609 140 740 | (8.9.11)
Product Description and Specifications
Read all safety warnings and all instructions. Failure to follow the warnings and instructions may result in electric shock, fire
and/or serious injury.
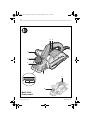
While reading the operating instructions, unfold the graphics
page for the machine and leave it open.
Intended Use
The machine is intended for planing of firmly supported
wooden materials, such as beams and boards. It is also suitable for beveling edges and rebating.
Product Features
The numbering of the product features refers to the illustration of the machine on the graphics page.
1 Planing depth scale
2 Depth adjustment knob (insulated gripping surface)
3 Sawdust ejector
4 Lock-off button for On/Off switch
5 On/Off switch
6 Planer base plate
7 V-grooves
8 Handle (insulated gripping surface)
9 Blade drum
10 Clamping element for blade
11 Fastening screw for planer blade
12 Carbide blade (TC)
13 Allen key
14 Extraction hose (Ø 35 mm)*
15 Chip/dust bag*
16 Park rest
17 Parallel guide
18 Scale for rebating width
19 Locking nut for adjustment of rebating width
20 Fastening bolt for parallel and beveling guide
21 Angle stop*
22 Locking nut for angle adjustment
23 Fastening bolt for rebating depth stop
24 Rebating depth stop*
*Accessories shown or described are not part of the standard delivery scope of the product. A complete overview of accessories
can be found in our accessories program.
Bosch Power Tools
OBJ_DOKU-27752-001.fm Page 13 Thursday, September 8, 2011 9:58 AM
English | 13
Technical Data
Planer
Article number
Rated power input
Output power
No-load speed
Planing depth
Rebating depth
Planing width, max.
Weight according to
EPTA-Procedure 01/2003
Protection class
W
W
min-1
mm
mm
mm
kg
GHO 15-82
Professional
3 601 E94 0..
600
340
16000
0 – 1.5
0–9
82
2.5
/II
The values given are valid for a nominal voltage [U] of 230 V. For different voltages and models for specific countries, these values can vary.
Please observe the article number on the type plate of your machine.
The trade names of the individual machines may vary.
Noise/Vibration Information
Measured sound values determined according to EN 60745.
Typically the A-weighted noise levels of the product are:
Sound pressure level 84 dB(A); Sound power level 95 dB(A).
Uncertainty K =3 dB.
Wear hearing protection!
Vibration total values ah (triax vector sum) and uncertainty K
determined according to EN 60745:
ah =8 m/s2, K=1.5 m/s2.
The vibration emission level given in this information sheet
has been measured in accordance with a standardised test
given in EN 60745 and may be used to compare one tool with
another. It may be used for a preliminary assessment of exposure.
The declared vibration emission level represents the main applications of the tool. However if the tool is used for different
applications, with different accessories or poorly maintained,
the vibration emission may differ. This may significantly increase the exposure level over the total working period.
An estimation of the level of exposure to vibration should also
take into account the times when the tool is switched off or
when it is running but not actually doing the job. This may significantly reduce the exposure level over the total working period.
Identify additional safety measures to protect the operator
from the effects of vibration such as: maintain the tool and the
accessories, keep hands warm, organise work patterns.
Declaration of Conformity
We declare under our sole responsibility that the product described under “Technical Data” is in conformity with the following standards or standardization documents: EN 60745
according to the provisions of the directives 2011/65/EU,
2004/108/EC, 2006/42/EC.
Technical file (2006/42/EC) at:
Robert Bosch GmbH, PT/ETM9,
D-70745 Leinfelden-Echterdingen
Bosch Power Tools
Dr. Egbert Schneider
Senior Vice President
Engineering
Dr. Eckerhard Strötgen
Engineering Director
PT/ESI
Robert Bosch GmbH, Power Tools Division
D-70745 Leinfelden-Echterdingen
07.09.2011
Assembly
f Before any work on the machine itself, pull the mains
plug.
Changing the Tool
f Be cautious when replacing the planer blades. Do not
grasp the planer blades by the cutting edges. Possible
danger of injury due to the sharp cutting edges of the planer blades.
Use only original Bosch carbide blades (TC).
The carbide blade (TC) has 2 cutting edges and can be reversed. When both cutting edges are dull, the planer blade 12
must be replaced. The carbide blade (TC) may not be resharpened.
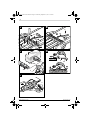
Disassembling the Planer Blade(s) (see figure A)
To reverse or replace the planer blade 12, rotate the blade
drum 9 until it is parallel to the planer base plate 6.
n Loosen the two fastening screws 11 with the Allen key
13 by approx. 1 – 2 turns.
o If necessary, loosen the clamping element 10 by giving it
a light blow with a suitable tool (e.g. a wooden wedge).
p Push the planer blade 12 sidewards out of the blade
drum 9 with a piece of wood.
Assembling the Planer Blade(s) (see figure B)
The guide groove of the planer blade always ensures continuous height adjustment when replacing or reversing it.
If required, clean the blade seat in the clamping element 10
and the planer blade 12.
When assembling the planer blade, ensure that it is seated
properly in the blade holder of the clamping element 10. The
planer blade must be assembled and aligned centred to the
planer base plate 6. Afterwards tighten the 2 fastening
screws 11 with the Allen key 13.
Note: Before restarting, check if the fastening screws 11 are
tightened well. Rotate the blade drum 9 by hand and ensure
that the planer blade does not graze.
Dust/Chip Extraction
f Dusts from materials such as lead-containing coatings,
some wood types, minerals and metal can be harmful to
one’s health. Touching or breathing-in the dusts can cause
allergic reactions and/or lead to respiratory infections of
the user or bystanders.
2 609 140 740 | (8.9.11)
OBJ_DOKU-27752-001.fm Page 14 Thursday, September 8, 2011 9:58 AM
14 | English
Certain dusts, such as oak or beech dust, are considered
as carcinogenic, especially in connection with wood-treatment additives (chromate, wood preservative). Materials
containing asbestos may only be worked by specialists.
– As far as possible, use a dust extraction system suitable for the material.
– Provide for good ventilation of the working place.
– It is recommended to wear a P2 filter-class respirator.
Observe the relevant regulations in your country for the
materials to be worked.
Clean the chip ejector 3 regularly. Use a suitable tool (e.g., a
piece of wood, compressed air, etc.) to clean a clogged chip
ejector.
f Do not reach into the saw dust ejector with your hands.
They could be injured by rotating parts.
To ensure optimum extraction of dust/chips, always work
with external dust extraction or a chip/dust bag.
External Dust Extraction (see figure C)
Mount the vacuum hose 14 (accessory) on to the saw dust
ejector 3.
Connect the vacuum hose 14 to a vacuum cleaner (accessory). An overview for connecting to various vacuum cleaners
can be found at the end of this manual.
The vacuum cleaner must be suitable for the material being
worked.
When vacuuming dry dust that is especially detrimental to
health or carcinogenic, use a special vacuum cleaner.
Integrated Dust Extraction (see figure C)
A chip/dust bag (accessory) 15 can be used for smaller jobs.
Insert the sleeve of the chip/dust bag firmly into the chip ejector 3. Empty the chip/dust bag 15 at regulary intervals to
maintain optimum dust collection.
Operation
Operating Modes
Adjusting the Planing Depth
With the adjustment knob 2, the planing depth can be adjusted variably from 0–1.5 mm using the planing depth scale 1
(scale graduation = 0.1 mm).
Park Rest (see figure D)
The park rest 16 allows the machine to be set down directly
after operation, without danger of damaging the working surface or the planer blade. While planing, the park rest 16 is tilted upwards thus enabling full contact of the rear part of the
planer base plate 6.
Note: The park rest 16 may not be removed.
Starting Operation
f Observe correct mains voltage! The voltage of the power source must agree with the voltage specified on the
nameplate of the machine. Power tools marked with
230 V can also be operated with 220 V.
2 609 140 740 | (8.9.11)
Switching On and Off
To start the machine, first push the lock-off button for the
On/Off switch 4 and then press the On/Off switch 5 and keep
it pressed.
To switch off the machine, release the On/Off switch 5.
Note: For safety reasons, the On/Off switch 5 cannot be
locked; it must remain pressed during the entire operation.
Working Advice
Planing (see figure D)
Set the required planing depth and place the front part of the
planer base plate 6 against the workpiece.
f Apply the machine to the workpiece only when
switched on. Otherwise there is danger of kickback when
the cutting tool jams in the workpiece.
Switch the machine on and guide the machine with even feed
over the surface to be planed.
To achieve high-grade surfaces, work only with low feed and
apply pressure on the centre of the planer base plate.
When machining hard materials (e.g. hardwood) as well as
when utilising the maximum planer width, set only low planing
depths and reduce planer feed, as required.
Excessive feed reduces the surface quality and can lead to
rapid clogging of the chip ejector.
Only sharp blades achieve good cutting capacity and give the
machine longer life.
The integrated park rest 16 also allows for continued planing
at any given location on the workpiece after an interruption:
– With the park rest folded down, place the machine on the
location of the workpiece where the planing is to be continued.
– Switch on the machine.
– Apply the supporting pressure onto the front part of the
planer base plate and slowly push the machine forward
(n). This tilts the park rest upward (o) so that the rear
part of the planer base plate faces on the workpiece again.
– Guide the machine over the surface to be planed (p) with
even feed.
Beveling Edges (see figure E)
The V-grooves in the front planer base plate allow quick and
easy beveling of workpiece edges. Depending on required
bevel width, use the corresponding V-groove. For this, place
the planer with the V-groove onto the edge of the workpiece
and guide it along the edge.
Groove to be used
Dimension
a (mm)
none
0–4
small
2–6
medium
4–9
large
6 – 10
Planing with Parallel/Beveling Guide (see figures F–H)
Mount the parallel guide 17 or beveling guide 21 to the machine using the corresponding fastening bolt 20. Depending
on the application, mount the rebating depth stop 24 with fastening bolt 23 to the machine.
Bosch Power Tools
OBJ_DOKU-27752-001.fm Page 15 Thursday, September 8, 2011 9:58 AM
English | 15
Loosen the locking nut 19 and adjust the requested rebating
width on the scale 18. Tighten the locking nut 19 again.
Adjust the requested rebating depth accordingly with the rebating depth stop 24.
Carry out the planing procedure several times until the requested rebating depth is reached. Guide the planer applying
sideward supporting pressure.
Beveling with the Beveling Guide
When beveling rebates and
surfaces, adjust the required
slope angle with the angle adjustment 22.
Maintenance and Service
Maintenance and Cleaning
f Before any work on the machine itself, pull the mains
plug.
f For safe and proper working, always keep the machine
and ventilation slots clean.
Ensure easy operation of the park rest 16 and clean it regularly.
When the carbon brushes wear below acceptable service tolerances, the machine will automatically cut out. The machine
must be sent to customer service for maintenance (for address, see the “Kundendienst und Kundenberatung” section.
If the machine should fail despite the care taken in manufacturing and testing procedures, repair should be carried out by
an after-sales service centre for Bosch power tools.
In all correspondence and spare parts order, please always include the 10-digit article number given on the type plate of
the machine.
After-sales Service and Customer Assistance
Our after-sales service responds to your questions concerning maintenance and repair of your product as well as spare
parts. Exploded views and information on spare parts can also be found under:
www.bosch-pt.com
Our customer service representatives can answer your questions concerning possible applications and adjustment of
products and accessories.
Great Britain
Robert Bosch Ltd. (B.S.C.)
P.O. Box 98
Broadwater Park
North Orbital Road
Denham
Uxbridge
UB 9 5HJ
Tel. Service: +44 (0844) 736 0109
Fax: +44 (0844) 736 0146
E-Mail: [email protected]
Bosch Power Tools
Ireland
Origo Ltd.
Unit 23 Magna Drive
Magna Business Park
City West
Dublin 24
Tel. Service: +353 (01) 4 66 67 00
Fax: +353 (01) 4 66 68 88
Australia, New Zealand and Pacific Islands
Robert Bosch Australia Pty. Ltd.
Power Tools
Locked Bag 66
Clayton South VIC 3169
Customer Contact Center
Inside Australia:
Phone: +61 (01300) 307 044
Fax: +61 (01300) 307 045
Inside New Zealand:
Phone: +64 (0800) 543 353
Fax: +64 (0800) 428 570
Outside AU and NZ:
Phone: +61 (03) 9541 5555
www.bosch.com.au
Republic of South Africa
Customer service
Hotline: +27 (011) 6 51 96 00
Gauteng – BSC Service Centre
35 Roper Street, New Centre
Johannesburg
Tel.: +27 (011) 4 93 93 75
Fax: +27 (011) 4 93 01 26
E-Mail: [email protected]
KZN – BSC Service Centre
Unit E, Almar Centre
143 Crompton Street
Pinetown
Tel.: +27 (031) 7 01 21 20
Fax: +27 (031) 7 01 24 46
E-Mail: [email protected]
Western Cape – BSC Service Centre
Democracy Way, Prosperity Park
Milnerton
Tel.: +27 (021) 5 51 25 77
Fax: +27 (021) 5 51 32 23
E-Mail: [email protected]
Bosch Headquarters
Midrand, Gauteng
Tel.: +27 (011) 6 51 96 00
Fax: +27 (011) 6 51 98 80
E-Mail: [email protected]
Disposal
The machine, accessories and packaging should be sorted for
environmental-friendly recycling.
Do not dispose of power tools into household waste!
2 609 140 740 | (8.9.11)
OBJ_DOKU-27752-001.fm Page 16 Thursday, September 8, 2011 9:58 AM
16 | Français
Only for EC countries:
According the European Guideline
2002/96/EC for Waste Electrical and Electronic Equipment and its implementation
into national right, power tools that are no
longer usable must be collected separately
and disposed of in an environmentally correct manner.
Subject to change without notice.
Français
Avertissements de sécurité
Avertissements de sécurité généraux pour l’outil
AVERTISSEMENT Lire tous les avertissements
de sécurité et toutes les instructions. Ne pas suivre les avertissements et instructions
peut donner lieu à un choc électrique, un incendie et/ou une
blessure sérieuse.
Conserver tous les avertissements et toutes les instructions pour pouvoir s’y reporter ultérieurement.
Le terme « outil » dans les avertissements fait référence à votre outil électrique alimenté par le secteur (avec cordon d’alimentation) ou votre outil fonctionnant sur batterie (sans cordon d’alimentation).
Sécurité de la zone de travail
f Conserver la zone de travail propre et bien éclairée. Les
zones en désordre ou sombres sont propices aux accidents.
f Ne pas faire fonctionner les outils électriques en atmosphère explosive, par exemple en présence de liquides inflammables, de gaz ou de poussières. Les outils
électriques produisent des étincelles qui peuvent enflammer les poussières ou les fumées.
f Maintenir les enfants et les personnes présentes à
l’écart pendant l’utilisation de l’outil. Les distractions
peuvent vous faire perdre le contrôle de l’outil.
Sécurité électrique
f Il faut que les fiches de l’outil électrique soient adaptées au socle. Ne jamais modifier la fiche de quelque façon que ce soit. Ne pas utiliser d’adaptateurs avec des
outils à branchement de terre. Des fiches non modifiées
et des socles adaptés réduiront le risque de choc électrique.
f Eviter tout contact du corps avec des surfaces reliées à
la terre telles que les tuyaux, les radiateurs, les cuisinières et les réfrigérateurs. Il existe un risque accru de
choc électrique si votre corps est relié à la terre.
f Ne pas exposer les outils à la pluie ou à des conditions
humides. La pénétration d’eau à l’intérieur d’un outil augmentera le risque de choc électrique.
2 609 140 740 | (8.9.11)
f Ne pas maltraiter le cordon. Ne jamais utiliser le cordon
pour porter, tirer ou débrancher l’outil. Maintenir le
cordon à l’écart de la chaleur, du lubrifiant, des arêtes
ou des parties en mouvement. Les cordons endommagés
ou emmêlés augmentent le risque de choc électrique.
f Lorsqu’on utilise un outil à l’extérieur, utiliser un prolongateur adapté à l’utilisation extérieure. L’utilisation
d’un cordon adapté à l’utilisation extérieure réduit le risque
de choc électrique.
f Si l’usage d’un outil dans un emplacement humide est
inévitable, utiliser une alimentation protégée par un
dispositif à courant différentiel résiduel (RCD). L’usage
d’un RCD réduit le risque de choc électrique.
Sécurité des personnes
f Rester vigilant, regarder ce que vous êtes en train de faire et faire preuve de bon sens dans l’utilisation de l’outil.
Ne pas utiliser un outil lorsque vous êtes fatigué ou sous
l’emprise de drogues, d’alcool ou de médicaments. Un
moment d’inattention en cours d’utilisation d’un outil peut
entraîner des blessures graves des personnes.
f Utiliser un équipement de sécurité. Toujours porter
une protection pour les yeux. Les équipements de sécurité tels que les masques contre les poussières, les chaussures de sécurité antidérapantes, les casques ou les protections acoustiques utilisés pour les conditions
appropriées réduiront les blessures des personnes.
f Eviter tout démarrage intempestif. S’assurer que l’interrupteur est en position arrêt avant de brancher
l’outil au secteur et/ou au bloc de batteries, de le ramasser ou de le porter. Porter les outils en ayant le doigt
sur l’interrupteur ou brancher des outils dont l’interrupteur
est en position marche est source d’accidents.
f Retirer toute clé de réglage avant de mettre l’outil en
marche. Une clé laissée fixée sur une partie tournante de
l’outil peut donner lieu à des blessures de personnes.
f Ne pas se précipiter. Garder une position et un équilibre adaptés à tout moment. Cela permet un meilleur contrôle de l’outil dans des situations inattendues.
f S’habiller de manière adaptée. Ne pas porter de vêtements amples ou de bijoux. Garder les cheveux, les vêtements et les gants à distance des parties en mouvement. Des vêtements amples, des bijoux ou les cheveux
longs peuvent être pris dans des parties en mouvement.
f Si des dispositifs sont fournis pour le raccordement
d’équipements pour l’extraction et la récupération des
poussières, s’assurer qu’ils sont connectés et correctement utilisés. Utiliser des collecteurs de poussière peut
réduire les risques dus aux poussières.
Utilisation et entretien de l’outil
f Ne pas forcer l’outil. Utiliser l’outil adapté à votre application. L’outil adapté réalisera mieux le travail et de manière plus sûre au régime pour lequel il a été construit.
f Ne pas utiliser l’outil si l’interrupteur ne permet pas de
passer de l’état de marche à arrêt et vice versa. Tout
outil qui ne peut pas être commandé par l’interrupteur est
dangereux et il faut le faire réparer.
Bosch Power Tools
OBJ_DOKU-15152-004.fm Page 139 Wednesday, September 7, 2011 4:56 PM
| 139
1 608 132 006
1x:
2 608 635 376
2x:
2 608 635 350
2 607 000 102
2 605 411 035
2 605 438 532
2 607 001 077
(45°)
Ø 35 mm
3 m 2 609 390 392
5 m 2 609 390 393
Bosch Power Tools
GAS 25
GAS 50
GAS 50 M
2 609 140 740 | (7.9.11)