1
QUALCOMM Globalstar
GCK-1400 Hands-Free Car Kit
Installation/User Guide
This guide is based on the production version of the QUALCOMM Globalstar GCK-1400
Hands-Free Car Kit. Software changes may have occurred after this printing.
QUALCOMM reserves the right to make changes in technical and product specifications
without prior notice.
QUALCOMM Incorporated
5775 Morehouse Drive, San Diego, CA 92121-1714
Document Number 80-98438-1EN Rev. A
Model Number CXCKT051-1
Copyright 1999 QUALCOMM® Incorporated.
All rights reserved.
This technology was exported from the United States in accordance with the Export
Administration Regulations. Diversion contrary to U.S. law prohibited.
QUALCOMM® is a registered trademark of QUALCOMM Incorporated.
Digital by QUALCOMM® is a registered trademark of QUALCOMM Incorporated.
SMART KEY™ is a trademark of QUALCOMM Incorporated.
Globalstar™ is a trademark of Loral Qualcomm Satellite Services, Inc.
Printed in the United States of America
Contents
Introduction ...............................................................................................1
Features .................................................................................................1
Safety precautions .................................................................................1
Exposure to radio frequency signals .....................................................1
Antenna care ..........................................................................................2
Phone operation .....................................................................................2
Driving ...................................................................................................2
Electronic devices ..................................................................................3
Pacemakers .....................................................................................3
Hearing aids ...................................................................................3
Other medical devices ....................................................................3
Vehicles ...........................................................................................3
Posted facilities ...............................................................................3
Blasting areas ........................................................................................4
Potentially explosive atmospheres .......................................................4
For vehicles equipped with an air bag ..................................................4
Operation ....................................................................................................5
Using the phone in a vehicle .................................................................5
Attaching the phone to the Hands-Free Car Kit cradle ...............5
Turning on the phone and Hands-Free Car Kit ...........................5
Car stereo mute ..............................................................................6
Hands-free mode ....................................................................................7
When you use hands-free mode .....................................................7
Adjusting speaker volume .....................................................................7
Connecting to a personal computer or fax (optional) ...........................7
Privacy Handset (optional) ....................................................................8
Privacy handset operation .............................................................8
Privacy Headset .....................................................................................9
Privacy headset operation ..............................................................9
Installation ................................................................................................11
Unpacking the Hands-Free Car Kit ...................................................11
Hands-Free Car Kit standard components .................................11
Hands-Free Car Kit optional accessories ....................................12
Component parts .................................................................................13
Globalstar electronic module .......................................................13
Hands-Free Car Kit cradle ...........................................................13
Hands-Free speaker .....................................................................13
Hands-Free microphone ...............................................................13
Car interface cable ........................................................................13
Car stereo muting (STEREO MUTE) ..........................................14
Ignition sense ................................................................................14
Outdoor unit .................................................................................14
Optional accessories ............................................................................14
ODU cable .....................................................................................14
Privacy handset ............................................................................14
Privacy headset and adapter .......................................................15
Cellular antenna (not included) ...................................................16
iii
Data cable (not included) .............................................................16
Precautions for installation .................................................................16
Where to install ...................................................................................16
Suggested positioning of components ..........................................17
Hands-Free Car Kit ......................................................................18
Installing the Hands-Free microphone ..............................................18
To install on the door post trim ...................................................18
To install on the sun visor ............................................................18
Installing the Hands-Free speaker .....................................................19
Connecting the leads on the car interface cable ................................20
Connection diagram .....................................................................20
Making the following connections ...............................................20
Notes on cable routing ..................................................................21
Mounting the ODU ..............................................................................22
Testing the car kit installation ...........................................................23
Errata .........................................................................................................24
Bulleted References .............................................................................24
MPE Distance Restriction Statement ................................................24
ODU Caution .......................................................................................24
iv
Before installing your Hands-Free Car Kit in a vehicle, please read this
manual thoroughly and retain it for future reference. Professional
installation is recommended.
Features
The Hands-Free Car Kit allows your Globalstar portable phone to be used
as a mobile telephone in your vehicle.
With this car kit installed in a vehicle, you can:
■
■
■
■
Turn the phone on and off by turning the vehicle’s ignition on and off.
Talk without picking up the phone.
Obtain unlimited talk time using DC current supplied by your vehicle.
Charge the phone’s battery.
Safety precautions
When using your phone in a vehicle, please observe the following rules.
Caution
Failure to follow these instructions may lead to serious personal
injury and possible property damage.
■
■
■
Secure the phone in your vehicle to prevent personal injury and
damage to the phone in the event of an accident.
When attaching or detaching the Outdoor Unit (ODU/GCK-9) to the car
kit with the ODU cables, disconnect all power to the phone and car kit.
Note that DC voltage is present in the central conductor of the ODU
cable (GCK-10, GCK-11). See Hands-Free Car Kit standard
components, page 11.
Detach the phone from the Hands-Free Car Kit and disconnect power
(GCK-7) to the Globalstar electronic module (GEM/GCK-1) when jump
starting the vehicle or recharging the car battery. Jump starting may
cause the car kit fuse to open. See Hands-Free Car Kit standard
components, page 11.
Exposure to radio frequency signals
Your wireless handheld portable telephone is a low power radio transmitter
and receiver. When it is ON, it receives and also sends out radio frequency
(RF) signals. In August, 1996, the Federal Communications Commissions
(FCC) adopted RF exposure guidelines with safety levels for hand-held
1
Introduction
Introduction
wireless phones. Those guidelines are consistent with the safety standards
previously set by both U.S. and international standards bodies:
ANSI C95.1 (1992)1
NCRP Report 86 (1986)2
■
ICNIRP (1996)3
Those standards were based on comprehensive and periodic evaluations of
the relevant scientific literature. For example, over 120 scientists,
engineers, and physicians from universities, government health agencies,
and industry reviewed the available body of research to develop the ANSI
Standard (C95.1).
■
■
The design of your phone and this car kit comply with the FCC guidelines
(and those standards).
Antenna care
Use only the supplied or an approved replacement antenna. Unauthorized
antennas, modifications, or attachments could damage the phone and may
violate FCC regulations.
Phone operation
Normal POSITION: Hold the phone as you would any other telephone
with the antenna pointed up and over your shoulder.
TIPS ON EFFICIENT OPERATION: For your phone to operate most
efficiently:
■
■
Extend your antenna fully.
Do not touch the antenna unnecessarily when the phone is in use.
Contact with the antenna affects call quality and may cause the phone
to operate at a higher power level than otherwise needed.
Driving
Check the laws and regulations on the use of wireless telephones in the
areas where you drive. Always obey them. Also, if using your phone while
driving, please:
■
■
■
Give full attention to driving – driving safely is your first
responsibility;
Use hands-free operation, if available;
Pull off the road and park before making or answering a call if driving
conditions require you to do so.
1.American National Standards Institute
2.National Council on Radiation Protection and Measurements
3.International Commission on Non-Ionizing Radiation Protection
2
Introduction
Electronic devices
Most modern electronic equipment is shielded from RF signals. However,
certain electronic equipment may not be shielded against the RF signals
from your wireless phone.
Pacemakers
The Health Industry Manufacturers Association recommends that a
minimum separation of six (6”) inches be maintained between a handheld
wireless phone and a pacemaker to avoid potential interference with the
pacemaker. These recommendations are consistent with the independent
research by and recommendations of Wireless Technology Research.
Persons with pacemakers:
■
■
■
■
Should ALWAYS keep the phone more than six inches from their
pacemaker when the phone is turned ON;
Should not carry the phone in a breast pocket;
Should use the ear opposite the pacemaker to minimize the potential
for interference.
If you have any reason to suspect that interference is taking place, turn
your phone OFF immediately.
Hearing aids
Some digital wireless phones may interfere with some hearing aids. In the
event of such interference, you may want to consult your service provider
(or call the customer service line to discuss alternatives). Optional for each
phone manufacturer.
Other medical devices
If you use any other personal medical device, consult the manufacturer of
your device to determine if it is adequately shielded from external RF
energy. Your physician may be able to assist you in obtaining this
information.
Turn your phone OFF in health care facilities when any regulations posted
in these areas instruct you to do so. Hospitals or health care facilities may
be using equipment that could be sensitive to external RF energy.
Vehicles
RF signals may affect improperly installed or inadequately shielded
electronic systems in motor vehicles. Check with the manufacturer or its
representative regarding your vehicle. You should also consult the
manufacturer of any equipment that has been added to your vehicle.
Posted facilities
Turn your phone OFF in any facility where posted notices require you to do
so.
3
Blasting areas
To avoid interfering with blasting operations, turn your phone OFF when
in a “blasting area” or in areas posted: “Turn off two-way radio”. Obey all
signs and instructions.
Potentially explosive atmospheres
Turn your phone OFF when in any area with a potentially explosive
atmosphere and obey all signs and instructions. Sparks in such areas could
cause an explosion or fire resulting in bodily injury or even death.
Areas with a potentially explosive atmosphere are often but not always
clearly marked. They include fueling areas such as gasoline stations; below
deck on boats; fuel or chemical transfer or storage facilities; vehicles using
liquefied petroleum gas (such as propane or butane); areas where the air
contains chemicals or particles, such as grain, dust, or metal powders; and
any other area where you would normally be advised to turn off your vehicle
engine.
For vehicles equipped with an air bag
An air bag inflates with great force. DO NOT place objects, including both
installed or portable wireless equipment, in the area over the air bag or in
the air bag deployment area. If in-vehicle wireless equipment is improperly
installed and the air bag inflates, serious injury could result.
4
Operation
Using the phone in a vehicle
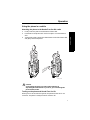
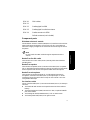
Attaching the phone to the Hands-Free Car Kit cradle
1.
2.
Clr
d
En
f3
de
c2
no6
Info
m
kl 5
v8
tu
yz9
Clr
wx
#
0
r
pw
e
as
e
l
Re ton
t
Bu
abc
jkl
2
d
En
def
3
6
mno
5
z9
wxy
uv8
#
0
r
pw
526AA_1999Q
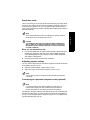
Caution
Avoid pulling the phone out of the cradle without first
depressing the release button. If you do so, you could damage the
phone and the cradle.
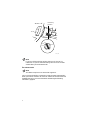
Turning on the phone and Hands-Free Car Kit
When you turn on the vehicle’s ignition, the phone and the car kit are
turned on. The phone is ready to make or receive a call.
5
Operation
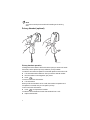
3.
Firmly insert the phone into the bottom of the cradle.
Push down on the phone until it locks into place. You should hear a
click.
To remove the phone, press the release button on the side of the cradle,
and gently remove the phone.
Accessory
position
ACC
OFF
START
LOCK
358AB_1999Q
Note
If you turn off the vehicle’s ignition during a call, the car kit
remains on so you can continue talking. The car kit turns off 30
seconds after you terminate the call.
Car stereo mute
Note
This feature requires a car stereo that supports it.
The car kit has the ability to mute the car stereo system automatically
when you make or receive a call if the car stereo has an audio mute line
(STEREO MUTE). For more information see Making the following
connections, page 20.
6
Hands-free mode
The car kit allows you to use your phone more efficiently and safely while
driving in your vehicle. When the phone is properly attached to the car kit
and the vehicle’s ignition is on, you can speak into the microphone and
listen to the other party through the speaker while keeping both hands on
the steering wheel.
Note
Operation
Do not extend the phone’s built-in Globalstar or cellular antenna
while the phone is connected to the car kit.
Caution
You should stop the vehicle in a safe place before attempting to
dial a number. If you must talk while the vehicle is moving, use
the Hands-Free microphone so that you can always concentrate
on traffic conditions.
When you use hands-free mode
■
■
It is recommended that you use one-touch dialing or speed dialing to
simplify key operations. See User Guide, QUALCOMM Globalstar
GSP-1610 Single-Mode User Terminal or QUALCOMM Globalstar
GSP-1600 Tri-Mode Phone.
Exercise extreme caution with traffic conditions.
Adjusting speaker volume
You can use the volume keys on the side of the phone to adjust the HandsFree speaker volume. You can:
■
■
Adjust the phone speaker volume while on a call.
Adjust the ringer volume when the phone is not on a call.
Note
You can also use menus to adjust the volume. Refer to the phone
user guide.
Connecting to a personal computer or fax (optional)
Note
You cannot hook up an analog fax machine to the car kit to
receive faxes. Check with your satellite service provider for
further information on connecting to a personal computer.
Connecting a serial port cable (RS-232, 9 pin) from your PC to the data port
of the car kit GEM (GCK-1) allows the phone to send and receive data via
the car kit. See Component parts, page 13. Use your PC fax software and
the cable provided with your PC.
7
Note
You cannot use the phone to talk while sending and receiving
data.
Privacy Handset (optional)
551AA_1999Q
Privacy handset operation
If background noise makes it difficult for either party to converse in handsfree mode, use the optional privacy handset or privacy headset.
To switch from hands-free operation to handset operation and make a call:
Lift the handset either before or after you dial the desired number.
Dial the number on the keypad of your phone.
■
Press Send .
To receive a call with the handset:
■
■
Lift the handset.
When you lift the handset from its cradle, the Hands-Free speaker and
microphone are muted, and you can speak in privacy.
■
To end a call with the handset:
Press End and replace the handset.
To switch from the handset to hands-free mode while on a call:
■
■
8
Replace the handset.
When you replace the privacy handset in its cradle, the Hands-Free speaker
and microphone are no longer muted.
Privacy Headset
Privacy headset operation
Note
Setting up the headset
■
■
■
■
Before starting to drive, plug the headset into the adapter attached to
the car kit cradle.
Place the earplug into either ear. The earplug should be firmly in place,
but not jammed into the ear canal.
Speak in the direction of the headset microphone instead of the HandsFree microphone. You will hear the other party through the earplug.
Use the volume keys or Preferences menu on your phone to adjust the
volume of the earplug when you are on a call. See the phone user guide.
Using the headset
To make a call with the headset:
Dial the desired number on the keypad of your phone.
Press Send .
When you use the headset, the Hands-Free speaker and microphone are
muted, and you can speak in privacy.
■
■
To receive a call with the headset:
When the phone rings, press any key except End or Pwr . See the
phone user guide for information on the AnyKeyAnswer option.
To end a call with the headset:
■
Press End .
To switch from the headset to hands-free mode:
■
■
Unplug the headset from the adapter when you are not driving.
9
Operation
The optional privacy headset cannot be used at the same time as
the privacy handset, and the headset will only work with the
optional headset adapter. See your service provider for this and
other optional accessories.
10
Installation
Unpacking the Hands-Free Car Kit
Unpack your Hands-Free Car Kit and check the contents listed on the next
page. If there is something missing, please contact the service provider
where you purchased your car kit.
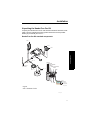
Hands-Free Car Kit standard components
GCK - 2
GCK - 6
GCK - 3
GCK - 1
Installation
GCK - 7
GCK - 14
GCK - 12
GCK - 13
Cellular antenna
(not included)
GCK - 10
Speaker
Microphone
Privacy Headset/
Handset
Modem (not included)
Cradle
GCK - 11
Power
GCK - 9
Black lead
Green lead
Red lead
Yellow lead
Ground
STEREO MUTE
Battery terminal (+)
ACC (or ON) position
549AA_1999Q
Legend:
GCK = Globalstar Car Kit
561AA_1999Q
11
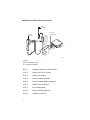
Hands-Free Car Kit optional accessories
GCK - 4
(Optional)
PC cable
(not included)
GCK - 8
(Optional)
GCK - 5
(Optional)
GCK - 1
028AB_1999q
Legend:
GCK = Globalstar Car Kit
PC = Personal computer
GCK-1
Globalstar electronic module (GEM)
GCK-2
Hands-Free Car Kit cradle
GCK-3
Hands-Free speaker
GCK-4
Privacy headset (optional)
GCK-5
Privacy headset adapter (optional)
GCK-6
Hands-Free microphone
GCK-7
Car interface cable
GCK-8
Privacy handset (optional)
GCK-9
Outdoor unit (ODU)
12
GCK-10
GCK-11
ODU cables
GCK-12
Cradle pigtail to ODU
GCK-13
Cradle pigtail to cellular antenna
GCK-14
Cradle connector to GEM
Cellular antenna (not included)
Component parts
Globalstar electronic module
The Globalstar electronic module (GEM/GCK-1) interfaces to the vehicle’s
power and houses the electronic circuit for the car kit. It provides and
controls the supply voltages for the accessories and the charge current for
the phone.
Note
Installation
Do not install the GEM inside the engine compartment of the
vehicle.
Hands-Free Car Kit cradle
The Hands-Free Car Kit cradle (GCK-2) securely holds the Globalstar
portable phone.
Hands-Free speaker
The Hands-Free speaker (GCK-3) connects to the GEM (GCK-1) speaker
jack. It should be mounted at least 20 inches (50 cm) away from the HandsFree microphone and should not be pointed towards the microphone.
Hands-Free microphone
The Hands-Free microphone (GCK-6), a unidirectional mouse-style
microphone, connects to the GEM (GCK-1) microphone jack. It can be
installed on the A-pillar with velcro or tape or on the driver’s sun visor
using double-sided tape.
Car interface cable
The car interface cable (GCK-7) connects to the GEM (GCK-1) via the 4-pin
connector.
■
■
■
■
The fused red lead connects to the positive terminal of the vehicle’s
battery.
The black lead ground (GND) connects to a clean, unpainted metallic
part of the vehicle.
The fused green lead (STEREO MUTE) is for car stereo mute.
The fused yellow lead (IGNS) is for ignition sense.
13
Car stereo muting (STEREO MUTE)
The phone provides a feature to mute the car stereo automatically during a
conversation which is convenient and provides for safer hands-free
operation. When the phone rings, the green fused lead provided for the
stereo mute feature goes to ground.
Note
This feature requires a car stereo that supports it.
Ignition sense
The ignition sense feature prevents the car kit from draining the vehicle’s
battery by executing an auto power off 30 seconds after the ignition key has
been turned off, if not currently in a call. The yellow wire of the car interface
cable (GCK-7) is used for the ignition sense feature. The use of ignition
sense is recommended to prevent accidental draining of the vehicle’s
battery. The wire is connected via a fuse to the vehicle’s ignition. Do not
connect it directly to the high voltage sections of the ignition circuit.
Outdoor unit
The Globalstar outdoor unit (ODU/GCK-9) permits communication with
the satellite when the phone is installed in the cradle.
ODU cables
The ODU cables consist of a pair of coaxial cables (GCK-10, GCK-11) that
connect the ODU to the cradle. Use only the ODU cables that come with
your car kit when connecting the ODU. Do not cut or modify the ODU
cables.
Caution
Note that DC voltage exists in the central conductor of the ODU
cable. Be sure that the cable connector is installed inside the
vehicle.
Optional accessories
ODU cable
If a longer transition cable is needed, an optional longer cable is available.
Contact your service provider for more information. Use only the ODU
cables that come with your car kit when connecting the ODU. Do not cut
or modify the ODU cables.
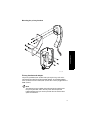
Privacy handset
The privacy handset (GCK-8) offers more privacy during a call than the
hands-free mode and can be attached to the cradle (GCK-2) with a
mounting plate. It is connected to the GEM (GCK-1) via a 6-position RJ-45
connector.
14
Mounting the privacy handset
Installation
694AA_1999Q
Privacy headset and adapter
The privacy headset (GCK-4) offers more privacy during a call and is
connected to the GEM through a headset adapter. The headset adapter
(GCK-5) attaches to the cradle (GCK-2) with velcro and is plugged into the
GEM (GCK-1).
Note
The optional privacy headset cannot be used at the same time as
the privacy handset, and it will only work with the optional
headset adapter. See your service provider for this and the other
optional accessories.
15
Cellular antenna (not included)
The cellular antenna is attached with a mini-UHF type connector to a
pigtail (GCK-13) on the cradle and is used to enhance reception when the
phone is in the cellular mode. This is not included with the car kit.
Data cable (not included)
A serial port data cable, RS-232, 9-pin, can connect a PC to the GEM (GCK1) so that the phone can send and receive data. This cable is not included in
the car kit. See Hands-Free Car Kit optional accessories, page 12.
Precautions for installation
■
■
■
■
■
■
■
■
■
■
It is recommended that the car kit be installed by a professional car kit
installer.
Choose the mounting location of the GEM and cradle carefully so that
they will not interfere with normal driving operations and are not
exposed to hot air from the vehicle’s heater.
The car kit should not be installed directly over any type of electrical or
connecting wire or pipeline for fuel, oil, air conditioning, or other
pipeline.
Do not place objects, including both installed or portable wireless
equipment, in the area over the air bag or in the air bag deployment
area. If in-vehicle wireless equipment is improperly installed and the
air bag inflates, serious injury could result.
The car kit is designed for vehicles with a negative ground 12 volt
electrical system only. If your vehicle has a negative ground 24 volt
electrical system, use a suitable voltage regulator. Other supply
voltages or polarities could damage the equipment.
Use only the cables included in the car kit or the optional longer cable
to connect the ODU to the cradle.
Turn off the ignition and disconnect the vehicle’s battery terminal
while installing the car kit.
After installation, check that the car interface cable and external
antenna cable do not interfere with opening and closing the doors and
trunk, or with moving the sun visor, steering wheel, brakes, gear shift,
or seats. Also, make sure all of the cables operate properly.
After installation, make sure that all the components are secured and
do not shift when the vehicle is in motion or comes to a stop.
Use the supplied fuses for wiring.
Where to install
Note
The installation of the car kit components may vary according to
the make and model of your vehicle. Suggested positioning of the
components is shown on the next page.
16
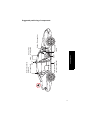
GEM
ODU
cable
Installation
Cellular antenna
cable (not supplied)
External cellular
antenna
(not supplied)
ODU
Phone and
cradle
To power
Hands-Free speaker
Hands-Free
microphone
Suggested positioning of components
17
Hands-Free Car Kit
Hands-Free
microphone
Phone and cradle
Info
Clr
End
Send
1
abc 2
ghi4
jkl5
prs7
tuv8
*
+0
def 3
mno6
wxyz9
#
pwr
297AB_98
For connection information, see Making the following connections, page 20.
Installing the Hands-Free microphone
Note
For best performance, locate the Hands-Free microphone
approximately 20 inches (50 cm) or more from the Hands-Free
speaker.
Have a trained professional install the microphone on the door post trim or
the driver’s side sun visor at a talking distance of approximately 16 inches
(40 cm). A shorter distance may enhance performance under noisy
conditions.
To install on the door post trim
1.
2.
Attach the microphone to the door post trim with velcro or double-sided
tape.
Aim the front of the microphone towards the driver.
To install on the sun visor
1.
2.
18
Attach the microphone under the sun visor with double-sided tape.
Aim the front of the microphone towards the driver’s face.
Adhere to
Visor
S012_43A
Note
Route the microphone cable and secure it with commercially
available tape so that it will not interfere with driving.
Installing the Hands-Free speaker
For best performance, install the speaker at least 20 inches (50 cm) from the
microphone and do not point it towards the microphone.
Remove the two screws to detach the speaker from the bracket.
Secure the bracket to an appropriate flat surface in the vehicle using
the two self-tapping screws (supplied), and then remount the speaker
onto the bracket.
550AA_1999Q
19
Installation
1.
2.
Connecting the leads on the car interface cable
■
■
■
■
■
Turn off the ignition and disconnect the vehicle battery terminal before
connecting the leads.
Make sure you do not drill through anything under the car.
Connect the red and then the yellow power input leads only after all
other leads have been connected.
Make firm connections.
Make sure the cables will not interfere with or be damaged by moving
seats, pedals, or emergency brakes.
Connection diagram
Speaker
Microphone
Privacy Headset/
Handset
Modem (not included)
Cradle
Power
2.
1.
Black lead
Green lead
Red lead
Yellow lead
Ground
STEREO MUTE
Battery terminal (+)
ACC (or ON) position
549AA_1999Q
Making the following connections
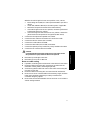
Use the connection diagram to connect the cables to the GEM in the order
listed.
1.
Before connecting the car interface cable to the GEM, connect the
leads.
Caution
Do not connect the car interface cable to the GEM first. Follow
the sequence listed below.
20
2.
3.
4.
5.
6.
7.
8.
Whether the vehicle ignition has an ACC position or not, connect:
❑
Black lead ground (GND) to a clean unpainted metallic part of the
vehicle.
❑
Green lead (STEREO MUTE) to the audio system, if applicable.
❑
Red lead to the positive terminal of the vehicle battery.
❑
If the vehicle ignition has an ACC position, connect the yellow lead
to the Power Sense ACC position.
❑
If the vehicle ignition does not have an ACC position, connect the
yellow lead to the ON position of the ignition (Power Sense).
Connect the microphone and speaker to the GEM.
Connect the ODU cables to the outdoor unit and to the cradle.
Connect the cellular antenna (not included).
Connect the cradle cable to the GEM.
Connect the data cable (not included) to the GEM.
Connect the optional privacy handset or privacy headset to the GEM.
Connect the car interface cable to the GEM.
Caution
■
■
Maximum input voltage is 16.0 volts.
Maximum input current is 4000 mA.
Notes on cable routing
■
■
■
■
■
■
If possible, use existing slots and channels in the vehicle for connection.
Route the cables so that they will not tangle or interfere with the
movement of seats, pedals, and emergency brakes.
Avoid routing cables under floor mats in foot traffic areas so they will
not catch on your feet.
Route the cables so that they will not cause electrical interference.
Be sure to cut the car interface cable to the necessary length, and then
install the fuse holders where they are easily accessible. See
Connection diagram, page 20.
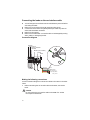
Be sure that the connector between GCK-10 and GCK-11 is inside the
vehicle. See figure below.
21
Installation
Exceeding the following input voltage and current values causes
the power fuse to open, and it will have to be replaced.
GCK - 9
GCK - 11
Info
Clr
End
Send
1
abc 2
ghi4
jkl5
prs7
tuv8
*
+0
def 3
mno6
wxyz9
#
pwr
GCK - 12
Carpet
GCK - 10
354AB_1999Q
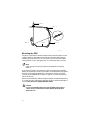
Mounting the ODU
The ODU is required for satellite communication when the phone is used
inside a vehicle. It should be mounted on the roof of the vehicle with an
unobstructed view of the sky. You can attach it to the roof of the vehicle
using magnets or a ski rack type mount, or permanently bolt it in place.
Note
Check with your service provider for available ODU mounting
options.
If you mount the ODU using magnets, check the surface of the magnets
before you put the ODU on the car. The ODU is not designed for high speed
driving, so use moderate speeds if it is mounted on the roof. The metal
surfaces on the underside of the ODU can get hot. Use caution when you
take it off the roof.
Be sure to route the ODU cable through the weather strip without pinching
it. Use only the ODU cables that come with the car kit when connecting the
ODU and do not cut or modify the ODU cable.
Caution
It is not recommended that you mount the ODU on the trunk or
a lower surface. Performance could be affected by the shadow
effect of the car.
22
Testing the car kit installation
Once installed, the car kit should be tested to ensure that it is operating
satisfactorily and that the position of the unit does not impair the driver’s
ability to control and operate the vehicle in any way.
Start the car, and listen for alternator whine. Check brake lights,
headlights, air conditioning, and windshield wipers to see that they operate
properly with the car kit installed.
Use the phone to make a call when the vehicle is parked and the engine is
running. During the call, switch off the engine. Ensure that the phone
operates with the engine running and with the engine turned off. For
information about using your phone, refer to the phone user guide.
Installation
23
Errata
The following text (bulleted references and MPE Distance Restriction
Statement) replaces the current content under Introduction in the
“Exposure to radio frequency signals” section.
Bulleted References
1.
2.
■
3.
4.
■
5.
Delete “ANSI C95.1 (1992)” from the bulleted list.
Replace it with:
ANSI/IEEE C95.1-1992 Standard
Leave “American National Standards Institute” in the footnote at the
bottom of the page.
Add the following to the bulleted list:
IRPA (1991) Guidelines on Protection Against Non-ionizing Radiation
Add “Internal Radiation Protection Association” to the footnote at the
bottom of the page.
MPE Distance Restriction Statement
Replace the paragraph under the bulleted list with the following:
The phone and this car kit are designed to comply with established ANSI,
FCC, and international safety standards for safe levels of human exposure
to RF energy. Nonetheless, RF field intensity at the surface of the
transmitting car kit antenna is fairly high. Maintaining a minimum line-of
-sight separation distance of 35 cm (14 inches) between the transmitting
antenna and all personnel will ensure that the General Population/
Uncontrolled Exposure Maximum Permissible Exposure (MPE) limits are
not exceeded. This satisfies the MPE limits mandated by the FCC in 47
CFR Ch. 1 (10-1-98 Edition), Part 1, paragraph 1.1310 and defined in the
ANSI/IEEE C95.1-1992 standard, and also satisfies the slightly
more-stringent European and international exposure limit
recommendations of IRPA (1991) and ICNIRP (1996).
ODU Caution
Add the following caution to the “Mounting the ODU” section:
Caution
As discussed in the earlier section on exposure to radio
frequency signals, when the ODU is transmitting, it is necessary
that at least 35 cm (14 inches) line-of-sight separation distance be
maintained between the ODU antenna and the people within or
near the vehicle. Mounting the ODU at least 35 cm from the edge
of the vehicle roof will satisfy that requirement under normal
use conditions.
24
A
adjusting headset earplug volume
phone menu 9
phone volume keys 9
adjusting phone speaker volume
phone menus 7
phone volume keys 7
adjusting ringer volume
phone volume keys 7
adjusting speaker volume
phone volume keys 7
air bag safety 4
antenna
cellular 7
Globalstar 7
antenna safety 2
C
cables
car interface cable 13
ODU 13, 14, 16
order to connect to GEM 20
routing 21
car interface cable 12
battery connection 13
ground 13
ignition sense 14
ignition sense feature 14
order to connect leads 20
stereo mute 13
car stereo mute 6, 14
cellular antenna 16
cradle 5, 12, 13
attaching the phone 5
privacy headset adapter 15
release button 5
cradle pigtail
to cellular antenna 13
to GEM 13
to ODU 13
D
data cable 16
data port
GEM 7
dialing
one touch 7
speed 7
driving safety 2
E
electronic devices 3
F
fax
connecting to 7
G
Globalstar
Electronic
(GEM) 12, 13
connection diagram 20
Module
H
Hands-Free Car Kit
components 13
features 1
positioning of components 17
standard components 11
testing 23
turning off 6
turning on 5
hands-free mode 5, 7
hearing aids 3
I
ignition sense
auto power off 14
installation 11
J
jump starting your vehicle
safety precautions 1
M
medical devices 3
microphone 7, 12, 13
connection to GEM 13
installation 13, 18, 19
mounting location 16
O
ODU cables 22
DC voltage 1, 14
operation 5
optional accessories 14
ODU cable 14, 16
privacy handset 14
Index-1
Index
Index
privacy headset and adapter 15
Outdoor Unit (ODU) 12, 14
mounting 22
mounting precautions 22
P
pacemakers 3
personal computer
connecting to 7
privacy handset 8, 12
mounting 15
operation 8, 9, 15
privacy headset 8, 12, 15
adapter 12, 15
operation 16
R
radio frequency 1
recharging the vehicle’s battery
safety precautions 1
S
safety
air bags 4, 16
antenna 2
blasting areas 4
driving 2
electronic devices 3
explosive atmospheres 4
hearing aids 3
hospitals 3
medical devices 3
pacemakers 3
precautions 1
radio frequency 1
speaker 7, 12, 13
connection to GEM 13
installation 19
U
user guide 7
Index-2