1
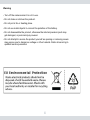
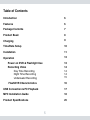
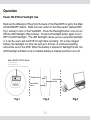
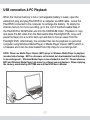
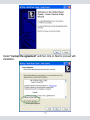
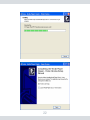
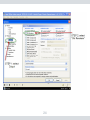
FlashDVR User’s Manual
Waterproof Digital Video Recorder with LED Flashlight
Copyright Notice
This manual is furnished under license and may be used or copied only in accordance with the
terms of such license. Except as permitted by such license, no part of this publication may be
reproduces, stored in a retrieval system, or transmitted, in any means, electronic,
mechanical, recording, or otherwise, including translation to another language or format, without
the prior written permission of SecurityMan.
The content of this manual is furnished for informational use only, is subject to change without
responsibility or liability for any errors or inaccuracies that may appear in this book.
All other product names, trademarks and registered trademarks in this document are the properties of their respective holders.
FCC Information
Note on FCC’s “Consistent Statement of Information” this product meet the requirements
specified in Part 15 of FCC Regulation. Operation rests with the following two conditions:
(1) The equipment should not cause any harmful interference.
(2) The equipment must accept any interference received, including interference that may us by
undesired operation.
After testing the product, we confirm that camera complies with the provision for class C digital
equipment in the 15th part in FCC regulation; and complies with the limitations for class B digital
equipment in Part 15 of FCC regulation.
1
2
Operating Restrictions
DO NOT use this product to violate one’s privacy. Monitoring one’s private
activities or private conversation without consent is illegal and this product is
not designed and manufactured for these purposes.
DO NOT use this product for any illegal activities. SecurityMan® shall not be
responsible for any consequences of illegal conducts made by users.
Conditions
Please read the following messages to make sure whether your working
environment is suitable.
• Ensure there is enough recording space in built-in memory card
• Make sure the rechargeable battery is fully charged
• The temperature should be kept between 0˚C to 50˚C (32˚F to 122˚F).
The relative humidity should remain from 15% to 85%.
• Avoid putting the product in places where occur might change rapidly in
temperature or humidity
• Keep it dry, dustless and avoid exposure in it directly in sunlight
• Keep product away from heat sources such as electric heater
• Do not use this product near aggressive chemicals
• Do not point the camera toward sunshine directly
3
Warning
• Turn off the camera when it is not in use.
• Do not shake or stricken the product.
• Do not put in fire or heating place.
• Do not use metal objects to connect the polarities of the battery.
• Do not disassemble the product, otherwise the internal precision parts may
get damaged, or personal injury caused.
• Do not attempt to service the product yourself as opening or removing covers
may expose you to dangerous voltage or other hazards. Refer all servicing to
qualified service personnel.
4
Table of Contents
Introduction
6
Features
6
Package Contents
7
Product Basic
8
Charging
9
Time/Date Setup
10
Installation
11
Operation
13
Power on DVR & Flashlight Use
Recording Video
Day Time Recording
Night Time Recording
Underwater Recording
13
14
14
14
15
FlashDVR Characteristics
16
USB Connection & PC Playback
17
MPC Installation Guide
18
Product Specifications
25
5
Introduction
Thank you for purchasing the FlashDVR. SecurityMan FlashDVR is a smart
flashlight with built-in color camera for video recording and 4GB memory of
storage. It is a portable flashlight DVR recorder ideal for daytime recording, night
time recording, and under water recording (submergible up to 33ft). Easy access
to recorded video files with USB interface to any personal computer to view, edit,
and playback footages. It is a great companion for drivers, bikers, campers,
hunters, scuba divers, cavers, hikers, and security guards.
Note: Please read the entire user’s manual before operation.
Features
• Sporty flashlight design with color camera built-in
• Crystal clear VGA quality with date and time stamp
• Strong lighting LED matrix for illumination in dark areas
• Submergible up to 10m (33ft) underwater
• Underwater “Lock” switch to prevent controls from the impact of water pressure
• Rechargeable Li-battery battery for 4/8 hours usage (record with flashlight on /
flashlight on only)
• Built-in 4GB of memory up to 2hrs of record time, records in AVI file format
• Mini USB 2.0 interface, connect to a PC for playback and download
• Easy mounting brackets for hat and bike
6
Package Contents
1 x Flashlight DVR (GETTIME.
1 x USB cable
1 x Hat-bracket
1 x User’s Manual
exe, User’s Manual inside)
1 x Lanyard
1 x Bike-bracket
1 x Plectrum
1 x Adhesive(3M)
1 x Power adapter/charger
User’s
Manual
7
Product Basics
Light Indicator Window
Flashlight Button
Record/Stop button
LED lighting
Microphone
Camera lens
Waterproof plug
Main ON/OFF/LOCK Switch
Mini USB Port
Waterproof plug
8
Charging
Charging is required before Flashlight DVR can be use. There are two ways to
charge; the first way is to use the A/C adapter (5V 1.5A) and the second way is
through a USB cable to plug into a computer to charge. To charge using the
A/C adapter, plug the adapter end into an electrical outlet and then plug the mini
USB to the back (remove Waterproof Plug) of FlashDVR and a solid red light
will appear in the Indicator Light Window to indicate charging. To charge using
a personal computer, plug the receptacle A of the USB cable into a PC and then
plug the mini USB to the back (remove waterproof Plug) of the FlashDVR and
a solid red light will appear in the Indicator Light Window to indicate charging, as
shown below. The solid red light will turn off when internal rechargeable battery
is fully charged. Charging the battery will take about 4 hours and a half.
Using A/C adapter
Using USB cable with computer
9
Time & Date Setup
Before using FlashDVR, test by recording a video file clip. Then plug the
DVR into a personal computer to playback (see USB connection & PC Playback
page 17). Check the Time/Date stamp of the recorded video file to be current up
to date. If the Time/Date stamp is not up to date, follow the procedure below to
reset the Time and Date:
1. Prepare a computer running windows 2000/ XP/ Vista/ 7 with current
Time/Date.
2. Connect the Flashlight DVR to a computer using the USB cable and a window
will appear as shown below. Select “Continue without scanning” to continue.
And then select “Open folder to view files” to get to the root explorer of Flashlight DVR directory.
10
3. Double click on the GETTIME.exe file in the root directory of the FlashDVR to
complete Time/Date setup.
Note. The system will automatically generate a temporary GETTIME.txt file in
the Mobile Disk directory of Flashlight DVR. Please also be noted that a PDF
copy of the FlashDVR user’s manual is included in the root directory of Flash
DVR for your reference.
4. Time/Date setup completed, disconnect USB cable.
Installation
There are two types of brackets included with the Flashlight DVR. The adventure
hat bracket and the bicycle handle bar bracket. The brackets can install in various
position and angle, as illustrated in the diagram below.
Bicycle handlebar
Adventure hat
11
Wrist
To mount the adventure hat bracket to an object, helmet or wrist, place the Flashlight DVR into the smoked plastic ring coupler holder, adjust DVR to a desire
position and then secure it down by fastening the latch. Next, loop and wrap the
elastic rubber strap around an object, helmet or wrist, thread elastic rubber strap
through the smoked plastic holder, and then secure by placing the plastic notch
through the belt hole of the rubber strap and thread the rubber strap through the
rubber holder. Lift up the rubber strap from the plastic notch to release the strap.
To mount the bicycle bracket to a handlebar or bar, place the Flashlight DVR in the
plastic holder (plastic notch towards the front of the DVR) and turn the thumb
screw clockwise to secure the DVR to the holder. Then mount the bracket to a
handlebar/bar and secure the bracket to the handlebar/bar by turning the thumb
screw clockwise. Turn the thumb screw counter clockwise to loosen the bracket.
Note: For handlebar/bar that is smaller than the bracket, use the adhesive
3M sticker on the inside of the bracket before securing. Measure the amount
of adhesive needed, cut adhesive according to measurement and then stick
it on the inside of the bracket.
To connect the lanyard to FlashDVR, simply hook the lanyard to the Waterproof
Plug of flashlight DVR and adjust the size by press+hold the leverage ball then
pull on the lanyard to adjust to the desire size.
12
Operation
Power ON DVR & Flashlight Use
Remove the Waterproof Plug from the back of the FlashDVR to get to the Main
LOCK/ON/OFF Switch. Slide the main switch to the ON position (default OFF,
Fig-1 below) to turn on the FlashDVR. Press the Flashlight button once to turn
ON the LED flashlight (Fig-2 below). Press the Flashlight button again to turn
OFF the LED flashlight. The LED flashlight can be use as a practical flashlight
or it can be use to aid the DVR for night time recording. On a fully charged
battery, the flashlight run time can last up to 6 hours of continuous lighting
without the use of the DVR. When the battery is drained in flashlight mode, the
LED flashlight will flash once to indicate battery is drained and then turns off.
Main ON/OFF/LOCK Switch
In the left: lock
In the middle: on
in the right: turn OFF the power
Flashlight button
Light indicator
window
Record/Stop
button
Fig-1
Fig-2
13
Fig-3
Recording Video:
Remove the Waterproof Plug and switch the Main LOCK/ON/OFF Switch to the
ON position. Place the microphone rubber plug (front of FlashDVR) away from
the microphone port for audio recording or vice versa to disable audio recording.
The microphone port is indicated with the microphone symbol. Press the Record
/Stop Button (Fig-2 above) to start video recording. Microphone port must be
plugged in with the waterproof microphone plug for underwater recording, see
Underwater Recording page 15 for detail.
Note: For smooth, stable playback footage; it is best to ensure the FlashDVR is stable during
recording as non-sturdy recording will result in un-stable playback the footages.
A solid blue light will appear for 7 seconds and then flashes blue in the Light
Indicator Window to indicate the DVR is in record mode. Press the Record/Stop
Button again to stop recording at any time. During the initial 7 seconds of solid
blue light recording, the audio will NOT record until the start of the blinking blue
light shown in the Indicator Window. FlashDVR comes with a 4GB built-in
memory. The built-in memory can record up to 2 hours of continuous video
footage in AVI format. Files will be automatically segmented into ~1GB per file,
on an average of 4~5 files for continuous recording until the memory is full.
Day time recording
A fully charged battery last up to 8.5 hours during day time recording without
the use of the LED flashlight. To record in the day, determine the use of the
audio (cover the mic port with the rubber plug to mute or vice versa), set the
recording angle and then press the Record/Stop button once to start recording.
Press the Record/Stop button again to stop the recording.
Night time recording
Night time recording requires the LED flashlight to be turill be shorter in
14
comparison to the day time use. The internal rechargeable battery of the FlashDVR in night time recording can last up to 4.5 hours (DVR on, Flashlight on).
To record at night time determine the use of audio (cover the mic port with the
rubber plug to mute or vice versa), position the camera at a desire angle, press
the Flashlight button to turn on the flashlight and then press the Record/Stop
button once to start recording. Night time recording visibility is limited to about
16~20 feet, environment may vary. Press the Record/Stop button again to stop
recording.
Underwater recording
There are several preparation steps to prepare before submerging FlashDVR
underwater for recording. To record underwater, please follow these steps:
1. Remove the waterproof plug from the back of FlashDVR by turning it counter
clockwise.
2. Switch the Main LOCK/ON/OFF Switch to the ON position. Turn ON the
flashlight if it is dark or leave the flashlight turn OFF if there is enough lighting
in the environment.
3. Press the Record/Stop button to start recording.
4. In order to avoid the impact of pressure on the buttons, the DVR has to be
in LOCK mode. Switch the Main Switch to the LOCK mode; this can be
accomplished by sliding the Main LOCK/ON/OFF Switch to the LOCK position.
Screw on the waterproof plug securely will prevent water from getting inside
to the Main Switch. In LOCK mode, everything is locked, including all the
buttons control.
5. Finally, to avoid the flow of water from damaging the microphone, please
make sure the microphone port is sealed with the waterproof rubber plug
located near the LED light.
6. FlashDVR is now safe to submerge underwater for recording and exploring.
15
WARNING 1: Before submerging FlashDVR: Microphone port must be plugged in with the
mic waterproof plug. The rear Waterproof Plug must be secure and tight.
WARNING 2: After underwater recording; switching from LOCK mode back to ON mode must
be precise; and cannot be over switch to OFF mode as recorded data will be lost. Take your
time and extra precaution when switching from LOCK to ON.
Flashlight DVR Characteristics
• Continuous recorded video file will automatically be saved as an incremental
file of ~1GB in size which is roughly 25~30 minutes of playback time per file.
• When the memory is full or the battery is drained, the Light Indicator Window
flashes red and the LED flashlight will flash once and then turns off. The
built-in memory of 4GB capacity can record 2 hours of continuous video
footage. Once full, it is necessary to connect the Flashlight DVR to a PC
to download and delete to empty and restore the memory capacity for
more recording.
• Avoid sliding the Main LOCK/ON/OFF Switch to the OFF position during record
mode as the recorded video data will NOT be saved.
• During charging or connection to a PC, Flashlight DVR cannot be use; cannot
record, cannot turn on flashlight.
• If the battery is drained, the Light Indicator Window will turn red, and the video
file will automatically be saved before shut down.
• In the recording, if the indicator light turns solid blue it means that the built-in
memory is full.
• If the computer cannot play the video file, please install the video player
software from http://mpc-hc.sourceforge.net/ Media Player Classic (MPC) or
latest update Window Media Player available.
16
USB connection & PC Playback
When the internal memory is full or rechargeable battery is weak, open the
waterproof plug and plug FlashDVR to a computer via USB cable. Leave the
FlashDVR connected to the computer to recharge the battery. To empty the
internal memory for more recording, go to the root of the Removable Disk of
the FlashDVR to DCIM folder and into the 100DSCIM folder. Playback or copy
and paste the AVI video from the Removable Disk Flashlight DVR. Copy and
paste the file(s) into a local or back up hard disk to free up space from the
Flashlight DVR. Alternatively, the recorded files can be playback on personal
computer using Windows Media Player or Media Player Classic (MPC) which is
a freeware and it can be downloaded from http://mpc-hc.sourceforge.net/ .
NOTE: Please use Media Player Classic (MPC) player or Windows Media Player to playback
recorded video footage. MPC is a freeware, not included, but downloadable from http://mpchc.sourceforge.net/ . Windows Media Player comes standard in most PC. Please reference
MPC and Windows Media Player help menu for software use and playback. When emptying
the memory, avoid deleting GETTIME.exe and FlashDVR User’s Manual.
17
MPC Installation Guide
To install the Media Player Classic, visit http://mpc-hc.sourceforge.net/ to
download the latest freeware MPC available and then double click on “MPCHomeCinema.1.3.1249.0(xxx).exe” to start the installation process as shown
below.
Click “Ok” at the Setup window as shown below.
At the Welcome window, click on Next to proceed.
18
Select “I accept the agreement” and then click on Next to proceed with
installation.
19
Click Next for the next 3 winows as shown below.
20
Be sure to check the “Create a desktop icon” as shown in the second window
below.
Then click on “Install” and then click on “Finish” to complete the installation
process as show below.
21
22
To open MPC player for playback, click on the “Media Player Clasic - Home
Cinema” shortcut on the desktop as shown below. Please reference MPC player
help menu for tutorial.
In case “Save Image” and “Save Thumbnails” does not allow image to be save,
click on View > Options > Output > Old Renderer (select Old Renderer) as shown
below, for MPC only. Then click on Apply and Ok to accept setting.
23
24
Product Specifications
Image Sensor
1/5” Color CMOS
Audio
Microphone built-in
Video Resolution
Storage Medium
Waterproof
Power Supply
Power Consumption
Rechargeable Battery
LED Power
Dimensions (WxDXH)
LED Light Color Temperature
Weight (net)
Viewing Angle
Video File Format
Video File Size ( Frame Size)
Recording Speed
Data transmission
Charge Time
Battery Work Time
Charge Current
Operating Temperature
Operating Humidity
640x480 (VGA)
4GB Built-in Memory
IP68 (10m max underwater)
5V 1.5A, positive inside
440mA
3.7V / 1800mAh Li-Battery
1W
119x38x46mm
5500~6000K
133g
55°
AVI
>30MB/min (21K/frame)
30 fps (auto)
USB 2.0
4 hrs 30min
4-8 hrs
1A
(MAX) 0°C~+50°C (+32°F~+122°F)
15%~85%RH
25