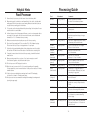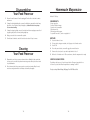
1
Signature Collection
W.P. APPLIANCES, INC.
Toll Free (800) 275-8273 Email address: [email protected]
Website: www.wolfgangpuck-kitchenware.com
Model BBLFP005
Printed in China
REV 1.0
All trademarks, service marks and trade names (collectively the “Marks”) are proprietary
to Wolfgang Puck World Wide.
PUCK
If you have any problems with this unit,
contact Consumer Relations for service
PHONE: 1- 800 -275 - 8273.
Please read operating instructions
before using this product.
Please keep original box and packing materials
in the event that service is required.
WOLFGANG
IMPORTANT NOTICE
Blender /
Food
Processor
Manual
Important Safeguards
When using electrical appliances, basic safety precautions should always be followed,
including the following:
1
Read all instructions carefully.
2
To protect against risk of electrical shock, do not put appliance base, cord or plug in
water or other liquid.
3
Close supervision is necessary when any appliance is used by or near children.
4
Turn unit off and unplug from outlet when not in use, before putting on or taking off
parts, and before cleaning. To disconnect, turn unit off, grasp plug, and pull from the
wall. Never yank on cord.
5
Avoid contact with moving parts.
6
Ensure that the food processor cover is locked in place before operating. Never operate
without the cover locked in place.
7
Your blender and food processor includes a safety interlock device which prevents the
unit from operating without the lids locked in place. Do not attempt to defeat this
interlock. Always check lids for damage prior to use.
8
Keep hands and utensils out of blender jar and food processor work bowl while
operating to prevent injury and/or damage to the unit. Use a scraper only when the
blender / food processor is not operating.
9
Do not operate any appliance with a damaged cord or plug or after the appliance
malfunctions or is dropped or damaged in any manner. Return
the appliance to an authorized service facility for examination, repair, or electrical or
mechanical adjustment.
Additional Safety Information
A short power-supply cord is provided to reduce the hazards resulting from
entanglement or tripping over a longer cord. An extension cord may be used with care;
however, be sure the marked electrical rating is at least as great as the electrical rating of
this appliance. The extension cord should be positioned such that it does not drape over
the counter or tabletop where it can be pulled on by children or tripped over. The
electrical rating of this appliance is listed on the bottom panel of the unit.
This appliance has a polarized plug (one blade is wider than the other). To reduce the risk
of electric shock, this plug will fit in a polarized outlet only one way. If the plug does not fit,
contact a qualified electrician. Do not modify the plug in any way.
10 The use of attachments not recommended or sold by the appliance manufacturer,
including canning jars, may cause fire, electric shock, or injury.
11 Do not use outdoors.
12 Do not let cord hang over edge of table or counter or touch hot surfaces, including the
stove.
13 Mixing flammable non-food substances can be harmful.
14 Blades are very sharp. Handle carefully. Store out of reach of children.
15 To avoid injury, never place cutting blade assembly on base without container
properly attached.
16 Always operate blender with cover in place.
17 When blending hot liquids, remove lid cap from cover and do not fill blender
beyond 3-cup level. Keep hands and face away from lid cap while motor is
running.
18 Do not use this appliance for other than intended use.
19 This appliance is intended for HOUSEHOLD USE ONLY.
SAVE THESE INSTRUCTIONS
1
2
Table of Contents
Important Safeguards
1
Additional Safety Information
2
About Wolfgang Puck
3
Know Your Blender / Food Processor
5
Before Your First Use
6
Assembling Your Blender
6
Using Your Blender
7
Cleaning Your Blender
7
Helpful Hints Blender
8
Speed Guide Blender Attachment
8
Assembling Your Food Processor
9
Wolfgang Puck,
owner of the famous
Spago restaurants and
one of the most influential
chef-restauranteurs in
America, is credited with
reviving California’s rich
culinary heritage. His cooking
innovations, a result of
blending fresh California
ingredients with his classical French techniques, are enjoyed by world leaders,
stars and fellow chefs alike. He established other trend-setting restaurants
like Postrio in San Francisco, Chinois on Main in Santa Monica, Granita,
Vert and Trattoria del Lupo. Home chefs can also share Mr. Puck’s talents
through his cookbooks and, of course, through his appliances!
3
Using Your Food Processor
10
Helpful Hints Food Processor
11
Processing Guide
12
Disassembling Your Food Processor
13
Cleaning Your Food Processor
13
Recipes
14
Limited Warranty
32
Signature Collection
Know Your
Blender / Food Processor
Before Your First Use
Wash all parts, except motor base and food processor gearbox, in warm soapy water.
Never immerse motor base or gearbox in water as this will damage the unit.
Assembling
Your Blender
Blender Jar &
Base
1
For safety purposes your blade assembly is designed to not fully remove from
your blender jar.
2
Your blender lid is designed to defeat operation of the blender unless the lid is
properly in place. You will notice three tabs on your blender lid, and two tabs on
your blender jar. The straight tab on the blender lid is used to engage the safety
interlock in the handle (Figure 1). Place the blender jar in front of you with the
handle facing to the right. Place the lid on the jar with the lid tabs to the left of
the tabs on the glass. Turn the lid counter clockwise until the straight tab is fully
engaged in the handle interlock above the handle and you cannot turn the lid
any further.
3
Place the filler cap into the lid and place the blender jar on the motor base with
the handle facing to the right of the control panel. This will engage the safety
activator pin as referenced in Figure 2.
4
Plug the blender into a 120-volt 60 Hz AC only outlet. Your blender is now ready
for use.
5
Before removing the blender jar from the motor base after use, always unplug the
unit first and make sure all lights on the control panel are out.
Food Processor Gearbox
Work Bowl
Food Processor
Cover with
Feed Tube
Motor base
Food
Pusher
Stem Adapter for
Slicer / Shredder
Disc
Filler Cap
Figure 1
Blender Lid
Stainless Steel
Chopping Blade
5
Figure 2
Reversible Slicing /
Shredding Disc
Jar Locking Tab
Safety Interlock Tab
6
Safety Activator Pin
Using Your Blender
1
2
3
4
5
Before operating the blender, make sure the blender jar is properly assembled
and in place on the motor base as outlined in the “Assembling Your Blender”
section on page 6. Put ingredients in jar and firmly attach lid. Always add
liquid ingredients first followed by solid ingredients.
This blender has 7 speeds or functions. Select the speed that best suits
your blending task. The indicator light will glow and indicate which speed you
have selected.
To add ingredients while the blender is on, remove the lid cap and drop
ingredients through the lid opening. Replace the lid cap securely when done.
Do not place your hands into the blender jar with the blender plugged in.
To start blending, press the On button and then select the desired speed. You can
change speeds during the blending process. When the blending process is
completed, press the Off button or re-press the currently selected speed button.
This blender is equipped with a Pulse function which allows you to pulse the
blender on and off at the desired speed without turning the blender off each time.
To utilize the Pulse function press the On button and then press the Pulse button.
You will notice that the Pulse indicator light will blink. Select the speed that you
wish to pulse and hold the button down for the desired time to pulse. Once you
remove your finger from the desired speed the blender will stop operating. Press
again to continue operation. To turn the pulse function off simply press the Pulse
button and the Pulse indicator will stop blinking.
Blender Helpful Hints
•
•
•
•
•
•
•
•
•
Cleaning Your Blender
Unplug your blender and remove glass jar from blender base by lifting straight up.
Rinse with warm water to remove any large food particles that may have accumulated
in the jar. For safety purposes your blade assembly is designed to not fully remove from
your blender jar. When cleaning your blender jar by hand always ensure that the jar is
removed from the motor base, and that the motor base is unplugged. Extreme caution
should be used when cleaning your blender jar as the blades are very sharp.
1 Your blender jar assembly can be cleaned by adding a small amount of dishwashing
detergent into the blender jar and fill halfway with water. Run on “mix” speed for
20 seconds and repeat with clean tap water.
2 Fully rinse the blender jar to remove all soapy residue. For stubborn stains fill
your assembled blender jar halfway with soapy water and allow to soak for 30
minutes. Repeat step 1 or use a thin nylon brush when cleaning around the blade assembly.
3 Wipe the cord and base clean with a damp cloth. Dry thoroughly.
Caution: Do not immerse the blender motor base in water or other liquid. Do not use
abrasive cleansers on any part of the blender.
If you must loosen your blade assembly to remove a piece of wedged food follow the
instructions below:
Disassemble the blender jar by turning the jar upside down and turning the protruding
tabs down and counter-clockwise. Do not force the blade assembly out of the glass jar,
merely clean around the gasket and blade assembly to remove any wedged food.
7
•
•
Your blender is equipped with a safety interlock that will prevent operation unless the
lid is properly placed on the blender jar, and the blender is properly placed on the
motor base. See Assembling Your Blender page 6.
Remove the lid cap while blending hot liquids; this will release any steam and
condensation that may build up inside the jar.
Do not place any utensil (spatula, fork, etc.) in the blender container while the
blender is operating. If you need to scrape ingredients from the sides of the jar, first
stop the blender and wait for the blades to completely stop moving.
When blending solid foods, always cut them into no larger than 1/2 inch to
1-inch pieces before placing them into the jar. Blend no more than 1/2 cup of these
foods at a time for uniform blending.
Remember that ice cubes vary in size and shape. Smaller ice cubes can be chopped
or crushed faster than larger ones. To add ice cubes to mixtures while the blender is
operating remove the lid cap and drop through the opening. Never attempt to crush
ice utilizing your food processor bowl.
If too much food is blended at one time, the motor may stall. If this happens, stop
the blender. Remove a portion of the food; repeat the blending process.
Always add liquid ingredients first, followed by solid ingredients.
To add food or liquid while the blender is operating, remove the lid cap from the
blender jar cover and drop the ingredients through the opening. Remember to replace
the lid cap when you have finished adding the ingredients.
Avoid over-blending. Usually, you will need to blend for only a few seconds,
not minutes.
This blender is not intended to do any of the following tasks: grind meat, mash
potatoes, whip cream, knead dough, whip egg whites, or serve as a juice extractor.
Never place any of the following ingredients into the blender jar: bones or large
pieces of solidly frozen foods. If the food cannot be cut with a knife, do not place
in the blender jar.
Speed Function Guide
for Blender Attachment
Chop
Mix
Stir
Puree
Pulse
Proc
Ice
All types of nuts, hard vegetables, and coffee beans
Powdered diet shakes, whip cream, bread crumbs
Salad dressings, sandwich spreads such as mayonaise,
frozen concentrated juices
Milkshakes, fruits for baby food, tomatos (Always core and remove
seeds from fruits before placing into blender jar)
The pulse button allows you to pulse any of the selected speeds by first
pressing pulse, and then your desired speed. In Pulse mode the blender
will stay on for as long as you keep your finger on the selected function
This speed should be utilized when using the food processor attachment.
Crush Smoothies & frozen cocktails. Always pulse several times in 5
second increments, then use the Puree function to desired consistenty
8
Assembling Your
Food Processor Attachment
Figure 1
1
Be sure the unit is unplugged. Place the work bowl on the
food processor gear box collar and twist counter-clockwise to lock
in place (see figure 1).
2
Place the assembled work bowl and gear box onto the
motor base.
3
If using the stainless steel chopping blade simply place it over
the shaft and allow it to fall freely to the bottom of the bowl.
Do not force the blade into the bowl. If the blade does not fall
freely simply turn it slightly left or right and place it onto the
shaft (see figure 2).
4
Figure 2
If using the reversible slicing / shredding disc first place the
stem adapter onto the gearbox shaft with large opening facing
down (see figure 3) and allow it to fall freely down onto the shaft.
Do not force stem adaptor onto the shaft. Then place the
slicing/shredding disc onto the stem (see figure 4) by matching
the shape of the stem adaptor to the slicing/shredding disk.
a. If shredding ensure that the raised shredding holes are on
top, if slicing ensure the raised slicing blade is on top.
5
Figure 3
Place the lid on the bowl by turning it counter-clockwise until
the lid clicks into place (see figure 5). The feed tube should be
in the same position and side as the handle. Place the food
pusher into the feed tube (see figure 6).
Using Your
Food Processor
The feed tube on the bowl can be used to add ingredients for processing. Use the
food pusher to push ingredients through the feed tube. You can also use the pusher
to seal off the feed tube while the appliance is running to prevent dust from entering
or foods/liquids from escaping.
Reversible Slicing and Shredding Disc
Use this disc for slicing and shredding fruits, vegetables, cheeses
and more.
Plug unit into a 120-volt 60 Hz AC only outlet. Turn the unit
on by pressing the On/Off button and then pressing the “Proc”
button. Use the food pusher when using the slicing or
shredding disks. Press the food down slowly and steadily
with the pusher.
IMPORTANT: Use GENTLE force to press down on the food
pusher. Excessive force could cause damage to the disk.
Figure 5
Figure 6
6
To stop your food processor, press the on/off button or
re-press the “Proc” button. Wait until the blade or disc comes to
a complete stop before removing the lid or bowl.
9
Precut large chunks of food to fit the size of the feed tube.
•
For best results, fill the feed tube evenly.
•
Press the ingredients down slowly and steadily with the pusher.
IMPORTANT: Use GENTLE force to press down on the food pusher. Excessive force
could cause damage to the disk.
•
When processing large quantities, process small batches at a time and empty the
bowl between batches. Caution: Blades are very sharp. Use care when handling.
Stainless Steel Chopping Blade
Use the stainless steel chopping blade for chopping, mixing,
blending, pureeing and preparing crumbs, and short crust pastry.
Note: Your food processor features a safety interlock system.
The unit will not operate unless the bowl and bowl cover are
properly aligned and locked into place.
Figure 4
•
•
•
Cut food into 3/4” pieces for best results.
•
Use the pulse feature to prevent over-processing.
•
Most foods should take 10 to 60 seconds to process. Avoid
letting the appliance run continuously.
If food sticks to the blade or side of bowl while processing, turn the unit off,
remove the lid, and use a spatula to remove or scrape down the ingredients.
When using the stainless steel chopping blade to chop, mince or puree, do not exceed 2
cups of liquid ingredients or 3 cups of dry ingredients. Use maximum quantity, and
then empty bowl for another batch.
10
Helpful Hints
Food Processor
1
Never attempt to process any food that cannot be cut with a sharp knife.
2
When mincing garlic, fresh herbs or small quantities of foods, add to feed tube with
multipurpose blade in place and processor running. Make sure bowl and all parts are
very dry before processing garlic or fresh herbs.
Processing Guide
Food
Attachment
Comments
APPLES
Slicing Side Up
Stack 2 quarters horizontally
in chute. Use moderate pressure.
BANANAS
Slicing Side Up
Peel and cut in half; use light pressure.
3
To chop nuts, use the chopping blade and the pulse setting. Use short pulses. Process
smaller batches for coarser texture.
BREAD
Chopping blade
Use up to 2 slices/broken into pieces.
Pulse speed.
4
Let hard cheeses, such as Parmesean and Romano, come to room temperature before
processing. For best results, chill soft cheeses in the freezer, such as cheddar and
mozzarella, for 10 to 15 minutes before processing.
CABBAGE
Shredding Side Up
Cut to fit chute; shred into bowl.
Add slaw ingredients (mayo, vinegar,
salt, etc.)
5
Make sure uncooked meats and poultry are very cold before processing.
CARROTS
Slicing Side Up
6
Do not overfill processing bowl. Fill no more then 1/3 to 1/2 full when chopping.
The bowl can hold up to 3 cups of dry ingredients or 2 cups liquid.
Cut into 4" lengths and pack in chute,
alternating thick and thin ends.
CELERY
(chopped)
Chopping blade
Up to 2 cups cut into 1/2" lengths.
Pulse to desired texture.
CHEESE
(cheddar)
Shredding
Side up cut chilled cheese
to fit chute/shred.
CHEESE
(parmesan)
Chopping blade
Cut into 1/2" cubes and
pulse up to 1 cup at a time.
CHOCOLATE
(grated)
Chopping blade
Use 1-2 squares cut into 8 pieces
Chop to desired texture.
CUCUMBER
Slicing Side Up
Cut to fit chute; use light pressure.
EGGS
(Hard boiled)
Chopping blade
Quarter up to 3 eggs and pulse to
desired texture. Add mayo, salt, and
seasoning for egg salad
NUTS
(chopped)
Chopping blade
Add up to 2 cups; pulse to
desired fineness.
ONIONS
Chopping blade
Quarter and fill chute, position onions
upright for coarsely chopped results.
Pulse.
PEPPERONI
Shredding Side Up
Cut into 4" (10 cm) lengths. Slice 1
piece at a time using firm pressure.
POTATOES
Shredding Side Up
Cut to fit chute. After shredding, place
in cold water to prevent darkening
before frying.
SQUASH
(shredded)
Shredding Side Up
Cut to fit chute; shred, salt and drain.
Fries well in butter or oil. Position in
chute & shred.
7
8
9
Position the slicing and shredding disks so that cutting surfaces are to the right of
the feed tube. This will allow one full rotation of the blade before contacting food.
If any part becomes stained or discolored after processing, clean with bleach and
water solution.
When processing several slices or pieces of food, put as many pieces as will
fit in feed tube together to help hold each other in place.
10 This food processor is NOT designed to crush ice.
11 Most foods can be processed in 10 to 30 seconds, depending on the quantity.
For large quantities, process in several batches. Let the processor rest about 1 minute
between batches.
12 If the food processor suddenly stops running, turn the unit OFF and unplug.
Let the unit cool down for 15 minutes and restart.
13 A food processor is not recommended for making Italian meringue (a meringue made
by using hot sugar syrup).
11
12
Homemade Mayonnaise
Disassembling
Your Food Processor
Makes 1 1/4 Cup
1
Be sure the unit is turned off and is unplugged. Turn the lid on the bowl clockwise
and remove.
2
If using the slicing/shredding disc, remove the disk before removing the bowl. Grasp
the plastic collar of the disc and pull straight up. Caution: Blades are very sharp.
Use care when handling.
3
If using the chopping blade, remove it from the bowl before emptying processed food
by grasping the plastic collar and pulling straight up.
4
Empty processed food or remove with a spatula.
5
Turn the bowl clockwise to unlock it from the motor base. Lift up to remove.
Cleaning
Your Food Processor
1
2
Disassemble your food processor as referenced above. Wash the blades, work bowl,
food processor cover and food pusher in warm soapy water. Do not place these items
in your dishwasher.
Do not immerse the food processor gearbox or motor base in water. Wipe the cord,
motor base and gearbox with a clean damp cloth and dry thoroughly.
13
INGREDIENTS
3 large egg yolks
1 teaspoon white vinegar
1 teaspoon dijon mustard
1/4 teaspoon salt
1/4 teaspoon white pepper
1 cup mild flavored oil, such as vegetable oil
METHOD
1
Secure blender to base.
2
Put egg yolks, vinegar, mustard, salt & pepper into blender carafe.
3
Secure lid.
4
Press the puree button; run untill egg yolks are well beaten.
5
Remove the clear plastic cap and slowly drizzle in the oil.
6
When oil is finished run for 30 seconds more, then the mayonnaise is ready.
SERVING SUGGESTIONS
Try adding a tablespoon of fresh chopped herbs. Tarragon is wonderful in a
chicken or potato salad. Basil mayonnaise is amazing on a BLT.
Recipe courtesy Debra Murray, Wolfgang Puck HSN Guest Host
14
Pesto
Makes scant 1/4 cup
Basil Garlic Vinaigrette
This simple dressing is great over fresh tomatoes, and makes a wonderful
marinade for chicken and shrimp.
INGREDIENTS
3 tablespoons extra-virgin olive oil
3 medium garlic cloves, coarsely chopped
2 tablespoons pine nuts, lightly toasted
12 medium fresh basil leaves, washed, dried, and coarsely chopped
Pinch salt
METHOD
1
In your blender, pour in the oil first, then the garlic, nuts, and finally
the basil leaves.
2
Blend on low speed to a smooth paste. Season with salt.
Makes about 1 cup
INGREDIENTS
1/2 cup fresh basil leaves, chopped
2 tablespoons of chopped garlic
1/4 cup champagne vinegar
2 tablespoons grated Parmesan cheese
1/2 cup olive oil
Salt
Freshly ground pepper
METHOD
Recipe courtesy Debra Murray, Wolfgang Puck HSN Guest Host
1
In your blender, combine the basil, garlic, vinegar, and Parmesan cheese
until the basil is pureed. With the motor running, pour the oil through the
opening and blend until smooth. Season with salt and pepper to taste; pour
into a small bowl, and set aside. Whisk before using.
Recipe courtesy Debra Murray, Wolfgang Puck HSN Guest Host
15
16
Soup of Pistou
with Basil Oil
Soup of Pistou
with Basil Oil (cont.)
Makes 8 servings
3
INGREDIENTS
SOUP
Prepare the basil oil: Place the food processor on the base with the chopping
blade attached. Place the basil and oil in food processor. Lock on the lid.
Press the puree button.
4
Brush one side of each slice of bread with a little of the basil oil and arrange
on a baking tray. Watching carefully so that the bread does not burn, toast
in the oven.
5
Ladle the soup into 8 heated bowls and serve with the toasted bread.
Pass the remaining basil oil. Serve immediately.
2 tablespoons olive oil
2 cups thinly sliced leek (1 whole)
1 cup carrot (1 whole), diced
1 cup celery, diced
1 large yellow squash, trimmed and cubed
1/2 cup green beans, diced
1/2 cup tomatoes, seeded and diced
6 cups chicken stock, heated
1 tablespoon garlic, minced
1 teaspoon salt
1/2 teaspoon freshly ground white pepper
juice from 1/2 medium lemon
Recipe courtesy Wolfgang Puck, Adventures in the Kitchen (Random House, 1991)
PISTOU SAUCE
2/3 cup olive oil
1/2 cup basil leaves
4 cloves garlic
2 medium tomatoes, peeled and seeded
BASIL OIL
1/2 cup olive oil
12 leaves fresh basil
8 slices country bread
METHOD
1
In a large heavy 4-quart saucepan, heat the olive oil. Over medium-high heat,
sauté the leek, carrot, and celery for 2-3 minutes, stirring occasionally. Add
the squash, green beans, and tomatoes, and cook 2 minutes longer. Pour in
the stock and add the garlic. Season with salt, pepper, and lemon juice and
cook over medium heat 25-30 minutes.
2
Meanwhile, prepare the pistou sauce: Place blender on base. Add all the
ingredients for pistou sauce. Secure the lid. Press the puree function.
Puree untill smooth. Pour into the finished soup and correct seasoning to taste.
17
18
Gazpacho with Crabmeat
Spago House Salad Dressing
Makes 8 servings
Makes 1 1/4 cups
INGREDIENTS
INGREDIENTS
2 1/2 pounds very ripe medium size tomatoes, cored and seeded
2 medium cucumbers, peeled and seeded
1 medium bell pepper (yellow, green or red), cut into 1-inch cubes
2 large celery stalks, cut into 1" pieces
3 tablespoons tomato paste
2 teaspoons salt
1/2 teaspoon freshly ground pepper
1/2 teaspoon cayenne pepper
1/4 cup olive oil
1 tablespoon sherry wine vinegar
2 cups vegetable stock or tomato juice
1/2 pound fresh lump crabmeat at room temperature
2 large shallots, peeled
1 tablespoon Dijon mustard
2 tablespoons zinfandel vinegar
2 tablespoons sherry wine vinegar
1/2 cup olive oil
1/2 cup vegetable oil
salt and freshly ground pepper to taste
METHOD
1
Secure the food processor to the base with the chopping blade attached.
2
Secure the lid.
3
Press the chop button, put the shallots through the feed tube, mince. Add
mustard, the vinegars, and slowly drizzle in the oil.
4
Remove the lid and add the desired salt and pepper for taste. Secure lid and
press process for 3 seconds.
5
Transfer to covered container and refrigerate until needed.
METHOD
1
In a large stainless steel, glass, or ceramic bowl, combine the tomatoes,
1 1/2 cucumbers, bell peppers, celery, tomato paste, salt, pepper, and
cayenne. Pour the olive oil and vinegar over vegetables. Cover and refrigerate
6 - 8 hours, up to overnight, stirring occasionally.
2
Place the food processor attachment on the base with the chopping blade
attached. Put vegetable mixture in food processor, secure lid and press the
chop button. This will take about 4 different batches. Do not
over chop, you want the vegetables minced but still with some texture.
3
Return the minced vegetables to the bowl, pour in the stock or tomato juice.
Correct seasoning to taste and chill until serving time.
4
When ready to serve, cut the remaining half of a cucumber into thin slices.
5
Ladle gazpacho into 8 soup bowls. Garnish with the cucumber slices and
top with crabmeat.
Recipe courtesy Wolfgang Puck, Adventures in the Kitchen (Random House, 1991)
Recipe courtesy Wolfgang Puck, Adventures in the Kitchen (Random House, 1991)
19
20
Peanut Butter
Black and Green Olive Tapenade
Makes 1 1/2 cups
Makes 4 servings
INGREDIENTS
INGREDIENTS
1 1/2 cups roasted peanuts -salted or unsalted
1 stick canola spread
1/4 cup light brown sugar
1 cup black niçoise olives, pitted
1 cup small French olives such as Picholines, pitted
1/2 cup oven dried tomatoes, drained
1 tablespoon capers
1 clove garlic, peeled
1 filet anchovy
1/2 tablespoon chopped basil leaves
1/2 tablespoon chopped fresh thyme leaves
1/2 tablespoon flat leaf parsley, chopped
1/4 tablespoon fresh oregano, chopped
1/4 cup extra virgin olive oil
METHOD
1
Place all ingredients into food processor with chopping blade attached.
2
Secure food processor lid.
3
Press the process button and process untill smooth, unless a chunky texture
is desired.
Recipe courtesy Debra Murray, Wolfgang Puck HSN Guest Host
METHOD
1
Secure the food processor to the base with the chopping blade attachment
in place.
2
Place all the ingredients except the oil in the food processor.
3
Secure the lid.
4
Press the pulse button, then press the ice crush button on and off until the
ingredients are coarsely chopped but well blended.
5
Press the chop button and slowly drizzle the oil through the feed tube.
6
Transfer to a bowl, cover with plastic wrap, and refrigerate until ready to use.
(Good for up to 1 month.)
SERVING SUGGESTIONS
This is a wonderful spread for a panini sandwich, or try topping crostini's with
this and goat cheese for a flavor explosion.
Recipe courtesy Wolfgang Puck, Live, Love, Eat! (Random House, 2002)
21
22
Tangerine Sauce
Fast and Easy Fruit Gelato
Makes 2 cups
Makes 8 servings
INGREDIENTS
INGREDIENTS
2 cups tangerine juice (In must produce sections of the grocery store,
or orange juice can be substituted.)
4 whole shallots, chopped
1 bunch cilantro, leaves only
2 teaspoons fresh ginger, chopped
juice from2 medium limes
1 large egg yolk
2 tablespoons sushi vinegar
1 teaspoon soy sauce
1 cup peanut oil
1 container frozen fruit concentrate approx. 11.5 ounces, keep in freezer
5 cups ice
METHOD
1
2
3
In a small sauce pan, combine the tangerine juice, chopped shallots, cilantro
leaves, and 1 teaspoon chopped ginger. Cook until syrupy and reduced by 3/4.
Place blender on the base. Scrape the contents of the saucepan into blender,
and add the lime juice, egg yolk, sushi vinegar, soy sauce, and the remaining
teaspoon of chopped ginger and secure the lid. Press the puree button and
process untill smooth.
With the motor running, remove clear plastic cap on blender and gradually
pour the peanut oil into the blender until smooth. Pour into a jar and
refrigerate, covered, until needed.
METHOD
1
Open the container of frozen fruit concentrate and place in blender.
2
Place blender on base.
3
Add 5 cups of ice.
4
Secure the lid.
5
Press the pulse button.
6
Keep pressing ice crush button on and off untill you have a perfectly smooth
frozen treat.
7
Store in freezer in an airtight container. In Italy they would use a stainless
airtight container, like a Wolfgang Puck stainless bowl with airtight lid.
SERVING SUGGESTIONS
There is nothing more refreshing, or feels more wonderful on your tongue than
gelato. Less firm than ice cream or sorbet, yet more fruit flavored intense. There
are tons of flavors of frozen fruit concentrate in your freezer section of the grocery
store, like coconut, tangerine, passion fruit, and guava. Experiment with them
all. On lemonade, we add 3 tablespoons of yogurt to blender and puree. It's like
divine lemon custard.
Recipe courtesy Wolfgang Puck, Adventures in the Kitchen (Random House, 1991)
Recipe courtesy Debra Murray, Wolfgang Puck HSN Guest Host
23
24
Sautéed Shrimp
with Tomato-Basil Vinaigrette
Cucumber - Yogurt Soup
Makes 4 servings
INGREDIENTS
Makes 4 servings
INGREDIENTS
16 large shrimp (such as Santa Barbara)
a pinch of salt & freshly ground pepper
2 tablespoons extra virgin olive oil
6 ripe plum tomatoes, peeled and seeded
2 medium shallot
2 cloves garlic, blanched
3 tablespoons chopped basil leaves plus 4 whole for garnish
1 tablespoon fresh parsley, chopped
1/2 teaspoon salt & freshly ground pepper
1 tablespoon good wine vinegar
1 tablespoon lime juice
1/2 cup extra virgin olive oil
3 cups plain yogurt
1 1/2 cups English cucumber, peeled and chopped
2 whole green onions, chopped
8 whole fresh mint leaves
2 tablespoons fresh cilantro, chopped
1 small serrano chile, seeded and membrane removed
1/2 teaspoon sea salt
1/2 teaspoon fresh ground pepper
METHOD
1
Place the blender on the base.
2
Place all the ingredients into the blender carafe.
3
Secure the lid.
4
Press the puree button.
METHOD
5
Puree untill smooth.
1
Peel and divein the shrimp leaving the tails intact.
6
Pour into a covered container; taste for additional salt and pepper.
2
Season shrimp lightly with salt and pepper and set aside.
7
Chill for at least 3 hours before serving.
3
Prepare vinaigrette by placing the blender onto the base. Add the tomatoes,
shallots, garlic, basil and parsley.
SERVING SUGGESTIONS
4
Secure the lid, and press the pulse button and the press the ice crush button
to coarsely chop ingredients.
This is a very easy first course! It’s very refreshing & terrific for a summer supper.
5
Remove the lid and add the vinegar, lime juice and a pinch of salt and pepper.
Recipe courtesy Debra Murray, Wolfgang Puck HSN Guest Host
6
Secure the lid, press pulse button then press the ice crush button 2 times to mix.
7
Remove the clear plastic top from blender, press the chop button and pour in
the oil.
8
Heat a ten inch skillet over medium high heat and add the 2 tablespoons
olive oil. When oil is hot add the shrimp in batches, not to over crowd pan,
cook shrimp for approx 1 1/2 minutes per side. Do not overcook shrimp or
they will become dry.
9
Spoon the vinaigrette into the center of each plate. Arrange 4 shrimp on the
vinaigrette and garnish with basil sprigs. Serve immediately.
Recipe courtesy Wolfgang Puck, Adventures in the Kitchen (Random House, 1991)
25
26
Cold Buttered Rums
Candied Tomato Soup
Makes 4 servings
Makes 6 servings
INGREDIENTS
INGREDIENTS
4 ounces dark rum
1 ounce cream
1 quart Butter Pecan ice cream
10 large ripe tomatoes, cut in half crosswise
2 tablespoons olive oil
sea salt
Italian seasoning
3 cloves roasted garlic
1 cup chicken stock
4 large basil leaves
METHOD
1
Place the blender on the base.
2
Pour the liquid into the blender first, then add the ice cream one scoop at a time.
3
Secure the lid.
METHOD
4
Press the puree button. Puree untill smooth and creamy.
1
Preheat oven to 325 degrees.
2
Line two large baking sheets with foil or parchment paper (optional).
SERVING SUGGESTIONS
3
Cut the tomatoes and place them cut side up on baking sheet.
These are dreamy served in chilled pewter mugs. Good anytime of year!
4
Drizzle the tomatoes with olive oil and sprinkle with sea salt and
Italian seasonings.
Recipe courtesy Debra Murray, Wolfgang Puck HSN Guest Host
5
Place in oven and roast for 2 hours.
6
After 1 hour, place a head of garlic wrapped in foil in oven to roast
for the soup.
7
After the tomatoes are done roasting, let cool untill they are cool to the touch.
8
Gently remove the skins and seeds at this time.
9
Place blender on the base.
10 Pour the tomatoes and any of their juice into the blender carafe.
11 Add the chicken stock, garlic cloves, and basil leaves.
12 Secure the lid.
13 If you would like the soup chunky, press the pulse button the pulse by
pressing a few times quickly on the ice crush button. Or if you would like it
smooth, almost creamy, hit the puree button.
14 Test for seasoning, you may wish to add a little more salt, or if your tomatoes
are a little acidic add a pinch of sugar.
SERVING SUGGESTIONS
This soup is so delicious! You may serve it cold with a dab of crème fraiche or
sour cream. I like it hot with a touch of pasta.
Recipe courtesy Debra Murray, Wolfgang Puck HSN Guest Host
27
28
Blueberry Smoothie
Blue Margaritas
Makes 2 servings
Makes 4 servings
INGREDIENTS
INGREDIENTS
2 cups frozen blueberries
1/2 cup pomegranate blueberry juice (In the produce section of the grocery store)
2 tablespoons honey or simple syrup
2 tablespoons plain yogurt
5 cups ice
4 ounces tequila
4 ounces Blue Curacao (An orange flavored liqueur)
1 cup sour mix
1 splash orange juice
lime slices
kosher salt
METHOD
1
Place blender on base.
2
Put all the ingredients into the blender.
3
Lock the lid.
4
Press the puree button. Puree untill smooth.
SERVING SUGGESTIONS
Not only are these beautiful, but they are delicious and very good for you. For
a dinner party you could omit the yogurt, and substitute 2 ounces of white rum
for a blueberry daiquiri.
Recipe courtesy Debra Murray, Wolfgang Puck HSN Guest Host
METHOD
1
Rinse your desired glasses with cold tap water.
2
Take a lime slice and run it around the rim of each glass.
3
Place a half a cup of salt in a dish. Dip the rim of each glass in the salt.
4
Chill the glasses.
5
Place the blender on the base.
6
Place the ice in the blender carafe to the 5 cup mark.
7
Add the tequila, Blue Curacao, sour mix and orange juice.
8
Secure the lid on blender, press puree. Blend until smooth.
9
Pour immediately into chilled glasses, serve with a lime wheel.
Recipe courtesy Debra Murray, Wolfgang Puck HSN Guest Host
29
30
Limited Warranty
Recipe Notes
This warranty covers all defects in workmanship or materials in the mechanical
and electrical parts, arising under normal usage and care, in this product for
a period of 12 months from the date of purchase provided you are able to
present a valid proof-of-purchase. A valid proof-of-purchase is a receipt
specifying item, date purchased, and cost of item. A gift receipt with date of
purchase and item is also an acceptable proof-of-purchase. Product is intended
for household use only. Any commercial use voids the warranty.
This warranty covers the original retail purchaser or gift recipient. During the
applicable warranty period within normal household use, we will repair or replace,
at our discretion, any mechanical or electrical part which proves defective, or
replace unit with a comparable model.
To obtain service under the terms of this warranty, call Toll Free (800) 275-8273.
THIS LIMITED WARRANTY COVERS UNITS PURCHASED AND USED WITHIN
THE UNITED STATES AND DOES NOT COVER:
•
Damages from improper installation.
•
Defects other than manufacturing defects.
•
Damages from misuse, abuse, accident, alteration, lack of proper care and
maintenance, or incorrect current or voltage.
•
Damage from service by other than an authorized dealer or service center.
This warranty gives you special legal rights and you may also have other rights to
which you are entitled which may vary from state to state.
31
32
Recipe Notes
Recipe Notes