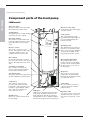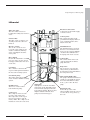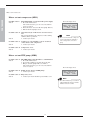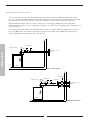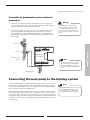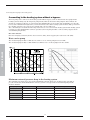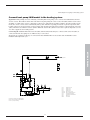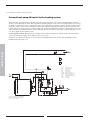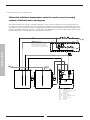
1
Heat Pump Compress 3000 6 720 642 634 (2009/11) EHP 6-11 LW/M | EHP 6-17 LW En User and Installation Guide User and installer manual for Bosch Compress heat pumps Bosch, 2009-11-30 Article number: 6 720 642 634 Version 2009/11 Copyright © 2009. 2 Table of Contents Table of Contents FOR THE USER .............................................................................................................. 5 Important information ....................................................................................... 5 This is how your heat pump works ..................................................................... 6 Technology in and around the heat pump ................................................................................................................6 Component parts of the heat pump .................................................................... 8 LWM model ............................................................................................................................................................8 LW model................................................................................................................................................................9 Control unit .................................................................................................... 10 The control unit’s two methods to control the heat pump........................................................................................11 Control panel .................................................................................................. 12 Controls and status lamps ....................................................................................................................................12 Menu dial .............................................................................................................................................................13 How to use the control panel .................................................................................................................................13 Basic functions (Customer level 1 .................................................................... 13 Menu outline for Basic functions (Customer level 1) ............................................................................................14 Select scrolling information on the menu display ...................................................................................................14 Set the heating ......................................................................................................................................................15 Set the desired room temperature ..........................................................................................................................18 Set the heat pump for extra hot water ....................................................................................................................18 Heating and hot water settings .............................................................................................................................19 Read the temperatures on the heat pump ...............................................................................................................19 Extra functions (Customer level 2) ................................................................... 21 Menu outline for Extra functions (Customer level 2) .............................................................................................21 Temperature settings .............................................................................................................................................22 Set extra heat curve with mixing valve ..................................................................................................................23 Hot water settings..................................................................................................................................................24 Timer control ........................................................................................................................................................24 Reading operating times on the heat pump and additional heat ............................................................................25 Set the time and date ............................................................................................................................................26 Alarms given by the heat pump .............................................................................................................................27 Return to the heat pump’s factory settings ..............................................................................................................27 Maintenance ................................................................................................... 28 Unscrew the front cover ........................................................................................................................................28 Sight glass .............................................................................................................................................................28 Particle filter .........................................................................................................................................................29 Protective anode ...................................................................................................................................................29 What to do if a fault occurs .............................................................................. 30 Dimmed menu display ..........................................................................................................................................30 Fuses and reset buttons on the heat pump .............................................................................................................31 All alarms ............................................................................................................................................................31 3 Table of Contents FOR THE INSTALLER ................................................................................................... 39 Important information to the installer ............................................................... 40 Checklist ........................................................................................................ 40 What the shipment includes ............................................................................. 41 Dimensions and plumbing connections ............................................................. 42 The heat pump and collector hose in general..................................................... 43 Transporting the heat pump ..................................................................................................................................43 Positioning the heat pump .....................................................................................................................................43 Maximum working temperatures ..........................................................................................................................43 Minimum working temperatures ...........................................................................................................................43 Fit the particle filter ..............................................................................................................................................43 Collector hose ........................................................................................................................................................44 Preparations before connection ........................................................................ 47 Moving the heat transfer fluid pipe for side entry ...................................................................................................47 Supplementing the heat pump with a groundwater system .....................................................................................50 Connection to groundwater system: electrical connection .......................................................................................51 Connecting the heat pump to the heating system ............................................... 51 Connecting to the heating system without a bypass: ................................................................................................52 Connect heat pump LWM model to the heating system...........................................................................................53 Connect heat pump LW model to the heating system ..............................................................................................54 LWM model: individual temperature control in each room, increasing volume of internal water and bypass.........55 LW model: individual temperature control in each room, increasing volume of internal water and bypass ............56 LWM model: Increasing volume of internal water without bypass..........................................................................57 LW model: Increasing volume of internal water without bypass .............................................................................58 Filling water in the heating system ........................................................................................................................59 Filling the heat transfer fluid in the collector hose .................................................................................................59 Connecting the heat pump to the power supply ................................................. 62 External connections to the heat pump ..................................................................................................................63 Connecting the general alarm, external input and load monitor............................................................................64 Installer and ser vice menu (I/S) ...................................................................... 65 How to use the control panel .................................................................................................................................65 Commissioning the heat pump ......................................................................... 66 Menu displays you might need to adjust or check ...................................................................................................67 Drying program for floor tile .................................................................................................................................70 Manual test run of the heat pump .........................................................................................................................71 Start the heat pump with only additional heat.......................................................................................................71 Important points to check after start up.................................................................................................................71 Technical information ...................................................................................... 74 The heat pump’s factory settings ............................................................................................................................74 Sensor table...........................................................................................................................................................74 Hot water cylinder for ECOLANE Heat Pump ......................................................................................................75 Technical information for three-phase models........................................................................................................76 Technical information single-phase models............................................................................................................77 4 For the user Important information Your new heat pump represents a new generation of heat pumps from Bosch. It contains numerous functions to control the temperature and production of hot water in the house. The control unit includes a control and monitoring function that stores important settings about the heat pump’s operation and maintenance. The settings are made by the installer and the user via a control panel on the front of the heat pump. Settings intended for the user, are presented under the headings Basic functions and Extra functions. When the heat pump has been installed and started there are a number of points you should check regularly. This may concern an alarm triggering or performing basic maintenance actions. First of all you should perform these actions yourself. This manual describes each step in detail. If the problem remains you should contact your dealer. 5 Note It is important as the user that you read through this chapter. Under no circumstances may the user make settings that are designed for the installer. This can cause serious malfunction of the heat pump. FOR THE USER This is how your heat pump works This is how your heat pump works The heat pump collects stored solar energy The heat pump has been manufactured for easy and reliable use as well as to provide your house with inexpensive and environment friendly heating. The easiest way to describe how a heat pump works is to say it works like a refrigerator, however, the other way round. In a refrigerator, heat is moved from the inside to the outside. In a heat pump, heat stored in the ground, rock or water, is moved into the house. The heat pump collects a few degrees of the stored solar energy. The heat is led into the house via a hose. The temperature is then increased in the heat pump and the heat is distributed to the house’s heating system. Rock heat Soil heat Technology in and around the heat pump The heat pump consists of four main parts: 1. Evaporator The evaporator evaporates the refrigerant to gas and transfers heat from the heat transfer fluid to the refrigerant circuit. 2. Condenser The condenser condenses the vapour to fluid again and transfers the heat to the heating system. 3. Expansion valve Lowers the pressure of the refrigerant. 4. Compressor The compressor increases the pressure of the refrigerant. These four main parts are linked in three circuits. A refrigerant circulates in the heat pump, which in some parts of the circuit is in a liquid state and in other parts in a gas state. Read more about the properties of the refrigerant in the sidebar to the right. See the detailed description of the technologies used in the heat pump on the next page. 6 Lake heat Note Boiling point in relation to the pressure: The boiling point of different liquids varies with pressure, the higher the pressure, the higher the boiling point. For example, water boils at +100ºC at normal pressure. Double the pressure and water boils at +120ºC. Half the pressure and water then boils at +80ºC. The refrigerant in the heat pump acts in the same way, the boiling point changes when the pressure changes. However, the boiling point of the refrigerant is as low as approximately -40ºC at atmospheric pressure. Consequently, it is also suitable for low heat source temperatures. This is how your heat pump works Heat transfer fluid pump 1 2 3 0ºC 4 +100ºC 0ºC Floor heating 6 Soil -3ºC -10ºC 5 Circulation pump Radiator Heat pump Rock Fan-assisted radiator 1 Heat transfer fluid in. The heat pump collects stored solar energy. It contains a heat transfer fluid which is a solution of water and antifreeze, glycol. The antifreeze mixture collects the heat from the rock and with the help of the heat transfer fluid it is led into the evaporator. The temperature is then approximately 0ºC. 2 In the evaporator, the heat transfer fluid meets the refrigerant. At this stage, the refrigerant is in a fluid state and is at approximately -10ºC. When the refrigerant meets the zero degree heat transfer fluid it starts to boil. It then forms a vapour, which is led into the compressor. The temperature of the vapour is 0ºC. 3 The pressure of the refrigerant increases in the compressor and the vapour temperature rises from 0ºC to approximately +100ºC. The warm gas is then forced into the condenser. 4 The condenser transfers the heat to the house’s heating system (radiators and floor heating) and the hot water system. The vapour is cooled in the condenser and becomes fluid. The pressure in the refrigerant is still high when it is led on to the expansion valve. 5 The refrigerant pressure is lowered in the expansion valve. At the same time, the temperature also drops to approximately -10ºC. When the refrigerant passes the valve and the evaporator it changes to vapour again. There is also a valve for regulating refrigerant flow. 6 The heat transfer fluid is led out from the heat pump to the rock to collect new stored solar energy. The heat transfer fluid is led out from the heat pump to the rock to collect new stored solar energy. The temperature of the fluid is approximately -3ºC. 7 FOR THE USER “The hot side” “The cold side” FOR THE USER Component parts of the heat pump Component parts of the heat pump LWM model Three-way valve The valve switches between heating the heating water and hot water. Electrical connections Connections for the mains supply as well as sensors. Venting nipple The nipple is used to vent the heating water in the hot water cylinder. Control panel The control panel has a background lit menu display with four rows of text information, three buttons and a dial. Hot water cylinder The cylinder is double-shelled and holds approximately 163 litres of hot water and 57 litres of the heating water. Distribution box The distribution box is enclosed. It houses a reset function for the motor cut-out as well as miniature circuit breakers (MCB) for the heat pump and electric cassette. Electric cassette The electric cassette is used to provide extra output in cold weather conditions, with large water consumption and at hot water peaks. Reset button Press in the button if the overheat protector on the electric cassette has tripped. The button is located on the side. Heat transfer fluid pump The pump is insulated and features an anti-corrosive finish. It ensures the heat transfer fluid circulates from, e.g. the rock to the heat pump. Condenser (not visable) The condenser condenses the vapour to fluid again and transfers the heat to the heating system. Evaporator The evaporator evaporates the refrigerant to gas and transfers heat from the heat transfer fluid to the refrigerant circuit. Circulation pump The pump ensures the heating water circulates within the heating system. Compressor The compressor increases the pressure of the refrigerant. The temperature of the vapour increases from 0ºC to approximately +100ºC. The compressor is insulated to reduce the noise level. Flexible hoses The hoses counteract vibrations in the heat pump. Control unit The control unit is enclosed. It controls and monitors all heat pump functions. Sight glass Sight glass to check the level in the refrigerant circuit. Air bubbles must not form in the sight glass when the heat pump is running. However, there might be bubbles when the heat pump is started and stopped. 8 Expansion valve Lowers the pressure of the refrigerant that enters the evaporator and collects energy from, e.g. the rock. LW model Electrical connections Connections for the mains supply as well as sensors. Three-way valve The valve switches between heating the heating water and hot water. Particle filter The filter can be opened for easy cleaning. It also has a shut off function. Control panel The control panel has a background lit menu display with four rows of text information, three buttons and a dial. Electric cassette The electric cassette is used to provide extra output in cold weather conditions, with large water consumption and at hot water peaks. Distribution box The distribution box is enclosed. It houses a reset function for the motor cut-out as well as miniature circuit breakers (MCB) for the heat pump and electric cassette. Reset button Press in the button if the overheat protector on the electric cassette has tripped. The button is located on the side. Control unit The control unit is enclosed. It controls and monitors all heat pump functions. Condenser The condenser condenses the vapour to fluid again and transfers the heat to the heating system. Evaporator The evaporator evaporates the refrigerant to gas and transfers heat from the heat transfer fluid to the refrigerant circuit. Circulation pump The pump ensures the heating water circulates within the heating system. Flexible hoses The hoses counteract vibrations in the heat pump. Compressor The compressor increases the pressure of the refrigerant. The temperature of the vapour increases from 0ºC to approximately +100ºC. The compressor is insulated to reduce the noise level. Sight glass Sight glass to check the level in the refrigerant circuit. Air bubbles must not form in the sight glass when the heat pump is running. However, there might be bubbles when the heat pump is started and stopped. 9 Heat transfer fluid pump The pump is insulated and features an anti-corrosive finish. It ensures the heat transfer fluid circulates from, e.g. the rock to the heat pump. Expansion valve Lowers the pressure of the refrigerant that enters the evaporator and collects energy from, e.g. the rock. FOR THE USER Component parts of the heat pump FOR THE USER Control unit Control unit The control unit is the brains of the heat pump. It makes sure the heat pump gives the best energy savings and that it runs for many years. The control unit controls and monitors the heating and hot water supply in your house. The monitoring function is especially important. It shuts down the heat pump in the event of operational disturbances so that no critical parts are damaged. Three-way valve Electric cassette (additional heat) Additional heat gives more output When the heat pump can not manage to heat the house by itself, for example, if there is a considerable drop in the outdoor temperature, the control unit ensures the additional heat source is connected. Together the heat pump and additional heat guarantee the right temperature in the house. Additional heat is provided by a built in electric cassette. Additional heat can never completely take over the heating from the heat pump. It only adds the output necessary for the heat pump to be able to produce the right temperature. When the heat pump can once again manage heating on its own the additional heat is automatically disconnected. Control unit Hot water is given priority over heating water In a house with water based heating a difference is made between heating water and hot water. The heating water is for radiators/floor heating and hot water is for showers and taps. Hot water is heated in a hot water heater. The hot water heater is fitted with a sensor that senses the temperature of the hot water. LWM models include a hot water heater in the heat pump while LW models have an external hot water heater. The heating water passes through the hot water cylinder’s outer shell and heats up the hot water heater’s inner tank. The control unit makes sure the heating of hot water is always given priority over the heating of the heating water. This means you never need to be without hot water. The control unit controls a three-way valve that switches between heating the heating water and hot water. Once the hot water has been heated the three-way valve switches so that the heating water is heated. Hot water Heating water Double-shelled hot water heater 10 Control unit FOR THE USER The control unit’s two methods to control the heat pump The control unit uses two different methods to control the heat pump. These two methods are: Control with an outdoor sensor and Control with an outdoor sensor supplemented with a room sensor. Control with outdoor sensor Control with an outdoor sensor is the most common method used by the control unit to control the heat pump. A sensor is installed on the external wall of the house. It sends out signals for regulating the heat pump. Control with an outdoor sensor means that the heat pump automatically regulates the heating in the house depending on the outdoor temperature. If the outdoor temperature drops, i.e. it becomes colder; the radiators inside the house will become warmer. You determine the temperature of the radiators, in relation to the outdoor temperature, with the help of a number of settings such as selecting the heat curve on the control unit. A lower curve gives higher energy savings. Control with outdoor sensor supplemented with room sensor Control with an outdoor sensor supplemented with a room sensor means that you also place a sensor in a central position inside the house. This is connected to the heat pump and provides the control unit with information about the room temperature. The signals affect the control unit’s settings (curves) and ensure the heat pump gives the best possible energy savings. This control method is used when factors other than the outdoor temperature influence the indoor temperature. Examples include the use of a stove or fan-assisted radiator or if the house is sensitive to the wind. 11 Note It is only the room where the room sensor is located that can influence regulation of the temperature. Note The room sensor influence is inhibited 24 hours after using clock setting for the heating, or any type of external control of the heat pump. FOR THE USER Control panel Control panel All settings are made from the control panel. It also displays heat production statistics and information about different alarms. When you have made your settings, the control panel makes sure they are saved in the control unit to carry out your wishes. Controls and status lamps Power switch (ON/OFF) You start and stop the heat pump using the power switch button. Lamp on: The heat pump is on. Lamp flashes: The heat pump is off. Alarm status Lamp flashes: A fault has occurred in the heat pump. Lamp on: The alarm has been acknowledged, but the fault remains. Temp. incr. / decr. Info Menu Temp. incr. / decr. Pressing once gives a shortcut to the most frequent temperature settings. Reg 637 K1 040622 16:08:15 Tu temp. Info Menu Info Pressing once gives continuous information about the heat pump’s and additional heat’s operating conditions. Status lamps Menu Press once to enter the main menu. The main menu contains all setting menus and temperature displays. Power switch (ON/OFF) Menu display Rego 637 Menu buttons 12 K1 040622 16:08:15 Ma temp. Info Menu Menu dial Control panel FOR THE USER Menu dial The menu dial is used to scroll through the menu display windows. Turn the menu dial clockwise (to the right) to move down through the menus. Turn the menu dial anti-clockwise (to the left) to move up through the menus. You also determine the values of different settings by using the dial. The menu display gives you information and the chance to make settings. You can: Initial menu display Choose different temperature and hot water settings. Choose extra hot water and the holiday function. See alarm causes and receive corrective instructions. Obtain operating statistics. Reg 637 K1 040622 16:08:15 Tu Temp. Info Menu How to use the control panel Reg 637 The principle of the control panel is based on the user using three menu buttons and a menu dial to move between the different menus and settings. On the lower row of the menu display you will always see information about the significance of the buttons. The function of the buttons changes depending on which window you are currently in. 040622 16:08:15 Tu Temp. Info Menu + Example If, from the initial menu, you press the Heat button, you will access the menu Temp. incr. / decr.. +/-. In this menu you can increase and decrease the heating in the house. Note that the significance of the buttons has now changed. You can either return to the initial menu by pressing the Return button or you can choose to change the heating setting in the house by pressing the Adjust button. If you press the Adjust button you can increase or decrease the heating in the house by using the menu dial. Save your adjustment by pressing the Save button. Basic functions (Customer level 1) temp. +/0 Return 5,0 Initial menu 10 Adjust Customer level 1 Reg 637 Basic functions (Customer level 1) are the functions most frequently used and the ones you have the most benefit of. You reach the basic functions by pressing one of the Heat, Info or Menu buttons in the initial menu. The designation K1 in the upper right corner indicates you are in Basic functions - Customer level 1. K1 040622 16:08:15 Tu temp. Info Menu Date 13 K1 Time Day Basic functions - Customer level 1 FOR THE USER Menu outline for Basic functions (Customer level 1) Reg 637 K1 Note 040622 16:08:15 Tu temp. Info Menu Each menu is numbered in the lower right-hand corner; this indicates which main display it is associated to. Main menu Indoor temperature settings 1 temp. +/Page 16 Temp. Fine-tune Page 17 Room temperature Page 18 Extra hotwater Page 18 STANDBY no rad heat required No need for hot water mode Page 15 HOT WATER MODE Heat pump only Page 15 HEATING Mode HP and add. heat Page 15 Heat rad required Heat pump starts in #### seconds Main menu Adjusting the hot water settings Page 19 Temperature settings Temp. incr. / decr. range 0-10 1.1 Temp. settings Adjust temp. range -10/+10 1.2 Page 17 Temp. settings 1.10 Page 18 Page 15 Page 18 3 Page 19 Page 19 Hot water setting Duration of add. hot water 2.1 Page 16 Int. temp 2 Main menu Monitor all temperatures Temperature readings Return radiator GT1 Temperature readings Out GT2 Temperature readings Hot water GT3 Temperature readings Shunt, flow GT4 Temperature readings Room GT5 Temperature readings Compressor GT6 Temperature readings Heat trfluid out GT8 = = The menu display is standard on all heat pumps. Temperature readings Heat tr fluid in GT9 The menu display is only shown on the heat pump in combination with an extra sensor or for a specific model. Temperature readings Ht trfld(coll)inGT10 Temperature readings Httrfld(coll)out GT11 Page 20 Select scrolling information on the menu display Reg 637 If you press the Info button in the initial menu, you will receive continuous information about the heat pump’s operation and working temperatures. This is what to do: 1. Press the Info button in the initial menu. Here follows a few of the windows displayed: 14 K1 040622 16:08:15 Tu temp. Info Menu The heat pump is in standby mode. STANDBY No rad heat required No need for hot water mode The heat pump is producing hot water. You see at which temperature the heat pump will stop and the present temperature. Note that the stop temperature is read at the bottom of the heater. The hot water is a few degrees warmer. HOTWATER MODE Heat pump only Supp. temp. 53,0° Present temp 42.0° The heat pump and additional heat are running. HEATING Mode HP and add. heat Supp. temp. 45,0° Present temp 44.0° The heat pump has received signals that it should produce heating. It now waits for the restart time to countdown to zero. Heat rad required Heat pump starts in 320 seconds Return to the initial menu by pressing one of the buttons or turn the dial. Set the heating It is easy to set the heating level on the heat pump. However, before we explaaccord. to clockow to do this it is important to understand the relation between the outdoor temperature, return temperature and heat curve slope. The easiest way to explain the relation is with a heat curve. Heat cur ve You use the heat curve to help set the indoor temperature you would like. The heat pump is controlled by the outdoor temperature. When the weather becomes colder, the heat pump ensures more heating is produced automatically. Return temperature: The return temperature is the temperature of the water that returns to the heat pump from the radiators. The water led out from the heat pump to the heating system is normally 7-10ºC higher than the return temperature. When the outdoor temperature is -10ºC and curve 4 is set, the pump attempts to keep the return water at approximately 40ºC. Outdoor temperature: The outdoor temperature determines how much heating the heat pump should produce. A sensor placed outdoors sends signals to the control unit, which then adjusts the heat pump. Cur ve slope: You can change the curve slope to increase or decrease the heating in the house. The scale is between 0-10. 15 Note On delivery the heat pump curve slope is set to position 4. This means that the return temperature is +35ºC when it is 0ºC outdoors. FOR THE USER Basic functions - Customer level 1 Basic functions - Customer level 1 FOR THE USER Change the cur ve slope The heat pump’s production of heat is adjusted by increasing or decreasing the curve slope in the Temp. incr. / decr. menu. This is especially effective in cold weather conditions. Return temperature (ºC) Curve slope (0-10) Cur ve slope: 2-4 Normal setting for floor heating.. 4-6.5 Normal setting for radiators. 7-10 Abnormal high setting. Outdoor temperature (ºC) Dashed line: If the return temperature exceeds 57ºC an alarm is given and the compressor switches off. The heat pump starts automatically when the return temperature drops. From the heat curve we see that curve slope 4 gives a return temperature of +35ºC when it is 0ºC outdoors. If the outdoor temperature drops we can see that the return temperature increases. The colder the outdoor temperature the higher the return temperature. At an outdoor temperature of approximately -30ºC we see the curve slope has nearly reached the limit value (+57ºC) for the return temperature. In cold weather (below +5ºC): If you are not satisfied with the indoor temperature when it is colder than +5ºC outdoors, you need to change the slope of the heat curve. This is what to do: 1. Press the Heat button in the initial menu. You should wait at least two days when increasing or decreasing the heating before making a new adjustment. temp. +/0 Return 4,0 10 Adjust 2. Press the Adjust button. 3. Turn the menu dial clockwise to increase the heating. Turn the menu dial anti-clockwise to lower the heating. (Adjust in small increments, 0.2-0.6 units, is usually enough.) temp. +/0 Return 5,0 Note 10 Save 4. Save the new value by pressing the Save button. 16 If it is still difficult to get a comfortable indoor temperature at an outdoor temperature around 0ºC, despite several attempts, you should adapt the heat curve. Read about how to “adapt the curve” in the section Extra functions – Customer level 2 / Temperature settings / Adapting the heat curve. Basic functions - Customer level 1 Fine-tune the heat cur ve FOR THE USER The heat curve can also be fine-tuned. Fine-tuning means that you offset the heat curve in parallel. Fine-tuning is done from the Temp. fine-tune menu. The diagram for fine-tuning shows how the dashed line has been offset upwards in parallel. This means the heating has been fine-tuned in a positive direction and the heat pump will be instructed to maintain a higher temperature on the return water at all outdoor temperatures. Return temperature (ºC) By using the menu dial on the control panel the fine-tuning line has been moved up so the heat pump produces more heat. Outdoor temperature (ºC) In warm weather (above +5ºC): If you are not satisfied with the indoor temperature when it is warmer than +5ºC outdoors, you should offset the curve in the Temp. fine-tune menu. This is what to do: 1. Press the Heat button in the initial menu. 2. Turn the menu dial clockwise until you reach the menu Temp. finetune.3. Temp. Fine-tune menu -10° Return 0,0 10° Adjust 3. Press the Adjust button. 4. Turn the menu dial clockwise to increase the room temperature. Turn the menu dial anti-clockwise to lower the room temperature. (Adjust in small increments, 0.2-0.6 units, is usually enough.) 5. Save the new value by pressing the Save button. 17 Basic functions - Customer level 1 FOR THE USER Set the desired room temperature If you have a room sensor connected to the heat pump you can set the required temperature in the room from the Room temperature menu. From Extra functions (Customer level 2) you can also set how much you want the sensor to influence the heating system. This is what to do: 1. Press the Heat button in the initial menu. Note The example describes how to set the required room temperature with the help of a connected room sensor. The range is 10ºC to 30ºC. 2. Turn the menu dial clockwise until you reach the menu Room temperature. Room temperature 10° Return 20,0 30° adjust 3. Press the Adjust button. 4. Turn the menu dial clockwise to increase the room temperature. Turn the menu dial anti-clockwise to lower the room temperature. 5. Save the new value by pressing the Save button. Set the heat pump for extra hot water You can obtain extra hot water by temporarily increasing the temperature of the water in the hot water cylinder. This may be appropriate when, for example, a large number of people need to shower. You choose how long the function should run using the Extra hotwater menu. . This is what to do: 1. Press the Heat button in the initial menu. 2. Turn the menu dial clockwise until you reach the menu Extra hotwater.3. . Add. hot water 1h Return 24h 48h adjust Note 3. Press the Adjust button. 4. Turn the menu dial clockwise to choose the number of hours that the electric cassette should be on (e.g. 24 hours). Add. hot water 1h Return 24h 48h Save 5. Save the new value by pressing the Save button. 18 When the set time has elapsed you must repeat the setting to get extra hot water again. Basic functions - Customer level 1 Move to the temperature settings for heating on Customer level 1 like this: 1. Press the Menu button in the initial menu. Reg 637 Main menu Indoor temperature settings 1 Return Select K1 040622 16:08:15 Tu temp. Info Menu 2. Press the Select button and scroll through the heating menus with the menu dial. Move to the temperature settings for hot water on Customer level 1 like this: 1. Turn the menu dial clockwise until you reach the menu Adjusting the hot water settings . Main menu Adjusting the hot water settings 2 Return Select Note 2. Press the Select button and scroll through the hot water menus with the menu dial. Read the temperatures on the heat pump There are several different temperature sensors in the heat pump. Each sensor plays an important part in the heat pump’s daily operations. It may, for example, adjust the heat production so that the pump does not become overheated. Proceed as follows to read the temperatures on the heat pump: 1. Press the Menu button in the initial menu. 2. Turn the menu dial clockwise until you reach the menu Monitor all temperatures (menu 3). Main menu Monitor all temp. on the screen 3 Return Select 3. Press the Select button. 4. Turn the menu dial to scroll through all the heat pump’s temperature sensors. See the next page. 19 Each menu is numbered in the lower right-hand corner; this indicates which main display it is associated to. FOR THE USER Heating and hot water settings Basic functions - Customer level 1 FOR THE USER All menus relating to temperature sensors Note All the menus associated with the heat pump temperature sensors are shown below. Note that you cannot make any settings in these menus, only read the current values. Some menus are standard for all models of Ecolane SE while others are only available in combination with different accessories. The sensors give an alarm if the temperature is outside of the permitted range/values. All sensors are not included as standard on the heat pump, some are available as accessories for different application areas. See more information under respective menus. Temperature readings Return radiator GT1 Off 41.3O now 40.3O Return The menu shows the temperature in the heating system’s return, i.e. the water from the radiators back to the heat pump accord. to clockeating mode. The temperature varies with the outdoor temperature. Temperature readings Out GT2 14,0° Return The menu shows the outdoor temperature. Some deviation compared to the true temperature may occur due to thermal radiation from the house to the installed outdoor sensor. Temperature readings Hot water GT3 Set 51.0° now 50.0° Return Temperature readings Shunt, flow GT4 Set 40.3° now 43.0° Return Temperature readings Room GT5 Set 20.0° now 19.5° Return Temperature readings Compressor GT6 90,0° Return Temperature readings Heat tr fluid out GT8 45,0° Return Temperature readings Heat tr fluid in GT9 40,3° Return Temperature readings Ht trfld(coll)inGT10 0,0° Return The menu shows the set and present temperature in the lower section of the outer container in the hot water heater. The temperature is approximately 5ºC lower than the temperature of the hot water inside the inner container. The menu only applies together with a flow sensor. If an extra curve with mixing valve is used, for example, for a floor heating system, you can see the temperature on the flow water in the circuit. The temperature varies with the outdoor temperature. The menu only applies together with a room sensor. The menu shows the set point value and present temperature in the room where the sensor is fitted. The menu shows the compressor’s working temperature. The temperature varies between 70ºC and 125ºC during operations. The menu shows the temperature of the radiator water as it leaves the heat pump. It varies depending on the outdoor temperature and whether the heat pump is accord. to clockot water production mode. The menu shows the temperature of the water that is led into the heat pump. It varies depending on the outdoor temperature and whether the heat pump is accord. to clockot water production mode. The heat pump stops at 57ºC for reasons of safety. The menu shows the temperature of the heat transfer fluid that is led into the heat pump from the bore hole or the ground. It can vary between -5ºC to +15ºC during a season. The menu shows the temperature of the heat transfer fluid that is led out of the heat pump to the bore hole or the ground. Normally, during operations, it is 1.5 - 5.0 degrees lower than the heat transfer fluid that is led into the heat pump. Temperature readings Httrfld(coll)outGT11 -4,0° Return 20 Extra functions - Customer level 2 Extra functions (Customer level 2) (Initial menu) 1. Press the Heat button until Access = CUSTOMER2 is displayed. 2. Press the Menu button to open the Main menu. From Customer level 2 you also have access to all Customer level 1 functions. K2 FOR THE USER Reg 637 The section Basic functions (Customer level 1) contains the functions that you will probably use the most and which you will receive the most benefit from. However, there are numerous extra functions that you can use to control your heat pump. This can, for example, include activating the heat pump’s holiday function or setting the time and date. If no settings are made on Customer level 2 (K2), the menu display will automatically return to Customer level 1 (K1) after 30 minutes. Proceed as follows to access the extra functions on Customer level 2: 040622 16:08:15 Tu temp. Info Menu Press the Heat button until Access = CUSTOMER2 is displayed. Menu outline for Extra functions (Customer level 2) Reg 637 K2 040622 16:08:15 Tu temp. Info Menu Menu principal Room temp. setting 1 Main menu Adjusting the hot water settings Page 23 Heat curve fine-tuning 1.3 Page 22 V3V +/interv. 0-10 2 Main menu Timer control settings Page 24 Page 25 2.2 Clock setting HP accord. to clock 4.1 Add. heat in operat. number of hours? 7.1 Page 24 Page 24 Page 26 interval for hot water peak Setting level heat pump +/- 1.5 1.6 4.1.1 Distribution HP DHW-Rad in % Main menu Clock, setting time and date 10 Page 27 Main menu Alarm logging of all alarms 11 Page 27 7.2 Page 25 Page 26 Clock setting DHW accord. to clock 4.3 Add. heat in operat. number of hours? 7.3 Page 25 Page 26 Page 23 Adjust curve V3V 7 Page 24 Page 23 Adjust. V3V range -10/+10 4 Main menu Op. time readings HP and add. heat Main menu Return to factory settings 12 Page 27 1.7 Page 23 Setting of room sensor infl 1.11 Note Page 22 Setting of holiday function 1.12 = The menu display is standard on all heat pumps. = The menu display is only shown on the heat pump in combination with an extra sensor or for a specific model. Page 22 Remote control temperature 1.13 Page 22 Setting of summer disconnection 1.14 Page 22 21 From Customer level 2 you also have access to all the basic functions on Customer level 1. Only the most frequently used menus in Customer level 2 are shown in the menu outline. All the menus cannot be presented due to space limitations. Use the dial to scroll through the menus. Extra functions - Customer level 2 FOR THE USER Temperature settings Proceed as follows to access the temperature settings for the heating on Customer level 2: 1. Press the Heat button until Access = CUSTOMER2 is displayed. 2. Press the Menu button. 3. Press the Select button and scroll through the menus using the menu dial. Fine-tune the heat cur ve You can “break” the heat curve up or down every fifth outdoor degree. For example, you can make a hump in the curve at 0ºC. Navigate to menu 1.3, press Select and turn the menu dial until 0°C is displayed in the upper left part of the menu. Press Adjust and turn the dial to increase or decrease the return temperature. The change must not exceed 1 - 2°C. Press Save and wait at least 24 hours prior to any further adjustment. The purpose of breaking the curve is to be able to influence the heat pump’s heat production at extra sensitive outdoor temperatures. Room sensor influence The menu is only shown for heat pumps having a room sensor installed. You use the menu to set how much the room sensor should influence the heat curve. A higher value will have a greater effect. Please note that the room sensor only fine-tunes the heat curve. Consequently, it is important the basic setting of the heat curve’s slope and fine-tuning are correct. Holiday mode The menu is only shown for heat pumps having a room sensor installed. The holiday function gives you the possibility to choose a number of days when the room temperature will be lowered to 15ºC (the temperature is not adjustable). When the days have passed the heat pump returns to the normal heating setting. Hot water production is not affected by the holiday function. Remote control The menu is only shown for heat pumps having a room sensor installed. In addition, special remote control equipment is needed. This equipment is available as an accessory. You can switch between the remote control mode and normal mode using a telephone. Summer disconnection The function means the heat pump only produces hot water when the outdoor temperature rises above the set value. 22 Main menu Indoor temperature settings 1 Return Select Temperature settings Heat curve fine-tuning 1.3 Return Select Temperature settings Setting of room sensor infl 1.11 Return Select Temperature settings Setting of holiday function 1.12 Return Select Temperature settings Remote control temperature 1.13 Return Select Temperature settings Setting of summer disconnection 1.14 Return Select Extra functions - Customer level 2 FOR THE USER Set extra heat curve with mixing valve If you have floor heating combined with radiators, you should set an extra heat curve with mixing valve. The mixing valve is a valve that lets water through in different amounts. It prevents the floor from becoming too hot and destroying the flooring. The menu is only displayed when there is an extra flow sensor, T4 (GT4), on the heat pump. You set the extra heat curve using two menus: Mix. valve incr/decr and Mix. valve fine-tune. Increase or decrease the mixing valve 1. Press the Heat button until Access = CUSTOMER2 is displayed. 2. Press the Heat button. 3. Turn the menu dial clockwise until you reach the menu Mix. valve incr/ decr.4. Mix. valve incr/decr 0 Return 2,0 10 adjust Note The initial position of the floor heating circuit is heat curve 2. The scale covers the range 0 to 10. Extra heat curve with mixing valve only works with an extra flow sensor T4 (GT4). 4. Press the Adjust button. 5. Turn the menu dial clockwise to choose a higher heat curve. Turn the menu dial anti-clockwise to choose a lower heat curve. 6. Save the new value by pressing the Save button. Fine-tune the mixing valve 1. Press the Heat button until Access = CUSTOMER2 is displayed. 2. Press the Heat button. 3. Turn the menu dial clockwise until you reach the menu Mix. valve fine-tune. Fine tune mix. valve -10° -0,0° 10° Return adjust 4. Press the Adjust button. 5. Turn the menu dial clockwise to set an upward, parallel offset on the curve. Turn the menu dial anti-clockwise to set a downward parallel offset on the curve. 6. Save the new value by pressing the Save button. 23 Note The example describes how to finetune the extra heat curve. The scale covers the range -10ºC to +10ºC. Extra functions - Customer level 2 Hot water peak Recurring increase in the hot water temperature The Range for hot water peak menu is used to set the range for a recurring increase in the hot water temperature. This function takes the water temperature temporarily up to approximately 65°C. Three settings are possible: inactive (default), daily or preferred day. Hot water range for hot water peak 2.2 Return Select Timer control Open the setting menus for timer control like this: 1. Press the Heat button until Access = CUSTOMER2 is displayed. 2. Press the Menu button. 3. Turn the menu dial clockwise until you access the menu Timer control settings (menu 4). 4. Press the Select button and scroll through the menus using the menu dial. Clock setting of the heat pump according to clock The function Clock setting HP accord. to clock is for those who want the heat pump to produce different amounts of heat at different times of the day and on different days of the week. This allows you to make further energy savings. The room sensor T5 (GT5) influence is inhibited 24 hours after using clock setting for the heating, or after any type of external control of the heat pump. This allows the heating to return to ordinary settings. In practise this means that should clock setting of the heating apply each night, then the room sensor has no function except temperature readings. Example: You want to set the heat pump so that it maintains a 3ºC lower radiator temperature on Mondays between 22:00 and 06:00. Main menu Indoor temperature settings 1 Return Select Main menu Timer control accord. to clock 4 Return Select Note When you have time based tariffs with cheaper electricity for example during the night, any savings may be lost if the return to normal temperature occurs when the more expensive electricity price applies. Clock setting Clock setting HP accord. to clock 4.1 Return Select 2. Press the Select button. Timer control HP 1 Mon 00:00-00:00 > 1. Turn the dial clockwise until you access the menu Clock setting HP accord. to clock (menu 4.1). Return adjust 3. Turn the menu dial clockwise to choose the day. Now press the Adjust button to select the weekday with the symbol ^. Turn the menu dial clockwise one step to activate the start day. The weekday now has a capital letter. > 4. Press the right-hand arrow (->) until the cursor reaches the first two zeros (00). Timer control HP 1 Mon 00:00-00:00 Timer control HP 1 Mon 00:00-00:00 Return Return 24 -> > > FOR THE USER Hot water settings -> 5. Turn the menu dial until the value 22:00:00 is displayed. Timer control HP 1 Mon 22:00-06:00 6. Press the right-hand arrow twice (->) to move the cursor two steps to the right. Return 7. Turn the menu dial until the value 06:00 is displayed. Timer control HP 1 Mon 22:00-06:00 8. Press the right-hand arrow so it is replaced by the Save function. Return -> > > <- 9. Finish by pressing the Save button. 10. Press the Return button. 11. Turn the menu dial clockwise until you reach the menu Setting level heat pump +/- (menu 4.1.1). 12. Press the Select button and set the temperature to -3ºC, which is to apply for the chosen time intervals. Do not set a too large temperature reduction, max approx. 3ºC for radiator systems and max approx. 1.5ºC for floor heating systems is sufficient. <- Save Timer control HP 1 Setting level heat pump +/- 4.1.1 Return Select Note If you would like to make the setting for every day of the week, carry out the instruction shown in the example seven times, once for each weekday. 13. Finish by pressing the Save button. The temperature set under 4.1.1 applies to all active time intervals. Clock setting of the hot water according to clock The Clock setting DHW accord. to clock (menu 4.3) works in exactly the same way as Clock setting HP accord. to clock (menu 4.1). You can choose to completely disable hot water heating to save energy. This is primarily effective when peak tariffs are charged. The procedure is the same as in the previous example. Use this to make your settings. Clock setting Clock setting DHW accord. to clock 4.3 Return Select Reading operating times on the heat pump and additional heat Statistics concerning the heat pump and additional heat operations are stored in the control unit. For example, you can see how many hours they have been running. To view the operating times for the heat pump and additional heat: 1. Press the Heat button until Access = CUSTOMER2 is displayed. 2. Press the Menu button. 25 Main menu Indoor temperature settings 1 Return Select FOR THE USER Extra functions - Customer level 2 FOR THE USER Extra functions - Customer level 2 3. Turn the menu dial clockwise until you reach the menu Op. time readings on HP and add. heat (menu 7). 4. Press the Select button and scroll through the menus using the menu dial. The number of hours the heat pump has been in operation Main menu Op. time readings HP and add. heat 7 Return Select Op. time readings Add. heat in operat. number of hours? 7.1 Return Select The menu shows the number of hours that the heat pump has been in operation since the day of installation. The heat pump’s hot water mode and heating mode operations as a percentage Op. time readings Distribution HP DHW-Rad in % 7.2 Return Select The menu shows the heat pump’s allocation between hot water mode and heating mode. The allocation is stated as a percentage. The number of hours additional heat has been in operation The menu shows the number of hours additional heat has been in operation since the day of installation. Set the time and date The heat pump has functions that are dependent on both the clock and date. Thus, it is important that these are correct. This is how you access the menu Clock, setting time and date: 1. Press the Heat button until Access = CUSTOMER2 is displayed. 2. Press the Menu button. 26 Op. time readings Add. heat in operat. number of hours? 7.3 Return Select 3. Turn the menu dial clockwise until you reach the menu Clock, setting time and date (menu 10). 4. Press the Select button and make your settings using the menu dial and menu buttons. Main menu Clock, setting time and date 10 Return Select Alarms given by the heat pump You can easily see any alarms given by the heat pump. The menu provides you with information about the alarm type and when it occurred. If there is an asterisk (*) in the menu window this means the alarm is still active, i.e. the cause of the alarm remains. This is how you access the Alarm logging of all alarms (menu 11): 1. Press the Heat button until Access = CUSTOMER2 is displayed. 2. Press the Menu button. 3. Turn the menu dial clockwise until you reach the menu Alarm logging of all alarms (menu 11). 4. Press the Select button and scroll using the menu dial between any alarms that may have previously occurred. Alarms are stored in chronological order. Read more about the heat pump’s alarms under the heading All alarms. Main menu K2 Indoor temperature settings 1 Return Select Main menu Alarm logging of all alarms 11 Return Select Return to the heat pump’s factory settings If you want to restore the factory settings on the heat pump you can easily reset all the settings you have made. This is how you access the Return to factory settings menu (menu 12): 1. Press the Heat button until Access = CUSTOMER2 is displayed. 2. Press the Menu button. 3. Turn the menu dial clockwise until you reach the menu Return to factory settings (menu 12). 4. Press the Select button. 5. Return to the factory settings by pressing the Yes button. When you return to the factory settings all the adjustments made on Customer levels 1 and 2 are reset such as temperature settings and time control settings. 27 Main menu K2 Indoor temperature settings 1 Return Select Main menu Return to factory settings 12 Return Select FOR THE USER Extra functions - Customer level 2 FOR THE USER Maintenance Maintenance Your heat pump requires a minimum of maintenance, however, we still recommend some servicing to get optimal performance from your heat pump. Check the following items a few times during the first year. You should then check them once or twice a year: Sight glass Expansion tank Particle filter Protective anode (only models with a stainless steel hot water cylinder) Unscrew the front cover Warning For reasons of safety the main power supply must be disconnected before working on the heat pump. Only an accredited refrigeration company is permitted to work on the refrigerant circuit. Unscrew the front cover On certain models you will need to open the front cover to access some of the maintenance areas, e.g. the sight glass and particle filter. The front cover is secured at the top by two screws. This is how you remove the front cover from the heat pump: 1. Unscrew the two screws on the top. See the picture. 2. Tilt the front cover towards you. 3. Lift the front cover up to release the lower edge. Remove the front cover by unscrewing the screws on the top. Sight glass Sometimes when the heat pump has started you can see the fluid in the refrigerant circuit bubble for a few minutes in the sight glass. This is completely normal. However, if it bubbles continuously you should contact your dealer. Sight glass If the sight glass shows green this means there is no moisture in the system. If it is yellow, there is moisture in the system. If this happens, contact your dealer. 28 LWM model Maintenance The task of a particle filter is to ensure no particles or dirt enter the heat exchangers. Over time the filter can become clogged and will need cleaning. There are particle filters on both the hot and cold sides. To clean the particle filters: 1. Shut down the heat pump using the ON/OFF button. 2. Close the valve and unscrew the sealing cap. 3. Loosen the circlip holding the screen in the valve. Use the supplied circlip pliers. 4. Lift out the screen from the valve and wash clean with water. 5. Refit the screen, the circlip and sealing cap. 6. Open the valve and start the heat pump using the ON/OFF button. On the cold side the particle filter is located outside of the heat pump. It may be concealed by insulation material or a black box. On LW model the hot side’s particle filter is fitted inside the heat pump. On LWM model it is located outside of the heat pump. Particle filter Screen Circlip Sealing cap LW model Protective anode Only applies to heat pumps with integrated, stainless hot water cylinder. A protective anode is located in the top of the cylinder with the task of preventing corrosion. The hot water cylinder must be filled with water in order for the anode to work. If an error occurs, an alarm is activated in the control unit. 29 FOR THE USER Note Particle filter FOR THE USER What to do if a fault occurs What to do if a fault occurs The control unit has an advanced monitoring system that gives alarms if anything unforeseen happens in the heat pump. Most alarms are rectified by you the user and there is never any risk that you can damage anything in the heat pump when you reset an alarm. If a room sensor is installed the lamp on this will come on when the heat pump gives an alarm. Time when the alarm occurred. Example of an alarm: Cause. Info button: When you press the Info button and turn the menu dial, information is displayed as well as possible actions to rectify the alarm. Date when the alarm occurred. Alarm Power failure 040622 16:08:15 Info Ackn. Ackn. button: When you press the Ackn. button, the alarm lamp on the control panel goes out and the heat pump starts again within 15 minutes if there is a heating requirement. If the fault has not been rectified the lamp will remain lit. Should several alarms have occurred on the heat pump, turn the menu dial clockwise to find out more information about each alarm. Info Acknowledge Dimmed menu display Possible cause 1: Blown fuse in the house’s fuse box/distribution box. Action: 1. Check the fuses in the house’s fuse box. 2. Change the fuse if necessary. If miniature circuitbreakers have tripped these are reset by pushing up the toggle switch. 3. The heat pump automatically returns to its operating mode 15 minutes after the fault has been rectified. Miniature circuitbreaker LWM model Miniature circuitbreaker LW model Possible cause 2: The heat pump’s miniature circuit-breaker has tripped. Action: 1. Reset the heat pump’s miniature circuit-breaker by pushing up the centre toggle switch. 2. The heat pump automatically returns to its operating mode 15 minutes after the fault has been rectified. Note For technical reasons the heat pump does not restart until 15 minutes after a stoppage. 30 What to do if a fault occurs LWM model LW model Particle filter Cleanable, with shutoff switch. Fuse 1 Reset for motor cut-out compressor. Fuse 2 Reset switch for the heat pump’s miniature circuit-breaker. Fuse 3 Reset switch for the electric cassette’s miniature circuit-breaker. Fuse 4 Reset button for the electric cassette overheat protection. Note: The button must be pressed in firmly. Sight glass Sight glass All alarms List of all alarms: An alarm can sometimes occur temporarily due to various reasons. However, there is never a risk involved in resetting an alarm. All the alarms that can appear in the menu display are described on the following pages. The descriptions give you an idea about the nature of the alarm and what you can do to rectify it. The text often refers to different fuses and reset buttons on the heat pump. These are shown in the figures above. 31 Motor cut-out compressor Motor cut-out HTF pump Compressor temperature Low pressure switch High pressure switch Electric cassette Power failure (3-phase) 3-phase incorrect (3-phase) High return to the heat pump Heat transfer fluid out max High heat transfer fluid delta Sensor fault Heat transfer fluid in under limit and heat transfer fluid out under limit Protective anode FOR THE USER Fuses and reset buttons on the heat pump What to do if a fault occurs FOR THE USER Motor cut-out compressor (MB1) Possible cause 1: Action: Intermittent fault or overload on the power supply. 1. Press the Ackn. button. The alarm indication goes out even if the fault has not been rectified. 2. Reset the motor cut-out on the heat pump (Fuse 1). 3. Wait for the heat pump to start. Possible cause 2: Current level (A) on the motor cut-out is set too low. The current drawn by the compressor varies during summer/winter operations. Action: 1. Contact your dealer. Possible cause 3: Contactor or cut-out faulty, or loose electrical connections to the compressor. Action: 1. Contact your dealer. The menu display shows: Alarm (MB1) Compr. circ. switch 040622 16:08:15 Info Ackn. Note The reset switch for the compressor can be found under heading Fuses and resetting buttons on the heat pump. Possible cause 4: Compressor error. Action: 1. Contact your dealer. Motor cut-out HTF pump (MB2) Possible cause 1: The HTF pump is blocked due to contamination. Action: 1. Press the Ackn. button. 2. Loosen the venting screw and remove the dirt. 3. Help to start the pump with a screwdriver. The alarm indication goes out even if the fault has not been rectified. Possible cause 2: Faulty electric motor on HTF pump. Action: 1. Contact your dealer. Possible cause 3: Temporar y error. Action: 1. Contact your dealer should repeated faults occur. The menu display shows: Alarm (MB2) HTF c-pump switch 040622 16:08:15 Info Ackn. Note The alarm indication goes out when acknowledging the alarm even if the fault has not been rectified. 32 What to do if a fault occurs Possible cause 1: The working temperature of the compressor is too high. Action: 1. Press the Ackn. button. 2. Contact your dealer at repeated alarms. Alarm (GT6) Compressor superheat 040622 16:08:15 Info Ackn. Possible cause 2: Intermittent temperature rise due to abnormal operating conditions. Action: 1. Press the Ackn. button. 2. Wait and see. The menu display shows: Low pressure switch (LP) Possible cause 1: Air in the heat transfer system. Action: 1. Press the Ackn. button. 2. Check the expansion tank. 3. Fill with fluid if necessary. 4. Listen for air in the system. If air is heard constantly, contact your dealer. Possible cause 2: The particle filter on the cold side is clogged. Action: 1. Check the particle filter. 2. Clean the particle filter if necessary. 3. Press the Ackn. button. Possible cause 3: Lack of refrigerant in the heat transfer circuit. Action: 1. Press the Ackn. button. 2. Wait for the heat pump to start. 3. Check whether it bubbles continuously in the sight glass. 4. If it bubbles continuously, contact your dealer. Possible cause 4: The HTF pump has stopped or is set at too low a speed. Action: 1. Press the Ackn. button. 2. Check that the pump has not stopped or is set at the wrong speed. Possible cause 5: Ice formation in the heat exchanger due to a lack of anti-freeze in the heat transfer circuit. Action: 1. Contact your dealer. Possible cause 6: Faulty expansion valve (the alarm appears in time periods of 3-4 weeks). Action: 1. Contact your dealer. 33 Alarm (LP) Low pressure switch 040622 16:08:15 Info Ackn. FOR THE USER The menu display shows: Compressor temperature T6 (GT6) What to do if a fault occurs FOR THE USER High pressure switch (HP) Possible cause 1: Air in the heating system. Action: 1. Press the Ackn. button. 2. Check whether there is air in the radiators. 3. Fill the heating system and vent if necessary. Possible cause 2: Not enough flow over the heat pump. Action: 1. Press the Ackn. button. 2. Check that the heat carrier pump has not stopped. 3. Check that all the valves are open. The thermostat valves accord. to clockeating systems should be fully open and in floor heating systems at least half of the coils should be fully open. 4. Possibly increase the speed of the heat carrier pump. Possible cause 3: The particle filter on the hot side is clogged. Action: 1. Press the Ackn. button. 2. Check the particle filter. 3. Clean the particle filter if necessary. Alarm (HP) High press. switch 040622 16:08:15 Info Ackn. Note Increase the speed of the heat carrier pump: Use a screwdriver or a coin to increase the speed of the heat carrier pump. Turn one step anti-clockwise. Electric cassette (EK) Possible cause 1: The electric cassette’s miniature circuit-breaker has tripped. Action: 1. Press the Ackn. button. 2. Reset the miniature circuit breaker button on the heat pump (circuit breaker 3) by pushing up the toggle switch. 3. Contact your dealer if the miniature circuit breaker trips again. Possible cause 2: The electric cassette’s overheat protection has tripped. Action: 1. Press the Ackn. button. 2. Reset the overheat protector (circuit breaker 4) by pressing in the button on the electric cassette’s protective casing. The circuit breaker is reset when you hear a clicking sound. 3. Check that the particle filter on the hot side is clean. 34 Alarm (EK) Electrical cassette (EE) 040622 16:08:15 Info Ackn. Note The miniature circuit-breaker button for the electric cassette can be found under the heading Fuses and reset buttons on the heat pump. The most frequent cause for the overheat protection tripping is a poor flow over the heat pump, which can be due to air in the heat pump or that the particle filter is clogged. What to do if a fault occurs The heat pump maintains all its settings in case of a power failure. When the power returns the heat pump automatically starts up according to the previous settings. Possible cause: Action: Alarm Power failure 040622 16:08:15 Info Ackn. One or two phases to the heat pump are down. 1. Check that the fuses in the house’s distribution box have not blown. 2. Change the fuse if necessary. If you have miniature circuit-breakers and these have tripped you reset them by pushing up the toggle switch. 3. The heat pump automatically returns to the operating mode once the fault has been rectified. 3-phase incorrect (3-phase) Possible cause 1: One or two phases to the heat pump are down. Action: 1. Check that the fuses in the house’s distribution box have not blown. 2. Change the fuse if necessary. If you have miniature circuit-breakers and these have tripped you reset them by pushing up the toggle switch. 3. The heat pump automatically returns to the operating mode once the fault has been rectified. Possible cause 2: Phase sequence to the heat pump is incorrect. (The alarm may only be rectified by an electrician.) Action: 1. Press the Ackn. button. 2. Switch the phase sequence on the incoming supply. The heat pump starts automatically once the phase sequence has been switched. Alarm 3-phase incorrect 040622 16:08:15 Info Ackn. Note If the power does not return on all phases at the same time during external electrical work, there is a risk that the Rego control unit gives a false alarm for a phase sequence error. High Heat transfer fluid delta T8/T9 (GT8/GT9) The heat pump gives an alarm when the temperature difference between the sensors T8 (GT8) and T9 (GT9) is too high. Possible cause 1: Not enough flow over the heat pump. Action: 1. Check that the heat carrier pump has not jammed. 2. Check that all the valves are open. The thermostat valves accord. to clockeating systems should be fully open and in floor heating systems at least half of the coils should be fully open. Possible cause 2: The particle filter on the hot side is clogged. Action: 1. Clean the particle filter. 35 Alarm GT8/GT9 High HTF delta 040622 16:08:15 Info Ackn. FOR THE USER Power failure (3-phase) What to do if a fault occurs FOR THE USER High return to the heat pump T9 (GT9) There is a sensor T9 (GT9) in the heat pump, which for reasons of safety, stops the compressor if the temperature of the return water from the radiators becomes too high. The limit lies at approximately 58ºC. Alarm (GT9) High return HP 040622 16:08:15 Info Ackn. Possible cause 1: The temperature setting is too high. Action: 1. Lower the temperature setting (Temp. +/-). Possible cause 2: The valves on the radiators or floor heating system are closed. Action: 1. Open all valves. 2. Press the Ackn. button. Possible cause 3: The hot water temperature is set too high. Action: 1. An alarm is given accord. to clockot water mode. Contact the installer to adjust the hot water temperature. Possible cause 4: The flow across the heat pump is greater than the flow in the heating system. (Only applies if a bypass is fitted.) Action: 1. Reduce the speed of the heat carrier pump or increase the speed of the main pump in the heating system. 2. Contact your dealer. Note The heat pump starts automatically when the temperature drops. Lower the speed of the heat carrier pump: Use a screwdriver or a coin to lower the speed of the heat carrier pump. Turn one step clockwise. The lowest speed should be avoided. Heat transfer fluid out max T8 (GT8) There is a sensor T8 (GT8) in the heat pump, which for reasons of safety, stops the compressor if the temperature of the water going out to the radiators becomes too high. Possible cause 1: Not enough flow over the heat pump. Action: 1. Check that the heat carrier pump has not jammed. 2. Check that all the valves are open. The thermostat valves accord. to clockeating systems should be fully open and in floor heating systems at least half of the coils should be fully open. Possible cause 2: The particle filter on the hot side is clogged. Action: 1. Clean the particle filter. 36 Alarm (GT8) Heat tran. f out max 040622 16:08:15 Info Ackn. Note The heat pump starts automatically when the alarm is reset and the water temperature has dropped to its normal value. What to do if a fault occurs All sensors connected to the heat pump can give an alarm when defective. In the example to the right it is sensor T1 (GT1), Return radiator, which has given an alarm. All sensors give alarms in the same way. Read more about the sensors under heading Read the temperatures on the heat pump. Alarm (GT1) Sensor return rad. 040622 16:08:15 Info Ackn. Note Possible cause 1: Temporar y error. Action: 1. Wait and see. Possible cause 2: Short circuit or broken sensor cable. Action: 1. If you have an ohmmeter you can disconnect the sensor and check the cable’s resistance. Compare with the sensor table in the section Technical information. Otherwise contact your dealer. Switch off the power before checking the resistance of the cable. Possible cause 3: Defective sensor or incorrect connection. Action: 1. Contact your dealer. Note HTF in under limit T10 (GT10) and HTF out under limit T11 (GT11) Possible cause 1: Temporar y low heat transfer fluid temperature. Action: 1. Wait and see. 2. If the alarm returns, contact your dealer. Possible cause 2: Too low flow on the cold side. Action: 1. Check the particle filter. 2. Clean the filter if it is clogged. Possible cause 3: The minimum heat transfer fluid temperature has been set too low. Action: 1. Wait and see. 2. If the alarm returns, contact your dealer. In a groundwater system the cause may also be: Possible cause 4: Clogged filter in the groundwater circuit. Action: 1. Clean the filter. Possible cause 5: The motor cut-out or a fuse on the pump in the groundwater system has tripped. Action: 1. Reset the motor cut-out or fuse. Possible cause 6: Faulty pump in the groundwater circuit. Action: 1. Contact your dealer. 37 The factory settings are 0°C and -2°C respectively. If anti-freeze liquid is used these values need to be changed. Contact your installer Alarm (GT10) Pump inlet too cold 040622 16:08:15 Info Ackn. Alarm (GT11) Pump outlet too cold 040622 16:08:15 Info Ackn. FOR THE USER Sensor fault What to do if a fault occurs Anode error Possible cause 1: Temporar y error. Action: 1. When large amounts of hot water are used (e.g. with a bath) the alarm may be given without there being a fault. Contact your dealer at repeated alarms. If the fault occurs at the weekend, you can wait to the next working day before contacting your dealer. Possible cause 2: Faulty electric anode. Action: 1. Contact your dealer. 38 Alarm Anode error 040622 16:08:15 Return Info For the Installer Installation of the heat pump should be performed by a qualified installer. The For the Installer chapter includes a section suggesting how the heat pump installer should install and commission the heat pump. The installation consists of a plumbing section and an electrical section. These provide technical data such as measurements, wiring diagrams and installer menus. Contents: Important information to the installer Checklist What the shipment includes Dimensions and plumbing connections The heat pump and collector hose in general Preparations before connection Connecting the heat pump to the heating system Connecting the heat pump to the power supply External connections to the heat pump Commissioning the heat pump Hot water cylinder for Heat Pump Technical information Note It is important that as the installer you also read through the For the User section of the manual. Here you will find the information necessary to get a comprehensive understanding of the heat pump. 39 Important information to the installer / Checklist Important information to the installer This manual provides you with all the information necessary to install the heat pump. The manual is divided into several sections. The order of these is based on the recommended installation sequence. Use the supplied checklist during installation. Before installation remember: Warning For reasons of safety the main power supply must be disconnected before working on the heat pump. Installation of the heat pump should be performed by a qualified installer. If the heat pump needs to be taken downstairs it may be temporarily tilted with the compressor downwards. However, never lay the heat pump down or transport it horizontally. Before the heat pump is commissioned, the heat transfer systems, the hot water cylinder and the heat pump must be filled and vented. FOR THE INSTALLER Check that pipe connections on the cold and hot sides are intact and have not shaken loose during transport. The HTF pump should be running when the heat transfer system is vented. The control unit measures the phase sequence and gives an alarm if the power supply has been connected incorrectly. Wiring should be kept as short as possible to protect the system from downtime, for example during a thunderstorm. Heat pump installation, energy drilling and collector installation must be carried out in accordance with applicable regulations. Checklist Each heat pump installation is unique. However, the following checklist will give you a general description of how the installation should be carried out. 1. 2. 3. 4. 5. 6. 7. 8. 9. 10. 11. 12. 13. Place the heat pump on a flat surface. Adjust the height using the rubber feet. Check that the bore hole for the collector hose has been bored according to applicable regulations (responsibility of the drilling company). Fit the incoming and outgoing pipes for the heating and heat transfer fluid circuits as well as the expansion tank. Fit the particle filters and valves. Make the connections for any external additional heat. Connect the pump to the heating system (plumbing). Follow the instructions for the pump in question. Install the outdoor sensor and a room sensor if used. Fill and vent the heating and heat transfer systems before commissioning. Connect the heat pump to the electrical system. Use the appropriate electrical diagram. Connect the external switch as well as additional heat if used, and an earth-fault breaker. Connect a general alarm, external controls and load monitor if used. Commission the heat pump by making all the necessary settings on the control panel. Check the heat pump after commissioning. Top up the heat transfer fluid if required. 40 What the shipment includes What the shipment includes Rubber feet Quantity: 4 Particle filter with screen Quantity: 2 (LWM model) Quantity: 1 (LW model) Outdoor sensor T2 (GT2) with cable Quantity: 1 Circlip pliers Quantity: 1 Room sensor T5 (GT5): Quantity: 1 Drain plug Quantity: 1 Return sensor T1 (GT1) Quantity: 1 Cable: 4 m Manual Quantity: 1 Safety valve Quantity: 1 41 FOR THE INSTALLER The following components are included in the delivery of the heat pump: Dimensions and connections Dimensions and plumbing connections The following illustrations show the dimensions of the heat pump and plumbing connections. All measurements are stated in millimetres. LWM model 596 79 240 356 471 538 569 517 506 5 1 6 1800 471 345 3 Electrical connections FOR THE INSTALLER 229 1 Return radiator 218 183 4 165 123 69 2 Flow radiator 3 Cold water in 4 Hot water out 5 HTF (coll) in 2 6 HTF (coll) out 398 464 554 596 LW model 105 310 365 455 505 569 5 482 447 1520 1 387 Electrical connections 321 3 6 2 266 1 Return radiator 2 Flow radiator 4 211 3 Return HWH 4 Riser HWH 5 HTF (coll) in 6 HTF (coll) in 42 The heat pump and collector hose in general The heat pump and collector hose in general Transporting the heat pump The heat pump should always be transported and stored in an upright position. Otherwise the suspension fittings inside the compressor can be damaged. If the heat pump must be tilted during entry to the installation site, this should be done for as short a time as possible. The outer cover plates should be removed to avoid damage, if the heat pump is moved without using the supplied pallet. The heat pump must not be stored at temperatures below -10ºC. Positioning the heat pump It is important that the heat pump stands on a flat surface as it contains sensitive parts. Adjust the rubber feet so the heat pump does not lean. The temperature surrounding the heat pump must be between 0ºC and 35ºC. Make sure there is a floor drain in the room where the heat pump is installed. The floor drain ensures any water is easily transported away if leakage should occur. Maximum working temperatures The heat pump can work at a maximum return water temperature of approximately 57ºC. If the temperature rises above this value the heat pump will stop for reasons of safety. The maximum outgoing temperature to the heating system is around 65°C. However, even higher temperature can be attained with the help of the electric cassette. Minimum working temperatures The heat pump is from factory preset to minimum temperature of heat transfer fluid (collector) ±0°C inlet and -2°C outlet. If anti-freeze liquid with a freezing point of -15°C is used, the heat pump can operate at outdoor temperatures down to -5°C. The preset values must be changed during commissioning. At this level the heating factor is (depending on model) appr. 3.3 - 3.5 at 35°C heat transfer fluid out and 2.4 - 2.6 at 50°C heat transfer fluid out. Fit the particle filter The task of the particle filter is to filter out dirt before it can enter the heat pump. Accordingly, the supplied particle filters should always be fitted on the incoming pipes on both the hot and cold sides. The filters should be fitted as close to the heat pump as possible and placed horizontally. Two particle filters are supplied with the LWM model. These are to be fitted on the outside of the heat pump. On the LW model the particle filter for the hot side is already fitted inside the heat pump. The supplied filter is to be fitted on the cold side, outside of the heat pump. 43 FOR THE INSTALLER The installer should take sound propagation into consideration when positioning the heat pump. The heat pump and collector hose in general Collector hose Note The task of the collector hose is to convey the heat transfer fluid through the ground or lake to fetch a few degrees of heat. The hose consists of a thin-walled plastic hose of the type PEM 40 x 2.4 PN 6.3. The depth and length of the collector hose are described in detail in the configuration program VPW2100. It is important when the collector hose is placed in the ground that air pockets are avoided. Installation and refilling around the collector hose Installation and filling the soil around the collector hose should follow applicable material and working descriptions and regulations. It is important that the filling material does not contain stones or other sharp objects that can damage the collector hose. We also recommend that the hose is pressure tested before starting to refill. If the hose should leak it is easier to fix the problem. FOR THE INSTALLER When cutting the collector hose it is important that no dirt or gravel enters the system. Dirt and gravel can cause a blockage in the heat pump. Minimum permitted bending diameter Minimum permitted bending diameter is 1 metre. If sharper bends are required an elbow connector must be used. If the collector hose is damaged by too sharp a bend, you can repair the damage using a straight coupling. Maximum length of the collector hose The maximum length of the collector hose is based on the heat transfer fluid pressure setting. We recommend a heat transfer fluid consisting of max 29 per cent ethanol by volume and water. Ethanol has good environmental and technical properties even at low temperatures and should therefore be used instead of other heat transfer fluids. Note The maximum collector hose lengths for heat pump models are provided in the table. Maximum length of collector hose with a single circuit (m) PEM 40x2.4 PN 6.3. Collector hose with 2 circuits in parallel: Maximum length per circuit (m) PEM 40x2.4 PN 6.3. EHP 7 LW/M 500 1000 EHP 9 LW/M 400 800 EHP 11 LW/M 400 800 EHP 14 LW - 800 EHP 17 LW - 800 Heat pump model 44 In situations where the length of the collector hose needs to exceed the permitted value, you can connect the hoses in parallel. As an example the table shows that for WPS 110 the maximum hose length is 400 metres. For two hoses connected in parallel the maximum length is 800 metres per hose, i.e. in total 1600 metres with a parallel connection. The heat pump and collector hose in general Outline drawings for the collector hose in the ground and through a wall The drawings below show how to run the collector hose in the ground and through a wall. The soil filling around the hose must not contain stones. If the hose is ploughed down, you must use equipment that guarantees the hose is laid at the right depth. Collector in the ground 200 mm C/C 800-1000 mm Filling of stone free soil approximately 100 mm around the collector hose. Example of the collector through the wall (from the side) Example of the collector through the wall (cross section) House wall Soil or rock collector Insulation from the wall Note Connecting the collector hose to the heat pump It is important that the collector hose has been pressure tested before it is connected to the heat pump. Pressure testing is carried out by the boring company or excavating company and determines whether the hose is in one piece and works as it should. A ground collector is usually pressurised during the laying process. A further leakage test must be performed on the collector hose before commissioning the heat pump. 45 Non-inflammable pipe material must be used when routing the pipes indoors. When plastic hose is used indoors this must be protected by 40 mm fire resistant, mineral wool sheet, EI30. FOR THE INSTALLER Collector, PEM 40 x 2.4 PN 6.3. C/C 800-1000 mm The heat pump and collector hose in general You can connect the collector hose to the heat pump with one or more circuits. In a multi-circuit solution, the collector hoses are connected in parallel as illustrated below. The parallel hoses are connected to two distributors. Each coil should have a shutoff valve and a control valve. The control valve is adjusted so that the flow rate is the same in the coils. After the distributor and the valves, the coils are connected to a collecting pipe. A filling unit, particle filter and an expansion tank are connected to the collecting pipe. A safety valve is connected to the outgoing pipe. The safety valve leads off any overpressure. One circuit at a time is filled with heat transfer fluid. Keep the valves closed in the other loops during the process. Read more about filling under the headings Connecting the heat pump to the heating system /Filling water in the heating system and Filling the heat transfer fluid in the collector hose. Filling unit Expansion tank FOR THE INSTALLER Filter Ground, lake or rock collector Heat pump Single circuit solution Control valve Filling unit Distributor Expansion tank Filter Ground, lake or rock collector Heat pump Multi-circuit solution 46 Preparations before connection Preparations before connection In some situations the heat pump may need extra preparations before it is commissioned. Such preparations may be: Moving the heat transfer fluid pipe for side entry Supplement the heat pump with a ground water system Moving the heat transfer fluid pipe for side entry FOR THE INSTALLER When the heat pump is supplied the heat transfer fluid side is assembled for a top installation. This means the pipes for heat transfer fluid in and heat transfer fluid out run through the top of the heat pump. If the heat pump is positioned in the house so it is difficult to install the heat transfer fluid pipes on the heat pump from above, they can be fitted from the side (side installation). Both the right- and left-hand sides are prepared for side installation. The following pages describe side installation. Side installation should be done before the heat pump is positioned in its final installation location. The heat transfer fluid pipes are fitted for top installation when the heat pump is delivered. 47 Preparations before connection Side installation on the right-hand side Proceed as follows to switch the heat transfer fluid pipes from top installation to side installation on the right: 1. Remove the blanking washers (figure 1). Figure 1 2. Dismantle the sensor and both heat transfer fluid pipes. The pipes run to the top of the top plate. Heat transfer fluid in is connected by a connector on top of the HTF pump. Heat transfer fluid out is connected to the bottom of the heat exchanger (figure 2). HTF (coll) out Sensor HTF (coll) in Note:The sensor fitted to heat transfer fluid out must be dismantled first (figure 2). Figure 2 FOR THE INSTALLER 3. Remove the Armaflex insulation from the heat transfer fluid pipes so they are completely clean (figure 3). 4. Cut the heat transfer fluid pipes so they are suitable for righthand side installation (figures 4 and 5). Follow the measurements given in figures 6 and 7. Figure 3 5. Solder on a solder elbow and a straight piece of copper tube. You can use the piece left over from cutting the heat transfer fluid out pipe as the straight piece. Note: Do not use compression ring couplings to secure the solder elbow on the copper pipe. Compression ring couplings require more space and space is limited in the heat pump. Figure 4 Heat transfer fluid in 6. Refit the heat transfer fluid pipes on the heat pump. See the result in figure 8. Figure 6 Figure 7 160 mm 7. Assemble the sensor on the heat transfer fluid in pipe. Use aluminium tape and cable ties. Solder elbow 225 mm Straight piece 140 mm 8. Slide on Armaflex insulation on both pipes and secure using Armaflex tape. Make sure you cover both pipes well, otherwise there is a risk of condensation. Figure 8 48 Figure 5 Heat transfer fluid out Preparations before connection Side installation on the left-hand side Proceed as follows to switch the heat transfer fluid pipes from top installation to side installation on the left: 1. Switch the heat pump’s right- and left-hand side covers. Figure 1 2. Remove the blanking washers (figure 1). HTF (coll) out 3. Dismantle the sensor and both heat transfer fluid pipes. The pipes run to the top of the top plate. Heat transfer fluid in is connected by a connector on top of the HTF pump. Heat transfer fluid out is connected to the bottom of the heat exchanger (figure 2). Note:The sensor fitted to heat transfer fluid out must be dismantled first (figure 2). Sensor HTF (coll) in Figure 2 FOR THE INSTALLER 4. Remove the Armaflex insulation from the heat transfer fluid pipes so they are completely clean (figure 3). Figure 3 5. Cut the heat transfer fluid in as in figure 4. Follow the measurements in figure 6. Solder on a solder elbow and a piece of straight copper tube. Use the material left over from cutting. 6. Cut the heat transfer fluid out as in figure 5. Follow the measurements in figure 7. Solder on a solder elbow and a piece of straight copper tube. Use the material left over from cutting. Note: Do not use compression ring couplings to secure the solder elbow on the copper pipe. Compression ring couplings require more space and space is limited in the heat pump. Figure 4 Heat transfer fluid in 7. Refit the heat transfer fluid pipes on the heat pump. See the result in figures 8 and 9. Figure 5 Heat transfer fluid out Straight piece Solder elbow Straight piece Solder joint 8. Assemble the sensor on the heat transfer fluid in pipe. Use aluminium tape and cable ties. 530 mm Figure 6 Figure 7 560 mm 9. Slide on Armaflex insulation on both pipes and secure using Armaflex tape. Make sure you cover both pipes well, otherwise there is a risk of condensation. Figure 8 View from the left 49 Figure 9 View from the right 225 mm Preparations before connection Supplementing the heat pump with a groundwater system Note The intermediate heat exchange should be connected against the flow. In addition, the pipe from the groundwater well is connected to the bottom of the intermediate heat exchanger so that the flow goes upwards. If the heat pump is installed for groundwater instead of rock, soil or lake, it must be supplemented with an intermediate heat exchanger. The intermediate heat exchanger protects the heat pump from contamination, clogging and freezing. A groundwater pump with non-return valve is installed at the bottom of the bore hole. The pump is used to pump the groundwater from the water source to the intermediate heat exchanger. Heat is transferred to the heat transfer fluid in the intermediate heat exchanger. The water is then pumped to a recharge well. The intermediate exchanger is installed in the boiler room or the like. FOR THE INSTALLER A filter has to be used in the water circuit. A similar filter type as in the brine circuit is recommended. A large filter is preferable if there is a risk for much contamination. The circuit to the heat pump is installed in the same way as described earlier i.e. with filling unit, expansion tank and safety valve. The circuit should also be protected against freezing down to -15ºC. To the heating system Filling unit Intermediate heat exchanger Exp. Filter Safety valve Groundwater Recharge well 50 Connecting the heat pump to the heating system Connection to groundwater system: electrical connection 1. Connect the ground water pump to the mains via a motor cut-out and a contactor. The control to the contactor (CK3) uses 230 V, which is taken from the terminals L and N (P3) in the heat pump. 2. Connect the auxiliary contact for the motor cut-out MB3 in series with the alarm input MB2. This method starts and stops the groundwater pump with the heat pump’s HTF pump. If the motor cut-out MB3 trips, the heat pump stops and the alarm for the HTF pump is displayed on the menu display. Warning If a single phase pump is used, it should always be connected with a contactor. It must never be connected to the P3 output on the heat pump as this can damage the control unit. Contactor Terminal card in the heat pump Groundwater pump G8 (P8) Note Alarm input There is a built-in motor cut-out in the pump on the 11-17 kW models. Models 6-9 kW have a strap fitted between L and MB2 on the terminal card. HTF pump G3 (P3) Connecting the heat pump to the heating system It is important that all previously mentioned preparations have been carried out before the heat pump is connected to the heating system. Also ensure the pipe system has been well flushed before it is connected to the heat pump. Flushing protects the heat pump from contamination. The heating system must be diffusion-proof. Oxygen must not enter the system. The heat pump is only intended to work in oxygen free systems with so-called “dead water”. When oxygen enters the system this causes corrosion in the heat pump and clogging of the filter on the heating system side. An intermediate heat exchanger is necessary in systems with oxygen penetration/diffusion to protect the heat pump. 51 Note Only qualified installers may carry out the installation. The installer should observe applicable regulations and recommendations from the supplier. FOR THE INSTALLER Motor cut-out Connecting the heat pump to the heating system Connecting to the heating system without a bypass: The heat pump can be connected to the heating system without a bypass, as the circulation in the heat pump and the heating system is managed by the integrated pump G2 (P2). This also means the main pump G1 (P1) is omitted. An absolute prerequisite for this type of connection is that a minimum flow of at least 70% of the nominal flow (see the table below) can be maintained throughout the year. The thermostat valves in the heating system should be fully open and in a floor heating system, it is necessary for at least half of the coils to be fully open. The control unit gives an alarm when the temperature increase exceeds 13ºC in the heating system. If the heating system is designed so that a minimum flow cannot be guaranteed, the heat pump should be connected using a bypass and an external main pump G1 (P1). Hot water function: Hot water charging is started by the hot water sensor T3 (GT3), and is stopped by the return sensor T9 (GT9). Heat carrier pump Pressure height (H) FOR THE INSTALLER The circulation pump G2 (P2) is a Wilo Star 25/6-130 accord. to clockeat pumps from 6 to 11 kW. The circulation pump G2 (P2) is a Wilo TOP-S 25/7.5 EM accord. to clockeat pumps from 14 to 17 kW. Flow (Q) Maximum external pressure drop in the heating system The maximum external pressure drop and the minimum flow that the integrated circulation pump can handle is presented in the table. If the minimum flow cannot be guaranteed a bypass and an external main pump G1 (P1) should be installed. Heat pump model Nominal flow Minimum flow Max external pressure drop EHP 7 LW/M 0.25 l/s 0.18 l/s 36.0 kPa EHP 9 LW/M 0.31 l/s 0.22 l/s 34.0 kPa EHP 11 LW/M 0.38 l/s 0.26 l/s 32.0 kPa EHP 14 LW 0.50 l/s 0.35 l/s 54.0 kPa EHP 17 LW 0.57 l/s 0.40 l/s 51.0 kPa 52 Connecting the heat pump to the heating system Connect heat pump LWM model to the heating system Application: The principle is based on floating condensing in the heat pump (curve control) and additional heat from an electric cassette. The built-in control unit controls the heat pump using the outdoor sensor T2 (GT2) and the return sensor T1 (GT1) according to the outdoor compensated control curve. When the heat pump is unable to meet the heating requirements, the electric cassette starts automatically and together with the heat pump provides the required temperature. The heating of hot water is given priority over the heating of the heating water. Hot water heating is controlled by the sensor T3 (GT3), which is located in the hot water cylinder. When the water in the cylinder reaches the required temperature, heat is once more supplied to the heating system. Connecting the sensors: External sensors T1 (GT1) and T2 (GT2) must always be connected. The sensor T5 (GT5) is connected when the heat pump is to be influenced by a room sensor. FOR THE INSTALLER An absolute prerequisite for this type of connection is that a minimum flow of at least 70% of the nominal flow can be maintained throughout the year. Heating system C11: F21: F22: F31: G2 (P2): G3 (P3): V21: V31: V40: W40: Symbols according to ISO/FDIS 14617. Letter codes according to IEC 61346-2. This is a principal drawing. 53 Expansion tank Safety valve Safety valve Safety valve Heat carrier pump Heat transfer fluid pump Filter Heating system Filter Heat transfer fluid in Hot water Cold water Connecting the heat pump to the heating system Connect heat pump LW model to the heating system Application: The principle is based on floating condensing in the heat pump (curve control) and additional heat from an electric cassette. The built-in control unit controls the heat pump using the outdoor sensor T2 (GT2) and the return sensor T1 (GT1) according to the outdoor compensated control curve. When the heat pump is unable to meet the heating requirements, the electric cassette starts automatically and together with the heat pump provides the required temperature. The heating of hot water is given priority over the heating of the heating water. Hot water heating is controlled by the sensor T3 (GT3), which is located in the hot water cylinder. When the water in the cylinder reaches the required temperature, heat is once more supplied to the heating system. Connecting the sensors: External sensors T1 (GT1) and T2 (GT2) must always be connected. The sensor T5 (GT5) is connected when the heat pump is to be influenced by a room sensor. FOR THE INSTALLER An absolute prerequisite for this type of connection is that a minimum flow of at least 70% of the nominal flow can be maintained throughout the year. Heating system C11: E42: F21: F22: F31: G2 (P2): G3 (P3): V21: V31: V40: W40: Symbols according to ISO/FDIS 14617. Letter codes according to IEC 61346-2. This is a principal drawing. 54 Expansion tank Hot water heater Safety valve Safety valve Safety valve Heat carrier pump Heat transfer fluid pump Filter Heating system Filter Heat transfer fluid in Hot water Cold water Connecting the heat pump to the heating system LWM model: individual temperature control in each room, increasing volume of internal water and bypass This solution is viable if you want to control the temperature of each room, for example if you use thermostat valves on the radiators in each room. The function of the heat pump is to maintain a temperature in accordance with the heat curve (depending on outdoor temperature) in the accumulator. The heating water is then distributed from the accumulator to the heating system. This solution also allows the overall volume of the installation to be increased if the volume of the heating system is inadequate, for example with one or two fan-assisted radiators. * Mixed heating system There is a possibility to control a second heating system with a mixing valve. This is recommended when a combination of radiators and a floor heating system is used. C11: C21: E22 : E42: F21: F22: G1 (P1): G2 (P2): G4 (P4): Q41: V21: V40: W40: Expansion tank storage tank water heater with electric cassette tank with outer shell safety valve safety valve Radiator pump Heat carrier pump Pump for mixed heating system mixer valve Filter Heating system Hot water Cold water » Symbols according to ISO/FDIS 14617. Letter codes according to IEC 61346-2. This is a principal drawing. 55 FOR THE INSTALLER * Connecting the heat pump to the heating system LW model: individual temperature control in each room, increasing volume of internal water and bypass This solution is viable if you want to control the temperature of each room, for example if you use thermostat valves on the radiators in each room. The function of the heat pump is to maintain a temperature in accordance with the heat curve (depending on outdoor temperature) in the accumulator. The heating water is then distributed from the accumulator to the heating system. This solution also allows the overall volume of the installation to be increased if the volume of the heating system is inadequate, for example with one or two fan-assisted radiators. * Mixed heating system There is a possibility to control a second heating system with a mixing valve. This is recommended when a combination of radiators and a floor heating system is used. FOR THE INSTALLER * C11: C21: E22 : E42: F21: G1 (P1): G2 (P2): G4 (P4): Q41: V21: V40: W40: 56 Expansion tank storage tank water heater with electric cassette tank with outer shell safety valve radiator pump heat carrier pump Pump for mixed heating system mixer valve filter heating system hot water cold water » Connecting the heat pump to the heating system LWM model: Increasing volume of internal water without bypass FOR THE INSTALLER This solution increases the overall volume of the installation if the volume of the heating system is inadequate, for example with one or two fan-assisted radiators. C11: C21: E22 : E42: F21: F22: G2 (P2): V21: V40: W40: Expansion tank storage tank water heater with electric cassette tank with outer shell safety valve safety valve Heat carrier pump Filter Heating system Hot water Cold water » Symbols according to ISO/FDIS 14617. Letter codes according to IEC 61346-2. This is a principal drawing. 57 Connecting the heat pump to the heating system LW model: Increasing volume of internal water without bypass FOR THE INSTALLER This solution increases the overall volume of the installation if the volume of the heating system is inadequate, for example with one or two fan-assisted radiators. C11: C21: E22 : E42: F21: G2 (P2): V21: V40: W40: 58 Expansion tank storage tank water heater with electric cassette tank with outer shell safety valve heat carrier pump filter heating system hot water cold water » Connecting the heat pump to the heating system Filling water in the heating system This is what to do: 1. Open and close the tap between the cold water system and the heating system in short time intervals. 2. Read the pressure on the pressure gauge. 3. Vent the system and refill to the correct pressure. The collector hose is filled with heat transfer fluid to be able to collect heat from the ground. The fluid is a mixture of water and anti-freeze. It should have a freezing point of approximately -15ºC. Proceed as follows to fill the collector hose with heat transfer fluid: See the illustration on the next page. 1. Connect two hoses (1 inch in diameter) to both filling valves 1 and 2. One of the hoses should have a submerged pump connected at the other end. Pump submersible with a minimum delivery pressure of 450 kPa. Minimum flow: 4 m³/h, type Wilo-Sub TWU 5-SE. The submerged pump should be fitted with a particle filter. 2. Place the hose and submerged pump in a barrel that holds 100 litres. 3. Fill the barrel with heat transfer fluid. The relation between water and heat transfer fluid can be found in the tables 1 and 2. Fill the water before anti-freeze liquid. Before starting up the pump, mix the antifreeze liquid in the tank to ensure a uniform mix. 4. Open valves 1 and 2 and close valve 3. Repeat points 5-8 for each circuit. The other circuits must be closed. 5. Start the submerged pump. The circuit is automatically filled with heat transfer fluid. 6. When the fluid level has dropped to 50 per cent in the barrel, stop the submerged pump and fill the barrel with more anti-freeze mixture. 59 Note The first litres from the return pipe are often contaminated. Therefore collect these litres in a separate tank. FOR THE INSTALLER Filling the heat transfer fluid in the collector hose Connecting the heat pump to the heating system 7. When the system is full and air no longer comes from the return pipe run the system for at least a further 30 minutes. You can also start the heat transfer fluid pump to speed up the air venting. Enter manual operation under menu 5.3 and start the pump G3 (P3). See Commissioning the heat pump/Testing the heat pump manually. 8. When venting is complete open valve 3, shut valve 2, and shortly after shut also valve 1. Disconnect the hoses and the heat transfer fluid side is ready for operation. Note FOR THE INSTALLER It is an advantage if an overpressure is created in the heat transfer fluid circuit. An underpressure damages the expansion tank and the collector hose. Expansion tank Safety valve Manual venting valve 3 2 1 Particle filter 60 Connecting the heat pump to the heating system Table 1: Mixing ratio in litres/metre 40/35Hose type: 40/35 40/35Hose type: 32/28 Hose type: 20/17 Water (l) Anti-freeze (l) Water (l) Anti-freeze (l) Water (l) Anti-freeze (l) Bioethanol 0,71 0,29 0,42 0,18 0,16 0,07 Propylene/ ethylene glycol 0,65 0,35 0,39 0,21 0,15 0,08 Anti-freeze type Example: A 200 metres of hose type 40/35 with anti-freeze gives 200 x 0.29 litres anti-freeze/ metre = 58 litres of anti-freeze and 200 x 0.71 litres of water/ metre = 142 litres of water. Bioethanol / Water Propylene/ethylene glycol / Water 25 % / 75 % 35 % / 65 % 61 FOR THE INSTALLER Table 2: Mixing ratio in per cent by weight Connecting the heat pump to the power supply Connecting the heat pump to the power supply Make sure the electricity has been switched off before connecting the heat pump to the mains. Check that cables and printed circuit cards are intact. High and low current cables should be routed separately in order to avoid interference on the sensors.Wiring diagram is supplied with the heat pump. The electrical installation may only be performed by a qualified electrician. For reasons of safety the main power supply must be disconnected before working on the heat pump. A description of external connections is given in this section. Examples of external connections include room and outdoor sensors and mixing valves. FOR THE INSTALLER Warning The electric connection as well as the material used to make this connection must comply with existing standards and in particular standard NF C15-100. The heat pump electrical supply must be protected with a D curve earth leakage circuit breaker. Wiring must be of the H07RNF type. Supply must be of the P+N+T type 230 V single-phase and 3P+N+T 400 V three phase. 62 Connecting the heat pump to the power supply External connections to the heat pump These are the external connections that must be made for the heat pump: Power supply 3-phase: The power supply is connected to terminals L1, L2, L3, N and PE. In the event of a possible phase sequence fault the heat pump will trip the alarm 3-phase incorrect. See more information in the section What to do if a fault occurs. Power supply 1-phase: The power supply is connected to terminals L, N, and PE. Mixing valve on the heating circuit: If a second heat curve with a mixing valve is to be used, the mixing valve is connected to terminal block SV1. External main pump in the heating system G1 (P1): The external main pump must be connected to the terminal card in those cases a bypass is required. The pump is connected to terminal P1. Return sensor radiator T1 (GT1): Must always be connected. Connect to terminal GT1. Hot water sensor T3 (GT3): Is connected if the heat pump is to produce hot water. Connect to terminal block GT3 X on the terminal card. On the LW model this sensor is already connected on delivery. Mixing valve sensor T4 (GT4): Is connected when a mixing valve for a second heat curve is to be used. Connect to terminal GT4. Terminal card for external connections Terminal card 230 V Alarm lamp, room sensor 63 G1 (P1) Mixing valve Room sensor Mixing valve Hot water Outdoor sensor Return radiator Room sensor T5 (GT5): Is connected if room sensor influence is required. FOR THE INSTALLER Outdoor sensor T2 (GT2): Must always be connected. Connect to terminal GT2. Connecting the heat pump to the power supply Connecting the general alarm, external input and load monitor General alarm The general alarm is activated irrespective of which alarm has tripped. When a general alarm is required on the heat pump, it is connected according to the diagram opposite. The contact for the general alarm output is potential free (no current) and it closes at a general alarm. Connect max 24 V and 100 mA on the contact. Terminal card for external connections FOR THE INSTALLER External input The heat pump includes prepared functions to permit the heating to be controlled externally, for example, from a telephone. The input to the heat pump can be programmed for different functions on the control unit. These functions are available from menu 1.13 (Remote control temperature) and menu 5.7 (Select external controls). The input must be short circuited to activate the function. Note that the contact must be potential free. Load monitor The load monitor has the task of disconnecting the additional heat in the event of a too high load on the house’s main fuse. Connect the load monitor to the external output according to the heading External input above. Select function 3 in the menu display 5.7 (Select external controls). When the external input has been short circuited the additional heat is disconnected. The heat pump is not affected. Note: It is not possible to utilise the other functions in menus 1.13 and 5.7 if you connect a load monitor. 64 Terminal card for external connections Commissioning the heat pump Installer and service menu (I/S) As the installer you have your own section of menus for settings, e.g. for commissioning. These are accessed from the control panel by holding down the menu button for approximately ten seconds. The menu displays are divided into lines and each display has a number to make it easy to find. If there is no activity for 30 minutes the menu display automatically returns to Customer level 1. Warning The Installer and service menu (I/S) is only for installers. Under no circumstances may the user access this level. The Installer level also includes Customer levels 1 and 2. How to use the control panel Here follows an example of how to use the control panel. The example shows how you move to menu display 5.13 and confirm the external sensors. You will also find more information about the control panel under the heading Control Panel in the User section. Reg 637 I/S 040622 16:08:15 Tu temp. Info Menu (10 sec) 2. The menu display Indoor temperature settings (menu 1) is shown. Main menu Indoor temperature settings 1 Return Select 3. Turn the menu dial clockwise (to the right) until you access the menu Commiss./Service for installer (menu 5). Now press the Select button. Main menu Commiss./Service for installers 5 Return Select 4. Turn the menu dial clockwise until you reach the menu Connected extra sensor in op. (menu 5.13). Now press the Select button. Commiss./Service Connected extra sensor in op 5.13 Return Select 5. The menu display Extra sensor(s) is shown. Confirm the extra sensors that you have connected by pressing the Confirm button. Extra sensor(s) GT4 GT5 Return Confirm 6. The text Confirming… is briefly shown in the menu display. This means your setting is being registered in the heat pump. Extra sensor(s) Confirming… 7. When the setting has been registered the previous menu display is shown. Press the Return button twice to return to the main menu. Extra sensor(s) Return 65 GT4 GT5 Confirm FOR THE INSTALLER 1. Press the menu button for approximately ten seconds until Access = SERVICE is shown on the menu display. Now press the Menu button. Commissioning the heat pump Commissioning the heat pump The heat distribution and heat transfer fluid circuits should be filled and fully vented before commissioning. Also check that there are no leaks. As many radiators as possible should be fully open when connecting to an existing water system. When connecting to a floor heating system at least half of all the floor coils should be open. When connecting a fan-assisted radiator system the fans are started first and then the taps on the fanassisted radiators are opened fully. Note Further important information on control unit can be found in the user section. Therefore read the entire manual before commissioning is started. Start the heat pump 1. Connect mains to the heat pump and press the ON/OFF switch on the control panel. FOR THE INSTALLER 3-phase heat pumps: The control unit automatically measures the phase sequence so the compressor does not operate in the wrong direction. If the phase sequence is wrong the alarm 3-phase incorrect will trip. Read more about the alarm under the heading What to do if a fault occurs.. Disconnect the mains power to the heat pump and switch the phases manually. 2. Activate the Installer/Service menu by pressing the Menu button until the text Access = SERVICE is shown on the menu display. Press the power switch ON/OFF Reg 637 I/S 040622 16:08:15 Tu temp. Info Menu 3. Temporarily adjust temp. incr. / decr. +/- to maximum value. To avoid having to wait for the heat pump restart timer you can go to the menu Fast restart of heat pump (menu 5.6) and quickly restart the heat pump. If the heat pump does not start, press the Info button to see if a heating demand exists. 4. Check the sight glass inside the heat pump during start up. Bubbles may appear in the sight glass for a few minutes during start up. The bubbles should then stop. Bubbles present when the heat pump is running are a fault symptom. They are probably due to insufficient refrigerant. Read more about the fault symptom under the heading What to do if a fault occurs. 5. Make the necessary settings on the control panel. Commiss./Service Fast restart of heat pump 5.6 Return Select Check the sight glass a. Confirm connected external sensors. If T3 (GT3), T4 (GT4) or T5 (GT5) have been connected, you must confirm these so the control unit knows they are installed. The displays presented by the sensors are only shown if the sensors have been confirmed. Commiss./Service Connected extra sensor in op 5.13 Return Select b. Set the maximal output to be used by the electric cassette. Choose between 1/3, 2/3 and 3/3. It is important that the electrical installation is adapted to handle the maximum electrical output. On delivery the control unit is set to 2/3. For more information about this see section Technical information. Commiss./Service Select conn capacity electrical cass. 5.2 Return Select 66 Commissioning the heat pump Menu displays you might need to adjust or check Temperature settings Set the neutral zone for the mixing valve in a heating system with two heat curves. In the neutral zone the mixing valve receives no signal to open or close. Only applies when the sensor T4 (GT4) is connected. Set the maximum temperature in the mixing valve circuit. You can, for example, set a maximum temperature for the floor heating system. On delivery of the heat pump the value is 60ºC. Only applies when the sensor T4 (GT4) is connected. The heat pump is from factory preset to minimum temperature of heat transfer fluid (collector) ±0°C inlet and -2°C outlet. If anti-freeze liquid with a freezing point of -15°C is used, the heat pump can operate at outdoor temperatures down to -5°C. The preset values must be changed during commissioning. The settings in menus 9.4 and 9.5 must be changed to -7°C and -10°C respectively. Temperature settings Heat curve hysteresis 1.4 Return Select Temperature settings Mixing valve curve Neutral zone 1.8 Return Select Temperature settings Mixing valve curve max at GT4 1.9 Return Select Hot water settings Set the temperature in the hot water heater’s outer shell. Note that the setting does not apply to the temperature inside the hot water cylinder. The factory setting is 52ºC, but this temperature can be increased to max 55ºC if necessary. Only applies when the sensor T3 (GT3) is connected. Set the hysteresis for the hot water temperature. The function measures below and above the value set in menu 2.3. Only applies when the sensor T3 (GT3) is connected. Less than 4ºC should be avoided. Hot water Setting of temperature. Return Select Hot water Setting of DHW hysteresis 2.4 Return Select Clock setting of additional heat You can set the control unit so that the additional heat is fully blocked during certain periods of the day. Read more under the heading Extra functions (Customer level 2)/Timer control about how to set the control unit. Commiss./Ser vice Make a check of all the functions before you commission the heat pump. You can manually start and stop the pumps and valves from the menu Manual operation of all functions. Set when the additional heat should be activated. On delivery the heat pump is set to activate the additional heat when necessary. Choose between Yes or No. If you choose No, the additional heat only engages during alarms, extra hot water and hot water peaks. The function Fast restart means you do not have to wait for the normal restart time to start the heat pump. If there is a need for heating or hot water the heat pump starts within 20 seconds. The setting must be repeated each time you need to make a fast restart. Single phase models: 67 Clock setting Add heat prog.time accord. to clock 4.2 Return Select Commiss./Service Manual operation of all functions 5.3 Return Select Commiss./Service Select function add.heat yes/no 5.5 Return Select Commiss./Service Fast restart of heat pump 5.6 Return Select FOR THE INSTALLER Set the hysteresis for heat pump on/off switching on the return sensor T1 (GT1). A lower value gives a shorter range between start and stop. Less than 5ºC should be avoided. Commissioning the heat pump Wait approximately 5 minutes after switching off the compressor before activating rapid restart of the heat pump, to allow the cooling circuit time to equalise pressure. In the menu 5.7 you set whether the heat pump, additional heat and hot water charging should be controlled externally. When the external input on the control unit is short circuited you can make one of the following choices: 0 : No effect (factory setting). 1 : HP, additional heat and hot water stop. 2 : HP no effect, additional heat and hot water stop. 3 : HP and hot water no effect, additional heat stops. 4 : HP and additional heat no effect, hot water stops. Commiss./Service Select external controls 5.7 Return Select Note If any of the alternatives to the left are selected it is not possible to utilise any of the functions in the menu Remote control temperature (menu 1.13). See Extra functions in the user section. Select the language that you would like for the menu texts. FOR THE INSTALLER Commiss./Service Selection of language menu 5.8 Return Select The heat pump is set for continuous operation of the heat carrier pump on delivery. In systems with a bypass, you can choose whether the heat carrier pump starts and stops with the compressor. Choose whether the heat transfer fluid pump shall run continuously, for example, when using *natural cooling. The heat transfer fluid pump should in normal mode always start and stop with the compressor. Select this menu to see the version number of the control unit. Confirm the extra sensors T3 (GT3), T4 (GT4) and T5 (GT5) that are connected externally. On confirmation, the control unit stores information about the sensors to be used. Commiss./Service Select operation alt. for P2 5.10 Return Select Commiss./Service Select operation alt. for P3 5.11 Return Select Commiss./Service Display software version number 5.12 Return Select Commiss./Service Connected extra sensor in op 5.13 Return Select Timer readings There are a number of different menu displays to help you check the status of the heat pump. The heat pump status is shown by the timer readings in menu 6. Read the additional heat timer The function shows the amount of time remaining before the additional heat is activated. If there is no countdown then there is no need of additional heat. Read the start delay * Natural cooling: In winter the heat pump takes heat from the bore hole in the rock and converts this to heat in the house. In the summer the cold in the same bore hole is used to give pleasant air conditioning. 68 Timer readings read add. heat delay 6.2 Return Select Commissioning the heat pump The function shows the time remaining until the heat pump starts again after a previous stoppage. The heat pump will not start if there is no heating or hot water need. Timer readings read start delay 6.4 Return Select Setting the additional heat Ramp time open Here you set the time that you would like the electric cassette to go from 0 to 100%. In some cases the ramp time open, may need to be adjusted to eliminate overexciting the system. Ramp time close Here you set the time that you would like the electric cassette to go from 100 to 0%. Show connected electric capacity Check how much additional heat (per cent) has been enabled. See more information under the heading Technical information. Additional heat Setting additional heat timer 8.1 Return Select Mixed add. heat Setting of ramp time open 8.3.4 Return Select Mixed add. heat Setting of ramp time close 8.3.5 Return Select Additional heat Show connected elec. capac. in op. Return Select Return to factor y settings If you regret your settings you can return to the factory settings in menu 12. If you are on Customer level 1 or 2 when you select Return to factory settings, only the settings in the displays accessible from Customer level 1 and 2 will be reset. If you are on the Installer/Service level when you select Return to factory settings only the displays accessible from Installer / Service level are reset. 69 Main menu Return to factory settings 12 Return Select FOR THE INSTALLER Additional heat timer The function gives you the possibility to set the time that should elapse before the additional heat starts if the heat pump cannot produce sufficient heat on its own. On delivery the heat pump is set to one hour. Commissioning the heat pump Drying program for floor tile When the heat pump has been installed in a newly built house with floor heating, the Drying of floor tile function can be used. The function is designed to slowly heat up the floor tile during a set number of days. The temperature is then maintained for a set number of days, to finally allow the tile to cool slowly for a set number of days. The heat pump works during drying operations with the hysteresis set in the display P1.4. Note During drying operations the heat pump does not produce any hot water and is not affected by timer controls. Once the drying program has finished the heat pump returns to normal mode. FOR THE INSTALLER It is also possible to operate drying program with only additional heat. Here you set how many days you want the heating phase to last. Drying program No of days for heating 5.14.1 Return Select Here you set how many days you want the floor heating system to maintain the maximum drying temperature. Drying program No. of days for max temp 5.14.2 Return Select Here you set how many days you want the cooling phase to last. Drying program No. of days for temp + cold 5.14.3 Return Select Here you set the start and stop temperatures for the drying program. Drying program Start/Stop temperature 5.14.4 Return Select Here you set the maximum temperature that the drying program should work at. Drying program Max temp. during drying 5.14.5 Return Select The function is activated and deactivated here. Drying program. Drying program Active drying 5.14.6 Return Select Temperature Note When an extra shunt group is installed, it works according to the normal heat curve. The mixing valve must be opened manually when you want this circuit to be included in the drying program too. Time 70 Commissioning the heat pump Manual test run of the heat pump Instead of starting the heat pump directly in normal mode, you can manually test run the pumps and valves. This is recommended as in this mode you can easily find any possible faults. In the menu display Manual operation of all functions (menu 5.3) you can run all functions manually. Press the Select button to start test operations. When you exit from the menu display the heat pump returns to normal mode. Commiss./Service Manual operation of all functions 5.3 Return Select Start the heat pump with only additional heat Important points to check after start up In the first period after commissioning particular attention should be paid to the pressure and levels in the heat distribution and heat transfer fluid circuits. After a short period of operation it may be necessary to top up the heat transfer fluid. On delivery the motor cut-out setting is determined by a value produced during hot water charging and a stable voltage. The recommended motor cut-out setting may not always be suitable as the voltage in the mains can fluctuate. The setting may therefore, from case to case, need to be adjusted. Adjust the setting using a clip-on ammeter when the heat pump is producing hot water. For the heat pump to perform at its best, it is important to check the flow on the hot side of the heat pump. Usually, the heat carrier pump has a speed selector switch. This must be set correctly for the pressure drop in the systems. A recommended temperature difference over the heat pump on the hot side is between 7-10 °C and on the cold side between 2-4 °C. You check this by going to menu display 3 and reading the sensors T8 (GT8) and T9 (GT9) as well as T10 (GT10) and T11 (GT11). It is important in systems with a bypass that the flow in the heating system exceeds the flow over the heat pump. If this is not the case, the heat pump flow goes back via the bypass to the heat pump return, which may cause the heat pump to give an alarm for a high return temperature. The flow over the heating system should be so great that the entire radiator surface is kept warm. In this way the heat emitting surface increases and in doing so the flow temperature from the heat pump is kept down. The heating system should be vented once again after test operations and then filled with cold water if necessary. 71 Commiss./Service Select function only add. heat 5.4 Return Select Note Do not forget to return this function to normal mode. FOR THE INSTALLER It might be necessary to run the heat pump before work on the heat transfer fluid circuit is complete. You can then start the heat pump with only additional heat. You must have filled and vented the heating system to run the heat pump with only additional heat. Go to the menu display Select the function only add. heat (menu 5.4) and press the Select button. If the arrow points towards Normal operation press the Adjust button. Turn the menu dial until the arrow points towards Only add. heat. Now press the Save button. This function ensures that additional heat heats both the hot water and the heating water. Commissioning report Client / Installation address: Installer: Type of equipment: Commissioning date: Serial number: Type of heat (soil heat, rock heat, other...): Total length of collector: FOR THE INSTALLER Other components of the installation: Additional heat .............................................. Room sensor T5 (GT5) Hot water heater type .............................................. Hot water heater temperature sensor T3 (GT3) Three-way valve .............................................. Mixing valve sensor T4 (GT4) Others: ..................................................................................................................................................................................................................... Points to be checked prior to commissioning Heating system (pressure, venting): filled checked Notes: ...................................................... HTF collector system (pressure, venting): filled checked Notes: ...................................................... Electric cassette: planned checked Notes: ...................................................... Particle filter: checked cleaned Notes: ...................................................... Sight glass: checked Notes: ...................................................... Temperatures after 10 minutes heating or hot water mode: Heat carrier out T8 (GT8): ............./..............˚C Heat carrier in T9 (GT9): ............./..............˚C HTF collector in T10 (GT10): ........../...........˚C HTF collector out T11 (GT11): ........../...........˚C Heat carrier pump G2 (P2) working correctly:................ HTF pump G3 (P3) working correctly:................ 72 Commissioning report Checks on concentrations carried out (collector hose and heating side) ..................................................................................................... Functional test carried out Menu settings 1.1, 1.4, 5.2 and 5.4. carried out The instructions about how to use the heat pump have been sent to the client / to the user Documentation about the apparatus has been handed over FOR THE INSTALLER Date and signature of the installer: 73 Technical information Technical information The heat pump’s factory settings Sensor table This table indicates the factory settings for all the settings likely to be changed by the fitter. This table indicates the values of the sensor resistors to different temperatures. Menu Factor y Temperature (ºC) k 1.1 temp. incr. / decr. +/- 4 -40 154,00 1.2 Temp. Fine-tune 0º -35 111,700 1.3 Fine-tune the heat curve 0º -30 81,700 1.4 Heat curve hysteresis 5º -25 60,400 1.5 Mix. valve incr/decr 4 -20 45,100 1.6 Adjust. mix. valve 0º -15 33,950 1.7 Fine tuning mix. valve curve 0º -10 25,800 1.8 Mixing valve curve neutral zone 3º -5 19,770 1.9 Max mixing valve curve at GT4 60º 0 15,280 1.10 inst. Int. temp 20º 5 11,900 1.11 Setting of room sensor 5 10 9,330 1.12 Setting holiday function 0 day 15 7,370 1.13 Remote control temperature Inactive 20 5,870 1.14 Summer disconnection setting 18º 25 4,700 2.1 No of hours for add. hot water 0 hours 30 3,790 2.2 Range for HW peak Inactive 35 3,070 2.3 Heating temp. setting 52º 40 2,510 2.4 Setting of DHW hysteresis 2º 45 2,055 4.1 Clock setting HP accord. to clock Inactive 50 1,696 Level of PAC setting +/- 0º 55 1,405 4.1.1 TECHNICAL INFORMATION settings 4.2 Timer control settings for add. heat Inactive 60 1,170 4.3 Clock setting DHW accord. to clock Inactive 65 0,980 5.2 Select capacity of conn. for additional heat 2/3 70 0,824 5.4 Select function add. heat only OFF 75 0,696 5.5 Select add. heat function yes 80 0,590 5.7 Select external control 0 85 0,503 5.10 Select P2 mode of funct. P2 running cont. 90 0,430 5.11 Select P3 mode of funct. P3 with Compres. 8.1 Setting add. heat time 60 minutes Ramp time open 20 min 8.3.4 8.3.5 Ramp time closed 3 min 9.4 Min. temp pump inlet -10º 9.5 Min. temp. pump outlet -10º 74 Technical information Technical information for three-phase models Compress 3000 14 LW 17 LW Emitted/ Supplied output at 0/35°C 1 kW 14.4/3.1 16.7/3.7 2 kW 13.9/4.2 16.2/4.9 Minimum flow heating side l/s 0.35 0.40 Nominal flow heating side l/s 0.50 0.57 Maximum pressure available heating side (at nominal flow) kPa 54 51 Nominal flow of antifreeze mixture to the collector hose l/s 0.78 0.90 Maximum pressure available to collector hose (at nominal flow) kPa 74 71 Bioethanol - water or Propylene/ethylene glycol - water Type of antifreeze Maximum pressure heating side bar 1.5 Maximum pressure on collector hose side bar 4 Maximum output temperature to the heating system °C 65 Working temperatures on collector hose side °C -5 to +20 Integrated collector hose and heat carrier pump Yes Power supply 400V 3N~ 50Hz Additional heat settings kW The recommended type of fuse depends on the electrical output 3 6 kW electric cassette 9 kW electric cassette Starting current 4 3.0 / 6.0 / 9.0 A 20 25 A 25 32 A 52 50 Compressor Scroll Type R407c HFC refrigerant kg 2.30 2.30 Connection for heat fluid out/in mm Cu 28 Cu 28 Out/in collector hose connection mm Cu 35 Dimensions of model LW (LxDxH) mm Weight of model LW kg Control unit 1 2 3 4 5 Cu 35 600x600x1520 190 195 Rego 637 Output data at 0/35°C and maccord. to clockeating medium flow are stated according to the European standard EN 255. Output data at 0/50°C and maccord. to clockeating medium flow are stated according to the European standard EN 255. aM type fuse, D curve circuit breaker Soft starter Electric anode included 75 TECHNICAL INFORMATION Emitted/ Supplied output at 0/50°C Technical information Technical information single-phase models Compress 3000 EHP7LW/M EHP9LW/M 11 LW/M Emitted/ Supplied output at 0/35°C 1 kW 7.2/1.7 9.1/2.1 10.6/2.4 2 kW 6.8/2.2 8.5/2.7 10.0/3.2 Minimum flow heating side l/s 0.18 0.22 0.26 Nominal flow heating side l/s 0.25 0.31 0.38 Maximum pressure available heating side (at nominal flow) kPa 36 34 33 Nominal flow of antifreeze mixture to the collector hose l/s 0.38 0.46 0.57 Maximum pressure available to collector hose (at nominal flow) kPa 45 44 80 Emitted/ Supplied output at 0/50°C Bioethanol - water or Propylene/ethylene glycol - Water Type of antifreeze Maximum pressure heating side bars 1.5 Maximum pressure on collector hose side bars 4 Maximum outgoing temperature to the heating system °C 65 Working temperatures on collector hose side °C -5 to +20 Integrated collector hose and heat carrier pump Yes Power supply 230V 1N~ 50Hz Additional heat settings kW 3.0 / 6.0 / 9.0 The recommended type of fuse depends on the electrical output 3 6 kW electric cassette 9 kW electric cassette Starting current. soft start AaM 40 50 50 AaM 63 63 63 A 23.8 30.9 34.6 TECHNICAL INFORMATION Compressor Scroll Type R407c HFC refrigerant kg 1.60 1.80 2.40 Connection for heat fluid out/in mm Cu 22 Cu 22 Cu 22 Out/in collector hose connection mm Cu 28 Cu 28 Cu 28 Dimensions of Model LW (LwDxH) mm Weight of model LW kg Dimensions of Model LWM (LwDxH) mm Weight of model LWM Hot water heater in stainless steel kg Integrated hot water heater with double shell on model LWM.4 Hot water heater model LWM litres Control unit 1 2 3 4 600x600x1520 152 155 201 210 218 Stainless steel Stainless steel Stainless steel 185 185 185 Rego 637 Output data at 0/35°C and min heating medium flow are stated according to the European standard EN 255. Output data at 0/50°C and maccord. to clockeating medium flow are stated according to the European standard EN 255. aM type fuse, D curve circuit breaker Electric anode included 76 170 600x600x1800 77 TECHNICAL INFORMATION 78 TECHNICAL INFORMATION 79 TECHNICAL INFORMATION ROBERT BOSCH LIMITED PO Box 42048 Tower Junction Christchurch 8149 Telephone number +64 (0)3 943 0750 Fax number +64 (0)3 943 0756