1
DOCUSIGN USERS MANUAL
Last Updated: June 18, 2014
Version 2.0
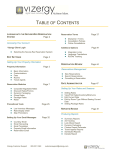
Table of Contents
DOCUSIGN OVERVIEW ............................................................................................................................ 6
AGILOFT CERTIFICATION BY DOCUSIGN ........................................................................................................... 6
AGILOFT INTERFACE TO DOCUSIGN ................................................................................................................ 6
DEFINITIONS........................................................................................................................................... 7
E-SIGNING WITH AGILOFT....................................................................................................................... 9
OVERVIEW OF THE AGILOFT/DOCUSIGN E-SIGNING PROCESS .......................................................... 10
GENERAL DESCRIPTION OF THE E-SIGNING PROCESS .................................................................................... 10
CREATE AND CONFIGURE AN ACCOUNT AT DOCUSIGN ...................................................................... 13
CONFIGURE YOUR KNOWLEDGEBASE FOR DOCUSIGN ...................................................................... 14
SET UP THE DOCUSIGN USERS (AT DOCUSIGN) ............................................................................................ 14
SET UP THE DOCUSIGN EXTENSION (AT AGILOFT) ......................................................................................... 17
Set Up the DocuSign Administrator .................................................................................................... 19
Define the DocuSign Server ................................................................................................................ 20
Enable DocuSign Connect ................................................................................................................... 20
Add the Remaining DocuSign Users ................................................................................................... 21
Deciding How to Store the Signers and Documents in Agiloft .......................................................... 23
Review/Configure DocuSign Envelope Creation Actions................................................................... 24
Create/Update Print Templates to Add DocuSign Tags .................................................................... 28
Signing Contracts Provided by External Parties ................................................................................. 35
PROCEDURES FOR SENDING DOCUMENTS TO DOCUSIGN ................................................................ 37
STEPS FOR DOCUSIGN USERS (SENDERS)................................................................................................... 37
1)
PREPARE THE CONTRACT RECORD .................................................................................................... 37
2)
CREATE A DOCUSIGN ENVELOPE ...................................................................................................... 40
3)
PREVIEW THE DOCUMENT AT DOCUSIGN TO CHECK THE TAGS .............................................................. 44
Adding Tags .......................................................................................................................................... 48
4)
SEND OUT THE DOCUMENT FOR E-SIGNING ....................................................................................... 48
5)
MONITOR THE E-SIGNING PROCESS.................................................................................................. 50
6)
E-SIGNING COMPLETION ................................................................................................................. 52
PROCEDURES FOR E-SIGNING AT DOCUSIGN ..................................................................................... 56
2
NOTIFICATION EMAIL FROM DOCUSIGN ....................................................................................................... 57
E-SIGNING THE DOCUMENT AT DOCUSIGN ................................................................................................... 59
SELF E-SIGNING A DOCUMENT AT DOCUSIGN............................................................................................... 63
ADDITIONAL FUNCTIONALITY AT DOCUSIGN ....................................................................................... 65
ACCOUNT FEATURES AT DOCUSIGN............................................................................................................. 65
DASHBOARDS AT DOCUSIGN ..................................................................................................................... 67
EMAIL NOTIFICATIONS AT DOCUSIGN .......................................................................................................... 68
PERMISSIONS AT DOCUSIGN ..................................................................................................................... 69
REPORTS AT DOCUSIGN............................................................................................................................ 70
TEMPLATES AT DOCUSIGN ........................................................................................................................ 71
APPENDIX A – SAMPLE CONTRACTS FOR E-SIGNING ......................................................................... 74
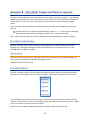
APPENDIX B - DOCUSIGN TABLES AND FIELDS IN AGILOFT ................................................................ 78
DOCUSIGN USERS TABLE.......................................................................................................................... 78
Automation ........................................................................................................................................... 78
DOCUSIGN ROLES ................................................................................................................................... 78
DOCUSIGN ENVELOPES ............................................................................................................................ 79
Automation ........................................................................................................................................... 79
DOCUSIGN RECIPIENTS ............................................................................................................................ 80
CHANGES TO THE CONTRACTS TABLE .......................................................................................................... 80
3
Table of Figures
Figure 1 - DocuSign Home Page ............................................................................................................. 15
Figure 2 - DocuSign Account Administration Options ........................................................................... 15
Figure 3 - DocuSign Users ...................................................................................................................... 16
Figure 4 - Set Up DocuSign User ............................................................................................................ 16
Figure 5 - View/Change Information for DocuSign User........................................................................ 17
Figure 6 - Initialize the DocuSign Extension ........................................................................................... 17
Figure 7 - Deploy the DocuSign Extension Functionality ....................................................................... 18
Figure 8 - DocuSign Extension Setup ..................................................................................................... 19
Figure 9 - Add DocuSign System Administrator as the first DocuSign User........................................... 19
Figure 10 - DocuSign Extension Configuration....................................................................................... 21
Figure 11 - Add DocuSign User............................................................................................................... 22
Figure 12 - Add DocuSign Users ............................................................................................................. 22
Figure 13 - Configure Action Options..................................................................................................... 24
Figure 14 - DocuSign Action Prefix ......................................................................................................... 24
Figure 15 - DocuSign Action Wizard ....................................................................................................... 25
Figure 16 - Add DocuSign Action Default Recipients ............................................................................. 27
Figure 17 - ABC Electronics Company Contacts ..................................................................................... 31
Figure 18 - Contract Signing Block as Seen at Agiloft ............................................................................ 32
Figure 19 - Contract Signing Block as Seen at DocuSign ........................................................................ 34
Figure 20 - Contract Record for ABC Electronics ................................................................................... 38
Figure 21 - Table of Attachments........................................................................................................... 39
Figure 22 - Selecting Signers and Files to Sign from a List ..................................................................... 39
Figure 23 - DocuSign Envelope for ABC Electronics ............................................................................... 40
Figure 24 - Add a Special Message for Signer 1 ..................................................................................... 41
Figure 25 - Require an Access Code for Signer 2 ................................................................................... 42
Figure 26 - DocuSign Envelope Status Tab ............................................................................................. 43
Figure 27 - Completed DocuSign Envelope ............................................................................................ 44
Figure 28 - Use DocuSign Matching Template? ..................................................................................... 45
Figure 29 - DocuSign Review .................................................................................................................. 45
Figure 30 - DocuSign Signing Tag Review............................................................................................... 46
Figure 31 - Signing Tags at DocuSign...................................................................................................... 47
Figure 32 – Signing Tag Properties ......................................................................................................... 47
4
Figure 33 - DocuSign Envelope............................................................................................................... 49
Figure 34 - Agiloft Envelope Status ........................................................................................................ 50
Figure 35 - Making Envelope Corrections .............................................................................................. 51
Figure 36 - Document Actions Options .................................................................................................. 52
Figure 37 - DocuSign Form Data ............................................................................................................ 53
Figure 38 - DocuSign Envelope History .................................................................................................. 54
Figure 39 - DocuSign Certificate of Completion ..................................................................................... 55
Figure 40 - – Email Notification for Signer1 ........................................................................................... 57
Figure 41 - Signer Enters His Access Code ............................................................................................. 58
Figure 42 - Signer Agrees to Electronic Signing...................................................................................... 58
Figure 43 - Signing Block for Signer2...................................................................................................... 60
Figure 44 - Choosing a Signature ........................................................................................................... 61
Figure 45 - Confirm Signing .................................................................................................................... 62
Figure 46 - Sign Up for a Free DocuSign Account?................................................................................. 62
Figure 47 - Self E-Sign a Document ........................................................................................................ 64
Figure 48 - Resizing an Added Tag ......................................................................................................... 64
Figure 49 - DocuSign Account Features ................................................................................................. 66
Figure 50 - Dashboards at DocuSign ...................................................................................................... 67
Figure 51 - Manage Email Notifications at DocuSign ............................................................................. 68
Figure 52 - Manage DocuSign Permissions ............................................................................................ 69
Figure 53 - DocuSign Reports ................................................................................................................. 70
Figure 54 - Manage DocuSign Template Screen .................................................................................... 72
Figure 55 - Using Color to see Tags ........................................................................................................ 74
Figure 56 - Default Roles ........................................................................................................................ 78
Figure 57 - DocuSign Envelope Screen................................................................................................... 79
Figure 58 - DocuSign Recipient Screen .................................................................................................. 80
Figure 59 - New Signer Fields ................................................................................................................. 81
5
DOCUSIGN O VERVIEW
DocuSign is the leading eSignature solution in the market, allowing easy, efficient, and secure signing of
electronic documents. Accessible anytime, anywhere, on any device, businesses of all sizes and
industries are replacing manual, paper-based signature methods with DocuSign’s electronic signatures.
The benefits are clear – no more paper documents to mail and route manually, quicker signatures by all
parties, a clear audit trail, improved visibility and control, and reduced costs.
As The Global Standard for eSignature®, DocuSign offers the easiest, fastest, most secure way to send,
sign, track, and store documents in the cloud.
The DocuSign website at www.docusign.com has a great deal of information, FAQs, whitepapers, videos,
etc. that explain the entire e-sign infrastructure and the particular DocuSign how-to’s. To learn more
about the Docusign solution itself, start here: https://www.docusign.com/faq.
You will need to set up an account at DocuSign before configuring the Agiloft interface. To use the
Agiloft-DocuSign integration, you will need an Enterprise account that is transaction-based. For more
information, visit the DocuSign Products and Pricing page.
AGILOFT CERTIFICATION BY DOCUSIGN
Agiloft has completed an extensive certification process by DocuSign to verify that the Agiloft API
(Application Programming Interface) is compliant with all DocuSign and e-signing standards
requirements. To find out more about the DocuSign certification process click here.
AGILOFT INTERFACE TO DOCUSIGN
Agiloft provides embedded integration with DocuSign, and this document will explain how to set up and
use that interface to send and e-sign your important electronic documents, all from within your Agiloft
KnowledgeBase. Note that notification emails are sent to signers by DocuSign and that all actual esigning is performed in the cloud through the DocuSign website.
This document will assume that the reader has some familiarity with much of the Agiloft functionality,
and especially that relating to Contract Management and the use of document print templates and
metadata tags.
The Agiloft interface is intended to be as self-sufficient as possible, in that the Agiloft customer can
perform all their e-signing functionality from within their Agiloft KnowledgeBase without ever having to
go to the DocuSign website other than to e-sign documents.
However, the DocuSign website does have additional functionality and some users may need to perform
some operations at DocuSign, depending on their business requirements. The main action that may
need to be done at DocuSign is adding the special DocuSign signature tags to the document before
sending it. This can be avoided for documents created from standard print templates in Agiloft or from
your standard company print templates preconfigured with the DocuSign tags. But for documents
provided by 3rd parties that cannot be easily modified, it will generally be easiest to add the tags
through the drag-and-drop interface available at DocuSign.
6
See a later section in this manual, “Additional Functionality at DocuSign” on page 65 for more details
about other functionality available at the DocuSign website.
DEFINITIONS
DocuSign API:
Agiloft Application Programming Interface that enables customers to e-sign and manage
electronic documents within their KnowledgeBase.
DocuSign Account Administrator:
The “owner” of the company’s DocuSign account. The Administrator can add DocuSign users,
assign permissions, and perform many other functions on the DocuSign website.
DocuSign Sender/User:
Someone who is authorized to send out documents for e-signing. The user will have an entry in
the company account on the DocuSign website.
DocuSign Signer/Recipient:
Someone who receives an email request to e-sign a document. The signer is not required to
have a DocuSign account or have an entry in the company account on the DocuSign website.
DocuSign Websites:
https://www.docusign.com – main company website
https://www.docusign.net – Administrator sets up DocuSign configuration parameters here
Envelope:
A container for electronic documents being e-signed. An envelope can contain multiple
documents, each with multiple pages, for e-signing by one or more people.
E-Signature:
An electronic signature, or eSignature, as defined by the Federal ESIGN Act , is an “electronic
sound, symbol or process, attached to or logically associated with a contract or other record and
executed or adopted by a person with the intent to sign the record” (ESIGN). All 50 states have
laws that define electronic signatures in substantially the same way. Learn more
DocuSign electronic signatures are:
Legal – DocuSign is the only eSignature company that is ISO 27001 certified as an information
security management system (ISMS). This is the highest level of global information security
assurance available today, and provides customers assurance that DocuSign meets stringent
international standards on security.
Secure – Each Electronic Signature is unique, documentable, encrypted, and tamper-evident.
DocuSign guarantees confidentiality of all transactions and furthermore provides multi-faceted
verification of signing events.
Auditable – DocuSign provides a complete and extensive audit trail that serves as third-party
validation of transaction completion, including information such as the signer’s email address,
name, authentication method, IP address with time stamp, and more.
KB:
The Agiloft Knowledgebase in which the business process and document records reside
7
Routing:
Also called Sending Order. This is the order in which e-signers are specified to e-sign the
document. Within Agiloft the routing is typically achieved sequentially by specifying signers as 1,
2, 3, etc.; e.g., signer 2 will not receive the document until signer 1 has e-signed, etc. If the order
of signatures is not important, you can specify parallel routing by assigning the same routing
number to some or all of the signers.
Tags (or Tabs):
Indicators within electronic documents specifying actions to be taken by e-signers, such as “sign
here”, “initial here”, “enter date”, etc. Each signer could have different sets of tabs and each
signer will only see the tabs meant for him or her.
Template:
A set of instructions that allow you to create a standard document, with pre-set recipient roles,
signing tags, and information fields. Templates can also contain the signing instructions for the
document and any signature attachments. Generally, templates are used for (1) saving personal
often-used forms to easily resend the same form multiple times for reuse, and (2) filling in tags
for commonly used forms such as tax forms, NDA agreements, and common applications.
Templates can be set up both within Agiloft and on the DocuSign website.
8
E-SIGNING WITH AGILOFT
The DocuSign API (Application Programming Interface) to DocuSign will enable and facilitate the
creation, sending, e-signing, management, and storage of your contracts, agreements, and other
important documents through the use of DocuSign, the industry leader in secure electronic signatures.
You will be able to accomplish this in a variety of ways: either completely from within your existing
Agiloft KnowledgeBase (KB), or through a shared functionality of KB processes and work done on the
DocuSign website.
In general the DocuSign integration setup will progress as follows:
1. Sign up for a DocuSign account that fits your business needs. Agiloft can help with this process.
2. Become familiar with the Agiloft DocuSign API (this document) and the DocuSign website.
3. Set up and configure your KnowledgeBase to interface with your DocuSign account.
4. Set up DocuSign functionality for all employees who will be sending out documents.
5. Decide how the DocuSign process will be accessed and used – totally within the KB or not.
6. Create templates for commonly distributed documents with the Docusign tags preconfigured
(optional).
7. Use the interface to send, sign, and manage your documents (KB only, or KB and DocuSign).
Although much of this process is managed within the Agiloft KnowledgeBase, all actual e-signing and
emailing to/from recipients is done via the DocuSign website.
This document is primarily intended to describe the Agiloft KnowledgeBase processes. For DocuSign
processes and issues, please consult the extensive information on the DocuSign website, although
specific links will be provided in this document as appropriate.
The main user documentation links are at: http://www.docusign.com/support/downloads
http://www.docusign.com/sites/default/files/DocuSign_Service_User_Guide.pdf (204 pages)
http://www.docusign.com/sites/default/files/Account%20Administration%20Reference%20Guide.pdf
(51 pages)
9
OVERVIEW OF THE AGILOFT/DOCUSIGN E-SIGNING PROCESS
This section outlines the main points of the e-signing process. As was previously mentioned, Agiloft
provides complete embedded DocuSign functionality that allows KnowledgeBase (KB) contract
administrators to perform the most common e-signing procedures from within the KB.
In some cases, KB administrators may perform some of their e-signing setup, management, and
reporting through the DocuSign website as well. This latter capability will be summarized in a final
section of this document.
However you choose to implement document e-signing within your KB, there is a similar basic flow to
the process. In general you will be sending documents from your KB to the DocuSign website which will
in turn email invitations to the specified recipients inviting them to e-sign a document. Signers will be
guided through the entire process by DocuSign and will be asked to input information at specified
locations within the document marked by tags.
These tags (also called tabs) have typically been previously embedded in the document by the sender,
either by inserting metadata information into the document itself or by using the DocuSign “drag and
drop” functionality on the DocuSign website. The tags mark the specific locations in the document
where each recipient is asked to “sign here”, and where their name, title, and date signed will be placed.
A person who has been designated as both a DocuSign User in Agiloft and a User with Sender
permissions in DocuSign is allowed to send out documents for e-signing. Procedures for setting up these
permissions are detailed in later sections.
After an Agiloft document has been set up for e-signing, what gets sent to DocuSign is called an
envelope, which can be thought of as a container similar to a paper envelope. Each envelope contains:
One or more documents to be e-signed by one or more recipients
Contact information for those recipients
Routing information specifying the order in which the recipients will sign
GENERAL DESCRIPTION OF THE E -SIGNING PROCESS
This is a general example based on a specific configuration. Exactly how this process will work depends
on the configuration of your KB, the way you have configured the Docusign Create Envelope Action in
Agiloft, the fields you will use to hold the signers, where you are storing the documents (in an attached
file field in the Contract or in a Documents or Attachments table within the Contract), and whether you
are generating the contract document and/or signature page from an Agiloft print template or working
with a contract document that cannot be edited (i.e. a pdf file sent by a vendor).
1) First, establish procedures within your KnowledgeBase for how e-signing will be added into your
existing contract administration and approval processes. This may include setting up templates with
Agiloft $docusign:xxx metadata tags – this will be discussed in detail in Create/Update Print
Templates to Add DocuSign Tags on Page 28.
2) Configure and Deploy the DocuSign interface (described in detail in Configure Your KnowledgeBase
for DocuSign on page 14). This also pre-configures your default DocuSign envelope and sets up
some default signer parameters. Also make sure your client/customer Company and all signers are
set up in the Agiloft KnowledgeBase.
10
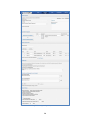
3) Create or edit the Contract record, ensuring that the DocuSign-relevant fields are populated:
Define the Signers in the Contract record based on the fields you have mapped in the Docusign
Create Envelope Action (these will generate the DocuSign Recipients records).
Create or attach the Document(s) to be sent – again this depends on the specific configuration
of your KB and where you are storing the documents to be signed – in a file field or in a related
table.
4) When done updating the Contract, create the envelope that will be sent to DocuSign by clicking the
“DocuSign Envelopes” tab in the Contract record:
Click the “Create DocuSign Envelope” action button which was pre-configured in step (2) above.
This will create the Docusign Envelope, mapping the attached file(s) to be signed, and will create
the Recipient records based on the definition of the action button.
If desired you can modify the signer (Recipients) information:
Click the edit icon to change any existing recipient (signer) information
Click “New” in the Recipients action bar to add a new recipient.
Select a recipient and click the “Delete” icon in the action bar to delete a recipient.
5) Send the envelope to DocuSign:
“Send” tells DocuSign to start the e-signing process without any envelope review.
“Discard” deletes this envelope and does not send it to DocuSign.
“Create & Preview” allows you to review the envelope and document at DocuSign:
Check the signing tags for each recipient before the e-signing emails are sent out. If the tags
were not previously added by generating the document from a print template, you can drag and
drop them onto the document at this time.
If you’ve created templates at DocuSign and your document matches one of them, you’ll be given an
option to “Apply the DocuSign template?” but if you have already set up the document and
the recipient information in Agiloft with embedded DocuSign tags, just click “Cancel”.
Select each signer from the dropdown and verify that the signing tags they will see are correct.
If not, you can edit the document to correct the tags or close the window to return to Agiloft.
When all tags are correct, click “Send” at the bottom to generate notification email(s) to the signers.
6) DocuSign notifies each recipient in turn by email that a document is at DocuSign awaiting signatures.
Note: recipient with Send Order=2 won’t get an email until recipient with Send Order =1 has signed.
7) The Recipient/signer clicks the link in their email to be taken to the DocuSign website:
The Recipient/signer must first “agree to do business electronically” with the sender.
If the sender has specified an Access Code, the signer is asked to input it to gain access to the
document.
The Signer may be asked to select a signature style.
8) The Recipient/signer is guided through the document(s) to each place requiring his/her input:
DocuSign combines all documents in the envelope into one file (noted by a separator in right pane).
The Signer can navigate through the file for review before signing.
The Signer will see any previous signings but not any tags meant for other signers.
DocuSign prompts the signer for action at each tag.
Note that the signer can decline signing, assign another signer instead, elect to sign on paper, etc.
9) After the signer has completed all requested actions, the signer is asked to confirm their signing by
clicking the “Confirm Signing” icon on the left.
The Sender receives status update emails as each signer processes the document.
11
DocuSign also maintains a complete history of all signer actions which is available to the sender.
10) DocuSign repeats steps 6-9 in turn for the next signer(s) specified by the sender (if any).
11) When all signing is complete, the sender and all signers get an email with a pdf of the fully-signed
document. Rules defined in Agiloft can then automatically update the related Contract and
Documents associated with the Contract.
12
CREATE AND CONFIGURE AN ACCOUNT AT DOCUSIGN
As with most software, DocuSign accounts are priced according to the desired functionality. First you
will need to determine how many of your employees and/or groups will need to send out documents for
e-signing. These are the “Users” and they will need to be set up as such by your DocuSign account
administrator. People who will be signing the documents, either at your company or at your customers
or vendors, do not have to be registered at DocuSign. There are no restrictions on the number of
document signers.
With an Enterprise account at DocuSign, you can have an unlimited number of users sending documents
for signature. The pricing is based on the number of envelope transactions per year, with a minimum of
500 transactions per year at a current price of $5.75 per envelope, for a minimum retail annual price of
$2,875/year. Volume and non-profit organization discounts are available. Contact DocuSign or Agiloft
sales departments for additional information.
The next three sections will describe in detail the procedures for configuring your system at both Agiloft
and DocuSign, sending out documents for signature from Agiloft, and e-signing documents at DocuSign.
Following that will be a brief discussion of other features available at DocuSign.
At the end of this document there are two appendices:
Appendix A – Sample Contracts for E-Signing:
This shows how to set up a contract with metadata tags for DocuSign.
Appendix B - DocuSign Tables and Fields in Agiloft:
This is a summary of the Agiloft additions for DocuSign functionality.
13
CONFIGURE YOUR KNOWLEDGE BASE FOR DOCU SIGN
The DocuSign configuration will require actions both within Agiloft and at DocuSign.
What needs to be done in Agiloft depends on whether you are adding DocuSign to an older KB
that does not have it already deployed, or whether you are using a newer KB, dating from after
May 2014, that has DocuSign pre-deployed. The pre-deployed KB will already have all the
DocuSign Tables and fields, as well as some additional rules and other configuration that will
differ from the deployment that is added to an existing KB.
As the DocuSign Account Owner you will already be set up as Account Administrator of your DocuSign
account. The Administrator has full permissions to perform all operations on the DocuSign website. You
will get an email from DocuSign with a link to click to activate your account and enter your password.
More DocuSign Account Administrator functions will be discussed in other sections of this manual.
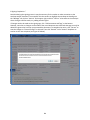
SET UP THE DO CUSIGN USERS (AT DOCUSIGN)
As the DocuSign Account Administrator you can set up additional DocuSign Users as Senders or Account
Administrators on the DocuSign website. You can also grant certain types of Users special sets of
privileges that you define. Remember, however, that any User set up on DocuSign must also be set up in
Agiloft if that User will be sending out documents to be e-signed from the Agiloft KnowledgeBase.
Before Users can be set up on Agiloft they must first be set up on the DocuSign website. Depending on
the User’s permissions as set up by the Account Administrator at DocuSign, he/she could be allowed
other privileges such as adding other Users, creating templates, specifying routing information for
envelopes, etc. These privileges would apply only to envelopes sent out by this User from the DocuSign
website, since any User sending out envelopes from Agiloft would already have these privileges. See the
section “Permissions at DocuSign“ later in this manual for details.
Note that some of your Senders/Users may already have a DocuSign account. If that is the case you can
continue to use their existing DocuSign logon ID (email address) or you can create a new ID for them in
your DocuSign account using a different email address. For bookkeeping purposes, it is probably
desirable that all of your Senders/Users perform all their DocuSign activities from within one DocuSign
account.
To add a DocuSign Sender at DocuSign, go to the DocuSign website https://www.docusign.net and logon
as Account Administrator.
14
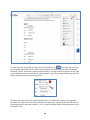
Figure 1 - DocuSign Home Page
On the DocuSign home page, click “Edit” in the “DocuSign ID Card” box. This brings up the full range of
Administrator options in the left pane. The Account Administration options are shown below:
Figure 2 - DocuSign Account Administration Options
15
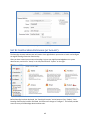
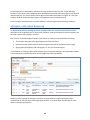
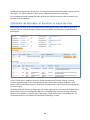
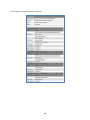
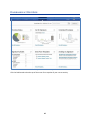
In the left pane in the “Account Administration” section, click on “Users”. Other functions can also be
performed from this display. For example, Permission Profiles can be set for User types. Permissions
can also be specially set for individual Users via the Users screen below.
Figure 3 - DocuSign Users
This shows a display of all the active DocuSign Users for this account. Clicking the choice box for “Show
closed users” will also display all previously active users. Clicking “Open” for any User will display more
detailed information about their Account, Permissions, Address, and Sharing. Clicking “Close” for a User
will close their DocuSign access and, by extension, close DocuSign functionality from Agiloft as well.
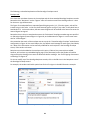
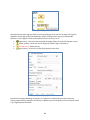
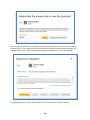
To set up a new User click the “New” icon in the upper left of the above screen. To set up a new
“Comma Separated Value” list for bulk emailing click the “New/CSV” icon.
Figure 4 - Set Up DocuSign User
Consult the DocuSign Administrators Guide (page 9) for more details about the setup:
http://www.docusign.com/sites/default/files/Account%20Administration%20Reference%20Guide.pdf
In most cases all that is required is the new user’s email address and a click in the “Sender” group. The
default permissions should be sufficient in most cases.
The new Sender will receive an email which, upon replying, will complete the setup in DocuSign. At that
point the Agiloft Administrator can then also set up the user in the KnowledgeBase as a DocuSign User
by the process described in the next section, “Set Up the DocuSign Extension (at Agiloft))”.
16
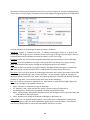
Figure 5 - View/Change Information for DocuSign User
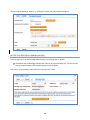
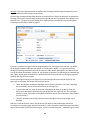
SET UP THE DO CUSIGN EXTENS ION (AT AGILOFT)
The DocuSign Account Administrator will need to have Agiloft Admin permission to launch and configure
the Agiloft DocuSign Extension functionality.
After you have created your account at DocuSign, log into your Agiloft KnowledgeBase as a system
administrator, and click on “Setup” in the left pane and then “System” on the right:
Figure 6 - Initialize the DocuSign Extension
Before DocuSign has been deployed, the “DocuSign Extension” action button will say “Deploy”. Once
DocuSign functionality has been initialized, this button will change to “Configure”. This button provides
access to many of the DocuSign administration tasks.
17
Figure 7 - Deploy the DocuSign Extension Functionality
If your Agiloft KB was created after May 2014, it will likely already have Docusign deployed and
ready to use. If you see the “Configure” button, you will know that the basic deployment is
already enabled. However, the appropriate Docusign server and other information will still
need to be customized for the integration to be usable in production.
If using a KB in which DocuSign has been pre-deployed, some of the DocuSign Elements are
hidden even from the admin user, to avoid them cluttering up the interface. The DocuSign
Tables and fields are active and visible to a group called DocuSign User. To start using DocuSign,
simply edit the admin user and add the “DocuSign User” group to his Groups field. You can
repeat this procedure for any users that you want to be able to access/view the DocuSign tables
and fields.
When adding DocuSign to an existing KB, when the “Deploy” action button is clicked for the first
time, several tables and fields, rules, and updates are added to the Knowledgebase, so it may
take several minutes for the process to complete and the screen in shown in “Figure 8 DocuSign Extension Setup” to appear. See Appendix B - DocuSign Tables and Fields in Agiloft
for a description of the Tables, Fields, and Actions that are added as part of the DocuSign
Deployment.
18
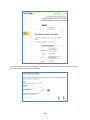
After clicking the DocuSign “Deploy” or “Configure” button, the screen below will appear:
Figure 8 - DocuSign Extension Setup
S ET U P THE D OCU S IGN A DMINISTRATOR
The first step is to set up the DocuSign Administrator as a DocuSign User in Agiloft.
Remember that the DocuSign Administrator must be set up on DocuSign first. The user should
also be created already in the People/Employees table in Agiloft.
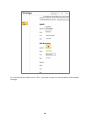
Click “New” in the DocuSign Users action bar to bring up this screen:
Figure 9 - Add DocuSign System Administrator as the first DocuSign User
19
Look up the user by typing their login or Name into the fields and using the lookup.
Full Name – The user’s Full Name in Agiloft should match the name input at DocuSign.
DocuSign User Name (Email) – must match the email address input at DocuSign
DocuSign Password – must match the password input at DocuSign (you must type this in)
Then click the “Grant Access to DocuSign” action button to add the Administrator.
Before proceeding, if you are logged in as a different user to Agiloft, logout and log back into Agiloft as
the DocuSign Administrator user you just set up.
D EFINE THE D OCU S IGN S ERVER
DocuSign assigns its customers to a specific server type, which maps to a DocuSign web address.
In most cases this will be a production server called “NA1” which will use www.docusign.net. “NA1” will
generally be the value that should be selected.
Other server choices available via the “Change Server” action button are:
“NA2” – also for production accounts
“Demo” – for demonstration (i.e., non-production) accounts
“EU1” – call your DocuSign representative for more information
“Preview” – call your DocuSign representative for more information
If using a KB in which the basic Docusign Extension has already been deployed, the Server value
will be set to Demo. This must be changed to the appropriate server before you can use the
system in production. To change it, click the “Change Server” button.
When the DocuSign account is created at DocuSign, the account administrator should be
provided with the server type.
The server must be changed before the DocuSign Connect is Enabled. If you forget to do it
before enabling the connection, you will need to Disable the Docusign Connect by clicking the
button.
“Accept Real-Time Updates?” should be set to Yes. This enables envelope status updates to be posted
back to Agiloft (recommended).
Once the Docusign server has the correct value, you are ready to enable the connection.
E NABLE D OCU S IGN C ONNECT
The DocuSign Administrator can now enable the Agiloft DocuSign Connection by clicking the “Enable
DocuSign Connect” action button.
You have the option of disabling DocuSign functionality anytime later by clicking “Disable”.
You need to click “Enable DocuSign Connect” before the other DocuSign Users are added.
Once the connection is enabled, additional users may be added.
20
Figure 10 - DocuSign Extension Configuration
The remainder of this section will guide the DocuSign Administrator through the rest of the setup
process. Note that there are some optional areas at the bottom of the screen for setting up DocuSign
Actions, Tables, and Recipients. These functions can be specified here now or at any time later.
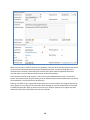
A DD THE R EMAINING D OCU S IGN U SERS
These will be the people who will be sending out documents to be e-signed. You can add them now or
later via this screen (Setup -> System -> Configure DocuSign Extension).
Again, DocuSign Users (Senders) will have account records on both Agiloft and DocuSign. DocuSign
Recipients (Signers) are not required to have Agiloft or DocuSign account records.
Every person who sends out documents for signature (called a “DocuSign User” in Agiloft and a “User”
with “Sender” Permissions at DocuSign) must have a user record in the following places:
The People/Employees table of Agiloft
The DocuSign Users table
The Users table of the company’s account at DocuSign
People who will be receiving those documents to sign (called DocuSign Recipients in Agiloft) are not
required to be registered in Agiloft or at DocuSign, though it is ideal to create person or contact records
for them in Agiloft.
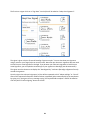
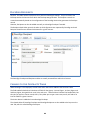
To add DocuSign Users in your KnowledgeBase, click “New” in the “DocuSign Users” area on the
DocuSign Extension screen (Figure 10 - DocuSign Extension Configuration) to go to the screen below:
21
Figure 11 - Add DocuSign User
Enter the following information:
Login: This is the Agiloft login for this DocuSign User.
Full Name: This is the first and last name of this DocuSign User, pulled from the Person record.
DocuSign User Name (Email): This is the email address for this DocuSign User. This will be the login for
this User at DocuSign.
Access Granted: This is a display-only field; it will change to “Yes” upon a successful add at DocuSign.
DocuSign Password: If you are registering yourself, enter (or create) your DocuSign password. If you are
the Administrator and are registering someone else, leave this blank.
DocuSign passwords are not stored in the Agiloft KnowledgeBase.
Then click the “Grant Access to DocuSign” action button to add the User to Agiloft.
Remember that the DocuSign User must have been previously invited (and have accepted) to be
set up as a DocuSign User at Docusign.
A successful User addition will look like this:
Figure 12 - Add DocuSign Users
At this point, the person is set up to send documents for e-signing through Agiloft and DocuSign.
22
The Agiloft admin must create at least one authorized User with DocuSign admin permissions.
This enables push notifications from DocuSign to Agiloft so that envelope/recipient statuses are
returned by DocuSign to Agiloft and that updated/signed pdf documents are attached back to
the DocuSign Envelope record and emailed back to the Sender and all signers.
D ECIDING H OW TO S TORE THE S IGNERS AND D OCUMENTS IN A GILOFT
If you are adding DocuSign to an existing KB, you may want to add some new fields or tables to Agiloft to
hold some of the information related to DocuSign. Please see Appendix B - DocuSign Tables and Fields
in Agiloft for a list of the tables and fields that are added with the DocuSign Extension.
Some new fields are automatically added to the Contracts Table. These include three linked sets of
fields for the signers: Internal Signer, 1st Party Signer and 2nd Party Signer, along with their email, title,
and so on. These fields are linked to the People table, but they do not require a source record, that is,
they allow you to type a new name, email, title and so on into the field for a given Contract.
If you may need additional signers or want to use different fields for your signers, you can add them. Or
if you are running DocuSign against a Table other than Contracts, you may want to add fields to that
table to hold the Signers.
Document handling is another element you may want to adjust on an older implementation when you
enable DocuSign. It is recommended that when integrating with DocuSign for e-signature, an embedded
Attachments or Documents table is used within a Contract, rather than an attached file field, because
this gives greater control over the documents sent for signature.
If an attached file field is used, it is not possible to select only some files in the field for signature.
Whereas, if an Attachments table is used, then a multivalue link to that table’s file field allows the
contract manager to select the specific documents he wants sent to DocuSign for Signature.
The default setup for systems created after May 2014 will have such a configuration, and the
field called Files to Sign will be the one selected by default for the DocuSign Action.
There are a few options for handling attached files that you may want to consider:
1) Moving all files into an Attachments table that has a link to the Contract (and/or to other tables
to which an attached file may be related). Typically with this implementation, you will set up
conversion from an attached file field in the Contract to a record in this table, mapping the file
into a new Attachment record, and then emptying the attached file field in the Contract record.
This way, print templates that create documents or inbound emails would both add the file(s) to
a local field in the Contract, then have it moved automatically into one or more Attachment
records for better control.
If this method is used, then you would create a field in the Contract that is a “link to single field
from other table” with multiple values enabled, with the source being the attached file field
from the Attachments table. The records are filtered to those Attachments for the current
Contract. This field provides a list of all related files and it can be labeled: Files to Sign, so that
the DocuSign sender can simply select the files he wants to be part of the DocuSign envelope.
This is then the field that is used in the DocuSign Envelope creation action.
The above is the default setup for systems created after May 2014.
23
2) Adding a new Attached File field just to hold the documents for Signature. This allows the
Sender to upload just the files he wants to send from a selection of other files. However, the
drawback is that he must first store the files locally in order to upload them.
3) Cleaning unwanted files out of the DocuSign Envelope before Sending – When the DocuSign
Envelope is created, it can automatically map the files from the main Attached File field in the
Contract. The sender can then click the garbage can icon next to the files he does not want to
include in the envelope to remove them before sending to DocuSign. The only downside to this
is that it relies on users to remember to remove unwanted files.
The decision about signers and files and where you will be storing the documents to be signed must be
made and implemented before you can effectively customize the DocuSign Envelope Action.
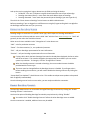
R EVIEW /C ONFIGURE D OCU S IGN E NVELOPE C REATION A CTIONS
The Action and Table dropdowns and buttons provide shortcuts to customizing the DocuSign-related
actions that may be running in different tables within Agiloft.
Figure 13 - Configure Action Options
By default, when you turn on the DocuSign extension there will be one action defined for the Contract
Table to Create Docusign Envelopes. That action can be edited from here by selecting it and clicking the
“Edit Action” button. It will also be found in the list of available actions in the Contract Table Rules area.
The Table drop-down here allows the administrator to choose another Table in the system and add a
DocuSign Envelope Creation action here directly.
The “DocuSign Action” is a new action type available for Rules and Action Buttons once
DocuSign is enabled.
When DocuSign-related Actions are displayed in the Rule Wizard, they are all prefixed by a ?:
Figure 14 - DocuSign Action Prefix
The DocuSign Action Wizard
A DocuSign Action can be configured for any table in Agiloft. By default, when we enable the DocuSign
extension, we add the action to the Contracts Table. We preconfigure it to use certain fields for the
documents to be sent, the signers, and so on.
These settings can be changed to fit your preferred configuration by editing the action itself. The action
defines the fields that represent the signers, the signing order, signer roles, the email subject and
message lines for the emails sent to the Signers from DocuSign, and the location of the files to be signed
within the record. This information can be set up initially and modified at any time later as business
needs change.
24
The following section describes the default setup of the Contract Table Create DocuSign Envelope
Action. The options are accessed by selecting the action from the Action drop-down shown in Figure 10
- DocuSign Extension Configuration above and clicking the “Edit Action” button:
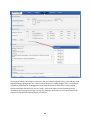
Figure 15 - DocuSign Action Wizard
There are default entries for the fields, but they can be changed:
Name: This is the name of the action itself
Description: This is the description of this action.
DocuSign Template: This dropdown will list templates already set up at DocuSign by the Admin (if any).
Template creation at DocuSign will be described in a later section of this manual. If there are DocuSign
templates, one can be selected and downloaded by clicking “Load”. A downloaded template will
populate fields on this screen and in the Recipients tab.
If a DocuSign template is not to be used, select “-send without template-“.
Most Agiloft customers will find it more convenient to use Agiloft print templates instead of
DocuSign templates.
Load (action button): Click this action button to download the selected DocuSign default template to be
used (if any).
Attach Documents: This dropdown lists the fields in the Contracts table (or the table on which the
action is being created) that are of type “File with Versioning” or “Link to Single Field in another table”
of type File (with one or multiple values enabled). The file field selected here will be mapped into the
DocuSign Envelope when it is created and the files attached there will be sent to DocuSign for Signature.
Subject: This is the default email Subject line that all Recipients will receive when they are invited to
sign. Variables from the record may be included in the Subject. For instance, if the Subject was
“$contract_title”, the title of the contract would be used. The default email body message for each
signer will be included on the Recipients tab.
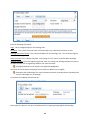
Set up the Recipients on the Recipients Tab
Up to five default email Recipients (Signers) can be specified by clicking the “Recipients” tab on the
DocuSign Action screen. Note that Recipients can also be entered manually when creating a DocuSign
envelope. This will be described in the section: Create a DocuSign Envelope on page 40.
25
In the screen below (Figure 16 - Add DocuSign Action Default Recipients), three default recipients (esigners) have been specified in the default DocuSign envelope creation. In this example, one “Internal
Signer” (e.g., someone from your company) and two external signers (people from your client’s or
customer’s company) are specified. Note that any of these default recipients can be overwritten or
edited before the contract is sent out for signatures.
In a given contract, if there are only one or two signers defined, then the additional signers are simply
ignored, so the action should define the maximum number of signers for a document.
There is a strict relationship between the information in these fields, the metadata signing tags in the
contract document or template, and the order in which documents need to be signed. More details are
provided in “Procedures for Sending Documents to DocuSign” for how these fields interrelate and how
all this information needs to be set up to populate the DocuSign envelope.
Below is a summary of the data fields in Figure 16 below:
Number of Recipients (1-5): This is the number of people who will receive an email notification about
this document. Based on the number selected here, additional fields appear or disappear.
Sending Order: Integer indicating when DocuSign sends out email notifications to the specified
recipients. Sequential: Recipient “1” will be notified before Recipient “2”, etc. Parallel: If it doesn’t
matter which of, say, two recipients needs to sign first, their Sending Order should be set to the same
number. Any subsequent signers would not be notified until both of the parallel signers had signed.
Role Name: This is a dropdown box for selections from the DocuSign Roles table (which is modifiable).
These Role Names must match exactly any metadata tags in the template/document.
Role: This is the “action” that this Recipient is to perform. The dropdown has choices of “Certified
Delivery”, “Editor”, “CC”, “Agent”, and “Signer”. Signers are required to Sign before the envelope is
marked as Completed.
Recipient Field: This dropdown list includes all the linked fields to the People table in the Contract table.
These linked fields may be strict or loosely linked fields. The Recipient record will be populated with the
data for the person in this field for a given contract.
Access Code (optional): The recipient must type in this code at DocuSign to gain access to the
document.
Message (optional): This enables a special email message to be added to the standard DocuSign text for
this recipient.
26
Figure 16 - Add DocuSign Action Default Recipients
27
C REATE /U PDATE P RINT T EMPLATES TO A DD D OCU S IGN T AGS
For commonly sent-out documents like support contracts, non-disclosure agreements, etc., Agiloft
DocuSign Users (also known as DocuSign Senders) can set up time-saving templates either within the
Agiloft KnowledgeBase or in their account at the DocuSign website: https://docusign.net. For most
purposes, Agiloft templates will be much more useful, as they can populate field variables from the
Contract or Record into the template automatically.
This section explains the Metadata Tags that can be added to Agiloft print templates in order to pre-tag
documents, so that Senders do not need to add any steps to their normal process.
For more information on DocuSign template creation and usage:
Review section “Templates at DocuSign” of this document
Review the DocuSign Template Guide at:
https://www.docusign.com/sites/default/files/Quick%20Start%20-%20Using%20Templates.pdf
Agiloft Metadata Tags
Your Agiloft KnowledgeBase may already be using Print Templates in which special tags (known as
metadata) are pre-inserted into documents. These metadata tags are “placeholders” only, and become
populated with specific company and/or customer data when the template is processed at Agiloft.
For example, a metadata tag such as “$formula($company)” (without quotes) could be inserted into a
contract template at a specific place, and when the contract document is processed this tag gets
replaced by the actual name of the company.
If you are not familiar with the Print Template functionality, it is recommended that you review
that section of the Administrator Manual for Agiloft.
All metadata tags begin with the “$” character (without quotes). The metadata tags relating specifically
to DocuSign are of the form “$docusign:<type>:<field name>:<role name>” (described below).
Agiloft Metadata Tags for DocuSign
In addition to the standard Agiloft metadata tags there are special metadata tags that enable DocuSign
functionality within contract templates. These tags allow DocuSign signing icons (e.g., “Sign Here”,
“Initial Here”, etc., indicators) to be created automatically by generating the Contract document within
Agiloft, so that signers do not have to perform manual drag and drop operations on the DocuSign
website. Using these pre-built templates reduces effort, standardizes DocuSign procedures, and reduces
e-signing errors.
These special metadata tags need to be added to any MS Word contract print templates being used by
the system. These tags will then be translated into DocuSign commands to display/retrieve data and/or
display the signing icons. Some “$docusign:Text:xxx:yyy” tags can even post back to Agiloft information
that was keyed in at DocuSign during the signing process.
The Agiloft DocuSign tags are signer-specific, that is, they relate specifically to that signer. Assigning
signers and their signing order will be described immediately after this DocuSign tag discussion. An
example will then be given to make the entire process easier to follow.
Note that in the tags below there are no actual quote marks. They are added only for emphasis or
clarity. In some cases, like <type>, the quotes indicate the exact term. For <role name> the quotes
28
indicate the exact term the user selected for the “Role Name” field in Figure 16 - Add DocuSign Action
Default Recipients.
The format for all Agiloft DocuSign tags is: “$docusign:<type>:<field name>:<role name>”, where:
$docusign: begins each metadata tag for DocuSign functionality.
The Agiloft DocuSign API translates these tags into commands for DocuSign to process.
<type>: is one of “SignHere”, “FullName”, “Title”, “DateSigned”, ”Company”, or “Text”.
“Text” is the default type and is used to display a wide range of text fields.
“Text” tags can also be used to retrieve data typed in by the signer (described later).
Note that there are no quote marks in <type> – quotes are shown here only for readability.
<field name> (optional): null, or the specific field name (in Agiloft) that you want to be inserted
or retrieved.
<role name>: the explicit “Role Name” of the signer which is assigned during envelope creation.
This tag gets assigned to a specific signer via the <role name> parameter. There is a one-to-one
correlation between <role name> in the metadata tag $docusign:<type>:<field name>:<role
name> and the “Role Name” parameter specified for that signer in the Create a DocuSign
Envelope section on page 40. The choices in the <role name> dropdown come from the entries
in the DocuSign Roles table.
Here is a list of some standard Agiloft metadata tags for DocuSign and their functions:
$docusign:SignHere::<role name>
Inserts a “Sign Here” icon in the document where signer <role name>=“Role Name” is expected
to sign:
$docusign:FullName:<field name>:<role name>
The <field name> parameter will come from the dropdown selection for “Recipient Field” for
that signer (=Role Name) in the “DocuSign Action” configuration screen (Figure 16 - Add
DocuSign Action Default Recipients). Agiloft inserts the full name of the <role name>=“Role
Name” person from the People table (if via lookup), or from the name typed in on the Contracts
-> DocuSign Envelopes for that signer.
$docusign:FullName:internal_contract_owner:<role name>
Agiloft inserts the Internal Contract Owner field from the Contract record.
$docusign:FullName: party1_signer_full_name:<role name>
Agiloft inserts the 1st Party Signer Name field from the Contract record (in the DocuSign
Envelopes tab).
$docusign:Title::<role name>
DocuSign will pre-fill this field from the last time this signer typed in their title at DocuSign,
otherwise the signer is prompted to type in their title. DocuSign stores title information for both
users/senders and signers, but signer titles are not shown in its address book display.
29
$docusign:DateSigned::<role name>
DocuSign auto-fills this field with today’s date when the <role name> person signs the
document.
$docusign:Text:contract_title:<role name>
Agiloft inserts the Contract Title from the Contracts record (from the Contract Details tab).
The latter is just an example of what is possible. In actual practice an Agiloft print template
would just insert the variable directly onto the Document by using the standard variable:
$contract_title. There is no reason to use a DocuSign tag for a field that can be inserted directly
from the Contract.
Example of Setting Up a DocuSign Contract
For example, assume the company “ABC Electronics” is a fictional customer of Agiloft whose annual
support contract is up for renewal. Here is some information from the ABC Electronics company record:
30
Figure 17 - ABC Electronics Company Contacts
In this example the support contract renewal will be signed by one Agiloft employee (Bill Newman) and
two ABC Electronics employees (James Martin and Brenda Smith).
The following screen shows the simplified signing block for the contract. Here the $docusign:xxx tags are
made visible and shown in a red font color, but in “real life” they need to be made “invisible” (i.e., font
color = white). Also note that the tag font sizes may need to be made smaller to fit within the actual
wording space in the document. The use of Word frames may be necessary to fit lengthy $docusign:xxx
tags into the space allotted, due to the way DocuSign overlays the tag fields instead of replacing them.
Word frames are smaller “windows” which contain longer text strings which can be viewed in their
entirety by scrolling through them horizontally.
So some initial “trial and error” testing may be required to properly position the signing tags in your
templates. More about these issues later.
The metadata tags in the document below will be linked to individual signers in Step (2) further below,
“Create a DocuSign Envelope.”
31
g) This Agreement may be signed in one or more counterpart copies, all of which
together shall constitute one Agreement and each of which shall constitute an original.
IN WITNESS WHEREOF, the parties of
Agiloft
Signature: $docusign:SignHere::InternalSigner
Name:
$internal_signer_fullname
Title:
$internal_signer_title
Date:
$docusign:DateSigned::InternalSigner
$company_name
Signature: $docusign:SignHere::Customer1
Name:
$party1_signer_full_name
Title:
$docusign:Title::Customer1
(note: if you are capturing the signer’s title in
Agiloft, you can replace this with the Agiloft field variable, i.e., $party1_signer_title)
Date:
$docusign:DateSigned::Customer1
Signature: $docusign:SignHere::Customer2
Name:
$party2_signer_full_name
Title:
$docusign:Title::Customer2
Date:
$docusign:DateSigned::Customer2
Figure 18 - Contract Signing Block as Seen at Agiloft
A few observations on the variables used above:
Using a DocuSign tag with Text or one of the standard tags will typically ask the Signer for the
information when he signs. For instance, if you use the DocuSign Title tag, the signer will be
asked to type in his Title when he signs (then DocuSign will remember it for future signings). If
you are storing the Signer’s Title in a Contract field already, then you could simply use an Agiloft
field tag instead to populate the Signer’s title into the printed document even before he signs
(as shown above for the Customer1/Party1 Signer).
32
Likewise the Signer’s Full Name can be prepopulated from the field in Agiloft, or it can be
requested by DocuSign when he signs.
There are a couple of reasons why you may want to use a DocuSign Tag over an Agiloft one – you may
get more complete data that way, since Signers are asked to fill out the field. Also, signers may delegate
their signature authority to another person at their company, so the actual signer may not match the
Agiloft Signer data.
Shown below is what that signing block page will look like for the first ABC Electronics signer (James
Martin, whose Role Name = Customer1). At this stage the contract has been sent out for signature and
has been signed by the Agiloft contract administrator (whose Role Name=InternalSigner).
Note that the tags above in red font have been made “invisible” by specifying white font.
The first ABC Electronics signer, James Martin, will see the display below. Note that no signing tags
appear yet for the second Customer2 signer, Brenda Smith. Signing order will be explained in the
section, “Create a DocuSign Envelope”.
The fields filled in by DocuSign for the Agiloft signer and the first Customer1 signer are underlined for
clarity.
33
g) This Agreement may be signed in one or more counterpart copies, all of which
together shall constitute one Agreement and each of which shall constitute an original.
IN WITNESS WHEREOF, the parties for Agiloft Support Contract
Agiloft
Signature:
Name:
Bill Newman
Title:
Contract Administrator
Date:
04/02/2014
ABC Electronics
Signature:
Name:
James Martin
Title:
Purchasing Manager
Date:
04/03/2014
Signature:
Name:
Title:
Date:
Figure 19 - Contract Signing Block as Seen at DocuSign
Given the need for DocuSign Tags to be added to a Document, the most efficient way to use DocuSign is
to “templatize” as many of your Contract types as possible into standard print templates that can be
generated by Agiloft to create your Contract documents. This way, the tags can be pre-configured and
will be present in the Contract Documents without staff members needing to worry about them.
Print Templates can be stored as an attached file associated with a Contract Type record or in a separate
table of Print Templates that can be selected by Contract Managers within a Contract to define which
document should be generated. An Attached File action can be triggered by an action button (Create
and Attach Contract) to generate a Word or PDF file based on the Print Template document and attach
it to a file field in the Contract (and from there into a linked Attachment Record).
34
The Agiloft Professional Services Team can assist with designing your print templates and determining
the best way to store and manage them.
However, there are inevitably Contracts or Documents requiring signatures that cannot be generated
from a preconfigured Print Template, and the next section discusses the ways you may decide to handle
this scenario.
S IGNING C ONTRACTS P ROVIDED BY E XTERNAL P ARTIES
When using DocuSign to gather electronic signatures on documents that are provided by vendors or
other third parties (and that are therefore) not based on preconfigured templates, the DocuSign tags
need to be added to the document(s) manually.
There are a few choices for how to manage this process.
Contract Manager Manually Adds Tags in the DocuSign Interface
Once the DocuSign Envelope is created in Agiloft, the button to “Create & Preview” brings up the
document(s) loaded into DocuSign for confirmation before sending. From here the contract manager
can navigate to the signature blocks and manually drag the tags for each signer onto the Document. See
the discussion starting at Figure 30 - DocuSign Signing Tag Review.
Pros:
This is a straightforward and clear process, and is easy for contract managers to learn.
It can accommodate any number of signers and special tags, including adding initials on any
page.
Combined with a check of the signer email addresses and document, it doubles as a good final
preview of what will be sent for signature.
Cons:
It is tedious if there are many tags being added, and there are typically four for each signer
(Signature, Name, Title, Date Signed).
There is room for user error – putting the wrong signer role with the wrong block, forgetting to
add all the tags, etc.
It requires manual user intervention between when the contract is ready for signing and when it
is actually sent for signature.
Signers Add Tags while Signing
If no tags are added before the document is sent for signature, then the signers can add the tags
manually when they sign. The interface in DocuSign allows them to add tags for date, name, title, and
their signature to the appropriate places in the document (see Figure 30 - DocuSign Signing Tag Review).
Pros:
This spreads the burden of tagging to the individuals doing the signing.
It allows the process of sending to happen automatically without user intervention.
The Contract manager doesn’t have to spend time manually entering all the tags.
35
Cons:
The user interface is not as simple as it might be – signers may become confused about how to
add tags and sign.
You do not typically train your external signers, so you cannot ensure that they do it correctly.
The process may bog down due to signer confusion.
Using a Preconfigured Signature Page Template
Using Agiloft’s Print template capabilities, it is possible to preconfigure one or more signature pages to
“add” to any documents provided by vendors. The signature page can consist of preconfigured
DocuSign tags for the signers so no tags need to be manually added to the document.
Some legal language may be added to the page, in addition to the title of the Contract or any other
fields from the contract or document record in Agiloft.
If the contract provided by the vendor is in .docx format, it is possible to define an Attached File action
that will merge the signature page print template with the contract document to create a new .docx or
.pdf document file that is then sent to DocuSign.
Pros:
The DocuSign tagging is automated so users don’t have to worry about it.
The signature page can be merged using an action button or a rule, so the contract manager can
control it manually or built-in logic may be applied, such as “if the Standard Contract Used field
has a No value, append the signature block, otherwise don’t.”
There is less room for error since the system controls the tagging and it is preconfigured by the
administrator.
The signers’ names and titles can be pulled automatically from Agiloft so they would not have to
type in their name or title when they add their signature in DocuSign.
Cons:
There may be legal issues with using an appended signature page instead of the preexisting
signature block on the contract (which would not be used).
The number of signers and their identities would need to be stored in Agiloft before the
signature page is generated so they can be populated into the signature page.
If the contract is a pdf file, it cannot be merged with the signature page, so they would be stored
as two separate documents.
It requires some semi-complex automation for the print template to be merged, a new
document created, and that document added to the contract for selection to send to DocuSign,
so it may be difficult to do without the assistance of Agiloft Professional Services.
Any of these methods will work, so it is a question of which makes the most sense for the context in
which signing will be done at your organization. This decision should be made and the methodology
decided upon before embarking on using DocuSign.
36
PROCEDURES FOR SENDING DOCUMENTS TO DOCUSIGN
This section describes the steps performed by an Agiloft DocuSign User (Sender) to prepare a document
for e-signing, specify the signers and the signing order, preview the document at DocuSign, send out the
document, and monitor the e-signing process until the document has been completed.
As was mentioned before, DocuSign is set up to process envelopes which are containers of documents,
signer contact information, signer responsibilities, and routing (send) order specifications. This is all the
information that DocuSign needs to manage and complete the requested e-signing tasks.
Ideally, the envelope structure, standard recipients, order of signing, and any custom messages will be
predefined in Agiloft by configuration of the “DocuSign Action” that generates the Envelope, so starting
the e-sign process can be as simple as clicking the button to create the Envelope and clicking the Send
button to send it through DocuSign.
STEPS FOR DOC USIGN USERS (SEN DERS)
The following Sections describe the tasks that the DocuSign User/Sender must do to create envelopes,
send out documents, and monitor the e-signing process.
Specific procedures and details for each step will be provided in the following numbered Sections 1– 6:
1) Create a contract record.
2) Create a DocuSign envelope containing the document(s) in the contract record above.
Also specify e-signers, responsibilities, routing information, and signing order, if not
preconfigured.
3) Preview the envelope at DocuSign and make any necessary revisions.
4) Once the envelope is ready, send it out to the signers for e-signing.
5) Monitor the progress of the e-signing process in both Agiloft and DocuSign.
6) When e-signing is complete, take any additional steps needed.
1) PREPARE THE CO NTRACT RECO RD
First, a word about terminology: for this discussion the term “contract document(s)” means the actual
contract document(s) that will be signed by the parties involved, and which will be created either from a
print template or provided by an external party.
The term “contract record” refers to the record in the Contracts table which contains all the associated
information about the contract, including a link to the contract document(s) which will get created by
the print template.
We’ll continue to use the ABC Electronics example to make the process easier to follow and understand.
First suppose that we have a contract record for the annual customer support for ABC Electronics (the
relevant part of Contracts screen is shown below in Figure 20):
37
Figure 20 - Contract Record for ABC Electronics
Before we are ready to send the Contract for signatures, there may be an approval process and several
versions of the Contract Document(s) that go through that process. We are omitting that entire
workflow for this example, and entering the scenario at the point where all approvals have been
received and the Contract Document(s) have been attached somewhere.
In our default Contracts setup, we have a Tab on the Layout called Documents with a “Create and
Attach” action button that can generate the Contract Document and create an Attachment record with
the attached file. Your KB may be set up differently.
However your KB is set up, to generate the document from a print template you will generally have an
action button or a rule that runs on a particular print template to create an attached file in some field.
In a KB dating after May 2014, by the time the contract is ready for signatures, we might have some
attachments stored in a table within the Contract as follows:
38
Figure 21 - Table of Attachments
Here, we are going to want to sign the final version of the Agreement and omit the earlier draft.
So once we have the final document(s) approved and ready for signature, we need a way to select just
those documents to be part of the DocuSign Envelope.
This can be done in a couple of different ways:
1) Using an action button like the one above called “Add to Packet” which can be used after first
selecting the desired documents in this table. That action can update a field in the Attachments
record, which is then used in a filter on an Attachments field mapped to the DocuSign Envelope.
2) By giving the Sender a multivalue file field from the Attachments table and having her select the
Document(s) she wants. See Figure 22 below – the field “Files to Sign” shows all Attachments
for this Contract. The Sender simply selects one or more files to be included in the Envelope.
Figure 22 - Selecting Signers and Files to Sign from a List
Continuing with the ABC Electronics example, Figure 22 also shows the Signer fields on the “DocuSign
Envelopes” tab of the Contract layout. By default, this is where the Signers for the Contract are
selected. Remember that in the default setup we have specified one Agiloft signer (Internal Signer) and
two external signers (1st/2nd Party Signers, who in this case are James and Brenda, of ABC Electronics).
39
To see how all this is tied together, refer back to Figure 16 which shows how the “Create DocuSign
Envelope” action button was configured, which specified that there would be three signers (one internal
and two external). This is why there are three Signer information blocks shown in Figure 16. Also refer
to Figure 18 which shows how these signers are mapped into the contract document.
Once the Signers and Documents have been defined, it is time to generate the DocuSign Envelope.
2) CREATE A DOCUSIGN ENVELOPE
As mentioned previously, DocuSign processes envelopes which are containers that hold one or more
documents to be e-signed by one or more email recipients, routing information for those recipients, and
the order in which the e-signing is to occur.
Now click the “Create DocuSign Envelope” action button to create the entire envelope containing:
The contract document to be signed (agreement-final-rev2.docx)
Name and contact information for the three signers (who will be notified via email to sign)
Signing order (Send Order) and roles (Signer, CC, etc.) for the three signers
It is worthwhile to study the relationship between Figure 23 (below) and Figure 16 to see how the fields
in the envelope are populated based on the DocuSign Action that was defined.
Figure 23 - DocuSign Envelope for ABC Electronics
Note that in this example the Recipient record for the second external signer (Brenda) has been
modified (via the Edit icon) for parallel signing (Send Order = 2 for both James and Brenda), so either
James or Brenda could sign first.
40
The following is a detailed explanation of the DocuSign Envelope record:
Envelope tab:
This shows the main data elements in the envelope and the three attached DocuSign Recipients records.
Remember that “Recipients” are the “Signers” who will receive an email from DocuSign when it is time
for them to e-sign the document.
The Figure 23 envelope defines a sequential/parallel signing order (1, 2, 2) for the signers, who will be
invited to sign in this order. In this case, both external signers can sign in any order, so they both have a
Send Order of 2. In the order above, the two external Signers will be notified at the same time once the
Internal Signer has signed.
Remember that in the print template document the “Role Name” DocuSign metadata tag was specified
as: $docusign:SignHere::InternalSigner in Figure 18, so the Role Name for Signer 1 on this screen must
also be “InternalSigner”.
Also remember that much of the envelope was set up via the “Create DocuSign Envelope” action button
configuration in Figure 16: the email Subject line, the default email message for each signer, Send Order,
etc. Most of this information can be manually modified for each recipient in the DocuSign Envelope
screen, if the sender so chooses.
Recipients can also be added to the envelope at this point, if desired. Any new recipients added,
however, will not have any embedded signing tags (in the document) and so the Sender will need to
drag and drop the DocuSign icons onto the document before sending it. See “Self E-Signing a Document
at DocuSign” at Figure 47.
To view or modify any of the DocuSign Recipient records, click on the Edit icon in the Recipients area of
the DocuSign Envelope record.
For example, the sender could add a special note for the first signer in the ABC Electronics example:
Figure 24 - Add a Special Message for Signer 1
41
The sender could also specify additional security for any or all recipients, for example, by designating an
“Access Code” which the signer would have to enter at DocuSign before gaining access to the document:
Figure 25 - Require an Access Code for Signer 2
The field definitions in the DocuSign Recipient records are as follows:
Send Order: Integer; “1” indicates first signer, “2” indicates second signer, and so on. In general, the
second signer will not get access to a document until the first signer has signed, and all signers with the
same Send Order will be notified at the same time when it is their turn to sign.
Envelope: Display only; this ID will be assigned automatically when the envelope is sent to DocuSign.
Full Name: First and Last Name of this signer; this may be filled in by lookup or by typing in directly.
Email: Email address of this signer; DocuSign will send signing notices to this address.
Title: May be filled in by lookup or by typing in directly. DocuSign will allow the signer to modify their
title when signing, and will store that title in its address book to prompt future title entries.
Role Name: This is one of the entries in the DocuSign Roles table, and it must match exactly the last field
of the DocuSign metadata tag in the contract document – for the example in Figure 23, the tags are
$docusign:SignHere::Customer1 (for James), and $docusign:SignHere::Customer2 (for Brenda). DocuSign
will place a “Sign Here” icon in the document where each person should sign.
Role: This is what the recipient is supposed to do. These values are taken from DocuSign’s Roles and
should not be changed. The dropdown choices are:
Signer: Recipient is requested to e-sign the document.
CC: Recipient is not a signer and will only receive a Courtesy Copy of the document.
Certified Delivery: Recipient will be emailed a certified copy of the document.
Agent: Sender creates “placeholder” Recipient records, but the Agent will fill in the actual name and
email address of the actual signers.
Editor: Recipient can modify the envelope to add signers, documents, etc.
Access Code: This is an optional security feature. If the sender enters something here, DocuSign will
request that signer to input this Access Code before getting access to the document – for enhanced
security it’s probably better to convey this code another way than in an email.
42
Message: This field is populated with the default email message in the DocuSign Envelope Action and
may be modified for each recipient by the sender.
The DocuSign Envelope and DocuSign Recipient records also have a Status tab which will be updated by
DocuSign if during the initial DocuSign Deployment (Figure 8) the field “Accept Real-Time Updates” was
specified “Yes.” As signers progress through the e-signing process, DocuSign will post status updates
indicating the latest actions taken by signers.
Figure 26 - DocuSign Envelope Status Tab
A record is created in the Agiloft table DocuSign Recipients for each signer of the contract. By default,
the DocuSign Recipients table does not appear on the left pane in Agiloft – it is generally accessed
through the DocuSign Envelopes record in the Contracts Table. When all Recipients have been entered
into the Envelope record above in Figure 23, the envelope is complete. The $docusign:xxx metadata tags
have ideally already been inserted into the attached document and rendered into the signing tags that
DocuSign will display for the signers.
Once the DocuSign Envelope record (Figure 23) and the DocuSign Recipient records (Figure 24 and
Figure 25) are complete, the Sender now has three choices:
“Send” will send the envelope to DocuSign with no further interaction. From there, DocuSign
will immediately send an email notification to the first signer(s).
“Create & Preview” will send the envelope to DocuSign and allow the sender to check the
document at DocuSign and preview the signing tags that each signer will see. If any changes
need to be made, the sender will be able to make them at that time (described in more detail in
the next section).
“Discard” will delete the envelope and Recipients from Agiloft and nothing will get sent to
DocuSign.
With the “Create & Preview” choice, the sender has the option to use the DocuSign interface to
manually insert the signing tags. He/she could attach a “plain” document (without the Agiloft metadata
tags) to the envelope, specify at least one signer, and click “Create & Preview”. Additional signers could
43
be added at DocuSign and the “drag & drop” functionality could then be used to add the signing tags for
each signer. This will be outlined in a later section “Additional Functionality at DocuSign.”
This is probably the preferred approach when working with a Document that has been provided in pdf
format or by an outside party.
3) PREVIEW THE DOCUMENT AT DOCUSIGN TO CHECK THE TAGS
The envelope can either be sent to DocuSign from the DocuSign Envelope screen above (Figure 23) or
from the Contract screen (DocuSign Envelopes tab) shown below, by clicking the Create & Preview or
Send buttons:
Figure 27 - Completed DocuSign Envelope
Clicking “Send” doesn’t require or allow any further interaction by the sender. Clicking “Create &
Preview” takes the sender to the DocuSign website where he/she can review the document, verify
and/or modify the intended recipients, revise Roles or Sending Order, and check/modify the signing tags
for each recipient.
If templates had also been set up at DocuSign, the sender might see the screen below if the document in
the envelope matches (to a configurable degree) an existing DocuSign template. DocuSign templates
define entire envelopes – the document(s), signing tags, recipient information, and signing order. This
will be outlined later in the “Additional Functionality at DocuSign” chapter.
44
Figure 28 - Use DocuSign Matching Template?
In this case, the sender has already created a complete envelope in Agiloft with all the desired
information, so he’ll click “Cancel” to use his own envelope. Clicking “Apply” would have used the
DocuSign template instead of the envelope from the sender.
Figure 29 - DocuSign Review
Figure 29 shows the document being reviewed at DocuSign. Along the right are the page number icons
for this 6-page document. Pages with a yellow icon indicate that there are signing tags there. Along the
45
left are the various signing tags that can be dropped onto the document. The “Tag for:” dropdown in the
upper left will indicate which signer is assigned the tags which are currently highlighted. Here the
sender can check that the tags are assigned to each signer, reposition the tags if necessary, verify that
each tag is referencing the proper Agiloft $docusign:xxx field, reformat or delete the tag, etc.
In the screen below we’ll first examine the tags for the InternalSigner, in this case, Bill Newman:
Figure 30 - DocuSign Signing Tag Review
The signing tags are illuminated for each signer as the signers get selected in the “Tag for:” dropdown.
Note that only actual signers will appear in the “Tag for:” dropdown. Any tag can be expanded by
clicking on it:
46
Figure 31 - Signing Tags at DocuSign
Select the person whose tags you want to review by clicking on their name in the upper left “Tag for:”
dropdown. Those tags will then be displayed in yellow. Clicking on each tag (in this example Bill
Newman’s “Title” tag) will reveal an information box with up to four icons:
(right arrow) – click this arrow to expand the display field (not present for signature icons)
(anchor symbol) – hover over this to display the field this tag is anchored to
(X inside circle) – delete this tag
(gear symbol) – click on this to edit the properties of the field:
Figure 32 – Signing Tag Properties
Note that by clicking and holding any tag you can reposition it. Repositioning can also be done by
clicking a tag and then pressing the arrow keys. In addition you can change any of the information listed
in the Tag Properties box above.
47
A DDING T AGS
If working with a document that was not generated from a Print Template in Agiloft and that therefore
has no pre-existing Tags, the Sender can use this same preview screen to add all of the necessary Tags.
The process is to select each signer from the dropdown box in the upper left and then proceed through
the document(s) to locate each place where some action has been requested for that signer.
The sender clicks on the appropriate tag (displayed in the left pane), drags it to the desired location, and
drops it onto the document. The sender proceeds until all of that signer’s tags have been inserted. Then
the sender selects the next signer from the dropdown and proceeds in like manner until all tags for all
signers have been inserted into the document.
The sender can click “Preview” at the bottom of the screen and view the document as each signer will
see it. Signers are selected in turn by the upper left dropdown.
4) SEND OUT THE DOCUMENT FOR E-SIGNING
After the sender has examined the document, verified signer information and routing order, previewed
the signing tags for each signer, repositioned any tags (via click and drag), and/or made any necessary
modifications to the tags, the sender has these five choices which are listed at the bottom of the
DocuSign “review screen” (Figure 29) above:
Preview: Shows the document as each signer will see it, in order (only tags for them will be shown)
<Go Back: Takes you back to the previous screen (or to the envelope, Figure 33 below)
Discard Changes: Discards any changes you made during envelope review
Send: Click the “Send” button on the bottom left of the DocuSign screen to begin the e-signing process.
If the sender is the same person as the first signer he/she will be asked: “Would you like to sign your
envelope now? (yes/no).”
Save Draft: (in DocuSign envelope template format) This option will save the envelope in the sender’s
Draft folder, and it can be reexamined at another time. Bringing up the Draft copy will display the
envelope screen below (Figure 33). Note the signing order diagram that can be displayed by clicking
Order Diagram. From this Draft display you have these options:
Next – takes you back into the document in review mode
Send Now – sends out the envelope
Save Draft – saves any changes you made during this editing phase
Discard Changes – discards any changes you made during this editing phase
48
Figure 33 - DocuSign Envelope
The envelope contains all the signer information that was created in Agiloft: (name, email address, email
subject/message, signing order, etc.). Note that by clicking on the “Order Diagram” box, a visual display
will appear. The display can be dragged to a more convenient place if information is being overlaid.
Once the document has been sent out, the “action” shifts to the signers (see the following section,
“Procedures for E-Signing at DocuSign” on Page 56). However, the sender can continue to monitor the
process by using the tools described in the next Section.
49
5) MONITOR THE E -SIGNIN G PROCESS
By default, the sender receives an email from DocuSign as each person views the document. The sender
and any persons who have signed the document receive an email notification if any subsequent signer
declines or reassigns their signing to another person.
There is current historical information available both within Agiloft and at DocuSign. In Agiloft go to the
DocuSign Envelopes table, select the desired envelope, and then click on the Status tab to see summary
information similar to the screenshot below:
Figure 34 - Agiloft Envelope Status
There are also detailed status, summary, and historical records kept at DocuSign. These are described in
the following Section “(6)
50
E-Signing Completion.”
Note that during the signing process it may be necessary for the sender to make corrections to the
envelope and/or document. To accomplish this the sender can highlight the envelope at DocuSign on
the “Manage” tab, click on “Actions” at the upper right, and click “Correct” to be taken to the envelope
where changes could be made, say, adding another signer.
If changes need to be made to the signing tags, click “Edit Documents and Tags” at the bottom.
However, note that no changes can be made to the actual document text itself and that tags can only be
edited for signers who have not yet processed the document. To complete the action, click “Correct” to
save the changes or “Discard Changes” to discard. Then click “Resend” in the “Actions” dropdown to
send on to the next recipients (see Figure 35 below).
Figure 35 - Making Envelope Corrections
51
6) E-SIGNING COMPLETION
When all signers have completed their signing duties, the sender will receive a confirmation email from
DocuSign which also contains a pdf of the document with all e-signatures and all metadata fields filled
in. At this point the document is complete and can be filed by the sender and sent along for any further
processing as dictated by the company’s contract management protocols.
At DocuSign there are many summary and historical displays that can be accessed either from within a
document via the “More” button at the upper right or by going to the envelope “Manage” display and
clicking the “Actions” button on the upper right:
Figure 36 - Document Actions Options
52
The envelope “Form Data” display is as follows:
Figure 37 - DocuSign Form Data
53
The envelope “History” display is as follows:
Figure 38 - DocuSign Envelope History
This will show every action taken on the envelope in sequential order and is a more complete picture of
the signing process than the envelope status display in Agiloft. This display will not be created until the
envelope has been sent to the first signer.
54
The envelope “Certificate of Completion” display is as follows:
Figure 39 - DocuSign Certificate of Completion
55
PROCEDURES FOR E-SIGNING AT DOCUSIGN
The previous section showed how an Agiloft DocuSign User/Sender creates an envelope for e-signing by
preparing a document or template, identifying the signers, and specifying a signing order. As
demonstrated, the sender has complete control and oversight of the e-signing process from start to
finish.
This section describes the duties and options available to the document e-signers. To aid in user
understanding we’ll continue with our original example of the Agiloft support contract for ABC
Electronics. As you recall, this contract calls for three signers – one from Agiloft and two from ABC.
Note that the sender needs to be set up as a DocuSign User by a DocuSign account administrator. The
signers of the document can be, but do not need to be, registered on their company’s DocuSign account.
The process for signers is as follows:
Respond to a notification email by clicking on the “Review Document” link.
Enter the access code or any other security measures specified by the sender (if any).
Create or choose a signature style (first time only).
Review the document, e-sign, and provide any other signing information as requested.
The signer can also defer or decline signing, or specify someone else to be the signer.
Each signer will get a pdf copy of the document with signing information up to that point.
When signing is complete, the sender and all signers receive an email with the completed pdf
document link which can be used to save the document locally.
The email notification logic can be adjusted at DocuSign by the account administrator to avoid
getting emails on every change to the envelope. See Figure 51 below.
DocuSign displays all documents within an envelope as one file, with page number tabs along the right
for easy navigation within the envelope and a white space in between each document. In this example,
there is only one document in the envelope.
The signer is taken into the document(s) and is led to each of the places within the document(s) that
have been specified as requiring their input (indicated by yellow tabs along the left). The signer can also
move about and review any parts of the document(s) they desire to see.
Also note that while on the DocuSign website the signer has access to all the extensive Help information
available there.
While reviewing the document, the signer can click “More” to see additional options, which include the
original options available in the notification email (Change Signer, Decline, Sign on Paper, Finish Later) as
well as View (Envelope) History, View Certificate, View Form Data, and View Consumer Disclosure. These
were described at the end of the previous Section “E-Signing Completion.”
When the signer has reviewed the document and all requested fields have been completed, a message
window is displayed stating “All required fields complete” and the signer is asked to confirm their
signing by clicking on the “Confirm Signing” tab on the left. After that, the document is emailed to the
next signer (if any).
56
When all specified recipients have completed their e-signing, the original sender gets an email
notification with an attached pdf of the fully-signed document. If a recipient has added other signers,
DocuSign manages the process just as if all signers had been explicitly specified originally.
NOTIFICATION EMAIL FROM DOCUSIGN
Each signer of the document will receive in turn an email notification from DocuSign that a document is
available for their electronic signature (see Figure 40 below). The signer clicks on the “View Documents”
button and is taken to the DocuSign website for the actual e-signing.
In the ABC Electronics example, the first signer is Bill Newman:
Figure 40 - – Email Notification for Signer1
Note that the special email Message information that was entered on the Recipients screen for this
signer appears in his notification email.
If an access code was assigned by the sender, then the signer will have to enter that code and click
“Validate” before getting access to the document:
57
Figure 41 - Signer Enters His Access Code
Next, the signer is asked to click a checkbox specifying that they “agree to do business electronically”
with the sender. If the companies have conducted electronic business before through DocuSign, the
message might read “I consent to use Electronic Records and Signatures.” The screen is below:
Figure 42 - Signer Agrees to Electronic Signing
The “Review Document” button does not become active until the consent box is checked.
58
Each email recipient (potential signer) has these options:
Review Document: Review, sign, and provide all requested information in the document.
Decline: Recipient is asked to provide the sender with a reason for declining to sign. This effectively ends
the signing process, and notification emails are sent to the sender and all previous signers.
Finish Later: Recipient can return to the document anytime by clicking the email link.
Sign on Paper: Physically sign and then return the signed document by fax (there are some restrictions).
See the DocuSign documentation for more information.
Change Signer: The document can be reassigned and sent to someone else for signature. A reason will
also have to be provided (this option is controlled by permissions).
E-SIGNING THE DOCUMENT AT DOCUSIGN
When the “Review Document” button in Figure 42 above is clicked, the signer is taken into the
document for review. Page number icons are displayed along the right for quickly navigating to areas of
special interest. DocuSign should guide the signer through the process by highlighting in yellow those
page numbers needing his/her attention.
Figure 43 below shows the document as James Martin would see it. He is the second signer and sees
the first signer’s signature, but he does not see any tags for subsequent signers:
59
Figure 43 - Signing Block for Signer2
For a text box (like the red box next to “Title:”), the signer can type in a new title (which will be saved by
DocuSign).
60
The first time a signer clicks on a “Sign Here” icon he/she will be asked to “Adopt Your Signature”:
Figure 44 - Choosing a Signature
The signer is given a choice of several DocuSign “signature styles.” You can also draw your signature
using a mouse or your finger/stylus on touch screens. Note that your electronic signature does not need
to look like your actual signature to be legal. If you do want your electronic signature to look like your
actual signature, you can upload a scanned copy of your signature to DocuSign (see documentation).
The signer can also choose not to display the “DocuSigned by:” enclosure (DocuSign eSignature format)
around the signature.
Once the signer has selected a signature, he/she will be requested to click “Adopt and Sign” or “Cancel”.
After all the requested information fields have been completed (either automatically by the template or
by typing it in), the signer will see a message saying “All required fields complete” and will be asked to
click the yellow “Confirm Signing” button at the left:
61
Figure 45 - Confirm Signing
Once the signer clicks the “Confirm Signing” tab he/she will get an invitation from DocuSign to sign up
for a free account (note that this is optional):
Figure 46 - Sign Up for a Free DocuSign Account?
62
Options available at Figure 46 above:
Get a free DocuSign account: Enter and confirm your password, then click “Sign Up Now”. Remember
that signers don’t need to be registered at DocuSign, but senders do.
Download (lower right): Click to download a copy of the document. Note that the signing block area will
be complete only up through the current signer.
Print (lower right): Click to print a copy of the document. Note that the signing block area will be
complete only up through the current signer.
Exit: Click the “X” in the upper right hand corner to exit this window. You’ll be taken to a DocuSign
“thank you” window that you can just close.
At this point the signer has completed his/her work and DocuSign will send a notification email to the
next signer (if any) specified in the routing order.
After each signer has signed or after any other event which affects the status of the envelope, DocuSign
sends a status update to the sender. This status is posted at both Agiloft and DocuSign.
SELF E-SIGNING A DOCUMEN T AT DOCUSIGN
A signer can sign a document for which no tags have been preconfigured. This might happen several
ways, for example, if the sender added the signer at DocuSign by modifying the envelope before sending
out the document, without adjusting the document, or if a specified editor added a signer, etc.
In this case a signer might be presented with a screen like the following:
63
Figure 47 - Self E-Sign a Document
To create their own signing tags, the signer clicks on the tool tip icon
at the upper right to see the
list of available tags. (Under certain circumstances the signer may have to click the “More” dropdown
and select “Correct” and choose “Edit Documents and Tags”). The signer selects a tag from the list, drags
it to the desired location in the document, and then drops it. Tags can be repositioned by drag and drop,
and/or resized by clicking on the resizing points:
Figure 48 - Resizing an Added Tag
The signer then types in their title, which DocuSign saves in its address book. When all the tags have
been placed, the signer clicks the “Finish” button on the upper right. A popup window will ask “Are you
finished signing your document? Yes/No.” If “Yes” is clicked, DocuSign sends an email notification to the
next signer, if any.
64
In summary, DocuSign treats the added signer like any other signer, but the signer must manually add
his/her own signing tags.
ADDITIONAL F UNCTIONALITY AT DOCUSIGN
Agiloft has implemented the basic functionality to get documents e-signed on DocuSign. The DocuSign
website itself has additional options that an organization may want to investigate if their e-signing
requirements are more complex.
The following sections touch on some additional DocuSign functionality.
For more information please consult these help resources on the main DocuSign website:
http://www.docusign.com/faq
http://www.docusign.com/support/downloads
http://www.docusign.com/sites/default/files/DocuSign_Service_User_Guide.pdf
http://www.docusign.com/sites/default/files/Account%20Administration%20Reference%20Guide.pdf
ACCOUN T FEATURES AT DOCUSIGN
There are many configurable features of your DocuSign account which the Account Administrator can
view by clicking “Edit” from the “DocuSign ID Card” box on the home page (see Figure 1 and Figure 2),
and then clicking “Features”.
The screen below only shows a portion of the many configurable options available.
65
Figure 49 - DocuSign Account Features
There is a very long list of configurable features in this display. Note that the DocuSign defaults should
suffice for most users.
66
DAS HBO ARDS AT DOCUSIGN
Figure 50 - Dashboards at DocuSign
Click the Dashboards tab at the top of the screen for a snapshot of your current activity.
67
EMAIL NOTIFICATIONS AT DOCUSIGN
Figure 51 - Manage Email Notifications at DocuSign
From the Home tab click the Edit link at the upper right corner of your DocuSign ID card (see Figure 1) to
display the Administrator options. The default configuration (all boxes checked) should suffice for most
users.
68
PERMISSIONS AT DOCUSIGN
Permissions can be set at DocuSign for user types and individual users. Please consult the DocuSign
documentation for details.
Figure 52 - Manage DocuSign Permissions
69
REPO RTS AT DO CUSIGN
Figure 53 - DocuSign Reports
There are a number of reports available from the Reports tab that can provide more information about
your account.
70
TEMPLATES AT DOCUSIGN
Some users may want to manage their electronic signing partially or completely from DocuSign itself,
rather than from their Agiloft KnowledgeBase. This section will describe in general terms how that can
be done. Note that in this case the KB will not have the “complete story” of the e-signing process.
Templates in Agiloft and templates in DocuSign are functionally the same in that they both create
envelopes containing documents, signers, and routing information. The main difference is that signing
tag icons are drag-and-dropped onto the document at DocuSign, and in Agiloft the $docusign:xxx
metadata tags are embedded in the document which later get translated automatically into the signing
tag icons at DocuSign.
For more detailed information on DocuSign templates please refer to:
http://www.docusign.com/sites/default/files/Quick%20Start%20-%20Creating%20a%20Template.pdf
To create a template at DocuSign see the template screenshot below (Figure 54):
1) Log on to your DocuSign account at https://docusign.net (note: you must be an administrator)
2) Click “Manage” then “Create” (at the upper left) and then “Template” in the dropdown
To view existing templates, click “Manage,” then “Templates”, then click on desired template
3) Enter Template Name and Description
4) Upload the contract document(s) for the template envelope:
If more than one document, you can specify the order in which the documents will display
Note: recipients will see all of the envelope documents sequentially in one display
5) Assign the Recipients and Routing information:
Enter Recipient Role (e.g., Signer 1) and click “Add Signer”
For each signer enter Email Address, Name, Action (from dropdown), Identify (from dropdown)
To change routing sequence, click and drag “grab bar” or re-enter “Order” number
To verify routing sequence, click on “Order Diagram” for a graphical representation
6) Enter Email Subject, Message, and any individual notes to recipients
7) Click “Next” at lower right to enter document(s) to insert the signing tags
Select the recipient from the dropdown under “Tag for:” at upper left
For that recipient drag and drop the appropriate tags from the left pane onto the document(s)
8) When all recipients have been assigned tags, click “Save” at the lower left
You can first select “Preview” to make sure all tags are correct for all recipients
71
Figure 54 - Manage DocuSign Template Screen
72
To use a template to create an envelope at DocuSign (see screenshot above, Figure 54):
1) Log on to your DocuSign account at https://docusign.net (note: you must be a Sender); also see:
https://www.docusign.com/support/how-to-guides/Creating-an-Envelope-using-a-Template )
2) Click “Send”, then click “Choose an Online Document”.
3) Click “My Templates”, and then click the desired template.
4) The template, as originally created, will be displayed (see above screenshot).
5) You can make changes here (i.e., add/change signers, change email message, etc.).
6) Click “Send Now” (or “Next” to preview the email/document, change tags, etc., before sending).
7) Recipients will receive (in signing order) emails requesting their e-signatures.
73
APPENDIX A – SAMPLE CONTRACTS FOR E-SIGNING
The best way to have a hassle-free user experience of the DocuSign Integration is for the administrator
to prebuild standardized Print Templates in Agiloft with the necessary DocuSign tags. Once print
templates for your various contract types have been created in Agiloft, the e-signing process becomes
both simple and automated.
To assist you with your DocuSign setup, an abbreviated contract document is provided here. The next
two pages will be the first and last pages (pages 1 and 6, respectively) of a sample Agiloft contract. The
first page shows some standard “$” metadata tags and the next page shows the signing page for the
contract, which was set up for one internal signer (Agiloft) and two external signers (ABC Electronics).
Note that the “$docusign:<type>:<field name>:<role name>” tags on this signing page are “invisible”
(i.e., font color = white). All tags added to documents should be in white font, because the entries
made by the Signers are simply placed “on top of” these tags. The tags are anchored to the location on
the page where the data will be displayed, but they need to be invisible on the document. If the
$docusign:xxx tags are visible in the document, they will remain visible after DocuSign has inserted their
signing icons (e.g., “Sign Here”, etc.)
The page after the example template shows that same signing page with the $docusign:xxx tags made
“visible” (i.e., font color = black). You can also view any $docusign:xxx tag by selecting the tag area and
then hovering over the “font color” icon as shown below:
Figure 55 - Using Color to see Tags
Note that this two-page contract is an example only, and of course you can create any type of signing
block(s) you wish.
74
AGILOFT CUSTOMER SUPPORT AGREEMENT – Sample
This Agreement is between Agiloft, Inc., a California Corporation, (“Provider”) whose principal place of business is
460 Seaport Court, Suite 200, Redwood City, CA, USA 94063 and $company_name, located at $street_address,
$city, $state_province $zip_or_postal_code (“Customer”).
This Agreement supplements the End User License Agreement for Agiloft and hereby incorporates the limitations
of liability and general provisions of that Agreement. The Customer has purchased the standard annual
support/upgrade contract for its license of Agiloft.
1. INTRODUCTION
This Agreement covers standards for the provision of software support and upgrades by Provider to Customer, in
connection with that End User License Agreement dated as of $contract_start_date between Customer and
Provider (the "License Agreement"). This Agreement terminates on $contract_end_date, and may be renewed for
additional twelve-month periods.
In accordance with the License Agreement, Provider has granted to Customer a license to use the Licensed
Software (as defined in the License Agreement). Customer will operate the Licensed Software at its location in
$city, $state_or_province (the "Customer Facility", which shall include any other location to which Customer may
move its operations center in the future).
Customer has purchased licenses for both staff users (“Staff User”) (typically, technicians and other high-level
employees) and end users (“End User”) (typically external customers and internal end users).
2. SUPPORT AND UPGRADE SERVICES
2.1
SCOPE OF SERVICES
a) The following are the Support and Upgrade Services that will be offered by Provider in connection with
the Licensed Software:
Provider shall:
(i) develop and provide corrections, changes, or workarounds ("Corrections") for any defects,
errors, or malfunctions in the Licensed Software (collectively, "Defects"), discovered by Customer or Provider, on a
timely basis, given the nature and scope of the Defect;
(ii) provide to Customer all improvements, modifications and enhancements to the Licensed
Software which Provider shall make from time to time and which Provider makes available to its Customers
generally in the form of new releases; and
(iii) provide Customer with any upgrade releases ("Upgrade Releases") to the Licensed Software
and all new Versions and Releases of the Licensed Software, which Provider makes available to its Customers
generally; provided, however, that if any such Version or Release contains significant new or improved
functionalities, Provider shall have the right to make such Version or Release available to Customer only upon the
payment of additional license fees, or upon such other terms, as the Provider requires of its Customers generally
therefor.
[Contract page 1 is above; (Contract pages 2-5 are deleted); Contract page 6 is below]
75
f) This Agreement may not be assigned by either party except in connection with and under the
circumstances permitted under the License Agreement. Subject to the foregoing, this Agreement will be binding on
the parties and their respective successors and permitted assigns.
g) This Agreement may be signed in one or more counterpart copies, all of which together shall constitute
one Agreement and each of which shall constitute an original.
IN WITNESS WHEREOF, the parties of $docusign::contract_title:InternalSigner
Agiloft
Signature: $docusign:SignHere::InternalSigner
Name:
$docusign:FullName:internal_signer_full_name:InternalSigner
Title:
$docusign:Title::InternalSigner
Date:
$docusign:DateSigned::InternalSigner
$company_name
Signature: $docusign:SignHere::Customer1
Name:
$docusign:FullName:party1_signer_full_name:Customer1
Title:
$docusign:Title::Customer1
Date:
$docusign:DateSigned::Customer1
Signature: $docusign:SignHere::Customer2
Name:
$docusign:FullName:party2_signer_full_name:Customer2
Title:
$docusign:Title::Customer2
Date:
$docusign:DateSigned::Customer2
[Contract signing page 6 above, with “invisible” tags]
[This is what should get sent to DocuSign]
[The same page with these tags made “visible” is below]
76
f) This Agreement may not be assigned by either party except in connection with and under the
circumstances permitted under the License Agreement. Subject to the foregoing, this Agreement will be binding on
the parties and their respective successors and permitted assigns.
g) This Agreement may be signed in one or more counterpart copies, all of which together shall constitute
one Agreement and each of which shall constitute an original.
IN WITNESS WHEREOF, the parties of $docusign::contract_title:InternalSigner
Agiloft
Signature: $docusign:SignHere::InternalSigner
Name:
$docusign:FullName:internal_signer_full_name:InternalSigner
Title:
$docusign:Title::InternalSigner
Date:
$docusign:DateSigned::InternalSigner
$company_name
Signature: $docusign:SignHere::Customer1
Name:
$docusign:FullName:party1_signer_full_name:Customer1
Title:
$docusign:Title::Customer1
Date:
$docusign:DateSigned::Customer1
Signature: $docusign:SignHere::Customer2
Name:
$docusign:FullName:party2_signer_full_name:Customer2
Title:
$docusign:Title::Customer2
Date:
$docusign:DateSigned::Customer2
[Contract page 6 above, shown with “visible” tags]
[Note: Do not send “visible” tags to DocuSign]
77
APPENDIX B - DOCUSIGN TABLES AND FIELDS IN AGILOFT
Turning on the DocuSign extension creates several Tables, Fields, and Actions in Agiloft. If you manually
deploy the DocuSign extension on an existing KB, you should see most of the new tables at the bottom
of the left pane, as well as in other areas, such as the Contract layout and the DocuSign configure
screen.
If you start from a KB that already has DocuSign deployed, the tables may be displayed in a different
position.
DocuSign Actions in the system are denoted with a prefix of ?, i.e. “?: Grant Access to DocuSign”.
Many of these actions cannot be edited by an admin user – they are hard coded.
This is a brief overview of the items that are added by the DocuSign deployment and their purpose:
DOCUSIGN USERS TABLE
Purpose: This table needs to have a record for each Agiloft user who will be sending documents to
DocuSign (by creating the Envelope and clicking the Send button). Each record must have a valid
DocuSign login to enable the sending.
A UTOMATION
There are two rules running on this table that run actions to add or remove the Agiloft DocuSign User
to/from the list of valid Users in the linked DocuSign Account.
These rules should not be touched.
DOCUSIGN ROLES
Purpose: This table is used to name the Roles that will be assigned to Signers and people identified as
Recipients in the DocuSign Action to create the Envelope. It has been prepopulated with four roles:
Figure 56 - Default Roles
In the DocuSign Action Wizard, when choosing the recipients, the admin selects from this list for each
recipient. The role name is used in the DocuSign tags that are added to the document to match a Signer
to his role, and the role names must match exactly.
New roles may be added as needed and applied to the Signers and the Document tags.
78
DOCUSIGN EN VELOPES
Purpose: This table holds the DocuSign Envelopes, which contain a link back to the Contract from which
they were created, an embedded table of the DocuSign Recipients, and a field with the attached files
that will be sent to DocuSign to be reviewed/signed.
A DocuSign Envelope is created when a user clicks an action button that runs a “DocuSign Action”. By
default, a button called “Create DocuSign Envelope” is added to the Contracts table on the DocuSign
Envelopes Tab (added to the layout during the deployment).
How the envelope and recipients are populated depends on the configuration of the Action run by the
button, and it may be changed by updating the Action.
Figure 57 - DocuSign Envelope Screen
The Status of the Envelope is updated automatically based on progress at DocuSign. Once it has been
sent to DocuSign, it will have a Status of Created and will show the Envelope ID at DocuSign. As each
Recipient signs, the Status of the Recipient record will be updated to show as Completed.
More details on working with the Envelope are provided in the section: “Create a DocuSign Envelope”.
A UTOMATION
If using a system that was pre-deployed with DocuSign enabled, this table will have a rule that updates
the linked Contract when the Envelope Status changes to Completed. The rule sets the Status of the
linked Contract to Signed and maps the Signed Document files to Document records that are linked to
the Contract.
79
DOCUSIGN RECIPIENTS
Purpose: This table holds the Recipients for a particular DocuSign Envelope. They are linked to the
Envelope and to the Contract from which the Envelope was generated. The Recipient records are
created automatically based on the configuration of the DocuSign Action that generates the Envelope
record.
However, Recipients can also be added manually to a DocuSign Envelope if needed.
The Recipient Send Order controls the order in which Signatures are requested by DocuSign and each
Recipient should have a different Role Name for a given contract.
Figure 58 - DocuSign Recipient Screen
The DocuSign Envelope and Recipients tables are usually accessed from within the Contract.
CHANGES TO THE CONTRACTS TABLE
When DocuSign is first deployed, several fields and a new tab are added to the Contracts Table.
The fields added include three linked sets of fields for the signers: Internal Signer, 1st Party Signer and
2nd Party Signer, along with their email, title, and so on. These fields are linked to the People table, but
they do not require a source record, that is, they allow you to type a new name, email, title and so on
into the field for a given Contract.
The Action button is added to Create DocuSign Envelope.
The related tables of DocuSign Envelopes and DocuSign Recipients are also added to the layout on the
new Tab, which is called DocuSign Envelopes:
80
Figure 59 - New Signer Fields
When deploying DocuSign manually on an older KB, only the Admin group has view permissions for the
new tables and fields. Permissions will need to be manually added for other user groups.
When starting from a KB where DocuSign has been pre-enabled, the DocuSign-specific tables and fields
will be visible by default to a new group called DocuSign User. This way they will not get in the way of
other users until you decide you want to finish setting up and start using the DocuSign integration.
In this case, even the admin group may not see all fields on the layout and will not see the tables in the
left pane. To quickly “turn on” all elements, simply edit the admin user and add the DocuSign User
group to his Groups field.
81