1
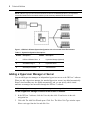
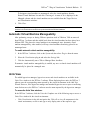
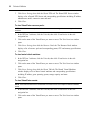
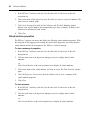
VIRTUALIZATION
Technical Bulletin
DSView 3® Plug-in
Avocent, the Avocent logo, The Power of Being There, MergePoint Unity, DSView and
Dambrackas Video Compression are trademarks or registered trademarks of Avocent Corporation
or its affiliates in the U.S. and other countries. All other marks are the property of their respective
owners.
© 2011 Avocent Corporation. All rights reserved. Emerson, Emerson Network Power and the
Emerson Network Power logo are trademarks or registered trademarks of Emerson Electric Co.
This document may contain confidential and/or proprietary information of Avocent Corporation, and
its receipt or possession does not convey any right to reproduce, disclose its contents, or to
manufacture or sell anything that it may describe. Reproduction, disclosure, or use without specific
authorization from Avocent Corporation is strictly prohibited. All other marks are the property of
their respective owners.
590-759-501F
3
TA B LE OF C ON TE N TS
DSView 3 Software Plug-in for Virtualization
System Requirements
1
1
System Configuration
1
Adding a Hypervisor Manager or Server
2
Virtual Machines Management
4
Automatic Virtual Machine Manageability
5
Units View
5
Deleting virtual environment units
6
Access rights
6
Unit Tools
6
Virtual machine sessions
6
VI Client sessions (VMware only)
8
SSH sessions to hypervisor servers
8
Rebooting
9
Synchronizing the Virtual Environment and DSView 3 Software
9
Virtual Machine Operations
10
Controlling the Virtual Environment from the DSView 3 Software
12
Common unit properties and settings
12
Virtual environment properties and settings
12
Security
12
Service addresses settings
14
VirtualCenter server settings (VMware only)
15
Hypervisor server settings
17
Virtual machine properties
20
Data Logging
21
Configuring data logging in the DSView 3 software
22
Configuring data logging on a virtual machine
23
Exporting a virtual machine data logging key
23
Configuring the Syslog
24
Configuring the SSH
24
4
DSView® 3 Plug-inVirtualization
Installing the data logging client
24
DSView 3 Software Events
27
Troubleshooting and Tips
29
VMware viewer ports
29
Mozilla Firefox
29
Events
30
DSView 3 zones - virtualization restrictions
30
1
DSView 3 Software Plug-in for
Virtualization
The DSView® 3 management software plug-in for Virtualization allows you to access and
control virtual machines from the DSView 3 software. Supported unit types include VMware®
VirtualCenters, ESX Servers and virtual machines, as well as Citrix® XenServersTM and virtual
machines. You can launch a Virtual Network Computing (VNC), Remote Desktop (RDP), Secure
Shell 2 (SSH) or VMware viewer session to supported virtual machines from a single point of
access.
The information provided here is supplemental to the DSView 3 help and the documentation
included with the virtual environment. For detailed information on a particular functionality,
please refer to the corresponding documentation.
NOTE: Some operations are not supported in all virtual environments. Typically, if an operation is not supported, the
corresponding buttons and links will not be visible when the virtual environment units are selected.
System Requirements
DSView 3 management software requirements
•
DSView 3 software version 3.5 or later is required for VMware environments
•
DSView 3 software version 3.7 or later is required for Xen environments
VMware requirements
•
(Optional) VMware VirtualCenter version 2.5 or later
•
VMware ESX Server version 3.5 or later
Xen requirements
•
Xen Express, Standard, Enterprise or Platinum versions 4.1 or later; only the Enterprise and
Platinum versions support resource pool, which is required for XenMotionTM
System Configuration
Connect the hypervisor managers and servers to a network accessible by the DSView 3 software.
2
Technical Bulletin
NOTE: (VMware only) If you do not need to access the VI Client on an attached ESX Server, you only need to
connect the VirtualCenter to the network and then you can access any attached ESX Servers as well.
Figure 1.1: DSView 3 Software System Configuration with a Connected Virtual Environment
Table 1.1: System Configuration Descriptions
Number
Description
Number
Description
1
DSView 3 Software Client
4
Hypervisor Manager (Optional)
2
Virtualization Plug-In
5
Hypervisor Server
3
SOAP/https Connection
6
Virtual Machines
Adding a Hypervisor Manager or Server
You can add hypervisor managers or independent hypervisor servers to the DSView 3 software.
When you add a hypervisor manager, the attached hypervisor server(s) are added automatically.
Hosted virtual machines are also added automatically, and you can specify which virtual
machines are managed and accessible through the DSView 3 software.
NOTE: Adding a hypervisor manager or server by discovering units from a range of IP addresses is not supported.
To add a hypervisor manager or server to the DSView 3 software:
1.
In the DSView 3 software, click the Units tab, then click Virtualization in the side
navigation bar.
2.
Click Add. The Add Unit Wizard opens. Click Next. The Select Unit Type window opens.
Select a unit type from the list and click Next.
DSView® 3 Plug-in Virtualization Technical Bulletin 3
-orClick a unit type in the side navigation bar, then click Add. The unit type is
designated for you based on the navigation link you select. Click Next.
If you click Add from any Units View window not described, the Add Unit Wizard will not
include options for adding a hypervisor manager or server.
3.
The Network Configuration window opens.
a.
Enter the IP address of the unit type selected in the Address field.
b.
Select either https or http as the protocol.
NOTE: The https protocol option is not displayed for units that do not support https.
4.
c.
The default TCP port number for the http or https protocol is populated for you. If
necessary, you can enter a different port number in the Port field.
d.
Click Next.
The Server Credentials window opens.
a.
Enter the username and password required to access the unit.
b.
(Not supported in some virtual environments) If you want to use DSView 3 software
user credentials for virtual environment operations, select the Use DSView User
Credentials for Operations checkbox. If the checkbox is not selected, the credentials
provided for the hypervisor manager or server are used for all operations.
NOTE: If you select Use DSView User Credentials for Operations, you must also enable user credential caching in
the DSView 3 software.
5.
If you selected https as the protocol, the Certificate window opens and displays the
certificate. Click Next to accept the certificate.
6.
The Select Virtual Machines to Manage window opens. The list displays all virtual
machines hosted by the hypervisor manager or server and allows you to specify which
virtual machines are managed. Managed virtual machines can be accessed and controlled
from the Target Devices and Virtualization windows, while unmanaged virtual machines
are hidden and cannot be accessed.
a.
Select the hosted virtual machines you wish to manage and click Add.
-orSelect Manage all hosted virtual machines listed below.
b.
Click Next.
-or-
4
Technical Bulletin
If you do not want to designate any virtual machines as managed, click Next
without adding any virtual machines to the managed list. Unmanaged virtual
machines are only available from the Hosted VMs window, where the status
of managed or unmanaged can be applied. See Virtual Machines Management
on page 4for more information.
7.
(Not supported in some virtual environments) The Authorization Roles window opens. The
list displays the imported authorization roles for the hypervisor manager or server and
preset mappings to DSView 3 user-defined user groups. You can modify group mappings
once the Add Unit Wizard is complete; see Security on page 12. Click Next.
NOTE: Hypervisor manager or server roles that have the same name as an existing DSView 3 group are not
shown in the Authorization Roles window.
8.
The Completed Successful window opens. Click Finish.
Virtual Machines Management
Before you can access or control a virtual machine from the DSView 3 software, a virtual
machine must be designated as managed in the DSView 3 software. Once this configuration
takes place, the units are available from the DSView 3 Target Devices and Virtualization
windows. Each managed virtual machine uses a managed device license in the DSView 3
software; see the DSView 3 help for more information.
If you use the virtual environment to add or remove a virtual machine and the virtual
environment and DSView 3 software are synchronized, the list of hosted virtual machines is
updated. If a virtual machine was added, it is available in the Hosted VMs window but remains
unmanaged until you designate it as managed.
To designate virtual machines as managed devices:
1.
In the DSView 3 software, click the Units tab.
2.
Click Virtualization in the side navigation bar.
3.
Click on the name of the hypervisor manager or server you want to access. The Unit
Overview window opens.
4.
Click Server Settings - Hosted VMs in the side navigation bar.
5.
To designate virtual machines as managed, select the virtual machines from the Hosted
Virtual Machines list and click Manage. A status of Yes is displayed in the Managed
column, and the virtual machines are now available from the Target Devices and
Virtualization windows.
-or-
DSView® 3 Plug-in Virtualization Technical Bulletin 5
To designate virtual machines as unmanaged, select the virtual machines from the
Hosted Virtual Machines list and click Unmanaged. A status of No is displayed in the
Managed column, and the virtual machines are not available from the Target Devices
and Virtualization windows.
6.
Click Close.
NOTE: A setting of N/A in the Managed column indicates that the virtual machine was reported as a hosted virtual
machine in the virtual environment but is not synchronized with the DSView 3 database.
Automatic Virtual Machine Manageability
After performing a resync or during VMware operations such as VMotion, VMs are removed
from DSView 3 software and then added back when the virtual machine has been placed on a
different ESX. This places the virtual machine in an unmanaged state. Automatic virtual
machine manageability, when enabled, will keep virtual machines from being placed in an
unmanaged state.
To enable automatic virtual machine manageability:
1.
In the DSView 3 software, click on the System tab, then select Plug-ins from the menu.
2.
Select the Virtualization plug-in and select the Settings link.
3.
Click the Automatically move VMs to Managed State checkbox.
If automatic virtual machine manageability is enabled, any new or cloned virtual machines will
automatically be placed in a managed state.
Units View
The added hypervisor managers, hypervisor servers and virtual machines are available in the
Units View windows in the DSView 3 software. When displaying these units, the DSView 3
software uses the corresponding name reported by the virtual environment in the Add Unit
Wizard. However, if the hypervisor manager and attached hypervisor server report a conflicting
name for that server, the DSView 3 software uses the name reported by the hypervisor manager.
To access the Units View windows:
In the DSView 3 software, click the Units tab. Complete one of the following steps to access a
Units View window for the virtual environment:
•
Click Virtualization in the side navigation bar. Click All to view all components in the
virtual environment, or click a unit type to only display units of the respective type.
6
Technical Bulletin
•
Click Target Devices in the side navigation bar to view all target devices, including virtual
machines.
•
To enable Topology view, click Topology. Click the arrow next to the virtual environment
unit to expand the list and display all connected units.
NOTE: For more information about navigation and actions that can be performed from Units View windows, see
the DSView 3 help for more information.
Deleting virtual environment units
You may delete hypervisor managers or servers from the DSView 3 software by selecting the
units and clicking the Delete button in the Units View window. This action removes the unit
from the DSView 3 software but does not affect the virtual environment. For more information
about deleting units, see the DSView 3 help for more information.
NOTE: As a best practice, delete virtual machines from the virtual environment instead of clicking the Delete button
in the DSView 3 software. When virtual machines are added or removed from the virtual environment, the DSView
3 software will automatically be resynchronized with the virtual environment.
Access rights
DSView 3 software administrators may assign unit access rights for the virtual environment.
Unit access rights allow administrators to specify what users or user groups may perform certain
actions for a unit type. See the DSView 3 help for more information.
Unit Tools
A variety of tools for the virtual environment is available from the Unit Overview window.
From the DSView 3 software, you can merge virtual target device connections with physical
target device connections. Merging the unit connections allows all possible actions to be
available from a single view, while the physical and virtual target devices remain distinct
entities within the DSView 3 database. For example, a MergePoint® service processor (SP)
manager may be connected to a blade server that hosts an ESX Server. By merging the physical
blade server connections with the virtual EXS Server connections, you could launch a KVM
session to the blade server or VI Client session to the ESX Server from the same view with the
DSView 3 software. See the DSView 3 help for more for more information.
Virtual machine sessions
From the DSView 3 software, you can establish a VNC, RDP, SSH or VMware viewer session
to a virtual machine.
DSView® 3 Plug-in Virtualization Technical Bulletin 7
The VNC viewer service is automatically added when a virtual machine is added to the
DSView 3 software. The VMware viewer service is only added for VMware virtual machines.
The RDP viewer service is added only for virtual machines reporting a Windows® operating
system. The SSH session viewer service is only added for virtual machines reporting a Portable
Operating System Interface (POSIX) operating such as Linux® or Solaris®.
NOTE: The SSH service must be first be configured on the virtual machine from the DSView 3 software. See the
DSView 3 help for more information.
To manually add or remove services from the DSView 3 software, see the DSView 3 help for
more information. The VMware viewer cannot be manually added or removed using the Add
Services Wizard in the DSView 3 software.
NOTE: Virtual media sessions to virtual machines are not supported.
Session system requirements
The following parameters are required to establish sessions:
•
To establish a VNC or RDP session, the virtual machine must be configured to support that
viewer.
•
To establish an SSH session, the virtual machine must be configured with an SSH server
and be listening to SSH client requests.
•
To establish a VMware viewer session, Internet Explorer® 6.0 or later or Firefox® 2.0 or
later is required.
NOTE: By default, the VMware viewer uses ports 902 and 903 to communicate with ESX Servers. If these ports are
blocked by a firewall, the VMware viewer session fails to launch.
To open a session:
1.
In the DSView 3 software, click the Units tab, then click Virtualization in the side
navigation bar.
2.
Click All or Virtual Machine in the side navigation bar.
3.
In the Action column of the virtual machine, select the type of session you wish to open.
-orClick the name of the virtual machine to open the Unit Overview window. Under
Tools, select the type of session you wish to open.
4.
The session viewer launches in a new window.
8
Technical Bulletin
Session status (VMware only)
You can view the virtual machine session status in a Units View window. If a virtual machine
has at least one active session through the VMware viewer, a status of In Use is listed and a
yellow circle is displayed on the icon for the virtual machine. The In Use status and yellow
circle are also displayed for the ESX Server and/or VirtualCenter that hosts that virtual
machine.
NOTE: To view virtual machine session status, unit status polling must be enabled in the DSView 3 software. If the
polling cycle is too large, the virtual machine session status may not be accurate. See the DSView 3 help for more
information.
VI Client sessions (VMware only)
From the DSView 3 software, you can connect to the VI Client for a VirtualCenter and an ESX
Server. The VI Client is accessed by the IP address you entered in the Add Unit Wizard. See
Adding a Hypervisor Manager or Server on page 2 for more information.
To access the VI Client:
1.
In the DSView 3 software, click the Units tab, then click Virtualization in the side
navigation bar.
2.
Click on the name of the VirtualCenter or ESX Server you want to access. The Unit
Overview window opens.
3.
Under Tools, click the VI Client link. The VI Client opens in a new window.
SSH sessions to hypervisor servers
From the DSView 3 software, you can establish an SSH session to a hypervisor server, provided
the server is configured with an SSH server and listening to SSH client requests. The SSH
session service is automatically added when a hypervisor server reporting a POSIX operating
system is added to the DSView 3 software; to add or remove services, see the DSView 3 help
for more information.
Prerequisites
•
The SSH service must first be configured on the virtual machine from the DSView 3
software. See the DSView 3 help for more information.
•
The DSView 3 SSH key (public key) must be exported and configured as a trusted public
key for the SSH server. To export the DSView 3 public key, see the DSView 3 help for
more information.
DSView® 3 Plug-in Virtualization Technical Bulletin 9
To establish an SSH session to a hypervisor server:
1.
In the DSView 3 software, click the Units tab, then click Virtualization in the side
navigation bar.
2.
Click the name of the hypervisor server you want to access. The Unit Overview window
opens.
3.
Under Tools, click the SSH Session link. The SSH session opens in a new window.
Rebooting
You can reboot a hypervisor server from the DSView 3 software if you have access rights.
To reboot a hypervisor server:
1.
In the DSView 3 software, click the Units tab, then click Virtualization in the side
navigation bar.
2.
Click on the name of the hypervisor server you want to reboot. The Unit Overview
window opens.
3.
To reboot the hypervisor server normally, click the Host Reboot link in the Tools section.
-or(Not supported in some virtual environments) To force the hypervisor server to reboot,
even when in maintenance mode, click the Forced Host Reboot link in the Tools
section.
4.
The hypervisor server reboots.
Synchronizing the Virtual Environment and DSView 3 Software
If you use the virtual environment to add or remove a virtual machine, one of two results
occurs:
•
If the corresponding events are logged in the DSView 3 software, the virtual environment
and DSView 3 software are automatically synchronized.
•
If the DSView 3 server is unresponsive or if the connection is lost to the virtual
environment, an event is not received by DSView 3 software. In this case, automatic
synchronization does not occur; you must run the Resync Unit Wizard or update topology
task to synchronize the virtual environment and DSView 3 software.
For how managed devices are affected, see Virtual Machines Management on page 4.
If you use the virtual environment to make any changes other than adding or removing a virtual
machine, you must manually synchronize the hypervisor manager or server with the DSView 3
10
Technical Bulletin
software. You can use the Resync Wizard or the update topology task to resynchronize the
systems and update the DSView 3 software database.
An attached hypervisor server is automatically resynchronized when the hypervisor manager is
resynchronized; you cannot resynchronize an attached hypervisor server separately.
Using the Resync Units Wizard
From the Units Overview window, you can click the Resync button to launch the Resync Units
Wizard for the hypervisor manager or server. For instructions about using the Resync Units
Wizard, see the DSView 3 help (keywords: resynchronizing units).
NOTE: Although not supported, the Resync button is displayed for attached hypervisor servers. In this case, clicking
the Resync button causes a Resync Failed message to display.
Using the update topology task
The update topology task performs the same operations as the Resync Unit Wizard but can be
scheduled to occur at regular intervals. See the DSView 3 help for more information.
Virtual Machine Operations
If you have access rights, you can submit virtual machine operations to the virtual environment
from the Operations menu in the DSView 3 software. Operations include turn off or turn on,
suspend or resume, or reset virtual machines. The Operation Submitted window allows you to
view if the submission was successful. The events log records both a DSView 3 event
indicating that the operation was submitted as well as a virtual environment event stating the
results of the operation.
You can also hide virtual machines from the DSView 3 software window or view virtual
machine properties. These operations occur in the DSView 3 software, not the virtual
environment.
To hide virtual machines from view:
For instructions, see the DSView 3 help for more information.
To view unit properties using the Operations menu:
For instructions, see the DSView 3 help for more information.
To turn off virtual machines:
1.
In a Units View window containing virtual machines, click the checkbox next to one or
more virtual machines.
DSView® 3 Plug-in Virtualization Technical Bulletin 11
2.
Click Operations, then select Virtual Machine Power Off from the menu to turn off the
virtual machine.
3.
The Operation Submitted window opens. Click the link to view the results of the
submission.
To turn on virtual machines:
1.
In a Units View window containing virtual machines, click the checkbox next to one or
more virtual machines.
2.
Click Operations, then select Virtual Machine Power On from the menu to turn on the
virtual machine.
3.
The Operation Submitted window opens. Click the link to view the results of the
submission.
To suspend or resume virtual machines:
1.
In a Units View window containing virtual machines, click the checkbox next to one or
more virtual machines.
2.
Click Operations.
If the virtual machine is currently running, click Virtual Machine Suspend to pause the
virtual machine.
-orIf the virtual machine is currently suspended, click Virtual Machine Resume to return
the virtual machine to its normal state.
3.
The Operation Submitted window opens. Click the link to view the results of the
submission.
To reset virtual machines:
1.
In a Units View window containing virtual machines, click the checkbox next to one or
more virtual machines.
2.
Click Operations, then select Virtual Machine Reset from the menu to turn off and turn on
the virtual machine.
3.
The Operation Submitted window opens. Click the link to view the results of the
submission.
12
Technical Bulletin
Controlling the Virtual Environment from the DSView 3
Software
Common unit properties and settings
Using the DSView 3 software, you can manage properties, connections, session files and a
variety of other functions for any unit, including units in the virtual environment. For detailed
information about common unit properties and settings, see the DSView 3 help for more
information.
NOTE: Some unit operations described in the DSView 3 help are not supported for the virtual environment units.
Typically, if an operation is not supported, the corresponding buttons and links will not be visible when the virtual
environment units are selected.
NOTE: The DSView 3 Attach Device Wizard is not supported for virtual environment units.
Virtual environment properties and settings
Properties and settings specific to virtual environments are described in the following sections.
Security
You can view and configure security properties for hypervisor managers or servers. For some
virtual environments, you can also define mapping relationships between virtual environment
authorization roles and built-in DSView 3 user groups.
(VMware environment only) With the exception of the Web Access Methods, security settings
that you want to apply to attached ESX Servers must be configured for the corresponding
VirtualCenter. Otherwise, when an attached ESX Server is connected, the Security windows
display read-only information configured for the VirtualCenter.
To view and modify security settings:
1.
In the DSView 3 software, click the Units tab, then click Virtualization in the side
navigation bar.
2.
Click on the name of the hypervisor manager or server you want to access. The Unit
Overview window opens.
3.
Click Properties, then click Security in the side navigation bar.
a.
(For https connections only) Click Certificate to view and compare the recorded and
actual certificates. If the certificates do not match, you can click Update to retrieve the
latest certificate from the hypervisor manager or server.
DSView® 3 Plug-in Virtualization Technical Bulletin 13
b.
Click Credentials to view the username or modify credentials. You can enter a new
username and password in the corresponding fields.
(Not supported in some virtual environments) If you want DSView 3 software
user credentials to be used for the hypervisor manager or independent
hypervisor server operations, select the Use DSView User Credentials for
Operations checkbox. If the checkbox is not selected, the virtual environment
credentials provided in the Add Unit Wizard will be used for all operations.
Click Save.
c.
(Not supported in some virtual environments) Click Access Methods to change the
protocol or port information.
(Optional) In the Environment Access Method area, you can change the
protocol (http or https) or port number that the DSView 3 software uses to
access the virtual environment.
(Optional - VMware only) In the Web Access Method area, you can change
the protocol (http or https) or port number that the DSView 3 software uses to
access the VI Client. You may configure a unique Web Access Method for
each VirtualCenter and ESX Server.
NOTE: For successful connections, the protocol and port information entered in the DSView 3 Access Methods
window must correspond to the port and protocol information configured in the virtual environment.
4.
Click Close.
To view and modify authorization role settings (not supported in some virtual
environments):
1.
In the DSView 3 software, click the Units tab, then click Virtualization in the side
navigation bar.
2.
Click on the name of the hypervisor manager or server you want to access. The Unit
Overview window opens.
3.
In the side navigation bar, click Properties - Security - Authorization Roles. The
Authorization Roles window displays both the reported configuration roles for the
hypervisor manager or server and the DSView 3 built-in user groups.
4.
(Optional) If you are accessing a hypervisor server that is managed by a hypervisor
manager, you are prompted to log in to the hypervisor server.
5.
(Optional) To view the privileges assigned to a hypervisor manager or server authorization
role, select the role from the list and click View Privileges. Click Back to return to the
Authorization Roles window.
14
Technical Bulletin
6.
To map hypervisor manager or server roles to DSView 3 built-in user groups, complete the
following steps:
a.
Select a hypervisor manager or server role from the list.
NOTE: If a hypervisor manager or server role has the same name as an existing DSView 3 group in the DSView 3
software, an error message is shown and the virtual environment authorization role is not available for mapping.
b.
Select a DSView 3 built-in user group from the list and click Add.
c.
Select a preemption level from the list. For more information see the DSView 3 help.
d.
With both the role and user group highlighted, click Map Role. The mapped role is
listed in the Mapped Roles table.
e.
Click Save Roles.
Once saved, the imported hypervisor manager or server roles become user-defined groups in the
DSView 3 database. Any modifications must be done from the Users - Groups tab in the
DSView 3 software; for more information, see the DSView 3 help for more information.
Service addresses settings
For virtual machines that report multiple IP addresses, it may be necessary to designate the
primary IP address. For example, a virtual machine connected to a DCHP server may report both
a public and a private IP address. You can designate the public IP address as the primary to
allow remote sessions to be launched from the DSView 3 software.
To view and modify service address settings:
1.
In the DSView 3 software, click the Units tab, then click Virtualization in the side
navigation bar.
2.
Click on the name of the virtual machine you want to access. The Unit Overview window
opens.
3.
Click Properties, then click Services Address (Virtual) in the side navigation bar. All IP
addresses reported by the virtual machine are listed.
4.
To designate an IP address as the primary, select the IP address from the list.
5.
(Optional) If you do not want the selected IP address to be automatically replaced when an
IP changed event occurs, deselect Update Services Address on IP Changed Events.
NOTE: By default, the Update Services Address on IP Changed Events option is selected. If selected, the primary
IP address is overwritten when new IP addresses are reported, which disables remote sessions if the primary public
IP address is overwritten by a private IP address.
6.
Click Save, then click Close.
DSView® 3 Plug-in Virtualization Technical Bulletin 15
VirtualCenter server settings (VMware only)
The DSView 3 software can access and display the following VMware VirtualCenter server
settings; these settings are stored in the VirtualCenter and do not correspond to any DSView 3
software settings.
To view VirtualCenter data centers:
NOTE: A VirtualCenter data center is an entity used to group VMware virtual machines and host entities.
1.
In the DSView 3 software, click the Units tab, then click Virtualization in the side
navigation bar.
2.
Click on the name of the VirtualCenter you want to access. The Unit Overview window
opens.
3.
Click Server Settings, then click the Data Centers tab. The Data Centers window displays
a list of configured data centers and corresponding name and number of hosts and
connected virtual machines.
4.
Click Close.
To view VirtualCenter clusters:
NOTE: A VirtualCenter cluster is a collection of hosts available for backing virtual machines.
1.
In the DSView 3 software, click the Units tab, then click Virtualization in the side
navigation bar.
2.
Click on the name of the VirtualCenter you want to access. The Unit Overview window
opens.
3.
Click Server Settings, then click the Clusters tab. The Clusters window displays a list of
configured clusters and corresponding data centers, virtual machines and other
specifications.
4.
Click Close.
To view attached ESX Servers:
1.
In the DSView 3 software, click the Units tab, then click Virtualization in the side
navigation bar.
2.
Click on the name of the VirtualCenter you want to access. The Unit Overview window
opens.
16
Technical Bulletin
3.
Click Server Settings, then click the Hosted ESXs tab. The Hosted ESX Servers window
displays a list of hosted ESX Servers and corresponding specifications including IP address,
manufacturer, model, connection state and more.
4.
Click Close.
To view VirtualCenter resource pools:
NOTE: A VirtualCenter resource pool is a division of resources used to manage allocations among virtual
machines.
1.
In the DSView 3 software, click the Units tab, then click Virtualization in the side
navigation bar.
2.
Click on the name of the VirtualCenter you want to access. The Unit Overview window
opens.
3.
Click Server Settings, then click the Resource Pools tab. The Resource Pools window
displays a list of resource pools and corresponding parent, CPU and memory specifications.
4.
Click Close.
To view hosted virtual machines:
1.
In the DSView 3 software, click the Units tab, then click Virtualization in the side
navigation bar.
2.
Click on the name of the VirtualCenter you want to access. The Unit Overview window
opens.
3.
Click Server Settings, then click the Hosted VMs tab. The Hosted Virtual Machines
window displays a list of hosted virtual machines and corresponding specifications
including IP address, guest operating system, storage capacity and more.
4.
Click Close.
To view VirtualCenter events:
NOTE: These events are stored in the VirtualCenter environment and do not correspond to DSView 3 software
events.
1.
In the DSView 3 software, click the Units tab, then click Virtualization in the side
navigation bar.
2.
Click on the name of the VirtualCenter you want to access. The Unit Overview window
opens.
DSView® 3 Plug-in Virtualization Technical Bulletin 17
3.
Click Server Settings, then click the Events tab. The Events window displays a list of
events and the corresponding type, time of occurrence, tasks, target device address and the
user associated with the event.
4.
Click Close.
To view VirtualCenter tasks:
NOTE: These tasks are stored in the VirtualCenter and do not correspond to DSView 3 software tasks.
1.
In the DSView 3 software, click the Units tab, then click Virtualization in the side
navigation bar.
2.
Click on the name of the VirtualCenter you want to access. The Unit Overview window
opens.
3.
Click Server Settings, then click the Tasks tab. The Tasks window displays a list of tasks
and corresponding target device, status, time and the user who initiated the task.
4.
Click Close.
To view VirtualCenter alarms:
NOTE: These alarms are stored in the VirtualCenter and do not correspond to DSView 3 software alerts.
1.
In the DSView 3 software, click the Units tab, then click Virtualization in the side
navigation bar.
2.
Click on the name of the VirtualCenter you want to access. The Unit Overview window
opens.
3.
Click Server Settings, then click the Alarms tab. The Alarms window opens.
4.
a.
Click Triggered to view a list of any recently triggered alarms.
b.
Click Definitions for a description of preset alarms.
Click Close.
Hypervisor server settings
The DSView 3 software can access and display the following hypervisor server settings. With
the exception of data logging, these settings are stored on the hypervisor server and do not
correspond to any DSView 3 software settings.
To view hypervisor server general settings:
1.
In the DSView 3 software, click the Units tab, then click Virtualization in the side
navigation bar.
18
Technical Bulletin
2.
Click on the name of the hypervisor server you want to access. The Unit Overview
window opens.
3.
Click Server Settings, then click the General tab to view available information about the
hypervisor server, including IP address, version, manufacturer and model information.
To view hypervisor server hardware settings:
1.
In the DSView 3 software, click the Units tab, then click Virtualization in the side
navigation bar.
2.
Click on the name of the hypervisor server you want to access. The Unit Overview
window opens.
3.
Click Server Settings, then click the Hardware tab to view the following hardware
information for the hypervisor server.
a.
Click Processors to view general and system processor information.
b.
Click Memory to view physical memory information.
c.
Click Storage to view storage information, including identification, device, capacity,
free space and type.
d.
Click Networking to view networking information, including virtual switch, total port
groups, number of ports and total physical adapters.
e.
Click Storage Adapters to view the name, device, type and Storage Area Network
(SAN) identifier number for all storage adapters.
f.
Click Network Adapters to view device, speed, configured, vSwitch and network
information for all network adapters.
To view hypervisor server software settings:
1.
In the DSView 3 software, click the Units tab, then click Virtualization in the side
navigation bar.
2.
Click on the name of the hypervisor server you want to access. The Unit Overview
window opens.
3.
Click Server Settings, then click the Software tab to view software information for the
hypervisor server.
a.
Click Licensed, then click Features to view a list of licensed features and their status.
-orClick Licensed, then click Add-Ons to view a list of licensed add-on components and
their status.
b.
Click DNS and Routing to view host identification, DNS servers and default gateways.
DSView® 3 Plug-in Virtualization Technical Bulletin 19
4.
c.
Click VM Startup/Shutdown to view startup and shutdown information for connected
virtual machines.
d.
Click Security Profile to view firewall information.
e.
Click System Resource Allocation to view system resource pool information.
Click Close.
To view hosted virtual machines:
1.
In the DSView 3 software, click the Units tab, then click Virtualization in the side
navigation bar.
2.
Click on the name of the hypervisor server you want to access. The Unit Overview
window opens.
3.
Click Server Settings, then click the Hosted VMs tab. The Hosted Virtual Machines
window displays a list of hosted virtual machines and corresponding information including
the managed status, host IP address and power state. Click the name of a virtual machine to
view guest operating system, memory and storage capacity.
4.
(Optional) Click the name of a hosted virtual machine in the list to view more information
about that virtual machine in the details panel.
5.
Click Close.
To view hypervisor server events:
NOTE: This feature is not supported in all virtual environments. Typically, if an operation is not supported, the
corresponding buttons and links will not be visible when the virtual environment units are selected.
NOTE: These events are stored in the hypervisor server and do not correspond to DSView 3 software events.
1.
In the DSView 3 software, click the Units tab, then click Virtualization in the side
navigation bar.
2.
Click on the name of the hypervisor server you want to access. The Unit Overview
window opens.
3.
Click Server Settings, then click the Events tab. The Events window displays a list of
events and corresponding type, time of occurrence, tasks, target device address and the user
associated with the event.
4.
Click Close.
To view pool members:
NOTE: This feature is not supported in all virtual environments. Typically, if an operation is not supported, the
corresponding buttons and links will not be visible when the virtual environment units are selected.
20
Technical Bulletin
1.
In the DSView 3 software, click the Units tab, then click Virtualization in the side
navigation bar.
2.
Click on the name of the hypervisor server for which you want to view pool members. The
Unit Overview window opens.
3.
Click Server Settings, then click the Pool Members tab. The Pool Members window
displays a list of pool members and corresponding type (slave or master), IP address, state
(connected or disconnected) and version.
4.
Click Close.
Virtual machine properties
The DSView 3 software can access and display the following virtual machine properties. With
the exception of data logging, these settings are stored on the hypervisor server that hosts the
virtual machine and do not correspond to any DSView 3 software settings.
To view a summary of properties:
1.
In the DSView 3 software, click the Units tab, then click Virtualization in the side
navigation bar.
2.
Click the arrow next to the hypervisor manager or server to display hosted virtual
machines.
-orClick Virtual Machine in the side navigation bar to display all virtual machines.
3.
Click on the name of the virtual machine you want to access. The Unit Overview window
opens.
4.
Click VM Properties (Virtual), then click the Summary tab to view a summary of the
virtual machine properties.
5.
Click Close.
To view resources:
1.
In the DSView 3 software, click the Units tab, then click Virtualization in the side
navigation bar.
2.
Click the arrow next to the hypervisor manager or server to display hosted virtual
machines.
-orClick Virtual Machine in the side navigation bar to display all virtual machines.
DSView® 3 Plug-in Virtualization Technical Bulletin 21
3.
Click on the name of the virtual machine you want to access. The Unit Overview window
opens.
4.
Click VM Properties (Virtual), then click the Resources tab.
5.
a.
Click Datastore to view a list of datastore devices, corresponding capacity and free
space.
b.
Click Disks to view the location, capacity and free space for guest disks.
Click Close.
To view virtual machine events:
NOTE: This feature is not supported in all virtual environments; if not supported for the selected unit, the related
interface elements are not displayed on screen.
NOTE: These events are stored in the virtual machine and do not correspond to DSView 3 software events.
1.
In the DSView 3 software, click the Units tab, then click Virtualization in the side
navigation bar.
2.
Click the arrow next to the hypervisor manager or server to display hosted virtual
machines.
-orClick Virtual Machine in the side navigation bar to display all virtual machines.
3.
Click on the name of the virtual machine you want to access. The Unit Overview window
opens.
4.
Click VM Properties (Virtual), then click the Events tab. The Events window displays a list
of events and corresponding type, time of occurrence, tasks, target device address and the
user associated with the event.
5.
Click Close.
Data Logging
The DSView 3 software supports logging of serial session console data from virtual
environment units using the Syslog protocol. Data logging must be configured both in the
DSView 3 software and on each virtual machine. Licenses are required for data logging. For
more information about licenses and using data logging in the DSView 3 software, see the
DSView 3 help for more information.
22
Technical Bulletin
Configuring data logging in the DSView 3 software
You may enable data logging on multiple virtual machines on one hypervisor server, or you
may enable data logging one virtual machine at a time.
To view and configure data logging on multiple virtual machines on a hypervisor
server:
1.
In the DSView 3 software, click the Units tab, then click Virtualization in the side
navigation bar.
2.
Click on the name of the hypervisor server you want to access. The Unit Overview
window opens.
3.
Click Server Settings, then click the Data Logging tab. The Data Logging window opens
and displays a list of hosted virtual machines and corresponding data logging status and
machine type.
4.
To enable data logging on virtual machines, select the row(s) and click the Enable button.
-orTo disable data logging on virtual machines, select the row(s) and click the Disable
button.
5.
Click Close.
To view and configure data logging on a single virtual machine:
1.
In the DSView 3 software, click the Units tab, then click Virtualization in the side
navigation bar.
2.
Click the arrow next to the hypervisor manager or server to display hosted virtual
machines.
-orClick Virtual Machine in the side navigation bar to display all virtual machines.
3.
Click on the name of the virtual machine you want to access. The Unit Overview window
opens.
4.
Click VM Properties (Virtual), then click the Data Logging tab. The Data Logging
window opens.
a.
To enable data logging on the virtual machine, select the row(s) and click the Enable
button.
b.
To disable data logging on the virtual machine, select the row(s) and click the Disable
button.
DSView® 3 Plug-in Virtualization Technical Bulletin 23
5.
Click Close.
Configuring data logging on a virtual machine
You must configure data logging on each virtual machine for which you want to log data.
Virtual machine system requirements
•
A POSIX operating system (Linux or Solaris) with the Syslog enabled
•
Sun Java™ VM J2SE 1.5 or later
•
Secure Shell (SSH) (required to run SSH tunneling)
Exporting a virtual machine data logging key
For a virtual machine to be authenticated with the DSView 3 SSH server, the virtual machine’s
unique certificate key must be submitted with the request.
To export a virtual machine data logging key:
1.
In the DSView 3 software, click the Units tab, then click Virtualization in the side
navigation bar.
2.
Click the arrow next to the hypervisor manager or server to display hosted virtual
machines.
-orClick Virtual Machine in the side navigation bar to display all virtual machines.
3.
Click on the name of the virtual machine you want to access. The Unit Overview window
opens.
4.
Click VM Properties (Virtual), then click the Summary tab.
5.
Click Export Data Logging Key.
6.
If the key exports successfully, a message with the path and name of the exported key is
displayed.
•
The name of the file containing the key is id_rsa_[VMName].
•
The location of the exported key is the logged in user’s temporary directory on the
server where the DSView 3 software is installed.
For example, if the DSView 3 server is installed on a Windows server and the
name of the virtual machine is myVM, then the file location and name is
C:\Documents and Settings\[username]\id_rsa_myVM, where [username] is the
user login used by the DSView 3 server.
24
Technical Bulletin
Configuring the Syslog
The data logging client receives Syslog messages from a named pipe and forwards them to the
DSView 3 Syslog server.
To configure the Syslog:
1.
From the virtual environment command line, log in as administrator or root.
2.
Run the mkfifo command to create a fifo device:
mkfifo -m 666 <fifo path and name>
For example: mkfifo -m 666 /var/evt_pipe
3.
Edit the /etc/syslog.config file by adding the follow line at the end:
<event filter> |<fifo path and name>
For example: daemon.*;mail.*;*.=warn |/var/evt_pipe
4.
Restart the Syslog daemon using the following command:
/etc/init.d/sysklogd restart
-or/etc/init.d/syslog restart
Configuring the SSH
To configure the SSH:
1.
Open the file /etc/ssh_config or /etc/ssh/ssh_config file and add or modify the follow
option:
StrictHostKeyChecking no
2.
Import the DSView 3 SSH key (public key) as a trusted public certificate. See the DSView
3 help for more information.
3.
Restart the SSH using the following command:
/etc/init.d/sshd restart
Installing the data logging client
To install the data logging client:
1.
Download the Datalogclient.zip file from the Avocent web site.
2.
Copy and unzip the Datalogclient.zip file to an appropriate location on the virtual
machine. It consists of 3 files:
•
DataLoggingClient.jar java executable jar
DSView® 3 Plug-in Virtualization Technical Bulletin 25
3.
•
DataLoggingClient.properties properties file
•
DataLoggingClient.sh shell script
Copy the exported data logging key file to the appropriate location on the virtual machine.
a.
Set the data logging key file mod to 700 using the following command:
chmod 700 filename.
The data logging key file is only readable by the owner.
b.
If you also want to run the data logging key file with other users, provide ownership
to other users using the following command:
chown username.username filename.
4.
Edit the DataLoggingClient.properties file.
5.
Set the DataLoggingClient.sh to executable using the following command:
chmod +x DataLoggingClient.sh
6.
Execute the bash file to run the client using the following command:
./DataLoggingClient.sh -p <path to the java/bin directory> -c <path to the
DatatLoggingClient files>
7.
Add the DataLoggingClient.sh file to run when the virtual machine starts.
The data logging client attempts to create the fifo device if it is not available. In this case, you
must restart the Syslog daemon after the data logging client starts.
Properties file structure
The data logging client acts as a multiplexer: it receives data from the virtual machine Syslog
and sends it back to one or more DSView 3 servers or data log files. Input and output can be
specified by defining different pipe entries. By default, the DataLoggingClient.properites file
defines the input type as a fifo file to which the Syslog server writes, and the output type as the
TCP port used to redirect data to the DSView 3 server.
Table 1.3: Data Logging Client Properties
Property
Description
dls.localIp
Sets the IP address used by the DSView 3 software to identify the virtual machine.
dls.queueSize
Sets the message queue size.
26
Technical Bulletin
Property
Description
dls.bufferSize
Sets the size of the buffer (in bytes) used to receive and send data.
Sets the max number of messages included in a packet. By default, the data logging
dls.packetSize
client attempts to get a number of messages before sending data to the DSView 3
software. Setting this number to 1 would decrease the performance and increase
the network traffic.
Max wait time-out in milliseconds. The data logging client waits this amount of time
dls.waitTimeout
to reach the max packet size then sends the messages regardless of whether the
packet size is reached.
dls.pipes
dls.<pipe_name>
dls.<pipe_name>.type
List of pipes. Only the names in these properties are created as input or output
pipes.
Type of pipe. Use dls.file for files, dls.pipe for named pipes or fifo devices or dls.tcp
for TCP clients.
Designates if the pipe is an input or output pipe.
dls.<pipe_name>.filepath
dls.<pipe_name>.ip
(For TCP only) The IP address where the data logging client creates a socket
(always localhost).
dls.<pipe_name>.port
(For TCP only) socket port.
dls.<pipe_name>.encoder
(For TCP only) Sets the tunneling encoder only if SSH is available.
dls.<pipe_name>.encoder.ip
IP address from the SSH server that runs tunneling (always localhost).
dls.<pipe_name>.encoder.port
dls.<pipe_name>.encoder.publicKeyFile
dls.<pipe_name>.encoder.sshIp
dls.<pipe_name>.encoder.sshPort
DSView 3 Syslog Server port.
Path to the exported data logging key.
DSView 3 server IP address.
DSview 3 SSH server port.
DSView® 3 Plug-in Virtualization Technical Bulletin 27
Example properties file
dls.localIp = <virtual machine IP address>
dls.queueSize = 100
dls.bufferSize = 1000
dls.waitTimeout = 10000
dls.packetSize = 4
dls.pipes = pipe1,pipe2
dls.pipe1 = pipe
dls.pipe1.type = input
dls.pipe1.filepath = <path to the fifo device>
dls.pipe2 = tcp
dls.pipe2.type = output
dls.pipe2.ip = localhost
dls.pipe2.port = <port used in the Virtual Machine>
dls.pipe2.encoder = ssh
dls.pipe2.encoder.ip = localhost
dls.pipe2.encoder.port = <DSView Syslog server port>
dls.pipe2.encoder.publicKeyFile = <path to the DataLogging key>
dls.pipe2.encoder.sshIp = <DSView IP address>
dls.pipe2.encoder.sshPort = <DSView SSH server port>
DSView 3 Software Events
NOTE: This feature is not supported in all virtual environments. Typically, if an operation is not supported, the
corresponding buttons and links will not be visible when the virtual environment units are selected.
The following virtual environment events are logged under the Reports tab in the DSView 3
software. The actions that cause these events may be initiated from the DSView 3 software or
from the virtual environment. For more information about events, see the DSView 3 help.
NOTE: The virtual environment also logs events. These events can be viewed from the DSView 3 software Unit
Overview window for a virtual environment unit. However, events logged in the virtual environment do not
correspond to DSView 3 software events, which are shown under the Reports tab.
28
Technical Bulletin
Table 1.4: DSView 3 Software Events for a Virtual Environment
Events
Events
Host Forced Reboot Command Failed
Virtual Machine Name Changed
Host Forced Reboot Command Issued
Virtual Machine Name Change Failed
Host Reboot Command Failed
Virtual Machine Powered Off
Host Reboot Command Issued
Virtual Machine Powered On
Host Added
Virtual Machine Power Off Command Failed
Host Removed
Virtual Machine Power Off Command Issued
Virtual Machine Created*
Virtual Machine Power Off Failed
Virtual Machine Removed*
Virtual Machine Power On Command Failed
Virtual Machine Hot Migrating
Virtual Machine Power On Command Issued
Virtual Machine IP Address Changed
Virtual Machine Power On Failed
Virtual Machine IP Address Change Failed
Virtual Machine Reset Failed
Virtual Machine Migrated
Virtual Machine Resetting
Virtual Machine Migrating
Virtual Machine Suspend Command Failed
Virtual Machine Migration Failed
Virtual Machine Suspend Command Issued
Virtual Machine Reconfigured
Virtual Machine Suspended
Virtual Machine Reset Command Failed
Virtual Machine Suspend Failed
Virtual Machine Reset Command Issued
VMware Viewer Impersonation**
DSView® 3 Plug-in Virtualization Technical Bulletin 29
Events
Events
* If you use the virtual environment to add or remove a virtual machine, the corresponding events are logged and
the virtual environment and DSView 3 software are automatically synchronized..
** This event is initiated from the DSView 3 software and does not have an equivalent in the virtual environment.
This event will be recorded if:
Use DSView User Credentials for Operations was not selected in the Add Unit Wizard. See Adding a Hypervisor
Manager or Server on page 2 for more information.
-orAn event is initiated from a DSView 3 server that does not own the virtual unit. In this case, the supplied virtual environment credentials are used to access the unit.
Troubleshooting and Tips
VMware viewer ports
By default, the VMware viewer uses ports 902 and 903 to communicate with ESX Servers. If
these ports are blocked by a firewall, the VMware viewer session fails to launch.
Mozilla Firefox
Launching the VMware viewer
When using Firefox version 2.0.0.11, the VMware viewer may fail when attempting a
connection to an ESX Server. To solve this issue, upgrade your browser to Firefox version
2.0.0.12 or later.
NOTE: Firefox version 2.0.0.11 is the only version that demonstrates a failure to launch the VMware viewer, so
prior versions of Firefox may also be used.
Installing the VMware viewer plug-in
In some installations of the Firefox browser, the automatic installation of the VMware viewer
plug-in fails.
To manually install the VMware viewer plug-in:
1.
Save the MKS plug-in file to the local server. To be prompted with a Save As window for
the MKS plug-in, attempt to open a VMware viewer session to a virtual machine or launch
the VI Client from the Unit Overview window of an ESX Server or VirtualCenter.
2.
From the Firefox browser, open the saved MKS plug-in file and follow the on-screen
instructions.
30
Technical Bulletin
Events
In some cases, the virtual environment may be unresponsive and unable to receive tasks from
the DSView 3 server. The DSView 3 Events list will indicate that the task was submitted
successfully by the DSView 3 server even if the virtual environment did not receive it. To
troubleshoot an unresponsive virtual environment, see the documentation included with the
virtual environment.
DSView 3 zones - virtualization restrictions
DSView 3 software version 3.5.1 introduced DS Zones, which allows administrators to virtually
segregate units within the DSView 3 software. Each zone operates as an independent subset of
the DSView 3 software system, and units can be transferred to different zones. Users belong to
a single zone, but may switch to other zones if they have access rights. When DS Zones are
implemented in conjunction with a virtual environment, some virtualization features are
limited.
The following DS Zones conditions limit virtualization features:
•
Resources, including units that are part of the virtual environment, are not shared across
multiple zones.
•
Cross-zone information is not shown. Generally, users can only see information and access
resources for the zone they are logged in to. However, users logged in to the top level zone
can see information for other zones.
As a result of these DS Zones conditions, the following restrictions apply when virtual
environment units are spread throughout multiple zones in the DSView 3 software.
Adding virtual environment units
Users cannot add new hypervisor managers or servers if the unit or any part of the unit (such as
a virtual machine hosted on a hypervisor server) has already been added to a zone in the
DSView 3 software. If the add unit action fails, the following events occur:
•
A DSView 3 software event is sent to the top level zone. The event lists the conflicting
units (both the unit that already exists and the unit that could not be added), which zone
each unit belongs to and which user attempted to add the unit.
•
A DSView 3 software event is sent to the zone to which a user attempted to add a unit.
The event lists the unit that could not be added, which user attempted to add the unit and
states that the add unit action failed as a result of a zone conflict.
•
A detailed error message about the failure to add the unit is displayed to the user.
DSView® 3 Plug-in Virtualization Technical Bulletin 31
NOTE: Since cross-zone information is not shown, details regarding which zone and which units conflicted is not
sent or show to sub-level zones or users.
Reconciling virtual environment units
A unit cannot reconcile (for example, perform a resync or auto-topology operation) if the unit
or any part of the unit (such as a virtual machine hosted on a hypervisor server) has already
been added to a zone in the DSView 3 software. If the unit fails to reconcile, the following
event occurs:
•
A DSView 3 software event is sent to the top level zone. The event lists the conflicting
units (both the unit that already exists and the unit that could not be reconciled), which
zone each unit belongs to, and which user attempted to reconcile the unit.
Virtual machine management and licenses
In some cases, the dynamic relocation of managed virtual machines executed by manual
migration, VMware VMotion, XenMotion or Distributed Resource Scheduler (DRS) may affect
managed device licenses. If a hypervisor manager is not added to the DSView 3 software, but
manages two or more hypervisor servers that are spread throughout multiple zones in the
DSView 3 software, dynamic relocation of managed virtual machines causes the virtual
machine status to be set as “unmanaged” and frees a managed device license in the DSView 3
software. For more information, see Virtual Machines Management on page 4 and the DSView
3 software help.
Launching the VMware Viewer on a Windows Vista® client
If a DSView 3 software client is running the Vista operating system and the client browser is
launched with no administrator privileges, attempting to open a VMware message fails. The
error message The executable should not be invoked directly is displayed. To correct this issue,
either launch the client browser to “run as Administrator,” or configure the Vista Access
Control List (ACL) settings to permit the browser to run with administrator privileges.
32 xxxTechnical Bulletin
For Technical Support:
www.avocent.com/support
590-759-501F