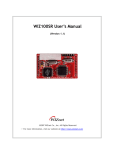
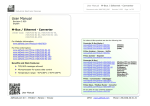
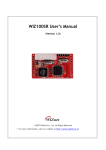
1
SERIES 4000
INTELLIGENT FIRE ALARM
CONTROL PANEL
GENERAL
COMMISSIONING
MANUAL
ISSUE 2C
( ACCESS CODE 25276 )
COMMISSIONING
Introduction
Commissioning involves checking that all connections have been made properly and that all
hardware is functioning correctly.
The panel is supplied set to ‘Installation mode’. In Installation Mode the green SYSTEM ON LED will
flash on and off. The panel will automatically detect and memorize all the devices connected to the
loops in the system.
The default settings of the system mean that the unit will be ready to operate and detect a Fire incident
from the moment power is switched on. Therefore, the system will be fully functional without any
additional setting up. All further actions will tailor it to the requirements of the specific installation at
hand.
Once the connections and hardware have been checked it is possible to get the basic fire alarm
system up and running very quickly - it is only necessary to have the system in Installation Mode for 90
seconds then set the system to ‘Active Mode’. Programming of the system to provide more advanced
functionality is covered in the next section.
The Main Panel Buttons
COMMISSIONING
ALARM SILENCE
If a fire has been detected and the sounders are operating this button will silence the sounders. The
LED will light when an alarm has been silenced; the panel buzzer will pulse when an alarm has been
silenced.
If a fault is being reported this button will stop the panel buzzer sounding but the LED will not light.
SYSTEM RESET
Soft resets the entire system. A soft reset should be satisfactory under almost all circumstances
however a Master Reset can be performed using the PCB mounted switch on the main PCB (not
shown) or by cycling the power on the Main Panel (removing both primary AC and secondary DC
supplies).
Note - if an alarm has been detected it is necessary to silence the alarms using SOUNDER SILENCE
before the SYSTEM RESET button will operate.
LAMP TEST
Lights all the LEDS, turns on the LCD back light and sets all display pixels to black.
Lamp test only operates whilst the key is depressed.
SOUND ALARMS
Activates all sounders. A second press de-activates all sounders.
The button LED is illuminated whilst the sounders are activated.
SOUND ALARMS will not activate the Fire Brigade output signal.
It is possible to define if pressing the SOUND ALARMS button will activate the systems' Fire I/O's.
AUXILIARY RELAYS (DISABLEMENTS)
When this button is activated all relays and I/O modules connected to the system have their outputs
disabled. This includes the normally energised FAULT relay, the FAULT I/O group and the EVAC relay.
When these outputs are disabled the button LED is illuminated. Pressing the button again restores
normal relay and I/O module operation.
SELECTED DETECTORS (DISABLEMENTS)
Via the programming menus individual sensors may have selective disablement turned on. When this
button is activated those sensors that have selective disablement turned on will not generate a fire
alarm condition. When activated the button LED is illuminated.
If no devices have selective disablement turned on then this button press will have no effect.
Pressing the button again restores normal sensor operation.
COMMISSIONING
ACTIVE DELAYS
Only when this button is activated (and the button LED illuminated) will the sounder, I/O module and
Fire Brigade Transmission delays operate.
Pressing the button again will deactivate the delays and will result in immediate sounder and I/O
operation and immediate sending of the Fire Brigade Signal.
FIRE (QUEUE REVIEW)
If more than one fire has been detected then the LED next to this button will flash. Press the button to
step through all detected fires. Once all fires have been reviewed the LED will be constantly
illuminated. Subsequent fires will be added to the end of the queue and the LED will start to flash
again.
After each button press the information will be displayed for 20 seconds. After that time the screen will
revert back to the first fire.
FAULT (QUEUE REVIEW)
If more than one fault has been detected, or if a fault and fire have been detected, then the LED next
to this button will flash. Press the button to step through all reported faults. Once all faults have been
reviewed the LED will be constantly illuminated. Subsequent faults will be added to the end of the
queue and the LED will start to flash again.
After each button press the information will be displayed for 20 seconds. After that the screen will
revert back to the first fault (or fire).
TEST (QUEUE REVIEW)
If the LED next to this button is illuminated then a test mode has been selected via the programming
menus. Pressing the button will show which sounders and zones have been set to test mode. If there
are more zones under test than can be displayed then pressing the button again will show the next set
of zones under test.
The information is displayed for 15 seconds before the default display is restored.
Note - a SYSTEM RESET will clear all test modes.
DISABLED (QUEUE REVIEW)
If the LED next to this button is illuminated then there is at least one disablement active in the system.
Pressing the button will display the disablements. If there are more disablements that can be displayed
then pressing the button again will show the next set of disablements and so on.
The information is displayed for 15 seconds before the default display is restored.
Possible disablements include - printer, fire brigade transmission, auxiliary relays, loops, zones,
detectors and sounders.
COMMISSIONING
Getting The Main Panel Running
If you have the optional printer fitted make sure that the printer paper is not being held firm by an
elastic band or piece of string.
Note that if external sub-panels are not powered up and if the battery has not been connected the
Main Panel WILL report faults when it is powered up. This is entirely normal. When this happens
silence the buzzer by pressing ALARM SILENCE.
Apply AC power to the Main Panel.
The LCD should display the software version and the message ‘INITIALISING’. This will be followed by
the date and time (and the company name if it has been set). Within a few seconds faults will be
reported, these will overwrite the date and time (and company name).
The SYSTEM ON LED on the fascia of the panel should be flashing green. This indicates that the
system is in Installation Mode. If the LED is solid green the system is in Active Mode and needs to be
put into Installation Mode - refer to the programming section for details on how to do this.
If the SYSTEM ON LED is flashing and information is being displayed on the LCD then the Main Panel
is functional.
If the PROC FAULT LED is lit and a continuous tone is audible then remove power and confirm that
the SIM CARD is fitted correctly.
COMMISSIONING
Getting A Repeater Running
Note that if the Main Panel is not powered up the Repeater WILL report a communication fault when it
is powered up. This is entirely normal. When this happens silence the buzzer by pressing ALARM
SILENCE.
Apply AC power to the Repeater.
The LCD should display the repeater software version and the message ‘INITIALIZING’. This will be
followed by the message ‘NO COMMS TO MAIN PANEL’.
If the ‘NO COMMS TO MAIN PANEL’ message is being displayed then the Repeater is functional.
If the PROC FAULT LED is lit and a continuous tone is audible then remove power and confirm that
the SIM CARD is fitted correctly.
A Repeater will also report a PROC FAULT if it has been assigned the same panel number as another
panel on the system.
COMMISSIONING
Getting A Standard Sub-panel Running
If the Standard Sub-panel is fitted within the Main Panel or Repeater box and wired up correctly then
the green COMMS OK LED should be either illuminated solidly or flashing when power is applied to
the Main Panel or Repeater.
If the Standard Sub-Panel is not housed within Repeater or Main Panel box then it will be necessary to
apply power to the Sub-panel.
If the COMMS OK is solid green then it is communicating correctly (via RS485 or TTL) with the Main
Panel. If it is flashing then there is no communication with the Main Panel.
The amber FAULT LED will also light if there is no communication with the Main Panel.
If the COMMS OK is permanently lit, then the Sub-panel is functional.
COMMISSIONING
Setting Panel Addresses And Types
Each Repeater and Sub-panel needs a unique address.
Each Repeater and Sub-panel also needs the detector type set.
Main Panel Integrated Sub-panel
This has a fixed address of 01.
The default detector type is Apollo discovery™™. In this mode all Apollo protocol devices (S90™,
XP95™ and Discovery™) are supported. (It is possible to change the detector type to Apollo
S90™/XP95™ only but this is rarely necessary.)
Repeater Integrated Sub-panel
The default address for the Integrated Sub-panel on a Repeater is 02. The default detector type is
Apollo Discovery™.
To set up the Integrated Sub-panel on a Repeater firmly depress the TEST (QUEUE REVIEW) and
DISABLED (QUEUE REVIEW) buttons on the Repeater while powering up.
This will power the Repeater up in REPEATER INSTALL MODE. If it does not, try again, the buttons
must be firmly held down during the power up process.
Once in REPEATER INSTALL MODE the following options are available:
Press SOUND ALARMS to clear the NVRAM
Press FIRE (QUEUE REVIEW) to increment the panel number
Press FAULT (QUEUE REVIEW) to decrement the panel number
Press TEST (QUEUE REVIEW) to step through the available detector types
Press SYSTEM RESET to save and exit REPEATER INSTALL MODE
If the system has not been commissioned or installed then it is recommended to clear the NVRAM.
Note that this will also set the panel number back to 02 and the panel type to DISCOVERY™.
If the system has been installed then clearing the Repeater NVRAM will clear all the installation
information and the SYSTEM must be put into INSTALLATION MODE to re-learn the fitted devices. A
Main Panel Master Reset must also be performed so that all system settings are re-sent to all
Repeaters and Sub-panels.
If the panel number is changed the SYSTEM must also be put into INSTALLATION MODE to learn the
new panel number.
COMMISSIONING
Standard Sub-panels
The Standard Sub-panel addresses and detector types are set using the DIP switches on the Sub-panel.
Each Sub-panel has an 6 way DIP switch. The first 5 switches set the panel number. Switch 6 (A) sets
the data protocol for the detectors fitted to the loops.
Note that addresses 01 and 02 are likely to be used by Integrated Sub-panels.
BATT
24V
EVAC
MPX
CN5
MAX 3A FAST ACTING
H8/3003
1
SILENCE
2
3
4
5
6
ON
PA N E L N O A
4000-SP
PANEL NUMBER
A
ON
1
SUB-PANEL NUMBER
LOOP
Nº's
1-3
4-6
7-9
10-12
13-15
16-18
19-21
22-24
25-27
28-30
31-33
34-36
37-39
40-42
43-45
46-48
SWITCHES 1- 5
SWITCH
ADDRESS
2
3
4
5
6
PROTOCOL
SWITCH A
MANUFACTURER'S PROTOCOL
1 2 3 4 5
01
02
03
04
05
06
07
08
09
10
11
12
13
14
15
16
0
1
0
1
0
1
0
1
0
1
0
1
0
1
0
1
0
0
1
1
0
0
1
1
0
0
1
1
0
0
1
1
0
0
0
0
1
1
1
1
0
0
0
0
1
1
1
1
0
0
0
0
0
0
0
0
1
1
1
1
1
1
1
1
0
0
0
0
0
0
0
0
0
0
0
0
0
0
0
0
SWITCH
A
6
Apollo Series 90™/ XP95™
Apollo Discovery™
1
0
COMMISSIONING
Getting Into Programming Mode
When the Main Panel is powered up it will be necessary to enter the panel programming mode.
Familiarize yourself with this section before proceeding to the next section in the manual and powering
up the panel.
Programming mode is accessed via the miniature infra-red keypad (IR Keypad) or by connecting a PC
(PS2) keyboard to the Main Panel. It is also possible to upload and download settings to a PC but to
do this you must first enter the panel programming mode.
INFRA-RED KEYPAD
0
1
2
3
A
4
B
5
C
6
D
7
E
8
F
9
G
H
I
J
K
[
L
]
M
.
N
,
O
P
&
Q
R
'
"
S
+
T
-
U
:
V
HOME
W
B-SP
X
SHIFT
Y
ENTER
Z
ESC
*
SPACE
EXIT
HOME: Return to first loop, zone, device etc.
B-SP: Backspace
SHIFT: Toggle this keypad to switch from alpha-numeric
to numeric
ENTER: Accept current selection
ESC.: Reject. (ESCape from current selection)
EXIT: Press both keys simultaneously to stop programming
COMMISSIONING
Connecting A PS2 PC Keyboard To The Main Panel
QUAD UART
SIM CARD CONNECTOR
STANDOFFS (4) FOR LOOPCARD
LOOPCARD
HEADER
DISPLAY
LOOPCARD HEADER
MASTER
RESET
PRINTER
CONNECTOR
PS2 PC KEYBOARD
ADAPTOR
PRINTER
FUSE
COMMISSIONING
The IR Keypad is typically the most convenient method to program the system. The sensor for the IR
Keypad is just below the SOUND ALARMS button on the Main Panel and on a Repeater. Each time a
key is pressed on the IR Keypad the Main Panel will beep.
If no beeps are audible then check the batteries in the IR Keypad.
The IR Keypad uses 2 x AAA batteries.
The IR Keypad Keys
To access the characters in RED, first press the SHIFT KEY. To return to the characters in BLACK press
the SHIFT KEY again.
Each time a key press is received by the panel the panel emits a beep. The beeps when SHIFT is on
are of a higher pitch than when SHIFT is off.
0-9 are used to input numbers
and
are used to select items
B-SP and
are often used to change fields (move the cursor)
+/- are often used to select the loop
ENTER is used to select items and to store changes
ESC is used to abort changes and exit
HOME is often used to go back to the start of a function
Pressing both EXIT keys exits programming mode.
Help
Where possible help is displayed automatically. However additional help is sometimes available if you
press the help key ‘:’ the colon.
The first press will display help for 7 seconds, a second press will ensure the help is displayed for 20
seconds. Pressing any key whilst help is displayed will clear the help but this key press will be ignored.
COMMISSIONING
Logging In
To enter programming mode you need to log in.
The Main Panel must be powered up and must have initialized itself i.e. NOT be showing the
‘INITIALISING’ message.
Press ENTER on the IR Keypad (or keyboard). You must now input your unique customer access code
(supplied with the panel). You have unlimited attempts but if code entry is not started within 10
seconds then the panel will revert back to it’s default screen. While entering the code you are allowed
up to 5 seconds between key presses.
Function Selection
The programming functions are arranged using a menu system.
To select a function or sub-menu use either
HOME takes you to "1-Review".
ESC takes you up a menu level.
and ENTER or 0-9 and ENTER.
Any number presses (0-9) will append a digit to what you see unless :
1) You are at the very top (1- Review) then the first press selects the first digit.
2) You are at the bottom then the press replaces the last digit.
The top level menus are:
1 Review Historic Log
2 Text Descriptions & Names
3 Zones - Disable & Assign
4 Sounders - Disable & Assign
5 Input/Output - Disable & Assign
6 Device Set-up
7 Monitor Device Counts & Test
8 General
Most functions operate in a consistent manner using the standard keys. The item that is being
changed is usually highlighted with a flashing cursor.
COMMISSIONING
Getting The System Running
Ensure all Sub-panels and Repeaters have unique addresses. Ensure all connectors are firmly in place.
Ensure that all connections are tight, with no stray strands of wire. Ensure that the SIM CARD is securely
fitted in all Main Panels, Repeaters and Standard Sub-panels
Power up all External Sub-panels and Repeaters then power up the Main Panel.
Ensure that the Main Panel is in Installation Mode (SYSTEM ON LED flashing). If not enter programming
mode and select function 8-4-1 Active/Installation Mode and put the panel into Installation Mode.
Press SYSTEM RESET.
Communications Check
Confirm that all standard Sub-panels have a solid green COMMS OK LED.
If the COMMS OK LED is flashing then there is no communication (via the Data Loop) to the Main Panel.
If the COMMS OK LED is solid green and the sub-panel has no other faults then the amber LOCAL FAULT
LED should be extinguished. If the LOCAL FAULT LED is lit then information on the fault should be available
at the Main Panel.
Confirm that all Repeaters are showing identical information (LEDs and LCD) to that displayed by the Main
Panel.
Main Panel Check
Press and hold LAMP TEST on the Main Panel.
All the LEDs should light, the LCD backlight should turn on and all pixels on the LCD should be black. (See
below.)
All the LEDs should be illuminated.
Release the LAMP TEST switch to end the test, all
LEDs should extinguish except SYSTEM ON and any active indications
FIRE
FAULT
FIRE ALARM SYSTEM
FIRE
FAULT
PRE-ALARM
TEST
TEST
DISABLED
ALARM DISPLAY
SYSTEM ON
ALARM FAULT
SUPPLY FAULT
JUNO-NET
MANUFACTURED TO THE
REQUIREMENTS OF
EN54 Pt 2 & Pt 4 1999
PROC. FAULT
TRANS. FAULT
DISABLED
AUXILIARY
RELAYS
SYSTEM RESET
LAMP TEST
FIRE BRIGADE
ACKNOWLEDGED
PAPER FEED
SOUND ALARMS
FIRE BRIGADE
TRANSMISSION
SELECTED
DETECTORS
ACTIVE
DELAYS
COMMISSIONING
Learning Which Devices Are Fitted
Enter programming mode.
If site specific data has NOT been pre-programmed then select function 8-3-1 Clear Customer Flash
Memory and clear the customer flash. (You must NOT do this if you have been supplied with a SIM
CARD pre-programmed with your site data.)
Select function 8-3-2 Clear Non-Volatile RAM and clear the NVRAM.
Exit Programming mode.
Press SYSTEM RESET.
Wait 90 seconds for the system to automatically learn which devices are present, program any
Discovery™ devices and report any faults.
(A SYSTEM RESET or Master Reset in Installation Mode results in an analogue loop power off period
of 8 seconds [reset], an analogue loop charge up of 15 seconds then commencement of loop polling.
30 seconds after polling has started the Discovery™ detectors are written to to set their LED ‘flash
when polled’ status and their sensitivity mode. This takes up to 30 seconds. The initial 30 second wait
is necessary to learn the presence of the devices before they can be written to.)
Review the faults (using the FAULT (QUEUE REVIEW) key if there is more than one). Note down the
messages then remove power and rectify the faults.
Power up the system, let it initialize and enter programming mode.
Select function 7-1 Device Count, Type and Value
Using the +/- keys to select the loop number and 0-9 or
Sub-panels and devices are present.
to select the device confirm that all
Once all faults have been cleared and the system has been in Installation Mode for 90 seconds then
the system can be put into Active Mode.
Note that there is no clear end to Installation mode because the system is constantly looking and
learning. However if the system is put into Active Mode and Installation Mode hasn’t had time to
identify all system components you will very quickly be greeted with error reports regarding unexpected
devices.
If devices are ever removed, replaced or added then Installation Mode must be selected so that the
system can learn the new configuration. If you do not do this the system will report a fault.
Note - New SAM’s (Self Addressable Modules) need a different installation process because they
need to be assigned addresses before the panel can learn that they are present. This procedure is
covered later in this manual in the section entitled “6-4 Automatic Address Setting (SAM)”.
COMMISSIONING
Sounder Audibility Check
If the building is unoccupied then press SOUND ALARMS. All sounders should operate until the button
is pressed again. Confirm that this is the case.
Note that Apollo loop sounders may take a second or two to respond.
If the building is occupied it is strongly recommended that the test sounders functions in programming
mode are used. Enter programming mode and select 7-2 Test Sounders. Using this function, all the
sounders can be checked.
Main Panel
The Main Panel Conventional Sounders will sound for 1 second then be silenced for 9 seconds.
Standard Sub-panels
Conventional Sounders and Loop Sounders are operated for 1 second then silenced for 9 seconds.
Note that the Loop Sounder operation is not synchronized to the loop sounder polling so the sounder
operation may sound a little intermittent - this is OK.
Integrated Sub-panels
Conventional Sounders and Loop Sounders are operated for 1 second then silenced for 9 seconds.
Conventional Sounder operation for a Repeater with Integrated Sub-panel will be synchronized to the
Loop Sounder operation.
COMMISSIONING
Analogue Loop Monitoring
Check that a short circuit or open circuit is detected on every Analogue Loop.
Open Circuit Test
Disconnect either the + or the - OUT connection for each Analogue Loop in turn. The connections
will be found on the
Main terminal connection board in the Main Panel and Repeaters or directly on Standard Sub-panels.
Within a few seconds a circuit fault should be reported for every loop that has been disconnected. No
individual detector faults should be reported. On standard sub-panels the amber LOCAL FAULT LED
should also be illuminated.
Reconnect the wires and press SYSTEM RESET to clear the fault reports.
Short Circuit Test
Connect the + to the - at the Analogue Loop IN connection terminals. Within a few seconds a circuit
fault should be reported for every loop that has been short circuited. On Standard Sub-panels the
amber LOCAL FAULT LED should also be illuminated.
If the short circuit is present for long enough and the Main Panel is Active Mode the panel will
consider all devices on that Analogue Loop to have been removed - these faults will also be reported.
Remove the short circuits and press SYSTEM RESET to clear the fault reports.
COMMISSIONING
Conventional Sounder Monitoring
Check the Conventional Sounder circuits for open and short circuit fault detection.
Main Panels and Repeaters with Integrated Sub-panels have two Conventional Sounder circuits.
Standard Sub-panels have two Conventional Sounder circuits.
Disconnect either the + or the - connection for each Conventional Sounder circuit in turn. Confirm
that a fault is reported within a few seconds. On Standard Sub-panels the amber LOCAL FAULT LED
should also be illuminated.
Restore the original connections and press SYSTEM RESET to clear the error reports.
Connect the + to the - at the Conventional Sounder connection terminals. Confirm that a fault is
reported within a few seconds. On Standard Sub-panels the amber LOCAL FAULT LED should also be
illuminated.
Remove the short circuits and press SYSTEM RESET to clear the fault reports.
Warning - if the Conventional Sounder outputs are short circuited while the sounders are active, the
electronic overload protection is tripped and the system will report a sounder fault. Once the short
circuit is cleared, a system reset will clear the faults.
COMMISSIONING
Detector Tests
If the devices have been assigned to Zones (on a pre-programmed SIM CARD or via the
programming menus) then it is possible to test the detectors with limited or no sounder operation.
Detector Tests By Zone
Before starting clear all faults, put the system into Active Mode, and press SYSTEM RESET.
Enter programming mode and select function 7-3 Sounders on Test Activation. This allows you to
choose an audible confirmation that a device has detected a fire. The audible confirmation consists of
a 1 second period of sounder operation.
ALL SOUNDERS ON DETECTOR TEST activates the Main Panel Conventional Sounders and all
Conventional Sounders and Loop Sounders on the Sub-panel under test.
SUB_PANEL SOUNDERS ON DETECTOR TEST only operates the Conventional Sounders and Loop
Sounders on the Sub-panel under test. I.e. The Sub-panel that the detector under test is physically
connected to.
Now select function 7-4 Test Zones to select the Zones which will be tested.
Exit programming mode, but DO NOT press SYSTEM RESET as this clears all test modes.
In test mode whenever a detector is activated the LED on that detector will be illuminated and the
event will be reported on the main panel for 15 seconds. If selected, the sounders will also operate for
1 second.
Pressing TEST (QUEUE REVIEW) will report the Zones that are in Test Mode.
Unassigned Detector Tests
If the detectors have not been assigned to a Zone then they can only be tested in normal (Active)
mode. Using the programming menu ensure the system is set to Active Mode then exit programming
mode and press SYSTEM RESET.
Carry out a fire test on each detector. Confirm the LED lights on the detector under test. Confirm that
the fire is reported correctly at the Main Panel (and any Repeaters). Confirm that the sounders
operate.
Note that sounders and detectors can be inhibited or delayed using the advanced features in the
programming menus. If the sounders do not operate as expected first verify all the settings for the
sounders and the device under test.
COMMISSIONING
Wrapping Up Installation And Commissioning
At this stage you may program the more advanced features of the system. The basic minimum usually
involves assigning text labels to the device and Zones.
Once you have completed this or if you have a pre-programmed SIM CARD then do not forget to
carry out the following steps:
Connect the batteries to the Main Panel, Repeaters and Sub-panels as described in the Installation
section of this manual.
Test that the battery monitoring is functional by temporarily removing the blue wire between each pair
of batteries. After a few seconds the fault should be reported on the Main Panel and Repeaters.
Standard Sub-panels will also illuminate the amber LOCAL FAULT LED. (See below for more details on
the test.)
When the blue wires are reconnected pressing SYSTEM RESET should clear the fault report.
Test that the primary supply monitoring is functional and that the battery system works. Switch off the
AC supply to each power supply unit in the system (Main Panel, Repeaters and separate Standard
Sub-panels). After a few seconds the fault should be reported on the Main Panel and Repeaters.
Standard Sub-panels will also illuminate the amber LOCAL FAULT LED. (See below for more details on
the test.)
Reconnect all AC supplies and press SYSTEM RESET.
Confirm that the system is in Active Mode - the SYSTEM ON LED is permanently lit.
Close the Main Panel and Repeater remembering to fit the three fascia panel retaining screws.
Close the panel box doors and lock them.
Give the keys to the person responsible for the fire alarm system.
COMMISSIONING
Master Reset
A Master Reset is not accessed through the programming menus. It occurs automatically when the
Main Panel power is cycled (both primary and secondary supplies removed and reconnected). It also
occurs when the PCB mounted push button fitted on the rear of the Main Panel main PCB is pressed.
A Master Reset (re)sends all settings to all sub-panels. Settings are otherwise only sent to sub-panels
when they are changed using the programming functions.
When no detectors are isolated the Master Reset settings download will complete within 15 seconds
(even with 32 sub-panels connected). This therefore happens whilst the INITIALISING message is
being displayed. In the worst case (where 32 sub-panels are connected, all loops are fully populated
and all detectors are isolated) this download will take 240 seconds.
In parallel with the settings download the sub-panels will power off their an analogue loops for a
period of 8 seconds [reset] then allow an analogue loop charge up of 15 seconds before
commencement of loop polling.
In Active Mode when the settings download is complete, and polling has commenced, the
Discovery™ detectors are written to to set their LED ‘flash when polled’ status and their sensitivity
mode. This takes up to 30 seconds.
In Installation Mode the Discovery™ write does not start until at least 30 seconds of polling has
elapsed so that the presence of the Discovery™ devices can be first learned.
DISPLAY MOTHERBOARD
(BACK VIEW)
QUAD UART
SIM CARD CONNECTOR
STANDOFFS (4) FOR LOOPCARD
LOOPCARD
HEADER
DISPLAY
LOOPCARD HEADER
MASTER
RESET
PRINTER
CONNECTOR
PS2 PC KEYBOARD
ADAPTOR
PRINTER
FUSE
OUT
+
RTN
+
RTN
LOOP 2
+
-
1
2
3
+
OUT
CLASS
CHANGE
L0285D
+
RTN
LOOP 3
-
-
NC
NO
NC
FIRE AUXILIARY
1
W
2
W
0V
+24
0V
AUX 2
J2
NO NC
2
0V
ZONE
MPX
1
ON
NO
W
3
6
7
8
B
A
-
F3
1A
F1
1A
+
3
F2
1A
SOUNDERS
2
-
1
+
B
A
B
RX 1
A
B
TX 2
RS485 IN
CF
+
+Ve
4
+
EVAC.
+Ve
-Ve
OUTPUT
24V
COMS I/O
F4
1A
-
-Ve
INPUT
PSU 24V
FIT COM'S BOARD HERE
UP/DOWNLOAD SW8 - OFF
RX 2
RS485 OUT
5
TX 1
A
4
NO
AUXILIARY
NC
UPLOAD/DOWNLOD
SOCKET
FAULT
W
DRG REF : A4000-024A
+24
AUX 1
SW1 OFF FOR PRE 2.07 SOFTWARE
4 CORE TO REP 4 & 5 ON
COMMS BYPASS - 2, 3 , 6 & 7 SW TO ON
INT LOOP FEEDS
OUT
-
SERIES 4000
MAIN TERMINAL BOARD
-
ZONE LED'S
LOOP 1
-
CLASS
CHANGE
+
MAIN TERMINAL MOTHERBOARD
LAYOUT & CONNECTION DETAILS
Unit 14, Meridian Centre, Vulcan Way,
Croydon, Surrey, CR0 9UG.
TEL : 01689 847626 , FAX : 01689 841138
OUT
REP
Alarmtronic Ltd
FAULT
FIRE
SUB PANEL
PRE ALARM
ISOL
IN
LOOP 2
OUT
IN
LOOP 3
OUT
ALARMTRONIC LTD
LS
2
1
Title:
CLASS 24V
24V
MPX
CHANGE AUX 1 AUX 2 ZONE
+ - + -
FIRE
FAULT
( AUXILIARY 1 ) ( AUX 3 )
1
UNIT 14 , MERIDIAN CTR , VULCAN WAY
SURREY , CROYDON , CR0 9UG
TEL : 01689 847626 , FAX: 01689 841138
SERIES 4000MP
CONTROL PANEL
LOOP 1
IN
+ - + - + - + - + - + -
OUT
ZMU
LEGEND:
DET - CONVENTIONAL DETECTOR
ION - ADDRESSABLE ION DETECTOR
OPT - ADDRESSABLE OPTICAL DETECTOR
ISOL - ADDRESSABLE LOOP ISOLATOR
ZMU - ZONE MONITOR UNIT
LS - ADDRESSABLE LOOP SOUNDER
I/O - INPUT/OUTPUT UNIT
BGU - BREAK GLASS UNIT
OPT
OUT
ION
EOL 10k 1/4 Watt
BGU
TX1 RX2
OUT
RX1
IN
S3
SOUNDERS
(POLARIZED)
S2
TX2
S4
- + - + - + - +
S1
AUX
( AUX 2 )
1
I/O
OUTPUT
A B A B A B A B
FAULT REPEAT
REPEAT
N
E
Client:
TO SUB-PANEL(S) OR REPEATER(S)
FROM SUB-PANEL(S) OR REPEATER(S)
L
240v AC INPUT
TYPICAL
WIRING
SCHEMATIC
SERIES 4000 ADDRESSABLE PANEL TYPICAL INTERLINK WIRING SCHEMATIC
0V
CONVENTIONAL
INPUT
FIRE
DET
REMOTE
EVAC
DET
FAULT
EOL
4K7
PRE
Drn:
WAC
Date:
NC
Checked:
4000 SERIES
REP OR SUB PANEL (1)
4000 SERIES
REP OR SUB PANEL (2)
RX1
IN
RX1
RDR
Approved:
4 CORE
TX1 RX2
OUT
IN
N
E
L
E
F.S.
Scale:
TX2
N
240v AC INPUT
TX2
A B A B A B A B
TX1 RX2
OUT
A B A B A B A B
L
240v AC INPUT
A4000 - 021
Drg. No.
B
Iss.