1
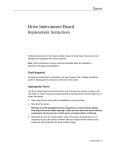
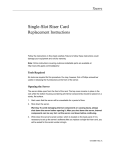
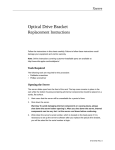
Xserve RAID
Using RAID Admin
and Disk Utility
Includes instructions
for creating RAID arrays
and monitoring Xserve
RAID systems
K Apple Computer, Inc.
© 2003 Apple Computer, Inc. All rights reserved.
Under the copyright laws, this manual may not be copied, in whole or in part, without the written consent of Apple.
Your rights to the software are governed by the accompanying software license agreement.
The Apple logo is a trademark of Apple Computer, Inc., registered in the U.S. and other countries. Use of the
“keyboard” Apple logo (Option-Shift-K) for commercial purposes without the prior written consent of Apple may
constitute trademark infringement and unfair competition in violation of federal and state laws.
Every effort has been made to ensure that the information in this manual is accurate. Apple is not responsible for
printing or clerical errors.
Apple
1 Infinite Loop
Cupertino, CA 95014-2084
408-996-1010
www.apple.com
Apple, the Apple logo, and Mac are trademarks of Apple Computer, Inc., registered in the U.S. and other countries.
Rendezvous and Xserve are trademarks of Apple Computer, Inc.
Java is a trademark of Sun Microsystems, Inc.
Other company and product names mentioned herein are trademarks of their respective companies. Mention of
third-party products is for informational purposes only and constitutes neither an endorsement nor a
recommendation. Apple assumes no responsibility with regard to the performance or use of these products.
Simultaneously published in the United States and Canada.
022-0794
Contents
Preface
About Software for Xserve RAID Systems
1
Configuring an Xserve RAID System
Installing the RAID Admin Application 8
Connecting to the System 8
Entering Basic Settings for an Xserve RAID System
System Identity and Access 10
Configuring Additional Systems 13
2
Working With RAID Arrays
7
9
15
Creating a RAID Array 15
About Spare Drives 17
Modifying a RAID Array 17
Rebuilding a RAID Array 18
Deleting a RAID Array 18
Formatting and Mounting Arrays on a Host System 19
Masking Drives on Multiple Host Systems (LUN Masking)
About the World Wide Port Name 21
Setting Up LUN Masking With RAID Admin 22
Adding Software RAID to Two or More Arrays 24
3
5
Monitoring Status and Adjusting Settings
21
27
Monitoring System Status 27
Adding a System to the Monitoring List 27
Getting System Information 27
Removing a System From the Monitoring List 30
3
Changing System Settings 30
Adjusting Basic Information and Network Settings 30
Adjusting Fibre Channel Speed and Topology 31
Adjusting LUN Masking 32
Adjusting Drive Cache and Controller Cache 32
Using System Commands 34
Turning the System Identifier On or Off 34
4
Contents
P R E F A C E
About Software for
Xserve RAID Systems
You use three applications to configure and monitor your Xserve RAID system. Two of these
applications, RAID Admin and Fibre Channel Info, are included on a CD with the system.
(In some instances, the CD with RAID Admin and Fibre Channel Info is supplied with
other systems or cards as well.)
The third application, Disk Utility, is part of Mac OS X and Mac OS X Server.
You use RAID Admin to set up the Xserve RAID hardware, including
m Creating or deleting RAID arrays (known as “hardware RAID”)
m Monitoring the status of one or more Xserve RAID systems
m Adjusting settings, including system name and password, network address for each
RAID controller, fibre channel communication speed, drive cache, controller cache, and
LUN masking
m Setting up email notification for system alerts
You use Fibre Channel Info to locate an identifier, the World Wide Port Name ( WWPN),
associated with each port on the fibre channel card in a host computer. You need this
number only if you have multiple host computers connected to one Xserve RAID system
through a switch. The Fibre Channel Info application works only with the Apple Fibre
Channel PCI Card.
You use Disk Utility to create volumes and mount them on the host system. You can also
use Disk Utility to add “software RAID” to two or more hardware RAID arrays. You use
Disk Utility for
m Mounting arrays on the host system (which includes putting the file system on arrays and
creating volumes)
m Implementing software RAID (striping or mirroring two or more RAID arrays)
5
This guide provides instructions for using RAID Admin to configure and monitor Xserve
RAID systems and using Disk Utility to enhance hardware RAID arrays. For descriptions of
RAID levels and the types of arrays you can set up on an Xserve RAID system, see Chapter 7,
“RAID Overview,” and Chapter 8, “Planning RAID Storage for the Xserve RAID System,” in the
Xserve RAID User’s Guide.
See Chapter 1, “Configuring an Xserve RAID System,” on page 7, for details on configuring a
system for the first time.
See Chapter 2, “Working With RAID Arrays,” on page 15, for instructions on creating and
deleting RAID arrays.
See Chapter 3, “Monitoring Status and Adjusting Settings,” on page 27, for information on
managing systems, changing settings, and getting details of a system alert.
6
Preface
C H A P T E R
1
1
Configuring an Xserve RAID System
You use RAID Admin to enter basic information, such as system name, access level and
password, and network settings, on the Xserve RAID system. Monitoring buttons require the
monitoring password; management buttons require the management password.
Monitoring buttons
(to connect to systems)
Management
buttons
Message
area
Monitoring tabs
Icons for
monitoring tabs;
an icon
changes color
to indicate a
change in
status.
System information
Before creating RAID arrays, it’s a good idea to configure the system with the name,
password, and network settings you want. You may need to get some information from the
network administrator for your location.
Be sure to write down the information you enter for the system and keep that record in a
safe place. If you plan to share your Xserve RAID system, other users will need to know some
or all of these details.
7
Installing the RAID Admin Application
You must install RAID Admin on all computers that you want to use to monitor or administer
Xserve RAID systems. Each monitoring computer must be using Java 1.3.1 or a more recent
version. ( Java 1.3.1 is supported in Mac OS X v10.2 and later versions.)
To install RAID Admin on a monitoring computer:
m Insert the Xserve RAID Admin Tools disc in the optical drive of the monitoring computer
and copy the folder “RAID Admin” to that computer.
You can also copy the software folder from a remote system or server if the computer you
want to use for monitoring does not have an optical drive.
Connecting to the System
RAID Admin uses Rendezvous discovery to simplify connecting to an Xserve RAID system the
first time. The application lists the IP address of the systems on the same subnet as your
monitoring computer.
The system’s default configuration is to use DHCP for a network address. If no DHCP server
is available, the system will automatically use a link local address of 169.254.x.x.
The first time you configure an Xserve RAID system, you must use RAID Admin
on a computer that is on the same subnet as the system. By doing so, you can connect to the
system without knowing the IP address of the system.
Important
To connect to a system:
1
8
Chapter 1
Turn on the Xserve RAID system.
Note: The first time you turn on the system, the RAID controllers begin initializing the
drives in the system. This process will take several hours; for example, an array with seven
drives takes a minimum of 12 hours to initialize. You can use the default RAID Level 5 array
(or arrays, depending on the number of drives in the system) immediately (as the drives
are initializing) or stop initialization by connecting to the system and deleting the arrays that
are set up at the factory. Connecting during initialization and deleting an array will not harm
the system. If you have written any data on an array, deleting that array will cause that data
to be lost.
2
Start RAID Admin on a computer that is on the same subnet as the system and click Add
System.
3
In the Add window, select the system you want from the list or type the IP address of the
system in the Address field.
4
Type the Monitoring Password.
Monitoring access allows you to monitor a system but not make changes. When you want to
create an array or make other changes, the software asks you to enter the management
password.
Note: The default monitoring password is “public.” The default management password
is “private.”
5
Click Add.
6
Select the system in the list to display its settings and information in the monitoring tabs.
Entering Basic Settings for an Xserve RAID System
You can enter or change a number of settings for the Xserve RAID system. These include
m System name
m Location of the system and key contact
m Management or monitoring password
m System time synchronization with the monitoring computer
Configuring an Xserve RAID System
9
m
m
m
m
Audible alarm on or off; automatic restart after power outage on or off
Network address configuration
Fibre channel options for transmission speed and connection type
LUN masking (for showing or hiding arrays when multiple hosts are connected to a
system)
m Turning on drive cache for each array and controller cache (for each RAID controller)
Some settings require that you restart the Xserve RAID system.
System Identity and Access
You use the Settings window in RAID Admin to add or change most information for your
Xserve RAID system.
To open the Settings window:
1
In the RAID Admin window, click the Settings button.
2
Enter the management password and click OK.
System Name and Contact Information
Use the System tab in the Settings window to enter or change the system name. (A default
name for the system is set at the factory.) You can also enter reference information, including
the physical location of the Xserve RAID system and the primary contact for that system.
10
Chapter 1
Click the “Synchronize Xserve RAID time” box to set the time to that of your computer (the
one on which you are using RAID Admin). (The system is preset at the factory.)
You can change the password for management or monitoring access using the appropriate
Change button. When setting up the system, you may want to change both passwords. Be
sure to write them down and make them available to anyone else who is authorized to make
changes (management) or monitor system status (monitoring).
Important Only one person at a time can manage a particular system. Each time you want
to do a management task, you must enter the management password.
The option for audible alerts is turned on by default.
Network Address
You use the Network tab of the Settings window to set the IP address for each RAID
controller in the system.
m If you have one or two fixed IP addresses, choose Manually from the Configure pop-up
menu and type the address, subnet mask, and router information.
m If you don’t have a fixed IP address, choose Using DHCP from the Configure pop-up
menu. (DHCP is the default setting for the system.)
For specific information about the IP address and other network details for your system,
check with the network administrator at your location.
Configuring an Xserve RAID System
11
Email Notification
The Xserve RAID system sends an email message whenever it detects an error condition, so
it’s a good idea to enter contact addresses when you configure the system. You can add as
many email addresses as you wish for notification; separate the names with commas.
To set up email notification:
1
In the RAID Admin window, click the Email button.
2
Enter the management password and click OK.
3
In the Email Notification window, click Add.
4
Enter one or more email addresses in the text field and click OK.
5
Enter the address of the SMTP server and the sender’s email address. You can use your own
address or create a new address on the SMTP server with a name such as “Xserve RAID 3
alert” to identify the system and the purpose of the email message. (The address you use
must be a valid one on the SMTP server.)
6
If the SMTP server requires authentication, click the authentication checkbox and enter the
appropriate user name and password.
You can use the Send Test Email button to verify that notification is working.
7
12
Chapter 1
Click Apply Now.
Configuring Additional Systems
If you plan to configure multiple Xserve RAID systems, you must enter the information and
choose settings for each system individually.
If the other systems you want to set up are on the same subnet, you can add each one to the
monitoring list and then add name and contact information, change passwords, and enter IP
addresses for each system. Each time you begin a management task, you have to enter the
management password for that system.
If you need to configure a system for the first time that is not on the subnet with your
monitoring computer, you must find out its IP address or use RAID Admin on another
computer on the subnet with that system. Once you know the IP address of the systems you
want to monitor, you can connect to them from any location with TCP/IP access.
Once you’ve configured the system with basic settings, you can begin using the RAID Level 5
arrays preconfigured at the factory, or you can create other RAID arrays and begin storing
data on the system.
Configuring an Xserve RAID System
13
C H A P T E R
2
2
Working With RAID Arrays
Once you’ve configured the Xserve RAID system with basic settings, you can create RAID
arrays (also known as RAID sets). For explanations of RAID levels and combinations offered
by the Xserve RAID system, see Chapter 7, “RAID Overview,” and Chapter 8, “Planning RAID
Storage for the Xserve RAID System,” in the Xserve RAID User’s Guide.
Creating a RAID Array
You use the Create Array window of RAID Admin to set up an array. This window lists the
hardware RAID levels you can create and displays a picture of the system’s front panel so that
you can easily choose the drives to include in each array. A checkbox is on each available
drive in the picture. (Once you’ve created an array, its drives show the array’s number.)
Note: The Xserve RAID system uses two RAID controllers. The upper controller manages
drives 1 through 7 on the left side of the system (when viewed from the front); the lower
controller manages drives 8 through 14 on the right side. If your system has fewer than 14
drives, you may want to rearrange the drive modules to take advantage of both RAID
controllers, which provide greater performance and redundancy. Dividing the drives
between the two controllers decreases the overall capacity of any one array, however.
If you want to move drive modules from one controller to the other, you must do it before
creating a RAID array that contains those drives. You cannot create a RAID array that spans
both controllers. ( You can use Disk Utility to add software RAID to two or more arrays,
however; see “Adding Software RAID to Two or More Arrays” on page 24 for details.)
Note: If you move a drive module from one RAID controller to another, the preset RAID
array using that drive is deleted.
Any drives not used in an array are treated as global spares (also called “hot spares”) for all
arrays on that controller.
Important Once you create an array, you cannot edit it. Be sure to plan the arrays carefully
to avoid having to remove an array later.
As you plan your arrays, keep in mind that each RAID controller can have up to three arrays.
15
To create a RAID array:
1
In the RAID Admin window, click Create Array.
2
Enter the management password and click OK.
3
In the Create Array window, select the RAID level you want to use.
This window provides brief details about each RAID level or drive when you click the button
for a RAID level or put the pointer on the picture of a drive module.
4
16
Chapter 2
Click the box on each drive you want to include in the array.
5
Choose the options you want.
m “Use RAID Now background initialization” lets you use the RAID array without waiting for
initialization to finish. While the array is being initialized, data read and write speeds will
be somewhat reduced. If this option is off, initialization takes place before the array is
visible on the host system.
Note: The array cannot be seen by the host computer before initialization is complete
unless RAID Now is used.
m “Use drive cache” enables the built-in write cache on each drive in the array. This option
improves efficiency and speed of data transfer, but the drive cache contents will be lost if
power to the system fails, unless you are using an uninterruptible power supply (UPS).
Important It is recommended that you use a UPS when you have drive cache enabled.
Without UPS backup, you could lose data in the event of a power failure.
In the event of a power failure, the system detects UPS power and immediately flushes
the data in the drive cache on a drive and then turns off the cache. When AC power is
restored, the system turns on the drive cache again.
6
Check the summary of the array you’ve chosen and click Create Array.
Note: The RAID controller automatically treats any drive not assigned to an array as a global
hot spare for arrays on that controller.
About Spare Drives
A spare drive is any drive that has not been assigned to an array. On the Xserve RAID, an
unassigned drive is “hot” (always spinning and ready for use) and global (available to any
array on its controller). A spare drive is used automatically by the RAID controller for its
group of drives (either drives 1 to 7 or drives 8 to 14) whenever a drive within an array fails.
(A controller can only use available drives on its side of the system; it cannot treat a drive on
the other side as a hot spare.)
When you assign a previously unused drive to a new array, it no longer serves as a hot spare.
Modifying a RAID Array
Once a RAID array is established, you cannot change its type or add and remove drives from
it. You can turn the drive cache on or off.
To modify a RAID array, you must back up all data in the array, delete the array, and create a
new array with the parameters you want.
Working With RAID Arrays
17
Rebuilding a RAID Array
If a drive fails, or an interruption in drive-to-controller communication occurs, data
availability is unaffected, but the data is no longer protected. The array is in a degraded state.
The RAID controller that controls the affected array will automatically attempt to reconstruct
the data in order to return the system to a protected state. For example, if a hot spare drive is
available when a drive fails in an array, the controller takes the available drive and integrates it
into the array. The controller then rebuilds the RAID array using the new drive.
Array performance will be diminished until the drive is rebuilt. During this rebuilding
process, an indicator on the drive module being added to the array alternately flashes amber
and green. If an array is rebuilding or degraded, a message with that information appears in
the message section of the RAID Admin window. The button beside the system name also
changes color (to yellow or red) to indicate a problem.
The Xserve RAID system automatically rebuilds a RAID array in certain instances.
m If you have created a protected array (RAID 1, 3, 5, or 0+1) and you have an unassigned
drive (a hot spare), each RAID controller automatically uses the spare drive to rebuild the
array if a drive in the array fails.
m If no hot spare drive is available on the RAID controller, the array operates in a degraded
state until you replace the failed drive.
m If you have a RAID 0 array, the system cannot rebuild the array in the event of a drive
failure or other interruption. All data on the array will be lost.
Deleting a RAID Array
You delete a RAID array in the Delete Array window.
Be sure to back up all data before you delete an array. If you delete an array
without first backing up all the data stored on the array, you will lose that data with no
possibility of recovery.
Warning
To delete an array:
18
Chapter 2
1
In the RAID Admin window, click Delete Array.
2
Enter the management password and click OK.
3
In the Delete Array window, click the button for the array you want to delete.
The drives for that array turn red in the picture of the system.
4
Click the confirmation checkbox to verify that you want to remove the array.
5
Click Delete Array (or click Cancel if you don’t want to delete the array).
Formatting and Mounting Arrays on a Host System
Creating an array creates a virtual device without a file system. You add a file system to each
RAID array on the host system using Disk Utility. The array appears in Disk Utility as an
unformatted disk.
Disk Utility is part of Mac OS X (or Mac OS X Server) and is stored in the Utilities folder
inside the Applications folder.
You must use Disk Utility on the host system to format arrays and mount them.
This procedure cannot be done remotely with Disk Utility.
Important
Working With RAID Arrays
19
To format and mount an array on the host system:
1
Restart the host system.
In some instances, restarting the host system may not be necessary, but if you are creating or
adding arrays, you generally must restart before the arrays are visible in Disk Utility.
2
Open Disk Utility on the host system.
3
Select the array in the list at the left side of the window.
4
Click the Erase tab.
5
Choose a format for the array from the Volume Format pop-up menu.
Note: You can take advantage of disk journaling by using the journaled volume format.
Journaling is a technique that helps protect the integrity of HFS+ disks in RAID arrays. It
both prevents a disk from getting into an inconsistent state and expedites disk repair if the
system fails. Performance diminishes slightly when journaling is on.
When you enable journaling on an array, a continuous record of changes to files on the disks
in the array is maintained in the journal. If your system stops running because of a power
failure or some other problem, when you restart the system the journal is used to restore the
array to a known good state. Although you may experience loss of user data that was
buffered at the time of the failure, the file system is returned to a consistent state. In
addition, restarting the system is much faster.
If you are using Mac OS X Server, you can also turn journaling on or off for an array at any
time in the Information section of Disk Utility.
6
20
Chapter 2
Type a name for the array.
7
Click Erase and confirm your decision by clicking Erase again.
Once formatting is complete, the array mounts on the host system.
Repeat this procedure for each new array.
Note: If you want to add software RAID to two or more arrays, you can skip this formatting
procedure and instead use the RAID section of Disk Utility to stripe or mirror the arrays
together in a set. This procedure also formats and mounts the resulting array. See “Adding
Software RAID to Two or More Arrays” on page 24 for details.
Masking Drives on Multiple Host Systems (LUN Masking)
If you have two or more host computers connected to an Xserve RAID system through a
switch, you must “map” each array to a specific host computer. You also “mask” arrays you
don’t want to be visible to that host.
By mapping arrays to specific host computers and masking others off from a host, you avoid
the possibility that more than one host user could write data on an array and possibly
corrupt the array or otherwise lose data.
You use RAID Admin to map and mask arrays, which is also known as “LUN masking.” LUN is
an acronym for “logical unit number,” which is a device addressing scheme.
About the World Wide Port Name
To map and mask arrays, you must provide a World Wide Port Name ( WWPN). This name is a
unique 16-character identifier assigned to each of the two ports on the Apple Fibre Channel
PCI Card. The specific WWPN you need for an array is the one for the port on the card that is
connected to the RAID controller for your array. (For more information about the Apple
Fibre Channel Card and its connections to the Xserve RAID system, see Chapter 4,
“Connecting Xserve RAID to a Host System and a Network,” in the Xserve RAID User’s
Guide.)
You use the Fibre Channel Info application provided on the Xserve RAID Admin Tools disc to
locate the WWPN for each port on the Apple Fibre Channel PCI Card.
Working With RAID Arrays
21
Locating the WWPN With Fibre Channel Info
To find the WWPN for a port on your host system’s fibre channel card
using Fibre Channel Info:
1
Copy the Fibre Channel Info application from the “Mac OS X Utilities” folder on the Xserve
RAID Admin Tools disc to your host computer.
Note: You must use this application on the host computer to locate the WWPN for each port
on the Apple Fibre Channel PCI Card in that computer.
2
Open Fibre Channel Info on the host computer.
The application displays Word Wide Port Name (on the right side of the window), as well as
the node name and the slot in which the fibre channel card is installed.
World Wide
Port Name
Note: The application locates a WWPN for each of the two ports on the fibre channel card.
You may need to experiment by using both of these names to map the arrays you want to
show on certain host computers and mask the arrays you want to hide.
Setting Up LUN Masking With RAID Admin
Once you have the WWPN, you enter it in the LUN Settings window of RAID Admin.
To set up LUN masking:
22
Chapter 2
1
In RAID Admin, click Settings.
2
Enter the management password and click OK.
3
WWPN for the fibre
channel port connected
to host computer A
Click the LUN Settings tab.
WWPN for the
fibre channel port
connected to host
computer B
4
In the LUN Settings window, click Enable LUN Masking for one or both controllers.
5
Enter the WWPN for the desired port on the fibre channel card in your host system.
If you don’t know which of two names will work, enter one and complete the steps below. If
the result was not what you wanted, repeat this procedure using the second WWPN.
6
Click one or more of the LUN buttons for the arrays you want to map to the host system
associated with that WWPN. Checked items are mapped to the host computer connected to
the fibre channel port with that WWPN and will be visible on that computer. Items that are
not checked are masked from that host computer.
m A LUN is the same as an array (or a RAID set). RAID Set 1 in the Arrays & Drives tab is the
same as LUN 0 in the LUN Settings window.
m If a LUN number is checked, that LUN is mapped to the host computer associated with
the corresponding WWPN (and is masked, or hidden, from other host computers).
m If a LUN number is not checked, that LUN is masked from the host computer associated
with the corresponding WWPN.
m If a LUN button is dimmed, no corresponding array has been set up.
Note: You can create up to three arrays on each controller; they are numbered LUN 0 to
LUN 2.
Working With RAID Arrays
23
7
Repeat this procedure for any WWPN identifiers for which you want to map and mask arrays.
8
Click Apply Now.
The LUN masking takes effect when the Xserve RAID system restarts.
Note: You do not have to map an array to the host computer that was used to create the
array. You can map an array to any host computer that is connected to the Xserve RAID
system on which the array resides.
Adding Software RAID to Two or More Arrays
Once you’ve set up arrays with RAID Admin, you can add either striping or mirroring
to two or more arrays using the Disk Utility application. Disk Utility is part of Mac OS X
(or Mac OS X Server) and is stored in the Utilities folder inside the Applications folder.
Adding software striping to RAID arrays increases efficiency of data transfer and storage.
Adding software mirroring to RAID arrays increases data protection.
Note: You must use Disk Utility on the host computer to add software RAID to two
or more arrays.
To add software RAID to two or more arrays:
24
Chapter 2
1
Open Disk Utility on the host system and click the RAID tab.
2
Drag the arrays you want to stripe or mirror from the left side of the window to the Disk list
at the center of the window.
Note: You must use two or more arrays to create a software RAID set.
3
Select the arrays in the Disk list.
4
Choose Stripe or Mirror from the RAID Scheme menu.
5
Enter a name for the new software RAID set.
6
Choose a format for the array.
Note: You can take advantage of disk journaling by using the journaled volume format.
Journaling is a technique that helps protect the integrity of HFS+ disks in RAID arrays. It
both prevents a disk from getting into an inconsistent state and expedites disk repair if the
system fails.
When you enable journaling on an array, a continuous record of changes to files on the disks
in the array is maintained in the journal. If your system stops running because of a power
failure or some other problem, when you restart the system the journal is used to restore the
array to a known good state. Although you may experience loss of user data that was
buffered at the time of the failure, the file system is returned to a consistent state. In
addition, restarting the system is much faster.
If you are using Mac OS X Server, you can also turn journaling on or off for an array at any
time in the Information section of Disk Utility.
7
Click Create.
Once you’ve created your RAID arrays, you can use RAID Admin to monitor the Xserve RAID
system.
Working With RAID Arrays
25
C H A P T E R
3
3
Monitoring Status
and Adjusting Settings
You monitor the status of your Xserve RAID system with the RAID Admin application.
You can also adjust most settings with this software.
Monitoring System Status
RAID Admin displays a variety of information about your system as it is operating.
Adding a System to the Monitoring List
You can monitor many systems at the same time. You simply need to add each one to the
monitoring list.
See “Connecting to the System” on page 8 for details on adding a system to the list.
Getting System Information
To get details about the system’s operation, open RAID Admin and add the system to the
monitoring list. Click a tab in the center of the window to display information for that
category.
27
m Info reports system name, lock status, controller details, and whether there is a problem
or power failure.
m Arrays & Drives shows details of each array and the drives in use and available. Click
Show Drives and then click an array in the picture to see details of the array. Click Show
Drives and then click a drive to see details of that drive.
28
Chapter 3
m Components shows the operating information about the power supplies, RAID
controllers, cooling modules, and cache backup batteries. You click the component to
view its details.
m Fibre Channel shows information about each RAID controller and the type of fibre
channel connection in use.
Monitoring Status and Adjusting Settings
29
Note: The World Wide Name is not the same as the World Wide Port Name ( WWPN)
used for LUN masking. See “Masking Drives on Multiple Host Systems (LUN Masking)” on
page 21 for information about LUN masking and WWPN.
m Network displays the IP address and related network details for each RAID controller.
Removing a System From the Monitoring List
You can easily take a system off the monitoring list.
Note: Avoid removing a system from the list if you don’t know its IP address or password.
If you remove a system, you must supply that information to list it again.
m To remove a system from the monitoring list, select it in the list and click Remove System.
Changing System Settings
You can adjust most settings for the Xserve RAID system while the system is operating. In a
few instances, you must restart the system for a change to take effect.
Adjusting Basic Information and Network Settings
See “System Name and Contact Information” on page 10 for instructions on adjusting basic
system settings, including changing passwords for Administrator and Guest access.
See “Network Address” on page 11 for instructions on adjusting the network information.
30
Chapter 3
Adjusting Fibre Channel Speed and Topology
In most instances, the default settings for fibre channel communications are the most
appropriate ones. If you have a fibre channel switch or a fixed transmission path among a
group of systems, you may want to use one of the other fibre channel options.
To adjust the fibre channel settings:
1
Open RAID Admin and click Settings.
2
Enter the management password and click OK.
3
In the Settings window, click the Fibre Channel tab.
4
Click buttons for the options you want to change.
m Change the Speed setting if you want to enhance or limit transmission speed.
m Change the Topology option if your system is connected to a switch or you have a fixed
network arrangement. Consult your network administrator if you aren’t sure whether to
change this setting.
5
Click Apply Now.
6
In the confirmation window, click OK.
Note: The fibre channel changes take effect when the Xserve RAID system restarts.
Monitoring Status and Adjusting Settings
31
Adjusting LUN Masking
See “Masking Drives on Multiple Host Systems (LUN Masking)” on page 21 for details on
LUN masking for systems that are connected to a switch and have multiple hosts connected
to the switch.
Adjusting Drive Cache and Controller Cache
RAID Admin lets you turn on two separate types of cache to enhance performance of your
Xserve RAID system.
m Drive cache enables the built-in write cache on each drive in the array. This option
improves efficiency and speed of data transfer, but the drive cache is not backed up
should the system lose power unless you are using an uninterruptible power supply
(UPS).
It is recommended that you use a UPS when you have drive cache enabled.
Without UPS backup, you could lose data in the event of a power failure.
Important
m Controller cache is a write cache used by the RAID controller. This cache is backed up by
the optional Xserve RAID Cache Backup Battery Modules.
It is recommended that you have the optional controller cache backup
battery modules installed if you use controller cache. Using controller cache with no
battery backup could result in data loss if there is a power failure.
Important
To set up drive cache and controller cache:
32
Chapter 3
1
Open RAID Admin and click Settings.
2
Enter the management password and click OK.
3
Click the Performance tab.
4
To set up drive cache, click buttons for the array for which you want to enable or disable the
drive cache.
5
To set up controller cache, click the button you want for Write Cache and Read Prefetch for
each controller.
m Write Cache is used to complete data transactions from the host computer before actually
writing the data to the drives.
m Read Prefetch anticipates that data should be retrieved from the arrays in sequential order
and “reads ahead.” A large Read Prefetch is recommended for video playback; a small
Read Prefetch is recommended for database applications.
6
Click Apply Now.
7
In the confirmation window that appears, click OK.
Note: Drive cache and controller write cache are required for applications that have a very
high throughput, such as high-resolution video editing. UPS backup for drive cache is highly
recommended.
Monitoring Status and Adjusting Settings
33
Using System Commands
Occasionally you may encounter a problem or situation in which you need to shut down the
Xserve RAID system or restart one of the RAID controllers or coprocessors. These system
commands are located in the System menu of RAID Admin.
The system commands include
m Shutdown, which shuts down the system completely. When you shut down the system
the data held in a cache is written on a disk before the system powers off.
Note: Use the Shutdown command if the Xserve RAID system will be turned off for more
than 72 hours. Shutting down with this command turns off the system and the optional
cache backup batteries. If you turn off the system using the power button, the cache
backup batteries remain on and could become discharged.
m Power Up, which starts up the system when it is in standby mode.
m Restart the Upper or Lower RAID Controller.
m Restart the Upper or Lower Management Coprocessor.
Note: Use the Restart system commands with care, because any of them may disrupt the
orderly transmission and storage of data.
Turning the System Identifier On or Off
You can use RAID Admin to turn on the system identifier light should you want to locate a
particular Xserve RAID system or assist another administrator in finding that system. You can
also turn off the system identifier when it’s on.
To turn the system identifier on or off:
1
Choose Toggle Service ID from the System menu.
2
Enter the management password and click OK.
This command turns the system identifier on when it’s off or off when it’s on.
34
Chapter 3