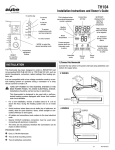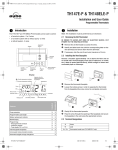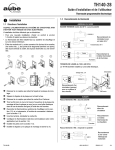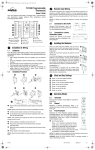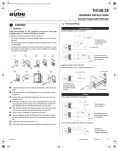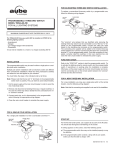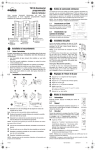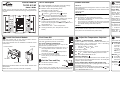
1
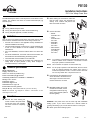
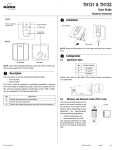
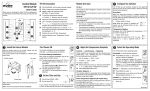
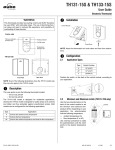
Control Module
TH132 A/F/AF
Owner’s Guide
Thank you for choosing the Aube TH132, a programmable thermostat that provides both energy savings and total
comfort.
TH132 Description
Models Overview
n DAY/HOUR/MIN—Set the day and clock settings.
o PGM—Program the schedule (programs).
p MODE—Select the operating mode.
TH132-A
RETURN—To exit a function.
q To configure temperature setpoints:
Comfort,
Economy and
Vacation.
r Adjust the floor temperature limit (AF only).
s
—Increase and decrease temperature.
t
—Indicates the number of the current
program when Automatic mode is enabled.
u Current operating mode (auto
/ manual ). In
Auto mode, the program’s associated setpoint icon is
).
also displayed (
v Indicates the room OR floor temperature.
w Heating indicators (see “Temperature Control”
below).
Install the Control Module
Control module
This model has been designed to control a room’s ambient temperature.
The TH132-A has one temperature sensor located in the
control module.
TH132-AF
This model is designed to use a floor sensor to control the
room temperature.
The TH132-AF has two temperature sensors:
•
The first one, installed in the control module, controls
the ambient temperature.
•
The second one, installed in the floor (and connected
to the power base), limits the temperature of the floor
(the default setting of this limit is 82°F).
TH132-F
This model is designed to control floor heating systems.
The TH132-F has one temperature sensor installed in the
floor (sensor is connected to the power base).
First Power ON
Align the bracket tabs on the control module with the
holes located on top of the power base.
This control module must be installed on a PB130 series
power base.
Air vents
On the first installation, the screen displays:
0:00, MO, and temperature (room/floor).
For Floor Heating Installations:
One of the two following messages may be displayed when a problem occurs:
LO: The floor temperature is below 32°F (0°C), or
the temperature sensor is defective, or not
connected.
The heating indicator
is displayed and
the relay is closed (energized).
HI: The floor temperature is above
140°F (60°C), or the temperature sensor is
defective.
Air vents
Set the Time and Day
Power base
Note: Keep the thermostat's air vents clean and free from
obstructions.
Note: The screw cannot be removed completely.
n Set the time (HOUR - MIN).
o Set the day (DAY).
If you remove the module from its base for more than
2 hours, the time and day will have to be reprogrammed.
Configure the Switches
The TH132 has two switches, located on the upper-left
part on the rear of the control module, which are used to
set the following options:
Early Start
When the Early Start function is enabled (disabled by
default), the TH132 calculates the optimum system start
time to obtain the desired temperature by the set time. To
enable this function:
Note: When this function is enabled, the
system can be activated before the program’s start time.
Temperature Display
By default, the TH132 displays the temperature in °C. If
you wish to change to °F:
and Economy
Setpoints
These setpoints are associated with the schedule’s programs (prog. 1 & 3 = Comfort, prog. 2 & 4 = Economy)
and are preprogrammed as follows:
A & AF models—
F model—
82°F,
68°F,
Select the Operating Mode
The TH132 offers three operating modes:
Automatic
. The current
program number is displayed.
You can temporarily bypass the current
program by setting a specific temperature setpoint
or by selecting one of the pre-defined setpoint
buttons (
). The new setpoint will be maintained
until the beginning of the next program.
68°F
Vacation Setpoint
The vacation setpoint is associated to the Vacation operating mode and is preprogrammed to 50°F. To modify this
setpoint, repeat above steps.
Floor Temperature Setpoint (AF model only)
The floor temperature limit is preprogrammed to 82°F to
avoid damage to your floor.
To modify, press the adjustment button (below ) using a
pointed object, set the desired temperature using
and
press MODE/RETURN to exit.
—Executes the schedule.
n Press MODE to select
64°F
To modify a setpoint:
n Set the temperature using
and press and hold the
or
button until it is displayed on the screen.
o Press MODE/RETURN to exit.
Position switch #2 up.
Note: When you switch from °C to °F or vice
versa, the
,
and
setpoints must be
redefined.
Adjust the Temperature Setpoints
Comfort
Position switch #1 down.
Manual
—Maintains a constant temperature.
n Press MODE to select .
o Set temperature
or select one of the predefined setpoint buttons (
).
Vacation —Maintains the Vacation setpoint
during a prolonged absence.
Press
.
400-132-000-A
Program Your Schedule
The schedule is used with the Automatic mode. The
schedule controls the heating system to automatically
switch between the Comfort and Economy temperature
setpoints at the times you have programmed.
The schedule consists of 4 programs per day defined as
follows:
Programs
Time i
Setpoint
Wake-up
Programs
s Press MODE/RETURN to exit.
Note: After 60 seconds of inactivity, the thermostat will
automatically exit programming mode.
To clear a program time:
When you clear a program time entry, the TH132 will
maintain the temperature setpoint of the last executed
program until the beginning of the next program.
n Repeat steps 1 to 3 above.
To enter the programs’ start time
o Press CLEAR to erase the time entry. The time por-
To shorten programming, you simply have to enter the
start time for each program.
n Press PGM.
p Press MODE/RETURN to exit.
tion of the LCD indicates --:-- when the program is
inactive.
q Press PGM to select program 2.
MO
TU
WE
TH
FR
SA
SU
6:00
6:00
6:00
6:00
6:00
6:00
6:00
8:30
8:30
8:30
8:30
8:30
--:--
--:--
16:00 16:00 16:00 16:00 16:00
--:--
--:--
23:00 23:00 23:00 23:00 23:00 23:00 23:00
and 4).
Back home
The programs’ start time can be different for each day of the week.
Programming Example
p Press PGM to select the program number (e.g. 1).
q Press HOUR and MIN to set the start time.
r Repeat steps 3 to 4 for remaining programs (e.g. 2, 3
Leave home
Night
i.
Note: It is sometimes faster to program the same schedule for the entire week and then to modify the exception
days.
Comfort :
• Monday to Friday, between 6:00 and 8:30 and
between 16:00 and 23:00.
• Saturday and Sunday, between 6:00 and 23:00.
Economy :
• Monday to Friday, between 8:30 and 16:00 and
between 23:00 and 6:00.
• Saturday and Sunday, between 23:00 and 6:00.
To program this schedule
n Press PGM.
o Press and hold DAY for 3 seconds to select all days
Technical Specifications
Warranty
The TH132 thermostat works differently than conventional
electromechanical thermostats.
It is equipped with a proportional integral adaptive (PIA)
controller which determines heating cycles by analyzing
the temperature behavior history within the room.
The PIA controller reduces temperature swings providing
accurate temperature control while increasing user comfort.
The controller determines the amount of power required
by the heating system to maintain the setpoint temperature.
When the heating system is activated, one of the following
icons is displayed:
Model: TH132 A / AF / F
AUBE TECHNOLOGIES INC. TWO (2) YEAR LIMITED WARRANTY
Display range: 32°F to 140°F (0°C to 60°C)
Setting range (ambient): 40°F to 86°F (5°C to 30°C)
Setting range (floor): 40°F to 104°F (5°C to 40°C)
Pre-programmed temperature setpoints:
Comfort: A/AF: 68°F (20°C) and F: 82°F (28°C)
Economy: A/AF: 64°F (18°C) and F: 68°F (20°C)
Vacation: A/F/AF: 50°F (10°C)
Floor limit: AF: 82°F (28°C)
Temperature resolution display scale: 0.1°
Storage:-4°F to 120°F (-20°C to 50°C)
Software: Class A
61 to 80%
81 to 100%
To erase programs 2 and 3 for Saturday and
Sunday
n
o
p
q
r
s
t
u
v
Press PGM.
Press PGM to select program 2.
Press DAY to select SAturday (SA).
Press CLEAR to erase the time (--:--).
Press DAY to select SUnday (SU).
Press CLEAR to erase the time (--:--).
Press PGM to select program 3.
Repeat steps 3 to 6.
Press MODE/RETURN to exit.
of the week.
Temperature Control
41 to 60%
RETURN to exit.
Set the time (6:00) using the HOUR and MIN buttons.
select all days of the week).
21 to 40%
program 3 (16:00) and program 4 (23:00).
s When all programs are configured, press MODE/
p Press PGM to select program 1.
o Press DAY to select the day (hold for 3 seconds to
1 to 20%
Set the time (8:30) using the HOUR and MIN buttons.
r Repeat step 4 for remaining programs:
Controller: Electronic
Temperature control: Proportional integral adaptive,
15-minute heating cycles
Programming protection: Protected memory
Clock protection: 2 hours
Size (H/W/D): 3.3 x 3.1 x 0.5 in (83 x 79 x 13 mm)
This product is guaranteed against workmanship defects
for a two-year period following the initial date of purchase.
During this period, AUBE Technologies Inc. will repair or
replace, at our option and without charge, any defective
product which has been used under normal conditions.
The warranty does not cover delivery costs and does not
apply to products poorly installed or randomly damaged
following installation.
This warranty cancels and replaces any other
manufacturer's express or implied warranty as well as any
other company commitment. AUBE Technologies Inc.
cannot be held liable for related or random damages
following the installation of this product.
The defective product as well as the purchase invoice
must be returned to the place of purchase or mailed,
prepaid and insured, to the nearest shipping address.
If you have any questions concerning the programming of
the TH132 programmable thermostat, call our technical
support team at:
705 Montrichard
Saint-Jean-sur-Richelieu
Quebec, Canada J2X 5K8
10 rue Ampère
95500 Gonesse
France
Tel.: (450) 358-4600
Toll Free: 1-800-831-AUBE
Fax: (450) 358-4650
Email: [email protected]
33 (0) 1 34 07 99 00
33 (0) 1 34 07 99 19
[email protected]
For more information on our products, visit us at:
www.aubetech.com
®
As an ENERGY STAR partner, Aube Technologies has
determined that this product meets the ENERGY STAR
guidelines for energy efficiency.
26/08/2003
400-132-000-A
PB130
Installation Instructions
230 V Line Voltage Power Base
The PB130-230 power base is used to power a TH13x Series control
module. The resistive load must not exceed 3450 watts (NI) @
230 VAC (15 A).
n
n
o
p
Parts
Guidelines
Before making the connections, make sure
that the base covers the electrical box
entirely. If not, install a wall plate at the
back of the base as shown.
p
Connect the wires:
1.
One (1) PB130-230 power base
One (1) floor sensor (for AF and F control modules only)
One (1) wall plate (optional, in certain countries)
o
o
• Power:
Terminals 1 & 5
• Load:
Terminals 2 & 4
see note 1
• Pilot Wire:
Terminal 3
see note 2
• Floor sensor:
Terminals 6 & 7
(no polarity)
see note 3
2.
Turn off power to the heating system at the main power panel to avoid
electrical shock. Installation should be carried out by an electrician.
All work must conform to the applicable country standards for
electrical installations and wiring.
This thermostat should be connected on a circuit equipped with
a fuse or a circuit breaker. It must be installed on a certified
electrical box.
For a new installation, choose a location about 1.5 m above the
floor.
For electric baseboards, convectors and fan-forced heaters, the
thermostat must be installed facing the heating system.
The thermostat must be installed on an inside wall.
Avoid locations where there are air drafts (top of staircase, air
outlet), dead air spots (behind a door), direct sunlight or
concealed chimneys or stove pipes.
p
Note 1 If a contactor is used between the thermostat and the load,
install a snubber at the contactor’s coil terminal to ensure
the proper operation of the thermostat.
Note 2 This connection is required on some models only.
Technical Specifications
3.
Note 3 For the proper operation of the thermostat, the floor sensor
must be centered between two heater wires having a
maximum temperature of 80°C. The floor sensor wire must
not cross any heater wire or be placed close to it.
Model: PB130A-230
Supply: 230 VAC, 50 Hz
Load: 15 A maximum (resistive only)
Power: 3450 Watts (NI) @ 230 VAC
Conformity: EN60730-2-9 / EN50081-1 / EN50082-2
Storage: -20°C to 50°C
Protection: Class 2
Protection degree: IP21
Automatic action: Type 1.B
Environment: Normally polluted
Size (H • W • D) : 2.95 x 2.95 x 0.55 in. (75 x 75 x 14 mm)
r
Push wires into the electrical box and
secure the base to the electrical box
anchorage. The head of the screw
must be less than 2 mm thick.
s
BEFORE installing the control
module onto the base, set the
configuration switches (if any)
on the control module (refer to
the user guide).
NOTE: The terminals are designed to handle a cross-section of wire
measuring 0.33 to 3.1 mm2.
q
n
Procedure
Remove the screw holding the
control module to the power base
and lift the lower part upwards.
The screw cannot be completely
removed.
PB130
4.
WARNING: This power base must be used only with 15-minute
heating cycles. If your control module has a selector switch for
choosing the heating cycle, ensure that the switch is correctly set.
t
Return power to the heating system.
400-130-001-E
19/9/05
1/1