1
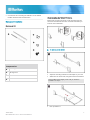
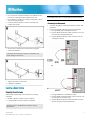
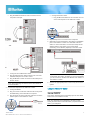
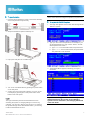
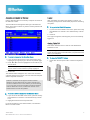
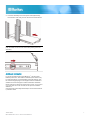
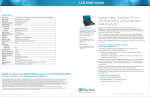
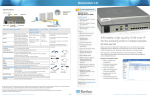
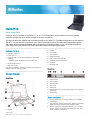
TMCAT17® Quick Setup Guide Thank you for your purchase of the TMCAT17™, a 1U 17" LCD KVM switch, which enables you to control multiple computers through a set of keyboard, touchpad (or mouse), and monitor. This Quick Setup Guide explains how to install and configure the TMCAT17. For additional information on any aspect of TMCAT17, see the TMCAT17 User Guide, which can be downloaded from the Firmware and Documentation section (http://www.raritan.com/support/firmware-and-documentation/) of Raritan's website. Or you can access the product's online help in the Product Online Help section (http://www.raritan.com/support/online-help/). Package Contents TMCAT17 switch x 1 Power cord x 1 Rackmount kit x 1 (including brackets and associated screws) * Mounting depth adjustable from 560 to 900 mm Quick Setup Guide x 1 Warranty card x 1 If anything is missing or damaged, contact the local dealer or Raritan Technical Support for help. 2. 3. 4. 5. 6. 7. 8. 9. Latches LCD display LCD controls Support brackets LCD power switch and LED Touchpad mouse and buttons Keyboard Mounting ears Rear View QS Rule Structure Diagrams Front View 1. 2. 3. 4. 5. 6. Power socket Power switch Ground screw User 2 port Admin port Channel ports (8 or 16 ports, depending on the model you purchased) 7. Reset button QS Rule Before Installation 1. Handle TMCAT QSG QSG-TMCAT-0D-v1.0-E 255-37-0122-00 RoHS It is very important to locate the TMCAT17 in a suitable environment. The surface for placing and fixing the TMCAT17 should be stable and level or mounted into a suitable cabinet. Make sure the place has good ventilation, is out of direct sunlight, away from sources of excessive dust, dirt, heat, water, moisture, and vibration. 1 Convenience for connecting the TMCAT17 to the related facilities should be well considered too. QS Rule Rackmount Installation Rack-Mounting the TMCAT17 Device Before rack-mounting the device, make sure M6 cage nuts have been inserted into the holes of vertical rails where you intend to mount TMCAT17. Rackmount Kit To rack-mount the device Component list Mounting brackets M6 cage nuts M6 washers M6 screws Leave all M6 screws slightly loose until you finish the installation in Step 4. TMCAT QSG QSG-TMCAT-0D-v1.0-E 255-37-0122-00 RoHS Adjust the mounting brackets to fit the depth of your rack. Attach them to vertical rails, using M6 screws and washers. Pick up TMCAT17. 2 Line up the rear of support brackets on the TMCAT17 with the front of mounting brackets installed in the rack. Push TMCAT17 to make the support brackets slide into the slots of mounting brackets. Continue pushing TMCAT17 until the mounting ears contact vertical rails. Note: If the computer is a Sun server, you must prepare the Sun USB MCUTP cable or DCIM-USB G2 instead of MCIM. Connecting the Equipment 1. Turn OFF all devices, including the TMCAT17 switch and computers. 2. Connect one MCIM or MCUTP cable to the computer. If using MCIM-USB or USB MCUTP cable: a. Plug the MCIM or MCUTP's USB connector into one of the computer's available USB ports. b. Plug the MCIM or MCUTP's video connector into the computer's VGA port. Secure both mounting ears to vertical rails, using M6 screws and washers. This step must be finished, or failure to complete it may cause damage to the device. - OR - Tighten all screws on both sides. Installation completed. QS Rule Installing a Basic System Preparing Requisite Items Collect these components or devices before connecting computers. MCIMs or MCUTP cables (one per computer) If using MCIMs, Cat5 UTP cables are required If using MCIM-PS2 or PS/2 MCUTP cable: a. Plug the MCIM or MCUTP's PS/2 mouse connector into the computer's PS/2 mouse port. b. Plug the MCIM or MCUTP's PS/2 keyboard connector into the computer's PS/2 keyboard port. The MCUTP cable is not compatible with Windows 98 operating system. Use MCIM for computers running Windows 98. TMCAT QSG QSG-TMCAT-0D-v1.0-E 255-37-0122-00 RoHS 3 c. Plug the MCIM or MCUTP's video connector into the computer's VGA port. - OR - 4. Repeat Steps 2 to 3 to connect more computers. 5. (Optional) Connect the MCCAT user station to the User 2 port on the TMCAT17 switch via a standard Cat5 UTP cable. For more information, see the Quick Setup Guide shipped with the user station or the section titled Connecting a User Station (Optional) in the User Guide. If using the Sun USB MCUTP cable: a. Plug the MCUTP's Sun USB connector into one of the available USB ports on the Sun server. b. Plug the MCUTP's video connector into the VGA port on the Sun server. Note: See Supporting Sun Servers in the User Guide for more information. If using the MCUTP cable: Plug the MCUTP cable's RJ-45 connector into one of the channel ports on the TMCAT17 switch. Tip: The TMCAT17 switch is compatible with the Paragon II enhanced user station, P2-EUST. If you have P2-EUST, you can connect it, instead of the MCCAT user station, to the TMCAT17 switch. 6. Connect an appropriate power cord to every device in the system. QS Rule 3. Connect the computer to the TMCAT17 switch. If using the MCIM: a. Plug one end of a Cat5 UTP cable into the RJ-45 port of the MCIM being connected with the computer. b. Plug the other end of the Cat5 UTP cable into one of the channel ports on the TMCAT17 switch. Using the TMCAT17 Switch Opening TMCAT17 This section describes how to physically open the LCD KVM switch when it is installed in a rack. Note: The diagrams are for illustration, and may not look exactly the same as the LCD KVM switch you purchased or the rack in your workplace. TMCAT QSG QSG-TMCAT-0D-v1.0-E 255-37-0122-00 RoHS 4 To open the device: 1. Push the latches toward the center to unlock the assembly of the LCD panel and keyboard tray. Note: <XXX> shown in the diagrams represents the model name, which varies according to the product you purchased. To log in to the TMCAT17 system: 1. The Login box appears on the screen after turning ON the TMCAT17 system. 2. Grasp the handle and pull the assembly out. 2. Type your user name and password. For example, if you are the administrator, the user name is "admin," and the default password is "raritan." a. Type admin in the User Name field, and press Enter. b. Type raritan in the Password field, and press Enter. The password is case sensitive. 3. Flip up the LCD panel to a suitable angle. 3. The Selection Menu appears, indicating your login is successful. 4. Turn on the LCD KVM switch by pressing the power switch on the rear panel. 5. Verify if the LCD's power LED is lit blue. If not, turn on the LCD display by pressing the LCD's power switch at the bottom of the LCD panel. Login The login mechanism prevents unauthorized users from accessing the system or changing settings. To access any computer, you may log in with any user account. To configure the system settings on the Administration Menu, you must log in with the administrator account. TMCAT QSG QSG-TMCAT-0D-v1.0-E 255-37-0122-00 RoHS Important: It is strongly recommended to change the default password for the security of your TMCAT17 system. For more information, see Changing Passwords in the User Guide. 5 Accessing a Computer or Channel Logout Use the Selection Menu to access any computer connected to the TMCAT17 switch. After completing your tasks in the TMCAT17 system, you should log out to prevent unauthorized people from accessing the system. The first OSD menu that appears after login is the Selection Menu, which does not show any channel name by default until you assign them. To log out of the TMCAT17 system: 1. If you do not see the OSD on the screen, press the hot key twice QUICKLY to activate it. The default hot key is Scroll Lock. 2. Press F9. The Login box appears, indicating that you have successfully logged out. Closing TMCAT17 This section describes how to close the LCD KVM switch installed in a rack. Note: The diagrams are for illustration, and may not look exactly the same as the LCD KVM switch you purchased or the rack in your workplace. To select a channel on the Selection Menu: 1. If you do not find the channel on the current page, press Page Down or Page Up to go to the next or previous page. 2. Press or to move the highlight bar to the channel you want to select. To close the TMCAT17 device: 1. Press down the LCD panel until it contacts the keyboard tray. Tip: You can press the corresponding number shown in the No column for that channel to quickly highlight it. 3. Press Enter. The Selection Menu disappears. The video of the accessed computer appears on the screen. You can control the computer with the keyboard and mouse. TMCAT17 switches do not support real-time channel detection. Do NOT disconnect the current computer and reconnect a different one to the channel you are accessing, or you may have mouse or keyboard input issues with that channel. When this occurs, re-select the channel on the Selection Menu to solve the problem. To select a different channel on the Selection Menu: 1. If you do not see the OSD on the screen, press the hot key twice QUICKLY to activate it. The default hot key is Scroll Lock. 2. Highlight another channel and press Enter. For more information on the Selection Menu, see Selection Menu in the User Guide. TMCAT QSG QSG-TMCAT-0D-v1.0-E 255-37-0122-00 RoHS 6 2. Push the assembly of the LCD panel and keyboard tray back into the rack until you hear the click sound of latches. Note: If the assembly is stuck and cannot be pushed back, then push the black arrows on both sides while pushing back the assembly. QS Rule Additional Information For more information about the TMCAT17™ and the entire Raritan product line, see Raritan's website (www.raritan.com). For technical issues, contact Raritan Technical Support. See the Contact Support page in the Support section on Raritan's website for technical support contact information worldwide. Raritan's products use code licensed under the GPL and LGPL. You can request a copy of the open source code. For details, see the Open Source Software Statement at (http://www.raritan.com/about/legal-statements/open-source-software-statement /) on Raritan's website. TMCAT QSG QSG-TMCAT-0D-v1.0-E 255-37-0122-00 RoHS 7