1
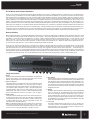
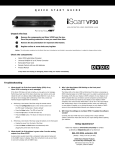
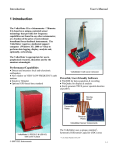
EQ 200
OWNER’S MANUAL
EQ 200
Ten-Band Stereo Graphic Equalizer
Congratulations on your purchase of the AudioSource® EQ 200.
Please take a few moments to read this entire manual, and be sure to
retain this document for future reference. Please read and observe all
safety instructions detailed on page 2.
FEATURES:
Ten Bands from 30 Hz to 16 kHz +/-12dB
Spectrum Analzyer Display
NOTE: If any part of this product is damaged or missing, please call your
dealer or AudioSource® directly at 1.877.715.5439 or 503.914.4688.
Tape 1 / Tape 2 play-record loops
Audio and Video inputs
Please read your warranty and retain your receipt and original carton
for possible future use.
Main Output
EQ Bypass
For more information about AudioSource® electronics, speakers and
accessories please visit www.audiosource.net
Front panel Right and Left Level controls
SPECIFICATIONS
Frequency Response: 10 Hz - 50 kHz +/- 1 dB
Harmonic Distortion:
0.03% of nominal output
Signal to Noise Ratio:
-95 dB
Input Impedance:
100k ohms
Output Impedance:
600 ohms
Load Impedance:
10k ohms or more
Inputs:
Audio, Video,
Tape 1, Tape 2
Outputs:
Main, Tape 1, Tape 2
Control Center Points:
30 Hz, 60 Hz, 120 Hz,
250 Hz, 500 Hz, 1 kHz,
2 kHz, 4 kHz, 8 kHz, 16 kHz
Control Range:
+/- 12 dB
Dimensions:
(W x H x D)
16-1/2” x 3-1/2” x 11-1/4”
(419 x 89 x 286 mm)
Net Weight:
8 lbs. (3.63 kg)
Power Consumption:
14 Watts
The chart below will help you identify which sliders on the GRAPHIC EQUALIZER Section will
most affect the sound and balance of particular instruments by illustrating where they lie in the
overall sonic spectrum.
30
60
120
250 500 1,000 2,000 4,000 8,000 16,000
KICK DRUM
SNARE DRUM
CYMBALS
CHIMES
BASS GUITAR
LEAD GUITAR
FEMALE VOCAL
MALE VOCAL
SAXAPHONE
ORGAN
PIANO
STRING BASS
VIOLIN
CELLO
CLARINET
FLUTE
TRUMPET
Fundamental Note
AudioSource®
13970 SW 72nd Ave
Portland, OR 97223
503.914.4688
www.audiosource.net
Harmonic or Overtone
EQ 200 Owner’s Manual
EQ 200
OWNER’S MANUAL
CAUTION
RISK OF ELECTRICAL SHOCK
DO NOT OPEN
CAUTION: TO REDUCE THE RISK OF ELECTRIC SHOCK, DO NOT REMOVE THE COVER. NO
USER SERVICABLE PARTS INSIDE. REFER SERVICING TO QUALIFIED PERSONNEL!
EXPLANATION OF
SAFETY SYMBOLS
The exclamation point within an equilateral triangle is intended to alert the user of the presence of important
operating and maintenance (servicing) instructions in the literature accompanying the appliance.
The lightning flash with the arrowhead symbol within an equilateral triangle is intended to alert the user to the
presence of uninsulated “dangerous voltage” within the products’ enclosure that may be of sufficient magnitude
to constitute a risk of electric shock to persons.
IMPORTANT SAFETY INSTRUCTIONS
• WARNING: TO PREVENT FIRE OR SHOCK HAZARD, DO NOT EXPOSE THIS APPLIANCE TO RAIN OR MOISTURE. THE APPARATUS SHALL NOT
BE EXPOSED TO DRIPPING OR SPLASHING AND THAT OBJECTS FILLED WITH LIQUIDS, SUCH AS VASES, SHALL NOT BE PLACED
ON APPARATUS.
• WARNING: TO PREVENT FIRE OF SHOCK HAZARD, DO NOT USE THIS PLUG WITH AN EXTENSION CORD, RECEPTACLE OR OTHER OUTLET
UNLESS THE BLADES CAN BE FULLY INSERTED TO PREVENT BLADE EXPOSURE.
• WARNING: THE MAINS PLUG IS USED AS DISCONNECT DEVICE. THE DISCONNECT DEVICE SHALL REMAIN READILY AVAILABLE.
• WARNING: ONLY USE ATTACHMENTS OR ACCESSORIES SPECIFIED OR PROVIDED BY THE MANUFACTURER.
1. Read these instructions.
2. Keep these instructions.
3. Heed all warnings.
4. Follow all instructions.
5. Do not use this apparatus near water.
6. Clean only with dry cloth.
7. Do not block any ventilation openings. The ventilation should not be impeded
by covering the ventilation openings with items such as newspaper, tablecloths, curtains etc. Install in accordance with the manufacturer’s instructions.
8. Do not install near heat sources such as radiators, heat registers, stoves,
or other apparatus (including amplifiers) that produce heat. No open flame
sources, such as lighted candles, should be placed on the apparatus.
9. Do not defeat the safety purpose of the polarized or grounding type plug.
A polarized plug has two blades with one wider than the other. A grounding
type plug has two blades and a third grounding prong. The wide blade or
third prong is provided for your safety. If the provided plug does not fit into
your outlet, consult an electrician for replacement of the obsolete outlet.
10. Protect the power cord from being walked on or pinched particularly at the
plugs, convenience receptacles, and at the point of exit from the apparatus.
11. Unplug the apparatus during lightning storms or when unused for long
periods of time.
12. Refer all servicing to qualified personnel. Servicing is required when the
apparatus has been damaged in any way, such as when the power supply
cord or plug is damaged, liquid has been spilled or objects have fallen into
the apparatus, the apparatus has been exposed to rain or moisture, does
not operate normally, or has been dropped.
13. The apparatus should be connected to a mains socket outlet with a protective
earthing connection.
Two Year Limited Warranty
AudioSource, a division of Peak Audio Group, warrants this product against defects in materials and workmanship for a limited period of time.
For a period of two (2) years from date of original purchase, we will repair or replace the product, at our option, without charge for parts.
Customer must pay for all labor charges associated with the removal and re-installation of speakers for the limited period and all parts and
labor charges after the limited warranty period expires. The limited warranty period for factory refurbished products expires after ninety (90) days
from date of original purchase. This limited warranty applies only to purchases from authorized AudioSource Retailers or Distributors. This
limited warranty is extended only to the original purchaser and is valid only to consumers in the United States.
Consumers are required to provide a copy of the original sales invoice from an authorized AudioSource Retailer or Distributor when making
a claim against this limited warranty. This limited warranty only covers failures due to defects in materials or workmanship that occur during
normal use. It does not cover failures resulting from accident, fire, flood, misuse, abuse, neglect, mishandling, misapplication, alteration, faulty
installation, modification, service by anyone other than AudioSource, or damage that is attributable to Acts of God. It does not cover costs of
transportation to AudioSource or damage in transit. The customer should return their defective product, freight prepaid and insured, to AudioSource
only after receiving a Return Authorization.
Repair or replacement under the terms of this warranty does not extend the term of this warranty. Should a product prove to be defective in
workmanship or material, the consumer's sole remedies will be repair or replacement as provided under the terms of this warranty. If the defective
product is discontinued AudioSource may replace the product with an equivalent or superior product at its option. Any cost of re-installation
or repair of wall or ceiling surface is the sole responsibility of the customer and that cost shall not be the responsibility of AudioSource. Under
no circumstances shall AudioSource be liable for loss or damage, direct, consequential or incidental, arising out of the use of or inability to use
the product. There are no express warranties other than described above.
2
13970 SW 72nd Ave. Portland, OR 97223 • 503.914.4688 • www.audiosource.net
EQ 200
OWNER’S MANUAL
A Few Words about Graphic Equalizers
Thank you for choosing this AudioSource EQ 200 Graphic Equalizer. Used correctly, a Graphic Equalizer is a powerful tool for very detailed control
over the sound of your speakers, far more than available from simple tone controls. With the EQ 200, you can enhance the sound of older recordings,
alter instrumental and vocal balance to suit your own tastes, make “Custom Equalized” recordings, and a multitude of other uses. However, like any
tool, excessive or incorrect adjustments can yield very unpleasant results, and can overload your amplifiers and speakers. Improvement of sound
quality, particularly in the extreme bass and treble regions, is completely dependent upon the quality of the other equipment you are using in your
system. Limited amplifier power and speakers with a limited frequency range are the greatest barriers to achieving accurate, flat response. If you
detect any distortion in the bass or treble regions while boosting the EQ 200’s sliders in these areas, back off immediately, as you are probably over
taxing either your amplifier or your speakers. Please read this manual before use, and follow our suggestions and basic guidelines for the best sound.
Having said that, be assured that “good sound” is a relative thing… We all have different opinions and tastes. The EQ 200 is designed to allow you to
change the sound of your speakers to suit your own musical choices. On the first page of this manual is a chart designed to show you the frequency
content and range for a variety of musical instruments. This chart will help you find the proper sliders to adjust to achieve the desired results.
Basic Guidelines
Before adjusting the sliders, it is VERY IMPORTANT to clearly define your objectives. Without this consideration before adjustment takes place, it will
be very difficult to attain pleasing results. Carefully listen to your system – ask yourself “What DON’T I like about the sound?” If the answer is “I want
more Bass”, you have two ways to accomplish this. Choice #1 – Raise or “Boost” the sliders for the lowest frequencies – on both channels – Left &
Right. Choice #2 – Lower or “Cut” the sliders on the midrange and higher frequencies. The end result will be the same – You’ll have more bass.
Conversely, if you’d like to hear more High Frequencies, you have two ways to accomplish this. #1 – “Boost” the sliders for the highest frequencies –
on both channels Left & Right. #2 – “Cut” the sliders of the Midrange and Bass frequencies.
As you can see, there are a variety of ways to accomplish your objectives. Be aware that due to the nature of all equalizer sliders, you will find that
movement of any given slider will also have some effect on the setting of the sliders adjacent to either side of it. Experiment – let your ears decide
what sounds best, but try to have a clear objective before you begin. One suggestion: avoid the “Boost – Boost Syndrome”… avoid “Boosting” on
frequency area too much, by “Cutting” another frequency area. Don’t just radically boost everything- it will add noise to the system, and overtax your
other components. Subtle, careful equalization will make a huge improvement in the overall sound of your system. Enjoy your EQ 200, and if you have
any questions, we are here to help. You can call AudioSource at 877.715.5439, Monday through Friday, 7:00am to 5:30pm Pacific Time.
9
8
9
7
Using the Controls
1
2
3
1. Power
Press this button to activate the power on the EQ 200. The LED will be
green to show power is “On”. Push the button again to turn “Off” the
EQ 200. The LED will be red to show this selection.
2. Tape 1-2 / Tape 2-1
This button allows you to make a tape copy of “Dub” between the two
cassette decks. Press this button “In” to “Dub” from Tape 1 to Tape 2.
The LED will be green to show this selection. Leave this button in the
“Out” position to “Dub” from tape 2 to Tape 1. The LED will be red to
show this selection. When the “Line / Tape” switch is “Out”, or in the
TAPE position , this “Tape 1-2 / Tape 2-1” switch will select which tape
deck is to be listened to. Leave it “In” for Tape 1, “Out” for Tape 2.
3. Audio / Video
This button selects between two input sources. Press the button “In”
to select an Audio input source, such as a CD player, or MP3 player.
The LED will be green to show this selection. Leave the button “Out”
to select a Video input source, such as a DVD player or VCR. The
LED will be red to show this selection.
Note: The EQ 200 equalizes the sound of these various components.
At no time does the EQ 200 alter the picture, and no “Video – Type”
connections are included. These inputs will accept any “Line Level”
source, such as a CD player, MP3 player, tape deck, VCR, etc.
13970 SW 72nd Ave. Portland, OR 97223 • 503.914.4688 • www.audiosource.net
4
5
6
4. EQ / Bypass
Use this switch to instantly compare the “equalized” and “un-equalized”
sound. Press this button “In” to hear the result of your equalization curve.
The LED will be green to show this selection. When this button is “In”
the red LEDs in all twenty sliders will light up. Leave this switch in the
“Out” position to bypass the equalization of the EQ 200. The LED will
be red to show this selection, and the red LEDs in the sliders will
disappear at this time.
5. EQ Rec
EQ Record. Press this button to make a tape copy of with the equalization
curve you have just set. The LED will be green to show this selection.
This can be useful when making a cassette tape to play in your car.
A well equalized tape can improve the sound from smaller, less
expensive car stereo speakers. With this button in the “Off” position,
the cassette tape copy will be recorded without equalization. The LED
will be red to show this selection.
6. Line / Tape
This button selects between input sources. In the “In” position, the
“Line Input” is chosen. The LED will be green to show this selection.
Leave this button in the “Out” position to hear the “Tape Input”. The
LED will be red to show this selection.
3
EQ 200
OWNER’S MANUAL
Using the Controls (continued)
7. Level Controls
Both left and right channels have a control marked “Level”. This controls
the level, or volume of each channel. Usually, these controls can be
set to their maximum position, but these levels can be reduced if an
overly strong input signal causes distortion. Usually, similar adjustments
should be made for both channels.
8. Spectrum Analyzer Display
This provides a visual display of the relative signal levels in each of the
EQ sliders. The Spectrum Analyzer display is divided into ten columns
of LEDs which correspond to the ten EQ sliders. You can use this display
to assist you in setting your equalizer sliders, as well as to obtain
information about the frequency content of the music as you play it
through the EQ 200.
9. EQ Sliders
Each of these sliders will give 12 dB of “Boost” and 12 dB of “Cut”.
There are ten sliders per channel – ten for the Left channel, and ten
for the Right channel.
9. EQ Sliders (continued)
Looking at the front panel, the sliders that control the lowest frequencies
are on the left, with the higher frequencies farther right. Usually,
identical adjustments should be made for both channels.
These sliders are one octave apart from one another. This corresponds
with the entire range of human hearing. The last page of this owners’
manual contains a chart, showing which sliders to adjust to affect the
sound of various instruments.
For instance, the lowest note of a bass guitar is 42 Hz. By adjusting the
sliders at 30 Hz and 60 Hz you can raise or lower the volume of the
bass guitar, bass drum, and any other musical instruments that occupy
this frequency range. On the other hand, the sound of the female vocalist
occupies a frequency range from roughly 200 Hz to 1500 Hz. By adjusting
the sliders within this range, you can change the tonal character of the
female voice, and any other musical instruments that occupy this
frequency range.
Hooking it all up
The EQ 200 should be connected through the “Tape Monitor Loop” of your receiver, integrated amplifier, or preamplifier. Since the EQ 200 replaces the
tape deck, remember to activate the “Tape Monitor” switch on your receiver, integrated amplifier, or preamplifier – as you would when playing your tape
deck. Your tape deck can now be plugged into the back of the EQ 200.
When making or changing connections, it is always wise to unplug the power cords of your components – or at least make sure the power is “Off”, so
you won’t hear any unexpected “pops” during connection of cables.
The steps below are for connecting two tape decks, the EQ 200, a receiver, and an auxiliary source such as an MP3 player. Your set up may vary.
1. Connect the TAPE OUT or TAPE RECORD jacks (different components use different terminology) on the back of your receiver/integrated
amplifier/preamplifier to the AUDIO IN jacks of the EQ 200.
2. Connect the MAIN OUT jacks of the EQ 200 into the TAPE IN or TAPE MONITOR jacks of your receiver/integrated amplifier. This completes the “loop”.
3. Always make sure to engage the “TAPE MONITOR” button on our receiver, no matter which input source you want to listen to. This allows the
“equalized” signal to be heard on any source material.
4. You can connect two tape decks to the EQ 200. For Tape 1, connect the LINE OUT or MONITOR jacks on your tape deck to the TAPE 1 IN (play)
jacks on the EQ 200. Next, connect the LINE IN or RECORD jacks on your tape deck to the TAPE 1 OUT (rec) jacks on the EQ 200.
5. You may use the VIDEO IN jacks on the EQ 200 to connect any high output source, such as an MP3 player, CD player, tape deck, or the audio
outputs of a DVR, cable box, DVD player or VCR.
Note: Any of the inputsAudio In, Video In, Tape 1 In,
or Tape 2 In can be used as
inputs for the EQ 200.
VIDEO
IN
OUT
L
AUDIO
R
TAPE
OUT (rec)
MP3 / CD
DVD / VCR
CABLE BOX
DIGITAL ANTENNA
DIGITALCONVERTER
TAPE
IN (play)
LINE
OUT
RECEIVER
VIDEO
PHONO
CD
AUX
R
AV2
LINE
OUT
LINE
IN
L
R
4
AV1
13970 SW 72nd Ave. Portland, OR 97223 • 503.914.4688 • www.audiosource.net
DVD
L
R
L
INPUT
AV3
CD
LINE
IN
OUTPUT
Main Zone 2 Record
Tuner
VIDEO
L
R
CASSETTE DECK 1
CASSETTE DECK 2