1
Installation and wiring
Einbau und Verkabelung
Belastung durch Ihr Stereosystem zu verkraften.
Wir empfehlen ausserdem die Verwendung einer hochbelastbaren Batterie und
eines Energiespeicherungskondensators,
sowie zusätzliche Stützbatterien um die
Leistungsabgabe Ihres Verstärkers zu
maximieren und stabilisieren.
To maximize the performance of your
amplifier, we suggest the use of a heavy
duty battery and an energy storage
capacitor as well as additional back-up
batterys to maximise and stabilize the
power output of your amplifier.
ACHTUNG!
CAUTION!
ETON FA Verstärker sind Hochleistungsverstärker die auch im Wettbewerbsbereich eingesetzt werden. Hier können je
nach angeschlosserner Last und Lautstärke extreme Ströme fliessen, die auch zu
extremen Spannungsschwankungen
führen können. Zum Betrieb der ETON FA
Verstärker muss eine entsprechende
Spannungstabilisierung installiert werden.
Vergewissern Sie sich bei Ihrem Hersteller,
ob die Serienlichtmaschine und das
Bordnetz hierfür ausgelegt sind.
ETON schliesst eine Garantie sowie einen
weiterführenden Schadenersatz für
Schäden die durch unsachgemäßen Betrieb oder Nichtbeachtung oben genannter
Warnhinweise entstanden sind, ausdrücklich aus!
ETON FA amplifier are high performance
amplifier which are also used at dB-drag
competition events. According to the
circumstances of connected load and
sound volume, it is possible that very high
current is drawn from the electrical system
of your car. Due to this circumstances
extreme voltage fluctuations can occur.
To operate ETON FA amplifiers you have to
install corresponding power stabilization.
Doublecheck at your automaker if the
alternator and on-board electrical system is
able to handle additional batterys.
ETON excludes any warranty claims and
also any further warranty claims which
result of improper operation, installation or
nonobservance of the warning notices
above!
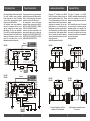
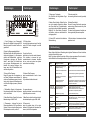
VERKABELUNG DES SYSTEMS
WIRING THE SYSTEM
Vorsicht! Wenn Sie beim Einbau des Caution! If you do not feel comfortable
Installation and wiring
Einbau und Verkabelung
zubehör, insbesondere von elektrischen
Motoren isoliert und getrennt verlegt sein.
Dies dient dazu, ein übersprechen und
damit Störungen aus elektrischen Strahlungsfeldern in das Audiosignal zu verhindern.
Werden Kabel durch die Spritzwand oder
andere Metallbarrieren geführt, müssen die
Kabel zur Vermeidung von Kurzschlüssen
(BRANDGEFAHR) mit Plastik- oder Gummiringen zusätzlich geschützt werden. Die
Kabel zunächst etwas länger lassen und
erst später exakt anpassen.
Note: Ma ke sure the cable cross-sections
are equal at plus and minus cables.
Hinweis: Achten Sie immer auf ausreich- For every plus cable connected to the
ende Kabelquerschnitte. Diese sollten bei
Plus- und Minuskabeln identisch sein.
Für jedes an der Batterie angeschlossene
Pluskabel muss auch ein gleich starkes
Minuskabel von der Batterie zur Karrosserie
(oder direk t zur Endstufe) geführt werden.
battery an equally strong minus cable has to
be carried from the battery to the trim (or
directly to the amplifier).
2. Das ROTE Kabel (Stromkabel) durch
abisolieren von 1,9 cm am Kabelende zur
Befestigung am Verstärker vorbereiten.
Das blanke Kabel in den B+-Anschluss
einführen und die Madenschraube zur Befestigung desKabels anziehen.
2. Prepare the RED wire (power cable) for
attachment to the amplifier by stripping 3/8"
of insulation from the end of the wire. Insert
the bared wire into the B+ terminal and
tighten the set screw to secure the cable in
place.
Hinweis: Das B+- Kabel muss maximal 45
cm von der Fahrzeugbatterie mit einer
Sicherung ausgestattet sein.
Note: The B+ cable MUST be fused 18" or
3. Trim the RED wire (power cable) within
18" of the battery and splice in a inline fuse
holder (not supplied).
See Specifications for the rating of the fuse
to be used.
4. Strip 1/2" from the battery end of the
power cable and crimp an appropriate size
ring terminal to the cable. Use the ring
terminal to connect to the battery positive
terminal.
Geräts unsicher sind, lassen Sie es bitte
von einem qualifizierten Eton Fachhändler
einbauen.
with wiring your new unit, please see your
local authorized ETON Dealer for
installation.
Vorsicht! Entfernen Sie vor dem Einbau
den negativen Batteriepol, um Schäden am
Gerät, Feuer bzw. mögliche Verletzungen
zu vermeiden.
Bitte erfragen Sie in Ihrer Fachwerkstatt ob
ein Trennen der Batterie ohne Probleme
möglich ist.
Caution! Before installation, disconnect
the battery negative (-) terminal to prevent
damage tothe unit, fire and/or possible
injury.
Please ask your car dealer if disconnecting
the battery is possible without any problem.
3. Das ROTE Kabel (Stromkabel) maximal
45 cm von der Batterie abisolieren und
einen Inline-Sicherungshalter einspleißen/
montieren.
Die maximale Stromaufnahme zum
festlegen des Sicherungswertes ist in den
technischen Daten aufgeführt.
Zunächst noch KEINE Sicherung einsetzen.
1. Planen Sie die Kabelverlegung.
Die RCA-Kabel sollen dicht zusammen
bleiben, aber von den Stromkabeln des
Verstärkers und anderem Hochleistungs-
1. Plan the wire routing.
Keep RCA cables close together but
isolated from the amplifier's power cables
and any high power auto accessories,
4. 1,3 cm am Ende des Stromkabels abisolieren und einen Ringadapter von
geeigneter Größe an das Kabel crimpen.
Den Ringadapter zum anschließen an den
positiven Anschluss der Batterie benutzen.
9
especially electric motors.
This is done to prevent coupling the noise
from radiated electrical fields into the audio
signal.
When feeding the wires through the firewall
or any metal barrier, protect them with
plastic or rubber grommets to prevent short
circuits (DANGER OF FIRE). Leave the
wires long at this point to adjust for a precise
fit at a later time.
less from the vehicle's battery.
Do NOT install the fuse at this time.
10