1
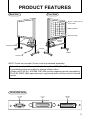
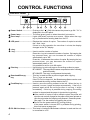
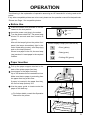
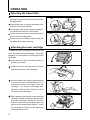
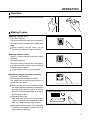
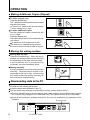
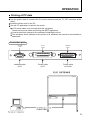
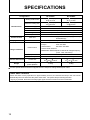
OPERATION MANUAL
BF-030SPP/WPP
PLUS
First of all, we would like to thank you very much
for purchasing a Plus Copy board CONFERENCE
MODEL.
Please read this Operation Manual before using
the machine to get the best performance out of
the product.
We recommend that you keep this manual for
future reference.
EXPLANATION OF UL REGULATORY LABEL
(USA ONLY)
PLEASE NOTE: The description "Computer Rooms" on the
label located on the rear of the copyboard, refers to areas where
an abundance of computer control equipment (such as high output
servers) is being used, It does NOT refer to environments such
as offices or classrooms where there are simply PC's being used.
UL regulations require that we place a warning label in regard to
this item being used in a "Computer Room". Please understand
that this equipment will in no way interfere with the running of
computer equipment or peripherals. The UL regulation simply
applies to all items that contain flammable material in excess of a
specified area, We would like to further stress that there is no
inherent risk of this equipment causing a fire. It is only pointing
out that should a fire occur, then this equipment will also burn
along with any other flammable materials contained in the room.
Should you have any questions whatsoever about this information,
please call PLUS Corporation of America directly at (201)8182700
CONTENTS
FEATURES ......................................................... 1
SAFETY PRECAUTIONS ................................... 2
PRODUCT FEATURES ...................................... 3
CONTROL FUNCTIONS ..................................... 4
OPERATION ....................................................... 5
MAINTENANCE/STORAGE ............................. 10
HANDLING PRECAUTIONS ............................. 10
TROUBLE SHOOTING ..................................... 11
SPECIFICATIONS ............................................ 12
Printer must be purchased separately.
Compatible printer: HP LaserJet 6L, 6Lse, 6Lxi, 6MP, 6Pse, 6Pxi
*Compatible printers are subject to change without notice.
Please call PLUS @ 1-800-289-7587 with question regarding printer
compatibility.
*PLUS BF-030PP plain paper electronic copy board dose not have a
built-in thermal printer.
FEATURES
The world's first plain paper printing electronic copy board with two
built-in interface that let you print directly from the writing pancl's surface
to a compatible PC printer or download information to your personal
computer.
You can copy the information on the board surface quickly onto plain
paper via the connected compatible PC printer.
The plain paper does not discolor or fade like heat-sensitive paper,
thus making copies unnecessary and saving both time and money.
By connecting your PC to the board, you can download the information
on the board surface and save it. Then, you can edit and send it via email or network to other remote location.
If a PC and compatible PC printer is connected to the port on the
bottom of the board, it is possible to use the unit as a PC printer.
(It is necessary to install the auxiliary driver software in the PC unit.)
The board surface can be easily moved with a light manual touch.
BF-030SPP BOARD FAX CARTON CONTENTS
The product package contents are as listed below. Please confirm that
all parts have been included before using the equipment.
Copy board ......................... 1
MAIN UNIT ACCESSORIES
Special markers (one each of
black, red, blue)
Special eraser (1)
Instruction Manual (1 copy with
Guarantee)
Power cord (1 cord, 4 meters
long)
Printer power cord (2 cord, 1.1
and 2.5 meters long)
Printer cable (1 cable, 1.3
meters long)
BOARD WARE ACCESSORIES
Interface cable (D-Sub 9 pin,
2 m): 1
Set-up disk (floppy disk): 1
Set-up manual: 1 copy
User registration card: 1
Note: HP LaserJet 6L, 6Lse, 6Lxi, 6MP, 6Pse, 6Pxi and Extension PCL 5 are
trademarks of Hewlett-Packard Company in the United States.
MS-DOS, Windows, Windows 3.1, and Windows 95 are registered trademarks
of Microsoft Corporation in the United States and in other countries.
All other product names and company names are the registered trademarks
or trademarks of the respective companies.
1
SAFETY PRECAUTIONS
Before use (picture displays).
Please read this manual carefully before using your board-Fax BF-030SPP/WPP and
keep the manual handy for future reference.
CAUTION
TO PREVENT SHOCK, DO NOT OPEN THE CABINET. NO USER-SERVICEABLE PARTS INSIDE. REFER SERVICING TO QUALIFIED PLUS
SERVICE PERSONNEL.
WARNING
TO PREVENT FIRE OR SHOCK, DO NOT EXPOSE THIS UNIT TO RAIN OR
MOISTURE. DO NOT USE THIS UNIT’S GROUNDED PLUG WITH AN EXTENSION CORD OR IN AN OUTLET UNLESS ALL THREE PRONGS CAN BE FULLY
INSERTED. DO NOT OPEN THE CABINET. THERE ARE HIGH-VOLTAGE COMPONENTS INSIDE. ALL SERVICING MUST BE DONE BY QUALIFIED PLUS
SERVICE PERSONNEL.
WARNING
TO PREVENT FIRE OR SHOCK, DO NOT EXPOSE THIS UNIT
TO RAIN OR MOISTURE. DO NOT USE THIS UNIT’S
GROUNDED PLUG WITH AN EXTENSION CORD OR IN AN
OUTLET UNLESS ALL THREE PRONGS CAN BE FULLY
INSERTED. DO NOT OPEN THE CABINET. THERE ARE
HIGH-VOLTAGE COMPONENTS INSIDE. ALL SERVICING
MUST BE DONE BY QUALIFIED PLUS SERVICE PERSONNEL.
2
PRODUCT FEATURES
Back Side
Front Side
50mm × 50mm (2"×2")
cross-ruled
Writing surface
Accessory tray
Control
panel
Connection ports
T-frame
Caster
Power cord
NOTE: Printer not included. Printer must be purchased separately.
Compatible printer: HP LaserJet 6L, 6L, 6Lse, 6Lxi, 6MP, 6Pse, 6Pxi
*Compatible printers are subject to change without notice.
Please call PLUS @ 1-800-289-7587 with qucstion regarding printer compatibility.
*PLUS BF-030PP plain paper electronic copy board dose not have a built-in thermal
printer.
Connection ports
PC COM
PORT
PC LPT
PORT
PRINTER
PORT
3
CONTROL FUNCTIONS
CONTROL PANEL
PLUS BOARDFAX
BF-030SPP
DONWLOAD
FEED
POWER ON
ERROR
PC ON LINE
POWER
A
B
C
J
D
E
F
PRINT
REPERT
STOP
G
H
I
Power Switch ..................... Pushing to the " " (ON) side causes the power to go ON. "01" is
displayed in the LED panel.
Power lamp ........................ The lamp (green) goes on when the switch is turned on.
Error lamp .......................... Lights (red) when a printer error occurs. Blinks when the copy
key is pressed while sending data from the PC.
LED panel .......................... Displays the number of copies. The number of copies is set with
the + and - keys.
If there is no key operation for more than 1 minute, the display
changes to the "01" display.
+ key
- key .................................... Used to set the number of copies.
Press the + key to increase the number of copies. By keeping the
key pressed down, you can increase the number of copies
automatically up to "99".
Press the - to decrease the number of copies. By keeping the key
pressed down, you can decrease the number of copies
automatically down to "01".
It is possible to set for up to 99 copies.
Print key ............................. Use this key to print one page on the writing surface to paper.
BF-030SPP: The copy has the same compression ration vertically
and horizontally.
BF-030WPP: The copy is compressed horizontally.
Download/Recopy ............. This key is used to make a print-out again after copying.
key
The +/- keys can be used.
If the PC On-Line lamp is lit, the Boardware software can be used
to download the writing surface data to the PC.
Feed/Stop key .................... Used to move the writing surface to the left. When the key is
pressed, it moves 1 page and stops automatically. If the key is
pressed again while the writing surface is moving, it stops
immediately. If this key is pressed during copying, the writing
surface is stopped and the paper is ejected during printing.
If the number of copies is set to multiple copies, the printer will
eject the set number of page for the paper which were printed on
up to the point when the stop key was pressed. Reset the printer.
See page 7 for the method of resetting the printer
Do not turn the power switch OFF during printing.
If the power switch is turned OFF by mistake during printing,
this could cause a paper jam.
PC ON-Line lamp ............... This lamp is lit when the Boardware software is used and the unit
is connected to a PC.
4
OPERATION
The following is the explanation of operation assuming an HP LaserJet 6L is being used as the
printer.
If any other compatible printers are to be used, please see the operation manual for that particular.
*Please see Page.1 for compatible printers.
Before Use
Press the caster lock switches to set the
casters to the lock position.
POWER ON
Insert the power cord plug in the socket.
Turn the power switch ON. The power lamp
blinks 2-3 seconds and then remains lit
(green).
After all the lamps light on the printer front
panel, the lamps immediately light in the
order of data lamp (center), error lamp (top)
and on-line lamp (bottom).
If there is no paper in the unit, the error lamp
(top) remains lit. Insert paper in the required
location.
ERROR
POWER
Printer Display Lamps (HP LaserJet 6L)
• Error (yellow)
• Data (green)
• Printing OK (green)
Paper Insertion
Pull up the paper support attached to the
back of the printer paper feed tray.
Insert paper in the paper feed tray.
Up to 100 sheets can be inserted at a time.
Make sure that no paper is protruding from
the paper feed tray at this time.
If paper is inserted in the paper feed tray,
the on-line lamp (bottom) is lit.
1
2
Use the paper guide to locate center the
paper in the feed tray.
For further details, consult the Operation
Manual for the printer.
3
5
OPERATION
Selecting the Paper Path
Operate the paper path lever on the lower
left side up the front of the printer to select
the paper path.
Pushing the lever up causes the paper to be
ejected in the tray on the top.
Pushing the lever down causes the paper to
be ejected from the font of the printer.
Do not operate the lever during copying as
this could cause paper jams.
If there are many copies, to be printed use
the paper eject tray on the top.
Attaching the toner cartridge
To attach the toner cartridge, first remove the
toner cartridge from the package. (Keep the
package in a safe place for re-storage of the
cartridge).
Hold the cover with both hands and pull
toward you to open.
Shake the toner cartridge well to evenly
distribute the toner in the cartridge.
Hold the ends of the sealing tape attached
to the side of the cartridge and pull it to
completely remove the tape from the
cartridge. The length of the tape after
removal is 490 mm (19.3 inches) or twice
the length of the cartridge.
While grasping the handle on the cartridge
(so that the arrow is facing the printer side),
insert the cartridge in the printer. Be sure
that the ends of the cartridge match the
groove on the black plastic section. Insert
the cartridge all the way to the back and
close the printer cover.
6
上
Up
下
Down
OPERATION
Operation
Use the special markers to write on the board.
Making Copies
Making a single copy.
Press the Copy key.
The writing surface moves the equivalent of
one side and the contents are copied onto
paper.
When making a single copy it is not
necessary to set the number of copies.
Making multiple copies.
Use the +/- keys to set to the required number
of copies.
Press the Copy key.
The writing surface moves the equivalent of
one side and the contents are copied on
multiple sheets of paper.
It is possible to set to up to 99 copies.
Stopping copying operations midway.
Press the Feed/Stop key.
The writing surface being read stops.
The pages which was being printed on is
ejected from the printer.
If the unit has been set to multiple copies,
the sheets that were printed up to that point
are ejected for the set number of copies.
Remove all the inserted paper at this time
and reset the printer.
Resetting the printer.
Hold down the printer front panel button
(approx. 5 seconds) and release the button
after the 3 display lamps light in order.
If the printer is being reset, it is not possible
to receive key operations while the copy
count display is blinking.
Printer front panel
7
OPERATION
Making Additional Copies (Repeat)
To make a single copy
Press the Repeat key.
The 1 additional sheet is printed out from data
that was just copied.
There is no need to set several sheets
when making only 1 copy.
To make additional copies
Set the number of copies needed with the
[+] or [-] keys.
Press the Repeat key.
The copies are printed out from data that was
just copied.
A maximum of 99 copies can be set.
The Stop key is disabled during printout.
Be sure to set the correct number of copies.
Moving the writing surface
Moving with the keys.
Press the Feed/Stop key. When the key is
pressed, the writing surface moves to the left
the equivalent of one page and then stops.
If the Feed/Stop key is pressed during
movement, the unit immediately stops.
Moving manually
It is also possible to move the writing surface
manually. The sheet can be moved in this
case either to the left or right. Avoid moving
the writing surface too quickly manually as
this could cause malfunctioning.
Downloading data to the PC
Use the auxiliary cable to connect the COM Port on the PC and the PC COM connector (9 pins) on
the board to the auxiliary serial cable.
Install the board ware software in the PC.
Use the board ware software to download the writing surface data to the PC.
The PC ONLINE lamp on the unit switch panel lights up when the boardware starts up and
the "Repeat" key changes to the "Download" key. The Repeat function is now inoperable.
Consult the board ware software manual for the connect installation and operation of the
software.
Download key
PLUS BOARDFAX
BF-030SPP
DONWLOAD
FEED
POWER ON
ERROR
PC ON LINE
PRINT
POWER
8
PC ONLINE LAMP
REPERT
STOP
OPERATION
Printing of PC data
Use the printer cable to connect the PC printer connector and the, PC LPT connector of the
board.
Install the printer driver in the PC.
Use the PC applications to print to the printer.
A PC printer cable is not included with this equipment.
Please use a printer cable conforming with IEEE regulations.
Consult the printer manual for the method of installing the driver.
The accessory driver software for the printer is for Windows and cannot be connected to a
Macintosh.
Connection ports
PC COM
PORT
PC LPT
PORT
PRINTER
PORT
Interface cable
to PC
Printer cable
to PC
Printer cable
to Printer
9
MAINTENANCE/STORAGE
Conduct regular maintenance as described below to insure clear copies at all times.
(1) Cleaning the writing surface.
If the writing surface is dirty, use a damp cloth to clean it off. In case of severe buildup, use a neutral cleaner diluted in water. Be sure the sheet is completely dry
before operating the equipment again.
(2) Cleaning the accessory tray and frame.
Use a damp cloth to clean off any residue from markers on the accessory tray and
frame.
HANDLING PRECAUTIONS
<FOR SAFE USE>
1. Avoid placing the board in hot or cold areas where it is exposed to direct sunlight
or next to an air conditioning duct.
2. When using sticky tape on the surface of the writing surface to attach paper originals,
be sure to remove it at once when finished. Moreover, after removing it, wipe the
writing surface clean.
Do not hit or pierce the panel with any hard or sharp objects.
3. Do not leave writing or marks on pages 1-4 for a long time since it may become
difficult to erase.
4. As thinner, benzine, alcohol, etc., may discolor or mark the main unit and the
writing surface never use such chemicals when cleaning.
5. After use, be sure to turn OFF the power switch. In addition, when it is not to be
used for a long time, make certain that the plug is pulled form the outlet.
6. Always use the correct type of marker. Be careful not to use other markers as the
panel may be damaged or, in some cases, the ink may be difficult to remove.
7. To ensure all information will be printed, leave a slight margin around the edge of
the panel as indicated below.
20mm
30mm
30mm
20mm
8. When moving this machine, disengage the caster locks, hold both the right and
the left sides of the main unit firmly, and avoid any sudden jolts or shocks.
10
TROUBLE SHOOTING
BEFORE CALLING FOR HELP, TRY ....
PROBLEM
POWER WONT TURN ON
CHECKPOINT
Check if power cord is connected to outlet (plug
socket).
WONT COPY EVEN BY
PRESSING COPY KEY
Check if printer power cord or printer cable has
been disconnected.
Check if error lamps on the printer or main unit
are lit up.
(If these are lit up, try turning the power off
temporarily and then turning it back on again.)
WHEN SHEET WRITING CAN'T
BE REMOVED WITH ERASER
Was writing done with other than the special
markers?
(Gently wipe away with a cloth soaked in water
or neutral detergent and thoroughly wrung out.)
COPIES HAVE STAINS OR
SMEARS
Are many small pieces from the marker stuck
to the sheet?
(When dirty or stained gently stroke the sheet
surface wiping dirt away gently with a soft cloth
soaked in water and then well wrung out.)
Refer to the separate printer manual when printer related problems occur.
WHEN THIS HAPPENS .....
WHEN PRINTER OPERATION
DOESN'T MATCH SHEET
OPERATION
The sheet may sometimes pause for a while
when many entries have been made and
printer operation cannot keep up.
WHEN THE COPY
SLIGHTLY BLURRED
When the sheet has paused, the copy at the
portion may deviate slightly from position.
IS
If no satisfactory result can be achieved even after the above, contact the suppliers or
our company.
11
SPECIFICATIONS
Configuration
BF-030SPP
920 (H) 1300 (H) mm
36
51 inch
880 (H) 1240 (H) mm
34 48 inch
BF-030WPP
920 (H) 1800 (H) mm
Writing surface size
36
70 inch
880 (H) 1740 (H) mm
Effective reading size
34 68 inch
Board section
Number of pages
2 pages
Screen drive method
Unidirectional endless drive method
Feint lines
50 mm (2"¥2") cross-ruled
Writing tools
Special markers (black, red, blue)
Reading method
CCD sensor flat surface scan reading
Power source switch, copy, number of copies (+)(-), feed/stop
Control section
Main unit
dounload/recopy
Display section
Main unit
Power lamp, error lamp, LED panel (PC ON LINE LAMP)
North America
120V AC 60Hz
Europe
230V AC 50Hz
Asia/Oceania
220-240V AC 50Hz
Power source
Central South America
Usage conditions
Middle/Near East Respective rated local voltage/frequency
(110V, 120V, 220-240V)
Temperature
5-35 degrees C
Humidity
30%~85% (without dew condensation).
1470 (W) 600 (D) 1885 (H) mm 1970 (W) 600 (D) 1885 (H) mm
External dimensions
T-frame set
57 23 74 inch
77 23 74 inch
Main unit + legs +
Weight
41.6kg
46.6kg
printer platform
Product specifications and external appearance are subject to change without prior notice.
Power Save Function
If there has been no key operation for approximately an hour, the fluorescent lamp in the unit interior
automatically turns off and enters the power save state. The power lamp is lit during this time.
If any key is pressed, the fluorescent lamp lights again and the unit returns to the normal state.
12
PLUS CORPORATION
3-B22, NAKASE 1-CHOME, MIHAMA-KU, CHIBA 261-8501 JAPAN
PHONE: 043-296-3056 FAX: 043-296-3025
TELEX: J22113 PLUSJIM, CABLE PLUSJIMUK TOKYO
13