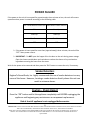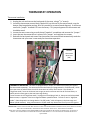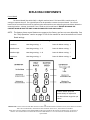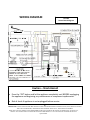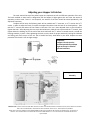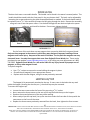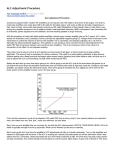
1
IMPERIAL PELLET STOVE Manufactured By: England’s Stove Works, Inc. PO Box 206 Monroe, VA 24574 INSTALLATION & OPERATION MANUAL 25‐IP/55‐SHPIP/55‐TRPIP 25‐IPS/55‐SHPIPS/55‐TRPIPS 10/7/2013 CAUTION PLEASE READ THIS ENTIRE MANUAL BEFORE INSTALLATION AND USE OF THIS PELLET FUEL‐BURNING APPLIANCE. KEEP CHILDREN, FURNITURE, AND ALL COMBUSTIBLES AWAY FROM ANY HEATING APPLIANCE. SAFETY NOTICE FAILURE TO FOLLOW THESE INSTRUCTIONS CAN RESULT IN PROPERTY DAMAGE, BODILY INJURY OR EVEN DEATH. FOR YOUR SAFETY AND PROTECTION, FOLLOW THE INSTALLATION INSTRUCTIONS OUTLINED IN THIS MANUAL. CONTACT YOUR LOCAL BUILDING OR FIRE OFFICIALS ABOUT RESTRICTIONS AND INSTALLATION INSPECTION REQUIREMENTS (INCLUDING PERMITS) IN YOUR AREA. SAVE THESE INSTRUCTIONS IMPORTANT: IF YOU HAVE A PROBLEM WITH THIS UNIT, DO NOT RETURN IT TO THE DEALER. CONTACT TECHNICAL SUPPORT @ 1‐800‐245‐6489 Mobile Home Use: This freestanding pellet unit is approved for mobile home or doublewide installation with the outside combustion air hook‐up. See the “Installation” section of this manual for details pertaining to mobile home installations. Mobile home installation must be in accordance with the Manufactured Home and Safety Standard ( HUD ), CFR 3280, Part 24. WARNING: USE OF OUTSIDE COMBUSTION AIR IS MANDATORY WITH THIS UNIT. DO NOT OPERATE WITH THE HOPPER OPEN; LID MUST BE SHUT AND TIGHTLY LATCHED DURING OPERATION. Note: England’s Stove Works does not recommend using a pellet stove as your only source of heat. Retain for your files Model Number Date of Purchase Date of Manufacture Serial Number 2 IMPORTANT! READ AND FOLLOW ALL INSTALLATION AND MAINTENANCE INSTRUCTIONS, INCLUDING CLEANING THE UNIT AS SPECIFIED, AND REPLACING GASKETS ANNUALLY, AND PARTS AS NEEDED. ENGLAND’S STOVE WORKS IS NOT RESPONSIBLE FOR ANY DAMAGE OR INJURY INCURRED DUE TO NEGLECT, OR DUE TO UNSAFE INSTALLATION OR USAGE OF THIS PRODUCT. CALL TECHNICAL SUPPORT WITH ANY QUESTIONS. TABLE OF CONTENTS Introduction Introduction ....................................... 4 Specifications Heating Specifications ....................... 5 Dimensions ........................................ 5 EPA Compliance ................................. 5 Installation Overview ......................... 6 Clearances to Combustibles .............. 7 Venting Introduction ......................... 8 Venting Guidelines ............................ 8 Additional Venting Information ......... 9 Approved Venting Methods Through the Wall ................ 10 Through the Ceiling ............ 11 Existing Chimney ................ 12 Mobile Home Installation ................ 13 Vent Termination Clearances .......... 14 Outside Air Hookup ......................... 15 Floor Protection ............................... 16 Getting Started ................................ 17 Lighting a Fire ............................. 17‐18 Control Board Settings .................... 19 Error Codes ...................................... 20 Power Failure ................................... 21 Thermostat Installation ................... 22 Thermostat Operation ................ 22‐23 Optional Accessories ....................... 23 Auger Motor .................................... 34 Convection Blower .......................... 35 Combustion Blower ......................... 35 Vacuum Switch ................................ 36 Igniter .............................................. 36 Gaskets ............................................ 37 Glass ................................................ 38 Control Board. ................................. 39 Wiring Diagram ............................... 40 Hopper Lid Latches .......................... 41 Door Latch ....................................... 42 Magnets .......................................... 42 Hopper Lid ....................................... 42 Fiberboard ....................................... 43 Panels .............................................. 43 Finish ............................................... 43 Illustrated Parts Detail Maintenance Troubleshooting ......................... 32‐33 Replacing Components Daily Operation Important Notes ................. 29 Exhaust Blower ................... 30 Convection Blower ............. 30 Cradle Removal .................. 31 Hopper Fines ...................... 31 Checking Gaskets ............... 31 Troubleshooting Guide Installation Yearly Exploded Parts Diagram .................. 44 Parts List ..................................... 45‐46 Other Details Daily Important Notes ................. 24 Daily Ash Removal ......... 24‐25 Cleaning the Burn Pot ......... 25 Bi‐weekly Baffle Removal ................... 26 Monthly Important Notes ............ 26‐27 Exhaust Chamber........... 27‐28 Venting Pipe ....................... 28 Ash Pan Latches .......................... 46 Warranty Serial Tag Sample ............................ 47 Warranty Details ........................ 48‐49 Important Notice ............................. 50 Warranty Reg. Form ........................ 51 3 IMPORTANT! READ AND FOLLOW ALL INSTALLATION AND MAINTENANCE INSTRUCTIONS, INCLUDING CLEANING THE UNIT AS SPECIFIED, AND REPLACING GASKETS ANNUALLY, AND PARTS AS NEEDED. ENGLAND’S STOVE WORKS IS NOT RESPONSIBLE FOR ANY DAMAGE OR INJURY INCURRED DUE TO NEGLECT, OR DUE TO UNSAFE INSTALLATION OR USAGE OF THIS PRODUCT. CALL TECHNICAL SUPPORT WITH ANY QUESTIONS. INTRODUCTION Thank you for purchasing this fine product from England’s Stove Works! England’s Stove Works was started, and is still owned by, a family that believes strongly in a “Do It Yourself” spirit; that’s one reason you found this product at your favorite “Do It Yourself” store. We intentionally design and build our stoves so that any homeowner can maintain their unit with basic tools, and we’re always more than happy to show you how to do the job as easily and as inexpensively as possible. However, while remaining simple, our stoves are designed to perform extremely efficiently, helping deliver more heat from less fuel. Please look at our vast Help section on our website and call our Technical Support Department at (800) 245‐6489 if you need any help with your unit. We are nearly always able to “walk you through” any installation issues, repairs, problems or other questions that you may have. Wishing you years of efficient, quality and “comfy” heating, EVERYONE AT ENGLAND’S STOVE WORKS Please Note: While information obtained from our web site and through our Technical Support line is always free of charge, there will be a service charge incurred with any “on‐site” repairs or maintenance that we may arrange. This manual encompasses all versions of the 25‐IP, including the 55‐SHPIP, 55‐SHPIPL and 55‐TRPIP. This also applies to the straight version of this unit with model numbers 25‐IPS, 55‐SHPIPS and 55‐TRPIPS. However, for simplicity of description, the stove will be referred to by the generic 25‐IP designation. 4 IMPORTANT! READ AND FOLLOW ALL INSTALLATION AND MAINTENANCE INSTRUCTIONS, INCLUDING CLEANING THE UNIT AS SPECIFIED, AND REPLACING GASKETS ANNUALLY, AND PARTS AS NEEDED. ENGLAND’S STOVE WORKS IS NOT RESPONSIBLE FOR ANY DAMAGE OR INJURY INCURRED DUE TO NEGLECT, OR DUE TO UNSAFE INSTALLATION OR USAGE OF THIS PRODUCT. CALL TECHNICAL SUPPORT WITH ANY QUESTIONS. SPECIFICATIONS Heating Specifications Heat Output Range** .................................................................... 14,108 to 35,023BTU/hr Approximate Pellet Burn Rate** .......................................................... 0.945 to 2.346 kg/hr Maximum Burn Time** .......................................................................................... 38 hours Approximate Square Footage Heated*** ................................................ up to 2,200 sq. ft. Hopper Capacity ................................................................................................... 80 pounds Dimensions EPA and Safety Compliance Specifications EPA Compliance ....................................................................................................... Certified Particulate Emissions ...................................................................................... 1.78 grams/hr Efficiency* ...................................................................................................................... 78% Tested To .................. UL 1482‐00, ASTM E 1509, ULC/ORD‐C1482‐M1990 & ULC S627‐00 Notes for this unit: Picture may not match your unit if you have the straight version. Clearances are the minimum for this unit and may need to be increased in the rear to have proper vent clearances. Follow all venting manufacturer clearances and local codes. *‐ This unit was not tested for efficiency; the efficiency shown is a default value normally attained by similar, certified pellet burning appliances. ** ‐ Heat output, burn rate and maximum burn time are heavily dependent on the type of pellets burned in the stove; as such, these numbers may vary. *** ‐ The maximum heating capacity of this unit can vary greatly based on climate, construction style, insulation and a myriad of other factors. Use this information in conjunction with a BTU loss calculation for your home to determine if this unit will be sufficient for your needs. 5 IMPORTANT! READ AND FOLLOW ALL INSTALLATION AND MAINTENANCE INSTRUCTIONS, INCLUDING CLEANING THE UNIT AS SPECIFIED, AND REPLACING GASKETS ANNUALLY, AND PARTS AS NEEDED. ENGLAND’S STOVE WORKS IS NOT RESPONSIBLE FOR ANY DAMAGE OR INJURY INCURRED DUE TO NEGLECT, OR DUE TO UNSAFE INSTALLATION OR USAGE OF THIS PRODUCT. CALL TECHNICAL SUPPORT WITH ANY QUESTIONS. INSTALLATION Installation Overview When choosing a location for your new stove, there are a multitude of factors that should be taken into account before beginning the installation. 1. Traffic Patterns – To help prevent accidents, the stove should be placed in a location where it is out of the way of normal travel through the home. 2. Heat Flow – When deciding on a location for the stove, consider the way heat moves throughout your home. Install the stove where you need the heat; basement installations often do not allow sufficient heat to flow to the upper floors and a top floor installation will not allow any heat to reach the floors below. Always consider that heat rises and will take the path of least resistance while it is still hot. 3. Exhaust Location – Outside walls are generally the best place to install a stove, since they allow easy exhaust and intake air installation (using our DuraVent AC‐3000 Kit, AC‐33000 if Canada). If there is not a feasible way to install the stove on an outside wall, there are methods for venting the stove up through the roof, but they tend to be more costly because they involve the use of more pellet vent pipe and can often make outside air installation more difficult. 4. Wall Construction – Locating the stove so that the exhaust system can pass between studs will simplify the installation and eliminate the need to reframe any sections of the wall to accommodate the wall thimble. WARNING Do not store or use gasoline or other flammable vapors and liquids in the vicinity of this or any other appliance. Do Not Over fire – If any external part starts to glow, you are over firing. Reduce feed rate. Over firing will void your warranty. Comply with all minimum clearances to combustibles as specified. Failure to comply may result in a house fire. Tested and approved for wood pellets only. Burning any other fuel will void your warranty. 6 IMPORTANT! READ AND FOLLOW ALL INSTALLATION AND MAINTENANCE INSTRUCTIONS, INCLUDING CLEANING THE UNIT AS SPECIFIED, AND REPLACING GASKETS ANNUALLY, AND PARTS AS NEEDED. ENGLAND’S STOVE WORKS IS NOT RESPONSIBLE FOR ANY DAMAGE OR INJURY INCURRED DUE TO NEGLECT, OR DUE TO UNSAFE INSTALLATION OR USAGE OF THIS PRODUCT. CALL TECHNICAL SUPPORT WITH ANY QUESTIONS. INSTALLATION Clearances to Combustibles Unit to Side Wall (A) Unit to Rear Wall (B) Unit to Corner (C) Unit Top to Ceiling Min. Ceiling Height 6 in. 6 in. 3 in. 9 in. 60 in. 152.4 mm 152.4 mm 76.2 mm 228.6 mm 1524 mm Alcove installation not recommended for this unit CAUTION Unit can be very HOT while in operation. Keep children away. Supervise children in the same room as this appliance. Alert children and adults to the hazards of high temperatures. Do NOT operate with protective barriers open or removed. Keep clothing, furniture, draperies and other combustibles away. Installation MUST comply with local, regional, state and national codes and regulations. Consult local building, fire officials or authorities having jurisdiction about restrictions, installation inspection, and permits. DO NOT CONNECT TO ANY AIR DISTRIBUTION DUCT OR SYSTEM 7 IMPORTANT! READ AND FOLLOW ALL INSTALLATION AND MAINTENANCE INSTRUCTIONS, INCLUDING CLEANING THE UNIT AS SPECIFIED, AND REPLACING GASKETS ANNUALLY, AND PARTS AS NEEDED. ENGLAND’S STOVE WORKS IS NOT RESPONSIBLE FOR ANY DAMAGE OR INJURY INCURRED DUE TO NEGLECT, OR DUE TO UNSAFE INSTALLATION OR USAGE OF THIS PRODUCT. CALL TECHNICAL SUPPORT WITH ANY QUESTIONS. INSTALLATION Venting Introduction This pellet stove operates on a negative draft system, which pulls combustion air through the burn pot and pushes the exhaust air through the vent pipe and out of the building. This unit must be installed in accordance with the following detailed descriptions of venting techniques; not installing the stove in accordance with the details listed here can result in poor stove performance, property damage, bodily injury or death. England’s Stove Works is not responsible for any damage incurred due to a poor or unsafe installation. If questions arise pertaining to the safe installation of the stove, our Technical Support line (800‐245‐6489) is available. Contact your local code official to be certain your installation meets local and national fire codes and if you’re uncertain about how to safely install the stove, we strongly recommend contacting a local NFI certified installer to perform the installation. Venting Guidelines ALWAYS install vent pipe in strict adherence with the instructions and clearances included with your venting system. DO NOT connect this pellet stove to a chimney flue which also serves another appliance. DO NOT install a flue pipe damper or any other restrictive device in the exhaust venting system of this unit. USE an approved wall thimble when passing through a wall and a ceiling support/fire stop when passing through a ceiling. ONLY use 3.0” or 4.0” Type L or Type PL pipe approved for pellet stove venting; DO NOT use galvanized or B‐Vent pipe. SEAL each joint of pellet vent with high temperature silicone (Part # AC‐RTV3) to prevent smoke spillage into the home. AVOID excessive horizontal runs and elbows, as both will reduce the draft of the venting system and will result in poor stove performance. INCLUDE as much vertical pipe as possible to prevent smoke from the unit from entering your home in the event of a power outage. INSPECT your venting system often, to be certain it is clear of fly‐ash and other restrictions. CLEAN the venting system as detailed in the maintenance section of this manual. WARNING INSTALL VENT AT CLEARANCES SPECIFIED BY THE VENT MANUFACTURER. HOT! Do not touch! Severe burns or clothing ignition may result. Glass and other surfaces are hot during operation. Do not attempt to touch or open the front or side panels during operation. This could result in severe burns or injury. 8 IMPORTANT! READ AND FOLLOW ALL INSTALLATION AND MAINTENANCE INSTRUCTIONS, INCLUDING CLEANING THE UNIT AS SPECIFIED, AND REPLACING GASKETS ANNUALLY, AND PARTS AS NEEDED. ENGLAND’S STOVE WORKS IS NOT RESPONSIBLE FOR ANY DAMAGE OR INJURY INCURRED DUE TO NEGLECT, OR DUE TO UNSAFE INSTALLATION OR USAGE OF THIS PRODUCT. CALL TECHNICAL SUPPORT WITH ANY QUESTIONS. INSTALLATION Additional Venting Information Do not mix and match components from different pipe manufacturers when assembling your venting system (i.e. Do NOT use venting pipe from one manufacturer and a thimble from another). We require a minimum vertical rise of 36 in. (3 ft.) of pipe to create natural draft in the system, which helps evacuate smoke from the stove in the event of a power failure or combustion blower failure. Venting systems 15.0 ft. or shorter may be composed entirely of 3.0 in. pellet pipe; to reduce frictional losses, venting systems longer than 15.0 ft. should be composed of 4.0 in. pellet pipe. Do not terminate the venting system directly beneath any combustible structure such as a porch or deck. Follow NFPA 211 rules listed below for venting system termination location relative to windows and other openings in the dwelling. o NFPA 211 (2006 ed.) Section 10.4 Termination: 10.4.5 (1) The exit terminal of a mechanical draft system other than direct vent appliances (sealed combustion system appliances) shall be located in accordance with the following: (a) Not less than 3 ft. (.91 m) above any forced air inlet located within 10 ft. (3.0m). (b) Not less than 4 ft. (1.2 m) below, 4 ft. (1.2 m) horizontally from or 1 ft. (305 mm) above any door, window or gravity air inlet into any building. (c) Not less than 2 ft. (0.61 m) from an adjacent building and not less than 7 ft. (2.1 m) above grade when located adjacent to public walkways. Distance between the termination opening and grade should be a minimum of 2 ft. (24 in.) contingent on the grade surface below the termination. When determining the termination height above grade, consider snow drift lines and combustibles such as grass or leaf accumulation. In areas where significant snowfall is possible, the termination height must be sufficiently high to keep the termination free of snow accumulation. Do not use makeshift compromises during installation or install any component of the unit or venting system in such a manner that could result in a hazardous installation. A chimney connector shall not pass through an attic or roof space, closet or similar concealed space, or a floor, or ceiling. Where passage through a wall or partition of combustible material is desired, the installation shall conform to CAN/CSA‐B365. WARNING: Venting system surfaces get HOT, and can cause burns if touched. Noncombustible shielding or guards may be required. 9 IMPORTANT! READ AND FOLLOW ALL INSTALLATION AND MAINTENANCE INSTRUCTIONS, INCLUDING CLEANING THE UNIT AS SPECIFIED, AND REPLACING GASKETS ANNUALLY, AND PARTS AS NEEDED. ENGLAND’S STOVE WORKS IS NOT RESPONSIBLE FOR ANY DAMAGE OR INJURY INCURRED DUE TO NEGLECT, OR DUE TO UNSAFE INSTALLATION OR USAGE OF THIS PRODUCT. CALL TECHNICAL SUPPORT WITH ANY QUESTIONS. INSTALLATION Approved Venting Method 1: Through the Wall For high altitude installations (above 4,000 ft.), the vent pipe should be increased from 3‐inch (3”) to four‐inch (4”). Generally the simplest installation method, venting through the wall using our AC‐3000 kit, AC‐33000 if Canada (or similar venting system) is also the preferred venting method. It minimizes horizontal pipe, allows the stove to be installed close to the wall and keeps the clean‐out tee on the outside of the house, for ease of cleaning. When installing any venting system, Type L or Type PL pipe must be used and all clearances to combustibles (listed by the pipe manufacturer) must be strictly adhered to. Use the pipe manufacturer’s approved thimble for passing through a combustible wall, and maintain at least the minimum clearances to combustibles. Use an appliance collar where the pellet vent connects to the exhaust output of the pellet stove and attach the appliance collar to the exhaust blower output using three sheet metal screws. Secure the pellet vent to the outside of the house using a wall strap just below the 90 degree elbow. Seal each pipe connection joint with high temperature RTV Silicone, to ensure the system is leak free (Check with the specific venting system manufacturer’s instructions before doing so). If the pellet vent pipe being used is not a “Twist Lock” system, three (3) sheet metal screws are required at each pipe joint. Connect the pellet stove to outside combustion air using the kit included with your stove or using an alternative method, as described in the “Outside Air” section, on page 15. This installation type can be modified for basement (Basement installations should always be performed by a professional installer) or other installations wherein the tee and vertical section of the pipe would be inside the home and the venting system would simply pass horizontally through the thimble and then terminate. Please Note: Installation diagrams are for reference purposes only and are not drawn to scale, nor meant to be used as plans for each individual installation. Please follow all venting system requirements, maintain the required clearances to combustibles, and follow all local codes. 10 IMPORTANT! READ AND FOLLOW ALL INSTALLATION AND MAINTENANCE INSTRUCTIONS, INCLUDING CLEANING THE UNIT AS SPECIFIED, AND REPLACING GASKETS ANNUALLY, AND PARTS AS NEEDED. ENGLAND’S STOVE WORKS IS NOT RESPONSIBLE FOR ANY DAMAGE OR INJURY INCURRED DUE TO NEGLECT, OR DUE TO UNSAFE INSTALLATION OR USAGE OF THIS PRODUCT. CALL TECHNICAL SUPPORT WITH ANY QUESTIONS. INSTALLATION Approved Venting Method 2: Through the Ceiling For high altitude installations (above 4,000 ft.), the vent pipe should be increased from 3‐inch (3”) to four‐inch (4”). Venting through the ceiling/roof may be the only feasible venting option in some cases and is a factory recommended installation. When installing any venting system, Type L or Type PL pipe must be used and all clearances to combustibles listed by the pipe manufacturer must be strictly adhered to. Use the pipe manufacturer’s approved ceiling support for passing through a combustible ceiling, as well as the required fire stops, radiation shields, flashing and storm collar. Be certain to follow the manufacturer’s required height of termination above the roof line, and maintain at least the minimum clearances to combustibles. Use an appliance collar where the pellet vent connects to the exhaust output of the pellet stove and attach the appliance collar to the exhaust blower output using three sheet metal screws. Seal each pipe connection joint with high temperature RTV Silicone, to ensure the system is leak free (Check with the specific pipe manufacturer’s instructions before doing so). If the pellet vent pipe being used is not a “Twist Lock” system, three (3) sheet metal screws are required at each pipe joint. Connect the pellet stove to outside combustion air using the kit included with your stove or using an alternative method, as described in the “Outside Air” section, on page 15. This venting method can also be modified so that the venting system runs horizontally through the wall from the stove, then transitions to vertical and terminates above the roofline. When using this modified version of this installation be certain to carefully follow the venting system manufacturer’s instructions diligently. Please Note: Installation diagrams are for reference purposes only and are not drawn to scale, nor meant to be used as plans for each individual installation. Please follow all venting system requirements, maintain the required clearances to combustibles, and follow all local codes. 11 IMPORTANT! READ AND FOLLOW ALL INSTALLATION AND MAINTENANCE INSTRUCTIONS, INCLUDING CLEANING THE UNIT AS SPECIFIED, AND REPLACING GASKETS ANNUALLY, AND PARTS AS NEEDED. ENGLAND’S STOVE WORKS IS NOT RESPONSIBLE FOR ANY DAMAGE OR INJURY INCURRED DUE TO NEGLECT, OR DUE TO UNSAFE INSTALLATION OR USAGE OF THIS PRODUCT. CALL TECHNICAL SUPPORT WITH ANY QUESTIONS. INSTALLATION Approved Venting Method 3: Existing Chimney System For high altitude installations (above 4,000 ft.), the vent pipe should be increased from 3‐inch (3”) to four‐inch (4”). Using an existing masonry or factory built chimney for venting is the only other acceptable method for venting this pellet unit. Use Type L or Type PL venting pipe until entering the existing chimney. Use the appropriately sized adapter when transitioning from the pellet vent pipe to the masonry or factory built thimble and be certain that the adapter is sealed tightly to both the pellet venting system and the existing chimney. Before using an existing chimney, be certain it is in good condition (A chimney sweep inspection is highly recommended). Also, make sure the chimney meets the minimum standards listed in NFPA 211 (A chimney professional can confirm this upon inspection). If connecting this stove to a factory built chimney, it may ONLY be a 6” flue, UL103 HT venting system (ULC S629 if Canada). Connection to any other factory built chimney may result in a poorly operating or dangerous stove installation. When connecting to an existing masonry chimney, the cross‐sectional area of the flue must be considered. A chimney with a flue larger than 6” round (28.27 sq. in.) may require relining with an approved pellet stove chimney lining system. Use an appliance collar where the pellet vent connects to the exhaust output of the pellet stove and attach the appliance collar to the exhaust blower output using three sheet metal screws. Seal each pipe connection joint with high temperature RTV Silicone, to ensure the system is leak free (Check with the specific pipe manufacturer’s instructions before doing so). If the pellet vent pipe being used is not a “Twist Lock” system, three (3) sheet metal screws are required at each pipe joint. Connect the pellet stove to outside combustion air using the kit included with your stove or using an alternative method, as described in the “Outside Air” section, on page 15. Please Note: Installation diagrams are for reference purposes only and are not drawn to scale, nor meant to be used as plans for each individual installation. Please follow all venting system requirements, maintain the required clearances to combustibles, and follow all local codes. 12 IMPORTANT! READ AND FOLLOW ALL INSTALLATION AND MAINTENANCE INSTRUCTIONS, INCLUDING CLEANING THE UNIT AS SPECIFIED, AND REPLACING GASKETS ANNUALLY, AND PARTS AS NEEDED. ENGLAND’S STOVE WORKS IS NOT RESPONSIBLE FOR ANY DAMAGE OR INJURY INCURRED DUE TO NEGLECT, OR DUE TO UNSAFE INSTALLATION OR USAGE OF THIS PRODUCT. CALL TECHNICAL SUPPORT WITH ANY QUESTIONS. For high altitude installations (above 4,000 ft.), the vent pipe should be increased from 3‐inch (3”) to four‐inch (4”). INSTALLATION Mobile Home Installation The England’s Stove Works, Inc. outside air kit MUST be used for installation of this unit in a mobile home. Please see the “Outside Air” section on page 15 for more information regarding outside air connections. The outside air inlet must be kept clear of leaves, ice and other debris. Keeping the outside air inlet free of restriction is crucial to preventing air starvation and smoke spillage. The pellet stove MUST be secured to the floor of the mobile home using lag bolts and the holes provided in the bottom of the base for this purpose. Outdoor‐aired space heaters must be attached to the structure. The pellet stove MUST be grounded with #8 solid copper grounding wire (or equivalent), terminated at each end with an NEC approved grounded device. Carefully follow all clearances listed in the appropriate section of this manual AND follow the venting manufacturer’s minimum clearance requirements. Similarly, be certain the venting system used is approved for mobile home use. Installation must be in accordance with Manufacturers Home & Safety Standard (HUD) CFR 3280, Part 24 as well as any applicable local codes. Use silicone to create an effective vapor barrier at the location where the chimney or outside air ducting passes through to the exterior of the structure. Roof Flashing and Storm Collar Chimney Cap/Spark Arrestor Joist Shield/Firestop Mobile Home Approved Type L or Type PL Pellet Vent Pipe CAUTION THE STRUCTURAL INTEGRITY OF THE MANUFACTURED HOME FLOOR, WALL AND CEILING/ROOF MUST BE MAINTAINED. DO NOT CUT THROUGH FLOOR JOISTS, WALL STUDS, CEILING TRUSSES OR ANY OTHER SUPPORTING MATERIAL WHICH COULD BE DETRIMENTAL TO THE STRUCTURAL INTEGRITY OF THE HOME. WARNING: DO NOT INSTALL IN A SLEEPING ROOM. 13 IMPORTANT! READ AND FOLLOW ALL INSTALLATION AND MAINTENANCE INSTRUCTIONS, INCLUDING CLEANING THE UNIT AS SPECIFIED, AND REPLACING GASKETS ANNUALLY, AND PARTS AS NEEDED. ENGLAND’S STOVE WORKS IS NOT RESPONSIBLE FOR ANY DAMAGE OR INJURY INCURRED DUE TO NEGLECT, OR DUE TO UNSAFE INSTALLATION OR USAGE OF THIS PRODUCT. CALL TECHNICAL SUPPORT WITH ANY QUESTIONS. VENT TERMINATION CLEARANCES A) MIN. 4‐FT CLEARANCE BELOW OR BESIDE ANY DOOR OR WINDOW THAT OPENS. B) MIN. 1‐FT CLEARANCE ABOVE ANY DOOR OR WINDOW THAT OPENS. C) MIN. 2‐FT CLEARANCE FROM ANY ADJACENT BUILDING. D) MIN. 7‐FT CLEARANCE FROM ANY GRADE WHEN ADJACENT TO PUBLIC WALKWAYS. E) MIN. 2‐FT CLEARANCE ABOVE ANY GRASS, PLANTS, OR OTHER COMBUSTIBLE MATERIALS. F) MIN. 3‐FT CLEARANCE FROM A FORCED AIR INTAKE OF ANY APPLIANCE. G) MIN. 2‐FT CLEARANCE BELOW EAVES OR OVERHANG. H) MIN. 1‐FT CLEARANCE HORIZONTALLY FROM COMBUSTIBLE WALL. I) VENTS INSTALLED WITH MECHANICAL EXHAUSTERS SHALL TERMINATE NOT LESS THAN 12 IN. (305MM) ABOVE THE HIGHEST POINT WHERE THEY PASS THROUGH THE ROOF SURFACE. Notes on termination of Pellet Vent Pipe from NFPA 211 (2006 ed.) Section 10.4 Termination: 10.4.5 (See also “INSTALLATION” section of manual AND additional notes above): - Not less than three (3) feet above any forced air inlet located within ten (10) feet. - Not less than four (4) feet below, four (4) feet horizontally from, or one (1) foot above any door, window or gravity air inlet into any building. - Not less than two (2) feet from an adjacent building, and not less than seven (7) feet above grade where located adjacent to public walkways. The exhaust exit shall be arranged so that the flue gases are not directed so that it will affect people, overheat combustible structures, or enter buildings. Forced draft systems and all parts of induced draft systems under positive pressure during operation shall be installed gastight or to prevent leakage of combustion products into a building. Through-the-wall vents shall not terminate over 14 create hazards or a nuisance. public walkways, or where condensate or vapor could IMPORTANT! READ AND FOLLOW ALL INSTALLATION AND MAINTENANCE INSTRUCTIONS, INCLUDING CLEANING THE UNIT AS SPECIFIED, ANDand REPLACING GASKETS ANNUALLY, AND(including PARTS AS NEEDED. Be sure to follow local codes all manufacturer’s instructions exhaust pipe). ENGLAND’S STOVE WORKS IS NOT RESPONSIBLE FOR ANY DAMAGE OR INJURY INCURRED DUE TO NEGLECT, Consult a professional installer and/or if you have any questions. OR DUE TO UNSAFE INSTALLATION OR USAGE OF call THISTechnical PRODUCT. Support CALL TECHNICAL SUPPORT WITH ANY QUESTIONS. OUTSIDE AIR HOOK‐UP The use of outside combustion air is mandatory on this pellet stove. The outside air connection pipe protrudes from the lower rear center of the stove; use the included outside air kit to attach your stove to outside combustion air. Instructions and all the parts needed to make the outside air connection to your pellet stove are included with the outside air kit. If it is not feasible to use the included outside air hookup kit in your stove installation, other materials may be used, provided the following rules are followed: The pipe used for outside air hookup must be metal, with a minimum thickness of .0209 in. (25 gauge mild steel) or greater and an inside diameter of approximately 2.0 in. All pipe joints and connections should be sealed with pipe clamps or other mechanical means, to insure a leak free outside air connection. Long runs of pipe and excessive elbows for outside air should be avoided. Due to frictional resistance in pipe, any excessive outside air piping can result in poor stove performance. A screen or other protection device must be fitted over the outside air termination point to prevent rain, debris and nuisance animals from entering the piping system. Increase the outside air pipe size to 3.0 in. diameter pipe if the outside air connection is more than 6 ft. in length, more than two (2) elbows are used or if the stove is installed in a basement. The outside air connection system should be inspected at least annually to be certain it is free from blockage. Caution NEVER draw outside combustion air from: 1. Wall, floor or ceiling cavity. 2. Enclosed space such as an attic, garage or crawl space. 15 IMPORTANT! READ AND FOLLOW ALL INSTALLATION AND MAINTENANCE INSTRUCTIONS, INCLUDING CLEANING THE UNIT AS SPECIFIED, AND REPLACING GASKETS ANNUALLY, AND PARTS AS NEEDED. ENGLAND’S STOVE WORKS IS NOT RESPONSIBLE FOR ANY DAMAGE OR INJURY INCURRED DUE TO NEGLECT, OR DUE TO UNSAFE INSTALLATION OR USAGE OF THIS PRODUCT. CALL TECHNICAL SUPPORT WITH ANY QUESTIONS. FLOOR PROTECTION This pellet stove requires a non‐combustible floor protector if the stove is to be installed on a combustible floor. If the floor the stove is to be installed on is already non‐combustible (i.e. a concrete floor in a basement) and has an R value equal to or higher than .2, no floor protection is needed (although a decorative floor protector can still be used for aesthetic reasons). Prefabricated floor protectors which are UL listed (ULC if Canada) or equivalent can be purchased or a floor protector can be built from standard materials: two sheets of .5” thick cement board covered with ceramic tile would be a suitable floor protector which meets the .2 R‐value requirement. When using any floor protector, consider that this stove is not only heavy but will induce heating and cooling cycles on the floor protector which can damage tile and loosen mortar and grout joints. A hearth rug is NOT an approved substitute for a proper hearth pad. For the US: The floor protector must extend at least 6 in. (152.4 mm) from the front & sides and 4 in. (101.6 mm) from the rear. For Canada: The floor protector must extend at least 18.0 in. (457.2 mm) from the front of the unit, 8.0 in. (203.2 mm) from the sides of the unit and 4.0 in. (101.6 mm) from the rear. In Canada, it is required that the non‐combustible floor protector is underneath and extends 2 in. (50.8 mm.) on either side of any horizontal venting runs AND/OR is directly underneath any vertical venting pipe. 4” (U.S.A.) 16 IMPORTANT! READ AND FOLLOW ALL INSTALLATION AND MAINTENANCE INSTRUCTIONS, INCLUDING CLEANING THE UNIT AS SPECIFIED, AND REPLACING GASKETS ANNUALLY, AND PARTS AS NEEDED. ENGLAND’S STOVE WORKS IS NOT RESPONSIBLE FOR ANY DAMAGE OR INJURY INCURRED DUE TO NEGLECT, OR DUE TO UNSAFE INSTALLATION OR USAGE OF THIS PRODUCT. CALL TECHNICAL SUPPORT WITH ANY QUESTIONS. DAILY OPERATION Getting Started Check to see that the hopper is clean and free from foreign materials. Be sure to connect this unit to a working outlet; we recommend using a surge protector to help protect the electronic components from damage. BEFORE your first fire, dry run your unit (no pellet fuel in the hopper) for twenty minutes; pressing the “ON” button with the unit plugged in will initiate the dry run. Once the “ON” button is pressed, you should immediately hear the exhaust blower start and operate continuously. After a few seconds, the letters “S U” will appear in the two display windows of the control board. After about three to five minutes, look for the red glow of the igniter in the igniter port of the burn pot to be certain it is operating normally. Hold the hopper lid switch (See “Illustrated Parts Diagram” pg. 44) down with your finger and check to see that the auger is turning. Release the hopper lid switch and be certain that the auger stops turning. DO NOT PUT YOUR FINGERS IN THE HOPPER OR NEAR THE ROTATING AUGER. After about twenty minutes, the control board should display “E‐2” in the two display windows (More information on Error Codes can be found in the Error Code section of this manual). At this point, the dry run is complete and your pellet heating appliance is ready for normal operation. Lighting a Fire In order for this stove to operate, the hopper must first be filled with pellet fuel. Lift the hopper lid using the flush‐mount handle and pour the pellet fuel directly into the hopper. We recommend using only pellets manufactured by PFI Certified facilities, since pellets bearing the PFI stamp of approval will be low in ash and moisture, high in BTU’s, and uniform in size and quality. This pellet stove will perform equally well using softwood and hardwood pellets, and although the ash may differ slightly in appearance or texture, both types of pellets will burn cleanly and efficiently in this stove. This pellet stove is equipped with an automatic pellet ignition system; the only user input required to light the stove is a simple press of the “On” button. Shortly after pressing the “On” button, the letters “S U” will appear in the heat range and blower speed windows of the control board. This indicates the stove has entered the start‐up sequence and is operating normally. 17 IMPORTANT! READ AND FOLLOW ALL INSTALLATION AND MAINTENANCE INSTRUCTIONS, INCLUDING CLEANING THE UNIT AS SPECIFIED, AND REPLACING GASKETS ANNUALLY, AND PARTS AS NEEDED. ENGLAND’S STOVE WORKS IS NOT RESPONSIBLE FOR ANY DAMAGE OR INJURY INCURRED DUE TO NEGLECT, OR DUE TO UNSAFE INSTALLATION OR USAGE OF THIS PRODUCT. CALL TECHNICAL SUPPORT WITH ANY QUESTIONS. The fuel feed rate and combustion air during start‐up is determined by the control board, so the stove may be started on any heat range. After approximately fifteen minutes, the fire should be burning brightly and the “S U” should disappear from the control board. At this point, the stove has begun normal operation and the display windows on the control board will remain empty, unless the Heat Range or Blower Speed is adjusted. It is normal for the unit to smoke during the first fire, as paints and oils cure. This should dissipate within the first hour. Open a door and/or window during the first fire to ventilate the area. Daily Operation Notes Only high quality, ¼” (.25 in.) diameter wood pellets, should be used in this stove. Using low grade wood pellets with high ash content OR wood pellets with a high moisture content can cause the burn pot to fill with ash at a more rapid pace and can cause intervals between periodic maintenance to become significantly shorter. Please read the “Maintenance” section of this manual thoroughly to understand how fuel selection affects stove operation, maintenance and cleaning. Variation in the flame height is normal; not all wood pellet fuel is uniform in size, which can affect the way pellets are fed into the burn pot. Although the flame height may increase and decrease during operation, there is no loss of efficiency. Always store wood pellet fuel in a dry location; storing wood pellet fuel in a dry location ensures the fuel will remain pelletized and low in moisture content. Also, be certain that all wood pellet fuel is stored at a safe distance from the pellet heater; storing fuel in close proximity to the stove can result in a fire. This pellet burning room heater is equipped with a specially designed burn pot which comes preinstalled from the factory. This burn pot elevates the burning pellets and delivers air at the precisely‐required locations. Pellets must only be burned in the factory burn pot; no modifications should be made to this burn pot and no additional grates or other fire elevators should be used. CAUTION NEVER USE GASOLINE, GASOLINE‐TYPE LANTERN FUEL, KEROSENE, CHARCOAL LIGHTER FLUID, OR SIMILAR LIQUIDS TO START OR “FRESHEN UP” A FIRE IN THIS HEATER. KEEP ALL SUCH LIQUIDS WELL AWAY FROM THE HEATER WHILE IN USE. ADDITIONALLY, NEVER APPLY FIRE‐STARTER TO ANY HOT SURFACE OR EMBERS IN THE STOVE. DO NOT USE CHEMICALS OR FLUIDS TO START THE FIRE. DO NOT BURN GARBAGE OR FLAMMABLE FLUIDS SUCH AS GASOLINE, NAPHTHA OR ENGINE OIL. 18 IMPORTANT! READ AND FOLLOW ALL INSTALLATION AND MAINTENANCE INSTRUCTIONS, INCLUDING CLEANING THE UNIT AS SPECIFIED, AND REPLACING GASKETS ANNUALLY, AND PARTS AS NEEDED. ENGLAND’S STOVE WORKS IS NOT RESPONSIBLE FOR ANY DAMAGE OR INJURY INCURRED DUE TO NEGLECT, OR DUE TO UNSAFE INSTALLATION OR USAGE OF THIS PRODUCT. CALL TECHNICAL SUPPORT WITH ANY QUESTIONS. CONTROL BOARD SETTINGS The control board on this stove allows the user to adjust the heat output and convection blower speed, turn the unit on and off, and test components for function (more on diagnostic mode later). The lower buttons on the control board (Low Fuel Feed, Low Burn Air, and Air on Temp) are not meant to be adjusted during normal operation of the unit. These buttons are factory preset and should not be adjusted by the user. To energize the unit and initiate a fire, press the “On” button. The LED above the button should turn green and the control board should display “S U” shortly after pressing the button. To shut the unit down, press the “Off” button. The LED above the button should turn red and the board should display “S d” shortly after pressing the button. This initiates the shut down sequence, and the stove will remain in shut down mode until it has cooled down. To increase the heat output of the stove, press the “Up” heat range button. The number in the heat range display window will increase, signifying that the control board is now adjusting the heat output to your desired level. The blower speed will increase the same amount as the heat range, because the stove is designed to operate with the blower speed greater than or equal to the heat range. Pressing the “Down” arrow will decrease the heat range and blower speed. To increase the blower speed without increasing the heat range, press the Blower Speed “Up” arrow until the desired blower speed is shown in the display window. Pressing the “Down” arrow will decrease the blower speed; however, the control board will not allow the blower speed to be set lower than the heat range. Caution This unit is meant to operate only with the ash pan and main viewing door closed. Smoke spillage and an inefficient, lazy burn will result from attempting to operate the stove with either door open. In addition, using fuel other than wood pellets can create an unsafe situation and can also generate excess carbon monoxide. Carbon monoxide is an odorless, colorless gas which can be deadly. Be sure to burn only wood pellets. The use of a carbon monoxide detector is strongly recommended. 19 IMPORTANT! READ AND FOLLOW ALL INSTALLATION AND MAINTENANCE INSTRUCTIONS, INCLUDING CLEANING THE UNIT AS SPECIFIED, AND REPLACING GASKETS ANNUALLY, AND PARTS AS NEEDED. ENGLAND’S STOVE WORKS IS NOT RESPONSIBLE FOR ANY DAMAGE OR INJURY INCURRED DUE TO NEGLECT, OR DUE TO UNSAFE INSTALLATION OR USAGE OF THIS PRODUCT. CALL TECHNICAL SUPPORT WITH ANY QUESTIONS. ERROR CODES Error codes, or “E‐Codes,” are alphanumeric codes that will appear in the Heat Range and Blower Speed windows of the Control Board if the unit experiences an abnormal condition. Error codes are the control board’s way of telling the user that something isn’t operating correctly within the stove, and that the unit should be carefully inspected before reigniting. See the “Trouble‐Shooting Guide,” page 32, for additional information on error codes. E‐0 When this is displayed in the control board windows (typically when restarting after an “E‐ Code” shutdown), it means there are currently no errors and the stove will begin normal operation. E‐1 This error code is not used on this stove. If it is displayed in the control board windows, please contact Technical Support and they will diagnose the cause of the false code. E‐2 When this code is displayed in the control board window it indicates a failure to light. Although the stove may have ignited the pellets, the control board did not register a high enough temperature to determine the fire was lit. If a fire was ignited, wait for the unit to cool, clean the burn pot and restart the unit. E‐3 This error code indicates the preset maximum allowable exhaust temperature was exceeded. Commonly referred to as “Over‐Firing,” the E‐3 code means something in the stove is causing the exhaust gas to be hotter than expected. E‐4 This code is displayed based on a drop in the exhaust temperature. This code means the fire or “proof of flame” has been lost. It usually results from the hopper being empty. If an error code continues to display, if the error code seems unexplainable, or if you have any other questions about error codes and what they mean, please contact Technical Support at (800) 245‐6489. Hopper Lid Safety Switch ‐ This unit is also equipped with a hopper lid safety switch (Part # AC‐HLSB) which is directly connected to the auger motor. In the event the hopper lid is left open while the stove is in operation, the hopper lid switch will prevent the auger from turning. This is to prevent byproducts of combustion from entering the home through the open hopper lid and also to simply prevent operation with the hopper lid open. Improper hopper lid safety switch operation will result in an auger that will not turn and therefore a stove that will not burn. NEVER place your hand or any object near the auger while the stove is connected to power. 20 IMPORTANT! READ AND FOLLOW ALL INSTALLATION AND MAINTENANCE INSTRUCTIONS, INCLUDING CLEANING THE UNIT AS SPECIFIED, AND REPLACING GASKETS ANNUALLY, AND PARTS AS NEEDED. ENGLAND’S STOVE WORKS IS NOT RESPONSIBLE FOR ANY DAMAGE OR INJURY INCURRED DUE TO NEGLECT, OR DUE TO UNSAFE INSTALLATION OR USAGE OF THIS PRODUCT. CALL TECHNICAL SUPPORT WITH ANY QUESTIONS. POWER FAILURE If the power to the unit is interrupted for approximately three minutes or less, the unit will resume operation when power is restored according to the following table: Unit’s State Before Power Loss State When Power Returns ON Start‐Up Start‐Up Start‐Up Shut‐Down Shut‐Down OFF OFF If the power is interrupted for more than (approximately) three minutes, the unit will be “OFF” when power returns. IMPORTANT – Do NOT open the hopper lid or the door to the unit during power outage. Open the closest outside door and a window to reduce the chance of any combustion byproducts entering the home from the stove. Wait for the power to be restored and then press the “ON” button to restart the unit, if necessary. Smoke Detectors England’s Stove Works, Inc. highly recommends the use of smoke detectors in every room of the house. However, locating a smoke detector directly above this unit can result in nuisance alarms. Caution – Shock Hazard Press the “Off” button and let the appliance completely cool BEFORE unplugging the appliance and beginning any maintenance or component replacement. Risk of shock if appliance is not unplugged before service 21 IMPORTANT! READ AND FOLLOW ALL INSTALLATION AND MAINTENANCE INSTRUCTIONS, INCLUDING CLEANING THE UNIT AS SPECIFIED, AND REPLACING GASKETS ANNUALLY, AND PARTS AS NEEDED. ENGLAND’S STOVE WORKS IS NOT RESPONSIBLE FOR ANY DAMAGE OR INJURY INCURRED DUE TO NEGLECT, OR DUE TO UNSAFE INSTALLATION OR USAGE OF THIS PRODUCT. CALL TECHNICAL SUPPORT WITH ANY QUESTIONS. THERMOSTAT OPERATION Thermostat Installation 1. Unplug the unit and remove the back panel of the stove, using a 5/16” wrench. 2. Locate the thermostat connect block, labeled J18, on the rear of the control board, near the bottom (See image below and pg. 40 of this manual for a control board diagram). It will have a small wire “jumper” installed in it from the factory. This jumper bypasses the thermostat and should be saved. 3. Loosen the two screws using a small slotted “jewelers” screwdriver and remove the “jumper.” 4. Insert the two thermostat wires in place of the “jumper” and retighten the screws. 5. Reinstall the back panel and mount the thermostat; the control board automatically reads the thermostat and your stove is now ready for thermostat operation. Connect thermostat wires here (J18) THERMOSTAT OPERATION: This stove is equipped with a unique, new feature that allows two options for thermostatic operation: The stove comes from the factory pre‐programmed in “On/Off mode,” which turns the stove on and off when the call for heat comes or leaves, like a furnace. The second, or “High/Low mode,” burns at whichever heat range you set the stove at until the call for heat leaves, at which point the stove goes to the Low heat range setting. To set the stove in the “High/Low mode,” unplug the unit and plug it back in, then press and release both down arrows; H L appears in the heat range and blower speed windows. The unit is now in “High/Low mode.” (Note: Repeat this to change back to “On/Off mode;” a 0 0 will appear in the heat range and blower speed windows). Using a thermostat in On/Off mode may shorten the life of your stove’s igniter. THERMOSTAT OPERATION 22 IMPORTANT! READ AND FOLLOW ALL INSTALLATION AND MAINTENANCE INSTRUCTIONS, INCLUDING CLEANING THE UNIT AS SPECIFIED, AND REPLACING GASKETS ANNUALLY, AND PARTS AS NEEDED. ENGLAND’S STOVE WORKS IS NOT RESPONSIBLE FOR ANY DAMAGE OR INJURY INCURRED DUE TO NEGLECT, OR DUE TO UNSAFE INSTALLATION OR USAGE OF THIS PRODUCT. CALL TECHNICAL SUPPORT WITH ANY QUESTIONS. Thermostat Operation Details The 25‐IP was designed to operate equally well in both manual and thermostat mode. While using the control board for heating control gives the user control over the heat output of the stove, the thermostat allows the stove to “start‐up” and “shutdown” independently, which will help maintain your house at a more constant temperature and save pellet fuel. This pellet stove can be connected to either a wall thermostat (Part # PU‐DTSTAT) or wireless remote thermostat (Part # AC‐3003). Although either thermostat will operate the stove properly, we highly recommend the wireless thermostat for the convenience of starting your pellet stove from anywhere in the house. During thermostatic operation, the stove will burn at whatever heat range and blower speed the control board has been set to. When the call for heat is gone (i.e. the room is up to temperature), the stove will enter the thermostatic shutdown sequence (in “On/Off mode,” see previous page). If, during the shutdown period, the call for heat returns, the stove will complete the shutdown cycle before relighting. Remember to locate the thermostat near the stove in a central location; putting the thermostat in a distant room can cause the stove to overheat the room it’s located in because the thermostat will only sense the temperature of the room in which it is located. *Note: When using the On/Off function for the thermostat, the igniter is used more frequently and may need replacement sooner. OPTIONAL ACCESSORIES Wall Thermostat (PU‐DTSTAT) Installing this wall thermostat allows the 25‐IP to operate on the same principle as a furnace: The stove will shut‐down and relight as the call for heat comes and goes (in “On/Off mode,” see previous page). This will maintain the house at a more constant temperature, while conserving pellets. Remote Thermostat (AC‐3003) The remote thermostat for the 25‐IP takes the convenience of thermostat operation one step further by allowing temperature adjustments from anywhere in the home. The remote thermostat allows precise temperature control from wherever you desire and only requires six (6) AA batteries to operate. 23 IMPORTANT! READ AND FOLLOW ALL INSTALLATION AND MAINTENANCE INSTRUCTIONS, INCLUDING CLEANING THE UNIT AS SPECIFIED, AND REPLACING GASKETS ANNUALLY, AND PARTS AS NEEDED. ENGLAND’S STOVE WORKS IS NOT RESPONSIBLE FOR ANY DAMAGE OR INJURY INCURRED DUE TO NEGLECT, OR DUE TO UNSAFE INSTALLATION OR USAGE OF THIS PRODUCT. CALL TECHNICAL SUPPORT WITH ANY QUESTIONS. *Failure to properly clean your stove can cause poor performance and possibly a burn back!* DAILY MAINTENANCE Disposal of Ashes – Ashes should be placed in a metal container with a tight fitting lid. The closed container of ashes should be placed on a noncombustible floor or on the ground, well away from all combustible materials, pending final disposal. If the ashes are disposed of by burial in soil or otherwise locally dispersed, they should be retained in the closed container until all cinders have been thoroughly cooled. Important Notes As with any maintenance concerning this unit, be sure the unit is “OFF” and has completed the Shut‐Down cycle BEFORE beginning. Be aware that metal parts in the firebox can remain HOT long after the fire has gone out and EVEN after the Shut‐Down cycle is complete. Always use extreme caution when handling potentially hot stove parts, even if you think they should be cold. Ashes should only be removed when the stove has been shut‐down and has been allowed to cool thoroughly. Hot embers can remain under ashes long after the fire has gone out, so always be extra careful when handling any ashes from this (or any) stove. Different pellets will generate varying amounts of ash and burn pot deposits. Carefully monitor the ash build up in the stove when first operating the unit, as well as whenever a different brand of pellets is burned. While the amount of ashes generated by this unit is not excessive compared to a traditional log‐ burning woodstove, keeping the unit clean and free of ash is ESSENTIAL for peak performance and maximum efficiency. Ash build‐up hampers airflow, reduces efficiency, and can cause a smoke back. England’s Stove Works® is not responsible for any damages incurred due to a poorly maintained and/or dirty stove. This pellet stove is a highly efficient machine and, as such, requires sufficient maintenance to keep it operating at its peak. Ash Removal and Disposal Press the “Off” button and allow the stove to complete the shut‐down cycle and cool completely. Because of the open design of the firebox, the majority of the ash will be on either side of the cradle. Open the front panel, then the main door of the stove and use an old paint brush or putty knife to move ash from around the burn pot into the open areas beside the cradle. 24 IMPORTANT! READ AND FOLLOW ALL INSTALLATION AND MAINTENANCE INSTRUCTIONS, INCLUDING CLEANING THE UNIT AS SPECIFIED, AND REPLACING GASKETS ANNUALLY, AND PARTS AS NEEDED. ENGLAND’S STOVE WORKS IS NOT RESPONSIBLE FOR ANY DAMAGE OR INJURY INCURRED DUE TO NEGLECT, OR DUE TO UNSAFE INSTALLATION OR USAGE OF THIS PRODUCT. CALL TECHNICAL SUPPORT WITH ANY QUESTIONS. Use a long handled screwdriver or putty knife to remove any deposits left in the burn pot, being careful to remove them from the burn pot and not allow them to filter down into the cradle area. Excessive ash build‐up in the cradle can cause poor stove performance (See “Cleaning the Burn pot,” below). Pull the ash pan latches out and turn, then slide the ash pan out of the stove. Dump the ashes into a metal container (as described previously) and store them on a non‐ combustible surface to allow any embers to cool before disposal. Slide the ash pan back into the stove; turn the latch, making certain it catches the lip of the ash pan opening. The stove is now ready to resume normal operation. Be certain the ash pan is ALWAYS installed properly in the stove; an air‐tight seal around the ash pan is crucial for proper operation of the stove. Cleaning the Burn Pot Along with removing ashes from the stove, cleaning the burn pot is the other essential part of daily maintenance that will keep the stove operating at its peak. Pellets contain varying amounts of impurities and fusible material that will accumulate in the burn pot over time. Some pellets will contain much higher amounts of these fusible impurities, therefore extra vigilance may be required to maintain a clean burn pot. Allowing impurities to build up in the burn pot can restrict the air flow to the fire, resulting in a dirty, inefficient burn. Always allow the stove to finish the shut‐down cycle and cool completely before performing any maintenance inside the firebox. Open the front panel, then the main door of the stove and remove the burn pot by lifting it straight up and out of the cradle. WARNING – The burn pot can remain HOT long after the fire has gone out, so wear protective gloves whenever handling a potentially hot burn pot. Once the burn pot is out of the stove, use a long handled screwdriver or putty knife, as previously mentioned, and remove any deposits from the inside of the burn pot. Be certain all air orifices are clear and unrestricted by fusible ash matter; a fine tipped screwdriver or scratch awl can be useful in removing stubborn matter from these orifices. Remove any ash material from the bottom of the cradle and brush any ash from the top of the cradle into the bottom of the firebox. Keeping the top of cradle free of ash is crucial in allowing the burn pot to make a positive air‐tight seal with the top of the cradle. Insert the burn pot back into the cradle using the reverse of the procedure detailed above. 25 IMPORTANT! READ AND FOLLOW ALL INSTALLATION AND MAINTENANCE INSTRUCTIONS, INCLUDING CLEANING THE UNIT AS SPECIFIED, AND REPLACING GASKETS ANNUALLY, AND PARTS AS NEEDED. ENGLAND’S STOVE WORKS IS NOT RESPONSIBLE FOR ANY DAMAGE OR INJURY INCURRED DUE TO NEGLECT, OR DUE TO UNSAFE INSTALLATION OR USAGE OF THIS PRODUCT. CALL TECHNICAL SUPPORT WITH ANY QUESTIONS. BI‐WEEKLY MAINTENANCE Baffle Removal As with any maintenance concerning this unit, be sure the unit is “OFF,” has completed the Shut‐Down cycle, and is completely cool BEFORE beginning. Be aware that metal parts in the firebox can remain HOT long after the fire has gone out and EVEN after the Shut‐Down cycle is complete. Always use extreme caution when handling potentially hot stove parts, even if you think they should be cold. Bi‐weekly maintenance should include the steps listed in this section AS WELL AS the steps listed in the “Daily Maintenance” section. The firebox baffle is a free floating design, which reduces thermal stresses on the baffle and makes it easily removable for cleaning. Remove the baffle by : Grasping the baffle in the center, lift up on the rear of the baffle and slide it towards the back of the stove. Then tilt the front downward, moving it down towards the cradle. Last, tilt one end up, the other down and remove from the opening of the stove. When the baffle is out of the stove, the area where fly‐ash accumulates on the firebox shelf will be clear. The use of a utility vacuum is highly recommended because it will prevent fly‐ash from falling through the exhaust holes and into the exhaust chamber. After removing all the fly‐ash from behind the baffle, reinsert the baffle into the stove, using the reverse of the process detailed above. MONTHLY MAINTENANCE Important Notes As with any maintenance concerning this unit, be sure the unit is “OFF,” has completed the Shut‐Down cycle, and is completely cool BEFORE beginning. Be aware that metal parts in the firebox can remain HOT long after the fire has gone out and EVEN after the Shut‐Down cycle is complete. Always use extreme caution when handling potentially hot stove parts, even if you think they should be cold. 26 IMPORTANT! READ AND FOLLOW ALL INSTALLATION AND MAINTENANCE INSTRUCTIONS, INCLUDING CLEANING THE UNIT AS SPECIFIED, AND REPLACING GASKETS ANNUALLY, AND PARTS AS NEEDED. ENGLAND’S STOVE WORKS IS NOT RESPONSIBLE FOR ANY DAMAGE OR INJURY INCURRED DUE TO NEGLECT, OR DUE TO UNSAFE INSTALLATION OR USAGE OF THIS PRODUCT. CALL TECHNICAL SUPPORT WITH ANY QUESTIONS. Monthly maintenance should include the steps listed in this section AS WELL AS the steps listed in the “Daily Maintenance” and “Bi‐weekly Maintenance” section. Intervals between monthly cleanings will depend on the duration that the stove is burning on a daily basis. A stove which is operated continuously will need more frequent monthly cleanings than a stove which is used periodically as supplemental heat. A good rule of thumb for monthly maintenance is that it should be done each time an entire ton of pellets is burned OR once per month, whichever comes first. If excess ash accumulation is found in the exhaust chamber or venting system during monthly maintenance, the interval between cleanings should be reduced to eliminate the possibility of poor stove performance due to ash accumulation. Exhaust Chamber Cleaning The exhaust chamber of the stove was intentionally designed as an ash accumulation area. Allowing ash to accumulate here prevents excess ash build‐up in the combustion blower and the venting system. Similarly, the exhaust chamber is easily accessible via the two exhaust chamber clean‐out ports located in the firebox. *Before cleaning out the exhaust chamber, first perform the cleaning of the firebox shelf as listed under bi‐weekly maintenance. Using a 5/16” socket wrench, remove the screws which hold each of the clean‐out covers in place. The cleanout covers are located on the back wall of the firebox, near the bottom. Remove the cleanout covers from the firebox and BEFORE vacuuming the chamber out, observe the type and quantity of ash build‐up. The ash deposited in the exhaust chamber should be light, fluffy, grey or white in color, and should be no higher than half way up the clean‐out port. Do NOT allow the ash to accumulate higher than about half way up the cleanout port; significant ash accumulation in this area can “choke” the combustion blower and cause poor stove performance. Using a utility type vacuum cleaner, vacuum the fly ash out of the exhaust chamber. A short piece of hose can be attached to the end of the utility vacuum line and can be useful in reaching the ash which accumulates between the clean‐out ports. 27 IMPORTANT! READ AND FOLLOW ALL INSTALLATION AND MAINTENANCE INSTRUCTIONS, INCLUDING CLEANING THE UNIT AS SPECIFIED, AND REPLACING GASKETS ANNUALLY, AND PARTS AS NEEDED. ENGLAND’S STOVE WORKS IS NOT RESPONSIBLE FOR ANY DAMAGE OR INJURY INCURRED DUE TO NEGLECT, OR DUE TO UNSAFE INSTALLATION OR USAGE OF THIS PRODUCT. CALL TECHNICAL SUPPORT WITH ANY QUESTIONS. A specially designed ash vacuum and pellet stove cleaning kit is available from the England’s Stove Works website; please see: http://www.englanderstoves.com/store/. Once all ash has been removed from the exhaust chamber, reinstall the cleanout port covers, using the screws previously removed. Be certain to tighten the screws down to sufficiently seal the cleanout port covers, but do not over‐tighten them, as it is possible to damage the screw. Venting Pipe Cleaning Low spots and direction changes in the venting system (such as tees and elbows) are areas for potential fly‐ash and creosote accumulation. INSPECT these areas diligently to keep the venting system in safe operating condition. Depending on the specific type of venting system your stove is connected to, it may be possible to remove the clean‐out tee cover and simply run a pipe brush up the pipe to remove any fly‐ash accumulation. Brushes specifically made for cleaning pellet pipe are available at the retailer where you bought this stove, as well as at most hearth product dealers. Horizontal runs of pipe, such as from the exhaust connection on the stove to the vertical transition, will accumulate fly ash and should be inspected carefully and brushed clean. Check the termination cap to be certain it is not clogged or restricted by any fly‐ash accumulation. After thoroughly cleaning the venting system, reseal any disassembled seams with high temperature silicone (Part # AC‐RTV3) if applicable to your venting system. Inspect seams that were not disassembled to be certain a smoke‐tight seal is still being made. After prolonged use, leaks in the venting system can usually be found by searching for fly‐ash deposits on the outside of the pipe. Carefully check for leaks in the venting system and seal them accordingly. Although most pellet venting systems are designed to last a lifetime, pellet fly‐ash can be corrosive under certain conditions. When cleaning your venting system, examine the pipe carefully for any signs of deterioration and replace sections that show excessive wear. It is unlikely that this will ever be a concern, but maintaining your venting system in safe operating condition is crucial to safe stove operation. 28 IMPORTANT! READ AND FOLLOW ALL INSTALLATION AND MAINTENANCE INSTRUCTIONS, INCLUDING CLEANING THE UNIT AS SPECIFIED, AND REPLACING GASKETS ANNUALLY, AND PARTS AS NEEDED. ENGLAND’S STOVE WORKS IS NOT RESPONSIBLE FOR ANY DAMAGE OR INJURY INCURRED DUE TO NEGLECT, OR DUE TO UNSAFE INSTALLATION OR USAGE OF THIS PRODUCT. CALL TECHNICAL SUPPORT WITH ANY QUESTIONS. YEARLY MAINTENANCE Important Notes As with any maintenance concerning this unit, be sure the unit is “OFF,” has completed the Shut‐Down cycle, and is completely cool BEFORE beginning. Be aware that metal parts in the firebox can remain HOT long after the fire has gone out and EVEN after the Shut‐Down cycle is complete. Always use extreme caution when handling potentially hot stove parts, even if you think they should be cold. Yearly (or end of season) maintenance should include the steps listed in this section AS WELL AS the steps listed in the “Daily Maintenance,” “Bi‐weekly Maintenance,” and “Monthly Maintenance” sections of this manual. Yearly maintenance should be performed at the end of the burning season. Leaving ash and other build‐up in the stove during the non‐heating months can lead to premature metal degradation in the stove and venting system. Using extra attention to detail and being certain to be very thorough in the end of season cleaning will help increase the operating life of the stove and venting system. SOOT AND FLY ASH: FORMATION AND NEED FOR REMOVAL The products of combustion will contain small particles of fly ash. The fly ash will collect in the exhaust venting system and restrict the flow of the flue gases. Incomplete combustion, such as that which occurs during startup, shutdown or incorrect operation of the room heater will lead to some soot formation which will collect in the exhaust venting system. The exhaust venting system should be inspected at least once every year to determine if cleaning is necessary. Caution – Shock Hazard Press the “Off” button and let the appliance completely cool BEFORE unplugging the appliance and beginning any maintenance or component replacement. Risk of shock if appliance is not unplugged before service. 29 IMPORTANT! READ AND FOLLOW ALL INSTALLATION AND MAINTENANCE INSTRUCTIONS, INCLUDING CLEANING THE UNIT AS SPECIFIED, AND REPLACING GASKETS ANNUALLY, AND PARTS AS NEEDED. ENGLAND’S STOVE WORKS IS NOT RESPONSIBLE FOR ANY DAMAGE OR INJURY INCURRED DUE TO NEGLECT, OR DUE TO UNSAFE INSTALLATION OR USAGE OF THIS PRODUCT. CALL TECHNICAL SUPPORT WITH ANY QUESTIONS. YEARLY MAINTENANCE Exhaust Blower Cleaning Although the exhaust blower and blower housing were designed to minimize ash build‐up, some fly‐ ash will still accumulate there throughout the burning season. The amount and type of ash will depend on the type of pellets and venting system, but generally this accumulation will be mild. If, when cleaning the exhaust blower, a large accumulation of fly‐ash is found, cleaning the exhaust blower and housing should be performed monthly or bimonthly to prevent this excess buildup. Instructions Before beginning the exhaust blower cleaning procedure, be certain the unit is unplugged and thoroughly cooled down. Remove the panel to the left (if facing the stove). See page 43 for panel removal instructions. Once the panel is off, the exhaust blower will be clearly visible. Disconnect the venting system from the exhaust blower just enough that you will be able to remove the exhaust blower from the stove (the rear panel will also need to be removed). Unplug the two wires which connect the stove wiring harness to the exhaust blower, using the quick connect plugs. Loosen the five (5) 5/16” self‐drilling screws which hold the exhaust blower to the exhaust blower tube; a 12” socket extension will likely be necessary to reach all of the screws. Lift the exhaust blower up and out of the stove. The gasket which seals the exhaust blower to the exhaust blower tube is fragile, so take extra care when removing the blower. Even when being careful, though, it is easy to tear this fragile gasket, and since an airtight seal is crucial here, it is best to replace this gasket (Part # ‐ PU‐CBG) every time the exhaust blower is removed. With the exhaust blower removed, use a utility vacuum to remove any ash accumulation in the exhaust blower tube. Use a soft paint brush and carefully remove any ash accumulation from the inside of the exhaust blower, and from the exhaust blower fan blade. Inspect the exhaust blower motor for dust accumulation and carefully remove it, ensuring that all air cooling holes into the motor are open and free of dust deposits. Install the blower in the reverse order as described above. Remember to check the condition of the exhaust blower gasket. Reinstall the venting system and panels. Convection Blower Cleaning As always, be certain the stove is cool and unplugged before servicing any components within the unit. Since the convection blower does not handle any by‐products of combustion, it does not require serious cleaning like the exhaust blower. However, dust from the home and other debris in the air can accumulate on the blades of the convection blower. The convection blower is located on the side of the stove opposite the combustion blower, and an access panel on the stove is provided, for easy convection blower cleaning. Any dust that has built up on the fan blades can usually be easily removed with a vacuum or a soft paint brush. 30 IMPORTANT! READ AND FOLLOW ALL INSTALLATION AND MAINTENANCE INSTRUCTIONS, INCLUDING CLEANING THE UNIT AS SPECIFIED, AND REPLACING GASKETS ANNUALLY, AND PARTS AS NEEDED. ENGLAND’S STOVE WORKS IS NOT RESPONSIBLE FOR ANY DAMAGE OR INJURY INCURRED DUE TO NEGLECT, OR DUE TO UNSAFE INSTALLATION OR USAGE OF THIS PRODUCT. CALL TECHNICAL SUPPORT WITH ANY QUESTIONS. YEARLY MAINTENANCE Cradle Removal and Cleaning The cradle needs to be removed yearly, to be cleaned and to replace the cradle gasket. To remove the cradle: First, remove the back panel from the stove (using a 5/16” socket). Looking into the stove from the front, loosen the two bolts in the front that hold the cradle, then remove the igniter (see page 36). After the igniter is removed, finish loosening the bolts and lift the cradle out of the stove. Clean out the cradle and remove the old gasket (it may be necessary to scrape the gasket off). Replace the gasket, using an adhesive (high‐temp. silicone can be ordered with this part). Place the cradle back into the stove and tighten the bolts by hand until they are touching the cradle. Then, use a ½” socket to tighten until the gasket is mated. The bolts do not need to go all the way in. *Note: When tightening the bolts, tighten each one a little at a time.* Cleaning Pellet Fines from the Hopper and Auger Depending on the type and quality of pellets burned in the stove, some accumulation of pellet fines and dust is possible in the hopper. The lowest part of the auger, near the back of the stove, is where most fines will accumulate. With the stove off, unplugged, completely cool and with the hopper empty, use a utility vacuum to remove the fines from the auger tube. If the fines cannot be removed from the top of the hopper: Remove the back panel, using a 5/16” socket to remove the screws. Locate the auger motor assembly at the middle rear of the stove, and once it is found, find the two set screws on either side of the cast iron mounting collar. Using a 1/8” allen wrench, loosen the set screw on either side of the auger mounting collar. With a utility vacuum in hand, let the auger assembly slide out of the auger tube just enough so that the vacuum can be used to remove any fines from this area. Reinstall the auger assembly and tighten the two set screws; reinstall the back panel, being certain to tighten the retaining screws on the rear of the stove. Checking Gaskets An airtight seal at the door openings and hopper lid opening is crucial to proper stove performance. Any air leaks at these areas can not only cause a dirty, inefficient burn but can also pose a serious safety threat. Because of this, gaskets should always be maintained in good condition, and replaced annually, or sooner if necessary. Gasket tightness can be checked using the “dollar‐bill” method: Place a dollar bill between the gasket and the stove body (at the location where the gasket meets the stove). Tighten the latching mechanism down and attempt to pull the dollar bill out. If the dollar bill slides in and out easily, the gasket needs to be replaced. This test should be repeated around the entire gasket perimeter, as gaskets will sometimes seal tightly on one side, but will be worn and seal poorly on another side. 31 IMPORTANT! READ AND FOLLOW ALL INSTALLATION AND MAINTENANCE INSTRUCTIONS, INCLUDING CLEANING THE UNIT AS SPECIFIED, AND REPLACING GASKETS ANNUALLY, AND PARTS AS NEEDED. ENGLAND’S STOVE WORKS IS NOT RESPONSIBLE FOR ANY DAMAGE OR INJURY INCURRED DUE TO NEGLECT, OR DUE TO UNSAFE INSTALLATION OR USAGE OF THIS PRODUCT. CALL TECHNICAL SUPPORT WITH ANY QUESTIONS. Trouble‐Shooting Guide WARNING: To avoid ELECTRICAL SHOCK always disconnect the unit from the power source BEFORE attempting any repair. If this guide does not correct the problem, call your local dealer or Technical Support at 1‐800‐245‐6489. Problem Auger not turning Smoke smell or dust in house Cause 1. Bad auger motor. 2. Foreign matter jamming auger. 3. Vacuum sensor. 1. Improper exhaust connection. Room blower not operating 1. Loose thermal sensor. 2. Blower speed set higher than heat range, causing stove to cool and blower to cycle. 3. Loose connection. 1. Loose connection. 2. Bad blower. 3. Bad vacuum sensor. 1. Bad exhaust blower. 2. Excessive pellet moisture. 3. Excessive ash build‐up. 4. Low quality pellets. 1. Power surge. Exhaust blower not operating Lazy Fire Blown Fuse 2. Exposed wire. 3. Electrical component shorting. High Pellet Consumption Squeaking Noise 1. Low quality or non‐uniformly sized pellets. 1. Obstruction in auger tube. Pinging or Rattling Noise "E‐1" Code On Control Board 2. Blower Noise. 1. Foreign material in blower. 2. Loose exhaust fan set screw. 1. N/A on this unit. Solution 1. Replace auger motor. 2. Remove pellets and object. 3. Check exhaust blower. 1. Check exhaust connections for leaks, especially the exhaust blower connect. Seal leaks with silicone, aluminum tape or a hose clamp. 1. Tighten connection on sensor. 2. Lower blower speed. 3. Check control board connection. 1. Check control board connection. 2. Replace blower. 3. Replace vacuum sensor. 1. Inspect and replace blower. 2. Keep pellets dry. 3. Thoroughly clean unit. 4. Use only PFI premium pellets. 1. Replace fuse; use surge protector. 2. Check for exposed or frayed wire and loose connections. 3. Check motors and blowers for obstructions or short circuits. 1. Use premium pellets or try another pellet brand. 1. Check auger tube for foreign objects. 2. Remove, clean, and oil blower. 1. Check both blowers for material. 2. Check set screw for tightness. 1. Contact Technical Support. 32 IMPORTANT! READ AND FOLLOW ALL INSTALLATION AND MAINTENANCE INSTRUCTIONS, INCLUDING CLEANING THE UNIT AS SPECIFIED, AND REPLACING GASKETS ANNUALLY, AND PARTS AS NEEDED. ENGLAND’S STOVE WORKS IS NOT RESPONSIBLE FOR ANY DAMAGE OR INJURY INCURRED DUE TO NEGLECT, OR DUE TO UNSAFE INSTALLATION OR USAGE OF THIS PRODUCT. CALL TECHNICAL SUPPORT WITH ANY QUESTIONS. Unit Shuts Down in 15‐20 minutes with an "E‐2" code on control board. "E‐3" Code on Control Board (Overfire) "E‐4" Code on Control Board (Proof of flame lost) 1. Loose thermal sensor. 1. Check both sides of thermal sensor connection (exhaust blower and control board). 2. Control board settings. 2. Start stove on minimum Heat Range 5 to ensure a good fire is started. 3. Failure to light pellets. 3. Check igniter for buildup or failure. 1. Convection (Room Air) blower failure. 1. Check convection blower for proper function, replace if necessary. 2. Partially blocked flue. 2. Check flue for obstructions. 3. Using fuel other than premium wood 3. Use ONLY premium wood pellets pellets. in this stove. 1. The hopper is empty. 1. Refill the hopper with pellets and restart the stove. 2. The hopper lid was left open too long 2. Keep the hopper lid open for the during refueling. shortest interval possible when refueling. The safety switch stops the auger when the hopper lid is open. 3. Component failure. 3. An auger motor failure or combustion motor failure can sometimes result in an "E‐4" code. 4. Blower speed is set too high, cooling firebox too rapidly. 4. Operate the stove with the blower speed and heat range at the same value. Notes: 1. Whenever instructed to check/replace the vacuum sensor, also check for loose or cracked vacuum hose. Also, be certain the vacuum measurement port in the firebox is kept clean (clean with a pipe cleaner or brush, do not use a vacuum to clean). 2. To restart and clear an error code displayed on the control board, push the "ON" button and the unit should reset the error and restart. 3. If you are uncertain about the meaning of an error code or have any questions at all, PLEASE contact Technical Support at (800)245‐6489. 33 IMPORTANT! READ AND FOLLOW ALL INSTALLATION AND MAINTENANCE INSTRUCTIONS, INCLUDING CLEANING THE UNIT AS SPECIFIED, AND REPLACING GASKETS ANNUALLY, AND PARTS AS NEEDED. ENGLAND’S STOVE WORKS IS NOT RESPONSIBLE FOR ANY DAMAGE OR INJURY INCURRED DUE TO NEGLECT, OR DUE TO UNSAFE INSTALLATION OR USAGE OF THIS PRODUCT. CALL TECHNICAL SUPPORT WITH ANY QUESTIONS. REPLACING COMPONENTS Auger Motor 1. Before beginning any component replacement, be certain the unit is unplugged and thoroughly cooled down. Also, make sure the hopper is empty before attempting to remove or replace the auger motor assembly. 2. Remove the back panel of the unit, using a 5/16” wrench. Before loosening any auger motor bolts, detach the wiring harness from the auger motor. 3. Locate the auger motor assembly at the rear of the stove, and begin by loosening the two 1/8” allen set screws on either side of the cast iron auger motor coupler. 4. Slide the auger assembly out of the tube. 5. Next, remove the four screws which hold the cast iron auger motor coupler to the auger motor, using a 5/16” wrench. Slide the cast iron auger motor coupler and the steel spacer plate off of the auger motor. 6. Loosen the 1/8” allen set screw which holds the steel auger coupler to the auger motor output shaft, and remove the steel auger coupler, as well as the rubber vibration dampener. 7. Reinstall the parts in reverse order on the new auger motor, being careful not to over‐tighten the bolts which hold the cast iron auger coupler to the auger motor. 34 IMPORTANT! READ AND FOLLOW ALL INSTALLATION AND MAINTENANCE INSTRUCTIONS, INCLUDING CLEANING THE UNIT AS SPECIFIED, AND REPLACING GASKETS ANNUALLY, AND PARTS AS NEEDED. ENGLAND’S STOVE WORKS IS NOT RESPONSIBLE FOR ANY DAMAGE OR INJURY INCURRED DUE TO NEGLECT, OR DUE TO UNSAFE INSTALLATION OR USAGE OF THIS PRODUCT. CALL TECHNICAL SUPPORT WITH ANY QUESTIONS. REPLACING COMPONENTS Convection Blower 1. Before beginning any component replacement, be certain the unit is unplugged and thoroughly cooled down. 2. Remove the rear panel (using a 5/16” wrench) and locate the convection blower. 3. Detach the convection blower from the wiring harness before going any further. 4. Loosen and remove the two screws which hold the blower to the stove; remove the blower from the stove. 5. Installation of the new blower is performed in reverse of removal; remember to reconnect the new blower to the wiring harness. (When installing the new blower, place the flange of the blower on the bottom bracket of the blower housing.) Combustion Blower 1. Before beginning any component replacement, be certain the unit is unplugged and thoroughly cooled down. 2. Remove the left side panel and locate the combustion blower (see p. 43 for panel instructions). 3. Disconnect the venting system from the exhaust blower, and disconnect the exhaust blower from the stove wiring harness. To remove the venting pipe, removal of the rear panel (using a 5 /16” wrench) may be necessary. 4. Remove all five screws which hold the exhaust blower to the exhaust blower tube. Once the screws have been removed, the blower can be lifted up and out of the stove. 5. Reinstallation is the exact opposite of the steps above; however, be certain to check the condition of the exhaust blower gasket and replace if necessary. 35 IMPORTANT! READ AND FOLLOW ALL INSTALLATION AND MAINTENANCE INSTRUCTIONS, INCLUDING CLEANING THE UNIT AS SPECIFIED, AND REPLACING GASKETS ANNUALLY, AND PARTS AS NEEDED. ENGLAND’S STOVE WORKS IS NOT RESPONSIBLE FOR ANY DAMAGE OR INJURY INCURRED DUE TO NEGLECT, OR DUE TO UNSAFE INSTALLATION OR USAGE OF THIS PRODUCT. CALL TECHNICAL SUPPORT WITH ANY QUESTIONS. REPLACING COMPONENTS Vacuum Switch 1. Before beginning any component replacement, be certain the unit is unplugged and thoroughly cooled down. 2. Remove the right side panel (see p. 43 for panel instructions). 3. Locate the vacuum switch as shown in the diagram below. 4. Disconnect the stove wiring harness and vacuum hose from the vacuum switch, taking note of where connections were made. 5. Remove the two screws which hold the vacuum switch to the vacuum switch bracket, using a phillips screw driver. 6. Installation is the reverse of removal; be absolutely certain the wires and vacuum hose are connected according to the wiring diagram in this manual. Igniter 1. Before beginning any component replacement, be certain the unit is unplugged and thoroughly cooled down. 2. Remove the rear panel of the unit, using a 5/16” wrench. 3. Loosen the bolts (in the front of the stove) that fasten the cradle (see also p. 31). 4. Locate the igniter as shown in the diagram below. 5. Disconnect the igniter wiring from the control board and use a 5/16” wrench to remove the igniter retaining screw. 6. Loosen the allen set screw (1/8” allen wrench) and remove the old igniter cartridge. 7. Install the new igniter in the igniter tube, retighten the set screw and reinstall the assembly into the stove. Be certain to reconnect the new igniter wires to the circuit board before reassembly. 8. Install the screw, locking in the assembly, and then tighten the bolts for the cradle...each one a little at a time until the gasket is mated. Replace the panels. 36 IMPORTANT! READ AND FOLLOW ALL INSTALLATION AND MAINTENANCE INSTRUCTIONS, INCLUDING CLEANING THE UNIT AS SPECIFIED, AND REPLACING GASKETS ANNUALLY, AND PARTS AS NEEDED. ENGLAND’S STOVE WORKS IS NOT RESPONSIBLE FOR ANY DAMAGE OR INJURY INCURRED DUE TO NEGLECT, OR DUE TO UNSAFE INSTALLATION OR USAGE OF THIS PRODUCT. CALL TECHNICAL SUPPORT WITH ANY QUESTIONS. REPLACING COMPONENTS IMPROPER GASKET MAINTENANCE, INCLUDING FAILURE TO REPLACE GASKETS, CAN CAUSE AIR LEAKS RESULTING IN SMOKE-BACKS. Gaskets 1. Door o This unit comes with a 5/8” rope gasket in the channel around the door opening that should be replaced at least once every year. To replace the door gasket (Part # AC‐ DGKNC), the old gasket must first be removed entirely — prior to adding the new adhesive, you may have to scrape the old cement from the channel. Once the cement and gasket have been added, the door should be closed and latched for twenty‐four hours to allow the cement to harden. 2. Window o If you are replacing the window gasket (Part # AC‐GGK), the new gasket will already have adhesive on one side. Remove the paper on the adhesive side and place the gasket around the outside edge of the glass, centered over the edge. Fold the gasket edges over on the glass, forming a “U” shape. 3. Combustion Blower o The Combustion Blower Gasket (Part # PU‐CBG) should be inspected whenever you remove or clean the Combustion Blower, and replaced if necessary. 4. Combustion Blower Motor o The combustion blower motor gasket (Part # PU‐CMG) generally does not need replacement, as it is not normally removed from the unit. However, if the exhaust blower is cleaned by removing the motor, rather than the entire blower assembly, this gasket must be inspected and replaced as necessary. 5. Cradle o The cradle gasket (Part # PU‐CGEP) needs to be replaced every time the cradle is removed, which will only be necessary during the yearly maintenance. 6. Hopper/Hopper Lid o There is one gasket under the top, and one under the lid. Both of these can be replaced using the same gasket kit (Part # PU‐HLG). Both should be inspected and replaced yearly. 7. Ash Pan o The ash pan gasket should be inspected and replaced annually, as well. 37 IMPORTANT! READ AND FOLLOW ALL INSTALLATION AND MAINTENANCE INSTRUCTIONS, INCLUDING CLEANING THE UNIT AS SPECIFIED, AND REPLACING GASKETS ANNUALLY, AND PARTS AS NEEDED. ENGLAND’S STOVE WORKS IS NOT RESPONSIBLE FOR ANY DAMAGE OR INJURY INCURRED DUE TO NEGLECT, OR DUE TO UNSAFE INSTALLATION OR USAGE OF THIS PRODUCT. CALL TECHNICAL SUPPORT WITH ANY QUESTIONS. REPLACING COMPONENTS Glass This unit has one ceramic glass panel (Part # AC‐G40) in the inner door; self adhesive window gasket is included with replacement windows purchased directly from England’s Stove Works. Never replace ceramic glass with tempered or any other type of glass and never operate this unit with cracked or broken glass. Surface scratches are acceptable and normal, but if this glass becomes cracked in any area, the unit should be shut down and the glass replaced with this high‐temperature ceramic glass. Ceramic Glass Specifications Glass Size: 14.5 in. (368.3 mm) x 10.75 in. (273.05 mm) Glass Type: 5mm Ceramic Glass (Keralite Pyroceram) Glass Manufacturer: Eurokera Glass Precautions 1. Never replace ceramic glass with tempered or any other type of glass. 2. Never operate this unit with cracked or broken glass. 3. Do not slam the door or strike the glass with any objects. Glass Cleaning 1. Be certain the stove and the glass are completely cool. 2. The build‐up on the glass will generally be light and water is normally sufficient to remove the deposits. If stubborn soot persists, use a cleaner made specifically for this purpose. Do not scrape the glass or use abrasive cleaners. 3. Rinse the glass with clean water and dry the glass before resuming normal operation. Glass Replacement 1. 2. 3. 4. Remove the door from the stove and rest it face down on a firm work surface. Using a 5/16” wrench, remove the four screws on the sides of the door. Remove the inner piece of the door. Remove the four screws holding the two window brackets. Lift the old glass panel out and discard (be especially careful if the old glass is broken or cracked). 5. The new glass panel must be wrapped with a self‐adhesive fiberglass tape gasket (Part # PU‐ GGK). This gasket serves to cushion the glass from the steel door and brackets. 6. Reinstall the window retaining brackets using the screws previously removed. Do not over‐ tighten the screws. 7. Place the inner door piece into the outer door piece and reinstall the screws previously removed from the sides. *See diagram on page 44 for door assembly.* 38 IMPORTANT! READ AND FOLLOW ALL INSTALLATION AND MAINTENANCE INSTRUCTIONS, INCLUDING CLEANING THE UNIT AS SPECIFIED, AND REPLACING GASKETS ANNUALLY, AND PARTS AS NEEDED. ENGLAND’S STOVE WORKS IS NOT RESPONSIBLE FOR ANY DAMAGE OR INJURY INCURRED DUE TO NEGLECT, OR DUE TO UNSAFE INSTALLATION OR USAGE OF THIS PRODUCT. CALL TECHNICAL SUPPORT WITH ANY QUESTIONS. REPLACING COMPONENTS Control Board The Control Board (Part # PU‐CBIP) is a digital read‐out board. This board offers a wide variety of settings to operate the unit. The right side panel can be opened to remove the control board. The control board can be removed from the unit by loosening the two outside screws and pulling the board down below the mounting bracket. A 6‐amp “quick‐blow” fuse is used on this Control Board. *BEFORE REPLACING THE CONTROL BOARD BE SURE THE UNIT IS COOLED COMPLETELY AND UNPLUGGED.* NOTE: The bottom three control buttons are preset at the factory and are not user adjustable. See the “Daily Operation” section on pages 17‐19 of the manual for more instructions on Control Board settings. Recommended Heat Ranges: Low Burn: Heat Range setting: 1 Medium Low: Heat Range setting: 2 – 3 Room Air Blower setting: * Medium High: Heat Range setting: 4 – 8 Room Air Blower setting: * High Burn: Heat Range setting: 9 Room Air Blower setting: 1 Room Air Blower setting: 9 *NOTE: Blower speed will automatically be adjusted to the desired heat range that you select. 39 IMPORTANT! READ AND FOLLOW ALL INSTALLATION AND MAINTENANCE INSTRUCTIONS, INCLUDING CLEANING THE UNIT AS SPECIFIED, AND REPLACING GASKETS ANNUALLY, AND PARTS AS NEEDED. ENGLAND’S STOVE WORKS IS NOT RESPONSIBLE FOR ANY DAMAGE OR INJURY INCURRED DUE TO NEGLECT, OR DUE TO UNSAFE INSTALLATION OR USAGE OF THIS PRODUCT. CALL TECHNICAL SUPPORT WITH ANY QUESTIONS. WIRING DIAGRAM PU‐CBIP Control Board Diagram Caution – Shock Hazard Press the “Off” button and let the appliance completely cool BEFORE unplugging the appliance and beginning any maintenance or component replacement. Risk of shock if appliance is not unplugged before service. 40 IMPORTANT! READ AND FOLLOW ALL INSTALLATION AND MAINTENANCE INSTRUCTIONS, INCLUDING CLEANING THE UNIT AS SPECIFIED, AND REPLACING GASKETS ANNUALLY, AND PARTS AS NEEDED. ENGLAND’S STOVE WORKS IS NOT RESPONSIBLE FOR ANY DAMAGE OR INJURY INCURRED DUE TO NEGLECT, OR DUE TO UNSAFE INSTALLATION OR USAGE OF THIS PRODUCT. CALL TECHNICAL SUPPORT WITH ANY QUESTIONS. Adjusting your Hopper Lid Latches The seals around the top of the pellet hopper are important to safe and efficient operation of the unit. The latch installed on these units is designed to pull the hopper lid tight against this seal. Over the course of operation as these seals “wear in” and compress, the tension of the latch should be tested periodically, and adjusted if necessary. To adjust the lid latch, the following tools will be needed: two ½” wrenches, or a ½” wrench and a ½” socket. In order to adjust the latch, first open the hopper lid and then lock the latch in its closed position. Then take the ½” wrench and loosen the nut closest to the latch. This nut is then adjusted closer to the lid itself to tighten the latch. After adjusting this nut to the desired location, hold this nut in place with the ½” wrench, then tighten down the holding nut on the end of the latch shaft with the ½” socket or second wrench, to hold the latching assembly in place. After tightening the latch, test the latch for proper tension by locking the lid down and lifting each front corner of the lid. The lid should be firmly held down by the latch. Repeat the same procedure if the latch is still not tight enough. Important: Hopper Lid Latch must be checked periodically and kept tight so the top is sealed to prevent back‐burn. Hopper Lid Latch Assembly 41 IMPORTANT! READ AND FOLLOW ALL INSTALLATION AND MAINTENANCE INSTRUCTIONS, INCLUDING CLEANING THE UNIT AS SPECIFIED, AND REPLACING GASKETS ANNUALLY, AND PARTS AS NEEDED. ENGLAND’S STOVE WORKS IS NOT RESPONSIBLE FOR ANY DAMAGE OR INJURY INCURRED DUE TO NEGLECT, OR DUE TO UNSAFE INSTALLATION OR USAGE OF THIS PRODUCT. CALL TECHNICAL SUPPORT WITH ANY QUESTIONS. DOOR LATCH The door latch uses a removable handle. This handle can be found in the owner’s manual packet. The handle should be stored inside the front panel in the very bottom shelf. The latch can be adjusted by loosening the screws and moving the plate forward/backward as needed. If the hook should need to be replaced, use a 5/32” allen wrench to loosen the bolt going through the hook. Remove the assembly, using care not to lose the spacer collars. Put the bolt through the new hook and place the spacer collars on, and install in the door. Do not over‐tighten the bolt. MAGNETS On the front of the unit there are two magnets that are used to hold the front panel closed. Only use these magnets in the manner in which they were designed; improper handling of these magnets could cause injury. Keep out of the reach of children. Do not place the magnets near any electronic items. Use only the magnets that come from England’s Stove Works, Inc. These can be purchased on our website, www.englanderstoves.com, or by calling our parts department at 1‐800‐ 516‐3636. England’s Stove Works, Inc. will not be liable for any injury caused by improper use of magnets, or if any other magnet is used. To replace magnets: Use a 5/16” socket to remove the screw holding the magnet in place. Discard the old magnet(s) in an appropriate manner. Replace with the new magnet, using the screw previously removed. HOPPER LID/TOP The hopper lid is permanently attached to the top. If more room is desired to do any work inside the hopper (cleaning the dust out, etc.), the whole top may be removed. To remove the hopper top: Loosen the two screws under the front of the top using a 5/16” socket. Next, remove the three screws on the rear of the top that hold the top to the hopper. Remove the top and place out of the way while working. When ready to put the top back, line up the two slots under the front side of the top with the two screws on the front of the stove. Replace the three screws previously removed from the back, then tighten the front screws. 42 IMPORTANT! READ AND FOLLOW ALL INSTALLATION AND MAINTENANCE INSTRUCTIONS, INCLUDING CLEANING THE UNIT AS SPECIFIED, AND REPLACING GASKETS ANNUALLY, AND PARTS AS NEEDED. ENGLAND’S STOVE WORKS IS NOT RESPONSIBLE FOR ANY DAMAGE OR INJURY INCURRED DUE TO NEGLECT, OR DUE TO UNSAFE INSTALLATION OR USAGE OF THIS PRODUCT. CALL TECHNICAL SUPPORT WITH ANY QUESTIONS. FIBERBOARD To remove the fiberboard: Remove the air wash bar, located on top of the cradle. Remove the burn pot. Using a 5/16” socket, remove the screw and washer that hold the fiberboard in place. Remove the board by pulling one side out first. Put new board in, using the reverse of the above. BE CAREFUL not to over‐tighten the screw. PANELS The panels are designed with venting holes to release some of the heat coming off the stove; however, the panels will get hot during operation. DO NOT TOUCH THE SIDES OR THE FRONT PANEL DURING OPERATION, OR WHILE SHUTTING /COOLING DOWN. EVEN AFTER THE STOVE HAS HAD ENOUGH TIME TO COOL, USE CARE WHEN HANDLING THE SIDE/FRONT PANELS, AS THEY COULD STILL BE HOT. The side panels on this unit are hinged and will swing open. You can open them to work within the stove. To open a side panel, simply pull from the front side, in the middle of the panel. To close the side panel, push it in at the top. There is a clip at the top and a magnet at the bottom. FINISH This new unit has been painted with High‐Temperature paint that should retain its original look for years. If the unit should get wet and rust spots appear, the spots can be sanded with fine steel wool and repainted. It is crucial that only High‐Temperature Spray Paint is used (Part # AC‐MBSP), as others may not adhere to the surface or withstand the high temperatures. Similarly, some brands of paint will not adhere to different brands of paint, so we highly recommend using our proprietary High‐ Temperature Spray Paint. 43 IMPORTANT! READ AND FOLLOW ALL INSTALLATION AND MAINTENANCE INSTRUCTIONS, INCLUDING CLEANING THE UNIT AS SPECIFIED, AND REPLACING GASKETS ANNUALLY, AND PARTS AS NEEDED. ENGLAND’S STOVE WORKS IS NOT RESPONSIBLE FOR ANY DAMAGE OR INJURY INCURRED DUE TO NEGLECT, OR DUE TO UNSAFE INSTALLATION OR USAGE OF THIS PRODUCT. CALL TECHNICAL SUPPORT WITH ANY QUESTIONS. ILLUSTRATED PARTS DIAGRAM Auger Motor Assembly Door Assembly 44 IMPORTANT! READ AND FOLLOW ALL INSTALLATION AND MAINTENANCE INSTRUCTIONS, INCLUDING CLEANING THE UNIT AS SPECIFIED, AND REPLACING GASKETS ANNUALLY, AND PARTS AS NEEDED. ENGLAND’S STOVE WORKS IS NOT RESPONSIBLE FOR ANY DAMAGE OR INJURY INCURRED DUE TO NEGLECT, OR DUE TO UNSAFE INSTALLATION OR USAGE OF THIS PRODUCT. CALL TECHNICAL SUPPORT WITH ANY QUESTIONS. REPLACEMENT PARTS LIST Part No Description From Diagram PU-4C447 CU-047042 PU-076002B AC-DGKNC AC-GGK AC-G40 AC-GGK AC-HLSB CA-AC CA-AMPP CU-RG CU-VS IP-25IP PU-62-40-151-3 PU-AFEP PU-BPEP PU-CBIP PU-CBG PU-CGEP PU-CHA PU-CMG PU-VH PU-HLG PU-BPCIP AC-HP CPM-CFB PU-103-50 PU-HTIP PU-FPIP PU-LPIP PU-RPIP PU-BAPIP PU-OAK PU-DLIP AC-MAG PU-ECPIP AC-APIP CA-50 PU-HFGIP PU-CBHS 250 CFM Room Air Blower 2.4 RPM Auger motor CW Rotation Combustion Exhaust Blower(Neg) Door Gasket 5/8” round Ash Pan Gasket Door Glass 10.675" x 14.438" Window Glass Gasket Hopper Lid Safety Switch Auger Motor Coupler Auger Mounting Plate Rubber Vibration Dampener Door Ajar Switch .05 Impingement plate (baffle plate) Recessed Hopper Lid Latch Steel Auger Burn Pot Unit Control Board Combustion Blower Gasket Cradle Gasket Cartridge Heater Element Combustion Motor Gasket Vacuum Hose Hopper Lid Gasket Burn Pot Cradle Hinge Pins for Door Ceramic Fiber Board Hopper Lid Latches For Ash Pan (2) Hopper Top (bolt on) Front Panel Left Panel Right Panel Back Access Panel Outside Air Kit Front Door Latch Magnets For IP Pellet Stove (2) Exhaust Cleanout Cover Plates (2) Ash Pan for Imperial Pellet Stove Door for Imperial Hopper Flange Gasket Control Board Heat Sensor 8 12 9 10 11 3 4 13 15 14 29 16 17 18 21 19 20 22 23 24 Not shown Not shown 25 26 Not shown 27 28 30 31 32 33 34 Not shown 6 Not shown 35 36 37 Not shown Not shown 45 IMPORTANT! READ AND FOLLOW ALL INSTALLATION AND MAINTENANCE INSTRUCTIONS, INCLUDING CLEANING THE UNIT AS SPECIFIED, AND REPLACING GASKETS ANNUALLY, AND PARTS AS NEEDED. ENGLAND’S STOVE WORKS IS NOT RESPONSIBLE FOR ANY DAMAGE OR INJURY INCURRED DUE TO NEGLECT, OR DUE TO UNSAFE INSTALLATION OR USAGE OF THIS PRODUCT. CALL TECHNICAL SUPPORT WITH ANY QUESTIONS. PU-AWBIP AC-GSIP AC-DLHIP AC-VMBIP AC-CMPIP AC-CHSEP PU-DVDIP MU-25IP AC-IPG PU-IPWH Air Wash Bar Glass Support Door Latch Handle Vacuum Switch Mounting Bracket Control Board Mounting Plate Cartridge Heater Sleeve DVD Manual Grill Wiring Harness 38 2 7 Not shown 39 Not shown Not shown Not shown 40 Not shown ASH PAN LATCHES The ash pan latches can be adjusted in the same manner as the hopper lid latch (see p. 41). 46 IMPORTANT! READ AND FOLLOW ALL INSTALLATION AND MAINTENANCE INSTRUCTIONS, INCLUDING CLEANING THE UNIT AS SPECIFIED, AND REPLACING GASKETS ANNUALLY, AND PARTS AS NEEDED. ENGLAND’S STOVE WORKS IS NOT RESPONSIBLE FOR ANY DAMAGE OR INJURY INCURRED DUE TO NEGLECT, OR DUE TO UNSAFE INSTALLATION OR USAGE OF THIS PRODUCT. CALL TECHNICAL SUPPORT WITH ANY QUESTIONS. You may write your unit’s Manufacture Date and Serial Number in the blank spaces on this sample tag, for future reference. This sample tag also shows the safety info. such as UL/ULC testing standard, etc. for your local officials, or anyone else who may need reference information. 47 IMPORTANT! READ AND FOLLOW ALL INSTALLATION AND MAINTENANCE INSTRUCTIONS, INCLUDING CLEANING THE UNIT AS SPECIFIED, AND REPLACING GASKETS ANNUALLY, AND PARTS AS NEEDED. ENGLAND’S STOVE WORKS IS NOT RESPONSIBLE FOR ANY DAMAGE OR INJURY INCURRED DUE TO NEGLECT, OR DUE TO UNSAFE INSTALLATION OR USAGE OF THIS PRODUCT. CALL TECHNICAL SUPPORT WITH ANY QUESTIONS. LIMITED FIVE (5) YEAR WARRANTY From the date of purchase to the original owner. The manufacturer extends the following warranties: Five Year Period: 1. Carbon steel and welded seams in the firebox are covered for five (5) years against splitting. 2. The steel door and hinges are covered for five (5) years against cracking. One Year Period: 1. Component parts such as the hopper, auger, burn‐pot, auger shaft and fasteners are covered for one (1) year against cracking, breakage and welded seam separation. 2. Electrical components, accessory items, glass and the painted surface of the stove are covered for one (1) year from the date of purchase. Conditions and Exclusions 1. Damage resulting from over‐firing will void your warranty. 2. This warranty does not apply if damage occurs because of an accident, improper handling, improper installation, improper operation, abuse or unauthorized repair made or attempted to be made. 3. The manufacturer is not liable for indirect, incidental, or consequential damages in connection with the product including any cost or expense, providing substitute equipment or service during periods of malfunction or non‐use.* 4. All liability for any consequential damage for breach of any written or implied warranty is disclaimed and excluded. Some states do not allow the exclusion of limitations of incidental or consequential damages, so the above may not apply to you 48 IMPORTANT! READ AND FOLLOW ALL INSTALLATION AND MAINTENANCE INSTRUCTIONS, INCLUDING CLEANING THE UNIT AS SPECIFIED, AND REPLACING GASKETS ANNUALLY, AND PARTS AS NEEDED. ENGLAND’S STOVE WORKS IS NOT RESPONSIBLE FOR ANY DAMAGE OR INJURY INCURRED DUE TO NEGLECT, OR DUE TO UNSAFE INSTALLATION OR USAGE OF THIS PRODUCT. CALL TECHNICAL SUPPORT WITH ANY QUESTIONS. Procedure Purchaser must give notice of claim of defect within the warranty period and pay transportation to and from a service center designated by the manufacturer. The dealer from which the unit was purchased or the factory, at our option, will perform the warranty service. Other Rights This warranty gives you specific legal rights; you may also have other rights, which may vary from state to state. Please Note: This warranty is null and void if the attached warranty registration AND a copy of the sales receipt is not returned within thirty (30) days from the date of purchase. Warranty is not transferable. 49 IMPORTANT! READ AND FOLLOW ALL INSTALLATION AND MAINTENANCE INSTRUCTIONS, INCLUDING CLEANING THE UNIT AS SPECIFIED, AND REPLACING GASKETS ANNUALLY, AND PARTS AS NEEDED. ENGLAND’S STOVE WORKS IS NOT RESPONSIBLE FOR ANY DAMAGE OR INJURY INCURRED DUE TO NEGLECT, OR DUE TO UNSAFE INSTALLATION OR USAGE OF THIS PRODUCT. CALL TECHNICAL SUPPORT WITH ANY QUESTIONS. Important Notice This registration information MUST be on file for this warranty to be valid. Please mail this information within thirty (30) days from the original date of purchase. Use any of these three easy ways to send your warranty information in! Mailing Address England’s Stove Works, Inc. Technical support Department P.O. Box 206 Monroe, Virginia 24574 Fax Number (434) 929‐4810 – Twenty‐four hours a day. Online Registration Visit our warranty registration website at: http://www.englanderstoves.com/warranty/warranty.html 50 IMPORTANT! READ AND FOLLOW ALL INSTALLATION AND MAINTENANCE INSTRUCTIONS, INCLUDING CLEANING THE UNIT AS SPECIFIED, AND REPLACING GASKETS ANNUALLY, AND PARTS AS NEEDED. ENGLAND’S STOVE WORKS IS NOT RESPONSIBLE FOR ANY DAMAGE OR INJURY INCURRED DUE TO NEGLECT, OR DUE TO UNSAFE INSTALLATION OR USAGE OF THIS PRODUCT. CALL TECHNICAL SUPPORT WITH ANY QUESTIONS. WARRANTY REGISTRATION for England’s Stove Works® Purchaser Information I. Purchased By (Name) ____________________________________________________ II. Address III. City _________________________________________ _______________________State________Zip Code IV. Telephone Number ____________ ___________________________________________ _______________________________________________ V. Email Address Dealer Information VI. Purchased From _____________________________________________ ___________________________________________________ VII. Address VIII. City_______________________ State________ Zip Code __________ Unit Information IX. Model Number_____________________ Purchase Date X. Purchase Price _____________ _____________________ XI. Serial Number_____________________ Mfg. Date _________________ Purchase Questions How did you first hear about our product? (Please check one) Word of Mouth ____ Other: Burn Trailer Demonstration____ Internet____ ________________________________________________________ Where did you receive information about our product? Via Telephone____ Dealer (Name of dealer) ___________ Internet____ Other: ________________________________________________________ 51 IMPORTANT! READ AND FOLLOW ALL INSTALLATION AND MAINTENANCE INSTRUCTIONS, INCLUDING CLEANING THE UNIT AS SPECIFIED, AND REPLACING GASKETS ANNUALLY, AND PARTS AS NEEDED. ENGLAND’S STOVE WORKS IS NOT RESPONSIBLE FOR ANY DAMAGE OR INJURY INCURRED DUE TO NEGLECT, OR DUE TO UNSAFE INSTALLATION OR USAGE OF THIS PRODUCT. CALL TECHNICAL SUPPORT WITH ANY QUESTIONS.