1
Mobile Application Development for BlackBerry Devices
Center for Mobile Education and Research (CMER)
http://cmer.cis.uoguelph.ca
University of Guelph
Geulph, Ontario
N1G 2W1
Canada
Programming for the BlackBerry
Table of Contents
Introduction....................................................................................................................... 4 Tutorial 1: Java ME.......................................................................................................... 5 Mobile Platforms ............................................................................................................ 5 Java ME .......................................................................................................................... 7 Development Tools (Java ME WTK) ............................................................................. 9 Midlets .......................................................................................................................... 10 Tutorial 2: Java ME for the BlackBerry ...................................................................... 12 The BlackBerry Architecture........................................................................................ 13 BlackBerry Application Models ................................................................................... 14 BlackBerry Extensions to Java ME .............................................................................. 15 RIM's Java Development Environment ........................................................................ 15 Running Existing MIDlets on the BlackBerry.............................................................. 17 Tutorial 3: Programming with BlackBerry API.......................................................... 18 BlackBerry JDE ............................................................................................................ 19 BlackBerry API............................................................................................................. 20 HelloWorld Example with BlackBerry API ................................................................. 20 Simulator....................................................................................................................... 22 Tutorial 4: Blackberry UI Components........................................................................ 23 BasicEditField............................................................................................................... 25 Dialog Popup Window.................................................................................................. 25 Screens .......................................................................................................................... 26 Layout Managers .......................................................................................................... 27 BitmapField................................................................................................................... 29 RadioButtonField.......................................................................................................... 29 GaugeField.................................................................................................................... 30 Custom LabelField........................................................................................................ 30 Tutorial 5: BlackBerry Menus....................................................................................... 32 Creating a Custom Menu .............................................................................................. 33 Creating a Context Menu .............................................................................................. 35 Tutorial 6: BlackBerry Events....................................................................................... 38 Focus Change Listener.................................................................................................. 39 Key Listener.................................................................................................................. 40 Touch Screen Events..................................................................................................... 43 Tutorial 7: Graphics and Sounds .................................................................................. 45 Graphics ........................................................................................................................ 45 Sounds........................................................................................................................... 48 Tutorial 8: Networking................................................................................................... 52 USB/Serial .................................................................................................................... 52 Bluetooth....................................................................................................................... 55 Radios ........................................................................................................................... 56 Wi-Fi ............................................................................................................................. 57 HTTP............................................................................................................................. 60 Tutorial 9: Managing Data ............................................................................................ 62 Persistent Data .............................................................................................................. 62 Programming for the BlackBerry 2
Files............................................................................................................................... 66 PIM ............................................................................................................................... 68 Tutorial 10: Deploying Applications onto the Blackberry using the Blackberry JDE
and Blackberry Desktop Manager ................................................................................ 72 Deploying a Blackberry Application using the Blackberry JDE and Blackberry
Desktop Manager .......................................................................................................... 72 Wiping the Blackberry Handheld Device ..................................................................... 73 Tutorial 11: Testing and Debugging using the Blackberry JDE ................................ 75 Testing and Debugging with the Blackberry JDE ........................................................ 75 Glossary ........................................................................................................................... 78 References........................................................................................................................ 80 Programming for the BlackBerry 3
Introduction
This references guide contains a series of tutorials that will introduce you to
programming applications for the BlackBerry handheld device. It is assumed that you
have a good understanding of the Java programming language and perhaps Java ME. The
tutorials included will cover fundamental BlackBerry concepts such as development
tools, architecture, UI components, multimedia, event handling, networking, and
managing data. Most of the tutorials use examples with Java code samples provided so
that you are able to play with and manipulate the code as you wish.
This guide was created with the intentions of integrating mobile devices and specifically
the BlackBerry handheld into conventional computer science curriculums. Combined
with other learning content and resources produced by CMER, educational institutions
should be better able to incorporate a mobile approach to the computing environment
and, in turn, generate programs that put students in the forefront of the industry.
Programming for the BlackBerry 4
Tutorial 1: Java ME
Mobile Platforms
Just like there are many platforms for developing desktop/server applications (Windows,
Mac, Linux), there are even more for mobile applications. Such mobile device platforms
include:
BlackBerry (RIM)
- A portable device that combines mobile phone functionality with the
ability to send and receive email and access the internet wirelessly.
Windows Mobile (Microsoft)
- Windows Mobile is a compact operating system combined with a suite of
basic applications for mobile devices based on the Microsoft Win32 API.
Devices which run Windows Mobile include Pocket PCs, Smart phones,
Portable Media Centers, and on-board computers for certain automobiles.
Palm OS (PalmSource)
- Palm OS is a compact operating system developed and licensed by
PalmSource, Inc. for personal digital assistants (PDAs) manufactured by
various licensees. It is designed to be easy-to-use and similar to desktop
operating systems such as Microsoft Windows.
Symbian
- A joint venture originally set up by Ericsson, Nokia and Psion to develop
an industry standard operating system for mobile multimedia terminals
Linux
- a free open-source operating system based on Unix.
Java ME (Sun Microsystems)
- Java 2 Micro Edition: A highly optimized version of the Java runtime
environment made for everything from mobile phones to desktops. In the
case of gaming, it's one of the two major platforms you'll find on mobile
phones.
Flash-Lite (Adobe)
- a light-weight version of Adobe Flash that is a powerful runtime engine
for mobile and consumer electronics devices that creates a more
interactive/engaging mobile application experience.
Android (Google)
- The Android mobile platform is based on the Linux operating system. It is
developed by the Open Handset Alliance.
Note: The aforementioned mobile platforms are all types of native platforms. Native, in
this sense, means that the application is running directly on the client device.
Alternatively, there are browser based platforms such as WAP/WML which are hosted by
a server. A combination of both a native-based application and a browser-based
application makes a hybrid platform.
Programming for the BlackBerry 5
Which mobile platform should you choose? As you can see, the possibilities are
numerous. It helps to have a good idea of the software that you will be developing. Ask
yourself the following questions:
Who is your target audience? Is your application intended for consumer use, or
will it be used more in business or corporate environments? Consumer devices are
generally different from business devices, so knowing your target audience will
help you narrow down your target device fairly quick. For example, you won't get
far developing a children’s game for the BlackBerry which has a large corporate
user community.
Are you developing a game or an application? If it's a game, consider the
demographics of the people who will play it (age, gender, economic bracket, and
so on). That will give you an idea of which consumer devices to target.
Are there any pre-existing requirements? If your distributor only handles
Symbian applications, for example, then your choice is easy. Likewise if you're
developing a business app for a company that already has Symbian phones in
place.
What's your skill-set? Assuming you're doing the coding, if you're a Java
developer then you probably want to stick with the Java platform (unless you
have a good reason for switching to some other technology).
How quickly do you need the application or prototype? Some technology
solutions add complexity, and thus development time, to a project, whereas others
limit both.
How much money do you have? Money is almost always the most important
factor to consider.
Programming for the BlackBerry 6
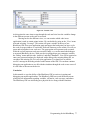
Java ME
For the purpose of this course, we will initially utilize
Java ME (Java 2 Micro Edition). Java ME is Sun’s
version of Java aimed at the consumer and embeddeddevices market. This pertains to machines with as little as
128kb of RAM and with processors a lot less powerful
than those used on typical desktop and server machines.
It specifically addresses the rapidly growing consumer
space that contains commodities such as cellular
telephones, pagers, Palm Pilots, set-top boxes, and other
consumer devices. It is targeted at two distinctive product
groups: personal, mobile, connected information devices
(e.g., cellular phones, pagers, and organizers) and shared,
Figure 1
fixed, connected information devices (e.g., set-top boxes,
Internet TVs, and car entertainment and navigation systems). The groups are addressed
using different configurations and profiles. In Java ME, applications are called MIDlets.
A MIDlet is a Java program for embedded devices, more specifically the Java ME virtual
machine. Generally, these are games and applications that run on a cell phone.
Configurations
Cell phones, pagers, organizers, etc., are diverse in form, functionality, and feature. For
these reasons, the Java ME supports minimal configurations of the Java Virtual Machine
(JVM) and APIs that capture the essential capabilities of each kind of device. At the
implementation level, a Java ME configuration defines a JVM and a set of horizontal
APIs for a family of products that have similar requirements on memory budget and
processing power. In other words, a configuration specifies support for:
1) Java programming language features
2) JVM features
3) Java libraries and APIs.
The K Virtual Machine
The K Virtual Machine (KVM) is a compact, complete, and portable Java virtual
machine specifically designed from the ground up for small, resource constrained
devices. The design goal of the KVM was to create the smallest possible complete JVM
that would maintain all the central aspects of the Java programming language but would
run in a resource-constrained device with a few hundred kilobytes of total memory. The
Java ME specification describes that the KVM was designed to be:
1) small, with a static memory footprint (40–80 KB)
2) clean and highly portable
3) modular and customizable
Programming for the BlackBerry 7
4) as “complete” and “fast” as possible
Currently, there are two standard configurations: the Connected Limited Device
Configuration (CLDC) and the Connected Device Configuration (CDC). The CLDC is
aimed at cellular phones, pagers, and organizers, while the CDC targets set-top boxes,
Internet TVs, and car entertainment and navigation systems. We will be more concerned
with the CLDC. As you can see from Figure 1, a JVM (e.g., the K Virtual Machine or
KVM) is at the heart of the CLDC. Note that CLDC 1.0 was the initial version, but today
CLDC 1.1, the enhanced version, is the standard. A major difference between the two is
that CLDC 1.0 didn’t include support for floating point numbers (so you could not
declare variables of type float or double), but CLDC 1.1 does.
Profiles
The Java ME makes it possible to define Java platforms for vertical markets by
introducing profiles. At the implementation level, a profile is a set of vertical APIs that
reside on top of a configuration, as shown in Figure 1, to provide domain-specific
capabilities such as GUI APIs. Currently, there is one profile implemented on top of the
CLDC, the Mobile Information Device Profile (MIDP), but other profiles are in the
works. The MIDP 1.0 was the initial profile and has several constraints (e.g., no support
for low-level sockets). MIDP 2.0 is the enhanced version of MIDP with several new
features, including end-to-end security (support for HTTPS), as well as support for
sockets.
Programming for the BlackBerry 8
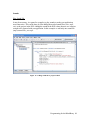
Development Tools (Java ME WTK)
There are several commercial and freely available tools for developing wireless Java
applications. A great tool (which we will be using) is Sun’s Java ME Wireless Toolkit
(Java ME WTK), which is easy to use and freely available. The Java ME WTK provides
a comprehensive tool set and emulators for developing and testing wireless applications
in Java, and it is available for the Windows, Linux, and Solaris platforms. It simplifies
the development of wireless applications by automating several steps such as
preverification and creating Java Archive (JAR) and Java Application Descriptor (JAD)
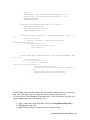
files. Figure 3 shows the interface for the Java ME WTK. The Java ME WTK can be
downloaded from http://java.sun.com/products/sjwtoolkit/download.html?feed=JSC.
Figure 2 – SUN Java Wireless Toolkit for CLDC
The Sun Java Wireless Toolkit can be integrated into IDEs (such
as NetBeans) but it can also run standalone. Running the Java
ME WTK standalone requires that you have three pieces of
software installed:
1) Java Platform, Standard Edition version 1.4.2 or higher
2) Java ME WTK for CLDC (Figures 2 & 3)
3) A text editor (JCreator, Texpad, Notepad, etc.)
A good tutorial for setting up your environment can be found at
http://developers.sun.com/mobility/midp/articles/wtoolkit/ .
Figure 3 – WTK Simulator
Programming for the BlackBerry 9
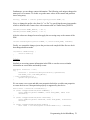
Midlets
MIDlets are developed using Java and compiled the same way you compile any Java
application. Similar to applets, however, where an applet is described in an HTML file, a
MIDlet or a group of MIDlets (known as a MIDlet Suite) is described in a Java
Descriptor (JAD) file. While applets run in a Web browser, MIDlets run in a MIDlet
management software (which is preinstalled on MIDP devices) that provides an operating
environment for KVM and MIDlets where they run. Unlike applets, however, MIDlets do
not get destroyed when they finish running. They remain installed on the device until
they are explicitly removed.
Note: It is natural for MIDlets to remain on the device till they are explicitly removed.
Therefore, MIDlets remain available for offline usage and in that sense MIDP supports
disconnected operations. This is a big plus for entertainment applications such as games!
In MIDlets, the basic unit of interaction is the screen, which encapsulates and organizes
graphics objects and coordinates user input through the device. A basic “Hello World”
MIDlet is demonstrated in the following example.
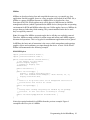
HelloMIDlet.java
import javax.microedition.midlet.*;
import javax.microedition.lcdui.*;
public class HelloMIDlet extends MIDlet {
// The display for this MIDlet
private Display display;
// TextBox to display text
TextBox box;
public HelloMIDlet() {
}
public void startApp() {
display = Display.getDisplay(this);
box = new TextBox("First Example", "Hello World", 20, 0);
display.setCurrent(box);
}
/**
* Pause is a no-op since there are no background activities or
* record stores that need to be closed.
*/
public void pauseApp() {
}
/**
* Destroy must cleanup everything not handled by the garbage
* collector. In this case there is nothing to cleanup.
*/
public void destroyApp(boolean unconditional) {
}
}
Notice the required methods for a MIDlet from the previous example. Figure 4
exemplifies the life-cycle of a MIDlet.
Programming for the BlackBerry 10
Figure 4 – MIDlet Lifecycle
Programming for the BlackBerry 11
Tutorial 2: Java ME for the BlackBerry
Introduction
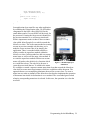
Developed by Research In Motion (RIM), the BlackBerry is a handheld wireless device
whose major selling feature to date has been instant, secure, mobile access to email. New
BlackBerry devices support voice communications as well. While some BlackBerry
devices are based on C++, many new ones support the Java 2 Platform, Micro Edition
(Java ME), primarily because Java technology makes developing applications so much
easier. Its platform-independence eliminates many porting woes and its automatic
garbage collection lets developers concentrate on application logic rather than memory
management.
RIM's support for Java ME includes development of its own Java virtual machine (JVM),
which supports the Connected Limited Device Configuration (CLDC) and the Mobile
Information Device Profile (MIDP). BlackBerry devices also come with additional
BlackBerry-specific APIs, however, that enable developers to create applications that
have the BlackBerry-native look and feel, and are more sophisticated than standard
MIDlets developed using MIDP.
This article describes the BlackBerry architecture and two application models. It will get
you started developing applications and deploying them on the BlackBerry.
Programming for the BlackBerry 12
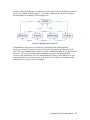
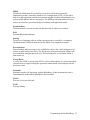
The BlackBerry Architecture
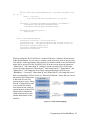
BlackBerry devices are offered by Nextel, Telus, Rogers, T-Mobile, and many other
wireless carriers. Once a device is on a carrier's network, it's linked to RIM's Network
Operating Center (NOC), which has direct connections to all RIM's carrier partners and
to BlackBerry Enterprise Servers (BES) deployed all over the world. The BlackBerry
Enterprise Server (BES) software is middleware that links handheld devices to corporate
email services such as Microsoft Exchange and Lotus Notes, as depicted in Figure 1:
Figure 5 - BlackBerry Architecture with Wireless Gateways
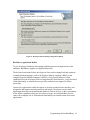
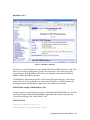
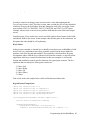
Installed behind the corporate firewall, a BES can be configured with additional services.
The Mobile Data Service (MDS), for instance, gives devices access to servers in the
corporate intranet that wouldn't be accessible from public networks otherwise. For your
BlackBerry to take advantage of such features you must configure it to use a BES when
you install the Desktop Software Manager. This manager comes with the BlackBerry, but
you install it on a computer connected to the corporate intranet and then connect the
BlackBerry to that computer. Encryption keys are generated for secure communication
between the device and the BES. On devices that aren't linked to a BES, email integration
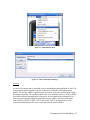
is achieved through a web-based client. You select the appropriate option when installing
the Desktop Software Manager, as in Figure 2.
Programming for the BlackBerry 13
Figure 6 - Desktop Software Manager Integration Options
BlackBerry Application Models
To give developers flexibility in designing sophisticated wireless applications for the
enterprise, BlackBerry supports two application models:
The browser-based model allows developers to focus on developing back-end content in
a standard markup language, such as the Wireless Markup Language (WML) or the
compact Hypertext Markup Language (cHTML). Using existing browsers' client
capabilities frees the developer from worrying about the client interface – but it does limit
client functionality to what the browser provides, and there's no support for offline
processing.
Custom Java applications enable developers to develop customized user interfaces and
navigation, and support content beyond text and images. Developers can also build
applications that users can download and install on wireless devices, so they can continue
to use offline capabilities while out of wireless coverage. Several BlackBerry devices
come with a complete set of APIs and tools that enable you to build custom Java-based
applications.
Programming for the BlackBerry 14
BlackBerry Extensions to Java ME
In addition to full support of standard CLDC and MIDP APIs, RIM provides BlackBerryspecific extensions that enable you to develop applications with the look and feel of
native applications. The BlackBerry APIs provide tighter integration for BlackBerry
devices, and access to BlackBerry features for user interface, networking, and other
capabilities.
Generally, you can use CLDC, MIDP, and BlackBerry APIs together in the same
application – with the notable exception of user-interface APIs. A single application
should not use both the javax.microedition.lcdui and net.rim.device.api.ui packages.
RIM's UI APIs provide greater functionality and more control over the layout of your
screens and fields, but at a cost: Resulting MIDlets will be non-standard, so porting to
other platforms will require more effort.
Unlike MIDP's UI classes, RIM's are similar to Swing in the sense that UI operations
occur on the event thread, which is not thread-safe as in MIDP. To run code on the event
thread, an application must obtain a lock on the event object, or use invokeLater() or
invokeAndWait() – extra work for the developer, but sophistication comes with a price
tag.
Your choices come down to these: You can develop your application as a standard
MIDlet that will run on any MIDP-enabled device, or as a RIMlet, a CLDC-based
application that uses BlackBerry-specific APIs and therefore will run only on BlackBerry
devices. If you're developing solely for the BlackBerry you should use the CLDC model
because the RIM APIs will give you the BlackBerry-native look and feel without denying
you the option to use Java ME-standard APIs in areas other than UI. For persistence, you
can use BlackBerry's APIs or the MIDP RMS APIs; if you're already familiar with RMS,
use it. For networking, use the Generic Connection Framework.
The main class of a RIMlet extends either net.rim.system.Application, if it's a
background application with no user interaction, or net.rim.system.UiApplication if the
RIMlet needs a user interface. Unlike a MIDlet's starting point, the entry point into a
RIMlet is the main() method. As in the MIDP UI, a RIMlet screen is not a movable
window. To display it you simply push it on the display stack using pushScreen().
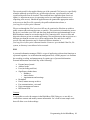
RIM's Java Development Environment
The BlackBerry Java Development Environment (JDE) is an integrated development
environment (IDE) that provides a complete set of tools and APIs for you to develop Java
applications that run on BlackBerry devices. JDE requires the Java 2 SDK to run. It
comes with a BlackBerry simulator for testing. However, you can also test on an actual
BlackBerry device. To test your applications on an actual BlackBerry you must also sign
up with a wireless carrier for a plan that includes data services. You can get voice service
Programming for the BlackBerry 15
as well, of course, but beware: Having both phone and email services in a single
appealing mobile device is addictive!
Figure 7 - BlackBerry JDE
Through the JDE you can compile your Java source code, package it in a .cod file, which
is in a proprietary format, and load your application into the BlackBerry, whose JVM will
then run it. Note that, as in other environments, a preverification process occurs before
classes are loaded into the device. The JDE preverifies code automatically before
packaging it in .cod files.
For a list of the JDE versions available that indicates what OS versions they support,
please see the JDE download page. Links to that page and to other resources for
developers appear at Java SDKs and Tools.
Programming for the BlackBerry 16
Running Existing MIDlets on the BlackBerry
To run a standard MIDlet on a Java-enabled BlackBerry device, you first need to convert
the .jad and .jar files to the .cod format, using the rapc command-line tool that comes
with RIM's JDE. You'll find rapc in the bin directory of your JDE installation. This
command converts a MIDlet named LoginMIDlet:
rapc import="c:\BlackBerryJDE3.6\lib\net_rim_api.jar"
codename=LoginMIDlet -midlet jad=LoginMIDlet.jad LoginMIDlet.jar
You can load the resulting LoginMIDlet.cod file into your BlackBerry device from your
desktop computer over a USB cable. Use the javaloader command, which can also be
found in the bin directory of your JDE installation. This command loads
LoginMIDlet.cod into my BlackBerry 7510 over USB:
javaloader -usb load LoginMIDlet.cod
Once the application is loaded into the BlackBerry, you can run it just as if it were a
native application.
You can use javaloader to delete applications from the BlackBerry as well as to load
them. This command will remove LoginMIDlet.cod from the BlackBerry:
javaloader -usb erase -f LoginMIDlet.cod
Programming for the BlackBerry 17
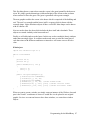
Tutorial 3: Programming with BlackBerry API
Introduction
At this point we should have a good understanding of Java ME. This is necessary as the
BlackBerry platform is based on Java ME. All that we know about Java ME can be
applied to creating BlackBerry applications. However, if you decide you develop strictly
for the BlackBerry then you are able to utilize the BlackBerry APIs which offer access to
BlackBerry specific features. This is beneficial for making dedicated Blackberry
applications but it also limits the application to only BlackBerry devices rather than
unleashing your Java ME application to all Java enabled devices. There are multiple tools
available for developing native BlackBerry applications. Some options are:
1)
2)
3)
4)
5)
BlackBerry Java Development Environment
BlackBerry MDS Studio
BlackBerry Plug-in for Microsoft Visual Studio
BlackBerry Plug-in for Eclipse
NetBeans
The tool that you use is your personal preference but these tutorials will demonstrate
examples using the BlackBerry JDE.
Programming for the BlackBerry 18
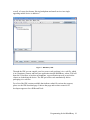
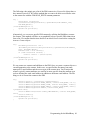
BlackBerry JDE
Figure 8 - BlackBerry JDE
BlackBerry Java Development Environment (BlackBerry JDE) is a fully integrated
development environment and simulation tool for building Java Micro Edition
applications for Java-based BlackBerry smartphones. It is a Mobile Information Device
Profile (MIDP) compliant Java ME environment for developers who wish to maintain
seamless portability in their wireless applications. In addition, the BlackBerry JDE
provides a full suite of interfaces and utilities to take advantage of some of the unique
features of the BlackBerry smartphone.
If you choose to build a BlackBerry-specific application, you will need to learn the
BlackBerry-specific API. This API includes new classes mainly for the BlackBerry user
interface. The JDE is free to download once your register with RIM (which is also free).
The BlackBerry JDE is a Java application itself so you will a Java Runtime Environment
to run it. You will also need the standard Java SDK which provides all the tools
necessary to create, package, test and debug BlackBerry applications. The JDE includes a
device simulator which eliminates having to use an actual BlackBerry handheld for
building and testing. The JDE comes with a set of JavaDocs to provide a description of
all the classes and interfaces available to the BlackBerry API.
Programming for the BlackBerry 19
BlackBerry API
Figure 9 - BlackBerry JDE API
Previously, we looked at how to create a simple HelloWorld MIDlet using Java ME. Now
that we are focusing on BlackBerry-specific development we can utilize some of the
special features of the BlackBerry API. Here is an example of that same HelloWorld
MIDlet with the BlackBerry interface.
The BlackBerry application starts like a typical Java ME application does, with a main
method. However, notice that there are some subtle differences. A MIDlet starts at the
startApp() method, but BlackBerry applications start with the main method .
HelloWorld Example with BlackBerry API
For this example, we will need two java files: HelloWorld & HelloWorldScreen. The first
represents the actual HelloWorld BlackBerry application and the latter represents the
screen that will display the “Hello World!” text.
HelloWorld.java
import net.rim.device.api.ui.*;
class HelloWorld extends UiApplication
Programming for the BlackBerry 20
{
public static void main(String[] args)
{
HelloWorld app = new HelloWorld();
app.enterEventDispatcher();
}
public HelloWorld()
{
pushScreen(new HelloWorldScreen());
}
}
The first thing you do in the main method is create an instance of your application by
calling its constructor. The constructor uses the HelloWorld class' parent class method of
pushScreen to display a screen. After calling the constructor, call your new instance's
enterEventDispatcher method. This method allows your application to start handling
various events that the BlackBerry device may send to the application.
Next, we must create the class HelloWorldScreen. The HelloWorldScreen class is what
will actually present a Hello World message to your application user. The java code is
shown below:
HelloWorldScreen.java
import net.rim.device.api.ui.component.*;
import net.rim.device.api.ui.container.*;
class HelloWorldScreen extends MainScreen {
public HelloWorldScreen()
{
super();
setTitle("Hello World Title");
add(new RichTextField("Hello World!"));
}
public boolean onClose()
{
Dialog.alert("Goodbye World!");
System.exit(0);
return true;
}
}
The HelloWorldScreen class extends from the
net.rim.device.api.ui.container.MainScreen class, giving your simple application
consistency with other native BlackBerry applications. The setTitle method does just that;
it sets the name for the title of the application.
The onClose method is fired when your screen (HelloWorldScreen) closes. In reaction to
the closing event, the application uses the alert method of the
net.rim.device.api.ui.component.Dialog class to display a popup on the screen stating the
message of “Goodbye World!”.
Programming for the BlackBerry 21
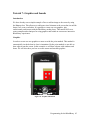
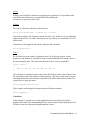
Simulator
The BlackBerry JDE has a simulation tool which allows us to test and run our Java
ME/BlackBerry applications with the look and feel of an actual Blackberry handheld.
There are a variety of BlackBerry simulators available to emulate the functionality of
actual BlackBerry products, including BlackBerry smartphones and BlackBerry
Enterprise Server. These simulators can be downloaded for free from the BlackBerry
website and can integrate directly into the JDE or operate standalone. We will be
focusing on the smartphone simulation. BlackBerry Device Simulators are used to
demonstrate and test how the BlackBerry Device Software, screen, keyboard and
trackball/trackball will work with your application. These simulators will also simulate
behavior in various wireless network conditions. BlackBerry Device Simulators are great
tools for testing, training and using in presentations.
When integrated with the BlackBerry JDE, BlackBerry Device Simulators can run and
debug applications developed in the BlackBerry JDE. Each simulator package represents
a publicly available application version and contains simulators for multiple BlackBerry
smartphones.
In the BlackBerry JDE, use the Build menu to compile your applications. Use the Debug
menu to run/simulate the application after compilation.
Figure 10 - BlackBerry JDE Build Menu
Figure 4 - BlackBerry JDE Debug
Menu
Programming for the BlackBerry 22
Tutorial 4: Blackberry UI Components
Introduction
Using the BlackBerry JDE we can build native BlackBerry applications. This means that
we can utilize the BlackBerry UI Components specified exclusively for those native
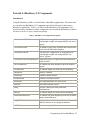
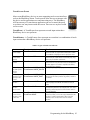
Blackberry applications. Table 1 is a full list of the BlackBerry UI components. For a
more descriptive explanation of these components you can read the BlackBerry JavaDocs
for the net.rim.device.api.ui.component package.
Table 1 - BlackBerry UI Component Descriptions
ActiveAutoTextEditField
Field that uses a supplied set of string patterns to
scan through a simple text string and pick out 'active'
regions.
ActiveFieldContext
An instance of this class is passed into factories that
create ActiveFieldCookie instances.
ActiveRichTextField
Field that uses a supplied set of string patterns to
scan through a simple text string and pick out
"active" regions.
ActiveRichTextField.RegionQueue Collects the arrays of regions and fonts common to
rich-text fields.
AutoTextEditField
An editable text field designed to provide autotext
support.
BasicEditField
An editable simple text field with no formatting.
BitmapField
Displays a bitmap.
ButtonField
Contains a button control.
CheckboxField
Contains a checkbox control.
ChoiceField
Base implementation of a choice field.
DateField
Stores date and time values.
Dialog
Provides a dialog box with predefined
configurations.
EditField
An editable simple text field with no formatting.
EmailAddressEditField
An editable text field designed specifically to handle
internet email addresses.
GaugeField
Displays a horizontal bar that you can use for
numeric selection or as a progress indicator.
LabelField
Contains a simple label.
Programming for the BlackBerry 23
ListField
Contains rows of selectable list items.
Menu
Screen to provide a menu.
NullField
A field of no size.
NumericChoiceField
A choice field that supports choosing from a range
of numeric values.
ObjectChoiceField
Choice field that supports a list of object choices.
ObjectListField
List field to contain a list of objects.
PasswordEditField
An editable text field designed specifically to handle
password input.
RadioButtonField
Field to provide a radio-button control.
RadioButtonGroup
Groups a set of related radio button fields.
RichTextField
Read-only field that supports richly formatted text.
SeparatorField
A field which draws a horizontal line across its
width.
Status
Simple dialog to show ongoing status.
TreeField
A simple field to show a tree structure.
Since we have a rough idea about each of the BlackBerry UI components we can go more
in depth with some examples. If you recall the previous tutorial we used a RichTextField
to display “Hello World!” on the screen.
HelloWorldScreen.java
import net.rim.device.api.ui.component.*;
import net.rim.device.api.ui.container.*;
class HelloWorldScreen extends MainScreen {
public HelloWorldScreen()
{
super();
setTitle("Hello World Title");
add(new RichTextField("Hello World!"));
}
public boolean onClose()
{
Dialog.alert("Goodbye World!");
System.exit(0);
return true;
}
}
Let’s take a brief look at some of the other components included in the BlackBerry UI.
Programming for the BlackBerry 24
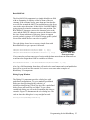
BasicEditField
The BasicEditField component is a simple editable text field
with no formatting. It displays a label in front of the text
contents. If the contents occupy more than one line then the
text will flow around the label. The trackball moves the focus
caret in the major directions. If this field is Field.EDITABLE,
typing inserts text into the contents at the caret position. The
BACKSPACE character removes the character prior to the
caret, and the DELETE character removes the character after
the caret. Some subclasses of this may choose to support
special symbols: typing a ALT+SPACE brings up the symbol
screen from which the user can select a symbol.
The code below shows how to create a simple form with
BasicEditField’s to get a person’s full name.
add(new BasicEditField("Fist Name: ", ""));
add(new BasicEditField("Last Name: ", ""));
add(new BasicEditField("Middle Initial: ", ""));
Figure 11 - Basic Edit
Field App Example
If we wanted to perform some type of action with the data entered into the fields then we
would need to assign those fields to variables as follows:
BasicEditField bef = new BasicEditField("First Name: ", "");
Also, for a full-functioning form there will need to be some buttons and event handles but
that will be covered in a later tutorial. Let’s move on to some other examples of
BlackBerry UI components.
Dialog Popup Window
The Dialog UI component provides a dialog box with
predefined configurations. To get a standard, predefined
dialog use alert(java.lang.String), ask(int), or
inform(java.lang.String). These pop ups offer a predefined
dialog screen and waits for user input. To get a more
customized dialog you will need to instantiate this class or
extend it. Figure 12 demonstrate the alert dialog box. The
code to show the dialog box is very straight forward:
Dialog.alert("Goodbye World!");
Figure 12 - Dialog Screen
Programming for the BlackBerry 25
Screens
The main structure for a BlackBerry device user interface is the Screen object. A
BlackBerry Java application may display more than one screen at a time, but only one
screen in a BlackBerry Java Application is active at one time. Once you create a screen,
you can add fields and a menu to the screen and display it to the BlackBerry device user
by pushing it on to the UI stack. There are multiple types of Screens that you can use for
different purposes. The BlackBerry® Java® Virtual Machine maintains Screen objects in
a display stack, which is an ordered set of Screen objects. The screen at the top of the
stack is the active screen that the BlackBerry device user sees. When an application
displays a screen, it pushes the screen to the top of the stack. When an application closes
the screen, it removes the screen off the top of the stack and displays the next screen on
the stack, redrawing it as necessary. Each screen can appear only once in the display
stack. The BlackBerry JVM throws a runtime exception if a Screen that the application
pushes to the stack already exists. A BlackBerry Java Application must remove screens
from the display stack when the BlackBerry device user finishes interacting with them so
that the BlackBerry Java Application uses memory efficiently. Use only a few modal
screens at one time, because each screen uses a separate thread. Table 2 describes the
various Screen classes and why each should be used.
Table 2 - BlackBerry Screen Classes
Screen Class
Description
Screen
The generic Screen class that is inherited by all other
Screen classes. You must assign a Manager to this
screen as it does not have one by default.
FullScreen
The FullScreen class contains a single vertical field
manager. Use this Screen to add UI components in a
vertical layout. This Screen also has no title field as
well.
MainScreen
The MainScreen is common to standard BlackBerry
applications. This screen contains a screen title field
and a scrollable vertical field manager. It also
provides default navigation components such as a
close menu and functionality for the BlackBerry
escape key.
PopupScreen
Screen providing features for building dialog and
status screens. When you build a popup screen you
must provide a delegate manager that the screen can
use to handle layouts.
Programming for the BlackBerry 26
Layout Managers
To arrange components on a screen, use the BlackBerry layout managers. The following
four classes extend the Manager class to provide predefined layout managers:
VerticalFieldManager - A manager that lays out fields in a single, vertical column.
HorizontalFieldManager - A manager that lays out fields along a single, horizontal row.
FlowFieldManager - A manager that lays out fields in a horizontal-then-vertical flow.
DialogFieldManager - A field manager used for laying out Dialog and Status screens.
The following code snippit creates a VerticalFieldManager that is scrollable and contains
two BasicEditFields. Keep in mind that layout managers may contain other layout
managers as components which is useful for more precise control over the look of your
applications.
Sample Code for VerticalFieldManager
MainScreen mainScreen = new MainScreen();
VerticalFieldManager vfm = new
VerticalFieldManager(Manager.VERTICAL_SCROLL);
vfm.add(new BasicEditField("First Name: ", ""));
vfm.add(new BasicEditField("Last Name: ", ""));
mainScreen.add(vfm);
ListField
The ListField UI component is used to display rows of
selectable list items of a set height. A ListField uses a
class that implements the ListFieldCallback interface to
perform drawing tasks. A ListField must register a class
that implements the ListFieldCallback interface using the
setCallback method before the class can be used. After
registration, when a ListField must display an item in its
list, it invokes the appropriate methods of the registered
callback class. When implementing the ListFieldCallback
class, you must override some methods including get,
indexOfList, drawListRow, and getPreferredWidth. View
and test the sample code below to understand how the
ListField works. The only one of these methods that we
used in this sample was drawListRow which gets the value
Figure 13 - List Field
from the specified vector index and draws it into the list.
This method allows you to customize the look of the list. You’ll also notice the add
method which appends list values to the vector.
Programming for the BlackBerry 27
ListFieldSampleScreen.java
class ListFieldSampleScreen extends MainScreen{
ListFieldSampleScreen() {
//set the screen title
setTitle("List Field Sample");
//instantiate the list ListField
ListField listField = new ListField();
//create instance of ListCallback class
ListCallback myCallback = new ListCallback();
//set list callback
listField.setCallback(myCallback);
//add components to screen
add(listField);
//add items to list
myCallback.add(listField,
myCallback.add(listField,
myCallback.add(listField,
myCallback.add(listField,
"Apples");
"Oranges");
"Bananas");
"Peaches");
}
class ListCallback implements ListFieldCallback{
private Vector listObjects = new Vector();
public void add(ListField list, Object object){
listObjects.addElement(object);
list.insert(listObjects.size() - 1);
}
public Object get(ListField list, int index) {
return listObjects.elementAt(index);
}
public void drawListRow(ListField list, Graphics g, int index,
int y, int w) {
String text = (String)listObjects.elementAt(index);
g.drawText(text, 0, y, 0, w);
}
public int indexOfList(ListField list, String object, int
index){
return 0;
}
public int getPreferredWidth(ListField list) {
return Graphics.getScreenWidth();
}
}
}
Programming for the BlackBerry 28
BitmapField
This BitmapField UI component is used to display a bitmap
image on the blackberry device. It can be generated from
various image formats such as the common GIF, JPEG, and
PNG. You are also able to create your own bitmaps by using
the Graphics class. In this example we will add a simple
image centered on the BlackBerry screen.
Bitmap b = new Bitmap(200, 40);
b = Bitmap.getBitmapResource("bb.gif");
BitmapField bf = new BitmapField(b);
bf.setSpace(Graphics.getScreenWidth()/2 b.getWidth()/2, Graphics.getScreenHeight()/2 b.getHeight()/2 );
add(bf);
We have a GIF image named bb.gif that has previously been
Figure 14 – Bitmap Field
added to the project. First, we create a bitmap of size 200 x 40
App Example
which mimics the actual size of bb.gif. We then create a
BitmapField from that bitmap, center the image using setSpace,
and add the BitmapField to the screen. The result is shown in Figure 2.
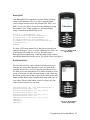
RadioButtonField
The RadioButtonField works with the RadioButtonGroup to
function just as any radio button does on a web form. In the
example shown below, we first create the RadioButtonGroup.
We then create each RadioButtonField while assigning it to the
group. Afterwards, we add each radio button to the screen (not
the button group). Notice that we provide the label for the radio
button and the initial status (selected/unselected) with a true or
false value. When a radio button is part of a group, only one
radio can be selected at any one time.
RadioButtonGroup rbg = new RadioButtonGroup();
RadioButtonField rbf1 = new
RadioButtonField("Radio 1", rbg, false);
RadioButtonField rbf2 = new
RadioButtonField("Radio 2", rbg, true);
RadioButtonField rbf3 = new
RadioButtonField("Radio 3", rbg, false);
add(rbf1);
add(rbf2);
add(rbf3);
Figure 15 - Radio Button
Field App Example
Programming for the BlackBerry 29
GaugeField
The GaugeField component displays a horizontal bar that you
can use for numeric selection or as a progress indicator. The
format of the component is a label followed by the gauge bar
itself. The gauge optionally has text overlaid indicating the
percentage of the gauge. If this field is built as
Field.EDITABLE, the user can utilize the trackball to change
the value
If the UI is not operating in MODE_ADVANCED mode, this
field adds a context menu item usable for changing its value
which is the mode depicted in Figure 4. When invoked, a
dialog appears in which one can use the trackball to select the
item without ALT-rolling. Pressing ENTER or clicking
dismisses the dialog, changing this field's value. Pressing
ESCAPE dismisses the dialog, canceling the change. The basic
constructor for a GaugeField takes a label parameter, minimum
value, maximum value, selected value, and some style
attributes (See code below).
Figure 16 - Gauge Field
App Example
GaugeField gauge = new GaugeField("Gauge Field: ", 1, 100, 50,
Field.EDITABLE | Field.FOCUSABLE);
Custom LabelField
At some point you may desire to customize simple characteristics of basic BlackBerry UI
components such as labels and edit fields. If you wish, for instance, to change the colour
or font of a field it is not possible to do that when creating the field itself. Instead, you
must create a new class that extends the desired field and overrides its paint method. The
following code snippet demonstrates how to create a label field with red text and a larger
bold font. This same concept can be applied to other BlackBerry UI components although
with more complexities.
Code Snippet
protected void paint(Graphics g)
{
//set the font style
Font defaultFont = Font.getDefault();
FontFamily ff = defaultFont.getFontFamily();
int fontSize = 20;
Font font = ff.getFont(FontFamily.SCALABLE_FONT,
FontSize).derive(Font.BOLD);
graphics.setFont(font);
Programming for the BlackBerry 30
//set the font colour
g.setColor(Color.RED);
//call the super class paint method
super.paint(g);
}
Conclusion
As you can see, implementing BlackBerry UI components is pretty similar for all
components. The best way to get a better understanding of the component functionality is
to try to implement them yourself. Hopefully this tutorial was a good start to introducing
the basic necessities of programming UI’s for the BlackBerry.
Programming for the BlackBerry 31
Tutorial 5: BlackBerry Menus
Introduction
Menus are a very important component of the BlackBerry UI. They let the user perform
actions dependant on the application that is active on the device. Menus eliminate
cluttered screens and provide ease of access to frequently used functions.
There are two classifications of menus for the BlackBerry: primary “action” menus and
“full” menus. The primary menu is a short version of the full menu. A trackball click
should perform one of two actions: execute an action (such as press a focused button) or
display the primary actions menu. It is possible to get to the full menu from the primary
menu. Figures 1 & 2 below exemplify both menu types in the BlackBerry email
application.
Figure 1 - Primary Actions Menu
Figure 2 - Full Menu
Programming for the BlackBerry 32
Creating a Custom Menu
By default, creating a screen that extends the MainScreen class automatically creates a
menu with a close menu item. We are going to create a simple screen with a few text
fields that we can perform some simple operation on by using a menu. The form will take
an email address and password. The menu operations will be to clear the email and
password text fields. Let’s look at the code:
MenuExample.java
import net.rim.device.api.ui.*;
import net.rim.device.api.ui.component.*;
import net.rim.device.api.ui.container.*;
class MenuExample extends UiApplication
{
private BasicEditField email;
private PasswordEditField password;
public static void main(String[] args)
{
MenuExample app = new MenuExample();
app.enterEventDispatcher();
}
public MenuExample()
{
MenuExampleScreen screen = new MenuExampleScreen();
screen.setTitle("Menu Example");
email = new BasicEditField("Email: ", "");
password = new PasswordEditField("Password: ", "");
screen.add(email);
screen.add(password);
pushScreen(screen);
}
private MenuItem menuItem1 = new MenuItem("Clear Email", 110, 10) {
public void run() {
email.setText("");
}
};
private MenuItem menuItem2 = new MenuItem("Clear Password", 110,
10) {
public void run() {
password.setText("");
}
};
private final class MenuExampleScreen extends MainScreen
{
protected void makeMenu(Menu menu, int instance) {
menu.add(menuItem1);
Programming for the BlackBerry 33
menu.add(menuItem2);
super.makeMenu(menu, 0);
}
public void close() {
super.close();
}
}
}
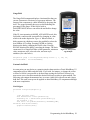
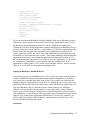
Our application class starts like any other application
by extending the UiApplication class. We will add to
components to the form: a BasicEditField for the
email address and a PasswordEditField obviously for
the password. Creating the form screen is identical to
the previous tutorials so we will not go into detail.
What is important to notice is that we have an inner
class called MenuExampleScreen which extends the
MainScreen class. This is the same method to creating
screens in previous example only this time we’ve
made the screen an inner class as to simplify the
application. There is a method called makeMenu
which overrides its superclass method within the
MainScreen class. In this method we add our custom
menu items as well as call the super class method. If
we omit the superclass method call then our custom
menu will not have the default close function which
Figure 3 - MenuExample.java
we would like to keep. The only left to do now is
Simulation
create the menu items that we’ve added to the menu.
We could have created a separate custom menu item class that extends the MenuItem
class itself to create menu item instances which we would then add to the menu. The
approach that we are exemplifying eliminates the need for an extra class. To create a
menu item we make an instance of the MenuItem class but also implement the operation
of that menu item inside its declaration in a run method. The run method gets invoked
when its corresponding menu item is selected. In this case, the operation is to clear the
text field.
Programming for the BlackBerry 34
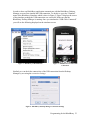
Creating a Context Menu
A context menu provides actions appropriate for the current active field. For example,
perhaps you would like a cut and paste menu options only specifically for one edit field.
This is possible by applying a context menu for that edit field. In the following example
we will add two context menus to the screen. This is done by creating inner classes that
extend the RichTextField class. For each of those inner classes we create two menu items.
This means that each context menu will have two personalized menu items.
ContextMenuExample.java
import net.rim.device.api.ui.*;
import net.rim.device.api.ui.component.*;
import net.rim.device.api.ui.container.*;
public class ContextMenuExample extends UiApplication {
private static MyContextField1 myContextField1;
private static MyContextField2 myContextField2;
public static void main(String[] args) {
ContextMenuExample app = new ContextMenuExample();
app.enterEventDispatcher();
}
private static class MyContextField1 extends RichTextField {
private MenuItem myContextMenuItemA = new MenuItem("Menu Item
A", 10, 2) {
public void run() {
myContextField1.setText("BlackBerry");
}
};
private MenuItem myContextMenuItemB = new MenuItem("Menu Item
B", 10, 1) {
public void run() {
myContextField1.setText("Research In Motion");
}
};
protected void makeContextMenu(ContextMenu contextMenu) {
contextMenu.addItem(myContextMenuItemA);
contextMenu.addItem(myContextMenuItemB);
}
MyContextField1(String text) {
super(text);
}
}
private static class MyContextField2 extends RichTextField {
private MenuItem myContextMenuItemC = new MenuItem("Menu Item
C", 10, 2) {
public void run() {
myContextField2.setText("BlackBerry");
}
Programming for the BlackBerry 35
};
private MenuItem myContextMenuItemD = new MenuItem("Menu Item
D", 10, 1) {
public void run() {
myContextField2.setText("Research In Motion");
}
};
protected void makeContextMenu(ContextMenu contextMenu) {
contextMenu.addItem(myContextMenuItemC);
contextMenu.addItem(myContextMenuItemD);
}
MyContextField2(String text) {
super(text);
}
}
public ContextMenuExample() {
MainScreen mainScreen = new MainScreen();
myContextField1 = new MyContextField1("My Context Field 1");
myContextField2 = new MyContextField2("My Context Field 2");
mainScreen.add(myContextField1);
mainScreen.add(myContextField2);
pushScreen(mainScreen);
}
}
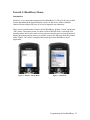
When we define the RichTextFields as a context field class, we declare the menu items
within that definition. As you can see, creating a menu item is the same as the previous
code sample. It takes parameters and provides a run method which is executed when the
menu item is selected. For the first RichTextField on the screen, the menu options are
“Menu Item A” and “Menu Item B”. Similarly, for the second RichTextField on the
screen, the menu options are “Menu Item C” and “Menu Item D”. “Menu Item A” and
“Menu Item C” will change the text of their corresponding RichTextField to say
“BlackBerry”. Conversely, “Menu Item B” and “Menu Item D” will change the text of
their corresponding RichTextField to say “Research In Motion”. Notice that you can set
the priority of the menu items
in the menu. For the first
context menu we gave “Menu
Item B” a higher priority and
so it becomes the default
selected menu item when its
context menu is invoked. The
figures below simulate the
results of the previous code
and the functionality of the
interface.
Figure 4 - Context Menu Mappings
Programming for the BlackBerry 36
Figure 5 – Context Menu for
Field 1
Figure 7 - Context Menu for
Field 2
Figure 6 – Results of Menu
Item B for Field 1
Figure 8 - Results of Menu Item
C for Field 2
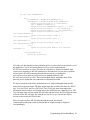
Conclusion
This tutorial explained the different types of menus that can be created on the
BlackBerry. It also explained how to implement these menus with code samples and
simulations. The code may seem complicated at first glance but it is still logical and
analogous to standard Java techniques. Understand the BlackBerry APIs to help you
comprehend the code.
Programming for the BlackBerry 37
Tutorial 6: BlackBerry Events
Introduction
With at least a basic understanding of the various Blackberry UI components and how to
implement them, the logical next step is to create some interaction with those UI
components. This is accomplished via BlackBerry event handling (event listeners). If you
are familiar with event handling in Java then you will pick up this tutorial quickly. Even
so, this tutorial will introduce you to the types of event listeners available through the
BlackBerry API.
Table 1 below shows some example event classes found in the net.rim.device.api.system
package.
Table 3 - Example Event Listener Classes
AlertListener
Provides functionality for receiving alert events.
AlertListener2
Provides functionality for receiving alert events.
AudioFileListener
The interface for receiving audio file events.
AudioListener
The base interface for receiving audio events.
Characters
Represents the special characters defined in the base font
classes.
CoverageStatusListener
The listener interface for receiving notifications of changes
in coverage status, taking into account radio coverage, serial
bypass and Bluetooth coverage, and any required service
book records.
GlobalEventListener
The listener interface for receiving global events.
HolsterListener
The listener interface for receiving holster events.
IOPortListener
The listener interface for receiving I/O port events.
KeyListener
The listener interface for receiving keyboard events.
KeypadListener
This interface provides constant values for the modifier
keycodes for use by extending interfaces (such as
KeyListener and TrackballListener) and implementing
classes.
PeripheralListener
The listener interface for receiving peripheral events.
PersistentContentListener
A listener class for persistent content events.
RadioListener
The listener interface for receiving radio events.
RadioStatusListener
The listener interface for receiving radio status events.
Programming for the BlackBerry 38
RealtimeClockListener
The listener interface for receiving real-time clock events.
SerialPortListener
Deprecated. The serial port is no longer supported.
SystemListener
The listener interface for receiving system events.
SystemListener2
The listener interface for receiving system events.
TrackballListener
NOTE: Use of this interface is strongly discouraged.
USBPortListener
Next, we will show some typical examples of how event listeners can be used with the
BlackBerry.
Focus Change Listener
The FocusChangeListener specifies what actions should occur when a field gains, loses,
or changes focus.
FocusListenerExample.java
import net.rim.device.api.ui.*;
import net.rim.device.api.ui.component.*;
import net.rim.device.api.ui.container.*;
class FocusListenerExample extends UiApplication {
FocusListenerExample() {
MainScreen mainScreen = new MainScreen();
RichTextField field1 = new RichTextField("Field 1");
RichTextField field2 = new RichTextField("Field 2");
FocusListener myFocusChangeListener = new FocusListener();
field1.setFocusListener(myFocusChangeListener);
field2.setFocusListener(myFocusChangeListener);
mainScreen.add(field1);
mainScreen.add(field2);
pushScreen(mainScreen);
}
public static void main(String[] args) {
FocusListenerExample app = new FocusListenerExample();
app.enterEventDispatcher();
}
class FocusListener implements FocusChangeListener {
public void focusChanged(Field field, int eventType) {
if (eventType == FOCUS_GAINED) {
System.out.println(field + " focus gained.");
}
if (eventType == FOCUS_CHANGED) {
System.out.println(field + " focus changed.");
}
if (eventType == FOCUS_LOST) {
System.out.println(field + " focus lost.");
Programming for the BlackBerry 39
}
}
}
}
In order to catch focus change events we must create a class that implements the
FocusChangeListener class. This class, in turn, must override the focusChanged method
which has access to the field whose focus has changed as well as the event type. Event
types include FOCUS_CHANGED, FOCUS_GAINGED, and FOCUS_LOST. In our
example, when a focus event occurs we print the field and the event to the build output
screen.
From this point, all we need to do is create our fields, add our focus listener to the fields,
and add our fields to the screen. In the example, this all takes place in the constructor. At
this point, that code should be self explanatory.
Key Listener
In the previous example we learned how to handle events that occur on BlackBerry fields
but it is also very important to know how to handle events from the device hardware
interface such as the keypad and trackball. This capability is also beneficial for game
development where often the keys of the device become the controls; we need to tell the
application which keys control what functions. In this next example we will use the
keypad and trackball to control specific functions of a typical game scenario. The five
operations that can take place in this game scenario are:
1)
2)
3)
4)
5)
Move Left
Move Right
Move Up
Move Down
Shoot
Take a look at the code sample below which will be dissected afterwards.
KeypadListenerExample.java
import
import
import
import
import
net.rim.device.api.ui.*;
net.rim.device.api.ui.component.*;
net.rim.device.api.ui.container.*;
net.rim.device.api.system.KeypadListener;
net.rim.device.api.system.KeyListener;
class KeypadListenerExample extends UiApplication {
private static RichTextField command;
KeypadListenerExample() {
MainScreen mainScreen = new MyScreen();
command = new RichTextField("Waiting for command...");
Programming for the BlackBerry 40
mainScreen.add(command);
pushScreen(mainScreen);
}
public static void main(String[] args) {
KeypadListenerExample app = new KeypadListenerExample();
app.enterEventDispatcher();
}
static class MyScreen extends MainScreen {
public boolean keyChar(char key, int status, int time) {
if(key == 'd'){
command.setText("Move Left");
}else if(key == 'j'){
command.setText("Move Right");
}else if(key == 't'){
command.setText("Move Up");
}else if(key == 'b'){
command.setText("Move Down");
}else if(key == 'g'){
command.setText("Shoot!");
}
return true;
}
protected boolean navigationMovement(int dx, int dy, int
status, int time) {
if(dx < 0 && dy == 0){
command.setText("Move Left");
}else if(dx > 0 && dy == 0){
command.setText("Move Right");
}else if(dx == 0 && dy > 0){
command.setText("Move Up");
}else if(dx == 0 && dy < 0){
command.setText("Move Down");
}
return true;
}
protected boolean navigationClick(int status, int time) {
command.setText("Shoot!");
return true;
}
}
}
Pleasingly, the code needed to implement this application is short and not very
complicated. There are various methods used in this example to get user inputs that are
all found inside the MyScreen class which is the MainScreen. These methods all override
their parent methods which are part of the Screen class. The keyCar method deals with
user input commands from the keypad and the other two methods prepended with
“navigation” deal with user input from the trackball. Taking this approach enables the
user to use the input device that they feel most comfortable with (keypad or trackball).
Programming for the BlackBerry 41
The keyChar method simply detects the character that was submitted to the device by
comparing the key parameter. The other input parameters are not needed for this
occasion. The status parameter can tell us information such as whether the shift or caps
lock inputs are enabled. The time parameter is the number of milliseconds since the
device was turned on. Our implementation of this method simply changes the
RichTextField on the screen to read the command operation. We return true because this
informs that the event was consumed. If we wanted all the key presses to behave as
normal then we would need to invoke the superclass with the alternative code:
return super.keyChar(key, status, time);
The results of this are not detectable for these keypad events, however, the consequences
are more noticeable if omitted from the navigation event methods that are responding to
the trackball commands.
The overridden navigationMovement method responds to the trackball events. Similarly,
it takes a status and time parameter equivalent to the keyChar method previously
discussed. It also takes X and Y coordinates that specify the change in movement from
the current position. A positive X and Y value means right and down respectively. A
negative X and Y value means left and up respectively. With this in mind we are able to
detect the direction of the trackball and then specify the appropriate command. We ignore
X and Y values of zero which means that a roll of the trackball must be in the perfect
direction (i.e left, right, up down) and that diagonal movements are not computed. We
return true to show that the event was consumed. If we were to call/return the superclass
method then we would notice curser movement on the screen because that is the normal
behaviour of trackball movement. We want to eliminate that typical behaviour for this
situation which is why we do not return the superclass method and only return true. If we
were to call the superclass method it would look as follows:
return super.navigationMovement(int dx, int dy, int status, int time);
Finally we need to respond to the input from a trackball
click which will invoke the “shoot” command. The
explanation of this method is now simple after defining the
previous two methods. Like the previous methods we
return true rather than calling the superclass method. In this
case, if we were to invoke the superclass method then the
gameplay would be interrupted by a menu because that is
the typical response of a trackball click. Figure 1 depicts
that possible outcome. Notice that the “shoot” command is
still invoked but we must exit the menu to input more
commands.
Look at the KeyListener, KeypadListener, and
TrackballListener classes of the BlackBerry API for more
details on the methods implemented in this example.
Figure 17 - Menu Interruption
from Trackwheel Click
Programming for the BlackBerry 42
Touch Screen Events
More recent BlackBerry devices are now supporting touch screen interfaces
such as the BlackBerry Storm. Touch screens allow the user to interact with
the device and its applications new and interesting ways. The BlackBerry
API has an array of events that an application can use to control the many
ways that a user may interact with the screen. There are two styles of touch
screen events:
TouchEvent - A TouchEvent class represents a touch input action that a
BlackBerry device user performs.
TouchGesture - A TouchGesture class represents an event that is a combination of touch
input actions that a BlackBerry device user performs.
Table 4 - Types of Touch Screen Events
Action
touch the
screen lightly
Event (net.rim.device.api.ui)
TouchEvent.DOWN
touch the
screen twice
quickly
click (press) the
screen
TouchGesture.TAP
slide a finger up
or down quickly
on the
screen
slide a finger to
the left or right
quickly on the
screen
hold a finger on
an item
TouchGesture.SWIPE_NORTH
TouchGesture.SWIPE_SOUTH
touch and drag
an item
on the screen
TouchEvent.MOVE
touch the
screen in two
locations at the
same time
TouchEvent.DOWN
TouchEvent.MOVE
TouchEvent.CLICK
Result
This action highlights an item or places the cursor in a
specific location. It is equivalent to rolling the trackball
or trackwheel to highlight an item or place the cursor.
On a web page, map, picture, or presentation
attachment, this action zooms in to the web page, map,
picture, or presentation attachment.
This action invokes an action. For example, when users
click an item in a list, the screen that is associated with
the item appears. This action is equivalent to clicking
the trackball or trackwheel.
Sliding a finger up quickly displays the next screen
TouchGesture.SWIPE_WEST
TouchGesture.SWIPE_EAST
This action displays the next or previous picture or
message, or the next or previous day, week, or month in
a calendar.
TouchGesture.HOVER
Holding a finger on the progress bar while a song or
video is playing fast forwards or rewinds the song or
video.
This action moves the content on the screen in the
corresponding direction. For example, when users touch
and drag a menu item, the list of menu items moves in
the same direction.
This action highlights the text between the two locations
or the list of items, such as messages, between the two
locations. To add or remove text or items from the
selection, users can touch the screen at another
location.
Programming for the BlackBerry 43
Touch screen events can be applied to either Manager, Screen, or
field classes and their subclasses. As a simple example, we will
demonstrate the code for handling a Screen touch screen click
event. You must first import the net.rim.device.api.ui.TouchEvent
class. The touchEvent method overrides it’s superclass method of
Screen. We simply get the message event type and look to see if it is
a CLICK event. The result is a dialog that displays that the event
has occurred.
TouchScreenSampleScreen.java
class TouchScreenSampleScreen extends MainScreen{
TouchScreenSampleScreen() {
super();
}
protected boolean touchEvent(TouchEvent message) {
if(message.getEvent() == TouchEvent.CLICK){
Dialog.alert("Touch event click occurred");
return true;
}
return false;
}
}
Conclusion
In this tutorial we learned fundamental event handling techniques for the BlackBerry API
including field events, screen events, and touch screen events. It is important to note that
the examples shown in this tutorial are only touching the surface with a few of the many
available event listeners that were listed in Table 1. Event listeners in the BlackBerry API
will allow you to communicate with almost all aspects and applications known to the
BlackBerry device. The more able you are to incorporate your code/programs with the
BlackBerry, the better you will be able to create more convincing and effective
BlackBerry applications.
Programming for the BlackBerry 44
Tutorial 7: Graphics and Sounds
Introduction
We have already seen a simple example of how to add an image to the screen by using
the Bitmap class. This allows us to add some visual elements to the screen but it would be
better if we went even further. It is possible to create our own graphics, play
audio/sounds, and interact with the BlackBerry media player. This tutorial will cover
some examples and techniques for using graphics and sounds to create more interactive
BlackBerry experiences.
Graphics
In order to create our own graphics we must override the paint method. This method is
automatically invoked when its class is instantiated. In the paint method we are able to
draw objects onto the screen. In this example we will draw a house with windows and
doors. We will also show you how to create custom and reusable graphics.
Figure 18 - Graphics Simulation
Programming for the BlackBerry 45
GraphicsExample.java
import net.rim.device.api.ui.*;
import net.rim.device.api.ui.container.*;
class GraphicsExample extends UiApplication
{
public static void main(String[] args)
{
GraphicsExample app = new GraphicsExample();
app.enterEventDispatcher();
}
public GraphicsExample()
{
MainScreen screen = new GraphicsExampleScreen();
pushScreen(screen);
}
private static class GraphicsExampleScreen extends MainScreen
{
public void paint(Graphics g)
{
//Grass
int width = this.getWidth();
int height = this.getHeight();
g.setColor(Color.GREEN);
g.fillRect(0, 200, width, height - 200);
//House
g.setColor(Color.RED);
g.fillRect(100, 100, 100, 100);
//Roof
g.setColor(Color.DARKKHAKI);
g.fillRect(95, 70, 110, 30);
//Door
g.setColor(Color.BROWN);
g.fillRect(160, 160, 20, 40);
g.setColor(Color.YELLOW);
g.fillRoundRect(172, 177, 5, 5, 2, 2);
//Windows
Window window1 = new Window(120, 120);
window1.paint(g);
Window window2 = new Window(160, 120);
window2.paint(g);
Window window3 = new Window(120, 160);
window3.paint(g);
}
}
}
Programming for the BlackBerry 46
This first thing that we want to draw onto the screen is the grass/ground for the house to
sit on. We simply get the dimensions (width and height) of the screen so that we know
where and how to draw the grass. The grass is generated with a green rectangle.
The next graphic to add to the screen is the house which is comprised of the building and
roof. The roof is a rectangle and the house itself is a square which is drawn with the
rectangle shape. Notice that these objects all have a solid fill. Most shapes can be drawn
with or without a fill.
Next we need to draw the door which includes the door itself and a doorknob. These
objects are created similarly to the house and roof.
Finally we will add windows to the house. In this case we have multiple (three) windows
rather than one single object. It would not make much sense to write the same lines of
code three times with different coordinates so instead we will create our own Window
class.
Window.java
import net.rim.device.api.ui.*;
public class Window
{
private int x;
private int y;
public Window(int x, int y)
{
this.x = x;
this.y = y;
}
public void paint(Graphics g){
g.setColor(Color.LIGHTBLUE);
g.fillRect(x, y, 20, 20);
g.setColor(Color.BROWN);
g.drawRect(x, y, 20, 20); //Outer window frame
g.drawLine(x+10, y, x+10, y+20); //Center vertical frame
g.drawLine(x, y+10, x+20, y+10); //Center horizontal frame
}
}
When we want to create a window we simply create an instance of the Window class and
pass it the X and Y coordinates of where we would like it to be placed in our original
graphic. So since we want our house to have three windows, we create three window
objects.
Programming for the BlackBerry 47
Sounds
Play Sound File
It may be necessary, in a game for example, to play sounds to make your application
more interactive. This can be done by first adding the needed sound files (wave, mp3,
etc.) to the project in the IDE. Adding the sound in the IDE is done because we want our
sounds to be exported with our application. In this example we add only one sound file
(mp3) named lion_roar.mp3.
Figure 19 - Adding sound file to project in JDE
Programming for the BlackBerry 48
This example will simply create a button that when pressed will play the sound file. The
steps involved in order to do this are adding a button and a listener for the button which
have already been covered.
AudioExample1.java
import
import
import
import
import
net.rim.device.api.ui.*;
net.rim.device.api.ui.container.*;
net.rim.device.api.ui.component.*;
java.io.*;
javax.microedition.media.*;
public class AudioExample1 extends UiApplication
{
public static void main(String[] args)
{
AudioExample1 app = new AudioExample1();
app.enterEventDispatcher();
}
public AudioExample1()
{
MainScreen mainScreen = new MainScreen();
ButtonField play = new ButtonField("Play Sound");
FieldChangeListener myFieldChangeListener = new
ChangeListener();
play.setChangeListener(myFieldChangeListener);
mainScreen.add(play);
pushScreen(mainScreen);
}
static class ChangeListener implements FieldChangeListener
{
public void fieldChanged(Field field, int context){
try{
Class c = Class.forName("AudioExample1");
InputStream is =
c.getResourceAsStream("/lion_roar.mp3");
Player player =
javax.microedition.media.Manager.createPlayer(is, "audio/mpeg");
player.realize();
player.prefetch();
player.start();
}catch(Exception e){
System.out.println("Could not play sound.");
}
}
}
}
We create a ButtonField named “Play Sound” and create a FieldChangeListener for it.
The FieldChangeListener is implemented through our custom ChangeListener class.
When the button is pressed the fieldChanged method will be invoked. We don’t need to
distinguish which button has been pressed because there is only one button on the screen.
Programming for the BlackBerry 49
In order to play the audio file we need to first create an object of our working class which
in this case is name “AudioExample1”. We create an input stream for the file and give
this information to an instance of the media player.
Figure 20 - BlackBerry Player Lifecycle
The BlackBerry player has its own lifecycle comprised of the following states:
unrealized, realized, prefetched, started, and closed. The initial state is the unrealized
state. The realize method tells the player to acquire information about the required media
resources. The prefetch method acquired additional resources and prepares those
resources such as buffering. The start method tells the player to start running. The close
method tells the player to release most of its resources. You’ll notice that this example
calls the realize, prefetch, and start methods.
Programming for the BlackBerry 50
Alerts
Perhaps you would like to make more engaging user experiences? It is possible to add
sound tones and vibrations to your applications by utilizing the
net.rim.device.api.system.Alert class.
Vibrate
The code to control the vibration is shown below:
Alert.startVibrate(300); //vibrate for 3 seconds
The value specified is the duration to vibrate the device for. In this case we specified 300
milliseconds which is 3 seconds. Durations can be specified up to a maximum of 25,500
milliseconds.
Vibrations can be stopped at any time by using the stop command:
Alert.stopVibrate();
Tones
We can make our own sounds by using tone alerts. By specifying an array of tone
frequencies and duration it is possible to make custom sounds that offer unique alerts to
the user and application. The code below shows how this can be accomplished:
short[] sound =
{
300, 50, 400, 50, 500, 50, 600, 50, 700, 50
};
The array data is comprised of pair values where the first pair value is the frequency and
the second pair value is the duration of that frequency. The values of this array create an
escalating sound where each tone has a duration of 50 milliseconds (half a second). The
second step is to play the sound:
Alert.playBuzzer(sound, 100);
These sounds can be stopped by using their specified stop command:
Alert.stopAudio();
Conclusion
In this tutorial we learned how to make applications more interactive by utilizing
graphics and sounds. By understanding the basic code for these utilities perhaps you will
be able to create more advanced implementations of them
Programming for the BlackBerry 51
Tutorial 8: Networking
Introduction
The BlackBerry is a mobile device made to be able to communicate via multiple
mediums. These mediums include USB/Serial, Bluetooth, Wi-Fi, and cellular data
networks. All of these connection types make the BlackBerry very powerful in being able
to stay connected and access all types of information. This tutorial will introduce you to
the types of connections previously stated and how you can use them to create more
robust applications on the BlackBerry.
USB/Serial
USB and serial connections allow BlackBerry applications to communicate with desktop
applications. It also allows BlackBerry applications to communicate with other peripheral
devices connected to the BlackBerry.
If you want to have a BlackBerry application communicate with a PC then you’ll need to
have the BlackBerry Desktop Manager installed on your PC. You also need to have the
BlackBerry Desktop Manager to simulate a USB or serial connection. At the time of this
tutorial the latest was version is BlackBerry Desktop Manager Version 4.3.
Figure 21 - BlackBerry Desktop Manager Version 4.3
Programming for the BlackBerry 52
In order to have our BlackBerry application communicate with the BlackBerry Desktop
Manager we must first simulate the USB connection. To do this we go to the “Simulate”
menu of the Blackberry Simulator which is show in Figure 2. Figure 3 displays the screen
of the simulator pending the USB connection was successful. Make sure that the
BlackBerry Desktop Manager is running. Once you simulate the “USB Cable Connected”
you will see the following displayed on the simulator screen:
Figure 2 - BlackBerry USB Simulation
Figure 3 - Simulator Screen after USB
Connection
Similarly we can check the connectivity of the USB connection from the Desktop
Manager by accessing the connection settings.
Figure 4 - BlackBerry Desktop Manager Connection Settings
Programming for the BlackBerry 53
Next we will show some code of how to send/receive data on the BlackBerry device. The
following segment of code creates a USB connection and sends a string value over the
stream.
USB Send
//create the comm connection with USB as the port
StreamConnection con = _
(StreamConnection)Connector.open("comm:COM1;baudrate=9600;bitsperchar=8
;parity=none;stopbits=1");
//create a data output stream from the USB connection stream
DataOutputStream dos = con.openDataOutputStream();
//the string to send
String sdata = "This is a test";
//send the data
dos.writeChars(sdata);
//close the connections
dos.close();
con.close();
USB Receive
//create the comm with USB as the port
StreamConnection con = _
(StreamConnection)Connector.open("comm:COM1;baudrate=9600;bitsperchar=8
;parity=none;stopbits=1");
//create a data input stream from the USB connection stream
DataInputStream dis = con.openDataInputStream();
//receive the data
String rdata = dis.readUTF();
//close the connections
dis.close();
con.close();
Keep in mind that this code is strictly for the BlackBerry device. In order for this code to
work there must be a client application communicating over the USB connection. This
client application could be a desktop application or an application on another peripheral
device.
Programming for the BlackBerry 54
Bluetooth
The first BlackBerry devices to support Bluetooth wireless technology (version 1.1) were
the BlackBerry 7100, 7250, 7290, and 7520 Series devices. All later BlackBerry devices
with Bluetooth wireless technology use version 2.0. Third-party applications are able to
create Bluetooth connections using the Bluetooth Serial Port Profile on any Bluetooth
enabled BlackBerry device.
You can use the net.rim.device.api.bluetooth API to let your BlackBerry Java application
access the Bluetooth Serial Port Profile, part of the JSR 82 implementation, and initiate a
server or client Bluetooth serial port connection to a computer or other Bluetooth enabled
device. The JSR 82 implementation added some additional Bluetooth wireless technology
profiles that can be used by third-party applications. These profiles include the Object
Push Profile (OPP) and the Object Exchange (OBEX) profile.
Simulating a Bluetooth connection is quite a bit more complex than a USB connection
because we require the actual Bluetooth hardware and drivers in order to simulate that
Bluetooth connection. There are Bluetooth development kits for the BlackBerry
simulation environment such as Casira from Cambridge Silicon Radio (CSR). You can
find out more about Casira at http://www.btdesigner.com/devcasira.htm.
Alternatively, if you have access to an actual BlackBerry device then it becomes much
simpler to test a Bluetooth application. There is a good code sample provided in the
BlackBerry Developers Knowledge Base that creates a BlackBerry Bluetooth connection
between the BlackBerry and another device which can be found here.
Programming for the BlackBerry 55
Radios
Working with the BlackBerry device transceiver involves using APIs that make
references to wireless access families.
Table 5 - Wireless Access Families
Wireless access family
3GPP
CDMA
WLAN
Description
GPRS, EDGE, UMTS, GERAN, UTRAN, and GAN
CDMA1x and EVDO
802.11, 802.11a, 802.11b, 802.11g
You can interact with the transceiver to inquire various attribute of the device radio.
Some important radio functions can be called through the
net.rim.device.api.system.RadioInfo API. Those functions are outlined in Table 2 below.
Table 6 - Some Radio Functions
Task
Retrieve the wireless access families
that a BlackBerry device supports.
Determine if a BlackBerry device
supports one or more wireless access
families.
Determine the wireless access family
transceivers that are turned on.
Turn on the transceiver for a wireless
access family. The WAFs parameter is
a bitmask.
Turn off the transceiver for a wireless
access family. The WAFs parameter is
a bitmask.
Steps
RadioInfo.getSupportedWAFs()
RadioInfo.areWAFsSupported(int wafs)
RadioInfo.getActiveWAFs()
Radio.activateWAFs(int WAFs).
Radio.deactivateWAFs(int WAFs)
Programming for the BlackBerry 56
Wi-Fi
With newer BlackBerry models we are able to communicate via the WLAN access
family which encompasses the 802.11 protocols. You can simulate various types of
networks such as a WLAN through the simulate menu and network properties in the
device simulator. In the network properties you are able to add, delete, or edit simulated
networks such as data and wireless networks.
You can start a WLAN connection in the device simulator by going to the “Set Up WiFi” option in the BlackBerry applications. Choose the WLAN that you would like to
connect to.
Figure 5 - Simulate Network Menu
Figure 6 - Network Properties Simulator
Using the WLANInfo API we are able to gather information about WLAN networks. The
following code determines if the device is currently connected to a Wi-Fi network and, if
so, outputs the wireless access point information.
The following example listens for WLAN connection events and displays information
about the WLAN connection when a connection exists. It also provides a menu that
enables the user to turn on/off the WLAN so that we can control when the WLAN
connection events are thrown.
WiFiExample.java
import
import
import
import
net.rim.device.api.ui.*;
net.rim.device.api.ui.container.*;
net.rim.device.api.ui.component.*;
net.rim.device.api.system.*;
public class WiFiExample extends UiApplication
{
Programming for the BlackBerry 57
public static void main(String[] args)
{
WiFiExample app = new WiFiExample();
app.enterEventDispatcher();
}
public WiFiExample()
{
MainScreen myScreen = new MyScreen();
pushScreen(myScreen);
}
public static class MyScreen extends MainScreen implements
WLANConnectionListener
{
private WLANInfo.WLANAPInfo info;
public MyScreen()
{
WLANInfo.addListener(this);
}
protected void makeMenu(Menu menu, int instance)
{
MenuItem showInfoItem = new MenuItem("WLAN Info", 10, 2) {
public void run() {
showWLANInfo();
}
};
MenuItem turnOnItem = new MenuItem("Turn On WLAN", 10, 2) {
public void run() {
Radio.activateWAFs(RadioInfo.WAF_WLAN);
}
};
MenuItem turnOffItem = new MenuItem("Turn Off WLAN", 10, 2)
{
public void run() {
Radio.deactivateWAFs(RadioInfo.WAF_WLAN);
}
};
menu.add(showInfoItem);
menu.add(turnOnItem);
menu.add(turnOffItem);
super.makeMenu(menu, instance);
}
public void networkConnected()
{
info = WLANInfo.getAPInfo();
System.out.println("Connected to WLAN: " + info.getSSID());
}
public void networkDisconnected(int i)
{
System.out.println("Disconnected from WLAN: " +
info.getSSID());
Programming for the BlackBerry 58
}
private void showWLANInfo()
{
try{
int WLANState = WLANInfo.getWLANState();
if(WLANState == WLANInfo.WLAN_STATE_CONNECTED){
System.out.println("Wi-Fi is connected!");
info = WLANInfo.getAPInfo();
System.out.println("WLANAPInfo Object: " + info);
System.out.println("SSID: " + info.getSSID());
System.out.println("BSSID: " + info.getBSSID());
System.out.println("Profile Name: " +
info.getProfileName());
System.out.println("Radio Band: " +
info.getRadioBand());
System.out.println("Data Rate: " +
info.getDataRate());
System.out.println("Signal Level: " +
info.getSignalLevel());
}else{
System.out.println("The WLAN is not currently
connected.");
}
}catch(Exception e){
System.out.println(e);
}
}
}
}
All of the core functionality occurs within the MyScreen class which is the MainScreen of
the application. You’ll also notice that the MyScreen class implements the
WLANConnectionListener class. This tells our class that we want to be notified when
events occur pertaining to WLAN connection or disconnection. We are able to perform
actions when a WLAN connection/disconnection occurs by overriding the
networkConnection and networkDisconnection methods defined by the
WLANConnectionListener class. These two methods simply output the name of the
network (access point) that was connected to or disconnected from.
We also override the makeMenu method because we want to add application specific
menu items to the main menu. The three menu items that we add to the menu are WLAN
Info, Turn On WLAN, and Turn Off WLAN. The WLAN Info menu item outputs the
information about wireless access point such as the SSID, data rate, signal level, etc. The
Turn On menu item will turn on the WLAN radio and conversely the Turn Off menu item
will turn off the WLAN radio. We used the net.rim.device.api.system.Radio API to
activate or deactivate the WLAN radio.
When we turn on/off the WLAN radio through the menu, the network
connection/disconnection events are thrown and an output message is displayed
correspondingly.
Programming for the BlackBerry 59
HTTP
One of the most popular ways to access information on the internet is to use your service
provider’s data network which uses technologies such as GPRS or EDGE. Most service
providers offer some sort of gateway to the internet through their cellular service. This
makes it possible to make applications that go beyond the confines of the device itself to
develop utilize a distributed system of information. Lets look at some code that will allow
us to access the internet from a BlackBerry device using the HTTP protocol.
//create the resource URL and specify http as the protocol
String URL = "http://www.myserver.com/sample.txt";
//Cast the returned object as an HttpConnection
HttpConnection con = (HttpConnection)Connector.open(URL);
//Set the HTTP request method (GET or POST).
con.setRequestMethod(HttpConnection.GET);
//Set header fields.
con.setRequestProperty("User-Agent", "BlackBerry/3.2.1");
// Extract data in 256 byte chunks.
byte[] data = new byte[256];
int len = 0;
StringBuffer raw = new StringBuffer();
while ((len = is.read(data)) != -1) {
raw.append(new String(data, 0, len));
}
//Assign the results to a string
String text = raw.toString();
//output the results
System.out.println(text);
//close the connections
is.close();
con.close();
The resource ‘http://www.myserver.com/sample.txt” is a made-up location but it
exemplifies what the URL resource should look like to some extent. We make sure to
specify HTTP as the protocol. The next step is to create the HTTPConnection with the
specified URL. We can change the request type by passing GET or POST to the
setRequestMethod function. The setRequestProperty tells the HTTP header that the client
is a BlackBerry device. The next step is to retrieve the resource where we use a standard
means to do so by reading the resultant data into a byte array and appending the bytes to a
StringBuffer until there is no data left. Finally we print the text from the document and
close our connection.
Alternatively to communication over the data network with HTTP, we are able to use
socket connections as well as datagrams. Deciding which protocol to use depends on the
Programming for the BlackBerry 60
application itself. You’ll need to consider the type of information that you will be
working with and the type of bandwidth that you will require. Choose one
communication type over another may also hinder your ability to communicate with
needed BlackBerry components. For example, utilizing sockets limits the applications
ability to work with BlackBerry’s push technology which is part of the BlackBerry
Mobile Data System. HTTP and socket connections rely (for the most part) on the TCP
protocol whereas datagram packets rely on the UDP protocol.
Conclusion
In this tutorial we learned networking techniques with the BlackBerry device. These
networking techniques encompassed wired connections such as USB/Serial as well as
wireless techniques such as Bluetooth, Wi-Fi, and the radio. These mediums allow us to
create highly communicative and dynamic applications because we are able to go beyond
the boundaries of the device itself. The availability of the communication types make the
BlackBerry very powerful in being able to ‘stay connected’ which makes the BlackBerry
a very effective mobile device. Knowing this should enable you to utilize those features
to make your BlackBerry applications more valuable to the user.
Programming for the BlackBerry 61
Tutorial 9: Managing Data
Introduction
Data holds value in any application. What is as important as the data is how that data is
stored. There are difference methods to store information on the BlackBerry handheld.
The BlackBerry API also provides access to its native applications that store important
information such as contacts, calendar, and email. Some methods of accessing several
types of information will be looked at as well as different ways to store, manage and
manipulate data.
Persistent Data
There are two ways to store data on a BlackBerry device. You can store date with either
the MIDP Record Stores or with the BlackBerry Persistence Model.
MIDP Record Store
The MIDP record store allows a BlackBerry Java Application to be portable across
multiple devices that are compatible with the Java Platform, Micro Edition. In MIDP,
store persistent data as records in RecordStore objects. MIDP records store data only as
byte arrays. In MIDP 2.0 and later, if an application creates a record store using the
RecordStore.AUTHMODE_ANY field, a MIDlet suite can share the record store with
other MIDlet suites. See the API reference for the BlackBerry Java Development
Environment for more information about the RecordStore class.
BlackBerry Persistence Model
The BlackBerry persistence model provides a flexible and efficient way to store data.
When writing a BlackBerry Java Application specifically for BlackBerry devices, use the
BlackBerry persistence model. The BlackBerry persistence model lets you save any
Object in the persistent store. As a result, searching for data in the persistent store is
faster than searching in the record store model. To store custom object types, the class of
the custom type must use the net.rim.vm.Persistable interface. In the BlackBerry
persistence model, BlackBerry Java Applications can share data at the discretion of the
BlackBerry Java Application that creates the data. Code signing specifies that only
authorized BlackBerry Java Applications can access the data.
More Details of BlackBerry Persistence Model
Security: By default, BlackBerry Java Applications on the BlackBerry device that are
digitally signed by Research In Motion can access the data in the persistent store. Contact
RIM for information on controlling access to the data.
Control: With the BlackBerry Enterprise Server, system administrators can use IT
policies to control the use of persistent storage by third-party BlackBerry Java
Programming for the BlackBerry 62
Applications. Administrators can set ALLOW_USE_PERSISTENT_STORE to TRUE or
FALSE. By default, third-party BlackBerry Java Applications are enabled to use
persistent storage (ALLOW_USE_PERSISTENT_STORE is TRUE). This policy does not
affect the MIDP record store.
Integrity: To maintain the integrity of data in persistent storage, partial updates are not
made if an error occurs during a commit. Data in the PersistentObject retains the values
from the last commit in order to preserve data integrity. If the BlackBerry JVM performs
an emergency garbage collection operation due to low memory, outstanding transactions
are committed immediately to avoid compromising data integrity. If the device fails
during this operation, partially completed transactions are committed when the
BlackBerry device starts. Outstanding transactions are not committed during normal
garbage collection operation.
For this tutorial we will be working with the BlackBerry Persistent Model however you
should understand the differences between the BlackBerry Persistent Model and the
MIDP Record store including when to use which.
PersistantDataExample.java
import
import
import
import
import
net.rim.device.api.ui.*;
net.rim.device.api.ui.container.*;
net.rim.device.api.ui.component.*;
net.rim.device.api.system.PersistentStore;
net.rim.device.api.system.PersistentObject;
public class PersistantDataExample extends UiApplication
{
private static PersistentObject store =
PersistentStore.getPersistentObject(0x117e3b88851668d3L);
public static void main(String[] args)
{
PersistantDataExample app = new PersistantDataExample();
app.enterEventDispatcher();
}
public PersistantDataExample()
{
MyScreen screen = new MyScreen();
screen.setTitle("Persistent Data Example");
pushScreen(screen);
}
public static class MyScreen extends MainScreen
{
private BasicEditField befUsername;
private BasicEditField befPassword;
public MyScreen()
Programming for the BlackBerry 63
{
super();
befUsername = new BasicEditField("Username:", "");
befPassword = new BasicEditField("Password:", "");
add(befUsername);
add(befPassword);
}
protected void makeMenu(Menu menu, int instance) {
menu.add(saveMenuItem);
menu.add(rememberMenuItem);
super.makeMenu(menu, 0);
}
private MenuItem saveMenuItem = new MenuItem("Save Info", 110,
10) {
public void run() {
String[] userinfo = {befUsername.getText(),
befPassword.getText()};
synchronized(store) {
store.setContents(userinfo);
store.commit();
}
}
};
private MenuItem rememberMenuItem = new MenuItem("Remember Me",
110, 10) {
public void run() {
synchronized(store) {
String[] currentinfo =
(String[])store.getContents();
if(currentinfo == null) {
Dialog.alert("Could not find store contents.");
} else {
befUsername.setText(currentinfo[0]);
befPassword.setText(currentinfo[1]);
}
}
}
};
}
}
The first thing we need to do is create a PersistentObject which requires us to specify a
long value. This long value is a unique key that is used as a reference to the
PersistentObject of the BlackBerry Persistence Store. The JDE provides a tool for us to
create a unique long value from a string value.
1) Type a string value in the JDE editor (We used ‘some.unique.string.value’)
2) Highlight the string value
3) Right-Click the string value and choose Convert to long
Programming for the BlackBerry 64
If you use the same string value as the example then it should be converted to the long
value 0x117e3b88851668d3L which matches the example as well.
The next thing we do is create the MainScreen which you should be accustomed to by
now. In the example we have created two BasicEditField’s that provide input for a user’s
username and password to simulate a login screen. We also created two MenuItem’s for
saving and retrieving the user’s information via the persistence store. Lets analyze the
code within the run methods of the two menu items.
The run method of the saveMenuItem is invoked when its menu item is selected by the
user. We create a string array that contains the username and password values of the
BasicEditFields. Next, we synchronize the store variable because we want to prevent any
other access/modification to the store while we are making changes to it. Lastly, we set
the contents of the store to the string array containing the username and password.
The run method of the rememberMenuItem is invoked when its menu item is selected by
the user. The first thing we do is synchronize access to the store object. Next, we want to
check is the array object containing the username and password is available. If it is not
then it means that the user information has never been saved so we simply provide a user
friendly message notifying the results. Conversely, if the user information has been saved
we want to populate the BasicEditField’s with the saved username and password.
Persistent storage is beneficial because it allows us to use data outside of the application.
This means that the application can be closed and reopened and still be able to work with
saved data. You can test this concept on the PersistentDataExample application.
1)
2)
3)
4)
Enter values into the username and password fields
Close the application using the close menu item
Run the application again
Choose the Remember menu item
The information in the store is still there.
Programming for the BlackBerry 65
Files
This javax.microedition.io.file.FileConnection interface is intended to access files or
directories that are located on removable media and/or file systems on a device.
File connection is different from other Generic Connection Framework connections in
that a connection object can be successfully returned from the open method without
actually referencing an existing entity (in this case, a file or directory). This behavior
allows the creation of new files and directories on a file system. For example, the
following code can be used to create a new file on a file system, where SDCard is a valid
existing file system root name for a given implementation:
try {
FileConnection fconn =
(FileConnection)Connector.open("file:///SDCard/file.txt");
if (!fconn.exists()){
fconn.create();
System.out.println("Created file.");
}else{
System.out.println("File location exists!");
}
fconn.close();
}catch (IOException ioe) {
System.out.println("Could not create connection.");
}
Developers should always check for the file's or directory's existence after a connection is
established to determine if the file or directory actually exists. Similarly, files or
directories can be deleted using the delete method, and developers should close the
connection immediately after deletion to prevent exceptions from accessing a connection
to a non-existent file or directory.
A file connection's open status is unaffected by the opening and closing of input and
output streams from the file connection; the file connection stays open until close is
invoked on the FileConnection instance. Input and output streams may be opened and
closed multiple times on a FileConnection instance.
All FileConnection instances have one underlying InputStream and one OutputStream.
Opening a DataInputStream counts as opening an InputStream, and opening a
DataOutputStream counts as opening an OutputStream. A FileConnection instance can
have only one InputStream and one OutputStream open at any one time. Trying to open
more than one InputStream or more than one OutputStream from a StreamConnection
causes an IOException. Trying to open an InputStream or an OutputStream after the
FileConnection has been closed causes an IOException.
You can simulate SD storage on the BlackBerry simulator. This utility can be access
through the Simulate Change SD Card… menu of the simulator.
Programming for the BlackBerry 66
Figure 22 - SD Simulation Menu
Figure 23 - SD Card Simulation Manager
Security
Access to file connections is restricted to prevent unauthorized manipulation of data. The
access security model applied to the file connection is defined by the implementing
profile. The security model is applied on the invocation of the open method with a valid
file connection string. The mode provided in the open method (Connector.READ_WRITE
by default) indicates the application's request for access rights for the indicated file or
directory and is therefore checked against the security scheme. All three connections
modes (READ_WRITE, WRITE_ONLY, and READ_ONLY) are supported for a file
connection and determine the access requested from the security model.
Programming for the BlackBerry 67
The security model is also applied during use of the returned FileConnection, specifically
when the methods openInputStream, openDataInputStream, openOutputStream, and
openDataOutputStream are invoked. These methods have implied request for access
rights (i.e. input stream access is requesting read access, and output stream access is
requesting write access). Should the application not be granted the appropriate read or
write access to the file or file system by the profile authorization scheme, a
java.lang.SecurityException is thrown.
File access through the FileConnection API may be restricted to files that are within a
public context and not deemed private or sensitive. This restriction is intended to protect
the device's and other users' files and data from both malicious and unintentional access.
RMS databases cannot be accessed using the File Connection API. Access to files and
directories that are private to another application, files and directories that are private to a
different user than the current user, system configuration files, and device and OS
specific files and directories may be restricted. In these situations, a
java.lang.SecurityException is thrown from the Connector.open method if the file, file
system, or directory is not allowed to be accessed.
PIM
A personal information manager (PIM) is a type of application software that functions as
a personal organizer. As an information management tool, a PIM's purpose is to facilitate
the recording, tracking, and management of certain types of personal information.
Personal information can include any of the following:
Personal notes/journal
Address books
Lists (including task lists)
Significant calendar dates
o Birthdays
o Anniversaries
o Appointments and meetings
Reminders
Email, instant message archives
Fax communications, voicemail
Project management features
RSS/Atom feeds
Contacts
It is possible to work with contacts in the BlackBerry PIM. Doing so, we are able to
create/delete contacts and modify contact information. Let’s look at some sample code
that will allow us to do these things.
Programming for the BlackBerry 68
The following code snippit gets a list of the PIM contacts in a ContactList object that we
have named contactList. We tell the method that we want to be able to read and/or write
to the contact list with the PIM.READ_WRITE constant parameter.
try {
ContactList contactList
=(ContactList)PIM.getInstance().openPIMList(PIM.CONTACT_LIST,
PIM.READ_WRITE);
}catch(PIMException e){
System.out.println(e);
}
Alternatively, we can access specific PIM contacts by utilizing the BlackBerry contact
list chooser. This method will allow us to graphically select a specific PIM contact item
from a list. We confirm that the item chosen is an actual Contact item before casting the
item as a Contact object.
try{
BlackBerryContactList list =
(BlackBerryContactList)PIM.getInstance().openPIMList(PIM.CONTACT_
LIST, PIM.READ_WRITE);
PIMItem item = list.choose();
if (item instanceof Contact) {
Contact contact = (Contact)item;
}
}catch(PIMException e){
System.out.println(e);
}
We can create new contacts and add them to the PIM. Once we create a contact object we
can add properties to the contact. In this case, we specified the first name, last name,
name prefix, email address and the access type of the contact item. You’ll notice that
when we specify contact attributes we can also be more specific about the attribute type
such as defining the work email address in addition to the home email address. The last
thing we do is commit the contact to the PIM.
try{
Contact contact = contactList.createContact();
contact.addString(Contact.NAME_PREFIX, Contact.ATTR_NONE, "Jr.");
contact.addString(Contact.NAME_GIVEN, Contact.ATTR_NONE, "John");
contact.addString(Contact.NAME_FAMILY, Contact.ATTR_NONE, "Doe");
contact.addString(Contact.EMAIL, Contact.ATTR_WORK,
"[email protected]");
contact.addBoolean(Contact.CLASS_CONFIDENTIAL, Contact.ATTR_NONE,
true);
contact.commit();
}catch(PIMException e){
System.out.println(e);
}
Programming for the BlackBerry 69
Furthermore, we can change contact information. The following code snippet changes the
name prefix of a contact. To do this we get the name values of the contact and put them
into a string array.
String[] newname = contact.getStringArray(Contact.NAME, 0);
Next, we change the prefix value from “Jr.” to “Dr.” by specifying the array item number
which is defined in the Contact class with constants such as Contact.Name_PREFIX.
newname[Contact.NAME_PREFIX] = "Dr.";
newname[Contact.NAME_SUFFIX] = "Jr.";
After the values are changed we need to apply the new string array to the contact of the
PIM
contact.setStringArray(Contact.NAME, 0, Contact.ATTR_NONE, newname);
Finally, we commit the changes just as the previous code sample did but first we check
that changes had been made.
if(contact.isModified()) {
contact.commit();
}
Calendar
Similarly to accessing contact information in the PIM we can also access calendar
information to create/delete and modify events.
EventList eventList = null;
try {
eventList = (EventList)PIM.getInstance().openPIMList(
PIM.EVENT_LIST, PIM.READ_WRITE);
} catch (PimException e) {
System.out.println(e);
}
We can create a new event and add event properties but before we add event properties
we must check to see if that particular property is supported by the device.
Event event = eventList.createEvent():
if (event.isSupportedField(Event.SUMMARY)) {
event.addString(Event.SUMMARY, Event.ATTR_NONE, "Meet with
customer");
}
if (event.isSupportedField(Event.LOCATION)) {
event.addString(Event.LOCATION, Event.ATTR_NONE, "Conference
Center");
}
if (event.isSupportedField(Event.START)) {
Date start = new Date(System.currentTimeMillis() + 8640000);
Programming for the BlackBerry 70
event.addDate(Event.START, Event.ATTR_NONE, start);
}
if (event.isSupportedField(Event.END)) {
event.addDate(Event.END, Event.ATTR_NONE, start + 72000000);
}
To change an event attribute use the appropriate set method.
if (event.countValues(Event.LOCATION) > 0) {
event.setString(Event.LOCATION, 0, Event.ATTR_NONE, "Board
Room");
}
We then commit the event after confirming that some change to the event has taken
place.
if(event.isModified()) {
event.commit();
}
Conclusion
In this tutorial we learned different methods to store, manage, and manipulate different
types of data. We also gave examples of how to utilize information built into the
BlackBerry handheld such as the PIM feature which gives us access to such information
as contacts, calendar, and email. With this is mind you can now add more functionality to
your Blackberry applications by making your applications more data centric and utilizing
information that the BlackBerry already provides.
Programming for the BlackBerry 71
Tutorial 10: Deploying Applications onto the Blackberry using
the Blackberry JDE and Blackberry Desktop Manager
Introduction
Once you have successfully developed your first Blackberry application you will need to
deploy your application onto a physical Blackberry device. This can be accomplished
through the Blackberry JDE and the Blackberry Desktop Manager. This tutorial will take
you through a step by step process on how to deploy your Blackberry application onto a
device using the two aforementioned tools as well as show you how to wipe your device
clean should you encounter any issues.
Deploying a Blackberry Application using the Blackberry JDE and Blackberry
Desktop Manager
In order to deploy Blackberry applications using the Blackberry Desktop Manager a
.ALX file must be created. We can create an .ALX file in the Blackberry JDE. Open up
the Blackberry JDE and open a completed Blackberry application that you wish to load
onto your device. Within the Blackberry JDE select the ‘Project’ menu item and then
select ‘Generate ALX file’.
Figure 24 - Generating ALX File in Blackberry JDE
The .ALX file will be found in the same folder as the .COD file for the Blackberry
application. This .ALX file contains a format as shown below. This file is needed for the
Blackberry Desktop Manager to find the Blackberry application files needed when
installing the application.
Example ALX File
Programming for the BlackBerry 72
<loader version="1.0">
<application id="TestApp">
<name> TestApp </name>
<description > </description>
<version > 0.1 </version>
<vendor > MyCompany </vendor>
<copyright > Copyright (c) 2009 MyCompany </copyright>
<fileset Java="1.35">
<directory > </directory>
<files > TestApp.cod </files>
</fileset>
</application>
</loader>
We can now open up the Blackberry Desktop Manager. Plug in your Blackberry using a
USB cable to your computer, then proceed to click on the ‘Application Loader’ icon in
the Blackberry Desktop Manager, from here click on ‘Add/Remove Applications’.
Clicking this will show all the applications currently installed on your Blackberry device.
We now wish to click on the ‘Browse…’ and find the .ALX file for our application. Once
we have found this the application will appear on the application list with the word
‘Install’ under the ‘Action’ tab. Click ‘Next’ and confirm that the applications that will
be installed are correct and then click ‘Finish’. The Desktop Manager will then install the
applications on the device. Ensure that the application has installed by looking at your
device and running the application. If we wish to remove the application, we can return to
the ‘Add/Remove Applications’ screen and then select the checkmark box by the
application we wish to remove. The ‘Action’ tab will display ‘Remove’ and we can then
click ‘Next’ and ‘Finish’ to remove the selected application.
Wiping the Blackberry Handheld Device
You may want to wipe your Blackberry device for a variety of reasons. If an application
you have installed has errors and for some reason cannot be uninstalled, if you want to
give your device to another individual clean of data, if you want to start fresh with the
minimum number of application on your device, etc. Wiping the device will remove any
application data stored on the device and can also remove all third party applications. To
wipe your Blackberry device, enter the ‘Options’ menu on the device, within the
‘Options’ screen select the ‘Security Options’ screen. Once in the ‘Security Options’
screen, select ‘General Settings’, then proceed to click the Blackberry button and select
‘Wipe Handheld’. At this point you will be presented with a confirmation message and an
option to wipe all third party applications from the device. If you click ‘Continue’ you
will be required to type the word ‘blackberry’ without quotes to wipe the device. The
device will wipe itself clean at this point.
Conclusion
Programming for the BlackBerry 73
In this tutorial we learned how to deploy applications onto our Blackberry handheld
device through the Blackberry JDE and Blackberry Desktop Manager. We provided an
example of an .ALX file which is used by the Blackberry Desktop Manager to install the
application files on the device. We also learned how to wipe a Blackberry device when
transferring ownership or encountering issues with mobile applications.
Programming for the BlackBerry 74
Tutorial 11: Testing and Debugging using the Blackberry JDE
Introduction
Providing a good user experience in your mobile application is one of the key aspects in
making it successful. A good user experience means that at bare minimum the mobile
application should be free of runtime exceptions that would prevent the user from
completely a task that your application provides. In order to ensure that you have
developed an error free application testing and debugging your application prior to
distribution is extremely important. The Blackberry JDE offers developers tools for both
testing and debugging their mobile applications. This tutorial will describe how to use
those tools.
Testing and Debugging with the Blackberry JDE
Open up the Blackberry JDE and load your Blackberry application into the workspace.
Once you are ready to begin testing your application you can go to the ‘Debug’ menu on
the menu list and select ‘Go’, alternatively you can hit F5 in the Blackberry JDE. This
will launch the Blackberry simulator and debugger. There is an output field at the bottom
of the screen with the ‘Debug’ tag shown as figure 25, this field can be used to write
System.out messages and System.err messages while running your application and
viewing the status of the simulator. This is the quick and simple method of debugging
your application.
Figure 25 - Debug Area
Prior to executing our application in the simulator we can also add breakpoints in our
application to help us diagnose problems or look at current issues in our application. To
set breakpoints in our application we can return to the ‘Debug’ menu at the top of the
JDE as shown in figure 26. We can set breakpoints at any location our cursor is in the
code or in specific instances such as when an exception is thrown.
Programming for the BlackBerry 75
Figure 26 - Debug Menu
Stopping at a breakpoint in our application will provide us with data regarding the current
state of the application. Once you have set a breakpoint in your code, run your
application to that breakpoint. Once the Blackberry JDE hits that breakpoint we have
several more screens that provide us information. We can view the call stack of our
simulator to the left of our code, shown below in figure 27.
Figure 27 - Call Stack
We also have a number of commands we can execute such as stepping into the code,
skipping lines, or exiting methods. These commands are found in the ‘Debug’ menu and
the top of the screen as individual buttons. In the bottom right corner of the Blackberry
JDE we can view the values of variables throughout our application shown as figure 28.
You can also view other aspects such as threads, locked objects, processes, etc. from the
‘View’ menu item on the menu bar.
Programming for the BlackBerry 76
Figure 28 - Variable View
At this point take some time to step through the code and view how the variables change
in the different screens as the code is executed.
Moving back to the different views, we can examine which code in our
application is used at certain points in time. We can do this by going to the ‘View’ menu
item and selecting ‘Coverage’. This action will open a window at the top of our
Blackberry JDE. Run your application again and stop at the breakpoint you have set. In
the code coverage window we can hit the ‘Refresh’ button to see the results. We will see
green and red markers in our code now. The green points will represent code executed
while the red will represent code not executed. Finally, we can also attach the debugger
to an actual Blackberry device. With your device plugged into your computer, return to
the ‘Debug’ menu and select the ‘Attach to’ and then ‘Handheld’. You will be required to
enter your password and may be displayed with a dialog with a missing debug file, we
can ignore this missing file if it is not your application. You should see an ‘attach:
success’ message in the debug window at the bottom of the JDE. We can then continue
debugging our application as we did with the simulator through the code on our screen if
it is the same as the one on the device.
Conclusion
In this tutorial we saw the ability of the Blackberry JDE to assist us in testing and
debugging our mobile applications. The Blackberry JDE has several different screens
which provide information regarding variables, call stacks, code coverage, and others.
The Blackberry JDE can also debug on a physical device along with the simulator.
Programming for the BlackBerry 77
Glossary
.ALX
Blackberry Application Loader File
BES
BlackBerry Enterprise Server
Caret
The term used by to indicate the cursor used when editing a text field
CDC
The Connected Device Configuration (CDC) is a specification for a Java ME
configuration. Conceptually, CDC deals with devices with more memory and processing
power than CLDC; it is for devices with an always-on network connection and a
minimum of 2 MB of memory available for the Java system.
CLDC
The Connected, Limited Device Configuration (CLDC) is a specification for a Java ME
configuration. The CLDC is for devices with less than 512 KB or RAM available for the
Java system and an intermittent (limited) network connection. It specifies a strippeddown Java virtual machine1 called the KVM as well as several APIs for fundamental
application services.
EDGE
Enhanced Data rates for GSM Evolution
GPRS
General Packet Radio Service
JAD
Java Application Descriptor (JAD) files describe the MIDlets (Java ME applications) that
are distributed as JAR files. JAD files are commonly used to package Java applications or
games that can be downloaded to mobile phones. Java applications enable Mobile phones
to interact programmatically with online web services, such as the ability to send SMS
messages via GSM mobile internet or interact in multiplayer games.
JDE
Java Development Environment
KVM
The KVM is a compact Java virtual machine (JVM) that is designed for small devices. It
supports a subset of the features of the JVM. For example, the KVM does not support
floating-point operations and object finalization.
Programming for the BlackBerry 78
MIDP
The Mobile Information Device Profile is a set of Java APIs that is generally
implemented on the Connected Limited Device Configuration (CLDC). It provides a
basic Java ME application runtime environment targeted at mobile information devices,
such as mobile phones and two-way pagers. The MIDP specification addresses issues
such as user interface, persistent storage, networking, and application model.
Persistent Data
The data needed to recreate an object in the same state as when it was written.
PIM
Personal Information Manager
Porting
The process of adapting software so that a program can be created for a computing
environment that is different from the one for which it was originally designed.
Preverification
Due to memory and processing power available on a device, the verification process of
classes are split into two processes. The first process is the preverification which is offdevice and done using the preverify tool. The second process is verification which is
done on-device.
Set-top Boxes
A set-top box (STB) or set-top unit (STU) is a device that connects to a television and an
external source of signal, turning the signal into content which is then displayed on the
television screen.
Trackball
Hardware interface for interacting with the BlackBerry. In this document the term is
interchangeable with trackball (BlackBerry Pearl models).
WLAN
Wireless Local Area Network
Wi-Fi
Wireless Fidelity
Programming for the BlackBerry 79
References
http://www.onjava.com/pub/a/onjava/2001/03/08/Java ME.html
http://www-128.ibm.com/developerworks/wireless/library/wi-arch23.html
http://www.uoguelph.ca/~qmahmoud/javame/Java ME-intro.pdf
http://developers.sun.com/mobility/midp/articles/wtoolkit/
http://developers.sun.com/mobility/midp/articles/blackberrydev/
http://ezinearticles.com/?BlackBerry-Programming-101-How-to-Get-Started-WithBlackBerry-Software-Development&id=432477
http://www.devx.com/wireless/Article/27869/0/page/3
http://www.blackberry.com/developers/docs/4.1api/index.html
http://na.blackberry.com/eng/developers/downloads/jde.jsp
http://na.blackberry.com/eng/developers/downloads/simulators.jsp
http://devsushi.com/2007/12/02/blackberry-jde-api-user-interface-field-reference/
http://www.blackberry.com/developers/docs/4.0api/net/rim/device/api/ui/component/pac
kage-summary.html
http://www.blackberry.com/knowledgecenterpublic/livelink.exe/fetch/2000/348583/8003
32/800505/800608/How_To__Distinguish_between_a_full_menu_and_a_primary_actions_menu.html?nodeid=131188
9&vernum=0
http://apsquared.net/blog/2007/07/10/blackberry-gpslocation-api/
http://na.blackberry.com/eng/developers/resources/journals/jan_2005/multimedia.jsp
http://www.blackberry.com/knowledgecenterpublic/livelink.exe/fetch/2000/348583/8003
32/800441/What_Is__Bluetooth_support_on_BlackBerry_devices.html?nodeid=1151480&vernum=0
http://www.blackberry.com/knowledgecenterpublic/livelink.exe/fetch/2000/348583/8003
32/800441/How_To_-_Use_the_Bluetooth_classes.html?nodeid=1106807&vernum=0
http://www.blackberry.com/knowledgecenterpublic/livelink.exe/fetch/2000/348583/8003
32/800429/How_To__Establish_an_HTTP_connection.html?nodeid=800632&vernum=0
http://www.blackberry.com/DevMediaLibrary/view.do?name=debug
Programming for the BlackBerry 80