1
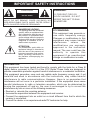
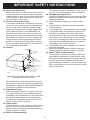
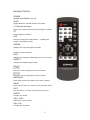
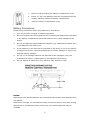
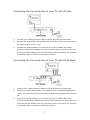
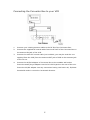
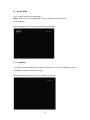
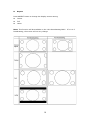
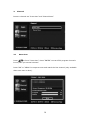
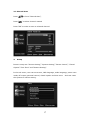
Contents
Important Safety Instructions .………………………………………………………………………………. 1
Location of Controls ………………………………………………………………………………………………… 4
Remote Control Unit ………………………………………………………………………………………………… 5
Connections ………………………………………………………………………………………………………….... 7
Install Guide ……………………………………………………………………………………………………………. 9
Basic Functions ……………………………………………………………………………………………………… 10
Volume Control ……………………………………………………………………………………………… 10
Select Channel …………………………………………………………………………………………….… 10
Signal Strength …………………………………………………………………………………….….….. 11
Program Information …………………………………………………………………..………………… 11
Closed Caption ………………………………….………………………………………..………………… 12
Audio Mode .…………………………………………………….………………………….………………… 13
TV Rating …………………………………………………………………………………………………….… 13
Aspect ……………………………………………………………………………………………………….…… 14
Main Menu …………………………………………………………………………………..………………………… 15
Apps …………………………………………………………………………………………………….………… 15
Channel ……………………………………………………………………………………………….………… 16
Auto Scan ……………………………………………………………………………………………… 16
Manual Scan …………………………………………….…………………………………………… 17
Setup ……………………………………………………………………………………………….…………… 17
Screen Setting ……………………………………………………………………………………… 18
System Setting ………………………………………………..…………………………………… 19
Parental Control ………………………………………………………………………….………… 20
Closed Caption ………………………………………………………………………….…………… 25
Time Zone ……………………………………………………………………………………………… 25
Restore Setting ……………………………………………………………………………………… 26
Factory Mode …………………………………………………………………………………….…… 26
Watching the Normal TV (NTSC) stations ……………………………………………………….…… 27
More Information ……………………………………………………………………………………………..…… 28
IMPORTANT SAFETY INSTRUCTIONS
CAUTION
WARNING:
RISK OF ELECTRIC SHOCK
DO NOT OPEN
CAUTION: TO REDUCE THE RISK OF ELECTRIC
SHOCK, DO NOT REMOVE COVER (OR BACK). NO
USER-SERVICEABLE PARTS INSIDE. REFER SERVICING TO QUALIFIED SERVICE PERSONNEL.
DANGEROUS VOLTAGE:
TO PREVENT FIRE OR
SHOCK HAZARD, DO NOT
EXPOSE THIS UNIT TO RAIN
OR MOISTURE.
FCC WARNING:
The lightning flash with arrowhead
symbol, within an equilateral triangle is intended to alert the user to
the presence of uninsulated dangerous voltage within the product’s
enclosure that may be of sufficient
magnitude to constitute a risk of
electric shock to persons.
This equipment may generate or
use radio frequency energy.
Changes or modifications to this
equipment may cause harmful
interference
unless
the
modifications are expressly
approved in the instruction
manual. The user could lose the
authority to operate this
equipment if an unauthorized
change or modification is made.
ATTENTION:
The exclamation point within an
equilateral triangle is intended to
alert the user to the presence of
important operating and maintenance (servicing) instructions in
the literature accompanying the
appliance.
INFORMATION:
This equipment has been tested and found to comply with the limits for a Class B
digital device, pursuant to Part 15 of the FCC Rules. These limits are designed to
provide reasonable protection against harmful interference in a residential installation.
This equipment generates, uses and can radiate radio frequency energy and, if not
installed and used in accordance with the instructions, may cause harmful
interference to radio communications. However, there is no guarantee that
interference will not occur in a particular installation. If this equipment does cause
harmful interference to radio or television reception, which can be determined by
turning the equipment off and on, the user is encouraged to try to correct the
interference by one or more of the following measures:
• Reorient or relocate the receiving antenna.
• Increase the separation between the equipment and receiver.
• Connect the equipment into an outlet on a circuit different from that to which the
receiver is connected.
• Consult the dealer or an experienced radio/TV technician for help.
1
IMPORTANT SAFETY INSTRUCTIONS
Before using the unit, be sure to read all operating instructions carefully. Please note that these
are general precautions and may not pertain to
your unit. For example, this unit may not have
the capability to be connected to an outdoor
antenna.
1. Read these instructions.
All the safety and operating instructions should
be read before the product is operated.
2. Keep these instructions.
The safety and operating instructions should be
retained for future reference.
3. Heed all warnings.
All warnings on the product and in the operating
instructions should be adhered to.
4. Follow all instructions.
All operating and use instructions should be followed.
5. Do not use this apparatus near water.
Do not use this product near water and moisture, for example: near a bathtub, washbowl,
kitchen sink or laundry tub; in a wet basement;
or near a swimming pool.
6. Clean only with dry cloth.
Unplug this product from the wall outlet before
cleaning. Do not use liquid cleaners or aerosol
cleaners. Use a dry cloth for cleaning.
7. Do not block any ventilation openings. Install
in accordance with the manufacturer's
instructions.
Slots and openings in the cabinet and in the
back or bottom are provided for ventilation, to
ensure reliable operation of the product and to
protect it from overheating. These openings must
not be blocked or covered. The openings should
never be blocked by placing the product on a
bed, sofa, rug or other similar surface. This product should never be placed near or over a radiator or heat source. This product should not be
placed in a built-in installation such as a bookcase or rack unless proper ventilation is provided or the manufacturer's instructions have been
adhered to.
8. Do not install near any heat sources such as
radiators, heat registers, stoves, or other
apparatus (including amplifiers) that produce
heat.
9. Do not defeat the safety purpose of the
polarized or grounding-type plug. A polarized
plug has two blades with one wider than the
other. A grounding type plug has two blades
and a third grounding prong. The wide blade
or the third prong are provided for your safety. If the provided plug does not fit into your
outlet, consult an electrician for replacement
of the obsolete outlet.
10. Protect the power cord from being walked on
or pinched particularly at plugs, convenience
receptacles, and the point where they exit
from the apparatus.
11. Only use attachments/accessories specified
by the manufacturer.
12. Use only with the cart, stand, tripod, bracket,
or table specified by the manufacturer, or
sold with the apparatus. When a cart is used,
use caution when moving the cart/apparatus
combination to avoid injury from tip-over
An appliance and cart combina- PORTABLE CART WARNING
(symbol provided by RETAC)
tion should be moved with care.
Quick stops, excessive force and
uneven surfaces may cause the
appliance and cart combination
to overturn.
13. Unplug this apparatus during
lightning storms or when unused for long
periods of time.
To protect your product from a lightning storm,
or when it is left unattended and unused for long
periods of time, unplug it from the wall outlet and
disconnect the antenna or cable system. This
will prevent damage to the product due to lightning and power-line surges.
14. Refer all servicing to qualified service personnel. Servicing is required when the apparatus has been damaged in any way, such as
power-supply cord or plug is damaged, liquid
has been spilled or objects have fallen into
the apparatus, the apparatus has been
exposed to rain or moisture does not operate
normally, or has been dropped.
15. Power source.
This product should be operated only from the
type of power source indicated on the marking
label. If you are not sure of the type of power
supply to your home, consult your appliance
dealer or local power company. For products
intended to operate from battery power, or other
source, refer to the operation instructions.
16. Power lines.
An outside antenna system should not be located
in the vicinity of overhead power lines or other
electric light or power circuits, or where it can fall
into such power lines or circuits. When installing an
outside antenna system, extreme care should be
taken to keep from touching such power lines or
circuits as contact with them might be fatal.
17. Overloading.
Do not overload wall outlets and extension cords
as this can result in a risk of fire or electric
shock.
2
IMPORTANT SAFETY INSTRUCTIONS
18. Object and liquid entry.
Never push objects of any kind into this product
through openings as they may touch dangerous
voltage points or short out parts that could result
in fire or electric shock. Never spill or spray any
type of liquid on the product.
19. Outdoor antenna grounding.
If an outside antenna is connected to the product, be sure the antenna system is grounded so
as to provide some protection against voltage
surges and built up static charges. Section 810
of the National Electric Code ANSI/NFPA 70
provides information with respect to proper to
grounding of the mast and supporting structure,
grounding of the lead-in wire to an antenna discharge product, size of grounding conductors,
location of antenna-discharge product, connection to grounding electrodes and requirements
for the grounding electrodes.
20. Service.
24.
a)
b)
c)
d)
e)
f)
25.
ANTENNA
LEAD IN
WIRE
GROUND
CLAMP
ANTENNA
DISCHARGE UNIT
(NEC SECTION 810-20)
ELECTRIC
SERVICE
EQUIPMENT
GROUNDING CONDUCTORS
(NEC SECTION 810-21)
GROUND CLAMPS
NEC - NATIONAL ELECTRICAL CODE
POWER SERVICE GROUNDING
ELECTRODE SYSTEM
(NEC ART 250, PART H)
S2898A
EXAMPLE OF ANTENNA GROUNDING AS PER
NATIONAL ELECTRICAL CODE
Do not attempt to service this product yourself
as opening or removing covers may expose you
to dangerous voltage or other hazards. Refer all
servicing to qualified service personnel.
21. Replacement parts.
When replacement parts are required, be sure
the service technician uses replacement parts
specified by the manufacturer or those that have
the same characteristics as the original parts.
Unauthorized substitutions may result in fire or
electric shock or other hazards.
22. Safety check.
Upon completion of any service or repairs to this
product, ask the service technician to perform
safety checks to determine that the product is in
proper operation condition.
23. Wall or ceiling mounting.
3
The product should be mounted to a wall or ceiling only as recommended by the manufacturer.
Damage requiring service.
Unplug this product from the wall outlet and refer
service to qualified service personnel under the
following conditions.
When the power-supply cord or plug is damaged.
If liquid has been spilled or objects have fallen
into the product.
If the product has been exposed to rain or water.
If the product does not operate normally by following the operating instructions. Adjust only
those controls that are covered by the operating
instructions, as an adjustment of other controls
may result in damage and will and require extensive work by a qualified technician to restore in
the product to its normal operation.
If the product has been dropped or the cabinet
has been damaged.
When the product exhibits a distinct change in
performance-this indicates a need for service.
Note to CATV system installer.
This reminder is provided to call the CATV system installer's attention to Article 820-40 of the
NEC that provides guidelines for proper grounding and, in particular, specifies that the cable
ground shall be connected to the grounding system of the building, as close to the point of cable
entry as practical.
Location of Controls
1
STANDBY Switch
2
POWER ON Indicator
3
CHANNEL UP Button
4
STANDBY mode Indicator
5
CHANNEL DOWN Button
6
RF OUT Jack
7
RF IN Jack
8
AUDIO R Jack
9
AUDIO L Jack
10
VIDEO OUT Jack
11
DC 12V IN Jack
4
Remote Control
POWER
POWER ON/STANDBY the unit.
MUTE
Toggle between normal & mute the audio.
0-9 Numerical keys
Select the channel directly by entering its number.
CC
Close Caption selection.
EPG
Electronic Program Guide button.
Display the
simple TV program guide.
SIGNAL
Display the received signal strength.
Auxiliary select channel.
OSD
Display the program information box in the screen
ASPECT
Change the display aspect ratio.
Move the cursor up/down for menu option.
Move the cursor left/right for menu option.
ENTER/OK
Enter and confirm the data in the menu system.
MENU
Open up the menu or return to the previous menu.
EXIT
Exit the menu or return to the previous menu.
AUDIO
Change the Audio.
VOL+/VOLAdjust the volume level.
CH+/CHChange the channels.
5
1.
2.
Slide the tap and lifting the battery compartment cover.
Insert 2 x “AA” size batteries into the compartment as the
polarity marking inside the battery compartment.
3.
Close the battery compartment cover.
Battery Precautions
Follow these precautions when using batteries in this device:
1.
2.
Use only the size and type of batteries specified.
Be sure to follow the correct polarity when installing the batteries as indicated
in the battery compartment. Reversed batteries may cause damage to the
device.
3.
Do not mix different types of batteries together (e.g. Alkaline and Carbon-zinc)
or old batteries with fresh ones.
4.
If the batteries in the device are consumed or the device is not to be used for
a long period of time, remove the batteries to prevent damage or injury from
possible battery leakage.
5.
Do not try to recharge batteries not intended to be recharged; they can
overheat and rupture. (Follow battery manufacturer’s directions.)
6.
Do not dispose of batteries in fire, batteries may explode or leak.
NOTES:
When there is an obstacle between the unit and the transmitter, the transmitter may
not operate.
When direct sunlight, an incandescent lamp, fluorescent lamp or any other strong
light shines on the Remote Sensor of the unit, the remote operation may be
unstable.
6
Connecting the Converter Box to your TV with RF Jack
1.
Connect your existing antenna cable to the RF IN of the Converter Box.
2.
Connect the supplied RF coaxial cable from the RF OUT of the Converter Box to
the antenna jack of the TV set.
3.
Connect the AC/DC adaptor of Converter Box to the suitable wall outlet.
Insert the small plug of adaptor into the DC 12V IN jack on the rear of the unit.
Insert the AC/DC adaptor into any convenient having 100-240V~AC, 50/60Hz
household outlet in vertical or horizontal direction.
Connecting the Converter Box to your TV with AV Sockets
1.
Connect your existing antenna cable to the RF IN of the Converter Box.
2.
Connect the Audio/Video cables (not supplied) from the AUDIO/VIDEO jacks
(white, red, yellow) of the Converter Box to the Audio/Video IN jacks of the TV
set.
3.
Connect the AC/DC adaptor of Converter Box to the suitable wall outlet.
Insert the small plug of adaptor into the DC 12V IN jack on the rear of the unit.
Insert the AC/DC adaptor into any convenient having 100-240V~AC, 50/60Hz
household outlet in vertical or horizontal direction.
7
Connecting the Converter Box to your VCR
1.
Connect your existing antenna cable to the RF IN of the Converter Box.
2.
Connect the supplied RF coaxial cable from the RF OUT of the Converter Box to
the antenna IN jack of the VCR.
3.
Connect the other RF coaxial cable (not included, you may be used the one
supplied from the VCR) from the antenna OUT jack of VCR to the antenna jack
of the TV set.
4.
Connect the AC/DC adaptor of Converter Box to the suitable wall outlet.
Insert the small plug of adaptor into the DC 12V IN jack on the rear of the unit.
Insert the AC/DC adaptor into any convenient having 100-240V~AC, 50/60Hz
household outlet in vertical or horizontal direction.
8
Install Guide
When the system is first use or user reset the set, the install guide will be displayed.
User can follow guide to set some parameter and scan the channel.
9
BASIC FUNCTIONS
1.
Volume Control
z
Press the MUTE button to turn to silence mode.
z
Press the MUTE button again or VOL+/VOL- buttons in orderto cancel the mute
function.
z
Press the VOL+/VOL- buttons to adjust the volume level.
2.
Select Channel
z
Press “CH+/CH-“ to select the channel
z
Press “0-9” and “-“ buttons to select the channel.
Example : Input “9”
“-” “2” to select channel 9-2.
10
3.
Signal Strength
z
Press SIGNAL button to display the strength of reception signal.
z
Press EXIT or SIGNAL buttons again to turn off the displayed signal.
4.
Program Information
Info Bar
Press OSD button to display the current broadcasting program information,
including:
z
Channel Number
z
Broadcast Station
z
Program Name
z
V-Chip Rating
z
Audio Service Type
z
Rating Info
z
Resolution
z
Display Format
z
Close Caption
z
Current Time and Date
z
Hour of Current Program
11
5.
Closed Caption
z
The device supports Closed Caption decoding function, the “Closed Caption” is
a system which allows conversations, narration and sound effects in TV
programs and home videos to appear as captions on the screen.
z
z
Not all the programs and videos offer closed caption.
Press “C.C” to get the “Closed Caption” service:
Off -> Service1 -> Service2 -> Service3 -> Service4 -> Service5 -> Service6
-> CC1 -> CC2 -> CC3 -> CC4 -> TT1 -> TT2 -> TT3 -> TT4 -> Off
12
6.
Audio Mode
Use to select output audio language.
Note: This function only applicable to the broadcasting program with
Multi-language.
Press AUDIO button to change desired audio language.
7.
TV Rating
Use to block those broadcasting program with violence, sex, not suitable for children.
Use MENU to select rating accordingly.
Following would be shown after the program is blocked.
13
8.
Aspect
Press ASPECT button to change the display screen among.
z
Center
z
Full
z
Letter
Note: This function will be available on the 16:9 broadcasting ONLY. If it is 4:3
broadcasting, the screen will not any change.
14
MAIN MENU
After installing your antenna system and DIGITAL CONVERTER BOX with
appropriate connectors.
Plug in the AC/DC adaptor and switch ON the DIGITAL CONVERTER BOX.
Press the MENU button to bring up the main menu.
sub-menus.
1.
The main menu consists of 3
The following on screen display appear:
Apps
Items in Apps are “Simple Guide”
Simple Guide lists the followed programs’ simple information in current channel.
15
2.
Channel
Items in channel are “Auto Scan” and “Manual Scan”
2.1
Press “
Auto Scan
“ to focus “Auto Scan”, Press “ENTER” to scan ATSC program channels.
It may take you several minutes.
Press “OK” or “MENU” to stop auto scan and watch the first channel (only available
after auto-scan is done).
16
2.2 Manual Scan
Press “
” to focus “Manual Scan”,
Press “
” to select channel wanted
Press “OK” to make a scan on selected channel.
3.
Setup
Items in setup are “Screen Setting”, “System Setting”, “Parent Control”, “Closed
Caption” Time Zone” and “Restore Setting”.
In the sub-menu, user can set screen, OSD language, audio language, power save
mode, RF output, parental control, closed caption and time zone.
the system to restore setting.
17
And user reset
3.1
Press “
Screen Setting
” to select the display screen from FULL, LETTER and CENTER.
18
3.2 System Setting
z
z
z
Select OSD Language
Press “
” to focus “OSD Language”,
Press “
” to select the On Screen Language : English, Spanish, French
Select Audio Language
Press “
” to focus “Audio Language”,
Press “
” to select the Audio Language : English, Spanish, French
Set Sleep Timer
Press “
” to focus “Power Save Mode”,
Press “
” to change the Sleep Timer : OFF, 15MIN, 30MIN, 1HR, 2HR,
4HR
z
z
Set Sound Output
Press “
” to focus “Sound Output”,
Press “
” to change the Sound Output : Normal, Left, Right, Mixed
Set RF Output Channel
Press “
” to focus “RF Output”,
Press “
” to change the RF Output Channel : channel3, channel4
19
20
21
2
How to set V-CHIP
z
Enter Parental Control.
z
Need to input password by press 0-9” (default is 1 2 3 4)
z
Press “
” to focus Lock System, and press “
” to open or close Parental
Control.
z
Press “
” to focus Country, and press “
z
Select Rating Control, and press “ENTER” access the Rating Control screen.
z
Select TV Rating or MPAA Rating in USA Country, and press “OK” access Rating
screen wanted.
22
” to select country : USA, Canada.
z
Select English Rating or French Rating in Canada Country, and press “OK”
access Rating screen wanted.
23
z
Press “
” to select the rating and press “OK” to block the rating.
The higher
rating will be blocked automatically.
3.
Change Password
Press “
” to select “Change Password” to modify the parental control password.
Please don’t forget the password you have set up.
24
3.4 Closed Caption
Select Closed Caption, and press “ENTER”, it will show the content of Closed
Caption.
Press “
” to focus items, and press “
caption wanted.
” to setup the attributes of closed
All changes can only be reflected on Service1 setting.
3.5 Time Zone
Timer item provides user to setup daylight saving, time zone and timer.
setting will influence display time in menu.
Press “
”to focus items, and press “
” to setup.
25
Time zone
3.6 Restore Setting
User can use restore setting to reset system or reset all default setting
3.7 Factory Mode
If we turn on Menu, press “1591” can enter the factory mode.
26
Watching the Normal TV (NTSC) stations
z
To watching the normal TV (NTSC) stations, turn OFF the Converter Box by
press the STANDBY button on the unit or POWER button on remote control.
When the Converter Box I Power OFF (Standby) mode.
The raw normal
analog (NTSC) TV signals will transmit to the TV through the Converter Box.
You can watch those normal TV stations as usual.
z
When the Converter Box in Power ON mode. Only the converted Digital TV
signals can transmit to the TV through the Converter Box.
Warning : If the AC/DC adaptor of the Converter Box failure, no any TV signals can
be received by the TV through the Converter Box.
27
More Information
Troubleshooting tips
Unit does not work
Unplug the AC/DC adaptor and plug it again.
No picture on the TV screen
Make sure the converter box is turned ON.
Make sure the connections between the converter box and TV are properly
done.
Choose different channels or video inputs on the TV set until the picture
appears.
No sound
Make sure the connections between the converter box and TV are properly
done.
Make sure the TV sound is not muted.
Remote control does not work
Make sure the batteries are inserted correctly.
Replace the batteries if they are exhausted.
Remove any obstacles between the remote control and the converter box.
Cannot watch a bilingual TV program in its secondary language.
Make sure you have correctly selected the audio settings. Refer to AV settings
in the main menu.
The Converter Box has turned OFF suddenly.
Check if POWER SAVER is activated in the main menu.
It is set to 4 hours by
default.
Weak signal or channel not available
Try to reposition of antenna. If the signal is still weak, a more powerful
antenna may be required to boost reception for the Digital TV signal.
28
Technical Specifications
Power Supply : AC/DC adaptor (Input : AC 100-240V~50/60Hz, 0.2A ; Output : DC
12V, 0.8A)
RF Freq. Range : 57MHz
863MHz
RF Channel Range : CH2
CH69
RF Input/Output Impedance : 75 Ohms
RF Output Channel : CH3 / CH4, selectable system
Input : HD-ATSC, SD-ATSC and NTSC
Output : NTSC
Video Output Impedance : 75 Ohms
Specifications are subject to change without notice.
29
LIMITED WARRANTY
Craig warrants this product to be free from manufacturing defects in material and
workmanship under normal use for a period of 90 days from date of purchase. If service
is required, please return the product to the store where it was purchased for exchange;
or, pack the unit in the original packing material with all accessories if applicable, a copy
of your sales receipt and a Cashier’s check or Money Order for $15.00 (to cover shipping
and handling costs) payable to Craig Electronics International Ltd. Ship your product
freight pre-paid. Your unit will be repaired, replaced or a refund will be forwarded to you
within four weeks of receipt of your unit. Please ship your unit to:
Craig Electronics International Ltd.
1160 NW 163 Drive
Miami, Fl 33169
This warranty is void if the product has been: a) Used in a commercial application or
rental. b) Damaged through misuse, negligence, or abuse. c) Modified or repaired by
anyone other than an authorized Craig service center. d) Damaged because it is
improperly connected to any other equipment.
Note: This warranty does not cover: a) Ordinary adjustments as outlined in the Owner’s
Manual which can be performed by the customer. b) Damage to equipment not properly
connected to the product. c) Any cost incurred in shipping the product for repair. d)
Damage to the product not used in the USA.
This warranty is not transferable and only applies to the original purchase. Any implied
warranties, including the warranty of merchantability, are limited in duration to the period
of this expressed warranty and no warranty whether expressed or implied shall apply to
the product thereafter.
Under no circumstance shall Craig be liable for any loss or consequential damage arising
out of the use of this product. This warranty gives specific legal rights. However, you may
have other rights which may vary from state to state. Some states do not allow limitations
on implied warranties or exclusion of consequential damage. Therefore, these
restrictions may not apply to you.
To Obtain Service on your Product
email:[email protected]
Printed in China
CVD508-IB-E0CR1-B0CV