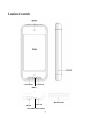
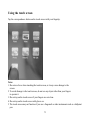
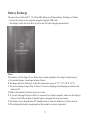
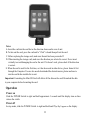
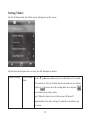
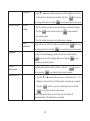
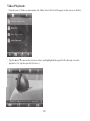
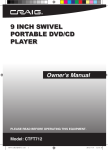
1
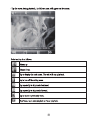
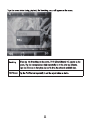
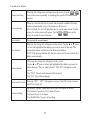
Location of controls
- ( Volume Down)
+( Volume up)
M (Menu)
Mini SD Card Slot
USB Port
Phones Jack
Power ON/OFF and Lock Switch
7
Using the touch screen
Tap the correspondence button on the touch screen with your fingertip.
Notes:
1. Do not use force when touching the touch screen, as it may cause damage to the
screen.
2. To avoid damage to the touch screen, do not use any object other than your fingers
to operate it.
3. Do not tap on the touch screen if your fingers are not clean.
4. Do not tap on the touch screen with gloves on.
5. The touch screen may not function if you use a fingernail or other instruments such as a ballpoint
pen.
8
Battery Recharge
The player has a built-in DC 3.7V, 600 mAH Lithium-ion Polymer battery. Recharge as follows:
~ Connect the player to the computer using the supplied USB cable.
~ The display on the unit will show as below and will start charging automatically.
Notes:
Your battery will last longer if you follow these simple guidelines for caring for and storing it.
A. For normal charge, it need approximate 4 hours.
B. Recharge and store the battery within the temperature range of 5°C~35°C (40°F~95°F).
C. Do not overcharge (longer than 12 hours). Excessive charging or discharging may shorten the
battery’s life.
D. Battery life naturally shortens slowly over time.
E. If you are charging the player while it is connected to a laptop computer, make sure the laptop’s
battery is also fully charged or that the laptop is plugged into its power source.
F. The battery is not charged in the PC Standby mode or when the hardware is safely removed.
G. The rechargeable battery incorporated in this product is not user replaceable.
9
Battery Indicator
= Battery full power.
= Battery empty, connect the unit to the computer for recharging. It would take about 4 hours
to fully recharge the battery. During charging, you can playback the music, videos or photos at the
same time.
Transferring Files
Before you getting start to playback music, videos or photos, you should transfer those files into the
player as:
1. Connect the player to the computer by the supplied USB connection cable.
2. Download the specific files into the player as download the files to others portable device.
3. After downloaded, disconnect the unit from computer.
Note:
~ All the downloaded files in this setting will stored in the Root Directory in the player. You can
also to created the new folders by yourself as desire.
WIN98 Driver
If the operation system of your computer is Window 98, installed the supplied Window 98 Driver in the supplier
CD to your computer as:
1. Insert the supplied installation CD into the CD Drive in your computer; the List of Folders in the CD will appear
on the computer’ s screen automatically.
2. Selected the “ WIN 98 DRIVER” and enter.
3. Selected and double click “ Msien.exe” and follow the on-screen instructions to install the software.
Mini SD card
This unit support Mini SD Memory Card ( Up to 4GB, Cards not included) for extending the memories
size, insert a Mini SD card into the card slot as the figure below :
10
Notes:
A. Insert the card into the card slot as the direction shown on the rear of unit.
B. To take out the card, press the card until a “Click” is heard then pull out the card.
C. Before replacing the storage card, make sure the unit has been powered off.
D. When inserting the storage card, make sure the direction you selected is correct. Never insert
violently to avoid damaging the card or the unit. If it doesn’t work, please check if the direction
is correct.
E. When the card is used for the first time, or it has been used in other device, please format it first
through the Computer. You are also needs downloaded the desired musics, photos and movie
into the card before installed to to unit.
Important: Formatting the Mini SD Card will delete all the data on the card. Download the data
to your computer before formatting the card.
Operation
Power on
Slide the POWER Switch to right and hold approximate 3 seconds until the display turn on then
release the switch.
Power off
In stop mode, slide the POWER Switch to right and hold until "Bye Bye" appear on the display .
11
Hold
To avoid the control buttons were presses by accident, lock it by:
~ Slide the POWER Switch to HOLD position to active the lock function. "
~ Slide the POWER Switch to center position to release the lock, "
" will appear on the screen.
" will disappear on the screen.
Volume Control
During playback, press the +/- (Volume) buttons on the front of unit or tap the volume +/- buttons
on the screen to adjust the volume.
Reset
If the unit is halt or the display becomes to abnormal. Press the RESET button by a small
screwdriver (not included) to reset the unit.
Main Menu
When power on the unit, the main menu will appear on the screen as below:
12
Setting Menu:
Tap the Setting button, the follow menu will appear on the screen:
Tap the desired function twice to enter. Set the functions as below:
Display Setting
Power Saving Tap the ▼ or ▲icon on the screen to set the timer to 5 seconds
Mode
– 30 seconds or Always On then tap the selected icon to confirm.
Tap the (
) icon to save the setting and exit or tap the (
icon return to previously menu.
Note: When the timer was set, the screen will turn off
automatically as the time setting. To turn the screen back, tap
the screen.
13
)
Brightness
Tap the ▼ or ▲icon on the screen to set the brightness level to
1 – 5 then tap the selected icon to confirm. Tap the (
the setting and exit or tap the (
System setting
Default
Setting
) icon to save
) icon return to previously menu.
·Tap Yes on the screen to reset all settings to default settings.
Tap the (
) icon to exit or tap the (
) icon return to
previously menu.
·Tap No on the screen to exit without any changes.
Touch
calibration
Language
Tap the red crosses (Total 5) on the screen then tap the (
the setting and exit or tap the (
) icon to save
) icon return to previously menu.
Tap the selected language on the screen twice then tap the
) icon to save the setting and exit or tap the (
(
) icon
return to previously menu.
System
Information
Auto power off
Read the information of the software. Tap the
exit or tap the (
(
) icon to
) icon return to previously menu.
· Tap the ▼ or ▲icon on the screen to set the timer to 3 – 20
Minutes or No auto Power off then tap the selected icon to confirm.
) icon to save the setting and exit or tap the
· Tap the (
(
) icon return to previously menu.
Note: When the timer was set, the unit will shut off
automatically if the idle time is expired.
14
Music Playback:
If Music is selected, the below menu will appear on the screen, select and play the desired song as
follows:
Tap the ▼ or ▲icon and the correspondence icon to choose the desired tracks as below:
Resume/Cur Tap twice to start playback the point of the music you was stopped.
rent Play
Or, tap twice resume to playback.
All Music
Tap twice, the music list will appear on the screen. Tap the ▼ or ▲icon on the screen
to selected and highlight the desired music, tap the selected music twice to stat
playback.
·Tape twice, the artist list will appear on the screen. (The unit will grouped the songs
Artist
to the artist list automatically)
·Tap the ▼ or ▲icon on the screen to selected and highlight the desired artist.
·Tap the ▼ or ▲icon on the screen to selected and highlight the desired song.
·Tap the selected song twice to start playback.
15
Album
·Tap twice, the album list will appear on the screen. (The unit will grouped the songs
to the album list automatically)
·Tap the ▼ or ▲icon on the screen to selected and highlight the desired album.
·Tap the selected album, the song list of the selected album will appear on the screen.
·Tap the ▼ or ▲icon on the screen to selected and highlight the desired song.
·Tap the selected song twice to start playback.
Genre
·Tap twice, the genre list will appear on the screen. (The unit will grouped the songs
to the genre list automatically)
·Tap the ▼ or ▲icon on the screen to selected and highlight the desired genre.
·Tap the selected genre, the song list of the selected genre will appear on the screen.
·Tap the ▼ or ▲icon on the screen to selected and highlight the desired song.
·Tap the selected song twice to start playback.
My Favorite ·Tap twice, the Favorite list will appear.
·Tap the ▼ or ▲icon on the screen to selected and highlight the desired song.
·Tap the selected song twice to start playback.
Note: Added the desired songs list by by follows.
·In All music menu, tap the ▼ or ▲icon on the screen to selected and highlight the
desired song.
·Tap the (
) button to add the selected song into the favorite list.
·Repeat the same procedures until all the desired songs were added into the list.
·Tap the (
Record
) icon to save the setting and exit or tap the (
) return
to previously menu.
·Tap twice, the list of recording files will appear.
·Tap the ▼ or ▲icon on the screen to selected and highlight the desired recording
file.
·Tap the selected file twice to start playback.
16
Dir List
Media Lib
Update
·Tap twice, the folder list will appear on the screen.
·Tap the ▼ or ▲icon on the screen to selected and highlight the desired folder.
·Tap the selected folder, the song list of the selected folder will appear on the screen.
·Tap the ▼ or ▲icon on the screen to selected and highlight the desired song.
·Tap the selected song twice to start playback.
Tape twice, the unit will re-organizing the internal data itself.
Earphones:
For private listening, insert the supplied earphones to the Phones Jack. The Built-in Speaker will
disconnect automatically.
Location of Indicators on the Screen:
When a song is selected or playing, the follows menu will appear on the screen:
17
1
2
3
4
5
6
EQ Modes
Volume level
Total number of tracks
Current tack number
Information of current track
Lyric
7
8
9
Bitrate of current track.
Total time of current track
Elapsed time of current track
The unit supports to display the lyric automatically if the
lyric is available with the song. (A file it’s file name with
“.lyc” extension).
Tap the screen during music playback, the follows setting menu will appear on the screen. Tape the
correspondence icon as follows:
10
When tap, the sub-setting menu will appear on the screen.
11
Tap to display the main menu.
12
Tap to turn off the setting menu.
13
·Tap repeatedly to skip tracks backward.
·Tap and hold to fast searching the specified section in the current track backward.
14
·Tap repeatedly to skip tracks forward.
15
Tap to return to previously menu.
16
Play/Pause, tap to start playback or Pause playback.
·Tap and hold to fast searching the specified section in the current track forward.
18
·A-B repeat.
·During playback, tap the screen, the setting menu will appear.
17
·Tap the icon of A-B to select the starting point for A-B repeat.
·Tap the icon of A-B to select the end for A-B repeat. The unit will plays the
selected section repeatedly.
·To resume normal playback. Tap the A-B icon again.
If the sub-setting menu is selected, the sub-setting menu will appear as below. Tap and set as
follows:
Repeat Mode
Play mode
EQ (Equalizer)
After setting, tap the (
Repeat One
Repeat All
Repeat
Folder
Intro
Normal
Shuffle
Tap the icon twice to play the current songs repeatedly.
Tap the icon twice to play all the songs in the unit repeatedly.
Tap the icon twice to play the songs in the current folder
repeatedly.
Tap the icon twice to play the first 10 seconds of each songs.
Tap the icon twice to play the songs one by one.
Tap the icon twice to play the songs randomly.
Tap the desired effect twice.
) icon to save the setting and exit or tap the (
menu.
19
) return to previously
Video Playback:
·Tap the icon of Video on main menu, the folder list or file list will appear on the screen as follow:
·Tap the ▲ or ▼ icons on the screen to select and highlighted the specific file then tap it to start
playback. (Or, tap the specific file twice.)
20
B.During recording, tap the screen once. The setting menu will appear on the screen. Tap the (
)
button to pause. Tap it again to resume recording.
C.When finished, tap the screen once. The setting menu will appear on the screen. Tap the (
)
button ,"save record file? YES NO" will appear on the screen.
D.Tap "YES" to save.
E.Tap "NO" to exit without save.
F.Playback the recording files as follows:
~~ ~ ~ ~ ~Tap the Record icon on main menu, the recording file list will appear on the screen.
~ Tape the ▲ or ▼ buttons repeatedly to select and highlighted the specific file then tap it to start
playback.
~ Other operations are same as playback music.
· If
is select, when tap the follows menu will appear on the screen:
24
Tap and set as follows:
Manual searching
Auto searching
Preset mode
Save channel
Delete channel
When tap, the setting menu will appear on the screen. Tap the
or
icons on the screen repeatedly to searching the specific FM radio station
as desire.
·When tap, the unit will start to search and stored all available FM radio
stations automatically. (Up to 30 stations can be stored.)
·After searched, the unit will playback the 1st stored radio station. Tap the
screen, the setting menu will appear. Tap the
or
icons on the
screen to search the stored stations.
Tap to preset the current channel.
When tap, the storage list will appear on the screen. Tap the ▲ or ▼ icons
to select and highlighted the address you want to store in then tap. The
current radio station will be stored in the desired address.
NOTE: If the memory had not full, the new station will be stored in the last
address automatically.
·When tap, the storage list will appear on the screen.
·Tap the ▲ or ▼ icons to select and highlighted the address you want to
delete then tap. “Do you want to delete? YES NO” will appear on the
screen.
·Tap “YES”. The selected channel will be deleted.
·Tap “NO”. Exit without changes.
Stereo on/off switch When tap, “ON” ; “OFF” will appear on screen. Tap ON to turn on stereo.
Tap OFF to turn it off.
Location setting
Tap to enter, Normal; Japan and World Wide will appear on screen.
·Tap Normal if you are in US, Canada, Mexico.
·Tap Japan if you are in Japan.
·Tap World Wide if you are in travelling.
25
·Tap to search and selected the photo file until the specific file is listed on the screen. Tap it twice to start
playback.
·Tape the screen during playback, the follows menu will appear on the screen:
26
Tap to enter to sub-setting menu
Tap to display the main menu.
Tap to turn off the setting menu.
Tap repeatedly to skip tracks backward.
Tap repeatedly to skip tracks forward.
Tap to return to previously menu.
If “
” is selected, the sub-setting menu will appear on the screen as follows:
27
Tap to set as follows:
Rotate Right
Turn the current picture
clockwise
Rotate Left
Turn the current picture
counterclockwise
Zoom In
Zoom in the current picture
Zoom out
Zoom out the current picture
Browse
Turn off
Turn off slide show mode
2 Sec
Turn on the slide show mode and set the
duration of each picture to 2 seconds.
5 Sec
Turn on the slide show mode and set the
duration of each picture to 5 seconds.
8 Sec
Turn on the slide show mode and set the
duration of each picture to 8 seconds.
After setting, tap the (
menu.
) icon to save the setting and exit or tap the (
28
) return to previously
Recording:
Tap the icon of Record on the main menu, the follows picture will appear on the screen:
Tap the screen again, the follows control menu will appear on the screen:
29
Tap to set or recording as follow:
Tap to enter to sub-setting menu
Tap to display the main menu.
Tap to turn off the setting menu.
Tap to return to previously menu.
Save the recording file and exit
·Tap the button, recording will start 2 seconds later,
speaker into the built-in microphone.
·During recording,tap the button to pause. Tap again
resume recording.
·Tap the icon, Yes or No will appear on the screen.
·Tap Yes to save the recording file.
·Tap No to exit without save.
Playback the recording file as follows:
·Enter to the Music mode, select and tap the Record on the selection menu as follows. The
recording files will listed on the screen.
·Tap the selected recording file twice, the selected recording file will start playback.
·Other operation controls is same as music playback.
Fil List:
Tap the icon of File List on the main menu, the folder list will appear on the screen. Searching the
desired folder and tracks by tap it. Double tap the select file to playback.
NOTE:
If mini SD Card was inserted. When tap , " Built-in Memories" and "Mini SD Card" will appear
on the screen as the figure below. Tap the desired one then the Folder/File list in it will appear
on the screen.
30
Trouble shooting:
Can't be Power On
Built-in battery consumed
Recharge the battery as page 9
Buttons do not
functioning
Power switch on HOLD
position
Slide the Power switch from HOLD
position to center position
No sound
Volume was set to minimum
position
Increase the volume by press the Vol +
button on the front of cabinet
Noisly playback
The file is corruption
Try the other files
Files can't be play
The format of the files can't
support by the unit
Download the MP3、WMA、WAV、AVI、
RM、RMVB、JPEG or BMP files into the
unit only.
Voice recording sound
quality is bad
Point the built in mic to the sound source,
no barriers between the mic and the sound
source.
31
Specification
PC connection
Flash memory
USB 2.0 (Fast Speed)
4G(Due to same memory was used for internal operation, only
approx 3.8GB memory are free for download. )
Power Sorce
Maximum Play time: Up to 2 hours for video playback. Or, 4
hours for music playback (Screen in off mode)
Built-in DC 3.7V, 600mAH Lithium-ion Polymer battery
Record
Sample rate
32KHz
Recording format
WAV
Sound output level
10mW/channel(32 ohm)
MP3 bit rate
8K bps – 320K bps and VBR
MP3、WMA
WMA bit rate
5K bps – 384K bps and VBR
Frequency response
200Hz to 20KHz
Formats supported
MP3、WMA、WAV、AVI、RM、RMVB 、 JPEG 、 BMP
Working temperature
0 ℃-35 ℃
Operating System
Windows98/SE/ME/2K/XP、Mac OS 10、Linux 2.4.2
The Specifications are subject to change without notice.
Accessories:
USB Connection Cable x 1
Earbuds x 1
Owner’s Manual x 1
Window 98 drive disc x 1
32
LIMITED WARRANTY
Craig warrants this product to be free from manufacturing defects in
material and workmanship under normal use for a period of 90 days
from date of purchase. If service is required, please return the product
to the store where it was purchased for exchange; or, pack the unit in
the original packing material with all accessories if applicable, a copy
of your sales receipt and a Cashier’s check or Money Order for $15.00
(to cover shipping and handling costs) payable to Craig Electronics
International Ltd. Ship your product freight pre-paid. Your unit will be
repaired, replaced or a refund will be forwarded to you within four
weeks of receipt of your unit. Please ship your unit to:
Craig Electronics International Ltd.
1160 NW 163 Drive
Miami, Fl 33169
This warranty is void if the product has been: a) Used in a commercial
application or rental. b) Damaged through misuse, negligence, or
abuse. c) Modified or repaired by anyone other than an authorized
Craig service center. d) Damaged because it is improperly connected
to any other equipment.
Note: This warranty does not cover: a) Ordinary adjustments as
outlined in the Owner’s Manual which can be performed by the
customer. b) Damage to equipment not properly connected to the
LIMITED WARRANTY (CONTINUED)
product. c) Any cost incurred in shipping the product for repair.
d) Damage to the product not used in the USA.
This warranty is not transferable and only applies to the original
purchase. Any implied warranties, including the warranty of
merchantability, are limited in duration to the period of this expressed
warranty and no warranty whether expressed or implied shall apply to
the product thereafter.
Under no circumstance shall Craig be liable for any loss or
consequential damage arising out of the use of this product. This
warranty gives specific legal rights. However, you may have other
rights which may vary from state to state. Some states do not allow
limitations on implied warranties or exclusion of consequential
damage. Therefore, these restrictions may not apply to you.
To Obtain Service on your Product
email:[email protected]
Printed in China
CMP621F-IB-E0CS1-B0KG