1
DX600 A ISDN
Gigaset Communications GmbH
Frankenstr. 2a, D-46395 Bocholt
Manufactured by Gigaset Communications GmbH
under trademark license of Siemens AG.
As of 1 Oct. 2011 Gigaset products bearing the
trademark 'Siemens' will exclusively use the trademark 'Gigaset'.
© Gigaset Communications GmbH 2010
All rights reserved. Subject to availability.
www.gigaset.com
GIGASET. INSPIRING CONVERSATION.
Gigaset DX600A isdn / IM-OST EN / A31008-N3101-R601-1-TE43 / introduction.fm / 05.03.2010
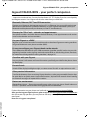
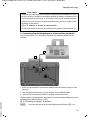
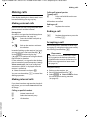
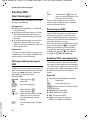
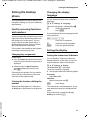
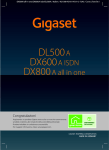
Gigaset DX600A ISDN – your perfect companion
Gigaset DX600A ISDN – your perfect companion
... impressive inside and out. Go crazy for the vibrant 3.5" TFT display, first-class sound quality
and elegant exterior. Your Gigaset can do a lot more than just make calls:
Bluetooth, Ethernet, DECT and FAX connection
Connect your Gigaset to the Internet and your PC via Ethernet. Use your public and private
directories on the Internet. Update the directory on your Gigaset, the directory from your
Bluetooth mobile phone and your directory on the PC simultaneously.
Directory for 750 vCards – calendar and appointments
Save phone numbers and other data to the local directory. Enter appointments and anniversaries in the calendar and set reminders.
Use your Gigaset as a PABX
Register up to six handsets and a fax machine and use the three Gigaset answering machines.
Assign each device its own phone number (MSN).
It's easy to configure your Gigaset thanks to the wizards
These determine the MSNs for your ISDN connection (provider-specific) and assist you with
registering handsets and assigning send and receive MSNs to the desktop phone, handsets,
fax machine and integrated answering machine (¢ page 14).
Go online with your Gigaset
Use your phone's info centre and have information specifically provided for the phone shown
on the display.
Do not disturb
Switch off the display backlight at night, use time control for calls or reject unknown calls.
Other practical information
Transfer the directory from an existing Gigaset handset, use the programmable function keys
for quick dial or to quickly access important functions, skip back five seconds when listening
to voicemail messages to repeat the last section.
Protect our environment
Gigaset Green Home — Be environmentally aware when using your phone. Details about our
ECO DECT products can be found at www.gigaset.com/customercare.
Version 4, 16.09.2005
Further information on your phone can be found at www.gigaset.com/gigasetDX600A.
After purchasing your Gigaset phone, please register it at www.gigaset.com/customercare –
this will ensure any questions you may have or warranty services you request are dealt with
even faster!
Have fun using your new phone!
1
Gigaset DX600A isdn / IM-OST EN / A31008-N3101-R601-1-TE43 / overview.fm / 05.03.2010
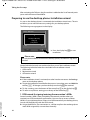
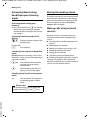
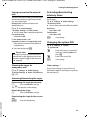
Desktop phone overview
Desktop phone overview
1
2
Version 4, 16.09.2005
7
8 9 10 11
1 Adjust volume S = quieter; R = louder
during a call/message playback:
Handsfree/receiver volume;
When an external call is being signalled:
Ringer volume
2 Display
3 Display keys (programmable)
In the menu: Open a menu for further functions
4 Message key
Access to call and message lists;
Flashes: New message/new call or new
firmware
5 End call/back key
End call, cancel function, go back one menu
level (press briefly), back to idle status
(press and hold)
6 Function keys (programmable)
7 Redial
Open the redial list
2
12
3
13
14
4
15
5
6
16
8 Handsfree key
9 Mute key
During a call: Activate/deactivate microphone
10 * key
Activate/deactivate ringer (press and hold);
Text input: Special characters table
11 Back key for answering machine
During playback: Back to the start of the
message/previous message
12 Play back messages
Activate/deactivate message playback
13 On/off key for answering machine
Activate/deactivate assigned answering
machine(s)
14 # key
For text input: Switch between upper/lower
case letters and digits
15 Control key
16 Microphone
Gigaset DX600A isdn / IM-OST EN / A31008-N3101-R601-1-TE43 / overview.fm / 05.03.2010
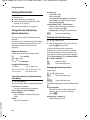
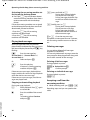
Understanding the display icons
Understanding the display icons
Display in idle status (example)
· 06:30
Ã1 2 3
Desktop phone status
(two lines)
Current month/year
à 02
Mo Tu We Th
Time
Fr
Sa Su
Mar 2010
01 02 03 04 05 06 07
13:52
08 09 10 11 12 13 14
15 16 17 18 19 20 21
Internal name
INT 1
Appointment added
to calendar
22 23 24 25 26 27 28
Current date
29 30 31
Calls
Calendar
Status display in the headers: The following icons are displayed dependent on the settings
and the operating status of your desktop phone:
Ã
123
à 02
¼
ò
™ 10
ó
· 06:30
Ë 09 n 08
Answering machine activated
1/ 2/ 3 numbers of the activated answering machines (orange=on)
Eco mode+ activated (white)
Eco mode+ and Eco mode activated (green)
Bluetooth activated
is replaced by ô, when a Bluetooth headset is connected, or by
õ when a Bluetooth data device is connected
Ringer deactivated
is replaced by ñ, when alert tone activated
Alarm switched on and wake-up time set
Number of new messages:
In the missed alarms list
In the SMS list
In the missed calls list
On the network mailbox
u
u
u
u
Signalling
External call
Internal call
Alarm clock
Appointment / anniversary
Version 4, 16.09.2005
Ø ÙÚ
ؼÚ
Øã Ú
Answering machine is
recording
ØÃ Ú
ØÜ
3
Gigaset DX600A isdn / IM-OST EN / A31008-N3101-R601-1-TE43 / Saturn_isdnIVZ.fm / 05.03.2010
Contents
Contents
Gigaset DX600A ISDN – your perfect companion . . . . . . . . . . . . . . . . . . . . 1
Desktop phone overview . . . . . . . . . . . . . . . . . . . . . . . . . . . . . . . . . . . . . . . . . . 2
Understanding the display icons . . . . . . . . . . . . . . . . . . . . . . . . . . . . . . . . . . . 3
Following safety precautions . . . . . . . . . . . . . . . . . . . . . . . . . . . . . . . . . . . . . . . 6
Taking the first steps . . . . . . . . . . . . . . . . . . . . . . . . . . . . . . . . . . . . . . . . . . . . . . . 7
Checking the package contents . . . . . . . . . . . . . . . . . . . . . . . . . . . . . . . . . . . . . . . . . . . . . . . 7
Installing the desktop phone . . . . . . . . . . . . . . . . . . . . . . . . . . . . . . . . . . . . . . . . . . . . . . . . . . 8
Connecting the desktop phone . . . . . . . . . . . . . . . . . . . . . . . . . . . . . . . . . . . . . . . . . . . . . . . 9
Preparing to use the desktop phone: Installation wizard . . . . . . . . . . . . . . . . . . . . . . . 14
Proceeding . . . . . . . . . . . . . . . . . . . . . . . . . . . . . . . . . . . . . . . . . . . . . . . . . . . . . . . . . . . . . . . . . . 22
Menu overview . . . . . . . . . . . . . . . . . . . . . . . . . . . . . . . . . . . . . . . . . . . . . . . . . . . 23
Making calls . . . . . . . . . . . . . . . . . . . . . . . . . . . . . . . . . . . . . . . . . . . . . . . . . . . . . . 27
Making external calls . . . . . . . . . . . . . . . . . . . . . . . . . . . . . . . . . . . . . . . . . . . . . . . . . . . . . . . . .
Making internal calls . . . . . . . . . . . . . . . . . . . . . . . . . . . . . . . . . . . . . . . . . . . . . . . . . . . . . . . . .
Ending a call . . . . . . . . . . . . . . . . . . . . . . . . . . . . . . . . . . . . . . . . . . . . . . . . . . . . . . . . . . . . . . . . .
Accepting a call . . . . . . . . . . . . . . . . . . . . . . . . . . . . . . . . . . . . . . . . . . . . . . . . . . . . . . . . . . . . . .
Activating/deactivating handsfree/open listening mode . . . . . . . . . . . . . . . . . . . . . .
Muting the desktop phone . . . . . . . . . . . . . . . . . . . . . . . . . . . . . . . . . . . . . . . . . . . . . . . . . . .
Making calls using network services . . . . . . . . . . . . . . . . . . . . . . . . . . . . . . . . . . . . . . . . . .
27
27
27
27
28
28
28
Using lists . . . . . . . . . . . . . . . . . . . . . . . . . . . . . . . . . . . . . . . . . . . . . . . . . . . . . . . . 29
Using the redial list . . . . . . . . . . . . . . . . . . . . . . . . . . . . . . . . . . . . . . . . . . . . . . . . . . . . . . . . . . 29
Using the call lists . . . . . . . . . . . . . . . . . . . . . . . . . . . . . . . . . . . . . . . . . . . . . . . . . . . . . . . . . . . . 29
Opening lists with the message key . . . . . . . . . . . . . . . . . . . . . . . . . . . . . . . . . . . . . . . . . . 29
Using directories . . . . . . . . . . . . . . . . . . . . . . . . . . . . . . . . . . . . . . . . . . . . . . . . . 30
Using the local desktop phone directory . . . . . . . . . . . . . . . . . . . . . . . . . . . . . . . . . . . . . . 30
Using online directories . . . . . . . . . . . . . . . . . . . . . . . . . . . . . . . . . . . . . . . . . . . . . . . . . . . . . . 31
Using the private net directory . . . . . . . . . . . . . . . . . . . . . . . . . . . . . . . . . . . . . . . . . . . . . . . 31
Sending SMS (text messages) . . . . . . . . . . . . . . . . . . . . . . . . . . . . . . . . . . . . . 32
Writing/sending/saving an SMS . . . . . . . . . . . . . . . . . . . . . . . . . . . . . . . . . . . . . . . . . . . . . . 32
Receiving an SMS . . . . . . . . . . . . . . . . . . . . . . . . . . . . . . . . . . . . . . . . . . . . . . . . . . . . . . . . . . . . 32
Reading SMS, managing lists . . . . . . . . . . . . . . . . . . . . . . . . . . . . . . . . . . . . . . . . . . . . . . . . . 32
Operating the desktop phone answering machine . . . . . . . . . . . . . . . . . 33
Version 4, 16.09.2005
Operating via the desktop phone . . . . . . . . . . . . . . . . . . . . . . . . . . . . . . . . . . . . . . . . . . . . . 33
Activating/deactivating call screening . . . . . . . . . . . . . . . . . . . . . . . . . . . . . . . . . . . . . . . . 35
Operating when on the move (remote operation) . . . . . . . . . . . . . . . . . . . . . . . . . . . . . 35
4
Gigaset DX600A isdn / IM-OST EN / A31008-N3101-R601-1-TE43 / Saturn_isdnIVZ.fm / 05.03.2010
Contents
Setting the desktop phone . . . . . . . . . . . . . . . . . . . . . . . . . . . . . . . . . . . . . . . . 37
Quickly accessing functions and numbers . . . . . . . . . . . . . . . . . . . . . . . . . . . . . . . . . . . .
Changing the display language . . . . . . . . . . . . . . . . . . . . . . . . . . . . . . . . . . . . . . . . . . . . . .
Setting the display . . . . . . . . . . . . . . . . . . . . . . . . . . . . . . . . . . . . . . . . . . . . . . . . . . . . . . . . . . .
Changing the handsfree/earpiece volume . . . . . . . . . . . . . . . . . . . . . . . . . . . . . . . . . . . .
Setting ringers . . . . . . . . . . . . . . . . . . . . . . . . . . . . . . . . . . . . . . . . . . . . . . . . . . . . . . . . . . . . . . .
Activating/deactivating advisory tones . . . . . . . . . . . . . . . . . . . . . . . . . . . . . . . . . . . . . . .
Changing the system PIN . . . . . . . . . . . . . . . . . . . . . . . . . . . . . . . . . . . . . . . . . . . . . . . . . . . .
37
37
37
38
38
39
39
Customer Service & Assistance . . . . . . . . . . . . . . . . . . . . . . . . . . . . . . . . . . . . 40
Questions and answers . . . . . . . . . . . . . . . . . . . . . . . . . . . . . . . . . . . . . . . . . . . . . . . . . . . . . . 41
Authorisation . . . . . . . . . . . . . . . . . . . . . . . . . . . . . . . . . . . . . . . . . . . . . . . . . . . . . . . . . . . . . . . . 41
Using insert strips . . . . . . . . . . . . . . . . . . . . . . . . . . . . . . . . . . . . . . . . . . . . . . . . . . . . . . . . . . . . 41
Version 4, 16.09.2005
Index . . . . . . . . . . . . . . . . . . . . . . . . . . . . . . . . . . . . . . . . . . . . . . . . . . . . . . . . . . . . 42
5
Gigaset DX600A isdn / IM-OST EN / A31008-N3101-R601-1-TE43 / security.fm / 05.03.2010
Following safety precautions
Following safety precautions
Warning
Be sure to read this user guide and the safety precautions before using your telephone.
Explain their content and the potential hazards associated with using the telephone to your
children.
$
Use only the power adapter supplied, as indicated on the underside of the desktop
phone.
Use only the cables supplied for fax, ISDN, LAN and receiver connection and connect
these to the intended port only.
Using your telephone may affect nearby medical equipment. Be aware of the technical conditions in your particular environment e.g., doctor's surgery.
Do not install the phone in a bathroom or shower room. The phone is not splashproof.
Do not use your phone in environments with a potential explosion hazard (e.g., paint
shops).
ƒ
If you give your Gigaset to a third party, make sure you also give them the user guide.
Remove faulty telephones from use or have them repaired by our Service, as they
could interfere with other wireless services.
Please note
u Please note that only terminals that are operated in-house (inside buildings) may be con-
nected to the ISDN connections.
u Not all functions described in this user guide are available in all countries and with all pro-
Version 4, 16.09.2005
viders.
6
Gigaset DX600A isdn / IM-OST EN / A31008-N3101-R601-1-TE43 / starting.fm / 05.03.2010
Taking the first steps
Taking the first steps
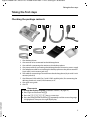
Checking the package contents
1
5
2
7
3
4
8
9
6
1
2
3
4
5
6
7
8
9
One desktop phone
One receiver to be connected to the desktop phone
One cable for connecting the receiver to the desktop phone
One power cable for connecting the desktop phone to the mains power supply
One telephone cable for connecting the desktop phone to the phone network
(8-pin with 2 mini western jacks 8/8)
One cable for connecting a fax machine to the desktop phone (6-pin with 2 mini
western jacks 6/6)
One Ethernet (LAN) cable (Cat 5 with 2 RJ45 modular jacks) for connecting the
desktop phone to a router (LAN/Internet) or PC
One quick user guide
One CD
Please note
Version 4, 16.09.2005
To change the display language, proceed as follows (¢ page 37):
¤ Press right on the control key v.
¤ Press the * # Q 3 # keys in succession.
¤ Press the bottom of the control key s repeatedly until the correct language
is highlighted. Then press the right display key.
7
Gigaset DX600A isdn / IM-OST EN / A31008-N3101-R601-1-TE43 / starting.fm / 05.03.2010
Taking the first steps
Firmware updates
This user guide describes the functions of your desktop phone from firmware
version 30.00.
Whenever there are new or improved functions for your Gigaset, firmware
updates are made available for you to download to your desktop phone.
If this results in operational changes to your desktop phone, a new version of
this user guide or the necessary amendments are published on the Internet
at www.gigaset.com.
Select the product to open the relevant product page for your desktop phone
where you will find a link to the user guide.
User guide
This document only describes how to get started with your Gigaset DX600A
ISDN and its key functions in condensed form.
You will find a detailed description of your Gigaset DX600A ISDN and its functions together with a description of its Web configurator on the enclosed CD.
You can make phone settings from the PC via the Web configurator
(the phone's Web interface).
These instructions are in PDF format. You will need Adobe® Reader® to view
these documents. Adobe® Reader® can be found on the Internet at
www.adobe.com.
Installing the desktop phone
The desktop phone is designed for use in dry rooms in a temperature range of +5°C
to +45°C.
¤ Set up the desktop phone at a central point in the building.
Please note
If you wish to operate handsets from your desktop phone, consider the range of
the desktop phone. This is up to 300 m in unobstructed outdoor areas and up
to 50 m inside buildings. The range is reduced when Eco mode is activated.
The phone's feet do not usually leave any marks on surfaces. However, due to the
multitude of different varnishes and polishes used on today's furnishings, the
occurrence of marks on the surfaces cannot be completely ruled out.
Warning
u Never expose the telephone to any of the following: Heat sources, direct sun-
light or other electrical appliances.
Version 4, 16.09.2005
u Protect your Gigaset from moisture, dust, corrosive liquids and fumes.
8
Gigaset DX600A isdn / IM-OST EN / A31008-N3101-R601-1-TE43 / starting.fm / 05.03.2010
Taking the first steps
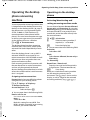
Connecting the desktop phone
The following diagram is an overview of all connections for your desktop phone.
The individual steps are described in detail below.
5
4
3
2
1
6
Version 4, 16.09.2005
Follow the steps in the order given below:
1 Connect the receiver to the desktop phone.
2 Connect the desktop phone to the telephone network (ISDN).
3 Connect the desktop phone to the mains power supply.
4 Connect the desktop phone to the router for accessing the Internet (via router
and modem or via router with integrated modem) and for configuring the desktop phone via the Web configurator.
5 Connect the desktop phone to a fax machine (optional).
6 Connect a wire-bound headset to the desktop phone.
9
Gigaset DX600A isdn / IM-OST EN / A31008-N3101-R601-1-TE43 / starting.fm / 05.03.2010
Taking the first steps
1. Connecting the receiver to the desktop phone
Underside of
the desktop
phone
2
3
1
1 Insert the jack, which can be found on the longer straight end of the connection
cable, into the connection port marked with the symbol ^ on the underside of
the desktop phone.
2 Place the straight part of the cable in the cable recess provided.
3 Insert the other jack on the connection cable into the port on the handset.
2. Connecting the desktop phone to the telephone network
3
1
Version 4, 16.09.2005
Underside of
the desktop
phone
2
1 Insert one end of the telephone cable (8-pin with 2 mini western jacks 8/8)
from the rear into the recess in the housing.
2 Plug the telephone cable into the port marked with the symbol ] on the underside of the desktop phone.
10
Gigaset DX600A isdn / IM-OST EN / A31008-N3101-R601-1-TE43 / starting.fm / 05.03.2010
Taking the first steps
3 Subsequently, connect the telephone cable to the ISDN connection.
3. Connecting the desktop phone to the mains power supply
3
1
2
1 Insert the small jack on the power cable from the rear into the recess in the housing.
2 Plug the jack into the port marked with the symbol \ on the underside of the
desktop phone.
3 Then connect the power cable to the mains power supply.
Warning
u Keep the power adapter plugged in at all times for operation, as the desk-
top phone does not work without a mains connection.
u Use only the power and telephone cable supplied.
You can now use your desktop phone to make calls and can be reached on your
main number!
Version 4, 16.09.2005
The answering machine on the desktop phone is set with a pre-recorded
announcement in answer and record mode (¢ page 33).
11
Gigaset DX600A isdn / IM-OST EN / A31008-N3101-R601-1-TE43 / starting.fm / 05.03.2010
Taking the first steps
4. Connecting the desktop phone with a router (Internet) or PC
Your desktop phone features a LAN connection, via which you can connect the
desktop phone to a router or PC.
It is at your discretion as to whether to connect the desktop phone to a router and
thus the Internet. However, you will require this connection, if you wish to use the
following features with your desktop phone:
u You wish to be notified as soon as new software is available for your desktop
phone on the Internet.
u The date and time on your desktop phone should be updated by a time server
on the Internet.
u You want to use info services and/or online directories on your desktop phone.
The desktop phone will have to be connected to a PC, if you wish to use the following features with your desktop phone:
u You wish to set up the desktop phone using its Web configurator. Your PC will
also have to be connected to the router for this to work.
u You wish to use the additional PC software "Gigaset QuickSync over Ethernet"
to load images or tunes from your PC to your desktop phone.
For Internet access you need a router connected to the Internet via a modem (this
may be integrated in the router).
3
1
2
Version 4, 16.09.2005
1 Guide the end of the Ethernet cable provided (Cat 5 with 2 RJ45 modular jacks)
from the rear through the recess in the housing.
2 Plug the jack on the Ethernet cable into the LAN port on the underside of the
desktop phone.
3 Then insert the second Ethernet cable jack into a LAN port on the router or PC.
12
Gigaset DX600A isdn / IM-OST EN / A31008-N3101-R601-1-TE43 / starting.fm / 05.03.2010
Taking the first steps
Please note
Your phone is preconfigured for dynamic assignment of the IP address. In order
for your router to "recognise" the phone, dynamic IP address assignment must
also be activated on the router i.e., the router's DHCP server must be activated.
If the DHCP server cannot or should not be activated, you must assign a fixed
IP address to the phone.
v ¢ Ï Settings ¢ System ¢ Local Network
Further information can be found in the long user guide on the enclosed CD.
5. Connecting the desktop phone to a fax machine (optional)
You can connect an ITU-T Group 3 fax machine to the desktop phone via the
FAX port.
3
2
1
Version 4, 16.09.2005
1 Insert one end of the fax connection cable from the rear into the recess in the
housing.
2 Plug the jack into the fax port on the desktop phone (labelled: FAX).
3 Connect the fax connection cable to the port on the fax machine.
The fax machine is automatically "registered" once you activate the FAX port on the
desktop phone (default setting is "off"):
v ¢ Ï Settings ¢ System ¢ FAX Port
§Change§
Press the display key to activate/deactivate the FAX port (³= on).
13
Gigaset DX600A isdn / IM-OST EN / A31008-N3101-R601-1-TE43 / starting.fm / 05.03.2010
Taking the first steps
After activating the FAX port, the fax machine is added to the list of internal participants with the internal name INT 8.
Preparing to use the desktop phone: Installation wizard
As soon as the desktop phone is connected, the installation wizard starts. The wizard allows you to make all necessary settings for your desktop phone.
The following message appears in the display.
Setup - Welcome
?
Would you like help
setting up
your phone?
No
Yes
¤ Press the display key §Yes§ to start
installation.
Please note
Use only the installation wizard on the desktop phone, but not on a registered
handset.
Several individual wizards are combined to form part of the installation wizard.
The following individual wizards are included in the installation wizard:
1 ISDN wizard
2 Registration wizard
3 Connection wizard
Please note:
u If the installation wizard is activated, no other handset can access the Settings
menu on the desktop phone.
u To quit the installation wizard before the process is complete, press and hold the
end key T. All changes you have already saved using §OK§ are retained.
u To skip a setting, press the bottom of the control key s or the display key §No§.
u To return to a previous setting, press the top of the control key t.
Version 4, 16.09.2005
1. ISDN wizard: Assigning/entering the connection's MSNs
Several numbers (MSNs) were provided by the network provider when you
received your ISDN connection confirmation. You can save up to ten numbers
(MSNs) on your desktop phone. If there is no MSN entered on your desktop phone,
you can do the following with the ISDN wizard:
u Assign the MSNs for your connection i.e., call these up from the exchange (automatic MSN assignment) or enter these manually
14
Gigaset DX600A isdn / IM-OST EN / A31008-N3101-R601-1-TE43 / starting.fm / 05.03.2010
Taking the first steps
Please note:
Not every ISDN provider supports automatic MSN assignment. If this feature is
not supported, then you must enter the MSNs for your connection manually
(¢ page 16).
u Set the receive MSN
u Set the send MSN
ISDN Wizard
?
Start ISDN
installation wizard?
No
Yes
¤ Press the display key §Yes§ to start
installation.
Ð
ISDN Wizard
This wizard helps you
detect and configure
your ISDN phone
numbers (MSNs).
¤ Press the display key §OK§ to start
OK
automatic MSN assignment. This
process will take some time.
A corresponding message is shown
in the display.
Ð
ISDN Wizard
MSN Assignment
MSN1: 12345601
After the MSNs have been successfully
assigned, a list containing the MSNs is
displayed.
MSN2: 12345602
MSN3: 12345603
MSN4: 12345604
Change
OK
¤ Press the display key §OK§ to close the
Version 4, 16.09.2005
ISDN wizard.
The display shows ISDN installation
complete.
15
Gigaset DX600A isdn / IM-OST EN / A31008-N3101-R601-1-TE43 / starting.fm / 05.03.2010
Taking the first steps
If no MSNs can be found, No MSNs detected. is shown. You are prompted to enter
your MSNs manually:
ISDN Wizard
Ð
Please enter your
MSN data.
Back
OK
¤ Press the display key §OK§ to enter the
MSNs manually.
¤ Enter a name for MSN 1 via the
ISDN Wizard
¤
MSN - Name
MSN1
MSN - Number
V
MSN - Name:
Back
Save
¤ Enter your first MSN number (max.
ISDN Wizard
20 digits).
¤ Press down on the control key again
MSN - Name
MSN1
to switch to the next field.
MSN - Number
123456
V
MSN - Name:
Back
number keys (max. 16 characters;
default MSN1)).
Press down on the control key s to
switch to entering the MSN number.
¤ Repeat the above procedure to
enter the remaining MSNs.
Save
¤ After entering the final MSN. Press
the display key §Save§.
Version 4, 16.09.2005
The display shows ISDN installation complete.
16
Gigaset DX600A isdn / IM-OST EN / A31008-N3101-R601-1-TE43 / starting.fm / 05.03.2010
Taking the first steps
2. Registration wizard
The registration wizard helps you register handsets to the desktop phone.
Please note
Registration
?
Register a
handset?
No
Yes
Press the left display key §No§, if you do
not wish to register any handsets. This
closes the registration wizard and the
connection wizard is started
(¢ page 18).
The long user guide on the enclosed
CD tells you how to register handsets at
a later stage.
¤ Press the display key §Yes§. The desktop phone changes to registration
mode.
¤ Start the registration within approx.
Registration
60 seconds on the handset
according to the handset's user
guide.
?
Please register
your handset
Info
Cancel
Info
Press the display key §Info§ to display
information about registering handsets.
If the handset has been successfully registered on the desktop phone, you will see
the following display (approx. 3 seconds long):
Registration
‰
Version 4, 16.09.2005
Handset registered
Once a Gigaset handset has been successfully registered, it will change to
idle mode. The handset's internal name
is shown on the display (INT 2, INT 3
to INT 7).
Then "Register a handset?" is shown in the display again (see above).
¤ Press the display key §Yes§ if you wish to register another handset and perform
the steps listed above with this additional handset.
Press §No§ to close the registration wizard and start the connection wizard.
17
Gigaset DX600A isdn / IM-OST EN / A31008-N3101-R601-1-TE43 / starting.fm / 05.03.2010
Taking the first steps
Please note
u By default, the desktop phone is assigned the internal name INT 1 and the
internal number 1.
u The desktop phone assigns the lowest free internal number to the handset
(possible numbers: 2–7). The handset's internal name is shown in the display
e.g., INT 2. This means that the handset has been assigned the internal
number 2.
u The internal numbers and names can be changed.
3. Connection wizard
Using the Connection wizard, you can assign the previously configured numbers
(ISDN MSNs, ¢ page 14) to internal parties (desktop phone, handsets and desktop
phone answering machines as well as any connected fax machine, ¢ page 13) as
send and receive connections, if necessary.
u Receive connections are numbers (MSNs) on which you can be called. You can
assign the MSNs for internal parties as the receive connection. Incoming calls are
only diverted to the terminals to which the relevant receive connection has
been assigned. Terminals are e.g., desktop phone, handsets or answering
machines or a connected fax machine.
u Send connections are the numbers (MSNs) that are sent to the called party.
The network provider calculates charges based on the send connections.
You can assign a fixed MSN as a send connection to each internal party.
u Every MSN can be both a send and receive connection. You can assign each MSN
to multiple handsets, the desktop phone and a connected fax machine as a send
and/or receive connection. It may only be assigned to an answering machine as
a receive connection.
After registration/getting started, the desktop phone, handsets and local answering machine 1 are assigned all MSNs as receive connections. The base number (usually MSN1) is assigned to the devices as a send connection.
a.
Connection Wizard
?
¤ Press the display key §Yes§, if you
Assign connections
to desk phone
INT 1?
Version 4, 16.09.2005
No
18
Yes
¤
wish to change the setting for the
desktop phone's send and receive
connections.
Press the display key §No§, if you do
not wish to change the setting for
the desktop phone.
Gigaset DX600A isdn / IM-OST EN / A31008-N3101-R601-1-TE43 / starting.fm / 05.03.2010
Taking the first steps
b.
Receive Connections
Ð
The list of receive connections currently assigned is displayed.
Press the bottom of the control key s
to scroll through the complete list if
necessary.
x
¤ Press the display key §Change§, if you
INT 1
receives calls for
MSN1: 12345601
MSN2: 12345602
MSN3: 12345603
Change
OK
¤
wish to change the setting for the
receive connections on the desktop phone.
Press the display key §OK§, if you do
not wish to change the setting.
Press §OK§ to skip the following steps. Continue from
Press §Change§ to display the following:
c.
If you do not want incoming calls to
MSN1 indicated on the desktop
phone:
¤ Press right on the control key v
to set to No.
INT 1
Receive calls for
MSN1:
f Yes
g
Receive calls for
V
MSN2:
Back
Save
¤ Press down on the control key s
d.
INT 1
MSN1:
f No
g
¤
Receive calls for
MSN2:
f Yes
Back
£ e.
to switch to the next MSN. Select
either Yes or No as described
above.
Repeat the steps for each MSN.
V
g
Save
¤ Press the display key §Save§ once
you have finished configuring the
settings for the desktop phone.
Version 4, 16.09.2005
The updated list of receive connections is displayed one more time for you to
check.
Press the display key §OK§ to confirm the assignment.
19
Gigaset DX600A isdn / IM-OST EN / A31008-N3101-R601-1-TE43 / starting.fm / 05.03.2010
Taking the first steps
e.
Ð
Send Connection
The send connection currently set for
the desktop phone is displayed.
INT 1
sends calls with
MSN1:
12345601
Change
OK
¤ Press the display key §OK§, if you do
¤
f.
If the desktop phone is to make calls
via a different MSN:
¤ Press the right of the control
key v repeatedly until the MSN
you wish to use or Select at each
call is displayed.
INT 1
Connection for
outgoing calls
f MSN 1
Back
not wish to change the setting.
Skip the following step.
To change the setting, press the
display key §Change§.
g
Save
¤ Press the display key §Save§ to save
the settings.
If handsets are already registered to the desktop phone, you are requested to
assign send and receive connections for the handsets. The following is shown in the
display:
Assign connections
to handset
INT ...?
¤ Perform steps a. to f. for each registered handset.
Version 4, 16.09.2005
Subsequently, you are requested to assign the receive connections to the three
answering machines on the desktop phone. "Assign connections to answering
machine ?" is shown in the display.
¤ Perform steps a. to d. for each answering machine.
Please note: Each MSN may only be assigned to one of the three local answering
machines as a receive connection.
20
Gigaset DX600A isdn / IM-OST EN / A31008-N3101-R601-1-TE43 / starting.fm / 05.03.2010
Taking the first steps
After successfully configuring the settings, you will see the following displays in
quick succession:
Connection wizard complete:
Connection Wizard
‰
Installation wizard complete:
Setup
‰
Connection
Setup
assignment
complete
complete.
Installation is complete.
Date & time
There are three methods of setting the date and time:
u By default, the date and time is transferred to your desktop phone from a time
server on the Internet as soon as the desktop phone is connected to the Internet.
You can activate/deactivate the synchronisation with a time server via the Web
configurator. Detailed information can be found in the Web configurator's user
guide on the enclosed CD.
u If synchronisation with the time server is unsuccessful (no connection to the
Internet/time server), the desktop phone assumes the date and time from the
ISDN network during the first outgoing external call.
u You can also set the date and time manually via the phone menu or one of the
registered handsets. Further information can be found in the long user guide for
the desktop phone on the enclosed CD.
Please note
Version 4, 16.09.2005
If the date and time have not been set, the time will flash in the desktop phone's
idle display (00:00) and §Time§ is displayed above the right display key.
To set the date and time manually, you must press the right display key §Time§
and enter the date and time.
21
Gigaset DX600A isdn / IM-OST EN / A31008-N3101-R601-1-TE43 / starting.fm / 05.03.2010
Taking the first steps
Proceeding
The most important functions are described in this quick user guide so that you can
quickly adapt your phone to your individual requirements. Use the following guide
to quickly locate the functions.
If you are unfamiliar with menu-driven devices such as other Gigaset telephones,
read the long user guide on the enclosed CD first to find out how the desktop telephone is operated. Here, you will also find detailed descriptions of all functions.
Information on ...
... is located here.
Making calls via ISDN
g
page 27
Sending and receiving SMS messages
g
page 32
g
page 33
Setting the ringer and volume
g
page 38
Setting the earpiece volume
g
page 38
Using the local directory and online directories
g
page 30
g
page 31
Configuring, activating/deactivating the local
answering machine, listening to messages
Transferring directory entries from existing Gigaset
handsets to the desktop phone
Version 4, 16.09.2005
If you have any questions about using your phone, please read the tips
on troubleshooting in the long user guide on the enclosed CD or contact
our Customer Care team.
22
Gigaset DX600A isdn / IM-OST EN / A31008-N3101-R601-1-TE43 / menutree_Saturn-ISDN_dt.fm / 05.03.2010
Menu overview
Menu overview
With the desktop phone in idle status, press v (open main menu):
Ç
Select Services
Next Call
Description
¢ Long user guide on the CD
Withhold Number
Keypad Control
Call Divert
Internal Line
MSN1
MSN2
:
MSN10
Call Waiting
Withhold # All Calls
Busy on Busy
Transfer (ECT)
Ringback Off
ò
Bluetooth
Description
¢ Long user guide on the CD
Activation
Search for Headset
Search for Data Device
Known Devices
Own Device
É
Additional Features
Description
¢ Long user guide on the CD
Info Centre
Resource Directory
Screensavers
Caller Pictures
Sounds
Capacity
Ê
Call Lists
¢ page 29
All Calls
Outgoing Calls
Accepted Calls
Version 4, 16.09.2005
Missed Calls
23
Gigaset DX600A isdn / IM-OST EN / A31008-N3101-R601-1-TE43 / menutree_Saturn-ISDN_dt.fm / 05.03.2010
Menu overview
Ë SMS
¢ page 32
New SMS
Incoming
Draft
Settings
Service Centres
Service Centr. 1
Service Centr. 2
Service Centr. 3
Service Centr. 4
Notification
Status Report
¢ page 33
Ì Answering Machine
Play Messages
Network Mailbox
¢ page 34
Answer Machine 1
Answer Machine 2
Answer Machine 3
Activation
¢ page 33
Answer Machine 1
Answer Machine 2
Answer Machine 3
Announcements
Record Announcemnt.
Answer Machine 1 to 3
Play Announcement
Answer Machine 1 to 3
Delete Announcemnt.
Answer Machine 1 to 3
Record Advisory Msg.
Answer Machine 1 to 3
Play Advisory Message
Answer Machine 1 to 3
Delete Advisory Msg.
Answer Machine 1 to 3
Recordings
Call Screening
Desktop Phone
Handset
Network Mailbox
Set Key 1
Description
¢ Long user guide on the CD
Network Mailbox
Version 4, 16.09.2005
Answering Machine
24
¢ page 35
¢ page 35
Gigaset DX600A isdn / IM-OST EN / A31008-N3101-R601-1-TE43 / menutree_Saturn-ISDN_dt.fm / 05.03.2010
Menu overview
Í
Organizer
Description
¢ Long user guide on the CD
Calendar
Alarm Clock
Missed Alarms
Î
Contacts
Directory
Network Directory
Online Directory
Yellow Pages
= List of online directories
available with provider-specific names
Prv.NetDir
Ï
Settings
¢ page 14
ISDN Wizard
Date/Time
Audio Settings
¢ page 30
¢ page 31
¢ page 31
¢ page 31
Call Volume
Ringer Settings
Volume
¢ page 38
¢ page 38
Melodies
Time Control
Anon. Call Silencing
Advisory Tones
¢ page 39
Music on hold
Display
Screensaver
¢ page 37
Backlight
¢ page 37
Language
Registration
Register Handset
Version 4, 16.09.2005
De-register Handset
25
Gigaset DX600A isdn / IM-OST EN / A31008-N3101-R601-1-TE43 / menutree_Saturn-ISDN_dt.fm / 05.03.2010
Menu overview
Telephony
Area Codes
Send Connections
INT 1 .... INT 8
Receive Connections
INT 1 .... INT 8
Answer Machine 1 ...
Answer Machine 3
Dialling Mode
Auto. Tone Dial
Auto. Keypad
Dial of * and #
Access Code
System
Reset
DECT Interface
FAX Port
¢ page 13
Repeater Mode
Local Network
Update Firmware
System PIN
Eco Mode
¢ page 39
Eco Mode
Eco Mode+
Please note
Version 4, 16.09.2005
This quick user guide only describes a small proportion of your desktop phone's functions.
A detailed description of all functions in the menu tree can be found in the long user guide
for your Gigaset DX600A ISDN on the enclosed CD.
26
Gigaset DX600A isdn / IM-OST EN / A31008-N3101-R601-1-TE43 / telephony.fm / 05.03.2010
Making calls
Making calls
If the display backlight is deactivated, it can
be reactivated by pressing any key.
Making external calls
External calls are calls using the public telephone network and the Internet.
Prerequisite:
One MSN is assigned to the desktop phone
as a send connection (¢ page 18).
~c
Enter the number and pick up
the receiver.
Or:
c~
Pick up the receiver and enter
the number.
Instead of picking up the receiver (c icon),
you can also press the handsfree key d
or the §Headset§ function/display key
(¢ page 37) to make a call using the handsfree function or headset.
If "line selection" is assigned to the desktop
phone instead of a send connection (setting:
Select at each call), the list of configured
connections (MSNs) is displayed once the
receiver is picked up.
¤ Select connection and press §OK§.
You can use the end key a to cancel the
dialling operation.
Making internal calls
Calling all internal parties
("group call")
u
Press and hold left on the control key.
All handsets are called.
Ending a call
&
Replace the receiver.
Ending a call
d
Replace the receiver or press the
end key T.
Accepting a call
An incoming call is indicated in three ways:
by ringing, by a display on the screen and by
the flashing handsfree key d.
Please note
Only calls to receive connections explicitly assigned to the desktop phone are
signalled and to receive connections for
which no assignment has been made
(¢ page 18).
Accept the call by:
¤ Picking up the receiver c.
¤ Pressing the handsfree key d.
¤ Select §Options§ ¢ Divert to AM to divert
the call to the answering machine
(¢ page 35).
If you have handsets registered to the desktop phone, you can make internal calls free
of charge.
Calling a specific handset
Version 4, 16.09.2005
u
s
c
Initiate internal call.
Select the internal party.
Lift handset.
27
Gigaset DX600A isdn / IM-OST EN / A31008-N3101-R601-1-TE43 / telephony.fm / 05.03.2010
Making calls
Activating/deactivating
handsfree/open listening
mode
Activating/deactivating open
listening
¤ Press the handsfree key d to activate/
deactivate open listening in earpiece
mode and when listening to the answering machine.
Activating handsfree mode while
dialling
~ d Enter the number and press the
handsfree key.
End the call:
T
Press end key.
Switching from earpiece to handsfree
mode
Prerequisite: You are making a call via the
receiver or via the receiver with open listening mode activated.
d& Press and hold the handsfree
key until you have put the
receiver down.
d
If the handsfree key does not
light up, press the key again.
Switching from handsfree to earpiece
mode
c
Pick up receiver. The speaker on
the desktop phone is deactivated.
Please note
Version 4, 16.09.2005
In handsfree mode, you can adjust the
speaker with the R and S keys.
28
Muting the desktop phone
During an external call, you can activate and
deactivate the microphone on the desktop
phone and the receiver using the mute key.
If the microphone is deactivated, Microphone is off is displayed.
Making calls using network
services
Network services are functions that your
network provider makes available to you,
such as:
u Diverting calls to another telephone connection
u Withholding your number
u Making consultation calls during a call
u Swapping between two callers
u Setting up a conference
u Transferring calls to another phone
u Initiating a ringback when busy/no reply
The long user guide on the enclosed CD
describes in detail how to use these network
services on your desktop phone.
Gigaset DX600A isdn / IM-OST EN / A31008-N3101-R601-1-TE43 / lists.fm / 05.03.2010
Using lists
Using lists
Using the call lists
The options are:
u Redial list
u Incoming message list (¢ page 32)
u Call lists
u Missed alarms list
u Answering machine list (¢ page 34)
Prerequisite: Calling Line Identification
Presentation (CLIP).
The options are:
u Accepted calls list
u Outgoing calls list
u Missed calls list
u List of all calls
Using the redial list
Opening call lists:
The redial list contains the 20 numbers last
dialled with the desktop phone (max. 32 digits).
Manual redial
In idle status or during a call:
Q
Open the redial list.
s
Select entry.
c / §Dial§ Pick up the receiver or (during
a call) press display key.
The number is dialled.
Automatic redial
You call and hear the busy tone or the party
does not answer:
§Options§ ¢ Automatic Redial
Select and press §OK§.
Or: In idle status:
Q
Open the redial list.
s
Select entry.
§Options§ ¢ Automatic Redial
Select and press §OK§.
The number is automatically dialled up to
ten times at fixed intervals. The handsfree
key flashes and "open listening" is activated.
¤ If the party answers:
Lift receiver c.
¤ To cancel the redial:
Version 4, 16.09.2005
Press any key.
¤ In idle status: Press t or v ¢ Ê
¤ Select list using s and press §OK§.
To call a number from the list:
¤ Select entry. Lift receiver c.
To copy the number to the directory:
¤ Select entry.
§Options§ ¢ Copy to Directory §OK§.
Opening lists with the
message key
Use the message key f to open the following lists:
u Answering machine list
u Network mailbox, if your network provider supports this function and quick
dial is set for the network mailbox.
u Incoming message list (¢ page 32)
u Missed calls list
u Missed alarms list
An advisory tone sounds as soon as a new
entry appears on a list. The message key
f flashes. In idle status, icons are shown
on the display to indicate new messages
(¢ page 3).
After pressing the message key f, you
can see all lists containing messages and the
network mailbox list.
To open the list:
Press the f key. Select list.
29
Gigaset DX600A isdn / IM-OST EN / A31008-N3101-R601-1-TE43 / directories.fm / 05.03.2010
Using directories
Using directories
The options are:
u (Local) directory (¢ page 30)
u Public online directory and classified
directory (¢ page 31)
u Private net directory (¢ page 31)
Using the local desktop
phone directory
You can save a total of 750 entries in the
directory.
Not only can you create a personalised directory for your desktop phone, but you can
send entries from it to handsets too
(page 31).
Open the directory:
In idle status or during an external call:
s
Press briefly.
Or in idle status:
v ¢ Î ¢ Directory
Length of the entries
3 numbers:
Max. 32 digits each
Name and surname: Max. 16 characters each
E-mail address:
Max. 60 characters
Saving number(s) in the directory –
new entry
Version 4, 16.09.2005
s ¢ <New Entry>
¤ You can enter data in the following fields:
First Name: / Surname:
Enter first names and/or surnames.
Phone (Home): / Phone (Office): /
Phone (Mobile):
Enter a number in at least one of the
fields.
E-Mail:
Enter e-mail address.
30
Anniversary:
Select On or Off.
With setting On:
Enter Anniversary (Date) and Anniversary (Time) and select reminder type:
Anniversary (Signal).
Caller Melody (VIP): / Caller Picture:
Select ringer and picture, if required.
Entry is marked with Æ.
Prerequisite: Calling Line Identification.
§Save§
Press the display key.
Dialling with the directory
s
¢ s (Select entry).
¤ Pick up the receiver c or press the display-key §Dial§ during a call.
If the entry only contains one phone
number, this is the number that is dialled.
If the entry contains several numbers, the
icons for the numbers stored are displayed:
ä for Phone (Home), k for Phone (Office),
l for Phone (Mobile).
r
Select number.
§Dial§
Press the display key.
Managing directory entries
In idle status:
s ¢ s (Select entry).
§View§
Press the display key.
Or:
§Options§
Press the display key.
The following functions can be selected with
q:
Display Number
Edit, add or call a number (pick up the
receiver c) or save as a new entry
(press Ó ).
Delete Entry / Delete List
Delete entry/entire list.
Gigaset DX600A isdn / IM-OST EN / A31008-N3101-R601-1-TE43 / directories.fm / 05.03.2010
Using directories
Copy Entry / Copy List
Send entry/list to a handset (to Internal)
or in vCard format via Bluetooth (vCard
via Bluetooth) or send entry in vCard format via SMS (vCard via SMS).
Edit entry
Entry is opened for editing.
Available Memory
Number of entries that are still available.
Using online directories
You can use public online directories (=
online directories and classified directories
e.g., "Yellow Pages") depending on your provider.
Prerequisite: The desktop phone is in idle
status.
s
Press and hold.
q
Select online telephone directories and press §OK§.
Using the private net
directory
Some providers offer users the option of creating and managing a private net directory
on the Internet.
¤ You can create your private net directory
using your PC's Web browser.
Opening an online directory on the
desktop phone
In idle status:
s
Press and hold.
q
Select the private net directory
and press §OK§.
Calling an entry
¤ Select entry and pick up receiver c.
A list of numbers appears if there is more
than one number.
¤ Using q, select number and press the
display key §Dial§.
Search for an entry:
¤ Enter name/business type and place or
¤
¤
number. Start search with §Search§.
Searching by number is not supported by
all online directories.
If several towns/cities are listed with the
same name, select the town/city and continue the search.
If the hit list is too long, start a detailed
search using §Refine§ or §Options§ ¢ Refine
search and refine or expand the search
criteria (e.g. with street name).
Calling subscribers
¤ Select entry and pick up receiver c.
Version 4, 16.09.2005
A list of numbers appears if there is more
than one number.
¤ Using q, select number and press the
display key §Dial§.
31
Gigaset DX600A isdn / IM-OST EN / A31008-N3101-R601-1-TE43 / sms_BRD_neutral.fm / 05.03.2010
Sending SMS (text messages)
Sending SMS
(text messages)
Your phone is delivered ready to send SMS
messages immediately.
Prerequisites:
u Calling Line Identification is enabled for
your phone line.
u Your network provider supports SMS on
the fixed line network (information on
this can be obtained from your network
provider).
u To receive SMS messages, you must be
registered with your SMS service provider. This occurs automatically when you
send your first SMS.
Please note:
If you wish to receive SMS messages via several MSNs, you must register each MSN separately with your service provider.
Or:
Save
Select and press §OK§. The message is saved in the draft list. You
can edit and send it later.
If you are interrupted by an external call
while writing an SMS, the text is automatically saved in the draft list.
Receiving an SMS
Received SMS messages are saved in the
incoming message list. Linked SMS messages are displayed as one message. If this is
too long or is not transferred completely, it is
split into individual messages.
New SMS messages are indicated by the Ë
icon in the display, the f message key
flashing and an advisory tone sounding.
You can open the incoming message list
with the message key f (¢ page 29)
or via v ¢ Ë SMS ¢ Incoming.
Reading SMS, managing lists
Version 4, 16.09.2005
Writing/sending/saving an
SMS
An SMS may contain up to 612 characters. If
there are more than 160 characters, the SMS
is sent as a linked SMS (up to 4 SMS messages with 153 characters each).
v ¢ Ë SMS
New SMS Select and press §OK§.
~
Write SMS.
§Options§
Press the display key.
Either:
Send
Select and press §OK§.
SMS
Select and press §OK§.
~/s
Select number with area code
(even if you are in that area)
from the directory or enter
directly.
§Send§
Press the display key. The SMS is
sent.
32
The draft list contains all of the saved SMS
messages for the assigned send connection.
The incoming message list contains all SMS
messages with an MSN that matches a send
or receive connection on the desktop
phone.
Read SMS
¤ Open the incoming/draft list and then:
q
§Read§
Select SMS.
Press the display key.
§Options§ gives you access to functions including the following:
u Delete Entry: Delete SMS
u Send: Send/forward SMS.
u Edit: Edit and send SMS.
u Reply (Incoming message list):
Write a new SMS to the sender
Gigaset DX600A isdn / IM-OST EN / A31008-N3101-R601-1-TE43 / answering_m.fm / 05.03.2010
Operating the desktop phone answering machine
Operating the desktop
phone answering
machine
You can operate the answering machine that
is integrated into the desktop phone using
the keys on the desktop phone (¢ page 2),
the phone menu, via a registered Gigaset
SL78H, SL400H or S79H handset or by
remote operation (other phone/mobile
phone). Your own announcement message
or advisory message can only be recorded
via the desktop phone or a handset:
v ¢ Ì ¢ Announcements
The desktop phone has three answering
machines (AM1, AM2, AM3), which can be
activated and used independently of each
other.
Once the desktop phone is set up, AM1 is
activated. All MSNs are assigned to it as
receive connections. AM2 and AM3 are available once you have assigned at least one
receive connection to them.
Each answering machine only receives calls
that are directed to its receive connections
and can only be operated via the end
devices (desktop phone/handsets) to which
at least one of the machine's receive connections is assigned.
Assigning receive connections
Prerequisite: At least two MSNs have been
configured on your desktop phone.
v ¢ Ï Settings ¢ Telephony
¢ Receive Connections
Answer Machine 1 / 2 /3
Select and press §OK§.
¤ You can enter data in the following fields:
Receive calls for xxx
Operating via the desktop
phone
Activating/deactivating and
setting answering machine mode
You can choose between Answer & Record,
Answer only and Alternating. By using the
Alternating setting, you can activate answer
and record mode for a set period of time,
outside this period the caller will only hear
the announcement.
v ¢ Ì ¢ Activation
q
Select answering machine, if
required (μ = activated).
§Edit§
Press the display key.
¤ You can enter data in the following fields:
Activation:
Select On or Off.
Mode:
Select Answer & Record, Answer only or
Alternating.
For Alternating:
Record from: / Record until:
Enter the start and end of the period in
4-digit format. (The time must be set.)
§Save§
Save setting.
When you switch the answering machine
on, the remaining memory time is
announced. The à icon is shown on the
display, as well as a digit for the activated
answering machine(s) (e.g., Ã1, Ã2 3).
Version 4, 16.09.2005
(xxx = Name of the receive connection MSN1,
MSN2 ...)
Select Yes or No.
Make this setting for every MSN. If an
MSN is already assigned to an answering
machine, you cannot select Yes.
33
Gigaset DX600A isdn / IM-OST EN / A31008-N3101-R601-1-TE43 / answering_m.fm / 05.03.2010
Operating the desktop phone answering machine
Activating the answering machine via
the key on the desktop phone
¤ Press the ý key to activate or deacti-
vate all answering machines that share a
receive connection with the desktop
phone.
If several answering machines are assigned
to the desktop phone and these are not all
deactivated, proceed as follows:
1. Press the ý key: All answering
machines are deactivated.
2. Press the ý key: All answering
machines are activated.
Playing back messages
New messages that have not yet been
played back are indicated by the à icon in
the second display line and by the f key
flashing.
f
Press the message key.
Answer Mach. 1: / Answer Mach. 2: /
Answer Mach. 3:
Select and press §OK§.
Or:
ü
Press the play key.
q
If necessary, select answering
machine and press §OK§
If there are new messages, playback then
begins with the first new message. Playback
ends after the last new message.
If there are no new messages, the old messages are played back.
Stopping and controlling playback
Version 4, 16.09.2005
During message playback:
2
Pause playback. Press 2 again
to resume Or
w
Press the middle of the control
key.
To continue select Continue
and press §OK§.
34
h (press and hold) or During time stamp playback:
Skip to previous message.
During message playback: Skip
to the start of the current message.
h (briefly press) or 4
During time stamp playback:
Skip to previous message.
During message playback:
Repeat the last five seconds of
the current message.
s or 3 Go to the next message.
If playback is interrupted for over a minute,
the answering machine returns to idle status.
Deleting messages
You can either delete all old messages
together or individually.
You can only delete new messages once the
time stamp has been played back along with
the first few seconds of the message.
Deleting all old messages
During playback or pause:
§Options§ ¢ Delete Old List §OK§
§Yes§
Confirm prompt.
Deleting an individual message
During playback or pause:
§Delete§ / Q
Accepting a call from the
answering machine
¤ While recording a call: c / §Accept§ / d
Recording stops and you can speak to the
caller.
Gigaset DX600A isdn / IM-OST EN / A31008-N3101-R601-1-TE43 / answering_m.fm / 05.03.2010
Operating the desktop phone answering machine
Diverting an external call to the
answering machine
You can divert an incoming external call to
the answering machine, even if it is deactivated.
Prerequisite: An external call is signalled on
the desktop phone, the receive connection
is assigned to an answering machine:
§Options§ ¢ Divert to AM
Select and press §OK§.
The answering machine starts in answer &
record mode and records the call.
Activating/deactivating two-way
record
You can record an external call with the
answering machine.
Prerequisite: The MSN is assigned to an
answering machine as a receive connection.
¤ Inform the caller that the call is being
recorded.
§Options§ ¢ Two-Way Record
Select and press §OK§.
§End§
End two-way record.
Activating/deactivating call
screening
While recording a message, you can screen a
call via the desktop phone speaker or registered handsets.
Permanently activating/deactivating
call screening
v ¢ Ì ¢ Call Screening
¢ Desktop Phone / Handset (³= on)
§Change§
Activate/deactivate call screening.
Deactivating call screening for the
current recording
Version 4, 16.09.2005
§Silence§
Press the display key.
Answering a call
d / c Press the handsfree key or pick
up the receiver.
Operating when on the move
(remote operation)
You can check and activate your answering
machine from any other telephone (hotel,
pay phone etc.).
Prerequisites:
u You have set a system PIN other than
0000 (page 39).
u The phone you are using for remote oper-
ation has tone dialling (DTMF).
u The connection/MSN via which you call is
assigned to the answering machine as a
receive connection.
Calling the answering machine and
playing messages
~
9~
Dial your own number.
When you hear your announcement, press 9 and enter the
system PIN.
You are informed whether any new messages have been recorded. The messages are
played. The following keys are used for operation:
A
During time stamp playback:
Skip to previous message.
During message playback: Skip
to the start of the current message.
B
Stop playback. Press again to
resume.
3
Go to the next message
D
Repeat the last five seconds of
the message
0
During message playback:
Delete current message.
:
Change the status of a previously played back message to
"new".
35
Gigaset DX600A isdn / IM-OST EN / A31008-N3101-R601-1-TE43 / answering_m.fm / 05.03.2010
Operating the desktop phone answering machine
Activating the answering machine
¤ Phone home and let the phone ring until
Version 4, 16.09.2005
you hear: "Please enter PIN" (approx. 50
seconds).
¤ Enter system PIN.
Your answering machine is activated. The
messages are played.
36
Gigaset DX600A isdn / IM-OST EN / A31008-N3101-R601-1-TE43 / settings.fm / 05.03.2010
Setting the desktop phone
Setting the desktop
phone
Your desktop phone is preset, but you can
change the settings to suit your individual
requirements.
Quickly accessing functions
and numbers
You can program the six function keys on the
right-hand side of the desktop phone and
the display keys (in idle status). You can
assign a phone number (quick dial) or a
desktop phone function to each of these
keys and change the assignment.
The number is then dialled or the function
started by simply pressing a key.
Changing key assignments
In idle status:
¤ Press and hold the display/function key
until a list of possible key assignments is
displayed.
¤ Select function or More Functions...
(provides additional functions) and
press §OK§.
Function key assignment: You can make a
note of the key assignment on the insert
strip next to the respective key.
Starting the function, dialling the
number
Version 4, 16.09.2005
When the desktop phone is in idle status:
¤ Briefly press the function or display key.
Changing the display
language
You can view the display texts in different
languages.
v ¢ Ï Settings ¢ Language
The current language is indicated by a Ø.
s
Select language and
press §Select§.
If you accidentally choose a language you do
not understand:
v* # Q 3 #
Press keys in sequence.
s
Select the correct language.
§Select§
Press the right display key.
Setting the display
Setting the screensaver/slideshow
You can display a screensaver when the
desktop phone is in idle status. It may conceal the calendar, date, time and name.
v ¢ Ï Settings ¢ Display
¢ Screensaver (³ = activated)
The current setting is displayed.
¤ You can enter data in the following fields:
Activation:
Select On or Off.
Selection:
Select screensaver with r.
§Save§
Save setting.
The screensaver is activated approx. 10 seconds after the display has changed to idle
status.
If the screensaver conceals the display,
briefly press end key T.
37
Gigaset DX600A isdn / IM-OST EN / A31008-N3101-R601-1-TE43 / settings.fm / 05.03.2010
Setting the desktop phone
Setting the brightness and time
control for the display backlight
Setting ringers
You can set the brightness of the display on
your desktop phone and specify a timeframe
during which the display is completely deactivated e.g., at night (reactivates as soon as a
key is pressed).
v ¢ Ï ¢ Display ¢ Backlight
The current setting is displayed.
¤ You can enter data in the following fields:
Time Control
Prerequisite: The date and time have
already been set.
Select On or Off.
For Time Control = On:
Display off from:
Enter time in 4-digit format.
Display off until:
Enter time in 4-digit format.
Brightness:
Set the brightness of the display backlight with r. You can select from five
brightness levels.
Setting the volume
¤ Press the display key §Save§.
Changing the handsfree/
earpiece volume
In idle status
v ¢ Ï ¢ Audio Settings
¢ Call Volume
You will hear a test tone.
r
Set the earpiece volume.
s
Scroll to the Speaker line.
r
Set the handsfree volume.
§Save§
Save setting.
During a call:
¤ Set the volume using the R and S
Version 4, 16.09.2005
keys.
¤ Press §Save§ if necessary to permanently
save the setting.
38
You can choose between five volumes and
the "crescendo" ringer.
v ¢ Ï ¢ Audio Settings
¢ Ringer Settings ¢ Volume
r
If necessary, set the volume for
internal calls and appointment
notification.
s
Scroll to the next line.
r
If necessary, set the volume for
external calls.
§Save§
Save setting.
Setting the ringer melody
You can set different ringers for the following functions:
u Internal calls
u For external calls to each individual
receive connection on the desktop
phone (MSN1 to MSN10)
In idle status:
v ¢ Ï Settings ¢ Audio Settings
¢ Ringer Settings ¢ Melodies
q
Select For internal calls or a
receive connection (MSN1
to MSN10).
r
Select the melody for this connection.
¤ Repeat the process, if necessary, for the
next connection.
§Save§
Save setting.
Or: Set the same ringer melody for all internal and external calls
q
Select All calls.
r
Select melody.
§Save§ §Yes§ Confirm and save settings.
The setting for all calls will not work as soon
as you change the setting for a connection.
Gigaset DX600A isdn / IM-OST EN / A31008-N3101-R601-1-TE43 / settings.fm / 05.03.2010
Setting the desktop phone
Setting time control for external
calls
Specify a time period when you do not want
the desktop phone to signal external calls
e.g., during the night.
Prerequisite: The date and time have
already been set.
v ¢ Ï ¢ Audio Settings
¢ Ringer Settings ¢ Time Control
¤ You can enter data in the following fields:
For external calls:
Select On or Off.
For For external calls = On:
Suspend ring. from: / Suspend ring. until:
Enter the start and end of the period in
4-digit format.
¤ Press the display key §Save§.
Please note
During this period, you will continue to
receive calls on the desktop phone from
numbers marked as Æ in the directory
(¢ page 30).
Silencing the ringer for
anonymous calls
v ¢ Ï Settings ¢ Audio Settings
¢ Ringer Settings ¢ Anon. Call Silencing
(³= on)
Activating/deactivating
advisory tones
In idle status:
v ¢ Ï Settings ¢ Audio Settings
¢ Advisory Tones
¤ You can enter data in the following fields:
Key Tones:
Select On or Off.
Confirmation:
Select On or Off.
§Save§
Save setting.
Changing the system PIN
v ¢ Ï Settings ¢ System
¢ System PIN
~
Enter the current system PIN if
necessary (default: 0000) and
press §OK§.
~
Enter new system PIN.
§Save§
Save setting.
Other settings, ...
that you can change on your phone are
described in detail in the long user guide on
the enclosed CD.
Activating/deactivating the ringer
Deactivating the ringer permanently
*
Press and hold the star key.
The ó icon appears in the display.
Reactivating the ringer
*
Press and hold the star key.
Deactivating the ringer for the current
call
Version 4, 16.09.2005
§Silence§
Press the display key.
39
Gigaset DX600A isdn / IM-OST EN / A31008-N3101-R601-1-TE43 / appendix.fm / 05.03.2010
Customer Service & Assistance
Customer Service & Assistance
Do you have any questions? As a Gigaset customer, you can find help quickly in this User Manual
and in the service section of our Gigaset online portal www.gigaset.com/service.
Please register your phone online right after purchase.
This enables us to provide you with even better service regarding questions or a warranty claim.
In order to contact our customer service via email, please use the email contact form from our
Gigaset online portal after selecting your home country.
Our representatives are also available on the telephone hotlines for consultation.
Version 4, 16.09.2005
Australia . . . . . . . . . . . . . . . . . . . . . . 1300 780 878
Austria. . . . . . . . . . . . . . . . . . . . . 0043 1 311 3046
Bahrain . . . . . . . . . . . . . . . . . . . . . 97 31 73 11 173
Belgium . . . . . . . . . . . . . . . . . . . . . . .0 78 15 66 79
Bosnia Herzegovina . . . . . . . . . . . . .033 276 649
Brazil . . . . . . . . . . . . . . . . . . . . . . . . . . . . 4003 3020
(grandes cidades e regiões metropolitanas Custo de uma ligao local)
. . . . . . . . . . . . . . . . . . . . . . . . . . . . . . 0800 888 3020
(demais localidades - Gratuito)
Bulgaria. . . . . . . . . . . . . . . . . . . . .+359 2 9710666
(0.50 евро на минута от всички държави за
стационарни телефони.За обаждания от
мобилни цени може да има други цени)
Canada . . . . . . . . . . . . . . . . . . . . . 1-866 247-8758
China . . . . . . . . . .0 21 400 670 6007 (RMB 0.11)
Croatia. . . . . . . . . . . . . . . . 01 2456 555 (0,23 Kn)
Czech Republic. . . . . . . . . . . . +420 23303 2727
Denmark. . . . . . . . . . . . . . . . . +45 (0) 35 25 86 00
Finland . . . . . . . . . . . . . . . . . . . . . . . 09 231 134 25
France . . . . . . . . . . . . . . . . . . . . . +33 170 706 181
Coût d’un appel local depuis une ligne fixe
France Télécom.
Germany. . . . . . . . . . . . . . . . . . . . . 01805 333 222
Der Anruf kostet Sie aus den deutschen Festnetzen 0,14 € pro Minute. Die Preise für Anrufe
aus den deutschen Mobilfunknetzen können
hiervon abweichen; ab dem 1.3.2010 betragen
sie höchstens 0,42 € pro Minute.
Greece . . . . . . . . . . . . . . . . . . . . . . . . 801-1000 500
(Χρέωση 0,0026 € το λεπτό για το σταθερό
δίκτυο της Ελλάδας. Για κλήσεις από κινητό
ίσως ισχύουν άλλες χρεώσεις)
Hong Kong . . . . . . . . . . . . . . . . . . . . . . 2763 0203
. . . . . . . . . . . . . . . . . . . . . . . . . . . . . . . . . . 2389 7285
Hungary . . . . . . . . . . . . . . .06 14 71 24 44 (27 Ft)
India . . . . . . . . . . . . . . . . . . . . .Please refer to your
. . . . . . . . . . . . . . . . . . . . . . . . . . local warranty card
Indonesia . . . . . . . . . . . . . . . . . . .(62-21) 5673813
. . . . . . . . . . . . . . . . . . . . . . . . . . (62-21) 888856000
Ireland . . . . . . . . . . . . . . . . . . . . . . . 18 50 77 72 77
Italy . . . . . . . . . . . . . . . . . . . . . . . . . . . 199.15.11.15
(€ cent 8,36 + IVA al minuto da telefono fisso
della rete Telecom Italia senza scatto alla risposta mentre per le chiamate effettuate attraverso la rete di altri operatori fissi o mobili consultate le tariffe del vostro operatore)
Jordan . . . . . . . . . . . . . . . . 00962 6 5625460/1/2
Kuwait . . . . . . . . . . . . . . . . . . . . . . 00965-2464993
Lebanon . . . . . . . . . . . . . . . . . . . . 00961-1236110
Luxembourg . . . . . . . . . . . . . . . +352 8002 3811
Malaysia . . . . . . . . . . . . . . . . . . . +603-8076 9696
Malta . . . . . . . . . . . . . .+390 2360 46789 (0,10 €)
Mexico
. . . .01800 999 4442738 (01800 999 GIGASET)
Netherlands . . . . . . . . . . . . . . . . . . 0900-3333102
(0,25 € per minuut (vast net). Voor oproepen uit
het mobiele netwerk kunnen andere prijzen
gelden.)
New Zealand . . . . . . . . . . . . . . . . . . 0800 780 878
Norway . . . . . . . . . . . . . . . . . . . . . . . . . 22 70 84 00
(Oppstartskost 89 øre + 15 øre pr minutt fra
fasttelefon linje. For samtaler fra mobil vil det
gjelde egne priser.)
Oman . . . . . . . . . . . . . . . . . . . . . . . 96 82 47 09 281
Poland . . . . . . . . . . . . . . . . . . . . . . . .0 801 140 160
Portugal . . . . . . . . . . . . . . . . . . (351) 808 781 223
(custo de uma chamada local)
Romania . . . . . . . . . . . . . . . . . . +40 021 204 9130
Russia . . . . . . . . . . . . . . . . . . . . . . .8 (495) 2281312
Serbia. . . . . . . . . . . . . . . . . . . . . . . . . 0800 222 111
Singapore . . . . . . . . . . . . . . . . . . . . . . . . 6735 9100
Slovak Republic . . . . 02 59 68 22 66 (4,428 sk)
Slovenija . . . . . . . . . . . . . . . . . . . . . . 0 14 74 63 36
South Africa . . . . . . . . . . . . . . . . +2711 46 13 181
Spain . . . . . . . . . . . . . . . . . . . . . . . . . . . 902 103935
Sweden . . . . . . . . . . . . . . . . . . . . . . . .08-750 99 11
Switzerland . . . . . . . . . . . . . . . . . . . 0848 212 000
Taiwan . . . . . . . . . . . . . . . . . . . . . . . . 02 266 24343
Turkey . . . . . . . . . . . . . . . . . . . . . . 0216 459 98 59
Ukraine . . . . . . . . . . . . . . . . . +380-44-451-71-72
United Arab Emirates . . . . . . . . . . 0 43 66 03 86
United Kingdom. . . . . . . . . . . . 0 84 53 67 08 12
USA . . . . . . . . . . . . . . . . . . . . . . . . . 1-866 247-8758
Vietnam. . . . . . . . . . . . . . . . . . . . . . . 1900 545 416
Please have your record of purchase ready when calling.
Replacement or repair services are not offered in countries where our product is not sold by
authorised dealers.
40
Gigaset DX600A isdn / IM-OST EN / A31008-N3101-R601-1-TE43 / appendix.fm / 05.03.2010
Customer Service & Assistance
Questions and answers
If you have any queries about the use of your
desktop phone, visit our website at
www.gigaset.com/customercare
for assistance 24/7. You will find a list of common problems and possible solutions in the
long user guide on the enclosed CD.
Authorisation
This device is intended for the ISDN telephone connection in your network.
Country-specific requirements have been
taken into consideration.
We, Gigaset Communications GmbH,
declare that this device meets the essential
requirements and other relevant regulations
laid down in Directive 1999/5/EC.
A copy of the 1999/5/EC Declaration of Conformity is available at this Internet address:
www.gigaset.com/docs
Using insert strips
Version 4, 16.09.2005
Blank insert strips for the function keys can
be found on the enclosed CD.
41
Gigaset DX600A isdn / IM-OST EN / A31008-N3101-R601-1-TE43 / Saturn_isdnSIX.fm / 05.03.2010
Index
Index
A
Accepting a call . . . . . . . . . . . . . . . . . . . . . . .
Activating
advisory tones . . . . . . . . . . . . . . . . . . . . . .
answering machine . . . . . . . . . . . . . . . . .
answering machine (remote
operation). . . . . . . . . . . . . . . . . . . . . .
two-way record . . . . . . . . . . . . . . . . . . . . .
Anniversary in the directory . . . . . . . . . . . .
Answering machine . . . . . . . . . . . . . . . . . . .
activating/deactivating . . . . . . . . . . . . . .
deleting messages . . . . . . . . . . . . . . . . . .
list . . . . . . . . . . . . . . . . . . . . . . . . . . . . . . . . .
playing back messages . . . . . . . . . . . . . .
remote operation . . . . . . . . . . . . . . . . . . .
scrolling back . . . . . . . . . . . . . . . . . . . . . . .
scrolling forward . . . . . . . . . . . . . . . . . . . .
Assigning
display keys . . . . . . . . . . . . . . . . . . . . . . . .
function keys . . . . . . . . . . . . . . . . . . . . . . .
key . . . . . . . . . . . . . . . . . . . . . . . . . . . . . . . .
Authorisation . . . . . . . . . . . . . . . . . . . . . . . . .
Automatic redial . . . . . . . . . . . . . . . . . . . . . .
27
39
33
36
35
30
33
33
34
29
34
35
34
34
37
37
37
41
29
B
Birthday, see Anniversary
Brightness of display backlight . . . . . . . . . 38
Version 4, 16.09.2005
C
Call
ending . . . . . . . . . . . . . . . . . . . . . . . . . . . . .
internal . . . . . . . . . . . . . . . . . . . . . . . . . . . .
lists . . . . . . . . . . . . . . . . . . . . . . . . . . . . . . . .
picking up from answering machine . .
two-way record . . . . . . . . . . . . . . . . . . . . .
Call screening during recording . . . . . . . .
Caller picture . . . . . . . . . . . . . . . . . . . . . . . . .
Calling
from classified directory . . . . . . . . . . . . .
from online directory . . . . . . . . . . . . . . . .
internal . . . . . . . . . . . . . . . . . . . . . . . . . . . .
Capacity
directory . . . . . . . . . . . . . . . . . . . . . . . . . . .
display (directory) . . . . . . . . . . . . . . . . . . .
Changing
display language . . . . . . . . . . . . . . . . . . . .
earpiece volume . . . . . . . . . . . . . . . . . . . .
42
27
27
29
34
35
35
30
31
31
27
31
31
37
38
handsfree volume . . . . . . . . . . . . . . . . . . .
ringer . . . . . . . . . . . . . . . . . . . . . . . . . . . . . .
system PIN . . . . . . . . . . . . . . . . . . . . . . . . .
Connecting a fax machine . . . . . . . . . . . . .
Customer Care . . . . . . . . . . . . . . . . . . . . . . . .
Customer Service & Assistance . . . . . . . . .
38
38
39
13
40
40
D
Deactivating
advisory tones . . . . . . . . . . . . . . . . . . . . . . 39
answering machine . . . . . . . . . . . . . . . . . 33
microphone . . . . . . . . . . . . . . . . . . . . . . . . 28
two-way record . . . . . . . . . . . . . . . . . . . . . 35
Deleting message . . . . . . . . . . . . . . . . . . . . . 34
Desktop phone
connecting with router . . . . . . . . . . . . . . 12
setting up . . . . . . . . . . . . . . . . . . . . . . . . . 8, 9
system PIN . . . . . . . . . . . . . . . . . . . . . . . . . 39
Dialling
from directory . . . . . . . . . . . . . . . . . . . . . . 30
from online directory . . . . . . . . . . . . . . . . 31
Directory . . . . . . . . . . . . . . . . . . . . . . . . . . . . . 30
managing entries . . . . . . . . . . . . . . . . . . . 30
saving entry . . . . . . . . . . . . . . . . . . . . . . . . 30
searching for an entry . . . . . . . . . . . . . . . 31
Display
backlight . . . . . . . . . . . . . . . . . . . . . . . . . . . 38
changing display language . . . . . . . . . . 37
screensaver . . . . . . . . . . . . . . . . . . . . . . . . . 37
setting . . . . . . . . . . . . . . . . . . . . . . . . . . . . . 37
Display backlight
brightness . . . . . . . . . . . . . . . . . . . . . . . . . . 38
time control . . . . . . . . . . . . . . . . . . . . . . . . 38
Documentation . . . . . . . . . . . . . . . . . . . . . . . . .8
E
Earpiece volume . . . . . . . . . . . . . . . . . . . . . . 38
Ending a call . . . . . . . . . . . . . . . . . . . . . . . . . . 27
External call
divert to ans. mach. . . . . . . . . . . . . . . . . . 35
F
Firmware updates . . . . . . . . . . . . . . . . . . . . . . .8
G
General troubleshooting . . . . . . . . . . . . . . . 41
Group call . . . . . . . . . . . . . . . . . . . . . . . . . . . . 27
Gigaset DX600A isdn / IM-OST EN / A31008-N3101-R601-1-TE43 / Saturn_isdnSIX.fm / 05.03.2010
Index
H
N
Handsfree mode . . . . . . . . . . . . . . . . . . . . . . 28
Handsfree volume . . . . . . . . . . . . . . . . . . . . . 38
Help . . . . . . . . . . . . . . . . . . . . . . . . . . . . . . . . . 41
Number of new messages . . . . . . . . . . . . . . .3
I
Operating remotely . . . . . . . . . . . . . . . . . . . 35
Operation (setting up the phone) . . . . . . . . .7
Icon
answering machine . . . . . . . . . . . . . . . 3, 33
new message . . . . . . . . . . . . . . . . . . . . . 3, 34
new SMS . . . . . . . . . . . . . . . . . . . . . . . . . . . 32
ringer off . . . . . . . . . . . . . . . . . . . . . . . . . . . 39
Identifying the caller (ISDN) . . . . . . . . . . . . 27
Installation wizard . . . . . . . . . . . . . . . . . . . . . 14
Internal call . . . . . . . . . . . . . . . . . . . . . . . . . . . 27
ISDN wizard . . . . . . . . . . . . . . . . . . . . . . . . . . 14
Package contents . . . . . . . . . . . . . . . . . . . . . . . 7
Picture
caller . . . . . . . . . . . . . . . . . . . . . . . . . . . . . . . 30
Playing back message (ans. mach.). . . . . . 34
Power adapter . . . . . . . . . . . . . . . . . . . . . . . . . .6
L
R
Language
display . . . . . . . . . . . . . . . . . . . . . . . . . . . . .
Linking, see SMS
List
answering machine . . . . . . . . . . . . . . . . .
call lists . . . . . . . . . . . . . . . . . . . . . . . . . . . .
missed calls. . . . . . . . . . . . . . . . . . . . . . . . .
network mailbox . . . . . . . . . . . . . . . . . . . .
SMS list . . . . . . . . . . . . . . . . . . . . . . . . . . . .
37
29
29
29
29
29
M
Making calls
accepting a call . . . . . . . . . . . . . . . . . . . . . 27
external . . . . . . . . . . . . . . . . . . . . . . . . . . . . 27
internal . . . . . . . . . . . . . . . . . . . . . . . . . . . . 27
Manual redial . . . . . . . . . . . . . . . . . . . . . . . . . 29
Medical equipment . . . . . . . . . . . . . . . . . . . . .6
Message key
opening list. . . . . . . . . . . . . . . . . . . . . . 29, 32
Messages
deleting . . . . . . . . . . . . . . . . . . . . . . . . . . . . 34
new message icon . . . . . . . . . . . . . . . . . . 34
playing back . . . . . . . . . . . . . . . . . . . . . . . . 34
Missed call . . . . . . . . . . . . . . . . . . . . . . . . . . . . 29
Muting the phone . . . . . . . . . . . . . . . . . . . . . 28
Version 4, 16.09.2005
O
P
Q
Questions and answers . . . . . . . . . . . . . . . . 41
Recording call . . . . . . . . . . . . . . . . . . . . . . . .
Redial . . . . . . . . . . . . . . . . . . . . . . . . . . . . . . . .
Ringer
changing . . . . . . . . . . . . . . . . . . . . . . . . . . .
setting volume . . . . . . . . . . . . . . . . . . . . .
time control . . . . . . . . . . . . . . . . . . . . . . . .
Router
connecting desktop phone . . . . . . . . . .
35
29
38
38
39
12
S
Saving a number in the directory . . . . . . . 30
Scope of delivery . . . . . . . . . . . . . . . . . . . . . . . .7
Screensaver . . . . . . . . . . . . . . . . . . . . . . . . . . 37
Setting
date . . . . . . . . . . . . . . . . . . . . . . . . . . . . . . . 25
screensaver . . . . . . . . . . . . . . . . . . . . . . . . . 37
time . . . . . . . . . . . . . . . . . . . . . . . . . . . . . . . 25
Setting up
desktop phone . . . . . . . . . . . . . . . . . . 7, 8, 9
Signal tone, see Advisory tones
SMS . . . . . . . . . . . . . . . . . . . . . . . . . . . . . . . . . . 32
deleting . . . . . . . . . . . . . . . . . . . . . . . . . . . . 32
linked . . . . . . . . . . . . . . . . . . . . . . . . . . . . . . 32
list . . . . . . . . . . . . . . . . . . . . . . . . . . . . . . . . . 29
reading . . . . . . . . . . . . . . . . . . . . . . . . . . . . 32
receiving . . . . . . . . . . . . . . . . . . . . . . . . . . . 32
43
Gigaset DX600A isdn / IM-OST EN / A31008-N3101-R601-1-TE43 / Saturn_isdnSIX.fm / 05.03.2010
Index
Sound, see Ringer
T
Text message, see SMS
Time control
display backlight . . . . . . . . . . . . . . . . . . . . 38
ringer . . . . . . . . . . . . . . . . . . . . . . . . . . . . . . 39
U
User guide . . . . . . . . . . . . . . . . . . . . . . . . . . . . . .8
V
VIP (directory entry) . . . . . . . . . . . . . . . . . . .
Volume
earpiece/handsfree . . . . . . . . . . . . . . . . .
ringer . . . . . . . . . . . . . . . . . . . . . . . . . . . . . .
setting . . . . . . . . . . . . . . . . . . . . . . . . . . . . .
30
38
38
38
W
Version 4, 16.09.2005
Warning tone, see Advisory tones
Writing (SMS) . . . . . . . . . . . . . . . . . . . . . . . . . 32
44