1
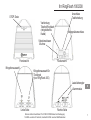
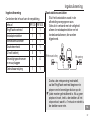
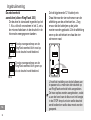
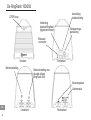
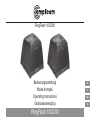
RingFlash 100/200
Bedienungsanleitung
Mode d’emploi
Operating Instructions
Gebruiksaanwijzing
RingFlash 100/200
D
F
GB
NL
RingFlash 100/200
Bedienungsanleitung �������������������������������������������������������������������������������3
Mode d’emploi�����������������������������������������������������������������������������������������14
Operating Instructions ���������������������������������������������������������������������������25
Gebruiksaanwijzing���������������������������������������������������������������������������������36
Sicherheitsinformationen
Sicherheitsinformationen
Bitte lesen Sie diese
Bedienungsanleitung sorgfältig durch.
Öffnen Sie unter keinen Umständen
das Gerät oder führen selbst etwaige
Reparaturarbeiten durch.
Installationsort
Vermeiden Sie eine übermäßige
Einwirkung von Rauch, Staub, Vibration,
Chemikalien, Feuchtigkeit, Hitze und
direktem Sonnenlicht.
Stromversorgung
Vorsicht: Verwenden Sie nur den
mitgelieferten Netzadapterstecker,
da andere Netzgeräte das Gerät
beschädigen könnten. Stellen Sie
sicher, dass der Netzadapterstecker
nicht aufgrund von Möbeln und
ähnlichem unzugänglich ist.
Entsorgung
Sie sind verpflichtet, Verbrauchsgüter in
Übereinstimmung mit den zutreffenden
gesetzlichen Bestimmungen ordentlich
zu entsorgen. Das nebenstehende
Symbol auf dem Produkt zeigt an, dass
elektrische und elektronische Geräte,
die nicht mehr benötigt werden, separat
vom Hausmüll entsorgt werden
müssen.
Elektrische und
elektronische Geräte
müssen an einer geeigneten,
durch die öffentlichen
Entsorgungsbehörden
eingerichteten Sammelstelle
entsorgt werden.
Verpackungsmaterial muss
örtlichen Bestimmungen gemäß
entsorgt werden.
Service−Hotline Deutschland: Tel. 0180 5 001388 Kosten bei Drucklegung:
14 ct/Min. aus dem dt. Festnetz; maximal 42 ct/Min. aus den Mobilfunknetzen
D
3
Inbetriebnahme
Inbetriebnahme
Prüfen Sie den Inhalt der Verpackung
Inhalt
RingFlash-Einheit
Netzadapterstecker
Telefonanschlusskabel
Türklingel-Einheit
D
4
RF100 RF200
1
1
1
1
1
1
0
1
12 Volt-Batterie
0
1
Befestigungsschrauben
und Wanddübel
Bedienungsanleitung
0
4
1
1
Anschluss der Basisstation
Schließen Sie die Basisstation wie
in der Abbildung dargestellt an.
Verwenden Sie aus Sicherheitsgründen
nur den Netzadapterstecker und
das Telefonanschlusskabel, die zum
Lieferumfang gehören.
Telefonanschlussdose
Netzsteckdose
S
obald Sie den Netzstrom einschalten,
wird die RingFlash-Einheit zu piepen
anfangen, um zu bestätigen, dass sie
korrekt installiert wurde. Wenn Sie keinen
Piepton hören, ziehen Sie bitte den
Netzstecker, warten 1 Minute und stecken
den Stecker wieder ein.
Service−Hotline Deutschland: Tel. 0180 5 001388 Kosten bei Drucklegung:
14 ct/Min. aus dem dt. Festnetz; maximal 42 ct/Min. aus den Mobilfunknetzen
Inbetriebnahme
Anschluss der Türklingel-Einheit
(nur RingFlash 200)
Die Türklingel hat eine
Standardeinstellung der Klingel auf
1. Wenn Sie dies in Klingel 2 ändern
möchten, verschieben Sie die in der
Türklingel befindlichen Schalter in die
unten dargestellten Positionen.
ON Der Stopp-Anzeigeknopf der
RingFlash-Einheit leuchtet rot auf,
1 2 wenn die Türklingel betätigt wird.
Klingel 1
ON
1 2
Klingel 2
Setzen Sie die im Lieferumfang enthaltene
12V Batterie ein. Lösen Sie dafür die
vier Schrauben der Abdeckung auf der
Rückseite. Achten Sie darauf die Batterien
richtig herum einzusetzen. Setzen Sie die
hintere Abdeckung wieder auf und ziehen
Sie die vier Schrauben fest.
ON
DP
1 2 3 4 5 6 7 8
ON
1 2
Der Stopp-Anzeigeknopf der
RingFlash-Einheit leuchtet grün
auf, wenn die Türklingel betätigt
wird.
Sie brauchen die Einstellung der Klingel nur
ändern, wenn Sie mehr als eine Türklingel
an Ihre RingFlash-Einheit angeschlossen
haben. Die zwei Optionen werden
angeboten, damit Sie anhand der Farbe
der Leuchte der STOPP-Taste erkennen
können, welche Türklingel gedrückt wurde
und welche Tür geöffnet werden muss.
Service−Hotline Deutschland: Tel. 0180 5 001388 Kosten bei Drucklegung:
14 ct/Min. aus dem dt. Festnetz; maximal 42 ct/Min. aus den Mobilfunknetzen
D
5
Inbetriebnahme
Klipsen Sie die vordere Abdeckung der
Türklingel ab, indem Sie eine kleine
Münze in den Schlitz an jedem Ende
der Türklingel setzen und drehen.
Unter Verwendung der mitgelieferten 4
Schrauben und Wanddübel befestigen
Sie die Türklingel neben Ihrer
Eingangstür.
Vibrationsalarm
Sie können ein Vibrationskissen (nicht
im Lieferumfang enthalten) in die Buchse
‘((o))’ auf der Rückseite der RingFlashEinheit einstecken. Bei Eingang eines
Anrufs beginnt das Vibrationskissen zu
vibrieren.
D
6
nter www.amplicom.eu finden Sie
U
die Bezugsquellen für ein kompatibles
Vibrationskissen.
Service−Hotline Deutschland: Tel. 0180 5 001388 Kosten bei Drucklegung:
14 ct/Min. aus dem dt. Festnetz; maximal 42 ct/Min. aus den Mobilfunknetzen
Ihr RingFlash 100/200
Anschluss
Telefonleitung
STOP-Taste
Verbindung
Telefon/Ringflash
(mitgeliefertes
Kabel)
Netzgeräteanschluss
Vibrationskissen
-Buchse
Frontansicht
Klingeltonauswahl
Rückansicht
Klingeltonauswahl für
Türklingel
(nur RingFlash 200)
Lautstärkeregler
Alarmmodus
Linke Seite
D
Rechte Seite
Service−Hotline Deutschland: Tel. 0180 5 001388 Kosten bei Drucklegung:
14 ct/Min. aus dem dt. Festnetz; maximal 42 ct/Min. aus den Mobilfunknetzen
7
So benutzen Sie Ihr RingFlash 100/200
Einstellen des Klingeltons
Auf Ihrer RingFlash-Einheit stehen 3
Klingeltöne zur Auswahl. Bewegen Sie
einfach den Schiebeschalter an der linken
Seite Ihres Produkts, um Klingelton 1, 2
oder 3 zu wählen.
Einstellen des Türklingeltons
(nur RingFlash 200)
Sie können aus zwei verschiedenen
Türklingeltönen wählen, indem Sie einfach
den Schieber an der linken Seite Ihres
Produkts bewegen, um Türklingelton 1
oder 2 zu wählen.
D
8
Einstellen des Alarmmodus
Es stehen 4 Alarmmodi zur Auswahl.
Bitte verwenden Sie den Schieber an der
rechten Seite des Produkts, um einen der
folgenden Alarmmodi zu wählen.
Modus Telefon
0
Aus
Türklingel
Klingelton vom
Lautsprecher
Blinklicht und
Klingelton vom
Lautsprecher
Lautsprecher
und Blinklicht
Lautsprecher
Klingelton vom
und externes
Lautsprecher
Vibrationskissen und externen
Vibrationskissen
Blinklicht
Klingelton vom
und externes
Lautsprecher,
Vibrationskissen Blinklicht
und externen
Vibrationskissen
Unterdrücken des Tonrufs
Betätigen Sie die STOP-Taste um den
Tonruf des eingehenden Anrufs zu
unterdrücken.
Service−Hotline Deutschland: Tel. 0180 5 001388 Kosten bei Drucklegung:
14 ct/Min. aus dem dt. Festnetz; maximal 42 ct/Min. aus den Mobilfunknetzen
So benutzen Sie Ihr RingFlash 100/200
Gebrauch der Türklingel
Danach müssen Sie auch die 8 Schalter in
(nur RingFlash 200)
der Türklingel entsprechend ändern. Dazu
Drücken Sie den Knopf der Türklingel.
lösen Sie die 4 Schrauben der hinteren
Das rote Licht im Knopf schaltet sich ein.
Abdeckung der Türklingel (wie beim
Die RingFlash-Einheit wird den von Ihnen
Einsetzen der Batterie).
eingestellten Türklingelton auslösen (Ton 1
Ändern Sie die Einstellung der 8 Schalter
oder 2).
entsprechend der Einstellung in der
Drücken Sie die STOPP-Taste an der
Ringflash-Einheit. Danach bringen Sie die
RingFlash-Einheit, um den Türklingelton
Türklingel wieder neben Ihrer Eingangstür
zu stoppen. Die rote Leuchte des
an.
Türklingelknopfs wird 1 Minute lang
eingeschaltet bleiben und sich dann
ON
DP
ausschalten.
Störungen durch andere Geräte
(nur Ringflash 200)
1 2 3 4 5 6 7 8
Beim Einsatz des Ringflash 200 und der
Türklingel kann es u. U. zu Störungen
kommen. Sie können die Frequenz des
Ringflash und der Türklingel wie folgt
ändern: An der Unterseite der RingflashEinheit finden Sie unter einer Abdeckung
8 kleine Schalter. Die Frequenz der
Ringflash-Einheit ändern Sie durch
betätigen dieser Schalter.
Service−Hotline Deutschland: Tel. 0180 5 001388 Kosten bei Drucklegung:
14 ct/Min. aus dem dt. Festnetz; maximal 42 ct/Min. aus den Mobilfunknetzen
D
9
So benutzen Sie Ihr RingFlash 100/200
Wandbefestigung
Bei Verwendung geeigneter Schrauben
und Wanddübel (nicht im Lieferumfang
enthalten) können Sie Ihre RingFlashEinheit mittels der Löcher im Boden
befestigen.
Service Hotline
Im Fall technischer Probleme können Sie
auch unsere Hotline anrufen: Tel. 0180
5 00 1388 (Kosten via Telekom zum
Zeitpunkt der D
. rucklegung: 14 ct/Min.). Im
Fall von Garantieansprüchen .wenden Sie
sich an Ihren Händler. Die Garantiezeit
beträgt 2 Jahre
D
10
Service−Hotline Deutschland: Tel. 0180 5 001388 Kosten bei Drucklegung:
14 ct/Min. aus dem dt. Festnetz; maximal 42 ct/Min. aus den Mobilfunknetzen
Wartung/Garantie
Wartung/Garantie
Wartung
• Reinigen Sie die Oberfläche des Produkts
mit einem weichen, flusenfreien Tuch
• Niemals Reinigungsmittel oder Lösungen
verwenden
Garantie
AMPLICOM-Geräte werden gemäß
neuester Produktionsmethoden hergestellt
und geprüft. Die Nutzung sorgfältig
ausgewählten Materials und hochentwickelter
Technologien gewähren eine störungsfreie
Funktion und eine lange Betriebsdauer. Die
Garantiebedingungen gelten nicht, wenn
ein Fehler des Telefonnetzwerkbetreibers
oder jeglichen zwischengeschalteten
Nebenstellen-Erweiterungssystems die
Ursache für die Fehlfunktion des Geräts
darstellt. Die Garantiebedingungen sind nicht
auf wiederaufladbare Batterien oder in den
Produkten verwendete Akkusätze anwendbar.
Der Garantiezeitraum beträgt 24 Monate ab
Kaufdatum.
lle Unzulänglichkeiten, die aus MaterialA
oder Produktionsfehlern resultieren und
während der Garantiezeit entstehen, werden
kostenlos beseitigt. Das Anspruchsrecht
gemäß der Garantiebedingungen wird
nach Intervention des Käufers oder dritter
Parteien annulliert. Schäden, die das
Ergebnis unsachgemäßer Handhabung
oder Betriebs, inkorrekter Platzierung oder
Lagerung, unsachgemäßen Anschlusses
oder Installation, höherer Gewalt oder
anderer externer Einflüsse sind, sind durch
die Garantiebedingungen nicht abgedeckt.
Im Beschwerdefall behalten wir uns das
Recht vor, defekte Teile zu reparieren oder
zu ersetzen oder ein Ersatzgerät zu liefern.
Ersatzteile oder -geräte gehen in unser
Eigentum über. Erstattungsrechte sind im
Fall der Beschädigung ausgeschlossen,
wenn keine Beweise der Absicht oder
groben Fahrlässigkeit seitens des Herstellers
vorliegen.
Service−Hotline Deutschland: Tel. 0180 5 001388 Kosten bei Drucklegung:
14 ct/Min. aus dem dt. Festnetz; maximal 42 ct/Min. aus den Mobilfunknetzen
D
11
Wartung/Garantie
D
12
enn Ihr Gerät im Verlauf des
W
Garantiezeitraums Anzeichen eines Defekts
aufweist, bringen Sie es bitte zusammen mit
dem Kaufbeleg zu Ihrem Händler zurück,
bei dem Sie das AMPLICOM-Gerät gekauft
haben. Alle Rechte auf Ansprüche gemäß der
Garantiebedingungen in Übereinstimmung mit
dieser Vereinbarung müssen ausschließlich
gegenüber Ihrem Händler geltend gemacht
werden. Zwei Jahre nach dem Kauf und
der Übertragung unserer Produkte können
Ansprüche gemäß der Garantiebedingungen
nicht mehr geltend gemacht werden.
Konformitätserklärung
Dieses Gerät erfüllt die in der folgenden
EU-Richtlinie aufgestellten Anforderungen:
1999/5 EU-Richtlinie über Funkanlagen und
Telekommunikationsendeinrichtungen und die
gegenseitige Anerkennung ihrer Konformität.
Die Konformität mit der oben genannten
Richtlinie wird durch das CE-Symbol auf
dem Gerät bestätigt. Um die vollständige
Konformitätserklärung anzusehen, wenden
Sie sich bitte an den auf unserer Website
www.amplicom.eu kostenlos verfügbaren
Download.
Vertrieb: Audioline GmbH, D-41460 Neuss
Service−Hotline Deutschland: Tel. 0180 5 001388 Kosten bei Drucklegung:
14 ct/Min. aus dem dt. Festnetz; maximal 42 ct/Min. aus den Mobilfunknetzen
Wichtige Garantiehinweise
Wichtige Garantiehinweise
Die Garantiezeit für Ihr AMPLICOM − Produkt
beginnt mit dem Kaufdatum. Ein Garantieanspruch besteht bei Mängeln, die auf Material−
oder Herstellungsfehler zurückzuführen sind.
Der Garantieanspruch erlischt bei Eingriffen
durch den Käufer oder durch Dritte. Schäden,
die durch unsachgemäße Behandlung oder
Bedienung, natürliche Abnutzung, durch
falsches Aufstellen oder Aufbewahren, durch
unsachgemäßen Anschluss oder Installation
sowie durch höhere Gewalt oder sonstige
äußere Einflüsse entstehen, fallen nicht unter
die Garantieleistung.
UM UNNÖTIG LANGE WARTEZEITEN
ZU VERMEIDEN, SENDEN SIE
REKLAMATIONSGERÄTE BITTE NICHT
AN UNSERE BÜROADRESSE.
BEI FRAGEN ZUR BEDIENUNG UND
GARANTIELEISTUNG LESEN SIE
BITTE DIE BEDIENUNGSANLEITUNG
ODER WENDEN SIE SICH AN
UNSERE HOTLINE:
0180 5 001388
(Kosten bei Drucklegung:14ct/Min. aus
dem dt. Festnetz, maximal 42 ct/Min. aus
den Mobilfunknetzen)
BITTE WENDEN SIE SICH IM GARANTIEFALL AUSSCHLIESSLICH AN
DEN HÄNDLER, BEI DEM SIE DAS
GERÄT GEKAUFT HABEN, UND
VERGESSEN SIE NICHT, DEN KAUFBELEG VORZULEGEN.
Version 1.1 − 15.06.2010
AUDIOLINE GmbH
Neuss
Internet: www.amplicom.eu
E−mail: [email protected]
D
13
Consignes de sécurité
Consignes de sécurité
Veuillez lire attentivement ce manuel
d’instruction.
N’ouvrez en aucun cas l’appareil ou ne
procédez à aucune réparation.
Emplacement de l’installation
Évitez toute exposition excessive à la
fumée, la poussière, les vibrations, les
substances chimiques, l’humidité, la
chaleur et les rayons du soleil.
Alimentation
Avertissement : N’utilisez que la
fiche d’adaptation fournie, d’autres
alimentations risquant d’endommager le
téléphone. Veillez à ce que l’accès à la
fiche d’adaptation ne soit pas obstruée
par un meuble ou autre.
Mise au rebut
Vous êtes tenu de jeter tous les
consommables conformément aux
réglementations applicables. Le symbole
figurant sur le produit indique que
l’appareil électronique et électrique et les
piles usagés ne doivent pas être jetés
avec les déchets domestiques.
Les appareils électriques et
électroniques doivent être jetés
dans des points de ramassage
installés par les autorités
en charge de la gestion des
déchets.
Les matériaux d’emballage
doivent être jetés
conformément aux
réglementations locales.
F
14
Assistance téléphonique au 0826 805 674 (numéro indigo)
Bien commencer
Bien commencer
Vérifiez le contenu de l’emballage
Contenu
RF100
RF200
Appareil “RingFlash”
Fiche d’adaptation
Câble de branchement
du téléphone
Appareil “Doorbell”
1
1
1
1
1
1
0
1
Batterie 12 volts
0
1
Vis de fixation et prises
murales
Manuel d’utilisation
0
4
1
1
Branchement du socle
Connectez le socle comme illustré
sur le diagramme. Pour des raisons
de sécurité, veillez à n’utiliser que la
fiche d’adaptation ainsi que le câble de
branchement fournis.
D
ès que vous allumerez l’alimentation
principale, l’appareil “RingFlash”
se mettra à biper pour confirmer
qu’il a été correctement installé. Si
vous n’entendez pas de bip, veuillez
débrancher la connexion alimentation,
attendez pendant 1 minute et
rebranchez ensuite l’alimentation.
Assistance téléphonique au 0826 805 674 (numéro indigo)
F
15
Bien commencer
Connexion de l’appareil “Doorbell”
(Uniquement “RingFlash” 200)
Retirez les 4 vis situées à l’arrière du
“Doorbell”.
Le “Doorbell” possède un réglage par
défaut à Bell 1. Si vous souhaitez le faire
basculer en Bell 2, veuillez déplacer
les interrupteurs situés à l’intérieur du
“Doorbell” vers les positions indiquées cidessous.
ON Le bouton indicateur d’arrêt
situé sur l’appareil “RingFlash”
1 2 deviendra rouge lorsque vous
Bell 1 appuierez sur le “Doorbell”.
Le bouton indicateur d’arrêt
ON
situé sur le l’appareil “RingFlash”
1 2 deviendra vert lorsque vous
Bell 2 appuierez sur le “Doorbell”.
F
Insérez la batterie 12 volts fournie, en
veillant à la positionner dans le bon sens.
Replacez le couvercle arrière, positionnez
et resserrez les 4 vis.
16
ON
DP
1 2 3 4 5 6 7 8
ON
1 2
Vous
avez seulement besoin de changer
le réglage de la cloche si vous avez plus
d’un “Doorbell” connecté à votre appareil
“RingFlash”. Les deux options sont
fournies de telle sorte que vous sachiez,
selon la couleur du voyant situé sur le
bouton STOP, sur quel “Doorbell” une
personne a appuyé et à quelle Porte vous
devez répondre.
éclipsez le couvercle avant du
D
“Doorbell” en plaçant une petite pièce
dans l’encoche de chaque côté du
“Doorbell” et tournez. A l’aide des 4 vis et
des prises murales fournies, attachez le
“Doorbell” sur la partie extérieure de votre
porte d’entrée.
Assistance téléphonique au 0826 805 674 (numéro indigo)
Bien commencer
Alarme vibration
Vous pouvez brancher un accessoire
vibrant (non inclus) dans la prise ‘((o))’
située à l’arrière de l’appareil “RingFlash”.
L’appareil vibre lorsque vous recevez un
appel.
Pour en savoir plus sur l’endroit où
acheter un accessoire vibrant compatible,
veuillez visiter le site www.amplicom.eu.
F
Assistance téléphonique au 0826 805 674 (numéro indigo)
17
Votre “RingFlash” 100/200
Bouton STOP
Connexion
ligne
téléphonique
vers prise
murale
Téléphone
vers la prise
“RingFlash”
Prise
adaptateur
d’alimentation
Prise du
vibreur
Vue arrière
Vue de face
Sélection
de la
sonnerie
Sélection de la
tonalité “Doorbell”
(Uniquement
“RingFlash” 200)
Contrôle du
volume
Mode alarme
F
Côté gauche
18
Côté droit
Assistance téléphonique au 0826 805 674 (numéro indigo)
Utilisation de votre “RingFlash” 100/200
Réglage de la sonnerie
Votre appareil “RingFlash” possède 3
sonneries au choix.
Il suffit de déplacer l’interrupteur à tirette
vers le côté gauche de votre produit pour
sélectionner la sonnerie 1, 2 ou 3.
Fixer la tonalité du “Doorbell”
(Uniquement “RingFlash” 200)
Vous avez le choix entre différentes
tonalités “Doorbell”. Il suffit de déplacer
l’interrupteur à tirette vers le côté gauche
pour sélectionner la tonalité 1 ou 2.
Réglage du mode alarme
Vous avez le choix entre 4 modes alarme.
Veuillez utiliser la tirette en la déplaçant
vers le côté droit pour sélectionner un des
modes alarme suivants.
Mode
0
L’alarme
sonnerie
Eteint
Flash
lumineux et
haut-parleur
Haut-parleur
et vibreur
externe
Flash
lumineux
et vibreur
externe
L’alarme Bell
Son de cloche venant
du haut-parleur
Son de cloche venant
du haut-parleur et
Flash lumineux
Son de cloche venant
du haut-parleur et
vibreur externe
Son de cloche venant
du haut-parleur,
Flash lumineux et
vibreur externe
Arrêter l’alarme sonnerie
Appuyez sur le bouton STOP situé sur
la partie avant de l’appareil pour arrêter
l’alarme sonnerie de cet appel, même si
la ligne téléphonique continue de sonner.
L’alarme sonnerie retournera à son
réglage original pour l’appel suivant.
Assistance téléphonique au 0826 805 674 (numéro indigo)
F
19
Utilisation de votre “RingFlash” 100/200
Utilisation de “Doorbell”
(Uniquement “RingFlash” 200)
Appuyez sur le bouton “Doorbell”, le
voyant rouge dans le bouton s’allumera.
L’appareil “RingFlash” jouera la tonalité
“Doorbell” que vous avez réglée (tonalité 1
ou tonalité 2).
Appuyez sur le bouton STOP situé sur
l’appareil “RingFlash” pour arrêter la
tonalité “Doorbell”. Le voyant rouge situé
sur le bouton “Doorbell” restera allumé
pendant 1 minute et il s’éteindra ensuite.
F
20
Compatibilité avec d’autres appareils
installés (Uniquement “RingFlash” 200)
Lorsque vous utilisez le “RingFlash” 200
et le “Doorbell”, il arrive parfois qu’un
problème de compatibilité survienne avec
d’autres appareils installés. Vous pouvez
changer le code situé sous l’appareil
“RingFlash” et à l’intérieur du “Doorbell”
pour résoudre ce problème.
Sous l’appareil “RingFlash”, vous
trouverez 8 petits interrupteurs situés sous
un couvercle. Vous pouvez changer le
réglage de ces interrupteurs pour remédier
à tout problème de compatibilité locale.
Lorsque vous aurez changé le réglage
des 8 interrupteurs situés sur l’appareil
“RingFlash”, vous devrez changer les 8
interrupteurs se trouvant à l’intérieur du
“Doorbell” pour qu’ils correspondent.
Dévissez le “Doorbell” se trouvant sur
l’extérieur de votre porte d’entrée. Retirez
les 4 vis situées sur la partie arrière
du “Doorbell”. Vous verrez que 8 petits
interrupteurs se trouvent à l’intérieur.
Changez le réglage de ces interrupteurs
pour qu’ils correspondent à ceux situés sur
l’appareil “RingFlash”.
ON
DP
1 2 3 4 5 6 7 8
Assistance téléphonique au 0826 805 674 (numéro indigo)
Utilisation de votre “RingFlash” 100/200
eplacez le couvercle arrière, positionnez
R
et resserrez les 4 vis. Réinstallez le
“Doorbell” sur l’extérieur de votre porte
d’entrée comme avant.
Montage mural
A l’aide de vis appropriées et de prises
murales (non fournies), vous pouvez
fixer au votre appareil “RingFlash”
au mur en utilisant les entailles en U
situés sur la base.
Service Hotline
En cas de difficulté, une assistance
téléphonique est à votre disposition
au 0826 805 674 (numéro indigo non
surtaxé). En cas de réclamations
conforme aux conditions de la garantie,
veuillez contacter votre revendeur. La
garantie est valable deux ans.
Assistance téléphonique au 0826 805 674 (numéro indigo)
F
21
Entretien/Garantie
F
22
Entretien/Garantie
Entretien
• Nettoyez les surfaces du produit à l’aide
d’un chiffon doux sans peluches
• N’utilisez jamais agents nettoyants ou de
solvants
Garantie
Les appareils AMPLICOM sont conçus et
testés conformément aux techniques de
production les plus récentes. L’utilisation
de matériaux choisis avec minutie et
technologies sophistiquées garantit un
fonctionnement sans problèmes et un cycle
de vie prolongé. Les termes de la garantie
ne s’appliquent pas lorsque la cause du
dysfonctionnement de l’appareil est dû à
l’opérateur du réseau téléphonique ou à tout
système d’extension d’autocommutateur
privé interposé. Les termes de la garantie ne
s’appliquent pas aux piles rechargeables ou
aux packs d’accus utilisés dans les appareils.
La période de garantie est de 24 mois à
compter de la date d’achat.
Tous les désagréments résultant de défauts
des matériaux de fabrication se produisant
pendant la période de garantie seront résolus
gratuitement. Les droits de réclamation
conformément aux termes de la garantie sont
annulés après l’intervention par l’acheteur
ou des tierces parties. Les dommages
résultant d’une mauvaise manipulation ou
fonctionnement, d’un positionnement ou d’un
stockage inappropriés, un branchement ou
une installation déficients, les impondérables
ou tout autre évènement extérieur ne sont
pas couverts par les termes de la garantie.
En cas de réclamations, nous nous réservons
le droit de réparer ou remplacer les parties
défectueuses ou de fournir un appareil de
rechange. Les appareils ou les pièces de
rechange sont de notre propriété. Les droits
à une compensation en cas de dommage
sont exclus en l’absence de preuve ou
d’intention ou de négligence flagrante par le
fabricant.
Assistance téléphonique au 0826 805 674 (numéro indigo)
Entretien/Garantie
Si votre appareil montre des signes de
défaillance pendant la période de garantie,
veuillez le renvoyer au point de vente
dans lequel vous avez acheté l’appareil
AMPLICOM accompagné du reçu. Les
droits de réclamation conformément à la
garantie dans le cadre de cet accord doivent
exclusivement certifiés pour ce qui est du
point de vente. Deux ans après l’achat et le
transfert de nos produits, les réclamations
dans la garantie ne peuvent plus être
présentées.
Attestation de conformité
Cet appareil est conforme aux normes
stipulées dans la directive européenne:
La directive 1999/5 EU sur les appareils radio
et les équipements de télécommunications
et la reconnaissance mutuelle de leur
conformité. La conformité avec la directive
susmentionnée est confirmée par le
symbole CE figurant sur l’appareil. Pour
lire l’attestation de conformité dans son
intégralité, veuillez vous reporter au
téléchargement gratuit sur notre site Internet
www.amplicom.eu.
F
Distribué par: Audioline GmbH, D-41460
Neuss
Assistance téléphonique au 0826 805 674 (numéro indigo)
23
Remarques importantes concernant la garantie
Remarques importantes concernant
la garantie
La période de garantie de votre produit
AMPLICOM commence à la date d’achat.
Une prétention à la garantie existe en cas de
défauts provenant de vices de matériel ou de
production. Le droit à la garantie expire en
cas d’intervention de l’acheteur ou de tiers.
Les dommages provenant d’un maniement
ou d’une manipulation incorrects, d’une usure
naturelle, d’une mauvaise mise en place ou
d’une mauvaise conservation, d’un raccordement ou d’une installation incorrects ainsi que
d’un cas de force majeure ou autres influences extérieures sont exclus de la garantie.
F
24
AFIN D’ÉVITER DE LONGS TEMPS
D’ATTENTE INUTILES, N’ENVOYEZ
PAS VOS APPAREILS SUJETS À RÉCLAMATION À NOTRE ADRESSE DE
BUREAU.
EN CAS DE QUESTIONS CONCERNANT LA MANIPULATION ET LA
PRESTATION DE GARANTIE, VEUILLEZ LIRE LE MODE D’EMPLOI OU
VOUS ADRESSER À NOTRE
HOTLINE : 0826 805 674
EN CAS DE GARANTIE, VEUILLEZ
VOUS ADRESSER EXCLUSIVEMENT À
VOTRE REVENDEUR APRÈS DUQUEL
VOUS AVEZ ACHETÉ L’APPAREIL,
ET N’OUBLIEZ SURTOUT PAS DE
PRÉSENTER VOTRE BON D’ACHAT.
Version 1.1 − 15.06.2010
AUDIOLINE GmbH
Neuss
Internet: www.amplicom.eu
E−mail: [email protected]
Safety Information
Safety Information
Please read this operating instruction
manual thoroughly.
Under no circumstances open the
device or complete any repair work
yourself.
Installation location
Prevent excessive exposure to
smoke, dust, vibration, chemicals,
moisture, heat and direct sunlight.
Power supply
Caution: Only use the power
adapter plug supplied because other
power supplies could damage the
product. Ensure access to the power
adapter plug is not obstructed by
furniture or such.
Disposal
You are obliged to dispose of
consumable goods properly in
accordance with the applicable legal
regulations. The adjacent symbol on
the product indicates that electrical
and electronic apparatus
no longer required must be
disposed of separately from
domestic waste.
Electrical and electronic
devices must be disposed of
at suitable collection points
provided by the public waste
authorities.
Packaging materials must
be disposed of according to
local regulations.
GB
Service−Hotline UK Tel. 0844 800 6503, cost via UK landline at time of going to print: 6p connection charge and 5p/min. thereafter,
different charges may apply if calling from a mobile phone. Hotline hours are Monday to Friday, 9am to 5pm, excluding public and national holidays
25
Starting Up
Starting Up
Check the contents of the package
Contents
RF100 RF200
RingFlash unit
1
1
Power adaptor plug
1
1
Telephone connection
1
1
cable
Doorbell unit
0
1
12 Volt battery
0
1
Fixing screws and wall
0
4
plugs
Operating Manual
1
1
GB
26
Connecting the base
Connect the base as illustrated in
the diagram. For reasons of safety,
only use the power adaptor plug and
telephone connection cable supplied.
Receiver connection
Mains power outlet
A
s soon as you switch the mains
power on, the RingFlash unit will beep
to confirm that it has been installed
correctly. If you do not hear a beep,
please unplug the power connection,
wait for 1 minute and then plug in the
power again.
Service−Hotline UK Tel. 0844 800 6503, cost via UK landline at time of going to print: 6p connection charge and 5p/min. thereafter,
different charges may apply if calling from a mobile phone. Hotline hours are Monday to Friday, 9am to 5pm, excluding public and national holidays
Starting Up
Connecting the doorbell unit
(RingFlash 200 only)
Remove the 4 screws from the back
of the Doorbell.
The Doorbell has a default setting
of Bell 1, if you wish to change this
to Bell 2, please move the switches
inside the Doorbell to the positions
indicated below.
ON The stop indicator button on
the RingFlash unit will be red
1 2 when the Doorbell is pressed.
Bell 1
The stop indicator button on
the RingFlash unit will be
1 2 green when the Doorbell is
Bell 2 pressed.
ON
Insert the 12 Volt battery supplied,
taking note to position the battery
the correct way around. Replace the
back cover, position and tighten the 4
screws.
ON
DP
1 2 3 4 5 6 7 8
ON
1 2
You
only need to change the Bell setting
if you have more than one Doorbell
connected to your RingFlash unit. The
two options are provided so that you will
know from the colour of the light on the
STOP button which Doorbell has been
pressed and which Door to answer.
Unclip the front cover of the Doorbell
by placing a small coin into the slot at
either end of the doorbell and twisting.
Using the 4 screws and wall plugs
provided, attach the Doorbell outside
your front door.
Service−Hotline UK Tel. 0844 800 6503, cost via UK landline at time of going to print: 6p connection charge and 5p/min. thereafter,
different charges may apply if calling from a mobile phone. Hotline hours are Monday to Friday, 9am to 5pm, excluding public and national holidays
GB
27
Starting Up
Shaker
You can plug a shaker accessory (not
included) into the socket ‘((o))’ on
the back of the RingFlash unit. The
shaker will then vibrate when you
receive an incoming call.
or details of where to purchase a
F
compatible Shaker, please go to www.
amplicom.eu.
GB
28
Service−Hotline UK Tel. 0844 800 6503, cost via UK landline at time of going to print: 6p connection charge and 5p/min. thereafter,
different charges may apply if calling from a mobile phone. Hotline hours are Monday to Friday, 9am to 5pm, excluding public and national holidays
Your RingFlash 100/200
STOP button
Telephone line
connection to
wall socket
Telephone to
RingFlash socket
Power adaptor
socket
Shaker socket
Rear view
Front view
Doorbell tone
selection
(RingFlash 200 only)
Ring tone
selection
Volume control
Alarm mode
GB
Left side
Right side
Service−Hotline UK Tel. 0844 800 6503, cost via UK landline at time of going to print: 6p connection charge and 5p/min. thereafter,
different charges may apply if calling from a mobile phone. Hotline hours are Monday to Friday, 9am to 5pm, excluding public and national holidays
29
Using your RingFlash 100/200
GB
30
Set the ring tone
Mode Ring alarm Bell alarm
Your RingFlash unit has 3 ring tones
0
Off
Bell sound from
to choose from. Just move the slider
the speaker
switch on the left hand side of your
product to select ring tone 1, 2 or 3.
Strobe light Bell sound from
and speaker speaker and
Set the Doorbell tone
strobe light
(RingFlash 200 only)
You can choose from two different
Speaker
Bell sound from
Doorbell tones, just move the slider on
and external speaker and
the left hand side of your product to
shaker
external shaker
select Doorbell tone 1 or 2.
Strobe light Bell sound
Set the alarm mode
and external from speaker,
There are 4 alarm modes to choose
shaker
strobe light and
from. Please use the slider on the right
external shaker
hand side of the product to select one
of the following alarm modes.
Stop the ring alarm
Press the STOP button on the front
of the unit to stop the ring alarm for
that call, even if the telephone line
continues to ring. The ring alarm will
return to its original setting for the next
call.
Service−Hotline UK Tel. 0844 800 6503, cost via UK landline at time of going to print: 6p connection charge and 5p/min. thereafter,
different charges may apply if calling from a mobile phone. Hotline hours are Monday to Friday, 9am to 5pm, excluding public and national holidays
Using your RingFlash 100/200
Using the Doorbell
(RingFlash 200 only)
Press the Doorbell button, the red
light in the button will turn on. The
RingFlash unit will sound the Doorbell
tone that you have set (tone 1 or tone
2).
Press the STOP button on the
RingFlash unit to stop the Doorbell
tone. The red light on the Doorbell
button will remain on for 1 minute and
then turn off.
Compatibility with other local devices
(RingFlash 200 only)
When using the RingFlash 200 and
Doorbell there may occasionally be
a compatibility problem with other
local devices. You can change the
code undereath the RingFlash unit
and inside the doorbell to solve this
problem.
Underneath the RingFlash unit you
will find 8 little switches underneath a
cover. You can change the setting of
these switches to overcome any local
compatibility issues.
When you have changed the setting of
the 8 switches on the RingFlash unit
you will need to change the 8 switches
inside the Doorbell to match.
Unscrew the Doorbell from outside
the Front Door. Remove the 4 screws
from the back of the Doorbell. Inside
you will see 8 little switches, change
the setting of these switches to match
those on the RingFlash unit.
ON
DP
1 2 3 4 5 6 7 8
Service−Hotline UK Tel. 0844 800 6503, cost via UK landline at time of going to print: 6p connection charge and 5p/min. thereafter,
different charges may apply if calling from a mobile phone. Hotline hours are Monday to Friday, 9am to 5pm, excluding public and national holidays
GB
31
Using your RingFlash 100/200
Replace the back cover, position
and tighten the 4 screws. Refix the
Doorbell outside your front door as
before.
Wallmounting
Using appropropriate screws and
wall plugs (not supplied), you can
wallmount your RingFlash unit using
the keyholes on the base.
Service Hotline
In the case of technical problems,
you can contact our hotline service,
UK Tel. 0844 800 6503 (cost via
UK landline at time of going to
print: 6p connection charge and 5p/
min, thereafter, different charges
may apply if calling from a mobile
phone). Hotline hours are Monday
to Friday, 9am to 5pm, excluding
public and national holidays. In the
case of claims under the terms of the
guarantee, contact your sales outlet.
There is a 2 year period of guarantee.
GB
32
Service−Hotline UK Tel. 0844 800 6503, cost via UK landline at time of going to print: 6p connection charge and 5p/min. thereafter,
different charges may apply if calling from a mobile phone. Hotline hours are Monday to Friday, 9am to 5pm, excluding public and national holidays
Maintenance/Guarantee
Maintenance/Guarantee
Maintenance
• Clean the product surfaces with a soft,
fluff-free cloth
• Never use cleaning agents or solvents
Guarantee
AMPLICOM equipment is produced and
tested according to the latest production
methods. The implementation of
carefully chosen materials and highly
developed .technologies ensure troublefree functioning and a long service
life. The terms of the guarantee do not
apply where the cause of the equipment
malfunction is the fault of the telephone
network operator or any interposed
private branch extension system. The
terms of guarantee do not apply to the
rechargeable batteries or power packs
used in the products. The period of
guarantee is 24 months from the date of
purchase.
All deficiencies resulting from material of
production faults which occur during the
period of guarantee will be eliminated
free of charge. Rights to claims under
the terms of guarantee are annulled
following intervention by the purchaser
or third parties. Damage caused as a
result of improper handling or operation,
incorrect positioning or storing, improper
connection or installation, Acts of God or
other external influence are not covered
by the terms of guarantee. In the case
of complaints, we reserve the right to
repair or replace defect parts of provide a
replacement device. Replacement parts
or devices become our property.
Rights to compensation in the case of
damage are excluded where there is no
evidence or intent or gross negligence by
the manufacturer.
If your equipment shows signs of defect
during the period of guarantee, please
return it to the sales outlet in which you
Service−Hotline UK Tel. 0844 800 6503, cost via UK landline at time of going to print: 6p connection charge and 5p/min. thereafter,
different charges may apply if calling from a mobile phone. Hotline hours are Monday to Friday, 9am to 5pm, excluding public and national holidays
GB
33
Maintenance/Guarantee
GB
34
purchased the AMPLICOM equipment
together with the purchase receipt. All
rights to claims under the terms of
the guarantee in accordance with this
agreement must be asserted exclusively
with regard to your sales outlet.
Two years after the purchase and transfer
of our products, claims under the terms of
guarantee can no longer be asserted.
Declaration of Conformity
This device fulfils the requirements
stipulated in the EU directive:
1999/5 EU directive on radio equipment
and telecommunications terminal
equipment and the mutual recognition of
their conformity.
Conformity with the above mentioned
directive is confirmed by the CE symbol
on the device.
To view the complete Declaration of
Conformity, please refer to the free
download available on our website www.
Distributed by: Audioline GmbH, D-41460 Neuss
amplicom.eu.
Service−Hotline UK Tel. 0844 800 6503, cost via UK landline at time of going to print: 6p connection charge and 5p/min. thereafter,
different charges may apply if calling from a mobile phone. Hotline hours are Monday to Friday, 9am to 5pm, excluding public and national holidays
Important Notes on the Guarantee
Important Notes on the Guarantee
The period of guarantee for the AMPLICOM
product begins on the date of purchase.
Rights to claims under the terms of guarantee
relate to deficiencies resulting from material
or production faults. Rights to claims under
the terms of guarantee are annulled following
intervention by the purchaser or third parties.
Damage caused as a result of improper
handling or operation, normal wear and tear,
incorrect positioning or storing, improper connection or installation, Acts of God or other
external influence are not covered by the
terms of guarantee.
TO PREVENT UNNECESSARY LONG
DELAYS, PLEASE DO NOT SEND
EQUIPMENT UNDER COMPLAINT TO
OUR OFFICE ADDRESS.
IN THE CASE OF QUESTIONS CONCERNING OPERATION OR THE
TERMS OF GUARANTEE, PLEASE REFER TO THE OPERATING MANUAL
OR CONTACT OUR HOTLINE:
0844 800 6503
CLAIMS UNDER THE TERMS OF GUARANTEE MAY ONLY BE ASSERTED
TO THE RETAILER WHERE THE
EQUIPMENT WAS PURCHASED,
WHEREBY THE PURCHASE RECEIPT
MUST ALSO BE SUBMITTED.
Version 1.1 − 15.06.2010
AUDIOLINE GmbH
Neuss
Internet: www.amplicom.eu
E−mail: [email protected]
GB
35
Veiligheidsinformatie
Lees deze gebruiksaanwijzing aandachtig U bent verplicht om verbruiksartikelen
volgens de van toepassing zijnde
door.
wettelijke bepalingen op de juiste manier
Maak het apparaat in geen geval open en
af te voeren. Het hiernaast afgebeelde
voer zelf nooit reparatiewerkzaamheden
pictogram op het product geeft weer dat
uit.
elektrische en elektronische apparaten
Voorkom buitensporige inwerking van
die niet langer worden gebruikt,
rook, stof, trillingen, chemicaliën, vocht,
gescheiden van het huisvuil
hitte en direct zonlicht.
moeten worden afgevoerd.
Elektrische en elektronische
Voorzichtig: Gebruik alleen de
apparaten moeten bij een
bijgeleverde netadapterstekker omdat
officieel inzamelingspunt worden
andere voedingseenheden het apparaat
ingeleverd.
zouden kunnen beschadigen. Zorg
Verpakkingsmateriaal moet
ervoor dat de netadapterstekker
volgens de lokale voorschriften
niet door meubels of soortgelijke
worden afgevoerd.
voorwerpen onbereikbaar is.
NL
36
Ingebruikneming
Ingebruikneming
Controleer de inhoud van de verpakking.
Inhoud
RingFlash-eenheid
Netadapterstekker
Toestelaansluitsnoer
Deurbeleenheid
RF100 RF200
1
1
1
1
1
1
0
1
12 volt-batterij
0
1
Bevestigingsschroeven
en muurpluggen
Gebruiksaanwijzing
0
4
1
1
Basisstation aansluiten
Sluit het basisstation zoals in de
afbeelding weergegeven aan.
Gebruik in verband met de veiligheid
alleen de netadapterstekker en het
toestelaansluitsnoer, die worden
bijgeleverd.
Telefoonaansluiting
Telefonanschlussdose
Netzsteckdose
Netspanning
odra u de netspanning inschakelt,
Z
zal de RingFlash-eenheid beginnen te
piepen om te bevestigen dat ze op de
juiste manier geïnstalleerd is. Als u geen
pieptoon hoort, trekt u de stekker uit het
stopcontact, wacht u 1 minuut en steekt u
de stekker weer erin.
NL
37
Ingebruikneming
Deurbeleenheid
aansluiten (alleen RingFlash 200)
De deurbel is standaard ingesteld op bel
1. Als u dit wilt veranderen in bel 2, zet u
de microschakelaars in de deurbel in de
hieronder weergegeven standen.
ON De stop-weergaveknop van de
RingFlash-eenheid licht rood op
1 2 als de deurbel wordt bediend.
Bel 1
ON
1 2
Bel 2
NL
38
De stop-weergaveknop van de
RingFlash-eenheid licht groen op
als de deurbel wordt bediend.
Zet de bijgeleverde 12 V-batterij erin.
Draai hiervoor de vier schroeven van de
afdekking aan de achterkant los. Zorg
ervoor dat de batterijen op de juiste
manier worden geplaatst. Zet de afdekking
weer op de achterkant en draai de vier
schroeven vast.
ON
DP
1 2 3 4 5 6 7 8
ON
1 2
U hoeft de instelling van de bel alleen aan
te passen als u meer dan één deurbel op
uw RingFlash-eenheid hebt aangesloten.
De twee opties worden aangeboden, zodat
u aan de hand van de kleur van het lampje
in de STOP-knop kunt zien welke deurbel
werd bediend en welke deur moet worden
geopend.
Ingebruikneming
Wip de afdekking van de voorkant van
de deurbel af door een klein muntstuk
in de sleuf aan elk uiteinde van de
deurbel te zetten en te draaien. Met
behulp van de bijgeleverde 4 schroeven
en muurpluggen monteert u de deurbel
naast uw voordeur.
Trilalarm
U kunt een trilkussen (niet bijgeleverd)op
de connector ‘((o))’ aan de achterkant van
het RingFlash-basisstation aansluiten.
Na ontvangst van een oproep begint het
trilkussen te trillen.
p www.amplicom.eu vindt u een
O
overzicht van alle leveranciers van
compatibele trilkussens.
NL
39
De RingFlash 100/200
Aansluiting
telefoonleiding
STOP-knop
Verbinding
telefoon/Ringflash
(bijgeleverd snoer)
Netspanningsaansluiting
Trilkussen
-connector
Voorkant
Beltooninstelling
Achterkant
Beltooninstelling voor
deurbel (alleen
RingFlash 200)
Volumeregelaar
Alarmmodus
NL
40
Linkerkant
Rechterkant
Zo gebruikt u de RingFlash 100/200
Beltoon instellen
De RingFlash-eenheid beschikt over 3
beltonen. Verschuif de schakelaar aan de
linkerkant van het apparaat om beltoon 1,
2 of 3 te selecteren.
Beltoon van de deurbel instellen
(alleen RingFlash 200)
U kunt uit twee verschillende beltonen van
de deurbel kiezen door de schakelaar aan
de linkerkant te verschuiven om beltoon 1
of 2 te selecteren.
Alarmmodus instellen
Er zijn 4 alarmmodi beschikbaar. Verschuif
de schakelaar aan de rechterkant van
het apparaat om een van de volgende
alarmmodi te selecteren.
Modus Telefoon
0
Uit
Deurbel
Beltoon via de
luidspreker
Knipperlicht en
Beltoon via de
luidspreker
luidspreker en
knipperlicht
Luidspreker en
Beltoon via de
extern trilkussen luidspreker en
extern trilkussen
Knipperlicht en
Beltoon via de
extern trilkussen luidspreker,
knipperlicht en
extern trilkussen
Beltoon onderdrukken
Bedien de STOP-knop om het geluid van
de inkomende oproep te onderdrukken.
NL
41
RingFlash 100/200 gebruiken
Deurbel gebruiken
Vervolgens moet u ook de 8
(alleen RingFlash 200)
microschakelaars in de deurbel in de
Druk de knop van de deurbel in. Het rode
juiste stand zetten. Hiervoor draait u de
lampje in de knop wordt ingeschakeld.
4 schroeven van de afdekking aan de
De RingFlash-eenheid zal de ingestelde
achterkant de deurbel los (net als bij het
beltoon produceren (beltoon 1 of 2).
plaatsen van de batterij).
Druk op de STOP-knop op de RingFlashZet de 8 microschakelaars in dezelfde
eenheid om de beltoon van de deurbel
stand als in de Ringflash-eenheid.
te stoppen. Het rode lampje in de knop
Vervolgens monteert u de deurbel weer
van de deurbel zal gedurende 1 minuut
naast uw voordeur.
ingeschakeld blijven en dan uitgaan.
Storingen door andere apparaten (alleen
ON
DP
Ringflash 200)
Bij gebruik van de Ringflash 200 en
van de deurbel kunnen onder bepaalde
1 2 3 4 5 6 7 8
omstandigheden storingen optreden. U
kunt de frequentie van de Ringflash en van
de deurbel als volgt aanpassen: Op de
onderkant van de Ringflash-eenheid vindt
u onder een afdekking 8 microschakelaars.
De frequentie van de Ringflash-eenheid
kunt u met deze schakelaars aanpassen.
NL
42
RingFlash 100/200 gebruiken
Bevestiging op de muur
Met behulp van geschikte schroeven en
muurpluggen (niet bijgeleverd) kunt u de
RingFlash-eenheid door middel van de
gaten in de bodemvastzetten.
Servicehotline
In geval van technische problemen kunt
u ook onze hotline bellen: Tel. 0180 5
00 1388 (kosten via de Telekom op het
moment van druk: 14 cent per minuut).
Neem voor garantie contact op met de
leverancier. De garantieperiode bedraagt
2 jaar.
NL
43
Onderhoud/garantie
NL
44
Onderhoud/garantie
Onderhoud
• Reinig het oppervlak van het product met
een zachte, niet-pluizende doek
• Gebruik nooit reinigingsmiddelen of
-oplossingen
Garantie
AMPLICOM apparaten worden met de
nieuwste productiemethoden gefabriceerd
en gecontroleerd. Gebruik van zorgvuldig
geselecteerde materialen en geavanceerde
technologieën zorgt voor een storingvrije
werking en lange levensduur. De
garantiebepalingen zijn niet van toepassing
als een storing in het apparaat het gevolg
is van een fout van de aanbieder van
het telefoonnetwerk of van de centrale
waarop het apparaat aangesloten is. De
garantiebepalingen zijn niet van toepassing
op oplaadbare batterijen of accusets die in de
producten gebruikt zijn. De garantieperiode
bedraagt 24 maanden vanaf datum van
aankoop.
lle gebreken die het gevolg zijn van
A
materiaal- of productiefouten en gedurende
de garantieperiode ontstaan, worden
kosteloos verholpen. De garantie vervalt na
ingrepen door de koper zelf of door derden.
Schade die het gevolg is van onvakkundige
omgang of gebruik, verkeerde plaatsing
of opslag, onvakkundige aansluiting of
installatie, overmacht of andere externe
invloeden valt niet onder de garantie. In geval
van reclamaties behouden wij ons het recht
voor om defecte onderdelen te repareren of
te vervangen of een vervangend apparaat te
leveren. Reserveonderdelen of -apparaten
worden ons eigendom. Recht op vergoeding
is in geval van beschadiging uitgesloten
als geen bewijzen van de intentie of grove
nalatigheid van de fabrikant bestaan.
Onderhoud/garantie
Als het apparaat in de loop van de
garantieperiode verschijnselen van een
defect vertoont, moet u het samen met
de aankoopbon terugbrengen naar de
leverancier bij wie u het AMPLICOM apparaat
hebt gekocht. Aanspraak op garantie
volgens deze overeenkomst kan alleen bij de
leverancier worden gemaakt. Twee jaar na
aankoop en overdracht van onze producten
vervallen alle aanspraken op basis van deze
garantiebepalingen.
Verklaring van overeenstemming
Dit apparaat voldoet aan de in de volgende
EU-richtlijn genoemde specificaties:
Richtlijn 1999/5/EG betreffende
radioapparatuur en telecommunicatieeindapparatuur en de wederzijdse erkenning
van hun conformiteit. De overeenstemming
met de bovengenoemde richtlijn wordt
bevestigd door het CE-merk op het apparaat.
De volledige Verklaring van overeenstemming
kunt u op onze website www.amplicom.eu
kosteloos downloaden.
Verkoop: Audioline GmbH, 41460 Neuss (D)
NL
45
Belangrijke garantie-informatie
Belangrijke garantiebepalingen
De garantieperiode voor uw AMPLICON
product begint op de datum van aankoop. De
garantie dekt gebreken die het gevolg zijn
van materiaal− of fabricagefouten. De garantie vervalt bij ingrepen door koper of derden.
Schade die het gevolg is van onjuiste behandeling of bediening, natuurlijke slijtage, verkeerde plaatsing of verkeerd opbergen, van
foutieve aansluiting of installatie valt evenals
schade door overmacht of overige externe
invloeden niet onder de garantie.
WEND U VOOR GARANTIE ALLEEN
TOT DE LEVERANCIER VAN HET
APPARAAT EN VERGEET NIET OM DE
AANKOOPBON MEE TE NEMEN.
VOORKOM ONNODIG LANGE WACHTTIJDEN EN STUUR HET APPARAAT
NIET NAAR ONS.
RAADPLEEG BIJ VRAGEN OVER DE
BEDIENING EN GARANTIE DEZE
GEBRUIKSAANWIJZING
AUDIOLINE GmbH
Neuss
Internet: www.amplicom.eu
E−mail: [email protected]
NL
46
Versie 1.1 - 15-06-2010