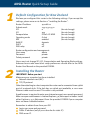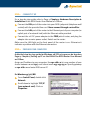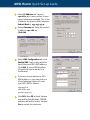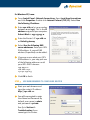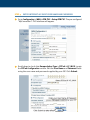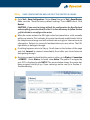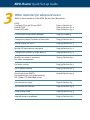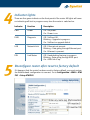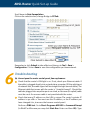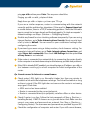
1
ADSL Router
Quick Setup Guide
RTA210
Important
This Guide is intended to get you started quickly.
We have pre-configured the router for the New Zealand
ADSL network. All you need to do is to follow through the
steps we describe here.
This Guide should be read in conjunction with the ADSL
Router User Manual. This is provided as a PDF file on the
Utility CDROM.
Note: the ADSL Router User Manual was written for
international users. New Zealand users should ignore
relevant material on page 9 and all sections of Chapter 3,
except Section 3.3 PPPoA+NAT mode. PPPoA+NAT is the
only mode of operation currently supported in New
Zealand.
Advanced users who have other setup preferences should
refer to the ADSL Router User Manual. There is a table in
Section 3 of this Guide is to assist you in locating the
relevant material.
Contents inside this box:
RTA210 router
Power adapter 12VDC 1A
ADSL line cord for New Zealand
RJ-45 Ethernet cable
Utility CDROM (User Manual included)
ADSL Router Quick Set-up Guide
1
Default Configuration for New Zealand
We have pre-configured this router to the following settings. If you accept the
settings, please move on to Section 2 "Installing the Router".
Router IP address
Subnet mask
VPI
VCI
Encapsulation
Operating mode
NAT
WAN IP
DHCP
DNS relay
192.168.1.1
255.255.255.0
0
100
PPPoA VC-MUX
G.dmt
enabled
dynamic
off
off
(do not change)
(do not change)
(do not change)
(do not change)
(do not change)
Router configuration and management:
User name
admin
Password
private
Telnet password
private
2
Users must not change VPI, VCI, Encapsulation and Operating Mode settings.
Advanced users who have other setup preferences should refer to the ADSL
Router User Manual on the provided CDROM.
Installing the Router
IMPORTANT- Before you start
Make sure your computer has these installed:
Network interface card (NIC)
TCP/IP protocol.
Other than attaching to a host computer the router can be connected to an uplink
port of a network hub. If the hub has no uplink port available, a cross-over
Ethernet cable must be used. This cable is not provided.
A web browser is required to enter your Internet account user name & password.
Make sure your web browser is Internet Explorer 5.0/Netscape 6 or better. Install
either Explorer 5.5 or Netscape 6 from the provided CDROM if your computer
does not have a suitable browser.
Remember to obtain these from your ISP:
Login user name and password
Public IP address (only if you subscribe for static IP)
DNS server IP.
STEP 1
CONNECT IT UP
For a step-by-step guide refer to Page 5 Chapter 2 Hardware Description &
Installation of the ADSL Router User Manual on CDRom.
Connect the DSL port of the router into your ADSL jackpoint (telephone wall
socket) with the provided line cord. Never connect through a microfilter.
Connect the LAN port of the router to the Ethernet port of your computer (or
uplink port of a network hub) with the Ethernet cable provided.
Connect the 12V DC power adapter to the PWR jack of router, and plug the
adapter into a mains power outlet. Switch on the router.
Make sure the LAN light on the front panel of the router is on. Otherwise it
indicates a problem with the Ethernet connection.
STEP 2
PREPARE YOUR COMPUTER
A detailed step-by-step guide for Windows 98/NT4.0/2000 can be found on
Page 17 Chapter 4 Setting up PC on the LAN of the ADSL Router User Manaul
on CDRom.
Assign an IP address to your computer. Use 192.168.1.x (x is any number of your
choice between 2 and 254) and subnet mask 255.255.255.0. Specify gateway
as 192.168.1.1 and enter DNS server IP.
For Windows 95/98/ME:
From Control Panel, double click
Network.
Scroll down to highlight TCP/IP
(your network card). Click on
Properties.
ADSL Router Quick Set-up Guide
Select IP Address tab. Specify
192.168.1.x (x is any number of your
choice between 2 and 254). This is the
IP address assigned to your computer.
Subnet Mask is 255.255.255.0.
Select Gateway tab. Enter the router’s
IP address 192.168.1.1.
Click Add
Select DNS Configuration tab, click
Enable DNS. Type in any name for
host. Enter your ISP’s DNS address.
Click Add. A second DNS address
(if specified) can be added in a
similar way.
If you are unsure what your ISP’s
DNS address is, you may pick one
of the following addresses until
your ISP’s DNS is known:
150.199.1.11
128.206.2.252
131.151.254.243
Click OK & then OK to finish. System
may ask for the Windows CDROM
and then will ask to restart. Answer
Yes to restart the computer.
For Windows XP/2000:
From Control Panel - Network Connections. Open Local Area Connections
and click Properties. Double click Internet Protocol (TCP/IP). Select Use
the following IP address.
Enter 192.168.1.x (x is any number
between 2 and 254). This is the IP
address assigned to your computer.
Subnet Mask is 255.255.255.0.
Enter the Router’s IP 192.168.1.1
as Default gateway.
Select Use the following DNS
server addresses. Enter your ISP’s
DNS address. A second DNS
address (if specified) can be added.
If you are unsure what your ISP’s
DNS address is, you may pick one
of the following addresses until
your ISP’s DNS is known:
150.199.1.11
128.206.2.252
131.151.254.243
Click OK to finish
STEP 3
USE WEB BROWSER TO CONFIGURE ROUTER
Start your web browser and
type the router’s IP address
http://192.168.1.1.
You will be prompted to enter
User Name and Password. By
default, user name is admin
and password is private.
See Q1 in Section 6 Troubleshooting if you
cannot get this screen.
ADSL Router Quick Set-up Guide
STEP 4
ENTER INTERNET ACCOUNT USER NAME AND PASSWORD
Go to Configuration > WAN > ATM PVC > Setup ATM PVC. The pre-configured
"MyConnection" PVC Interface will appear.
Scroll down to check that Encapsulation Type is PPPoA & VC_MUX. Locate
the PPP0A Configuration section. Edit the User Name and Password fields
using the user name and password supplied by your ISP. Click Submit.
STEP 5
SAVE CONFIGURATION AND CHECK IF THE ROUTER IS ONLINE
Go to Tool > Save Configuration. Click on Save. Next go to Tool > Reset Router.
Make sure the "Reset to factory default settings" box is NOT ticked. Click
Restart.
CAUTION - if you reset to factory default the configuration for New Zealand
and everything you entered will be lost. It is then necessary to follow Section
5 of this Guide to reconfigure the router.
When the router restarts the DSL light on the front panel turns solid, normally
within one minute. This indicates the router has already established a link to
the telephone exchange and will authenticate using your Internet account
information. Subject to successful authentication you are online. The DSL
light blinks as data gets through.
If nothing happens return to Step 4. Scroll down to the bottom of the page
and click Connect to connect immediately. Soon after you should observe
data getting through.
Any time you want to check that the router is online, go to Status > Connection
> ATMPVC. Under Status, it should show Active. The public IP assigned by
your ISP is displayed under NAT IP. The picture below shows the router has
been assigned 210.86.78.50. If you cannot go online see Q2 in Section 6 Troubleshooting.
ADSL Router Quick Set-up Guide
3
Other material for advanced users
Refer to these sections of the ADSL Router User Manual for:
DHCP:
Configure PC to get IP from DHCP
Enable DHCP
Show DHCP table
Page 32 Section 4.2
Page 43 Section 6.2.2
Page 70 Section 6.5.6
Use the Web Configuration Manager
Page 39 Chapter 5
Change the private IP address of the router
Page 42 Section 6.2.1
Enable routing RIP v1/v2
Page 45 Section 6.2.3
Modify ISP login name or password
Page 48 Section 6.3.2
Change from Dynamic to Static WAN IP
Page 48 Section 6.3.2
Modify user name or password
for router management
Page 53 Section 6.4.1
Set static routing
Page 54 Section 6.4.2
Set IP packet filtering
Page 57 Section 6.4.3
Set virtual server (NAPT);
Run applications such as Netmeeting,
IRC, Quake, FTP/Mail/Web server
Page 60 Section 6.4.4
Get connection status
Page 62 Section 6.5
Get connection statistics
Page 67 Section 6.5.4
Show routing table
Page 69 Section 6.5.5
Upgrade router via software
Page 72 Section 6.6.2
4
5
Indicator lights
There are four green indicats on the front panel of the router. All lights will come
on indicating self-test in progress every time the router is switched on.
Indicator
Function
Description
PWR
Power
Off - No power.
On - Power is on.
DIAG
Diagnosis
Off - Self-test OK.
Blinking – Upgrade in progress.
On - Self-test or upgrade failed.
LAN
Network Link
Off - Ethernet not present.
Blinking – Data going through Ethernet port.
On - Ethernet is present.
DSL
Link Status
Off - Handshaking/training in progress.
Blinking - Data going through ADSL port.
On - ADSL link is up.
Reconfigure router after reset to factory default
If it happens that the router has been reset to factory default, you must restore
the New Zealand configuration to connect. Go to Configuration > WAN > ATM
PVC > Setup ATM PVC:
ADSL Router Quick Set-up Guide
Scroll down to Data Encapulation.
Click on the selection box, change Bridge to PPP0A:
Remember to click Submit to take effect and then go to Tool > Save >
Configuration. Click on Save to save the configuration you have entered.
6
Troubleshooting
Q1. Cannot open the router control panel from my browser.
Check that the router’s LAN light is on. If not, check your Ethernet cable. If
the cable is plugged directly into a stand-alone computer OR the uplink port
of network hub, the cable type shall be straight through (normal cable). The
Ethernet cable that comes with the router is "straight through". Should the
cable be plugged into any other ports on a hub, a crossover (or uplink) cable
must be used. A crossover cable is not provided with the router.
Check that every IP address on the LAN is unique.The router’s private IP
address is 192.168.1.1. You must use this IP address, or the IP address you
have changed it to, to access the browser control panel.
Perform a PING test. Go to Start–Programs–MS DOS or Command Prompt
(In WinXP or Win2000 you may click Start-Run. Enter cmd then OK). Type
ping 192.168.1.1 then press Enter. The response should be:
Pinging 192.168.1.1 with 32 bytes of data:
Reply from 192.168.1.1: bytes=32 time=4ms TTL=30
If you see a similar response, router is communicating with the network
correctly and the problem lies elsewhere. If the result is Request timed out
or similar failures, there is a TCP/IP networking problem. Check the LAN cable
type is correct (as in step 1 above) and firmly plugged in. To check a computer's
network settings see Step 2 (Section 2 - Configuring Router).
Disable any firewall or virus checking software temporarily. If you are using
Internet Explorer, go to Tools–Internet options-Security. Reset security level
of all 4 icons to default. You can revert to your customised settings after
configuring the router.
If previously you were using a dialup modem, check browser setting. For
example in Internet Explorer, go to Tools–Internet options–Connections, and
select Never dial a connection. Also check LAN Settings that the option Use
a Proxy Server is not selected.
If the router is connected to a network hub, try connecting the router directly
to the computer in a stand-alone setup to eliminate any possible hub problems.
If the LAN is already DHCP enabled, you should assign an IP address 192.168.1.x
(x is between 2 and 254) to a host computer for initial configuration of the
router.
Q2. Cannot connect to Internet or cannot browse
Check router’s DSL light is on. Normally it takes less than one minute to
establish a link with the telephone exchange. The link will establish as long
as there is signal. If the DSL light does not come on the router is not seeing
any signal. Check that:
• ADSL service has been enabled.
• Router is connected to the correct jackpoint.
• Router is connected directly to jackpoint, not after a filter or other device.
Check if router is on line. Follow the last paragraph of Step 5 (Section 2 Installing Router). If NAT IP shows 0.0.0.0, you are not on line. Make sure the
correct user name and password are entered. See Step 4 (Section 2 Configuring Router). The username and password are provided by your ISP.
Check the configuration of computer and router. If you still cannot browse,
ADSL Router Quick Set-up Guide
perform a PING test as described in Q1-3, using these addresses:
(A) Ping www.dynalink.co.nz (or any valid web address)
(B) Ping 205.178.180.16 (or any valid public IP address)
If both (A) & (B) returned no reply, go to second image in Step 4 (Section 2
- Configuring Router). Make sure the Enable Network Address Translation
box is ticked. Also check that the router’s IP 192.168.1.1 is entered as gateway,
as in Step 2 (Section 2 - Configuring Router). If these settings are correct
ping the computer’s IP (eg. Ping 192.168.1.2). If there is still no reply your
network card may be faulty.
If (A) returned no reply but (B) showed a reply, this is probably a DNS problem.
Go to Step 2 (Section 2 - Configuring Router). Check that you have entered
the correct DNS address.
If both (A) & (B) showed a reply, it could be a problem with your browser
setting. Try returning any custom settings of browser to default. If you have
a personal firewall, disable it to see if it makes any difference. Also you may
try shutting down the computer and restarting.
Warranty
Dynalink Modems Ltd warrants this product against defects in materials and
workmanship for a period of twelve months from the original date of purchase.
We will, at our discretion, repair or replace the faulty unit, free of charge, provided
it is returned to us with proof of purchase from an authorised dealer within the
warranty period. Return delivery after repair will be paid for by Dynalink Modems
Ltd within New Zealand. We reserve the right not to repair or replace goods that:
have been mishandled, abused or not installed according to the guidelines
as outlined in the instructions.
have been subjected to a power surge from other equipment or other external
factors.
have been altered or modified.
Help
Always check that your hardware is installed correctly. Check our web site for
the latest information and troubleshooting guide. If you have difficulties, contact
Dynalink Technical Support for issues relating to router installation and operation:
Phone:
Fax:
Email:
Web:
0800 653 962 (Mon-Fri, 9am-4pm)
0800 503 962
[email protected]
www.dynalink.co.nz