1
Concept 470
Owner’s Guide
limited lifetime consumer warranty
Directed Electronics ("Directed") promises to the original purchaser to repair or replace with a
comparable reconditioned model any Directed unit (hereafter the "unit"), excluding without
limitation the siren, the remote transmitters, the associated sensors and accessories, which
proves to be defective in workmanship or material under reasonable use during the lifetime of
the vehicle provided the following conditions are met: the unit was professionally installed and
serviced by an authorized Directed dealer; the unit will be professionally reinstalled in the vehicle in which it was originally installed by an authorized Directed dealer; and the unit is returned
to Directed, shipping prepaid with a legible copy of the bill of sale or other dated proof of purchase bearing the following information: consumer's name, telephone number and address;
the authorized dealers name, telephone number and address; complete product description,
including accessories; the year, make and model of the vehicle; vehicle license number and
vehicle identification number. All components other than the unit, including without limitation
the siren, the remote transmitters and the associated sensors and accessories, carry a one-year
warranty from the date of purchase of the same. This warranty is non-transferable and is automatically void if: the original purchaser has not completed the warranty card and mailed it within ten (10) days of the date of purchase to the address listed on the card; the unit's date code
or serial number is defaced, missing or altered; the unit has been modified or used in a manner contrary to its intended purpose; the unit has been damaged by accident, unreasonable
use, neglect, improper service, installation or other causes not arising out of defects in materials or construction. The warranty does not cover damage to the unit caused by installation or
removal of the unit. Directed, in its sole discretion, will determine what constitutes excessive
damage and may refuse the return of any unit with excessive damage. TO THE MAXIMUM
EXTENT ALLOWED BY LAW, ALL WARRANTIES, INCLUDING BUT NOT LIMITED TO EXPRESS
WARRANTY, IMPLIED WARRANTY, WARRANTY OF MERCHANTABILITY, FITNESS FOR PARTICULAR PURPOSE AND WARRANTY OF NON-INFRINGEMENT OF INTELLECTUAL PROPERTY, ARE
EXPRESSLY EXCLUDED; AND DIRECTED NEITHER ASSUMES NOR AUTHORIZES ANY PERSON
OR ENTITY TO ASSUME FOR IT ANY DUTY, OBLIGATION OR LIABILITY IN CONNECTION WITH
ITS PRODUCTS. DIRECTED DISCLAIMS AND HAS ABSOLUTELY NO LIABILITY FOR ANY AND ALL
ACTS OF THIRD PARTIES INCLUDING ITS AUTHORIZED DEALERS OR INSTALLERS. DIRECTED
SECURITY SYSTEMS, INCLUDING THIS UNIT, ARE DETERRENTS AGAINST POSSIBLE THEFT.
DIRECTED IS NOT OFFERING A GUARANTEE OR INSURANCE AGAINST VANDALISM, DAMAGE
OR THEFT OF THE AUTOMOBILE, ITS PARTS OR CONTENTS; AND HEREBY EXPRESSLY DISCLAIMS ANY LIABILITY WHATSOEVER, INCLUDING WITHOUT LIMITATION, LIABILITY FOR
THEFT, DAMAGE AND/OR VANDALISM. THIS WARRANTY DOES NOT COVER LABOR COSTS
FOR MAINTENANCE, REMOVAL OR REINSTALLATION OF THE UNIT OR ANY CONSEQUENTIAL
DAMAGES OF ANY KIND. IN THE EVENT OF A CLAIM OR A DISPUTE INVOLVING DIRECTED OR
ITS SUBSIDIARY, THE PROPER VENUE SHALL BE SAN DIEGO COUNTY IN THE STATE OF CALIFORNIA. CALIFORNIA STATE LAWS AND APPLICABLE FEDERAL LAWS SHALL APPLY AND GOVERN THE DISPUTE. THE MAXIMUM RECOVERY UNDER ANY CLAIM AGAINST DIRECTED SHALL
BE STRICTLY LIMITED TO THE AUTHORIZED DIRECTED DEALER'S PURCHASE PRICE OF THE
UNIT. DIRECTED SHALL NOT BE RESPONSIBLE FOR ANY DAMAGES WHATSOEVER, INCLUDING
BUT NOT LIMITED TO, ANY CONSEQUENTIAL DAMAGES, INCIDENTAL DAMAGES, DAMAGES
FOR THE LOSS OF TIME, LOSS OF EARNINGS, COMMERCIAL LOSS, LOSS OF ECONOMIC
© 2 0 0 6 d i re c t e d e l e c t ro n i c s
i
OPPORTUNITY AND THE LIKE. NOTWITHSTANDING THE ABOVE, THE MANUFACTURER DOES
OFFER A LIMITED WARRANTY TO REPLACE OR REPAIR THE CONTROL MODULE AS DESCRIBED
ABOVE. Some states do not allow limitations on how long an implied warranty will last or the
exclusion or limitation of incidental or consequential damages. This warranty gives you specific legal rights and you may also have other rights that vary from State to State.
This product may be covered by a Guaranteed Protection Plan ("GPP"). See your authorized
Directed dealer for details of the plan or call Directed Customer Service at 1-800-876-0800.
Directed security systems, including this unit, are deterrents against possible theft. Directed is
not offering a guarantee or insurance against vandalism, damage or theft of the automobile,
its parts or contents; and hereby expressly disclaims any liability whatsoever, including without
limitation, liability for theft, damage and/or vandalism. Directed does not and has not authorized any person or entity to create for it any other obligation, promise, duty or obligation in
connection with this security system.
Make sure you have all of the following information from your dealer:
A clear copy of the sales receipt, showing the following:
z
Date of purchase
z
Your full name and address
z
Authorized dealer's company name and address
z
Type of alarm installed
z
Year, make, model and color of the automobile
z
Automobile license number
z
Vehicle identification number
z
All security options installed on automobile
z
Installation receipts
important! Please note that this manual was intended for US consumers
and therefore includes American phrases or words.
trademarks and copyrights
Bitwriter™, Clifford®, Code-Hopping™, Directed®, Doubleguard®, ESP™, FailSafe®, Ghost Switch™,
Learn Routine™, Nite-Lite®, Nuisance Prevention Circuitry®, NPC®, Revenger®, Silent Mode™, Soft
Chirp®, Stealth Coding™, Stinger®, Valet®, Vehicle Recovery System®, VRS®, and Warn Away®
are all Trademarks or Registered Trademarks of Directed Electronics, Inc.
ii
contents
limited lifetime consumer warranty . . . . . . . . . . . . . . . . . . . . . . . . . .i
trademarks and copyrights . . . . .ii
what is included . . . . . . . . . . . . .1
important information . . . . . . . .1
system maintenance . . . . . . . .2
your warranty . . . . . . . . . . . . .2
fcc/id notice . . . . . . . . . . . . . .2
replacement remote controls . . .3
transmitter configurations . . . . .4
transmitter functions . . . . . . . . . .5
standard configuration . . . . . .5
using your system . . . . . . . . . . . .6
arming . . . . . . . . . . . . . . . . . .6
disarming . . . . . . . . . . . . . . . .8
disarming without a transmitter8
remote siren silencing . . . . . . .8
transmitter chirp muting . . . . .9
transmitter sensor disable . . . .9
intellistart and smartwindows
sensor bypass . . . . . . . . . . . .10
auxiliary channel bypass . . . .10
panic mode with smart door
locking . . . . . . . . . . . . . . . . .10
disarm/valet mode . . . . . . . . .11
transmitter valet mode . . . . .11
one-time auto-arming bypass 12
low battery warning . . . . . . .12
multiple event total recall . . .13
false alarm control technology
(FACT II) . . . . . . . . . . . . . . . .13
select siren sounds . . . . . . . . . . .14
© 2 0 0 6 d i re c t e d e l e c t ro n i c s
diagnostics . . . . . . . . . . . . . . . . .15
arming diagnostics . . . . . . . .15
disarming diagnostics . . . . . .15
arm/disarm diagnostic chart .16
table of zones . . . . . . . . . . . .17
anti-code grabbing (ACG) . . . . .17
smart power up II . . . . . . . . . . .18
power saver mode . . . . . . . . . . .18
programming options . . . . . . . .19
cliffnet wizard installation software programming . . . . . . . .21
manual programming instructions . . . . . . . . . . . . . . . . . . .21
user selectable features . . . . .23
user selectable features descriptions - column one . . . . . . . .23
user selectable features descriptions - column two . . . . . . . .25
user selectable features descriptions - column three . . . . . . .27
pin programming . . . . . . . . . . . .29
auto-immobilization feature . .30
auto-immobilization sequence30
one-time valet feature . . . . . .31
mux sensors . . . . . . . . . . . . . . . .31
audio sensor . . . . . . . . . . . . .31
shock sensor . . . . . . . . . . . . .31
health check . . . . . . . . . . . . . . . .32
glossary of terms . . . . . . . . . . . .33
security & convenience expansions
34
iii
what is included
z
Control module and harness
z
Two five-button transmitters
z
Presentation envelope and quick reference card
z
Two window decals
z
External antenna/receiver with harness
z
Pre-wired blue status LED
z
PlainView 2 Valet switch
z
518C neo-siren
z
504C dual-stage shock sensor with harness
z
506T audio sensor
important information
Congratulations on the purchase of your state-of-the-art vehicle
security system. It has been designed to provide years of trouble-free
operation. This system must be installed by an authorized dealer.
Installation of this product by anyone other than an authorized dealer
voids the warranty. As verification of authorization, all authorized dealers are provided with preprinted dealer certificates.
In order to maximize the use of this system, please review this owner's
guide carefully prior to using your system. You can print additional or
replacement copies of this owner’s guide by accessing the Clifford website at www.clifford.com.
© 2 0 0 6 d i re c t e d e l e c t ro n i c s
1
system maintenance
The system requires no specific maintenance. Your transmitter is powered by a pair of miniature 3V lithium batteries (CR2016) that will last
approximately one year under normal use. When the battery weakens,
operating range will be reduced and the system will provide a low battery warning chirp indication when disarming.
your warranty
Your warranty registration must be completely filled out and returned
within 10 days of purchase. Your product warranty will not be validated if your warranty registration is not returned. Make sure you receive
the warranty registration from your dealer. It is also necessary to keep
your proof of purchase, which reflects that the product was installed by
an authorized dealer.
fcc/id notice
This device complies with Part 15 of FCC rules. Operation is subject to
the following two conditions: (1) This device may not cause harmful
interference, and (2) This device must accept any interference received,
including interference that may cause undesirable operation.
Changes or modifications not expressly approved by the party responsible for compliance could void the user's authority to operate this device.
Directed Electronics, Inc.
Tested to Comply
with FCC Standards
2
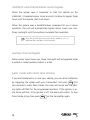
replacement remote controls
You can purchase replacement remote controls from your
Authorized Dealer or on-line at the following web site:
www.directedstore.com
Once you receive your new remote control, please refer to
instructions included on the remote packaging.
© 2 0 0 6 d i re c t e d e l e c t ro n i c s
3
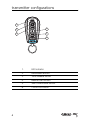
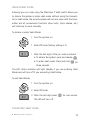
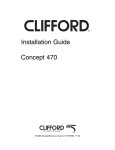
transmitter configurations
1
2
4
3
5
6
4
1.
LED Indicator
2.
Arm/Disarm Button
3.
Trunk Release Button
4.
Remote Start Button
5.
Silent Arm/Disarm Button
6.
Clifford G5 Button
transmitter functions
This system uses computer-based code learning to learn the transmitter buttons. This makes it possible to assign any transmitter button to
any system function. The transmitter initially comes programmed with
standard configuration, but may also be customized using the CliffNet
Wizard PC program. The buttons in all of the instructions in this manual correspond to a standard configuration transmitter.
standard configuration
Button
The arming, disarming, and panic function are controlled by this button.
Button
The trunk release or accessory output A is controlled by this button.
Button
If installed, Remote start is controlled by this button.
Button
Silent arm/disarm is controlled by this button.
and
Buttons
Accessory B is controled by these buttons.
then
Buttons
These buttons activate SmartWindows (If installed. Additional prats
required).
© 2 0 0 6 d i re c t e d e l e c t ro n i c s
5
twice then
Buttons
These buttons activate remote valet.
twice then
Buttons
These buttons disable the sensors.
twice then
Buttons
These buttons enter safe start mode for manual transmission vehicles
and activate Autostart mode (If installed, additional parts required)
using your system
The buttons used in the instructions in this manual correspond to the
standard transmitter configuration. If your transmitter has been custom
configured, the icons on your transmitter buttons may not correspond
to the indicated functions.
arming
You can activate, or arm, the system by pressing
on your trans-
mitter for one second. When the system arms, you will hear two short
siren sounds, or chirps, and see the parking lights flash twice. The LED
will begin to flash steadily. If the vehicle’s power door locks have been
connected to the system, the doors will lock.
While the system is armed, the LED status indicator will flash approxi6
mately once per second showing that the system is actively protecting
your vehicle. If you hear more than two chirps when arming, refer to
the Diagnostics section of this guide. These extra chirps confirm a malfunction autobypass.
The security system also can be programmed to arm itself
automatically (called passive arming). If the system is programmed for
passive arming, it will automatically arm 30 seconds after the ignition
is turned off and the system sees you leave the vehicle by opening and
closing a door. Whenever the system is in its 30-second passive-arming
countdown. The siren will chirp twice and the lights will flash twice five
seconds after the last door has been closed. The system is not actually
armed at that point. The system arms and the doors lock (if connected
and programmed for passive locking) at 30 seconds, but the siren will
not chirp. The early chirps provide you with a 25-second warning prior
to arming.
note: If any protected entry point (a door or a switch-protected trunk or
hood) is open, the system will not passively arm. Additionally, each
time a protected entry is triggered during the arming countdown, the
30-second countdown starts over.
When armed, your vehicle is protected as follows:
z
The LED will flash as a visible theft deterrent.
z
Light impacts will trigger the Warning Zone signal. When
triggered, the siren will sound for a few seconds.
z
Heavy impacts will trigger the system. The triggered
sequence is 30, 60, or 90 seconds of constant siren sounding and flashing parking lights.
z
If a protected entry (door, hood, or trunk) is opened, the system will immediately trigger the siren and flash the parking
lights. If any vehicle glass is broken the system will immediately trigger the siren and flash the lights.
© 2 0 0 6 d i re c t e d e l e c t ro n i c s
7
disarming
To disarm the system, press
. You will hear a chirp and the park-
ing lights will flash once. If the power locks are connected to the system, the doors will unlock. If the siren chirps three times when disarming, refer to the Diagnostics section of this guide. This is called Tamper
Alert. If the siren is active when the system is disarmed you will hear
two chirps but the system is not disarmed. (Refer to the Remote Siren
Silencing section of this guide.) However, if the alarm completes the full
trigger cycle when disarmed you will hear three chirps.
disarming without a transmitter
This feature allows you to disarm the system without the transmitter
should it be lost, damaged, or disabled. In order to disarm without a
transmitter, you must have the vehicle’s ignition key, know where the
PlainView 2 Valet switch is located, and have the PIN code. Be sure to
check with the installer for the location of the PlainView 2 Valet switch.
Please refer to the Disarm/Valet Mode section of this guide for instructions to enter the pin code.
remote siren silencing
This system offers remote siren silencing. Remote siren silencing is a feature that makes it possible to silence and reset the system when it is
triggering without disarming the system. If the system is triggered and
the siren has been sounding, press
on the transmitter to stop the
trigger and return the unit to the armed state. The system will not disarm, but rather reset. This prevents you from disabling the system
should you wish to silence it without visually checking the vehicle. After
8
resetting the system, press
again to disarm the system.
transmitter chirp muting
To temporarily turn off the arm or disarm chirps, use transmitter chirp
muting. Simply press
on the transmitter, and the confirmation
chirp(s) will be eliminated for that one operation only. The parking
lights will flash to confirm the arm/disarm command. If you want the
arm/disarm chirps turned off permanently, please refer to the UserSelectable Features section of this guide.
transmitter sensor disable
To temporarily disable a sensor input, arm the system, press
twice then
. The lights will flash four times and all warn away
trigger zones one, three, and eight are bypassed. Press the buttons
again; the lights flash four times and both warn away and full trigger
zones one, three, and eight are bypassed until the system is disarmed.
This can be performed anytime the system is armed.
1.
Arm the system.
2.
Press
3.
The lights will flash four times; all warn away zones are
now bypassed.
4.
Transmit the sensor bypass channel again.
5.
The lights will flash four more times; the sensor warn away
and full trigger zones are now bypassed.
6.
The sensor zones will reset when disarmed.
© 2 0 0 6 d i re c t e d e l e c t ro n i c s
twice then
.
9
intellistart and smartwindows sensor bypass
When the system sees a command to start the vehicle via the
Intellistart, it bypasses sensor zones and will continue to bypass these
zones until the remote start shuts down.
When the system sees a SmartWindows command for up or down
operation, the unit will automatically bypass sensor zones one, two,
three, and eight until the windows complete their operation.
note: These are optional accessories that can be added to your system. Additional parts and labor will be required.
auxiliary channel bypass
Alarm sensor input zones one, three, and eight will be bypassed while
a pulsed or timed auxiliary Output is active.
panic mode with smart door locking
If you are threatened in or near your vehicle, you can attract attention
by triggering the system with your transmitter! Just press
for
two seconds to enter Panic Mode. The siren will sound and the parking lights will flash for the programmed duration. If the ignition is on,
the doors will lock; if the ignition is off, the doors will unlock. To stop
Panic Mode at any time press
10
on the transmitter again.
disarm/valet mode
Entering your pin code using the PlainView 2 Valet switch allows you
to disarm the system or enter valet mode without using the transmitter. In valet mode, the security system will not arm, even with the transmitter, but all convenience functions (door locks, trunk release, etc.)
will continue to work normally.
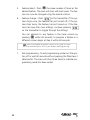
To disarm or enter Valet Mode:
1. Turn the ignition on.
2. Enter PIN code (factory setting is 2).
3. After the last digit of the pin code is entered:
a. To disarm the system: press and release
b. To enter valet mode: Press and hold
.
for
three seconds.
The LED status indicator will light steadily if you are entering Valet
Mode and will turn off if you are exiting Valet Mode.
To exit Valet Mode:
1. Turn the ignition on.
2. Enter PIN code.
3. After the last digit press
for one second.
The LED will turn off.
transmitter valet mode
© 2 0 0 6 d i re c t e d e l e c t ro n i c s
11
The operations described in this section refer to transmitter buttons.
Remember, the buttons used in all the instructions in this guide correspond to a Standard Configuration transmitter. This may not be how
your transmitter is set up.
To enter Valet Mode, press
twice then
. The LED status
indicator will light solid if you are entering Valet Mode, or will turn off
if you are exiting Valet Mode.
one-time auto-arming bypass
This will bypass the auto arm feature once only.
1.
With the key, turn the ignition on, then off within two seconds.
2.
The siren will chirp once to confirm auto arming bypass.
3.
The system will not auto arm.
note: The system will revert to normal auto arming when the system
sees the ignition on for at least three seconds.
During auto arming bypass the system will not roll up the windows if
SmartWindows is connected, and the accessory output will not autoactivate when using the remote to arm the system.
low battery warning
When the transmitter battery is low, the system will generate a lowpitched tone when disarmed.
12
multiple event total recall
This will report the last eight system triggers.
1.
Press and hold
of the PlainView 2 Valet switch.
2.
While still holding
release the button.
3.
The LED will start to blink to indicate the most recent trigger
and proceed down to the eighth trigger. If fewer than eight
triggers are stored in memory, the LED will blink continuously until the system is armed/disarmed using the transmitter
or the ignition is turned on. For more information, please
refer to the Table of Zones section of this guide.
, arm and disarm the system, then
false alarm control technology (FACT II)
Your system offers FACT
II, a feature that prevents annoying
repetitive trigger sequences due to a faulty sensor or environmental
conditions such as thunder, jackhammers, airport noise, etc.
Here’s how it works: The alarm triggers three times. If the same sensor is
triggering the alarm and the first and the third triggers are within 60 min-
II will interpret this pattern of triggers as false
alarms. After the third trigger, FACT II ignores, or bypasses, that sensor
utes of each other, FACT
(along with any other sensors sharing the same zone) for 60 minutes.
If the bypassed sensor tries to trigger the system while it is being
bypassed, the 60-minute bypass period will start over. This ensures that
a sensor that continually triggers will remain bypassed.
Doors are covered by FACT
II differently; if the alarm is triggered by an
open door for three full cycles, the doors will be bypassed until the trig© 2 0 0 6 d i re c t e d e l e c t ro n i c s
13
ger ceases. FACT
II is programmable. See the Programming Options
section of this guide.
note: Arming and disarming the system does not reset this function! The
only way to reset a bypassed zone is for 60 minutes or to turn on the ignition. If testing your system, it is important to remember that the FACT II programming can cause zones to be bypassed and appear to stop working.
If you wish to clear the FACT II memory, turn the ignition key on.
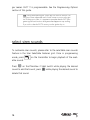
select siren sounds
To customize siren sounds, please refer to the selectable siren sounds
feature in the User Selectable Features grid. Once in programming
mode, press
on the transmitter to begin playback of the avail-
able sounds.
Press
on the PlainView 2 Valet switch while playing the desired
sound to add that sound; press
delete that sound.
14
while playing the desired sound to
diagnostics
The microprocessor at the heart of your security system is constantly
monitoring all of the switches and sensors that are connected to it. It
detects any faulty switches and sensors and prevents them from disabling the entire system. The microprocessor will also record and report
any triggers that occurred during your absence.
arming diagnostics
If the system is armed while an input is active (door open, sensor triggering, etc.) the unit will chirp twice when arming and then four more
times five seconds later. This is called Bypass Notification.
The security system will ignore the input that was active when the system was armed, until the input goes away. Three seconds later the system will monitor that input normally. For example, if your vehicle has
interior light exit delay, and you arm the system before the interior light
goes out, you may hear Bypass Notification chirps. Once the light shuts
off, however, the doors are monitored normally.
disarming diagnostics
Extra disarm chirps are the Tamper Alert. If three chirps are heard when
disarming, the system was triggered in your absence. If three chirps are
heard, the LED status indicator will indicate which zone was involved
when you turn the ignition on (see the Table of Zones section). The system will retain this information in its memory. Refer to the Multiple
Event Total Recall section of this guide.
© 2 0 0 6 d i re c t e d e l e c t ro n i c s
15
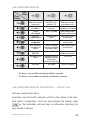
arm/disarm diagnostic chart
16
Action
Chirps
Light Flashes
Description
Arm
2
2
System armed
Arm
4
4
System armed with hood/
trunk active and bypassed
(zones 5 and 6)
Arm
2 (5 sec.) 4
2 (5 sec.) 4
System armed with door
active and bypassed (zone 4)
Arm
2 (10 sec.) 4
2 (10 sec.) 4
System armed with sensor
active and bypassed zones
1, 3, and 8
Disarm
1
1
System disarmed
Disarm
3
3
System disarmed with
tamper alert
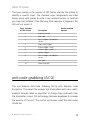
table of zones
The zone number is the number of LED flashes used by the system to
identify a specific input. The standard input assignments are listed
below, along with spaces to write in any optional sensors or switches
you have had installed. If the Warning Zone response is triggered, the
LED will not report it.
Zone - Number
of LED Flashes
Description
1
Proximity sensor
2
Not used
3
Mux 1 trigger - for optional
sensors
4
Door switch trigger
5
Instant trigger - trunk
6
Instant trigger - hood
7
Ignition trigger
8
Mux 2 trigger - for optional
sensors
9
Not used
10
Power interrupt
Dealer-Installed
Options
anti-code grabbing (ACG)
This unit features Anti-Code Grabbing (ACG) with Random Code
Encryption. This means the receiver and transmitters each use a mathematical formula called an algorithm to change their code each time
the transmitter is used. This technology has been developed to increase
the security of the unit. The control unit knows what the next codes
should be.
© 2 0 0 6 d i re c t e d e l e c t ro n i c s
17
smart power up II
This security system will store its current state to non-volatile memory.
If power is lost and then reconnected the system will recall the stored
state from memory. This means if the unit is in Valet Mode and the battery is disconnected for any reason, such as servicing the car, when the
battery is reconnected the unit will still be in Valet Mode. This applies
to all states of the system including arm, disarm, and Valet Mode.
power saver mode
Your system will automatically enter Power Saver Mode while armed or
in Valet Mode, after a period of time in which no operation has been
performed. This lowers the current draw on the vehicle's battery and
prevents the system from draining the battery. Power Saver Mode takes
over under the following conditions:
18
z
Power Saver when the system is armed: After the system has
been armed for 48 hours, the LED will flash at half its normal rate, decreasing the system's current draw.
z
Power Saver in Valet Mode: When the system enters Valet
Mode the LED illuminates steadily. If the vehicle is not used
(ignition is not turned on) for a period of one hour while the
system is in Valet Mode, the LED will shut off. If the system
remains in Valet Mode, the LED will come back on the next
time the ignition is turned on and then back off.
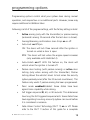
programming options
Programming options control what your system does during normal
operation, and require few or no additional parts. However, some may
require additional installation labor.
Following is a list of the program settings, with the factory settings in bold:
z
Active arming (only with the transmitter) or passive arming
(automatic arming 30-seconds after the last door is closed).
z
Arming/disarming confirmation siren chirps on or off.
z
Auto-Lock on/off/rpm
ON: The doors will lock three seconds after the ignition is
turned on unless a door is open.
RPM: The doors will lock when the engine speed increases
(only availiable with Intellistart 4).
z
Auto-Unlock on/off: With this feature on, the doors will
unlock when the ignition is turned off.
z
Passive door locking (with passive arming) or active door
locking (only when arming with the transmitter). Passive
locking allows the vehicle's doors to lock when the security
system passively arms (after the 30 second countdown). This
feature only works if passive arming has been programmed.
z
Panic mode enabled/disabled: Some states have laws
against siren capability while driving.
z
Full trigger response 30, 60, or 90 seconds: This determines
how long the full triggered sequence lasts. Some states have
laws regulating how long a security system can sound before
it is considered a nuisance.
z
False Alarm Control Technology (FACT II) on or off: Please
refer to the FACT II section of this guide for a complete
© 2 0 0 6 d i re c t e d e l e c t ro n i c s
19
explanation of how FACT II operates. If FACT II is programmed off, the security system will respond to inputs from
any sensor indefinitely.
note: Because many states have laws regulating security systems, programming FACT II off may cause your system to violate state laws.
z
Siren tones and chirp volume: The output of the siren consists of six different tones in sequence and the arm/disarm
chirp volume can be changed or eliminated.
z
Reset the system to all factory defaults.
z
Add or remove remote controls.
z
Change PIN code.
z
Custom configure the remote control.
z
Remote valet on or off.
z
Autostart with low battery voltage or cold temperature.*
* This feature is only available with optional IntelliStart
connected.
20
cliffnet wizard installation software programming
Cliffnet Wizard provides access to all available system features and
some that are not available when manually programming with the
Valet switch. Cliffnet Wizard is compatible with Microsoft Windows
2000/ME/XP/NT so most programming operations can be accomplished
by pointing and clicking with a mouse. This eliminates the need for programming grids and lengthy programming sequences. For a complete
guide to system programming using the Cliffnet Wizard refer to the
Cliffnet Wizard help menu.
manual programming instructions
Be sure to document changes by taking note of all feature changes
made in programming mode.
To enter the User Selectable Features programming:
1.
Ignition on - Turn the ignition to the run position or start
the engine.
2.
Enter PIN - Enter the factory preset PIN code 2 by pressing
on the PlainView 2 Valet switch twice, then
once.
note: If the factory preset PIN has been changed, the new PIN must
be entered.
3.
Hold/Chirp/Release - After entering the PIN code, press and
hold
until a chirp is heard and the LED turns on, then
release the button. You have now entered the feature selection position of the User Selectable Features grid.
4.
Column select - Press
the same number of times as the
desired column. After a pause the siren will chirp the same
number of times as the selected column for confirmation.
© 2 0 0 6 d i re c t e d e l e c t ro n i c s
21
5.
Feature select - Press
the same number of times as the
desired feature. The siren will chirp with each press. The feature can now be changed using the remote control.
6.
Feature change - Press
on the transmitter. If the system chirps once, the feature has just turned off; if the system chips twice, the feature has just turned on. If the feature has more than two settings, continue pressing
on the transmitter to toggle through the settings.
You can advance to any feature in the same column by
pressing
within 60 seconds; to program a feature in a
different column begin at step 4 within 60 seconds.
note: Refer to the Feature Descriptions sections of this guide for important notes and descriptions of the system features and programming.
7.
22
Exit programming - To exit programming mode turn the ignition off or wait 60 seconds without pressing the PlainView 2
Valet switch. The siren will chirp three times to indicate programming mode has been exited.
user selectable features
Then
Press
First
Press
Add new remote
(autolearn)
Auto (passive)
arm off/on
Set PIN code
(default = 2)
Select siren
sounds
New remote learn
arm/disarm only
New remote learn
accessory A channel
Chirps
off/on/quiet
FACT II off/on
New remote learn
accessory B channel
Auto lock
off/ignition/rpm
Remote valet
off/on
New remote learn
silent mode
Auto unlock
off/ignition
Entry delay off/on
New remote learn
remote valet
Auto (passive)
arm and lock
off/on
Siren duration
30/60/90
Reset to default
(except transmitter
and valet code)
Panic off/on
New remote learn
remote start*
Second unlock
off/on
Autostart setting*
(off/battery only/
temp only/
battery and temp)
Not Used
Not used
New remote learn
window down/vent**
Not Used
Clear all remotes
* This feature is only available with optional IntelliStart connected.
** This feature is only available with optional SmartWindows connected.
user selectable features descriptions - column one
add new remote (auto learn)
Auto-learn new five-button remote controls to the system in the standard button configuration. Once you have entered the feature, press
on the transmitter until you hear a confirmation indicating the
new remote is learned.
© 2 0 0 6 d i re c t e d e l e c t ro n i c s
23
auto (passive) arm - on/off
z
On: When the system sees the ignition turn off and the last
protected entry (door, hood, or trunk) close, it will begin a
30-second countdown before arming itself. After the first
five seconds, you will hear two chirps and the lights will
flash. The system will arm 25 seconds later.
z
Off: The transmitter must be used to arm the system.
chirps - on/off/quiet
z
On: Chirps will sound when arming/disarming the system.
z
Off: Chirps will not sound when arming/disarming the system.
z
Quiet: Chirps will sound when arming/disarming the system
but at a lower volume than normal.
auto lock - ignition/off/rpm
z
Ignition: The doors will automatically lock three seconds after
the ignition is turned on unless a door is open at that time.
z
Off: The doors will not lock automatically.
z
Rpm: The doors will lock when the system sees the engine
reach a preprogrammed RPM (available only with Intellistart 4).
auto unlock - ignition/off
24
z
Ignition: The doors will automatically unlock as soon as the
ignition is turned off.
z
Off: The doors will not automatically unlock when the ignition is turned off.
auto (passive) arm and lock - on/off
z
On: The doors will lock when the system passively arms. This
feature only applies when passive arming is programmed on.
z
Off: The doors will not lock when the system passively arms.
siren duration - 30/60/90
z
The system will sound the alarm for the programmed duration (30/60/90 seconds) during an alarm trigger or when the
system is put into panic mode.
second unlock - on/off
z
On: Second unlock output is active when the arm/disarm
button is pressed within 10 seconds of disarming the system.
z
Off: Second unlock output is pulsed at the same time as the
unlock output when the system is disarmed.
note: The second unlock can be installed by your dealer. Please note
that extra parts and labor may be required.
user selectable features descriptions - column two
set pin code
This feature allows the setting of the user's personal PIN code. For more
information, please refer to the PIN Programming section of this guide.
select siren sounds
The individual sounds the siren produces during an full trigger alarm can
be customized for owner recognition of an alarm trigger. For more information, please refer to the Select Siren Sounds section of this guide.
© 2 0 0 6 d i re c t e d e l e c t ro n i c s
25
fact II on/off
z
On: The alarm will bypass for 60 minutes if zones 1, 3, and
8 are triggered three times within a one hour period.
z
Off: The alarm will respond to zones 1, 3, and 8 inputs indefinitely without bypassing.
remote valet on/off
z
On: The alarm can be put into valet mode with the remote
control.
z
Off: The alarm can not be put into valet mode with the
remote control.
entry delay on/off
z
On: If the system has passively armed, it will not trigger for 15
seconds after a door is opened allowing the user to enter the
vehicle and disarm the system via the PlainView 2 Valet switch.
z
Off: There is no entry delay when armed. The system will
trigger instantly when a door is opened.
reset to default settings
z
All system settings (except PIN and remote programming) in
the User Programming grid will be reset to their default factory setting as indicated in bold lettering.
z
Press the arm/disarm button of the TX; the siren will chirp
twice as confirmation.
panic on/off
26
z
On: The panic feature is available.
z
Off: The panic feature is not available.
auto start setting - off/battery only/temp only/battery and temp
z
This feature is only available with the IntelliStart option.
z
Off: The vehicle will not autostart.
z
Battery: The vehicle will only autostart when the car battery
gets low.
z
Temperature: The vehicle will only autostart at a preset low
temperature.
z
Battery and temperature: The vehicle will autostart with a
low car battery or low temperature.
note: Temperature and battery calibration and settings can be made
only with the Cliffnet Wizard.
user selectable features descriptions - column three
The features in this column pertain to programming individual transmitter channels in custom configurations. The following is an explanation of the features.
arm/disarm only
The remote control channel programmed into this feature will arm/disarm the system only.
note: When programming a new remote control to custom configuration a channel must first be programmed to this feature before programming the remaining channels.
accessory a output
The transmitter channel programmed into this feature will activate the
accessory output.
© 2 0 0 6 d i re c t e d e l e c t ro n i c s
27
accessory b output
The transmitter channel programmed into this feature will activate the
accessory output.
silent mode
The transmitter channel programmed into this feature will arm/disarm
the system, but the siren will not chirp.
remote valet
The transmitter channel programmed into this feature will make the
system enter/exit valet mode.
remote start
z
This feature is only available with IntelliStart connected.
z
The transmitter channel programmed into this feature will
activate or shut down the Intellistart remote start system.
window control
z
This feature is only available with SmartWindows connected.
z
The transmitter channel programmed into this feature will activate the vent or roll down feature of the SmartWindows system.
clear all remotes
28
z
This feature will erase all remote codes from the system
memory. This feature is convenient for erasing any transmitters that have been lost, stolen, or incorrectly programmed
into the system.
z
After entering this feature press any button on the transmitter; the siren will chirp to indicate that all transmitters have
been erased from memory.
pin programming
A PIN code can have one to four digits; each digit can be from 0–9.
note: A PIN code cannot begin with a zero.
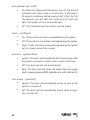
Programming Procedure
1.
Enter the feature location in the installer programming grid.
2.
Immediately press and release
switch.
3.
Select each digit by pressing
of the PlainView 2 Valet
1-9 times, and then press
to enter the number into the system. To enter a zero,
press
only.
4.
Wait for two siren chirps after a five second pause or five
seconds after the last digit has been entered if using less
than four digit code number.
5.
Turn off the ignition; the siren will chirp three times.
6.
The programming mode is now exited.
For Example: to program a PIN code of 1032:
1.
Press and release
hear one chirp.
3.
Press and release
once. You will not hear a chirp
after programming a zero.
5.
Press and release
three times, and then press
once. You will hear three chirps.
6.
Press and release
two times, and then press
once. You will hear two chirps.
© 2 0 0 6 d i re c t e d e l e c t ro n i c s
once and
once. You will
29
PIN Code Confirmation Procedure
Begin this procedure within 15 seconds of finishing the programming
sequence or the new code will not be set.
1.
Turn on the ignition.
2.
Enter the new PIN code.
3.
Press and hold
for three seconds.
z
LED turns on: New PIN code is learned and programming is complete.
z
LED stays off: New PIN code is not learned and the system reverts to the old PIN code. Redo the programming
sequence.
auto-immobilization feature
Auto-immobilization is a feature designed for maximum security; it
activates the UltraSecure Immobilization circuitry automatically.
auto-immobilization sequence
1.
Turn ignition off or disarm alarm.
2.
After 30 seconds the systems Immobilization circuits activate
and engage the starter and ignition interrupt.
3.
LED blinks at ½ normal speed.
Disarming auto-immobilization
To disarm auto-immobilization when active, follow any of the
sequences listed below.
30
z
Turn ignition on and press the arm/disarm button.
z
Arm the alarm and then disarm the alarm.
z
Turn the ignition on and enter the system valet/PIN code.
one-time valet feature
This feature allows the system to be put in valet mode only until the
next time the ignition is turned on.
OFF: Valet mode will only be exited by using the valet switch or
the remote control.
ON: Valet mode will be exited every time the ignition is turned on.
mux sensors
audio sensor
The 506T Audio Sensor is a low-current device that provides an added
level of protection to an existing security system by detecting sounds that
have the acoustic signature of breaking glass or metal-to-glass impacts.
shock sensor
The 504C dual zone magnetic resonance shock sensor provides a warn
ing trigger for lighter impacts to the vehicle as well as a full trigger for
heavy impacts.
© 2 0 0 6 d i re c t e d e l e c t ro n i c s
31
health check
Directed Electronics recommends you return to your installing Clifford
dealer to have your system checked for correct operation. The first
check is due one year after the installation date and at yearly intervals
thereafter.
note: There may be a small charge incurred for this service.
32
glossary of terms
Control Unit: The "brain" of your system. Usually hidden underneath
the dash area of the vehicle. It houses the microprocessor which monitors your vehicle and controls all of the system's functions.
Input: A physical connection to the system. An input can be provided
by a sensor, pinswitch or through an existing system in the vehicle, such
as ignition or courtesy lights.
LED: Blue light mounted somewhere in the vehicle. It is used to indi-
cate the status of your system. It is also used to report triggers and
faults in the system or sensors.
UltraSecure Immobilizer: A feature on the module which prevents the
vehicle’s engine from operating whenever the system is armed. The
vehicle is never prevented from running when the system is disarmed,
in Valet mode, or loss of power.
PlainView 2 Valet Switch: A small two-button switch mounted some-
where inside the vehicle. It is used to override the alarm when a transmitter is lost or damaged, or to enter or exit Valet mode.
Siren: Noise generating device usually installed in the engine compart-
ment of the vehicle. It is responsible for generating the "chirps" you
hear, as well as the six tones you hear while the alarm is triggered.
Transmitter: Hand-held transmitter which operates the various func-
tions of your system.
Trigger or Triggered Sequence: This is what happens when the alarm
goes off or trips. The triggered response of your system consists of the
© 2 0 0 6 d i re c t e d e l e c t ro n i c s
33
siren sounding and parking light flashing for the programmed duration.
Warning Zone Response: Lighter impacts or movement close to the vehi-
cle will generate the Warning Zone response. It consists of a warning
siren blast or beep.
Zone: A zone is a separate input that the alarm can recognize as
unique. Each input to the system is connected to a particular zone. Two
or more inputs often share the same zone.
security & convenience expansions
Here we have listed only some of the many expansion options available. Please contact your dealer for a complete list of all the options
available to you.
Backup Battery: The 520T keeps the system armed, triggers the alarm and
keeps the immobilization circuits active if main battery power is disconnected.
Power Trunk Release: The
button can operate a factory power
release for the vehicle’s trunk or hatch. (An optional relay may be required.) If the factory release is not power activated, the Directed®'s
522T trunk release solenoid can often be added.
Power Window Control: Automatic power window control is provided
with the SmartWindows system.
Remote Start System: For the ultimate in convenience, the IntelliStart
remote start system can start your vehicle, monitor engine functions,
and power your climate control system with a push of a button! Overrev protection, open-hood lockout, brake pedal shutoff, and automatic timer shutoff are all included.
34
The company behind this system is Directed Electronics
Since its inception, Directed® has had one purpose, to provide consumers with the finest vehicle security and car stereo products and accessories available. The recipient of nearly 100
patents and Innovations Awards in the field of advanced electronic technology, Directed® is ISO
9001 registered.
Quality Directed Electronics products are sold and serviced throughout North America and
around the world.
E&OE, specification is subject to change without notice. Some vehicles require optional
parts/wiring and a few are incompatible with some features.
Directed® is committed to delivering world-class quality products and services
that excite and delight our customers.
Vista, CA 92081
www.directed.com
© 2006 Directed Electronics - All rights reserved
G919600 11-06