1
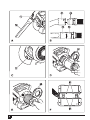
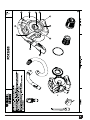
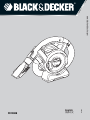
®
www.blackanddecker.com
PD1200B
简体中文
3
7
English
Dustbuster FLEXI 12 Volt Vacuum Cleaner
Technical data
Voltage
Weight
PD1200
Vdc 12
kg 1.8
Charger
Input voltage
Approx. charging time
Weight
Vac 220
h 16
kg 0.2
Intended use
Your Black & Decker Dustbuster Flex vacuum cleaner
has been designed for dry vacuum cleaning purposes. This
appliance is intended for household use only.
Safety instructions
Warning! When using battery-powered appliances, basic
safety precautions, including the following, should always be
followed to reduce the risk of fire, leaking batteries, personal
injury and material damage.
Read all of this manual carefully before using the
appliance.
The intended use is described in this manual. The use
of any accessory or attachment or the performance of
any operation with this appliance other than those
recommended in this instruction manual may present a
risk of personal injury.
Retain this manual for future reference.
Using your appliance
Do not use near water.
Do not use the appliance to pick up liquids or any
materials that could catch fire.
Do not immerse the appliance in water.
Never pull the charger lead to disconnect the charger
from the socket. Keep the charger lead away from heat,
oil and sharp edges.
This tool is not intended for use by persons (including
children) with reduced physical, sensory or mental
capabilities, or lack of experience and knowledge,
unless they have been given supervision or instruction
concerning use of the appliance by a person
responsible for their safety. Children should be
supervised to ensure that they do not play with the
appliance.
After use
Unplug the charger before cleaning the charger or
charging base.
4
When not in use, the appliance should be stored in a dry
place.
Children should not have access to stored appliances.
Inspection and repairs
Before use, check the appliance for damaged or
defective parts. Check for breakage of parts, damage to
switches and any other conditions that may affect its
operation.
Do not use the appliance if any part is damaged or
defective.
Have any damaged or defective parts repaired or
replaced by an authorized repair agent.
Regularly check the charger lead for damage. Replace
the charger if the lead is damaged or defective.
Never attempt to remove or replace any parts other than
those specified in this manual.
Additional safety instructions for batteries and chargers
Battery and charger
Never attempt to open for any reason.
Do not expose the battery to water.
Do not short circuit the charging terminals on the
vacuum cleaner bowl or the charging unit.
Do not store in locations where the temperature may
exceed 40°C.
Charge only at ambient temperatures between 10°C
and 40°C.
Do not incinerate the battery.
When disposing of batteries, follow the instructions
given in the section "Protecting the environment".
Have defective cords replaced immediately.
Do not expose the charging base to water.
Do not open the charging base.
Do not probe the charger.
Electrical safety
Your charger has been designed for a specific voltage.
Always check that the mains voltage corresponds to the
voltage on the rating plate. Never attempt to replace the
charger unit with a regular mains plug.
This appliance is double insulated; therefore no
earth wire is required. Always check that the
power supply corresponds to the voltage on the
rating plate.
The charger is intended for indoor use only.
Read the instruction manual before use.
+40ºC
+10ºC
Charge only at ambient temperatures between
10°C and 40°C.
Features
This appliance includes some or all of the following features.
1. On/off power switch
2. Removable hose/handle
3. Locking ring
4. Hose
5. Filter cleaning wheel
6. Charging inlet
7. Transparent door
8. LED charging indicator
9. Door latch
10. 2-in-1 combi nozzle accessory
11. Accessory clip
12. Crevice tool
Assembly
Mounting accessories (fig. A & B)
The 2-in-1 combi nozzle (10) has a brush that can be folded
forward for dusting and upholstery cleaning.
The crevice tool (12) allows for vacuuming in narrow and
hard to-reach places.
To fit an accessory press the accessory clip (11) and
slide the accessory onto the handle (2).
To remove an accessory, press the accessory clip (11)
and remove the accessory.
The handle (2) can be removed from the hose (4) allowing
the accessories to be connected directly to the hose cuff (18)
when required. To remove the handle:
Unclip the handle (2) from the appliance.
Rotate the locking ring (3) anti-clockwise to release the
clips.
Pull the hose (4) away from the handle (2).
Fit the accessory directly to the hose cuff (18).
To refit the handle:
Remove the accessory from the hose.
Push the hose (4) into the handle (2). Rotate the locking
ring (3) clockwise until it clicks into place.
Use
Before first use, the batteries must be charged for at least
16 hours.
Connect the appliance to the charger for a minimum
of 16 hours.
Charge the batteries as described below.
You may need to charge/discharge the appliance a minimum
of 5 times in order to achieve the best running time
performance.
Charging the battery (fig. C)
Warning! Do not charge the battery at ambient
temperatures below 10°C or above 40°C.
To charge the appliance:
Make sure that the appliance is switched off. The
battery will not be charged with the on/off power switch
(1) in the on position.
Insert the plug into the charging inlet (6) in the base.
Plug in the charger and switch on at the mains.
The charging indicator (8) will be lit.
For the first charging, leave the appliance to charge for
at least 16 hours.
Switching on and off
To switch the appliance on, slide the on/off power
switch (1) to the right to position 1.
To switch the appliance off, slide the on/off power
switch (1) to the left until it clicks into the off position.
Vacuuming
When operating the appliance, make sure that the hose
is not trapped, twisted or blocked.
The handle (2) can be easily removed from the
appliance allowing you to reach up to 1.5 m from the
appliance.
With the handle (2) removed, the appliance can be
carried using the built-in handle.
The handle (2) can also be removed from the hose (4)
so that you can connect an accessory directly to the
hose cuff (18) when required.
Hints for optimum use
When vacuuming stairs, always start at the bottom and
work your way up.
Optimising the suction force
In order to keep the suction force optimised, the filters must
be cleared regularly during use.
Turn the filter cleaning wheel (5) two turns clockwise to
remove out any dust from the filters.
The fine particulate filter must be cleaned regularly, see
“Cleaning the fine particulate filter” section.
Cleaning and maintenance
Emptying the dust container (fig. D)
The dust container must be emptied regularly, preferably
after every use.
Release the door catch (9) and open the transparent
door (7) 180° until it clicks in the open position.
Remove the pre-filter (19).
Empty the dust container.
5
Clean the pre-filter (19) by lightly shaking over a
dustbin.
Refit the pre-filter (19).
Close the transparent door (7) and make sure that it
clicks into place.
Warning! Do not, under any circumstances, rinse out the
dust container.
Warning! Do not immerse the appliance in water. A damp
cloth and soapy water should be used to clean the exterior
of the appliance. Always make sure that the appliance is
completely dry before re-use or storing.
You can check the location of your nearest authorised repair
agent by contacting your local Black & Decker office at the
address indicated in this manual. Alternatively, a list of
authorised Black & Decker repair agents and full details of
our after-sales service and contacts are available on the
Internet at: www.2helpU.com.
Cleaning the fine particulate filter (fig. E)
Batteries
The fine particulate filter (20) prevents particles and larger
objects from entering the motor housing.
The filter (20) is re-usable and should be cleaned regularly.
Remove the pre-filter (19) from the appliance as
described above.
Remove the fine particulate filter (20) by pulling firmly.
Tap the filter vigorously to remove loose dust from the
filter.
If necessary, wash the filter in warm, soapy water.
Make sure that the filters are dry.
Refit the fine particulate filter (20) on to the appliance.
Refit the pre-filter (19) as described above.
Replacing the filters
The filters should be replaced every 6 to 9 months and
whenever worn or damaged. Replacement filters are
available from your Black & Decker dealer (cat. no. PD10):
Remove the old filters as described above.
Fit the new filters as described above.
Protecting the environment
Separate collection. This product must not be
disposed of with normal household waste.
Should you find one day that your Black & Decker product
needs replacement, or if it is of no further use to you, do not
dispose of it with household waste. Make this product
available for separate collection.
Separate collection of used products and packaging
allows materials to be recycled and used again. Reuse of recycled materials helps prevent
environmental pollution and reduces the demand
for raw materials.
Local regulations may provide for separate collection of
electrical products from the household, at municipal waste
sites or by the retailer when you purchase a new product.
6
Black & Decker provides a facility for the collection and
recycling of Black & Decker products once they have
reached the end of their working life. To take advantage of
this service please return your product to any authorised
repair agent who will collect them on our behalf.
Black & Decker batteries can be recharged many
times. At the end of their useful life, discard batteries
with due care for our environment.:
If you want to dispose of the product yourself, the batteries
must be removed as described below and disposed of in
accordance with local regulations.
Discharge the battery by operating the appliance until
the motor stops.
Invert the appliance to get access to the screws that
attach the base (fig. F).
Remove the 8 screws (21).
Remove the base.
Disconnect the 3-pin connector.
Place the battery in suitable packaging to ensure that
the terminals cannot be short-circuited.
NiCd batteries are recycla ble. Take them to any
authorised repair agent or a local recycling station.
Guarantee
Black & Decker is confident of the quality of its products and
offers an outstanding guarantee. This guarantee statement
is in addition to and in no way prejudices your statutory
rights. The guarantee is valid within the territories of the
Member States of the European Union and the European
Free Trade Area.
If a Black & Decker product becomes defective due to faulty
materials, workmanship or lack of conformity, within 24
months from the date of purchase, Black & Decker
guarantees to replace defective parts, repair products
subjected to fair wear and tear or replace such products to
make sure of the minimum inconvenience to the customer
unless:
The product has been used for trade, professional or
hire purposes.
The product has been subjected to misuse or neglect.
The product has sustained damage through foreign
objects, substances or accidents.
Repairs have been attempted by persons other than
authorised repair agents or Black & Decker service
staff.
To claim on the guarantee, you will need to submit proof of
purchase to the seller or an authorised repair agent. You can
check the location of your nearest authorised repair agent by
contacting your local Black & Decker office at the address
indicated in this manual. Alternatively, a list of authorised
Black & Decker repair agents and full details of our aftersales service and contacts are available on the Internet at:
www.2helpU.com
Please visit our website www.blackanddecker.co.uk to
register your new Black & Decker product and to be kept up
to date on new products and special offers. Further
information on the Black & Decker brand and our range of
products is available at www.blackanddecker.co.uk.
7
Dustbuster FLEXI 12伏旋风充电式吸尘器
技术参数
PD1200
电压
重量
伏(直流) 12
千克 1.8
充电器
输入电压
充电时间约
重量
伏(交流) 220
小时
16
千克
0.2
设计用途
本百得Dustbuster FLEXI旋风充电式吸尘器的设计
用途是干燥条件下的吸尘. 本工具仅限家用。
安全须知
警告:当使用充电电器用品,应遵守下列的基本安
全措施以减低火灾、电源泄漏、人身伤害及物件损
坏的危险。
使用前应通读下列所有指示。
本吸尘器的设计用途已在本说明书中列明,使用任
何非本说明书推荐的配件、或以本吸尘器作为设计
用途以外的用途,将会构成人身伤害的危险。
请保留本说明书以作日后参考。
使用守则
操作时吸尘器的吸尘口及散热口不可与眼睛或
耳朵接近。
切勿让吸尘器暴露在雨中。
切勿使用无滤尘网的吸尘器。滤尘网若损坏,
请及时更换。
切勿伸展过远操作,在楼梯上吸尘时应格外小
心。双脚站稳,随时保持平衡。
切勿使用吸尘器吸正在燃烧或冒烟的东西,如
烟蒂、火柴或热的灰烬。
切勿在有易爆或易燃的物体或液体附近操作吸
尘器。马达所产生的火花会点燃火种。
切勿用吸尘器来吸取有毒物质或如汽油等的易
燃液体,也不可在这些易燃液体可能存在的地
方吸尘或吸液体。
切勿让小孩把本产品视为玩具,当本产品在接
近小孩的地方使用、或小孩在使用时,成人应
紧贴监督。
只可如本说明书所述使用本产品,只可使用厂
商推荐的附件。
请马上停止使用有下列情况的吸尘器:电源线
或充电插头损坏、吸尘器不能正常操作、曾掉
在地上、遗留在室外、掉入水中或遭受任何损
坏:应把它送往维修。
8
切勿把外物放在吸尘器的任何孔中。切勿使
用任何已堵塞的吸尘器:吸尘器的孔洞应无
尘、亚麻布、头发及任何会阻碍空气流动的外
物。
应把头发、宽松的衣服、手指或身体任何一部
份远离开启的或移动的部件。
手湿时切勿触摸充电插头或电气。
切勿猛力拉扯电线以使充电器插座脱离电源、
或使充电接头脱离吸尘器,应紧握充电器插
座或充电接头然后把它拨出。充电器(包括
插座、电线及充电接头)应远离热源、油脂
及尖锐的边缘。
应关掉吸尘器才装上配件。
切勿为接上电源的充电用品吸尘。
切勿使用下列任何情况的吸尘器,电线或充
电器损坏、发现机件故障、遗留在室外、曾
点在水中或有任何损坏:请把吸尘器送往维
修。
只可吸干物的吸尘器,切勿在室外使用或用
它吸取液体;干湿两用吸尘器也不可在室外
使用。
切勿让电源悬挂在枕边或接触热的表面,本吸
尘器应放置或悬挂在远离水槽或热的地方。
切勿试图吸取尖锐的物件以致损坏吸尘器或滤
尘网。
在楼梯上吸尘时应格外小心。
检查与维修
使用前,检查工具是否受损或存在缺陷部件。
检查部件是否破裂、开关是否损坏,是否存在
影响使用的其它情况。
如果部件损坏或存在缺陷,切勿使用工具。
损坏或缺陷部件必须交由授权维修代理处维修
与更换。
定期检查充电器导线是否损坏。如有损坏与缺
陷,请更换充电器。
禁止试图拆卸或更换本手册规定之外的任何部
件。
电池组和充电器安全附则
电池与充电器
禁止以任何理由试图打开。
电池禁止与水接触。
充电式吸尘器滚筒及充电单元上的充电端子禁
止短路。
禁止存放在温度可能超过40℃的地点。
仅可在10℃到40℃的环境温度范围内充电。
禁止焚烧电池。
丢弃电池时,请遵守“保护环境”章节中的规
定。
电源线一旦损坏,应立即更换。
充电座禁止暴露在水中。
请勿打开充电座。
请勿使用探针等查探充电器。
电气安全
充电器根据特定电压设计。请随时检查主电网电压
是否与标牌上的电压一致。切勿将充电器单元改造
成普通电源插头。
本工具为双重绝缘,因此无须接地线。
随时检查并确保电源电压与铭牌上的使
用电压相符。
本充电座仅限室内使用。
使用工具前,请仔细阅读使用手册。
+40ºC
+10ºC
仅可在10℃到40℃的环境温度范围内充
电。
部件名称
本工具包含下列部分或全部部件。
1. On/off电源开关
2. 可拆装软管/手柄
3. 锁定环
4. 软管
5. 过滤器清洁轮
6. 充电插座
7. 透明门
8. LED充电指示灯
9. 门销
10. 二合一吸尘嘴
11. 卡栓
12. 细缝吸头
组装
安装配件(图A、B)
二合一吸尘嘴(10)配有可向前打开的刷子,用于
吸尘和清洁家居饰品。
细缝吸头(12)适合于狭窄、受限场所。
要安装配件,按下卡栓(11),同时把配件滑
动安装到手柄(2)上。
要拆下配件,按下卡栓(11),同时把配件取
下。
必要时,手柄(2)可从软管(4)上取下,使配件
能够直接安装到软管管口(18)上。手柄的拆卸步
骤如下:
打开手柄(2)在工具上的卡子。
逆时针旋转锁定环(3),释放卡子。
把软管(4)从手柄(2)上拉下。
把配件直接安装到软管管口(18)上。
重新安装手柄的步骤:
从软管上取下配件。
把软管(4)推装到手柄(2)上。顺时针旋转
锁定环(3),直至锁定到位。
使用步骤
首次使用前,电池必须充电至少16小时。
工具与充电器连接至少16小时。
按如下步骤给电池充电。
为了达到最佳使用性能,您可能需要给工具充电/放
电至少5次。
电池充电(图C)
警告!环境温度低于10℃或高于40℃时,切勿充电。
充电步骤:
确保工具开关关闭。 on/off开关(1)打开状态下,
电池不能充电。
把插头插入充电座的充电插座(6)上。
插上充电器插头并打开主电网电源。
充电指示灯(8)亮。
首次充电时,至少充电16小时。
打开与关闭
要打开工具,把on/off开关(1)向右滑动到
“1”位置即可。
要关闭工具,把on/off开关(1)向左滑动,直
至卡入off位置即可。
真空吸尘
操作工具时,确保软管无障碍、扭转或堵塞。
手柄(2)可从工具上方便地取下,到达距工具
1.5米远的地方。
手柄(2)取下后,可以使用工具自身手柄来搬
动工具。
手柄(2)也可从软管(4)上取下,以便必要
时把配件直接安装到软管管口(18)上。
最佳应用提示
清洁楼梯时,始终自下而上作业。
吸尘力优化
为了达到最佳吸尘力,使用过程中必须定期清洁过
滤器。
顺时针转动过滤器清洁轮(5)两圈,使灰尘脱
离过滤器。
必须定期清洁微尘过滤器,具体内容见“清洁
微尘过滤器”。
清洁与维护
清空集尘室(图D)
集尘室必须定期清空,最好每次使用后都清空。
释放门销(9),打开透明门(7)180°,直至
发出咔嗒声并进入打开位置。
取下预过滤器(19)。
清空集尘室。
在垃圾箱上方轻轻摇动预过滤器(19),进行
清洁。
重新安装预过滤器(19)。
关闭透明门(7),确保其锁定到位。
9
警告!任何情况下,均禁止冲洗集尘室。
警告!本工具禁止浸入水中。可用湿布和肥皂水来
清洁工具外部。再次使用或存放工具前,请务必确
认工具完全干燥。
清洁微尘过滤器(图E)
微尘过滤器(20)可以防止颗粒和较大物体进入马
达壳内。
过滤器(20)可以重复使用,应定期清洁。
按照上述步骤,从工具上取下预过滤器(19)。
用力拉微尘过滤器(20),把它取下。
用力轻拍过滤器,清除松散灰尘。
必要时,使用温肥皂水清洗过滤器。
确保过滤器干燥。
把微尘过滤器(20)重新安装到工具上。
按照上述步骤,重新安装预过滤器(19)。
更换过滤器
每6到9个月,或当滤芯磨损、损坏时,即应更换滤
芯。百得零售商可提供滤芯备件(商品编号:PD10)
:
按上述步骤取下旧滤芯。
按上述步骤安装新滤芯。
保护环境
分类回收。此类产品不得和普通家庭垃圾一
起处理。
当您的百得产品需要更换或不再使用时,请不要把
它和家庭垃圾一起处理。把该产品单独分类回收。
旧产品和旧包装的分类回收使材料能够得以
再循环和再利用。再循环材料的重新利用有
助于防止环境污染和减少原料需求。
在市政垃圾场或您购买新产品的零售商处,地方法
规可能要求电器产品与生活垃圾分开回收。
百得提供设施来收集、回收使用寿命到期的百得产
品。要利用本服务,请将产品送往任何授权维修中
心,他们代表百得回收产品。
您可与本手册中的当地百得地址联系,查找最近的
授权维修中心的位置。此外,也可以登录互联网:
www.2helpU.com, 查看百得授权维修代理的办公
室清单,以及我们售后服务的详细资料与联系方式。
电池组
百得电池可以多次充电。其使用寿命终结
时,要小心处理,注意保护环境:
如果您打算自行处理本产品,必须按如下步骤取下
电池并根据本地法规处理。
10
运行工具给电池放电,直至马达停止。
倒置工具,可以看到连接底座的螺钉(图F)。
取下这8个螺钉(21)。
取下底座。
断开3针接头。
把电池置于合适的包装内,确保电极不会短路。
NiCd电池是可以回收的。把它们交给授权维修
代理处或本地回收站处理。
90570220