1
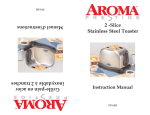
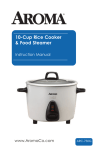
Precision
2-Slice Toaster
With Electronic Sensor
Instruction Manual
ATS-102
LIMITED WARRANTY
Congratulations on your purchase of the
Precision 2-Slice
Toaster. It will surely become one of your most practical appliances in your
home.
Please read all instructions before your first use.
Aroma Housewares Company warrants this product free from defects in material
and workmanship for one year from provable date of purchase in continental United
States.
Within this warranty period, Aroma Housewares Company will repair or replace, at
its option, defective parts at no charge, provided the product is returned, freight
prepaid with proof of purchase and U.S. $8.00 for shipping and handling charges
payable to Aroma Housewares Company. Before returning an item, please call the
toll free number below for return authorization number. Allow 2-4 weeks for return
shipping.
This warranty does not cover improper installation, misuse, abuse or neglect on the
part of the owner. Warranty is also invalid in any case that the product is taken apart
or serviced by an unauthorized service station.
This warranty gives you specific legal rights and which may vary from state to state
and does not cover areas outside the United States.
AROMA HOUSEWARES COMPANY
6469 Flanders Drive
San Diego, California 92121
1-800-276-6286
M-F, 8:30 AM - 5:00 PM, Pacific Time
Website: www.aromaco.com
Published By:
Aroma Housewares Co.
6469 Flanders Drive
San Diego, CA 92121
U.S.A.
1-800-276-6286
www.aromaco.com
© 2004 Aroma Housewares Company All rights reserved.
IMPORTANT SAFEGUARDS
Basic safety precautions should always be followed when using electrical
appliances, including the following:
1. Important: Read all instructions carefully before first use.
2. Do not touch hot surfaces. Use handles or knobs.
3. To protect against electrical shock, do not immerse cord, plug or the appliance
itself in water or other liquid.
4. Never leave appliance unattended when in use.
5. This appliance is not intended to be used by children. Close supervision is
necessary when the appliance is in use near children.
6. Do not operate or place the toaster on non-heat-resistant or flammable surface.
7. Do not place or operate toaster on hot burner, or gas stove flame or in a heated
oven.
8. Do not operate this appliance when the power cord or the plug is damaged, or
if it malfunctions, is dropped or has been damaged in any manner. Return the
appliance to an authorized service station for examination, repair or electrical/
mechanical adjustment.
9. Do not use attachments or accessories other than those supplied or
recommended by the manufacturer. Incompatible parts create a hazard.
10. Do not toast food that will drip fillings or coatings when heated. Clean out
accumulated crumbs frequently. Such accumulation inside the toaster is
unsanitary and increases the risk of fire or toaster malfunction.
11. Do not operate the toaster without the crumb tray securely in position.
12. Do not insert fingers, metal and non-metal utensils, foil-covered and over sized
foods, etc in toaster when plugged in as it increases the risk of electric shock.
13. Do not use outdoors.
14. Do not let cord hang over edge of table or counter, or touch hot surfaces.
15. Do not use the appliance for other than intended use.
16. Do not place any of the following or similar materials in or on the oven: paper,
plastic, etc. A risk of fire is present if the appliance is covered or touching
flammable material such as curtains, walls, etc. Never store any items on top of
the appliance.
17. Unplug from outlet when not in use and before cleaning. Allow the unit to cool
before putting on or taking off parts, and before cleaning the appliance.
18. Do not attempt to dislodge food when toaster is plugged in.
SAVE THESE INSTRUCTIONS
1
HOW TO CLEAN
Always unplug toaster and allow to cool completely before cleaning.
To Clean Body of Toaster:
Wipe the body of toaster clean with soft, damp cloth.
To Clean Crumb Tray:
The crumb tray is located at the side of the toaster bottom. It is recommended that
the crumb tray be cleaned out at least every 3-5 uses.
1. Gently slide the tray out.
2. Dump the crumbs in the trash can.
3. Using a damp cloth, clean the crumb tray.
4. Always dry the crumb tray completely before replacing it.
5. Push firmly to close the tray and make sure the tray is securely in position.
CAUTION:
•
•
•
•
•
•
Do not immerse the toaster in water or any liquid.
Do not use abrasive cleaners or scouring pads for cleaning.
Never use wet or damp accessories.
Do not clean the heating elements.
Never place toaster or accessories in dishwasher.
Clean the crumb tray often to reduce the risk of fire caused by built up crumbs.
6
HOW TO USE CONTINUED
To Warm Buns:
1. Place warming rack securely on top of the toasting slots, as shown in figure below.
2. Place buns on top of the warming rack.
3. Press toaster lever down to turn the toaster on.
4. Adjust function selector for desired darkness.
Bun Warming Rack:
SHORT CORD INSTRUCTIONS
1. A short power-supply cord is provided to reduce risk resulting from becoming
entangled in or tripping over a longer cord.
2. Longer extension cords are available and may be used if care is exercised in
their use.
3. If a longer extension cord is used:
a. The marked electrical rating of the extension cord should be at least as great
as the electrical rating of the appliance.
b. The longer cord should be arranged so that it will not drape over the counter
top or tabletop where it can be pulled by children or tripped over
unintentionally.
POLARIZED PLUG
Dust Cover:
To keep dust out of the toaster slots, always place dust cover over toaster slots when
not in use, after toaster is unplugged and completely cooled.
CAUTION:
• Do not leave the toaster unattended while in use.
• Do not block the top of toaster while in use.
• Do not toast any type of buttered bread. Melted butter may cause fire and/or
toaster malfunction.
• Never use metal or non-metal or sharp-edged utensil to remove toast.
• Do not place the dust cover on the toaster until it has completely cooled.
5
This appliance has a polarized plug (one blade is wider than the other); follow
the instructions below:
To reduce the risk of electric shock, this plug is intended to fit into a polarized
outlet only one way. If the plug does not fit fully into the outlet, reverse the plug. If
it still does not fit, contact a qualified electrician. Do not attempt to modify the plug
in any way.
This appliance is for household use only.
2
PARTS IDENTIFICATION
Before first use:
1
2
3
HOW TO USE
1. Read all the instructions and important safeguards.
2. Remove all packaging materials; make sure items are received in good condition.
3. Remove any stickers from the surface of the toaster and wipe the surface clean
with a damp dishcloth.
4. Place toaster on a flat, heat-resistant and non-flammable surface.
5. Run one cycle before first use, to burn off any residue
Do not use abrasive cleaners or scouring pads.
Do not immerse the appliance, cord and plug in water at any time.
Control Panel:
1. CANCEL: During the toasting process, if at anytime you would like to end the
toasting cycle, press the cancel button and the toast will pop up from the toaster.
2. BAGEL: Use this function for toasting bagels or thick breads.
3. DEFROST: For frozen bread, press the defrost button to extend the toasting time.
5
6
4
Darkness Selector Knob:
7
8
You may adjust the darkness of your toast from 1 to 7, 1 the lightest to 7, the
darkest. Darkness may vary according to the thickness of bread or moisture content.
When toasting for the first time, it is recommended that you select 3 or 4 (the middle
range); then adjust darkness to your preference.
To Toast Bread:
10
9
1.
2.
3.
4.
5.
Toast slots
Cool-touch body
Control panel
Crumb tray
Cancel button
1. Select the desired setting or function.
2. Place bread into toasting slots and press lever down.
3. When toasting a single slice, the bread can be placed in either one of the slots.
4. Toast will automatically pop up when the selected darkness is reached.
6. Bagel toasting button
7. Defrost button
8. Darkness selector
9. Warming rack
10. Dust cover
3
4
HOW TO USE CONTINUED
To Warm Buns:
1. Place warming rack securely on top of the toasting slots, as shown in figure below.
2. Place buns on top of the warming rack.
3. Press toaster lever down to turn the toaster on.
4. Adjust function selector for desired darkness.
Bun Warming Rack:
SHORT CORD INSTRUCTIONS
1. A short power-supply cord is provided to reduce risk resulting from becoming
entangled in or tripping over a longer cord.
2. Longer extension cords are available and may be used if care is exercised in
their use.
3. If a longer extension cord is used:
a. The marked electrical rating of the extension cord should be at least as great
as the electrical rating of the appliance.
b. The longer cord should be arranged so that it will not drape over the counter
top or tabletop where it can be pulled by children or tripped over
unintentionally.
POLARIZED PLUG
Dust Cover:
To keep dust out of the toaster slots, always place dust cover over toaster slots when
not in use, after toaster is unplugged and completely cooled.
CAUTION:
• Do not leave the toaster unattended while in use.
• Do not block the top of toaster while in use.
• Do not toast any type of buttered bread. Melted butter may cause fire and/or
toaster malfunction.
• Never use metal or non-metal or sharp-edged utensil to remove toast.
• Do not place the dust cover on the toaster until it has completely cooled.
5
This appliance has a polarized plug (one blade is wider than the other); follow
the instructions below:
To reduce the risk of electric shock, this plug is intended to fit into a polarized
outlet only one way. If the plug does not fit fully into the outlet, reverse the plug. If
it still does not fit, contact a qualified electrician. Do not attempt to modify the plug
in any way.
This appliance is for household use only.
2
IMPORTANT SAFEGUARDS
Basic safety precautions should always be followed when using electrical
appliances, including the following:
1. Important: Read all instructions carefully before first use.
2. Do not touch hot surfaces. Use handles or knobs.
3. To protect against electrical shock, do not immerse cord, plug or the appliance
itself in water or other liquid.
4. Never leave appliance unattended when in use.
5. This appliance is not intended to be used by children. Close supervision is
necessary when the appliance is in use near children.
6. Do not operate or place the toaster on non-heat-resistant or flammable surface.
7. Do not place or operate toaster on hot burner, or gas stove flame or in a heated
oven.
8. Do not operate this appliance when the power cord or the plug is damaged, or
if it malfunctions, is dropped or has been damaged in any manner. Return the
appliance to an authorized service station for examination, repair or electrical/
mechanical adjustment.
9. Do not use attachments or accessories other than those supplied or
recommended by the manufacturer. Incompatible parts create a hazard.
10. Do not toast food that will drip fillings or coatings when heated. Clean out
accumulated crumbs frequently. Such accumulation inside the toaster is
unsanitary and increases the risk of fire or toaster malfunction.
11. Do not operate the toaster without the crumb tray securely in position.
12. Do not insert fingers, metal and non-metal utensils, foil-covered and over sized
foods, etc in toaster when plugged in as it increases the risk of electric shock.
13. Do not use outdoors.
14. Do not let cord hang over edge of table or counter, or touch hot surfaces.
15. Do not use the appliance for other than intended use.
16. Do not place any of the following or similar materials in or on the oven: paper,
plastic, etc. A risk of fire is present if the appliance is covered or touching
flammable material such as curtains, walls, etc. Never store any items on top of
the appliance.
17. Unplug from outlet when not in use and before cleaning. Allow the unit to cool
before putting on or taking off parts, and before cleaning the appliance.
18. Do not attempt to dislodge food when toaster is plugged in.
SAVE THESE INSTRUCTIONS
1
HOW TO CLEAN
Always unplug toaster and allow to cool completely before cleaning.
To Clean Body of Toaster:
Wipe the body of toaster clean with soft, damp cloth.
To Clean Crumb Tray:
The crumb tray is located at the side of the toaster bottom. It is recommended that
the crumb tray be cleaned out at least every 3-5 uses.
1. Gently slide the tray out.
2. Dump the crumbs in the trash can.
3. Using a damp cloth, clean the crumb tray.
4. Always dry the crumb tray completely before replacing it.
5. Push firmly to close the tray and make sure the tray is securely in position.
CAUTION:
•
•
•
•
•
•
Do not immerse the toaster in water or any liquid.
Do not use abrasive cleaners or scouring pads for cleaning.
Never use wet or damp accessories.
Do not clean the heating elements.
Never place toaster or accessories in dishwasher.
Clean the crumb tray often to reduce the risk of fire caused by built up crumbs.
6
LIMITED WARRANTY
Congratulations on your purchase of the
Precision 2-Slice
Toaster. It will surely become one of your most practical appliances in your
home.
Please read all instructions before your first use.
Aroma Housewares Company warrants this product free from defects in material
and workmanship for one year from provable date of purchase in continental United
States.
Within this warranty period, Aroma Housewares Company will repair or replace, at
its option, defective parts at no charge, provided the product is returned, freight
prepaid with proof of purchase and U.S. $8.00 for shipping and handling charges
payable to Aroma Housewares Company. Before returning an item, please call the
toll free number below for return authorization number. Allow 2-4 weeks for return
shipping.
This warranty does not cover improper installation, misuse, abuse or neglect on the
part of the owner. Warranty is also invalid in any case that the product is taken apart
or serviced by an unauthorized service station.
This warranty gives you specific legal rights and which may vary from state to state
and does not cover areas outside the United States.
AROMA HOUSEWARES COMPANY
6469 Flanders Drive
San Diego, California 92121
1-800-276-6286
M-F, 8:30 AM - 5:00 PM, Pacific Time
Website: www.aromaco.com
Published By:
Aroma Housewares Co.
6469 Flanders Drive
San Diego, CA 92121
U.S.A.
1-800-276-6286
www.aromaco.com
© 2004 Aroma Housewares Company All rights reserved.