1
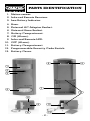
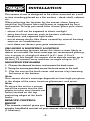
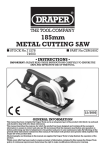
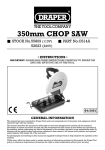
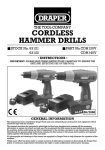
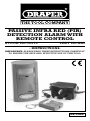
PASSIVE INFRA RED (PIR)
DETECTION ALARM WITH
REMOTE CONTROL
STOCK No.59319
PART No.AL8
• INSTRUCTIONS•
IMPORTANT: PLEASE READ THESE INSTRUCTIONS CAREFULLY
TO ENSURE THE SAFE AND EFFECTIVE USE OF THIS TOOL.
06/2000
FEATURES
Your passive infra red sensor alarm with keyring type
remote control offers you the protection of professional
alarm security that you can install yourself in minutes. It
uses a passive infra red (PIR) motion sensor to detect
intruders and activate a built-in alarm siren. To arm or
disarm the sensor alarm, you simply press “ON” (‘alarm’)
on your hand held unit.
The sensor alarm’s features include:
Compact and Portable – Makes the alarm easy to install
just about anywhere. Ideal for office, shop, home, garage,
shed, boat and recreational vehicles.
Versatile Mounting Capability – Lets you mount the
alarm on the wall, place it on a desk or table, or carry it
with you.Wireless Operation – no wiring required.
Effective, Reliable, Built-in PIR Sensor – Detects
motion up to 25 feet (7.5 metres) away and from an angle
of up to 110º.
Built-in Alarm Siren – Triggers when the sensor detects
motion within protected area, then automatically shuts
down and resets after 30 seconds.
Infra-red Keyring Remote Control - Gives you simple
handheld control of your sensor alarm up to 36 feet
(11metres).
Entry/Exit Delay - Gives you 5 seconds to disarm the
alarm after you enter the protected area, and gives you 30
seconds to leave the protected area after you arm the
alarm.
Programmable Security Code Switch - To prevent other
transmitters or radio devices from sounding the unit.
Battery Operated – Works even when mains power is not
available. (See page 3).
Warning Labels – Can be placed at possible points of
entry to deter intruders.
-1-
PARTS IDENTIFICATION
1.
2.
3.
4.
5.
6.
7.
8.
9
10.
11.
12.
13.
Motion sensor.
Infra-red Remote Receiver.
Low Battery Indicator.
Siren.
External AC Adaptor Socket.
External Siren Socket.
Battery Compartment.
ON (Alarm).
Infra-red Remote LED.
OFF (Alarm).
Battery Compartment.
Programmable Security Code Switch.
Battery Cover.
✚✌
✙✌
✕✌
✖✌
✗✌
✛✌
✘✌
✕✖✌
✜✌
✢✌
✕✕✌
✕✔✌
✕✗✌
-2-
PREPARATION
INSTALLING BATTERIES
1. Remove the screw at the base of the alarm unit and lift
from the bottom of the back cover.
2. Place (4) AA alkaline batteries following the polarity
symbols (+ and –) marked inside the battery
compartment.
3. Replace the alarm unit into the back cover.
NOTES:
• The alarm is disarmed after batteries are installed.
• The unit will beep and the “BATT LOW” indicator lights
when the batteries become weak and need replacing.
For the best performance and longest life, we recommend
that you only use new alkaline batteries and avoid mixing
new and old batteries.
-3-
PREPARATION Cont’d.
SETTING THE SECURITY CODE
A programmable 4-position security code switch is builtin the alarm unit and the remote control to prevent other
transmitters or radio devices from sounding the unit. Each
unit is factory preset.
To change The Factory Preset Code On The Sensor
Alarm Unit:
1. Locate programmable switch inside the battery
compartment.
2. Set the desired switch position.
3. Replace the alarm unit into the back cover.
To Change The Factory Preset Code On The Remote
Unit:
1. Locate programmable switch inside the battery
compartment.
2. Set the desired switch position.
3. Replace battery compartment cover.
Notes:
The remote must be set to the same code settings (same
numbers) as the alarm unit in order for the remote control
to function.
Do not set all the code settings to ‘0’.
Try arming and disarming your sensor alarm to be sure if
it recognizes the remote control (see Alarm Operation Arming Alarm and Disarming Alarm on page 6.
- 4-
INSTALLATION
The sensor alarm is designed to be either mounted on a wall
or free standing placed on a flat surface – desk, shelf, cabinet,
etc.
When selecting the location for the sensor alarm, keep in
mind that the Passive Infra red Sensor is triggered by heat
and motion. To help you avoid false alarms, place your alarm
unit:
• where it will not be exposed to direct sunlight
• away from heat sources, such as heaters, radiators,
fireplaces, and exposed light bulbs
• out of strong drafts, like those caused by central heating
vents or air conditioners
• so it does not detect your pets movements.
CHOOSING A MOUNTING LOCATION
Select a mounting location where the alarm is most likely to
detect an intruder. For best coverage we recommend placing
it in a corner at a height of about 5 to 61/2 feet (1.5 to 2
metres). At this height, the sensor alarm detects motion up to
25 feet (7.5 metres) away and from an angle of up to 110º.
MOUNTING THE ALARM
1. Choose the desired location,and remove the back cover.
2. Using the screws provided secure the back cover to the wall.
3. Clip the unit on the back cover and secure it by fastening
the screw at the bottom.
Note:
Your sensor alarm’s coverage depends on how high you place
it, the shape of the room, furniture placement, and so on.
Note:
External corner
Internal corner
To secure the unit in a corner,
install the screws into the thin
plastic circular area (knock-out
holes) located on the top
projecting edges of the back
cover.
REMOTE CONTROL
RANGE
The remote control gives you
simple handheld control of your sensor alarm up to 36feet
(11metres).
- 5-
OPERATION
ARMING ALARM
When leaving the protective area, point the remote
control at the sensor alarm and press the ON (alarm)
button. There will be a short beep, followed by a 30
second delay before the unit is armed. The exit delay
allows you time to leave the protected area without
activating the alarm.
DISARMING ALARM
When returning to the protected area, point the remote
control at the sensor alarm and press the OFF (alarm)
button. Note, there will be a short beep to indicate that
movement has been detected, followed by a 5 second
delay before the siren sounds. The entry delay allows you
time to enter the protected area and deactivate the alarm
before it triggers. Once the alarm is triggered, the siren
will sound for 30 seconds, then automatically reset and go
back to ARMED MODE. If movement continues, the siren
will automatically sound for a further 30 seconds, until the
sensor alarm is disarmed using the remote control.
- 6-
OPTIONAL ACCESSORIES
KEYCHAIN REMOTE CONTROLS
Get one for every family member! The optional Keychain
Remote Control provides every family member with access to
the sensor alarm.
AC ADAPTOR
To prolong battery life,an optional AC Power Adaptor may be
used to power the alarm.Simply plug it into the AC Adaptor
Socket (see ‘Parts Identification’on Page 2),and feed the cable
through the notch in the bottom of the back cover as the alarm
unit is snapped into place.
When an AC power adaptor is used,continuous power to the
alarm is provided from AC power.We recommend that four AA
batteries be fitted,in addition to the AC Adaptor,as back-up
power supply in the event of mains power failure.Only use a 6V
DC 500mA adaptor with a 3.5mm centre positive male plug.
EXTERNAL SIREN
To boost the output of the alarm,an optional external siren may
be added to the alarm.Simply plug it into the external siren
socket (see parts identification on page 2) and feed the cable
through the notch in the bottom of the back cover as the alarm
unit is snapped into place.
CARE & MAINTENANCE
To keep your alarm looking new, occasionally clean the
unit using a soft cloth slightly dampened with water and
wipe dry. Do not use chemical agents as this may damage
and discolour the unit.
REPLACING THE REMOTE CONTROLS BATTERIES
Operates on 3 x 1.5V LR44/AG13 button cell batteries (included).
1. Remove the screw at the back of the remote control and
lift from the bottom of the back cover.
2. Place 3 x ‘1.5V LR44/AG13’ alkaline batteries following
the polarity symbols (+ and -) marked inside the
battery compartment.
3. Replace the back cover and secure the screw.
-7-
CAUTION
The alarm siren is very loud. For your safety, never place
the unit close to your ears or let it sound for long lengths
of time.
BATTERY PRECAUTIONS
• Use only new batteries of the required size and
recommended type.
• Do not mix old and new batteries, different types of
batteries (standard, alkaline, or rechargeable), or
rechargeable batteries of different capacities.
• Be sure to follow the correct polarity when installing the
batteries as indicated in the battery compartment.
• If the device is not to be used for a long period of time,
remove the batteries to prevent damage or injury from
possible battery leakage.
• Do not try to recharge batteries not intended to be
recharged, they can overheat and rupture.
• Dispose of old batteries promptly and properly. Do not
burn or bury them.
• Always remove old or weak batteries. Batteries can leak
chemicals that can destroy electronic parts. (Follow
battery manufacturer’s directions).
Specifications are subject to change without notice.
-8-
NOTES
-9-
NOTES
- 10 -
DRAPER TOOLS LIMITED,
Hursley Road, Chandler's Ford, Eastleigh,
Hants. SO53 1YF. England.
Helpline: (023) 8049 4344.
Sales Desk: (023) 8049 4333.
General Enquiries: (023) 8026 6355.
Fax: (023) 8026 0784.
www.draper.co.uk
e-mail: [email protected]
YOUR DRAPER STOCKIST
© Published by Draper Tools Ltd.
No part of this publication may be reproduced,
stored in a retrieval system or transmitted in
any form or by any means, electronic, mechanical
photocopying, recording or otherwise without prior
permission in writing from Draper Tools Ltd.