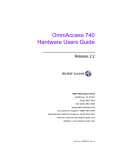
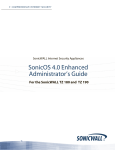
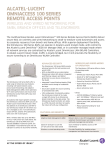
1
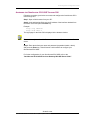
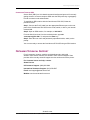
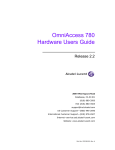
For final production, import color definitions from
\\daldoc01\docteam\templates\framemaker\book-template\color-defs\ production-colors.fm.
Do not import other template elements such as page layout.
To return to the draft version, import color def’ns from draft-colors.fm.
To switch to the beta version, import color def’ns from beta-colors.fm
OmniAccess 5510
Unified Services Gateway
Getting Started Guide
Release 3.0
Notes on numbered items on banner & legal pages
1
u26801 West Agoura Road
Calabasas, CA 91301
(818) 880-3500
FAX (818) 880-3505
[email protected]
Beta
US Customer Support—(800) 995-2696
International Customer Support—(818) 878-4507
Internet—service.esd.alcatel-lucent.com
Website: www.alcatel-lucent.com
Part No: 060269-00, Rev. D
1
2
CAUTION: THIS EQUIPMENT IS TO BE INSTALLED AND SERVICED ONLY BY QUALIFIED SERVICE
PERSONNEL.
Batteries Caution. There is a danger of explosion if the battery in your chassis is incorrectly replaced.
Replace the battery only with the same or equivalent type of battery recommended by the
manufacturer. Dispose of used batteries according to the manufacturer’s instructions. The
manufacturer’s instructions are as follows:
3
4
5
Return the module with the battery to Alcatel-Lucent. The battery will be replaced at AlcatelLucent’s factory.
Copyright
The Specifications and Information regarding the products in this manual are subject to change without
notice. All statements, information, and recommendations in this manual are believed to be accurate
but are presented without warranty of any kind, express or implied. Users must take full responsibility
for their application of any products.
THE SOFTWARE LICENSE AND LIMITED WARRANTY FOR THE ACCOMPANYING PRODUCT ARE SET
FORTH IN THE INFORMATION PACKET THAT SHIPPED WITH THE PRODUCT AND ARE INCORPORATED
HEREIN BY THIS REFERENCE.
This equipment has been tested and found to comply within the limits pursuant to the (Centre for
Telecom) rules. These limits are designed to provide protection against harmful interference when the
equipment is operated in a commercial environment.
The following information is for the Users of the OmniAccess 5510 Unified Services Gateway series: If it
is not installed in accordance with the installation instructions, it may not function exactly to the said
specifications. Modifying the equipment without Alcatel-Lucent's written authorization may result in the
equipment no longer complying with the said dimensions.
Copyright © 2010, Alcatel-Lucent. All rights reserved.
Not withstanding any other warranty herein, all hardware and software are provided "as is" with all
faults. Alcatel-Lucent disclaim all warranties, expressed or implied, including, without limitation, those
of merchantability, fitness for a particular purpose and non-infringement or arising from a course of
dealing, usage, or trade practice. In no event shall Alcatel-Lucent be liable for any indirect, special,
consequential, or incidental damages, including, without limitation, lost profits or loss or damage to data
arising out of the use or inability to use this manual, even if Alcatel-Lucent have been advised of the
possibility of such damages.
Table of Contents
Package Contents..................................................................................................................... 1
Required Tools and Equipment .......................................................................................... 2
Connecting AC Input Power...................................................................................................... 3
Connecting to the OmniAccess 5510 USG Console Port ......................................................... 4
Starting the OmniAccess 5510 USG......................................................................................... 6
Performing Basic Configuration Tasks...................................................................................... 9
Accessing the OmniAccess 5510 USG Through CLI ......................................................... 9
Accessing the OmniAccess 5510 USG Through GUI ...................................................... 15
Connecting Through Telnet........................................................................................ 16
Connecting Through SSH .......................................................................................... 17
Obtaining Technical Support................................................................................................... 17
List of Figures
Connecting the Power Brick on OmniAccess 5510 USG 3
Connecting to the OmniAccess 5510 USG Console 4
Connecting to Internal Network 16
List of Tables
Console Properties 5
OmniAccess 5510 USG System LED Status 6
Except on the first page, right running head:
Heading1 or Heading1NewPage text (automatic)
OmniAccess 5510 USG Overview
OmniAccess 5510 USG Overview
The OmniAccess 5510 USG is designed to provide most commonly used network
services, such as routing, switching, wide area network (WAN) connectivity,
network security with firewall, and related services using a non-modular platform
providing Ethernet switching and WAN interface.
PACKAGE CONTENTS
1. The OmniAccess 5510 USG
•
1U fixed chassis
•
AC power supply
•
AC country specific power cord
•
DB9->RJ45 console connector
•
256 MB compact flash
•
Product documentation card
2. Optional Rack Mount Equipment
•
Power supply tray
•
Power supply tray brackets and screws
•
19-inch rack mount ears and screws
3. Optional DC Power Supply and Power Supply Tray
•
DC Power Supply
•
Power supply tray
•
Power supply tray brackets and screws
Alcatel-Lucent
OmniAccess 5510 Unified Services Gateway Getting Started Guide
Beta
Beta
1
Left running head:
Chapter name (automatic)
Package Contents
REQUIRED TOOLS AND EQUIPMENT
You need the following items to install the OmniAccess 5510 USG:
•
•
•
Note:
Electrostatic Discharge Wrist Strap (ESD)
Level (optional)
Tape Measure (optional)
This equipment is designed to the highest quality standards of materials,
workmanship, and safety. Do not bypass any of the safety features of this equipment
or operate this in an improper environment.
Warning: Only trained and qualified personnel should be allowed to install or replace the
OmniAccess 5510 USG. Refer to the warnings and safety notes that are given in the
“OmniAccess 5510 Unified Services Gateway Hardware Users Guide” provided
with this device.
Refer to the “Rack Mounting the OmniAccess 5510 USG” section in the
“OmniAccess 5510 Unified Services Gateway Hardware Users Guide” to install
the OmniAccess 5510 USG in the rack.
Alcatel-Lucent
2
OmniAccess 5510 Unified Services Gateway Getting Started Guide
Beta
Beta
Except on the first page, right running head:
Heading1 or Heading1NewPage text (automatic)
Connecting AC Input Power
CONNECTING AC INPUT POWER
This section provides the procedures for connecting AC-input power to the
OmniAccess 5510 USG.
Note:
1. The OmniAccess 5510 USG installation must comply with all the
applicable codes. All the hardware materials used should be of
compatible material and preclude loosening, deterioration, and electrochemical corrosion of hardware and joined material.
2. For more details on power supply specifications, see the “AC Power
Specifications” chapter in the “OmniAccess 5510 Unified Services
Gateway Hardware Users Guide”.
Figure 1: Connecting the Power Brick on OmniAccess 5510 USG
Step 1: Plug the country specific power cord into the AC power supply.
Step 2: Plug the power cord into the AC power source.
Step 3: Be sure that the power cable is not left in a hazardous position that may
restrict movement of personnel or that may fray due to movement of other
equipment near the system.
Step 4: Connect the Kycon connector from the power supply to the chassis.
Step 5: Secure the Kycon connector to the chassis by tightening the power
connector’s retaining bracket captive thumb screw as shown in figure.
Alcatel-Lucent
OmniAccess 5510 Unified Services Gateway Getting Started Guide
Beta
Beta
3
Except on the first page, right running head:
Heading1 or Heading1NewPage text (automatic)
Connecting to the OmniAccess 5510 USG Console Port
CONNECTING TO THE OMNIACCESS 5510 USG CONSOLE PORT
The OmniAccess 5510 USG has a RJ-45 console port connector. A DB-9 to RJ45 (female) adapter is provided with the system to access the console port via a
DTE (computer/terminal) using a straight-through Ethernet cable. For additional
connector details, refer to “Pin Connector Details for OmniAccess 5510 USG”
in the “OmniAccess 5510 Unified Services Gateway Hardware Users Guide”.
Figure 2: Connecting to the OmniAccess 5510 USG Console
To connect the OmniAccess 5510 USG to the console, perform the following
steps:
Step 1: Connect the RJ-45 end of the console cable to the rear panel console port
on the OmniAccess 5510 USG and the DB-9 end to the serial port (COM) on your
computer/terminal.
Step 2: Start your terminal emulation software.
Example: kermit or hyperterm terminal (if you are using Microsoft Windows
operating system) or minicom terminal (if you are using Unix/Linux operating
system).
Alcatel-Lucent
OmniAccess 5510 Unified Services Gateway Getting Started Guide
Beta
Beta
4
Except on the first page, right running head:
Heading1 or Heading1NewPage text (automatic)
Connecting to the OmniAccess 5510 USG Console Port
Step 3: Set the console session as follows:
Table 1: Console Properties
Parameter
Value
Baud rate
9600
Parity
None
Data Bits
8
Stop Bit
1
Flow control
None
Step 4: Watch for console message output or press the Enter key to get the
device prompt.
Alcatel-Lucent
OmniAccess 5510 Unified Services Gateway Getting Started Guide
Beta
Beta
5
Left running head:
Chapter name (automatic)
Starting the OmniAccess 5510 USG
STARTING THE OMNIACCESS 5510 USG
After installing OmniAccess 5510 USG and connecting cables, follow the
procedure given below to start the system:
Step 1: Before you power ON the OmniAccess 5510 USG, check the following:
•
Ensure that the power supply chassis connector is securely inserted into the
chassis and secured.
•
Ensure that a PC or VT100 terminal is connected to the console port, using the
appropriate console cable. (If the system is not connected to a console, see the
“Connecting to the OmniAccess 5510 USG Console Port” section of this
document to connect the system to a console.)
Step 2: Power ON the OmniAccess 5510 USG.
Power on the OmniAccess 5510 USG by connecting the country specific power
cord to the power source. You should see the system LEDs showing activity. At
this point, the system begins its bootup sequence.
Step 3: Monitor the System front panel LED and console for various bootup
messages.
Once the system begins to startup, monitor the front panel LED for various stages
of booting process (refer to the table given below). In addition to the LED, monitor
the system console for various bootup text messages (an example of a bootup
message is given below). While a console access is not always required for
system startup, it is a good idea to monitor the console at least the first time the
system is booted and initial configurations completed.
LED Information
The following table shows the state in which the main LEDs should be after a
startup.
Table 2: OmniAccess 5510 USG System LED Status
LED
System
Status
Description
Off
Power up status. This is the default
display when the system is first
powered on and before the software is
loaded.
Solid Green
Power and system OK.
Solid Amber
Power and system fail.
Alcatel-Lucent
6
OmniAccess 5510 Unified Services Gateway Getting Started Guide
Beta
Beta
Left running head:
Chapter name (automatic)
Starting the OmniAccess 5510 USG
OmniAccess 5510 USG Bootup Message
Example:
The following is an example of the bootup message on an OmniAccess
5510-TE USG:
U-Boot 1.1.3 (Rev 2.5) (Mar
4 2010 - 16:14:03) OmniAccess 5510
Press Ctrl-C for Boot Options : 0
Loading system Images...
###################################################################
###################################################################
###################
OmniAccess 5510-T1E1
Checking storage medium
[FIXED]
###################################################
Alcatel-Lucent Software, Version 3.0.0, Build 73
Copyright
2003-2010 by Alcatel-Lucent Inc.
Built on Tue Jun 22 15:33:29 IST 2010
###################################################
OmniAccess 5510-T1E1
Board specific initialization
[ OK ]
Loading Startup Config ...
No Startup Config
Loading Factory Default Config ...
/-------- Percent Complete --------
Username :
The following is an example of the bootup message on an OmniAccess
5510-SR USG:
U-Boot 1.1.3 (Rev 2.0) (Mar 11 2009 - 19:52:49) OmniAccess 5510
Press Ctrl-C for Boot Options : 0
Loading system Images...
###################################################################
###################################################################
##################
OmniAccess 5510-USP
Checking storage medium
[FIXED]
###################################################
Alcatel-Lucent Software, Version 3.0.0, Build 81
Copyright (c) 2003-2010 by Alcatel-Lucent Inc.
Built on Mon Jun 28 13:21:55 IST 2010
###################################################
OmniAccess 5510-USP
OmniAccess 5510-USP
Installing image package
Board specific initialization
[ OK ]
[ OK ]
Alcatel-Lucent
7
OmniAccess 5510 Unified Services Gateway Getting Started Guide
Beta
Beta
Except on the first page, right running head:
Heading1 or Heading1NewPage text (automatic)
Starting the OmniAccess 5510 USG
Loading Startup Config ...
No Startup Config
Loading Factory Default Config ...
/-------- Percent Complete --------
Username :
The following is an example of the bootup message on an OmniAccess 5510
AB USG (ADSL Annex B):
U-Boot 1.1.3 (Rev 2.5) (Mar
4 2010 - 16:14:03) OmniAccess 5510
Press Ctrl-C for Boot Options : 0
Loading system Images...
###################################################################
###################################################################
###################
OmniAccess 5510-ADSL-AnnexB
Checking storage medium
[FIXED]
####################################################################
####
Alcatel-Lucent Software, Version 3.0.0, Build 83
Copyright (c) 2003-2010 by Alcatel-Lucent Inc.
Built on Mon Jul 12 14:47:20 IST 2010
####################################################################
####
OmniAccess 5510-ADSL-AnnexB
Board specific initialization [ OK ]
Loading Startup Config ...
No Startup Config
Loading Factory Default Config ...
/-------- Percent Complete --------
Username :
Step 4: Configure the system.
Alcatel-Lucent
OmniAccess 5510 Unified Services Gateway Getting Started Guide
Beta
Beta
8
Left running head:
Chapter name (automatic)
Performing Basic Configuration Tasks
PERFORMING BASIC CONFIGURATION TASKS
Once you boot OmniAccess 5510 USG and connect to the console, you can start
configuring your OmniAccess 5510 USG either through the Command Line
Interface (CLI) or the web-based Graphical User Interface (GUI).
ACCESSING THE OMNIACCESS 5510 USG THROUGH CLI
The CLI is the primary interface to access the OmniAccess 5510 USG through the
console. The CLI allows you to configure, monitor, troubleshoot the system, and
enables network connectivity.
Step 1: Once the system bootup is complete for the first time, it always loads with
the factory default configuration.
Step 2: The factory default configuration will have the following configurations
preconfigured:
On OmniAccess 5510-SR USG:
•
•
HTTPS, SSH, and TR-069 access to the system is enabled.
•
•
•
•
SNMP v2 is enabled with read-only community.
•
•
•
VLAN 1 will have default IP address 192.168.1.1
Default user name and password (superadmin/admin, admin) is enabled with
‘enable’ password ‘admin’.
All interfaces will be in administratively ‘UP’ state.
By default, DHCP client is enabled.
The DHCP server is enabled on VLAN 1 with pool address from 192.168.1.2 254. A host connecting to the VLAN 1 interface receives an address between
192.168.1.2 and 192.168.1.254
All switchports will be part of default VLAN 1.
By default, the serial interface comes up with PPP encapsulation with necessary
configuration to get IP address from the server.
On OmniAccess 5510-TE USG:
•
•
HTTPS, SSH, and TR-069 access to the system is enabled.
•
SNMP v2 along with related parameters like community string, user name,
password is enabled.
•
•
•
All interfaces will be in administratively ‘UP’ state.
•
•
•
VLAN 1 will have default IP address 192.168.1.1
Default user name and password (superadmin/admin, admin) is enabled with
‘enable’ password ‘admin’.
By default, DHCP client is enabled.
The DHCP server is enabled on VLAN 1 with pool address from 192.168.1.2 254. A host connecting to the VLAN 1 interface receives an address between
192.168.1.2 and 192.168.1.254
All switchports will be part of default VLAN 1
By default the controller mode is set to E1. The serial interface comes up with
PPP encapsulation with necessary configuration to get IP address from the
server.
Alcatel-Lucent
9
OmniAccess 5510 Unified Services Gateway Getting Started Guide
Beta
Beta
Except on the first page, right running head:
Heading1 or Heading1NewPage text (automatic)
Performing Basic Configuration Tasks
On OmniAccess 5510-AA/AB USG:
•
•
HTTPS, SSH, and TR-069 access to the system is enabled.
•
SNMP v2 along with related parameters like community string, user name,
password is enabled.
•
•
•
All interfaces will be in administratively ‘UP’ state.
•
•
•
VLAN 1 will have default IP address 192.168.1.1
•
ATM sub-interface comes up with VPI/VCI value as 0/32.
Default user name and password (superadmin/admin, admin) is enabled with
‘enable’ password ‘admin’.
By default, DHCP client is enabled.
The DHCP server is enabled on VLAN 1 with pool address from 192.168.1.2 254. A host connecting to the VLAN 1 interface receives an address between
192.168.1.2 and 192.168.1.254
All switchports will be part of default VLAN 1
By default, ATM sub-interface comes up with MER encapsulation with DHCP
client enabled on the interface.
Step 3: You can view the factory default configuration details by executing the
‘show running-configuration’ command.
Example:
The following is an example of show running-config command on the
OmniAccess 5510-SR USG that displays the factory default configuration:
ALU(config)# show running-config
!Current Configuration:
!
! Statlog Configuration
!
logging on
logging buffered priority 7
logging buffered size 128
logging console 3
logging system 5
service timestamps log
logging rate-limit 1 10 tag SWE subtag DOS
logging rate-limit 1 10 tag PVSTD subtag PKT
logging rate-limit 1 10 tag SWE subtag SESSION
!
!
!
!VRF Configuration
!
! MULTICAST Configuration
!NOE port reservation
! PVST Global configuration
!
https enable
ssh enable
snmp enable
Alcatel-Lucent
OmniAccess 5510 Unified Services Gateway Getting Started Guide
Beta
Beta
10
Left running head:
Chapter name (automatic)
Performing Basic Configuration Tasks
!
!
! Clock Timezone
!
clock timezone utc
!
! CWMP Configuration
!
!
! CWMP Configuration (End)
!
!
! SNMP Configurations
!
snmp agent rocommunity aluro
!
aaa services
!
username admin password 5 21232f297a57a5a743894a0e4a801fc3
username recovery password 5
e35dfd3c8ba8a900381051844a603a6e
username superadmin password 5
8ec760e45da5b29afb19ed8d68a3eb5e
enable password 5 21232f297a57a5a743894a0e4a801fc3
!
!
!
!
aaa authorization disable
!
!
interface FastEthernet0
no shutdown
top
!
interface Vlan1
ip address 192.168.1.1/24
no shutdown
top
!
interface switchport0
no shutdown
top
!
interface switchport1
no shutdown
top
!
interface switchport2
no shutdown
top
!
interface switchport3
no shutdown
Alcatel-Lucent
11
OmniAccess 5510 Unified Services Gateway Getting Started Guide
Beta
Beta
Left running head:
Chapter name (automatic)
top
!
interface Serial0
!Note: Effective IP address and MTU will be as negotiated by
PPP
!Note: Any HDLC/Frame-Relay configuration currently does not
apply
encapsulation ppp
ppp ipcp address accept-local
ppp authentication client-username admin
ppp authentication client-password admin
no shutdown
top
!
!
!
! Filter Policy configuration
!
!
!
! Dos attack configuration
!
!
!
! System doesn't have IDS License
! IDS configuration may not be effective
!
!Snort configuration
firewall
intrusion snort
top
!
!
! Firewall configuration
!
!
! Warning: Valid IPSEC license not found!
! IPSEC configurations may not be effective!
!
! No Algorithm Defined
! IPSEC Policy configuration
!
!
!
!QoS Configuration
!
!
!
!DDNS configurations
!
!
Alcatel-Lucent
12
OmniAccess 5510 Unified Services Gateway Getting Started Guide
Beta
Beta
Except on the first page, right running head:
Heading1 or Heading1NewPage text (automatic)
Performing Basic Configuration Tasks
!
top
!
!Customized-Services
!
!
!
!
!
!
!
top
!
!
!
!
! DHCP Server Configuration
!
service dhcp enable
!
ip dhcp pool p1
network 192.168.1.0 255.255.255.0
range 192.168.1.2 192.168.1.254
!
top
!
!
!
! DHCP CLIENT Configuration
!
!
ip dhcp client default_client
vendor-class-identifier broadband-forum.org
parameter-req-list vendor-specific
top
!
interface FastEthernet0
dhcp client default_client
top
!
interface Serial0
dhcp client default_client
top
!
!
!
!
! ASE Configuration
!
ase
top
!
Alcatel-Lucent
OmniAccess 5510 Unified Services Gateway Getting Started Guide
Beta
Beta
13
Left running head:
Chapter name (automatic)
top
top
!
!
!OAM Configuration
!
oam
top
!
!
! DHCP Relay configuration
!
!
end
Step 4: You can save the factory default configuration to the startup configuration
by using the following command:
Example:
ALU(config)# write mem
Note:
In case of reload, the system always boots up with the factory default configuration
unless you explicitly save the modified configuration.
For further configuration of your OmniAccess 5510 USG, refer to the
“OmniAccess 5510 Unified Services Gateway CLI Configuration Guide”
available for download. Refer to the Product Documentation Card for instructions.
Alcatel-Lucent
14
OmniAccess 5510 Unified Services Gateway Getting Started Guide
Beta
Beta
Except on the first page, right running head:
Heading1 or Heading1NewPage text (automatic)
Performing Basic Configuration Tasks
ACCESSING THE OMNIACCESS 5510 USG THROUGH GUI
Follow the procedure given below to access and configure the OmniAccess 5510
USG through GUI.
Step 1: Open a Web browser from your PC.
Step 2: In the address bar/field, type the IP address of the interface obtained from
the DHCP server and press the Enter key.
Example:
http://<ip address>
http://192.168.1.1
The login page for the Web GUI is displayed in the browser window.
Note:
Execute “show ip interface brief” command to view the IP address obtained from the
server.
Step 3: Enter the default user name and password (superadmin/admin, admin)
and press the Enter key. This will launch a web interface to configure your
OmniAccess 5510 USG.
For further configuration of your OmniAccess 5510 USG, refer to the
“OmniAccess 5510 Unified Services Gateway Web GUI Users Guide”.
Alcatel-Lucent
OmniAccess 5510 Unified Services Gateway Getting Started Guide
Beta
Beta
15
Left running head:
Chapter name (automatic)
CONNECTING THROUGH TELNET
Telnet is a user command and an underlying TCP/IP protocol for accessing
remote computers. Telnet allows you to log on as a regular user with preset
privileges to the specific application and data on that remote computer.
Ethernet Ports
Figure 3: Connecting to Internal Network
To establish a Telnet session with the OmniAccess 5510 USG, follow the
procedure below:
Step 1: Connect the RJ-45 cable from the appropriate Ethernet port on the rear
panel of the OmniAccess 5510 USG to the internal router, switch, or hub in your
LAN.
Step 2: Open a Telnet session, for example, to 192.168.1.1.
•
•
From the Windows host, click Start > Run, type telnet 192.168.1.1, and click OK.
From the Unix/Linux host, from the terminal window, type telnet 192.168.1.1 and
press the Enter key.
Step 3: Enter the user name and password (superadmin/admin, admin) at the
prompt.
You are now ready to access the OmniAccess 5510 USG using a Telnet session.
Alcatel-Lucent
16
OmniAccess 5510 Unified Services Gateway Getting Started Guide
Beta
Beta
Except on the first page, right running head:
Heading1 or Heading1NewPage text (automatic)
Obtaining Technical Support
CONNECTING THROUGH SSH
Secure Shell (SSH) is a Unix-based command interface and protocol for securely
getting access to a remote computer. SSH uses the RSA public key cryptography
for both connection and authentication.
To establish an SSH session with the OmniAccess 5510 USG, follow the
procedure below:
Step 1: Connect the RJ-45 cable from the appropriate Ethernet port on the rear
panel of the OmniAccess 5510 USG to the router, switch, or hub in your internal
network/LAN.
Step 2: Open an SSH session, for example, to 192.168.1.1.
From the Unix/Linux host, from the terminal window, type ssh
<username>@192.168.1.1, and press the Enter key.
Step 3: Enter the user name and password (superadmin/admin, admin) at the
prompt.
You are now ready to access the OmniAccess 5510 USG using an SSH session.
OBTAINING TECHNICAL SUPPORT
For all customers, partners, resellers, and distributors who hold valid
Alcatel-Lucent service contracts, the Alcatel-Lucent Technical Support Team
provides 24-hour-a-day, technical support services online and over the phone.
For Customer issues and help, contact:
Alcatel-Lucent
US Customer Support: (800) 995-2696
International Customer Support: (818) 878-4507
E-mail: [email protected]
Website: service.esd.alcatel-lucent.com
Alcatel-Lucent
OmniAccess 5510 Unified Services Gateway Getting Started Guide
Beta
Beta
17
Left running head:
Chapter name (automatic)
Alcatel-Lucent
18
OmniAccess 5510 Unified Services Gateway Getting Started Guide
Beta
Beta