1
ZySCAN Manual
ZySCAN Manual
Contact Us
For full contact details, visit the ZyLAB website - http://www.zylab.com
For support, visit our ZyLAB support website - http://support.zylab.com
Contents
About ZySCAN ........................................................................................................... 1
Create a job template ............................................................................................... 2
Template Wizard - General .................................................................................. 3
Template Wizard - Internals ................................................................................ 4
Template Wizard - Workflow ............................................................................. 14
Template Wizard - ZySCAN ................................................................................ 16
Template Wizard - ZyIMPORT ............................................................................ 18
Template Wizard - ZyFIELD ................................................................................ 20
Template Wizard - ZyOCR .................................................................................. 34
Template Wizard - ZyEXPORT ............................................................................ 41
Template Wizard - Summary ............................................................................. 45
Processing a job ...................................................................................................... 46
Scan ......................................................................................................................... 47
Add fields ................................................................................................................ 49
Import ..................................................................................................................... 50
Add fields and field values to electronic documents .............................................. 51
OCR ......................................................................................................................... 60
Export ...................................................................................................................... 61
View and manipulate documents during job .......................................................... 62
(Semi-)automatic job processing ............................................................................ 64
Global Options ........................................................................................................ 69
ZySCAN Manual
Advanced Scanning ................................................................................................. 75
Image Processing ............................................................................................... 76
Separating documents ....................................................................................... 82
Automatic image enhancements ....................................................................... 85
Zonal OCR........................................................................................................... 92
Process a locked job after a system failure ....................................................... 94
Internals ............................................................................................................. 98
Work with Scan Profiles ................................................................................... 101
Using the Command line.................................................................................. 104
About Final Bates Stamping .................................................................................. 110
Create Final Bates Stamping Job Template ..................................................... 111
Processing Final Bates Stamping Job ............................................................... 114
Searching for Bates Stamping Numbers .......................................................... 115
ZySCAN Manual
About ZySCAN
ZySCAN is a powerful tool that easily processes paper documents and existing image formats into
searchable information.
Input
ZySCAN can drive both high-end and low-end scanners so that all your paper documents can be scanned in
any size, whether it is A0, A4, A5, letter or legal. If you already have your documents in an image format
such as TIFF, JPEG or Fax, ZySCAN can import and process these files as well.
Automatic indexing
ZySCAN recognizes all the text in documents, regardless of the size, and uses this recognized text to
automatically index all of a document’s information. You can be sure that all of this information is
processed because ZySCAN’s different OCR (Optical Character Recognition) engines provide the most
accurate and thorough results possible. The OCR process also supports multiple languages, such as Arabic
and English, on the same page. Even rotated text is recognized.
Manual indexing
If required, ZySCAN enables you to add manual index fields to the scanned or imported documents. A
variety of different field types are possible, such as Plain Text, Date, List, Barcode and many others. These
manual indexes can be filled automatically with a date, the number of pages, the language of the document
and so on. Whatever information you need indexed, and depending on whether you want to have that
information manually or automatically indexed, ZySCAN gives you the flexibility to manage the information
in your documents in any way you see fit. The ZyLAB search programs enable you to search for all the
words that are indexed, which ensures that you are able to retrieve your documents again.
Information storage
ZySCAN uses an open file format to store all information. This format is XML or ASCII text for the manual
and automatic index information and open-source TIFF for the original scanned or imported documents.
The TIFF image guarantees a 100% copy of the original file, retaining all information such as signatures and
written remarks. XML is a non-proprietary format for information storage and exchange. On average, 1 GB
can store about 15,000 A4 pages (B/W).
Production Environment
ZySCAN is a very scalable solution and is therefore suited for high volume scanning and processing. Multiple
ZySCAN clients can be set up and the whole process of scanning and manual and automatic indexing can be
divided over different PCs to create a reliable high-volume scanning environment.
1
ZySCAN Manual
Create a job template
After you have created or reused an index in ZyINDEX, you can use ZySCAN to scan or import then process
your files, and export them to your index. Each document has to go through a sequence of steps, some
optional depending on the step configuration, to prepare the file for export. The steps are saved as a Job
Template, and multiple templates can be created to process different types of source files. Job Templates
are created using the ZySCAN template wizard.
Note
•
The job template allows you to automate some stages of the job (workflow).
•
You can create an entirely new template, create one based on an existing template, or change an
existing tempate. In all cases you have to use the Template Wizard.
•
Electronic documents (for example, Word documents) can be saved immediately in the Index data
folder "Electronic".
2
ZySCAN Manual
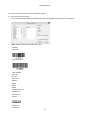
Template Wizard - General
Conditions
You want to create a job template.
Instructions
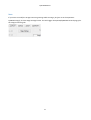
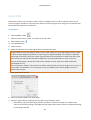
1. Start ZySCAN. Go to Template > New template.
The Template Wizard - General screen appears.
2. To create a completely new template, select "Define new job template".
or
To change an existing template, or create a new template based on an existing template, select "Define
new job template based on an existing job template".
3. Click Next.
Result
The Template Wizard - Internals screen appears.
3
ZySCAN Manual
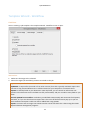
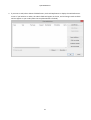
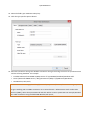
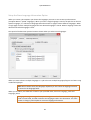
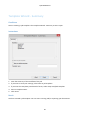
Template Wizard - Internals
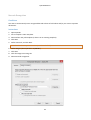
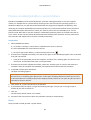
Conditions
You are creating a job template. The Template Wizard - Internals screen is open.
Instructions
1. When ZySCAN processes a job an Audit Trail is automatically created logging all the steps made and the
computer they were made from. If you want to prevent Audit Trail information being created, select
'Suppress job in Audit Trail' (see Note 1).
2. If you want create a link to an index, a RMA (Record Management Application) or an index over HTTP,
check the External Link checkbox (see Note 2).
If you want to use the field definitions and data locations of an index:
- select Index from the drop-down list.
- click Select and select an index.
All field definitions of this index will be reused. Also, the location of the data folders will be reused.
Any changes made to the field definitions will be synchronized.
- Click OK. The name of your selected index appears in the text box.
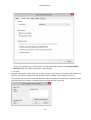
If you want to export to a record of a Record Management Application, select RMA from the dropdown list.
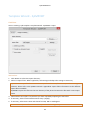
4
ZySCAN Manual
- Click Select.
- Enter the RMA URL and the User.
- Enter and confirm the Password.
Use a User name and Password of the RMA.
- Click OK.
Note: To be able to export your documents to RMA, a barcode for each record must already be
created in the RMA.
For more information, see Export scanned documents to RMA (page 11).
If you want to export to an Index over HTTP, select Index over HTTP from the drop-down list.
- Click Select.
- Enter the Base URL.
- Enter the Client Name and the Index Name.
- Enter the User name.
- Enter and confirm the Password.
- Click Test connection to test that the settings are correct.
- Click OK.
If required, check the Create ZyLAB Workflow checkbox.
Note: For more information on Creating a ZyLAB Workflow refer to the ZyLAB Workflow Manual.
3. Click Next.
Result
The Template Wizard - Workflow screen appears.
Note
1. When ZySCAN processes a job using a job template with an associated Audit Trail index, the required
audit trail information is generated and logged in an XML file ready for inclusion in the Audit Trail index.
For large jobs, this process can create a large amount of audit trail data which in certain configurations
can cause performance to decrease. If you think performance will decrease when audit trail
information is being generated, check the Suppress job in Audit Trail checkbox to stop the audit trail
data being created.
Note: Audit trail information includes the following: job open, job closed, job deleted, create a new job,
create a new job template, create a new text (txt/XML) file, create a new image (TIFF) file, export an
image (TIFF) file and fields edited.
2. External Link (to index) is an important option and it is recommended to use it for each job template
you create. With an External Link to an index, it is not necessary to define the fields again as they are
already defined in the index you linked to. Also, the location to where your documents will be exported
(the data folders) is the same. Any changes to the indexes field definitions will be synchronized with the
job template, ensuring the same settings are used.
Another advantage of the External Link to an index option is that it is possible for the index to detect
exactly which documents are added, making it possible to use Quick Build to build the index.
5
ZySCAN Manual
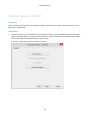
HTTP Export
Use HTTP Export to export ZySCAN processed data over https to a secured environment. ZySCAN users do
not need any access to the file store index data location.
When exporting via HTTP, ZySCAN Export will zip up the scanned and ocr-ed images, and upload the zip file
to a web client using a ZyLAB user account. The web client upload functionality will unzip the zip file and
add the images and ocr-ed text to the index data folders.
6
ZySCAN Manual
Configure HTTP Export
Conditions
You want to export ZySCAN processed data over https to a secured environment.
•
ZySCAN has been installed
•
ZyINDEX (incl. web client) has been installed
•
Windows IIS has been installed
•
An index has been created (index longname: httpexport)
•
A web client has been created (http alias and long name: httpexport, web client template style: ZyFIND
Enterprise)
•
The httpexport index has been added to the httpexport web client
•
The anonymous user is member of the Administrators group to allow uploading of documents to a web
client.
Instructions
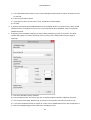
1. Start ZySCAN and create a new job template: Go to Template > New Template.
2. Click Next.
3. Select External link.
4. Select Index over HTTP.
7
ZySCAN Manual
5. Click Select.
6. Define your web client (http alias), index long name and user.
7. Click Test connection to test the settings.
8. Change settings if not OK.
9. If OK, click OK.
10. Click Next.
11. Select ZyIMPORT, ZyFIELD, ZyOCR and ZyEXPORT.
12. Click Next.
13. Browse for files you want to import. You may want to try with our example files first, located on
\\Program Files\ZyLAB\Information Management Platform\Examples\Import\Single page Tiff.
14. Select the correct import filter. When using the example files, the Single Page Tiff import filter.
15. Click Next.
16. Click Next.
17. Keep the default ZyOCR settings and click Next.
18. Click Next.
19. Enter a name for your job template and click OK.
Result
You are now ready to start using your job template in the production environment.
8
ZySCAN Manual
Note
•
Each document is transferred in a ZIP file. For example, 10 documents in one scanning job will be 10 ZIP
files that are transferred.
•
Use HTTP export carefully. For example, using http export with documents over 100 pages will result in
>8MB files that are transferred over HTTP.
9
ZySCAN Manual
Use HTTP Export
Conditions
You have created a job template for exporting ZySCAN documents via http. Now you want to start
processing.
Instructions
1. Start ZySCAN and click New Job.
2. Select the job template you created.
3. Click OK.
4. Click Import to import your files.
5. Click Yes to continue to the next stage.
6. If your linked index contains fields, enter the field values and click OK.
7. Click Yes to continue to the next stage.
8. Click Start OCR to OCR the image.
9. Click Yes to continue to the next stage.
10. Click Start Export and click Yes when finished exporting to close the job.
Result
You have scanned your documents and exported them via http.
Note
•
Each document is transferred in a ZIP file. For example, 10 documents in one scanning job will be 10 ZIP
files that are transferred.
•
Use HTTP export carefully. For example, using http export with documents over 100 pages will result in
>8MB files that are transferred over HTTP.
10
ZySCAN Manual
Export scanned documents to RMA
You can create an external link between ZySCAN and the RMA (Record Management Application). This will
allow you to store (scanned) documents directly in the RMA. First, you have to create a record in the RMA
and declare it. Then, select 'View barcode' and print the page. This page with barcode is placed on top of
the document you are about to scan. The scanned document is exported/stored as a component of the
record you just created.
In order to make this possible, you have to create a new job template in ZySCAN:
Conditions
ZySCAN is open.
The ZyLAB Barcode Reader is installed, the license key added.
Instructions
1. Go to Template > New Template.
2. Select 'Define new job template'.
3. Click Next.
4. Select 'External Link'.
5. Select 'RMA'.
6. Click 'Select URL'.
7. Define the RMA URL and User name and Password.
8. Click OK.
9. Click Next.
10. Select ZySCAN, ZyFIELD and ZyEXPORT.
11. Click Next.
12. Select the correct Scan interface.
13. Select the Image Processing tab.
14. Select Barcode Recognition.
Make sure 'ReadIris Software' selected.
Click Properties and select EAN 128.
Click OK.
11
ZySCAN Manual
If you do not want to store the barcode page in the RMA, select 'Split at barcode' and 'Delete
barcode page'.
To store the bar code value in an index barcode field select 'Fill in barcode field'. This will store the
barcode that is scanned last in the barcode field. When you want each scanned barcode value
stored in scan order in barcode fields select 'Recognize barcodes on multiple pages'. Note that you
must have an adequate quantity of barcode fields in your index.
15. Select Next.
16. Select Field Definitions.
17. Click Add definition.
18. Enter a Name (Barcode), and select a Type (barcode field).
19. Click OK twice.
20. Click Next.
21. Click Next.
22. Fill out a Template name (for example, 'Link to RMA').
23. Click Finish.
Result
You have created a new job template, which allows you to scan documents and export/store them in the
RMA.
12
ZySCAN Manual
Place the document with the barcode page on top in the scanner and go to File > New. Select the correct
template and click OK to start processing. When the job is finished, the document is exported/stored as a
component of a record in the RMA.
13
ZySCAN Manual
Template Wizard - Workflow
Conditions
You are creating a job template. The Template Wizard - Workflow screen is open.
Instructions
1. Make sure the Stages tab is selected.
2. Select the stages (the workflow) you want to include in the job.
ZySCAN: to import files from a scanner that has a direct connection to the workstation.
ZyIMPORT: to import files (scanned or from other sources) from disk. Typically used with copiers that
use FTP to copy scanned documents to a folder located on your computer or a network server.
ZyFIELD: to add key fields to your documents. With key fields, you can search on information not
present in the document itself. The fields are fully customizable, and you can add as many fields as you
want.
Exclude ZyFIELD from workflow: used when you add fields automatically with automatic field options,
barcodes, or if you use the electronic import filter. This turns off the field screen pop-up so you can
work without interruption. Fields can also be added later using ZyFIND.
ZyOCR: to convert text on images into actual text that can be searched. This is done using the inbuilt
Optical Character Recognition programs.
14
ZySCAN Manual
ZyEXPORT: to export files from a job to a predefined export folder from where ZyINDEX is used to build
the index.
3. Click Next.
Result
The Template Wizard - ZySCAN screen appears (if selected for the workflow).
•
The Current Stages tab cannot be edited. During the processing of a job it shows which stage you are in.
•
In the Batch Stages tab you can choose whether you want ZyFIELD, ZyOCR and/or ZyEXPORT to process
in a separate session. This can be convenient when you work with large batches and multiple users.
•
The Internals tab gives an overview of the options selected in the Template Wizard - Internals screen.
15
ZySCAN Manual
Template Wizard - ZySCAN
Conditions
You are creating a job template. The Template Wizard - ZySCAN screen is open.
Instructions
1. Select a Scan interface.
Kofax: Preferred for low-, medium- and high-end scanning solutions. Supports image enhancement.
Also, an automatic document separator can be added every n pages. This eliminates the use of manual
document separation when scanning large sets of forms or documents of equal length.
Twain: Supported for backward compatibility.
2. If required, select Show message when scanning is finished.
3. If necessary, select Create new document every n page(s).
4. If necessary, select Auto rotate, and choose from 90, 180 or 270 degrees.
5. Click Scan Source and select the source with the correct driver settings.
6. If you selected the Kofax scan interface, select a Scan profile to adjust scanner settings like page size,
resolution, color depth. These settings will be stored in the template.
16
ZySCAN Manual
A Scan profile represents a complete set of Kofax scanner properties and is identified by a unique userdefined name. The advantage of scan profiles is the ability to switch quickly between settings (without
browsing through various scanner menus), and the ability to save popular settings with a descriptive
name. For more information on creating Scan profiles, see Work with Scan Profiles (page 101).
7. Click Next.
Result
The Template Wizard - ZyIMPORT screen appears (if added to the workflow).
Note
•
If you linked to RMA in the Template Wizard - Internals screen, select the Image Processing (page 76)
tab to define Barcode Recognition (page 78). Select ReadIris Software, then click Properties and select
EAN 128. Click OK. Select the option Fill in barcode field.
Return to the General tab, or click Next.
17
ZySCAN Manual
Template Wizard - ZyIMPORT
Conditions
You are creating a job template. Template Wizard - ZyIMPORT is open.
Instructions
1. Click Browse to select the Import directory.
2. Select an import filter. Where applicable, click Settings and adjust the settings as necessary.
ZyIMPORT can import files from various sources, such as directories, fax-servers, or other scanning
solutions. Please refer to the ZyINDEX manual > Appendix B: Import filters information on the different
import filters available.
ZyIMPORT imports the files into the TIFF directory of the job and renames the files with a new unique
name.
3. Select Delete source files. This prevents you from repeatedly importing the same files.
4. If necessary, select Create new document every n page(s).
5. If necessary, select Auto rotate and choose from 90, 180 or 270 degrees.
This can be an important feature when the system is linked to digital copiers.
18
ZySCAN Manual
6. Click Import Source and select the source with the correct driver settings.
7. Click Scan Source Properties to adjust scanner settings like page size, resolution, color depth. These
settings will be stored in the template.
8. Click Next.
Result
The Template Wizard - ZyFIELD screen appears (if added to the workflow).
Note
•
If you linked to RMA in the Template Wizard - Internals screen, select the Image Processing (page 76)
tab to define Barcode Recognition (page 78). Select ReadIris Software, then click Properties and select
EAN 128. Click OK. Select the option Fill in barcode field.
Return to the General tab, or click Next.
19
ZySCAN Manual
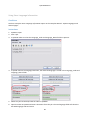
Template Wizard - ZyFIELD
Conditions
You are creating a job template. The Template Wizard - ZyFIELD screen is open. This screen allows you to
add and/or change fields.
Instructions
1. If you have linked this job template to an index and you want to use the field definitions of that index
without making changes, or if you have not linked to an index and do not want to add fields, click Next
and continue with the Template Wizard - ZyOCR screen.
To add or change fields, continue with the next step.
20
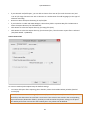
ZySCAN Manual
2. If you want to add, edit or delete field definitions, click Field Definitions to display the Field Definitions
screen. If you linked to an index, the index's fields will appear in the list, and all changes made to fields
will also appear in your index (when the Template Wizard is finished).
21
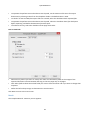
ZySCAN Manual
a) If you want to import a set of field definitions, click Import definitions and select a "fields.txt" file
from an index's "FIELDS" folder.
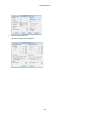
b) If you want to add new fields, click Add definition to display the New Field Definition window:
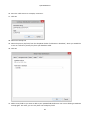
c) Enter the Name of the new field definition.
For example, Author, Name or Contract_number. Note that a field name may not contain spaces, so all
spaces entered are automatically replaced by underscores (_).
d) Select a Type from the dropdown list, and where applicable add Default and Fixed values, and the
value file name.
For more information about the different types, see Field types.
If you have selected the Plain text field or Logical field, you can select the Type-specific options button
and specify a region of the TIFF file that will be OCRed separately from the normal OCR process.
e) Select the Storage & Index tab. The following options are available (refer to the notes in Step 5:
Define fields for more information):
22
ZySCAN Manual
If you are using XML in job, or have linked to an index with XML Wrapper (see Template Wizard Workflow (page 14)), select Store field in > XML Wrapper.
f) Click OK.
3. Override Index Default Values allows you to make changes to the values of an index's fields while using
ZySCAN, but without changing the fields' default values in ZyINDEX. These changes will not be
synchronized with the index's fields, but the fields' values will appear in ZyFIND. This is especially useful
with fixed values, for example, to add the name of the person who is scanning.
23
ZySCAN Manual
a) In the Edit Default Field Values screen use the Navigate Fields buttons to select the field you want
to override.
b) Enter the new Default Value.
c) If you want to return to the index's value, click Reset to Index Default.
d) Click OK.
4. If you have selected Create ZyLAB Workflow on the Template Wizard - Internals screen, select ZyLAB
Workflow. Select a template and a user. For more information about workflow, refer to the ZyLAB
Workflow manual.
5. If required, click Final Bates Stamping to apply a Bates numbering system to your files. The Bates
number will appear in a field (if selected), in the xml file as text, and burned onto each page (if
selected).
a) Check the Add Bates stamp checkbox.
b) Enter the Bates Prefix. This can be any text. A sequential Bates number is added to the prefix.
c) Give a name to the Bates Number File, or browse to the location of the file you want to use.
d) If you want the Bates number to appear in a field, select a field definition from the drop-down list.
e) Select the ZySCAN stage you want the Bates stamping to occur.
24
ZySCAN Manual
f) If you want the Bates numbers to be permanently added to the pages check the Burn into page
checkbox. The X and Y measurements are the distances from the bottom left corner of the page. Or
select the location where the bates stamp should be placed.
g) Select the Foreground (bates number) color.
h) If you want to specify a background color, select the checkbox Background and select a color. Please
make sure that the colors do not conflict with each other. It is advised to test the readability of
exported documents.
Note: The foreground and background colors will be exported. However, if the original document is
B&W or grayscale, the bates stamp will also be B&W (so not in color!).
To prevent multiple instances of ZySCAN using the same Bates numbering range at the same time, the
job template will only work on the computer where it is installed.
6. Click Next.
Result
The Template Wizard - ZyOCR screen appears (if added to the workflow).
Note
If you linked to RMA in Template Wizard - Internals, create a Barcode field (select 'Barcode field' as the
type in the Name/Type tab). When the job is being processed, the barcode (printed out, on top of the job,
corresponding with the correct Record in the RMA) is added as a field to the document(s) being scanned.
This barcode establishes the link between ZySCAN and the RMA.
25
ZySCAN Manual
Database Lookup Field
The ZySCAN Database Lookup Field makes it possible to insert information from a database into the key
fields in ZySCAN/ZyINDEX. The Lookup Field is used to search for information in a database, and inserts this
information in the appropriate fields. Already ZySCAN/ZyINDEX offers several functions for including
database information, such as ODBC synchronization and database fields. However, with the Lookup Field
users can confirm and add information visually in real-time. The Database Lookup Field function should
work with all common databases using standard interfaces. The Database Lookup Field should work with
ODBC and ADO interfaces.
26
ZySCAN Manual
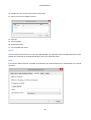
Configure Database Lookup Field
Conditions
ZySCAN is installed. You want to insert information from a database into the key fields in ZySCAN/ZyINDEX.
Instructions
1. Start ZySCAN.
2. Go to Template > New Template.
3. Click Next.
Or, link the job template to an index first. This will give you all the index settings.
4. Click Next.
5. Select ZyIMPORT, ZyFIELD, ZyOCR and ZyEXPORT.
6. Click Next.
7. Browse for the files you want to add information to. For example, single page tiff import files.
8. Select the Single Page Tiff import filter, or another suitable filter.
9. Click Next.
10. Click Field Definitions.
11. Click Add definition.
12. Enter a field name. For example, ClientID.
27
ZySCAN Manual
13. Select the field Type: Database Lookup key.
14. Click the Type-specific options button.
15. Enter the Connection string. The database connection string is the string to connect to your data source
and the referring database. For example:
Provider=Microsoft.Jet.OLEDB.4.0;Data Source="E:\ZyLAB Data\Database\Database.mdb"
Driver={Microsoft dBASE Driver (*.dbf)};DriverID=277;Dbq=c:\\ZyLAB Data\\Databases;
DSN=Benelux;Uid=;Pwd=;
For more connection strings, check http://www.codeproject.com/database/connectionstrings.asp
To get it working with an ODBC connection: Go to Control Panel > Administrative Tools. Select Data
Sources (ODBC), select the System DSN tab and click Add to create a system DSN. For example, Benelux.
The valid connection string would be DSN=Benelux;Uid=;Pwd=;
28
ZySCAN Manual
16. Enter the Table name. For example, Customers.
17. Click OK.
18. Select the Lookup tab.
19. Select the primary key field, from the dropdown listbox "Field name in database", which you would like
to use as a reference primary key from your database table.
20. Click OK.
21. Add as many fields as you want to add to your ZySCAN fields definitions. Do not use field type Database
Lookup again. Per index, you can only have one Lookup key field.
29
ZySCAN Manual
22. For each field click the Lookup tab to select the referring database field. Also, select the option "Look
up field value" to retrieve the value from the database.
23. Click OK when all fields are added.
24. Click Next.
25. Keep the default ZyOCR settings and click Next.
26. If you did not link your job template to an index, select the folders to export your txt/XML, XMLfields
and TIFF files to, and click Next.
27. If you linked your job template to an existing index, select “Export to default data directory and
modules of the index”, and click Next.
28. Enter a name for your job template.
29. Click Finish.
Result
You have created a job template, and added a lookup field and related fields. You are now ready to start
using your job template in the production environment.
Note
If you get an Unknown error during database lookup, this might be due to the fact that one or more
database key fields contain spaces. To avoid this problem, create a Database View in which each field name
(with spaces) is replaced by an alias (without spaces). For more information, see the Using ZyLAB Programs
and Databases manual > Database View.
30
ZySCAN Manual
Use Database Lookup Field
Conditions
You have created a job template, and configured the Database Lookup Field. Now you are ready to start
using your job template in the production environment. You want to have a visual view of the field values
that are being added while processing.
Instructions
1. Start ZySCAN.
2. Click New Job.
3. Select the job template you created for ZySCAN Database Lookup.
4. Click OK.
5. Click Import to import the files you want to add information to.
6. Click Yes to continue to the next stage.
7. Enter a value for the Database Lookup Field.
8. Click Look up.
9. The additional fields will be added when the field value for the Database Lookup Field is available in the
database.
31
ZySCAN Manual
10. Click OK.
11. Click Yes to continue to the next stage.
12. Click Start OCR to OCR the image.
13. Click Yes to continue to the next stage.
14. Click Start Export.
15. Click Yes when finished exporting to close the job.
Result
You have processed a job and added field values to your files.
32
ZySCAN Manual
Unicode Fields
With Unicode fields it is possible to get good field values (including Zonal OCR (page 92)) with the Arabian,
Russian, Hebrew and Asian OCR engines.
Note: Make sure the option 'Use XML internally' is selected when creating a job template (Template Wizard
- Internals).
33
ZySCAN Manual
Template Wizard - ZyOCR
Conditions
You are creating a job template. The Template Wizard - ZyOCR screen is open.
Instructions
Languages tab
Select one language
1. Select a language from the Available Languages drop down list.
2. Select an Available OCR engine.
If you are processing large batches with varying image quality, choose ZyLAB Global Professional OCR.
The Global Standard OCR engine is provided as the low-end OCR engine for ZySCAN.
Select multiple languages
1. Select one language and OCR engine.
Multiple languages are not supported for OCR engine ZyLAB Global Standard OCR. You will need the
ZyLAB Global Professional OCR engine. This engine supports language detection.
34
ZySCAN Manual
2. Check the Use multiple language/engines check box. Click the right-arrows button
language to the list.
to add the
3. Select more languages as required and add them to the list.
4. Choose between:
Store using combined languages (stores the OCRed text of only the recognized languages, which
means that a text with German sections will be OCRed in German and the English sections will be
OCRed in English)
Store each language separately (stores the OCRed text of all languages, which means that the whole
text will be OCRed for each selected language)
General tab
Select one or more of the following options.
•
Auto-orientation. This automatically rotates the image until the page is readable (portrait or landscape).
For example, if the page was fed in the scanner upside down, the OCR engine will rotate the image 180
degrees before OCR is performed. This is especially important when you use image files stored on disk
35
ZySCAN Manual
because you may have had no control over their orientation (rotation) when they were scanned. Please
note that auto-rotation is OCR-engine dependent and will never be 100% accurate.
•
Deskew. Only available for ZyLAB Global Professional OCR engine. The OCR process recognizes words
on a straight line from left to right, if an image is slanted words in different lines in the image will be
recognized as belonging to the same line of text. Deskew corrects such slanted images.
•
Enhance image. Only available for ZyLAB Global Professional OCR engine. The image quality of TIFF files
will be improved with techniques like line straightening, black dots removal and motion blur
restoration.
•
OCR directions. If you expect text to be displayed in more than one direction, select the appropriate
directions: 0, 90, 180 and/or 270 degrees. You can select all directions, if you do not want to miss
anything. However, please be aware that this may slow down the OCR process.
•
For Store language information, see Store Language Information (page 38).
•
For Predefined Profile, choose from:
TextExtraction Accuracy / TextExtraction Speed
Extracts all texts in a document for indexing, search or classification
DocumentArchiving Accuracy / DocumentArchiving Speed / BookArchiving Accuracy /
BookArchiving Speed
Converts documents to archive them digitally. Fast processing and a good visual quality combined
with a small size of the resulting PDF or PDF/A file are crucial when converting paper documents for
electronic archiving purposes.
DocumentConversion Accuracy / DocumentConversion Speed
Converts documents to re-use their content. Exact recognition accuracy and reconstrution of the
document's structure, layout and formatting are very important when its content needs to be reused. The high quality of OCR results reduces the need for text corrections.
EngineeringDrawings Processing
Recognizes technical drawings, with text arranged in different directions.
Accuracy versus Speed mode
The Accuracy mode uses all of the available character recognition tools. The speed of the recognition
depends on the image quality. The better the image quality, the faster it can be processed.
The Speed mode provides a 2-2,5 times faster recognition speed at the cost of a moderately increased
error rate (1,5-2 times more errors). On good print quality texts such a moderate increased error rate
can be tolerated, using for example fuzzy searches.
36
ZySCAN Manual
White Page Removal tab
•
If you want to detect and remove white (blank) pages based on file size, select White page recognition
using file size. A TIFF file smaller then 1,000 bytes (1 Kb) will be recognized as being blank. The pages
before and after this page will then belong to two different documents. If you want to separate your
pages it is better to use patch pages or bar codes, and these methods are described in Separating
documents.
Typically, a blank A4 300 dpi image compressed using TIFF group 4 will have a file size of approximately
1.5 Kb on disk. Shadow lines in the paper may create small groups of black pixels which can easily lead
to a 3 Kb file size, so white page detection limit of 3 – 4 Kb should be considered. To estimate file size,
check the file size of a blank page that has already been scanned.
•
If you want to detect and remove blank pages based on number of OCRed characters, select White
page recognition using number of OCRed characters.
Result
The Template Wizard - ZyEXPORT screen appears (if added to the workflow).
Note
In the Languages tab, if you select the option Store all output then the option Deskew in the General tab is
disabled.
37
ZySCAN Manual
Store Language Information
The option Store language information uses the ZyLAB language recognition tools to recognize the text
language, and to store the language code and language name in two dedicated fields in the document's
XML wrapper. The language code and name are derived from the ISO-639 standard and comprise a threeletter code, and a language name that appears in the language set in the ZySCAN Interface Language
(Options > Interface languages).
Note that if the Language_Code and Language_Name fields already exist in the index
specified as an external link then the Store language information option is already
selected and cannot be de-selected.
38
ZySCAN Manual
Setup the Store Language Information Option
When you create a job template you choose the languages you want to use to OCR your documents
(Template Wizard - ZyOCR: Languages). When you know a single language is used in the job this can be one
specific language, or a selection of languages when documents or pages contain different languages. When
a single page contains multiple languages the first detected language is stored. When a language cannot be
detected the Default language is used.
The speed of the detection process becomes slower when you select more languages.
When you want to detect multiple languages in a job select Use multiple languages/engines and Store using
combined languages.
Note: Do not Select Store each language separately as this causes all languages listed to
be stored in the language fields.
When you click Next, two fields are created in your specified index; these are Language_Code and
Language_Name.
Changing the Stage settings when a job is being processed will not create the language
code or name fields, and will not detect the languages used in the documents. You must
create or change a job template to use Store language information.
39
ZySCAN Manual
Using Store Language Information
Conditions
You have setup the Store Language Information option in the Template Wizard - ZyOCR Languages and
General pages.
Instructions
1. ZySCAN is open.
2. Start a job.
3. In ZyFIELD make sure that the Language_Code and Language_Name fields are present.
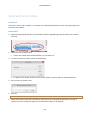
4. In ZyOCR monitor the language detection; the detected language is stored in the Language_Code and
Language_Name fields:
5. When the job has finished, build the index in ZyINDEX.
6. Open the index in ZyVIEW and view a document from the job. The two language fields will show the
ISO-639 language code and name.
40
ZySCAN Manual
Template Wizard - ZyEXPORT
Conditions
You are creating a job template. The Template Wizard - ZyEXPORT screen is open.
Instructions
General tab
Defines where the data from a job is exported to. This will typically be a file server location, which is also
accessible to ZyINDEX for indexing and to ZyFIND for displaying the documents. Make sure that there is a
backup policy for this location since it will contain all your valuable documents.
•
Select an Export method from the dropdown list.
If you have chosen Use XML internally (Template Wizard - Internals), or linked to an index with XML
Wrapper, choose XML/Tiff Export, otherwise the XML files will be stored as txt files after export.
If you have linked this job template to an index (Template Wizard - Internals), you can select Export to
default data directory and modules of the index. Do this if you want to use the selected index's data
locations and if you are using the TIMER automatic mode in ZyINDEX.
41
ZySCAN Manual
•
If you selected ‘Xml/Tiff Export’, you are able to choose from ‘UTF-8’ (for small character sets) and
‘UTF-16’ (for large character sets such as Chinese or a combination of world languages) as the type of
Character Encoding.
•
Browse to select the Export directory for txt/xml files.
•
If you linked to an index with XML Wrapper, select Place fields in separate XML file. Click Browse to
select the Export directory for field XML files.
•
Click Browse to select the Export directory for image files (TIFF).
•
Click Browse to select the Export directory for electronic files, if the electronic import filter is selected
(Template Wizard - ZyIMPORT).
Process Control tab
To create a standard job template keep the default settings.
•
To restore disk space after exporting jobs in batches, select the checkbox Delete job when finished
successfully.
Your documents are stored as images (the scanned/imported files) and text (the OCRed files).
Therefore, each document has a tiff and a txt version. These versions are stored in the corresponding
export directories (destination folders), and they are still located in the jobroot, taking a lot of space.
The Delete job function ensures that the finished jobs in the jobroot will be deleted.
42
ZySCAN Manual
•
To optimize the performance and enhance search speed, set the maximum file count for output
directories by selecting a value from the dropdown listbox. The default value is 1024.
•
To check if all TIFF and XML/TXT export files are created, select the checkbox Check exported files.
•
To optimize the performance and enhance search speed, select the checkbox Check free disk space
before exporting, and define the Minimum free disk space.
•
To enhance security, select the checkbox Create page hash codes.
Burn In Fields tab
•
Select Burn in fields if you want to 'stamp' the value of a selected key field on the images of the
exported document. Choose between burning on the First page only or All pages.
•
Click Select fields to determine which fields you want to have burned in and if you want to change their
sequence.
•
Define the left and top margin to determine the exact location.
Click Next to move to the next screen.
Result
The Template Wizard - Summary screen appears.
43
ZySCAN Manual
Template Wizard - ZyEXPORT: Create page hash codes (based on TIFF files)
It is now possible to create hash codes, based on image (tiff) files. This hash code is stored with the image
link in the XML file that is created during export. In order to create these hash codes, the 'XML/Tiff Export'
method has to be selected in the General tab. Then you select the Process Control tab and select the option
'Create page hash codes'. Now, for each image (tiff) file that is processed during a job a hash code is
created and saved within the XML file (with the image link) that is created during export.
If you use this option in combination with an hash code field, the calculation of the hash code field is based
on the xml-file with hash codes of the images. The hash code field is stored in a separate file (in order not
to change the contents of the XML file).
What is a hash code?
Hash codes are used to prove the authenticity of files. A hash code is a string, presented as 40 hex
characters:
<field id="hashcode">1004046B52575F85AF065E24594271B63B0E92D2</field>
This hash code is calculated based on the contents of a text (txt/XML/PDF/etc.) or an image (TIFF) file.
The hash code is based on the Secure Hash Standard. In this standard, the SHA-1 (Secure Hash Algorithm-1)
is specified. This Secure Hash Algorithm-1 is designed to ensure that it is impossible to find two different
files which produce the same hash code. This means that you can use this code to prove the authenticity of
your files.
Therefore if you want to share your files and want to have the possibility to prove that everyone is using
the same file and no changes are made, you are advised to add hash codes to your files.
44
ZySCAN Manual
Template Wizard - Summary
Conditions
You are creating a job template. The Template Wizard - Summary screen is open.
Instructions
1. View the summary of the workflow of the job.
2. If you want to save your settings, select Save as job template.
3. If you want this template preselected in future, select Keep as default template.
4. Enter a Template name.
5. Click Finish.
Result
You have created a job template. You can start scanning and/or importing your documents.
45
ZySCAN Manual
Processing a job
After an index and a job template have been created, you can start a job (the pages you are working with in
one batch). A job consists of the stages defined in a job template. The first stage is scanning or importing.
The first stage can be followed by adding fields, OCRing and exporting, depending on the job template you
chose. After the job has been finished, you can build the index. Finally, you can search your documents.
Each job can be ended with the Close Job button. When a job is closed, all settings are saved on disk. Select
Open job to continue.
Each job can be deleted with the Delete Job button.
46
ZySCAN Manual
Scan
Conditions
You want to process a job. ZySCAN is open. You are in the ZySCAN stage.
Instructions
Start a new job
1. Click New job.
2. Keep the automatically defined Job name.
3. Select a (job) template.
4. If you want the selected template to appear in the template box, click Keep as default job template.
That way, you do not have to select it the next time.
5. Click OK.
6. Place the correct documents in the scanner/copier.
7. Click Scan.
Restart an existing job
1. Click Open job.
2. If you have more then one job, select a Jobroot.
The Jobroot is the location where all jobs are stored.
3. Select a job.
4. Click OK.
5. Place the correct documents in the scanner/copier.
6. Click Scan.
Result
ZySCAN will notify you when the scanning of the job is completed. Press Yes to go to the next stage or No if
you want to continue scanning until all documents have been scanned. In case you continue scanning, each
document will be appended to the Job as a new document. We advise to restrict the number of pages in a
single job to 700 pages. More pages can be handled at the expense of slowing down your functions.
Enhance the quality of your scanning
To enhance your scanning, you can do one or more of the following:
•
Adjust the Stage Settings (select a Scan interface, and choose either "Show message when scanning is
47
ZySCAN Manual
finished", "Create new document every n page(s)" or "Auto rotate")
•
Enable Backside pages (disabled by default). First, scan all frontpages of one batch, then all backpages.
•
If you want to create new documents during scanning, click Start new document. For example, scan the
pages of chapter one, click Start new document, scan the pages of chapter two, click Start new
document, etc.
•
If you scanned one page wrong, click Re-Scan. With Re-Scan, you delete the old (wrong) page, and save
the new one.
•
Adjust the Scan Source Properties (select paper size, contrast and resolution. Note that these settings
depend on your scanner capabilities).
•
If you scan color images, make sure they are scanned at 150 dpi (max. 256 colors).
48
ZySCAN Manual
Add fields
If ZyFIELD is excluded from the workflow (see Template Wizard - Workflow (page 14)), you can ignore this
stage: the defined fields are automatically added to the scanned/imported documents.
Conditions
You are processing a job. ZySCAN is open. You are in the ZyFIELD stage, with the Field Editor open.
Assign fields manually per document (group)
1. Fill out a field value for each field definition.
2. Click Repeat for each field definition/value you want to assign to all documents in the job.
3. Use the navigation buttons to scroll through the pages/documents in your job and assign fields to
them. You can go directly to the 'Next document with Empty Fields' with the corresponding button.
Also, you can Edit Field Definitions.
4. Click OK.
The fields are added to your document(s).
5. If you want to go to the next stage, click Yes.
or
If you want to complete this stage for all jobs present in the jobroot, click No. Completing all jobs
present in a jobroot may be useful in a run-unattended mode (i.e. batch processing). For more
information, see (Semi-)automatic job processing (page 64).
a) Click Next available job.
b) Use the 'Edit field values', and 'Edit field definitions' buttons to change and add fields.
With the Multi-split button, you can assign the field values of the first document to all the following
ones.
Note
If you want to add fields to a single document, it is recommended to do that in ZyFIND. For more
information, see the ZyFIND manual > Fields: Label your documents.
49
ZySCAN Manual
Import
Conditions
You want to process a job. ZySCAN is open. You are in the ZyIMPORT stage.
Instructions
1. Click New job.
2. Keep the automatically defined Job name.
3. Select a (job) template.
4. If you want the selected template to appear in the template box, click Keep as default job template.
That way, you do not have to select it the next time.
5. Click OK.
6. Click Import.
Result
Tiff files (and other electronic documents/formats) are imported.
For more information about the different image formats that can be imported, see the ZyINDEX manual >
Appendix B: Import filters.
Note
Use
to cancel import.
50
ZySCAN Manual
Add fields and field values to
electronic documents
The XML Wrapper allows you to add fields (and field values) to electronic documents of any format (Word,
Excel, PDF, WAV, MPG, etc.). Also, you will be able to import documents with already defined fields.
In both instances, the field information is stored in an XML file that is linked to the document. In order to
be able to store field information in an XML file in ZyINDEX, an index has to be created using the XML
Wrapper.
51
ZySCAN Manual
Create an index with XML Wrapper
Conditions
ZyINDEX is open.
Instructions
1. Follow step 1 to 6, explained in the ZyINDEX manual > Create an advanced index, with the following
variations:
In the ZyINDEX manual > Step 2: Modules, make sure you select the XML Wrapper.
In the ZyINDEX manual > Step 5: Define fields, make sure you add Field definitions while Module
field: XML Wrapper is selected.
Complete all steps and click Finish.
Result
You have created an index with XML Wrapper.
52
ZySCAN Manual
Documents with already defined fields
Conditions
You have created an index with XML Wrapper. ZySCAN is open.
Instructions
1. Follow the steps, explained in Create a job template (page 2), with the following variations:
In Template Wizard - Internals, create an external link to an index with XML Wrapper. Do not select
Suppress job in Audit Trail, and do not select Use XML internally.
In Template Wizard -Workflow (page 14), select ZyIMPORT, ZyFIELD, Exclude ZyFIELD from
workflow and ZyEXPORT. Do not select ZyOCR.
In Template Wizard - ZyIMPORT (page 18), select Electronic Import as Import filter.
Complete the Template Wizard and click Finish.
2. Click New Job.
3. Select the template you just made.
4. Click OK.
5. Click Import.
6. Continue with Export.
7. Close the job.
Result
You have created a job template, tailored to importing electronic documents with already defined fields.
Also, you have imported and exported electronic documents with already defined fields. Now, you can
Build the index and search on Fields.
See (Semi)-automatic job processing (page 64), if you want to process a complete directory in one go.
53
ZySCAN Manual
Office documents
Conditions
You have created an index with XML Wrapper, and one or more fields. An Office application (for example,
Microsoft Word) is open.
Instructions
1. Open a document.
2. Go to ZyLAB > Archive Active Document.
3. Select an index with XML Wrapper.
4. Click OK.
The Documents Properties dialog appears.
5. Select the Field names you want to add values to.
6. Add the Field values.
7. Click OK.
Result
You added a document to the selected index. Also, you added fields.
54
ZySCAN Manual
E-mails
Conditions
You have created an index based on the Email Archive template. For more information, see the ZyINDEX
manual > Create an index based on a template.
An e-mail application (for example, Outlook) is open.
Instructions
1. Select one or more e-mails.
2. Click the Archive Messages button.
If you receive a warning, allow access for a few minutes and click Yes.
3. Select an index, based on the Email Archive template.
4. Click OK.
The Document Properties dialog appears.
The Field values are automatically added.
If you selected two or more e-mails, the added Field values are not visible.
5. Click OK.
Result
You added email(s) to the selected index. Also, you added fields.
55
ZySCAN Manual
Other electronic documents
If you want to add field values to electronic documents other than Office documents and emails, you have
two options:
1. Save electronic documents in the correct data folder of an index with XML Wrapper (with one or more
defined fields). Build the index and add field values with ZyFIND. This option is recommended for large
numbers of documents.
2. Upload electronic documents to your Web Client (where you selected an index with XML Wrapper
(with one or more defined fields)), and add field values while doing so. You can upload one document
at a time.
56
ZySCAN Manual
Add field values using ZyFIND
Conditions
You have created an index with XML Wrapper and added fields. You have a large number of electronic
documents you want to add field values to.
Instructions
1. Save your electronic documents in the correct data folder (Electronic).
2. Open ZyINDEX.
3. Open an index with XML Wrapper.
4. Build the index.
5. Open ZyFIND.
6. Go to File > Select index(es).
7. Select the index you just build.
8. Click OK.
9. Search for the documents you want to add field values to.
The documents appear in ZyResult.
10. Select the documents you want to add field values to.
11. Press Ctrl + F.
57
ZySCAN Manual
12. Double click the correct Field and add a Field value.
13. Select the Field you added a value to.
14. Click OK.
15. Go to ZyINDEX.
16. Rebuild the index.
17. Go to ZyFIND and search.
Result
You have added documents to an index with XML Wrapper. You build the index and added field values with
ZyFIND. You searched on the added field values, after you rebuild the index.
Note
If you cannot add field values in ZyFIND, check whether you selected Read only in ZyFIND when you created
the index:
58
ZySCAN Manual
Add field values using Web Client
Conditions
You have one or a few electronic documents you want to add field values to. You have access to a Web
Portal that contains an index with XML Wrapper, and one or more fields.
Instructions
1. Select the Contents tab.
2. Select in the Table of Contents the correct index (with XML Wrapper).
3. Click Upload.
The Upload File - Web page dialog appears.
4. Browse for the file you want to upload.
5. Select the folder (index) you want to add the file to.
6. Fill out the Field values.
7. Click Upload.
8. Click Refresh to check whether the file is added to the Table of Contents.
9. Open ZyINDEX.
10. Select the index you just uploaded a file to.
11. Rebuild by clicking the blue arrow:
.
Result
You uploaded a file to an index with XML Wrapper. Also, you added field values. After you have rebuild the
index, you can search the index (and your uploaded files).
59
ZySCAN Manual
OCR
During this stage, the pixels of the images (the scanned documents) are recognized as text (OCR: Optical
Character recognition).
Conditions
You are processing a job. ZySCAN is open. You are in the ZyOCR stage.
Instructions
Click "Start OCR" to OCR the current job.
Result
The job is OCRed. You can toggle between text and image with the text and image tabs.
Keep resource usage low
The OCR process takes quite some time. To keep resource usage at an acceptable level, OCR your jobs at a
later point in time (at night).
1. Select 'Close Job' (instead of 'Start OCR'). All settings are saved on disk.
2. At the end of the day, click 'OCR all deferred jobs'.
All feedback from the OCR engine (fatal and non-fatal errors and warnings), will be written in the OCR
error log file in the ZyLAB/Information Management Platform/Bin directory.
OCR color files
•
Make sure 'OCR color images' is checked by clicking the Stage Settings button.
•
Make sure color images are scanned at 150 dpi, with a maximum of 256 colors.
Color images will be over 300 kb per page. Deskew and Auto-orientation cannot be used in combination
with color scanning.
60
ZySCAN Manual
Export
During this stage, all documents from a job are exported to an export directory. This directory is predefined
in the job template.
Conditions
You are processing a job. ZySCAN is open. You are in the ZyEXPORT stage.
Instructions
Click Start Export.
Result
The documents are exported. Now you can build the index to make them searchable.
61
ZySCAN Manual
View and manipulate documents
during job
Conditions
ZySCAN is open. You are in one of the stages during a job.
View
Use these buttons to select an image region, zoom in, zoom out, drag, rotate, zoom to height, zoom to
width, and fit in window.
Use these arrows to scroll through the pages and documents.
If you want to select these and other options, you can also click with your right mouse button on the image
and choose an option.
Manipulate
If you want to remove a single page from a document, click
62
ZySCAN Manual
Toggle between Image and Text (the tabs), to see on which page you are and in which document.
Click New Document, to indicate that a page is the beginning of a new document. Use this option after
scanning.
Click
, to automatically split large documents. This can be useful with big
microfilm conversions or when processing forms or clippings where a document always has a fixed number
of pages.
63
ZySCAN Manual
(Semi-)automatic job processing
Jobs can be processed semi-automatically. This means that no explicit action is required. The images in the
Image Viewer are not updated. This is done for performance reasons.
You can process ZySCAN automatically. In the digital copier scenario (where ZySCANService monitors one or
more directories), this is very useful.
The main advantage is that no person has to be logged on. After rebooting the computer, the service is
automatically started. However, if no one is logged on, no drive mappings are available. You can resolve
this by using UNC paths to directly reference non-local disk locations.
64
ZySCAN Manual
Semi-automatic processing (entire job)
Conditions
ZySCAN is open.
Instructions
1. Go to Job > Run unattended > Entire job.
The Template Selection dialog appears.
2. Select a job template.
3. Click on the Arrows to the right button:
.
4. Repeat step 2 and 3 until finished.
5. Click OK.
Result
The selected job template(s) are processed.
A job template may consist of one or more stage(s) of the job process. For example,
adding fields with ZyFIELD. Or, importing with ZyIMPORT and adding fields with ZyFIELD.
65
ZySCAN Manual
Semi-automatic processing (parts of the job)
Conditions
ZySCAN is open.
Instructions
1. Go to Job > Run unattended > Only ZyOCR, Only ZyEXPORT or ZyOCR&ZyEXPORT >
a) Current jobroot
b) Several jobroots
2. If you have chosen Several jobroots, the Job Roots dialog appears.
3. Browse for the jobroots you want to process.
4. Click the button Add to list.
5. Click OK.
Result
The jobs of the selected jobroots are opened, processed, moved to the next stage and, when finished,
closed automatically.
66
ZySCAN Manual
Automatic processing
Conditions
You want to process ZySCAN automatically. ZySCAN is open.
Instructions
1. Go to Job > ZySCAN NT Service.
The ZySCAN NT Service dialog appears.
2. Select one of the four processes (OCR only, Export only, OCR & Export, Entire job).
If you selected "Entire Job", select a job template from the drop down list and click Add.
If you selected one of the other options, click Add and browse to add more Job roots.
3. Select and click Delete to delete Templates/Job roots.
4. Define the Time out value.
5. Click OK.
6. Reboot the computer to automatically start the service.
or
Go to Start > Settings > Control Panel > Services > ZySCANService and click Start.
Result
All the indexes you included to ZySCAN NT Service are automatically processed.
User privileges
Difficulties with starting the service, may be due to a lack of user privileges.
1. Go to the ZySCANService Properties dialog.
2. Select the Log On tab.
3. Select a user (Local System account or another selected account).
67
ZySCAN Manual
4. Click OK.
5. If the user has not enough rights, the operating system will ask to give these rights to the user.
6. Confirm.
The service is started. If you are working with templates that contain paths over your intranet, it is not
possible to use the local system account. It is wise to use the account of the domain administrator.
68
ZySCAN Manual
Global Options
Job Root Directory
Define the location where the content of ZySCAN jobs are stored.
Job Template Directory
Define the location where the ZySCAN templates are saved. The templates are convenient for creating
more than one job with the same settings, and necessary for automatic processing of large amounts of
data. For information on creating a template, see Create a job template (page 2).
Job Counter
The Job Counter is the folder name of the job. With each job the counter will be raised with 1. The counter
is linked to the machine on which ZySCAN runs during creation of the job. If the job root is located on a
69
ZySCAN Manual
network, the job name can be used to determine the origin of the job. The job name can be saved in an
automatic job name field.
File Counter
You may want to define the File Counter if you have more than one workstation, on separate locations.
During research, this will help you determine the origin of documents. For example, the File Counter may
start with AA for Aruba, or NL for the Netherlands.
Text Editor
Obsolete.
Default Job
Define the Job template which will be shown when creating a new job template. The new job template can
be based on the default Job template, but it is possible to choose another template.
Workflow Index
If you want to start a workflow whenever a document is exported to an index/database, select a workflow
index from the dropdown listbox.
File System Warnings
If you want to assist users with dealing with the file system limits when processing jobs, define File System
Warnings. Depending on the settings defined in the new File System Warnings dialog, messages will appear.
With File System Warnings defined, you can create a limit on the number of finished jobs in a job root that
can be processed, the number of pages per job, and the number of pages per document. The user gets a
message each time one of these three limits is reached, and react on it. This will prevent instability within
ZySCAN due to hardware issues, memory issues, data loss caused by server crashes, etc.
For more information on how to define File System Warnings, see File System Warnings (page 72).
Allow Valid Workflow only
With this option selected, users cannot move freely between ZySCAN stages. This allows you to separate
responsibilities during the scanning process (for example: automatic scanning/importing, after which a user
defines field values, followed by automatic OCR and export), or to force users to follow the preferred
scanning scenario (import/scan, fields, OCR, export).
Enable Job Logging
If you select Enable Job Logging, a statlog.txt file will be created in the job directory. This file will contain
information like "ZySCAN added to workflow", "ZySCAN removed from workflow", "ZyOCR no longer batch
stage", "ZyFIELD stage done", "Page added".
On deleting jobs, use the Recycle Bin
If you want to move the job directory to the Recycle Bin after completion of the job, select this option and
define in the job template the option "Delete job when finished successfully" (Template Wizard - ZyExport >
Process Control tab).
70
ZySCAN Manual
If you want to remove the job directory from the hard disk immediately after completion of the job, do not
select this option and define in the job template the option "Delete job when finished successfully"
(Template Wizard - ZyExport > Process Control tab).
Save Job Logging After Delete
Select this option if you want to save the statlog.txt file (which is created with the Enable Job Logging
option selected above) when the job directory is deleted.
Suppress fatal OCR errors (these errors will be written in the output text file)
Select this option if you want to prevent that an error dialog will abort the job or stop ZySCANService (and
restarted). With this option selected the job will continue with the next page. However, though the job may
continue, it is possible that these following pages are not OCRed.
Allow field definition when editing fields
This option is selected by default. If you deselect it, the "Edit field definitions" button in the Field Editor
dialog will be disabled.
71
ZySCAN Manual
File System Warnings
Conditions
You want to assist users with understanding the file system limits when processing jobs. Depending on the
settings defined in the File System Warnings dialog, messages will appear. With File System Warnings
defined, you can create a limit on the number of finished jobs in a job root that can be processed, the
number of pages per job, and the number of pages per document. The user gets a message each time one
of these three limits is reached, and react on it. This will prevent instability within ZySCAN due to hardware
issues, memory issues, data loss caused by server crashes, etc.
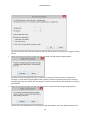
Instructions
1. Go to ZySCAN > Options > Global Options.
2. Click, next to the option File System Warnings, the Define button.
The File System Warnings dialog appears.
3. Define the maximum number of finished jobs in the Job Root (1-999999).
In some cases users do not empty their jobroot and/or do not delete completed jobs. This can result in
an enormous amount of completed jobs in the jobroot, which will affect performance.
4. Define the maximum number of pages per job (1-999999).
Some users scan very large batches in one job. Users will be advised to start a new job after a certain
amount of pages.
5. Define the maximum number of pages per document (1-999999).
Some documents can be very long because users scan large batches as one document.
6. Click OK twice.
Result
You have defined the limits based on which warning messages appear. Limits can be reached during import
or scanning.
•
When the maximum number of finished jobs in the Job Root is reached, the following message
appears:
72
ZySCAN Manual
The user can select one of the three options, and click OK. Or the user can stop processing by clicking
Cancel.
•
When the maximum number of pages per job is reached, the following message appears:
The user can stop importing/scanning, or ignore the message. If the user chooses to ignore this
message, no other warnings will appear and the whole job will be imported/scanned. If scanning is
stopped, pages that are already processed by the scanner (and exceed the limit defined), are not lost,
but included.
•
When the maximum number of pages per document is reached, the following message appears:
The user can split the document, by selecting the Split here button. Once the defined maximum of
73
ZySCAN Manual
pages in a document is reached again, the message will appear again. If the user chooses to Ignore this
message, no other warnings will appear and the whole document will be imported/scanned.
Note
•
In unattended mode, via ZySCAN > Job > Run Unattended (entire job), no job or document page
warnings are given. However, if a job root limit is reached, a message will appear.
In unattended mode, via ZySCANShellUtility, all messages are repressed.
In unattended mode, via ZySCANService, there is no user interaction.
74
ZySCAN Manual
Advanced Scanning
The ZySCAN module contains additional settings that can enhance image quality and recognize patch pages
and barcodes (in combination with image enhancement software or hardware of Kofax). This, together with
some other advanced features and functionalities, for example different import filters, zonal OCR and the
jobroot internals, will be explained in the following sections.
Kofax is an accelerator board vendor. Major scanner vendors are qualified but mainly towards the high end.
Kofax offers image processing for both video and SCSI scanners. Kofax uses ISIS drivers for most low to midrange scanners. Adrenaline is a complete family of scanner controllers, image-processing accelerators, and
software engines designed to offer support for professional document scanning. From workgroup to highvolume, SCSI to video, black and white to color, Adrenaline makes your scanning easier, better, faster, and
more reliable.
•
Certified compatibility. Kofax tests and certifies Adrenaline products to work with document scanners
from Bell & Howell, Canon, Fujitsu, Hewlett-Packard, Kodak, Panasonic, and Ricoh.
•
Dependable installation and operation. Adrenaline is designed for document scanners, so installation
and operation are consistent and reliable.
•
Sophisticated image processing, including black border removal, deskew, line removal, deshade,
destreak, despeckle, and character repair. (650i, 850. 1700 models)
•
Unsurpassed bar code recognition plus advanced recognition features such as patch code recognition,
page registration, and form recognition. (650i, 850, 1700 models)
The image enhancement properties, patch code recognition properties and bar code recognition properties
can be found in the Template Wizard - ZySCAN/ZyIMPORT, Image Processing tab. In case you want to use
these options during scanning, you have to select them in the scan template.
75
ZySCAN Manual
Image Processing
When Kofax hardware or software is installed it is possible to enhance the quality of your TIFF files. This can
help you to achieve a better OCR result.
Instructions
1. When creating a job template, in Template Wizard - ZySCAN/ZyIMPORT, select the Image Processing
tab.
2. Select Image Enhancement and select the Properties button.
Select one of the following options:
Deskew properties...
Compensates for image skew during scanning, resulting in straight images. The deskew feature
does not require lines or leading edge borders.
Black border properties...
Eliminates the black edges generated by scanners with black backgrounds, reducing the image file
size while improving legibility.
Deshade properties...
Adjusts for shaded backgrounds and eliminate random noise (speckles and streaks) whether
present on the original document or generated during the scan.
Despeckle properties...
Adjusts for shaded backgrounds and eliminate random noise (speckles and streaks) whether
present on the original document or generated during the scan.
Image filter properties...
Makes documents more legible and recognizable by performing a variety of image enhancements.
Lines and characters can be smoothed, thickened, thinned, filled, or outlined.
Line removal properties...
Eliminates all unwanted horizontal and vertical lines.
Streak properties...
Adjusts for shaded backgrounds and eliminate random noise (speckles and streaks) whether
present on the original document or generated during the scan.
3. Select Patch code recognition if you want to separate documents. For more information, see Patch
pages (page 83).
4. Select Barcode Recognition if you want to store recognized barcode values as field values. For more
information, see Barcode Recognition (page 78).
Result
You set one or more image processing properties, and thus enhanced the quality of your TIFF files.
76
ZySCAN Manual
Note
If you want to modify the Image Processing settings while running a job (you are in the ZySCAN or
ZyIMPORT stage), click the Stage Settings button. This will trigger the ZySCAN/ZyIMPORT General page, plus
the Image Processing tab.
77
ZySCAN Manual
Barcode Recognition
Conditions
You want to automatically store recognized barcode values as field values and/or you want to separate
documents.
Instructions
1. Open ZySCAN.
2. Go to Template > New Template.
3. Select Define new job template (or base it on an existing template).
4. Click Next.
5. Define Internals, and click Next.
It is advised to link this job to an index (with barcode fields).
6. Define Stages (select ZySCAN or ZyIMPORT).
7. Click Next.
8. Click the Image Processing tab.
9. Select Barcode recognition.
78
ZySCAN Manual
10. Select a Barcode reader from the dropdown listbox.
11. Click the Properties button.
If you selected ZyLAB Global Professional OCR, the following Barcode Settings can be defined:
•
Types: Select the appropriate barcode Types.
- Codabar
- Code 128:
- Code 39 (3 of 9):
- Code 39 Extended
- Code 39 HIBC
- Code 93
- D 2 of 5
- EAN 128
- EAN 13
- EAN 2
- EAN 5
- EAN 8
- Interleaved 2 of 5
- MSI Pharma
- MSI Plessey
- Postnet:
- Postnet 32
- Postnet 52
- Postnet 62
79
ZySCAN Manual
- UPC-A:
- UPC-E
ZyLAB backfile services uses the barcode 128 type since this type has proven very reliable in
combination with Kofax barcode recognition. Barcode 128 is also the barcode type that is printed by
the ZyLAB Document Registration Module.
1. Orientation: The application searches for bar codes in a linear fashion, examining the search area for
potential bar codes. For horizontal bar codes with an orientation of 0, for example, it works down the
image starting on the left and searching toward the right edge; for vertical bar codes, it works across
the image starting on the top edge and searches top to bottom. Bar codes can be oriented on an image
in four general directions. You can select the check box for 0, 90, 180, and/or 270 for the direction you
would like to search.
If you are scanning pages containing barcodes that are put on in a random direction, specify the
directions in which they have to be recognized:
- 0 Horizontal, rotated 0 degrees, read left to right
- 90 Vertical, rotated 90 degrees to the right, read top to bottom
- 180 Horizontal, rotated 180 degrees to the right, read right to left
- 270 Vertical, rotated 270 degrees to the right, read bottom to top
To detect barcodes placed at an angle, select the checkbox 'Detect skewed barcodes'.
Note: The more checkboxes are selected, the more performance will slow down.
2. Size: Define the minimum ratio to text height of the barcode (distance between the lines and numbers
of a barcode) to enhance reliability and performance. Default is -1 which means the size is adjusted
automatically.
3. In order to recognize the Code39 barcode type without the start/stop asterisk, select the checkbox
'Code39 Without Asterisk'. With this option selected the asterisks will be added to the barcode (again).
4. Click OK.
5. Optionally, you can specify that barcodes should be treated as patch pages (with the option Split at
barcode), and (if necessary) deleted afterwards. In contrast with a patch page, a barcode page (that is
used to indicate the start of a new document) is not deleted from the document.
You can also store the barcode value in an index barcode field by selecting 'Fill in barcode field'. This
will store the barcode that is scanned last in the barcode field. When you want each scanned barcode
value stored in scan order in barcode fields select 'Recognize barcodes on multiple pages'. Note that
you must have an adequate quantity of barcode fields in your index.
6. Click Next.
7. In Template Wizard - ZyFIELD, click Field Definitions.
80
ZySCAN Manual
8. Make sure that the field(s) you are linking to, are defined as barcode fields. If necessary, add or edit
fields.
9. Click OK.
10. Click Next until Finish, and complete the Template Wizard.
11. Start a New Job with the newly created Job template.
12. Go through all stages, and close the job.
Result
You have completed a job (scanned your documents), and stored recognized barcodes as field values.
Note
•
For more information on defining a new Job template, see Create a job template (page 2).
•
If bar codes are too large, they won't be recognized as bar codes.
•
See also the ZyINDEX manual > Synchronize fields and database records with ODBC.
81
ZySCAN Manual
Separating documents
You can automatically separate documents within jobs using Patch pages, White pages or Barcode pages.
•
A Patch page is a page with a defined logo functioning as document separator.
•
White page separation speaks for itself: a white page functions as a document separator. However, this
is not a very reliable method, because often a white page is not recognized due to image noise. The
advantage of white page separation is that no additional Kofax Adrenaline hardware or software engine
is required.
•
A Barcode page is a page with a bar code, often used to add database records in the ZyLAB keyfields,
but also to separate documents. (see Barcode Recognition (page 78)),
Separation based on bar codes or patch pages are highly reliable methods to split documents automatically.
Whenever the documents in a job have a fixed number of pages, the Multi-split button
allows you to split the job in batch. This can be useful with microfilm conversions
or when processing forms or clippings where a document always has a fixed number of pages.
82
ZySCAN Manual
Patch pages
There are two different patch pages:
•
a document separation page, which indicates the start of a new document, and
•
a stop scanning page, which will show the Kofax settings dialog to enable the user to change scanner
settings like paper size or switch to duplex scanning.
A Kofax Adrenaline board or software driver with image enhancement is required. The patch pages can be
found in the ~\ZyLAB\Information Management Platform\AddOn\Patch pages folder, and are called:
•
NewDocumentPatchPage.tif (Kofax) and
•
Patchcode.tif (from Read Iris)
•
StopPatchPage.tif (from Kofax)
In case you want to use them, print them out and put them in between the documents that need to be
separated, or in between documents where different scanner settings are needed.
A big advantage is that you can keep on scanning without manually separating documents. This is very
helpful with high volume scanning. With the stop page the scanner can be stopped to do some manual
adjustments.
Recognized patch pages will be deleted, once their job is done. They are not included in the index.
Recognize Patch pages
1. Create a template in ZySCAN
2. In Template Wizard - ZySCAN/ZyIMPORT, select the Image Processing tab.
3. Select Patchcode recognition.
4. Depending on the tif-file you are using (NewDocumentPatchPage (Kofax) or Patchcode (Read Iris)),
select Kofax or Read Iris from the dropdown listbox.
83
ZySCAN Manual
White pages
Separating documents based on the contents (or rather, the lack of contents), can be done in the following
way:
•
White Page Recognition using File Size, or
•
White Page Recognition using Number of OCR'ed Characters.
Additionally, you can set Maximum image file size and Maximum number of OCR'ed Characters. Maximum
image file size and Maximum number Of OCR'ed Characters is unlimited.
The size of an average white page depends on the source and compression. Using either ZyLAB Professional
OCR or ZyLAB Basic OCR, our test lab suggests the following values as a minimum image file size:
Source
Compression
Size
Wanglmg.exe
Group 3
6 Kb
Wanglmg.exe
Uncompressed
459 Kb
SP600 150dpi
Group 4
1 - 2 Kb
SP10 150dpi
Group 4
1 - 2 Kb
Note
We don't recommend White page removal, as it is very difficult to determine what the amount of bytes on
a white page will be (when is a page completely white?), and what the number of OCR'ed characters will be
(what if a character is not recognized?).
84
ZySCAN Manual
Automatic image enhancements
KOFAX supports automatic enhancement of images based on a new image enhancement method called
Virtual ReScan (Kofax VRS). This software enables you to scan your documents faster and with a better
quality. It corrects, if needed, the images so the text on the image has a better quality and so can be
recognized better by the OCR engine(s). The idea is that you never have to do a rescan and adjust the
scanner settings manually.
The purpose of document scanning is to electronically create accurate black-and-white images of original
source documents. The originals may also be in black-and-white, but often they will feature colors, shaded
backgrounds, reversed text or other elements difficult for a bitonal scanner to translate into crisp, clean,
black-and-white images.
Without VirtualReScan, even the most skilled scanner operator must go through a series of scans and
rescans to obtain an acceptable image from a complex document. Even this process yields less than perfect
results. And the more documents you have to scan, the longer and more costly this process is.
An alternative is to capture the document images as color or grayscale files. While this results in cleaner,
more readable images, it also results in excessively large files - too large for rapid transport and storage
over most conventional networks.
VRS uses the 256 shades of a grayscale image to analyze and determine the optimum settings for each
document. It then converts this image into a small, perfectly readable black-and-white image. Thus VRS
gives you the highest quality black-and-white images with small file sizes.
VRS is image enhancement technology providing: good quality images to your system with minimum effort
(you don't have to do the fine tuning of your scanner manually) and represents all the content of the
original with the smallest file size possible.
VRS also watches the status of the scanner (out of paper, paper jam, connection, etc.) and guides the end
user to resolve any hardware issues.
85
ZySCAN Manual
Conversion of the document with thresholding
The quality of the made scans depends also on the thresholding of the VRS module. Thresholding is the
conversion of a multi-bit grayscale image into a black and white image.
When a certain area contains more pixels then a certain level (threshold) given in will the area become
completely black. This concept of simple thresholding results in a compromise. Whatever threshold level,
there is always something sacrificed.
Look at the black & white image with different threshold levels. Whatever setting we choose, we always
lose some text. The threshold value of 55 (third picture) represents the picture rather ok. But all the faint
text is gone. The dark value (threshold 15 (second picture)) shows more text, but the picture is completely
gone and the dark backgrounds turn completely black, hiding the text. The light setting (threshold 95 (last
picture)) reveals the text superimposed with the dark background, but all the normal text and faint text are
completely gone.
VRS eliminates the compromise of thresholding by using a dynamic way of thresholding so the most left
picture will be the result.
86
ZySCAN Manual
Suppressing shaded and dark backgrounds and deskew properties
VRS also suppresses shaded and dark backgrounds. This makes the text more readable and results in small
file sizes.
Traditional deskew corrects the black & white image directly, resulting in jagged edges and artifacts (figure
below, right side). VRS deskews the gray image first and then converts it into a black & white image (picture
below, left side). VRS grayscale deskew produces crisper text.
Combined with VRS' automatic text enhancement, OCR forms processing systems produce up to 20% less
questionable characters!
Another thing that VRS does is fusing the edges of broken characters. This helps the OCR engine to
recognize the text on the images better and can read these characters much more accurately.
Below examples of the recognition on characters that are scanned with and without VRS are given. In first
figure the broken characters that are made due to scanning without VRS can be seen. A lot of characters
will not be recognized correct, this makes it harder to find the documents you are looking for.
The second figures shows the broken characters repaired by the edge fusion of VRS. The result of the OCR
engine recognizing these characters. All characters will be recognized correct. Searching on the word
"technology" will give a result now.
VRS corrects 99% of the images automatically and warns the user if an image is out of range. Adjustments
of images can be done without a physical rescan of the original.
87
ZySCAN Manual
VRS and ZySCAN
The installation of the VRS module is practically the same as other Kofax products.
In this section will be explained how VRS works together with ZySCAN, and what to do if a scanned image
does not match the requirements you gave in. The most important requirements you can give in are the
brightness and the contrast of the documents.
As stated before VRS not only allows you to scan your images faster and with a better quality but also
supports you during scanning.
The Auto Resolve Manager pops up when something has happened during scanning. Examples of these are:
scanner out of paper, no connection with scanner, paper jam, bent corners etc.
In high-volume situations where scanning speed is critical, VRS can be set to perform fast scanning at a
lower dots-per-inch (dpi) resolution. After analyzing the image, VRS will then convert the final bitonal image
(black and white) into a higher resolution dpi for better on screen viewing.
When you configure the VRS module the most important thing is the clarity. You only have to draw a
rectangle that gives the settings for the contrast and the brightness ranging from 0-100.
The brightness and contrast levels of each document will be analyzed, comparing them to the user-defined
acceptable range. Exceptions are automatically corrected or can be displayed to the operator for manual
88
ZySCAN Manual
adjustment. In manual mode, the operator uses the on-screen view of the image to read just clarity settings
until the desired result is obtained.
VRS lets the scanner operator further enhance the image by thinning or thickening lines and characters and
removing excessive speckling. With noise reductionnoise reduction, you obtain crisp, clean images every
time.
VRS will display optimum settings for each scanned image to allow users to create new default settings for
common documents. Thus, a form printed on difficult-to-read color paper can be scanned and analyzed so
that the optimum settings for that type of document can be created and saved for future use. VRS lets you
save multiple document profiles to accelerate the scanning process.
In the figures below you can see the difference of the same document in the viewer scanned with and
without VRS. The first picture is the original document. The second one is scanned without VRS. The third
one is scanned with the VRS module. Evident differences can be seen in parts that have a low contrast, look
for instance at the word 'airway' in the upper left corner. Also the difference can be seen in the right part of
the page that is fading. The lower right part in the image that is recognized with VRS can still be read.
89
ZySCAN Manual
90
ZySCAN Manual
91
ZySCAN Manual
Zonal OCR
Zonal OCR is used in case you want to OCR a certain rectangular part of a tiff. Usually this is done if you
want to recognize numbers or words that are always on the same region of an image. This information will
be automatically entered as a field value.
Instructions
1. Open ZyINDEX > Build
.
2. Open an index via File > Open, or create one via File > New.
3. Select Define Fields
.
4. Click Add Definition.
5. Define a name.
6. Make sure the Plain text or the Logical field is selected as the type.
A logical field can have two different values: true or false. When you use a logical field you have to give
in what the percentage of threshold is in order to get the logical field filled. For example, a threshold
percentage of 30 means that if the surface of black pixels in the selected area is larger then 30% of the
total surface, the value of this field will be filled with a true value (checked=1 or yes). In case the
amount of black pixels is smaller then 30% of the selected area the value of this field will be false
(unchecked=0 or no).
This could come in handy in case you have to detect tick boxes and you have to assign a yes or a no to a
certain field. This would be a very nice option in case you would want to select people from out of
questionnaire results.
7. Click Type specific options.
The Auto OCR Options dialog appears:
8. Select the option 'Obtain from OCR region'.
9. Specify a region (zone) by defining the left, right, top and bottom values.
Alternatively, select the 'Edit region' button, and draw a selection rectangle. For a better view,
zoom in on the tiff by pulling a rectangle with your right mouse button. Zoom out by double clicking
on the image. Click OK.
92
ZySCAN Manual
This zone will be OCRed separate form the normal OCR process. The result of this OCR is called zonal
OCR, and may be assigned to the plain text or logical field.
10. Click OK.
Result
You defined the field for zonal OCR. Link this index to the correct job template (Template Wizard Internals), and process the job. The fields will be filled with the appropriate values.
Note
It is also possible to add an automatic confidence keyfield, containing the OCR engine's confidence value for
the OCR of the given region. This can be used as a measure to indicate which images should be re-examined
by a user based on those with lower confidence ratings.
93
ZySCAN Manual
Process a locked job after a system failure
ZySCAN or ZySCANService will automatically lock a job that is being processed. In case the computer
crashes, for example due to a power failure, another process that corrupts the operating system or a
hardware malfunction, the job will remain locked after the program has stopped. Consequently, after
restarting the computer ZySCANservice will automatically start, but the locked job will not be processed
and ZySCAN will import the next file in 'entire job' mode or process the next available job in 'current
jobroot' mode. Note that in case the computer crashed during OCR the job has no 'locked' status but an
'error' status. In that case the job will be processed automatically by the automatic recovery mechanism.
This procedure will explain how to recover a locked job manually.
Instructions
1. Shut ZySCANService down:
a) Go to Start > Settings > Control Panel > (Administrative Tools >) Services.
b) Select ZySCANService at the bottom of the list.
c) Click your right mouse button, or select the Stop Service icon
.
2. If the Service is stopped successfully, start the Service again via the Windows program menu, and check
if the job is processed.
If the job is not processed, restart the computer, and check if it is working again. If it doesn't, stop
the Service, and continue with point 4 of the procedure.
3. If the Service cannot be stopped successfully, switch the "Startup Type" to manual, and restart the
computer. After the computer has rebooted, start ZySCAN and continue with this procedure.
4. In ZySCAN, click the Open Job button.
The Open Job dialog appears.
When ZySSCANservice processes a job with 'delete job after export' delete job after export it is likely
that there are no complete green jobs present. In the Open Job dialog illustration above the last entry
in the table indicates a locked job (lock status displays locked). Before we can open the job to process it
manually we have to unlock it.
5. Click Unlock all, or open the job that is not finished.
6. If you followed the last option, you get the following message: "The job you are trying to open is
locked: do you wish to unlock it?"
7. Click Yes.
The documents will be shown in the viewer.
8. Proceed to the next section to finish the job either manually or automatically.
Result
You processed a locked job after a system failure.
94
ZySCAN Manual
Note
•
If it is not possible to unlock the job, the following message box is displayed: "Unable to open job."
If you receive this message please continue with What to do if a locked job cannot be unlocked? (page
97).
•
Recovery from ZySCAN jobs with multiple documents with invalid primary keys has been made easy.
ZySCAN remembers which documents have been exported successfully and which have not been
exported.
95
ZySCAN Manual
Processing the job manually or automatically
Once the job is no longer locked, processing can continue. In case ZySCANService was running in 'current
jobroot' mode you can simply shut down ZySCAN, go to the services panel and start ZySCANService.
However, in case ZySCANService was running in 'entire job' mode it may be necessary to process the job
manually. Or, if for some reason, ZySCANService has failed repeatedly and there were multiple locked jobs
that have been unlocked, it is better to process the jobs automatically in run-unattended mode.
Processing the job manually
Go through the remaining of the pending stages by following the program manually.
The stages that have to be completed depend on the stage the job was in during failure
of the system. Possibly not all processes are pending anymore. If the job is opened it will
automatically go to the first pending job.
1. Open the job that has to be processed by selecting it.
2. Click OK.
Result
The job will be processed, and the next stage will appear if you click Yes. For more information on
processing a job, see Processing a job (page 46).
To begin ZySCAN the ZySCANService has to be started. The service can be started by selecting from the
services dialog and clicking the start button, or using the right mouse button. The subsequent jobs will run
automatically.
Processing the job automatically
The unfinished job can also be processed automatically. There are two options. First option is to
temporarily reconfigure ZySCANService to run in 'current jobroot' mode so it will finish all current pending
jobs in the jobroot. The automatic recovery mechanism of ZySCANService will automatically process bad
images even if OCR is not possible. The disadvantage is that ZySCANservice has to be reconfigured and later
on has to be restored to the original 'entire job' processing mode. Second option is to use ZySCAN rununattended (i.e. in batch) mode which enables ZySCAN to process jobs automatically similar to
ZySCANService but as a windows application. Note that if you are running ZySCAN on Windows98 or
Windows ME running ZySCAN run-unattended is your only option since services are not supported on these
operating systems.
Processing the job(s) automatically using run unattended ZySCAN mode
This has to be done by unlocking the job with "Unlock all" and pressing Cancel so no job is open. Go to job
in the menu and select > run unattended > ZyOCR & ZyEXPORT >> current jobroot.
If this works close ZySCAN after processing and start the services again.
96
ZySCAN Manual
What to do if the locked job cannot be unlocked?
Depending on the cause that locked the job, t may not be possible to unlock a locked job. A few of these
reasons are described below.
Note: In case you are not an experienced Windows user it is not a good idea to solve these problems
yourself. If you don't feel confident about what you are doing just call the helpdesk!!
•
The sequence.txt file in the job directory is corrupted, i.e. its contents do no longer match the sequence
of the tiff files in the tiff folder. If you arrange the content of the sequence.txt file, e.g. with notepad, in
the same order as the sequence of the tiffs as they appear in you document and save the txt file it will
work again. Open the job and try to process it manually or otherwise use the ZySCANService.
•
It is also possible that the paths (fields, import, export) in the settings.txt are not correct anymore.
Change the paths into the correct ones, save the txt file and open and process the job again.
A very efficient solution in case it won't work is closing the job, deleting it and scanning the documents
again. After this, start the service again and continue with scanning.
97
ZySCAN Manual
Internals
In this section we try to give you more insight on how ZySCAN works. If scanning is causing problems you
know where your documents are stored during the ZySCAN process. Also the contents of the standard files
will be explained.
Structure
Jobs are stored in the JobRoot directory. For each job a job directory is created in the JobRoot directory
with a name identical to the job name you assigned.
The JobRoot directory can be installed either on a network or local. Each job has its own directory storing
three text files and three folders. The three folders are:
•
field: field folder containing files that record key field information per document. A job can consist of
more documents. It is possible to add a set of key fields for each document.
•
text: text folder with files containing the OCR'ed text of the images
•
tiff: TIFF folder containing the original TIFF images
•
xml: XML folder containing the OCR'ed text in XML format
This folder will only be filled, if the option 'Use XML internally' is selected in the job template (Template
Wizard - Internals (page 4)).
The jobroot will grow if the "delete job when finished successfully" option is disabled. This means that you
have all your data two times on your system. (Once in the jobroot and once in the archive you exported to.)
Jobs that are not finished yet will be kept in this jobroot.
98
ZySCAN Manual
Tip: A job consists of a transparent directory structure accompanied by a number of parameter files that
are, in all cases, ASCII files. So when you have a lot of TIFF's coming from other programs, you are able to
create your own jobs without importing the files in ZySCAN. This can save you lots of disk space and importtime.
Naming Conventions
When TIFF images are imported or paper documents are scanned they are stored in the tiff folder with a
unique name. ZySCAN and ZyIMPORT (re)name the TIFF files and assign successive names to multiple TIFF's
in a job's tiff folder. For example, the first .tiff file in the tiff folder is renamed 000001.TIF, the next image
file will then be (re)named as 000002.TIF. The matching text files, stored in the text folder of the job, have
corresponding names. Thus, the text file belonging to 000001.TIF is called 000001.TXT. If you create your
own file name convention, be sure these are ALWAYS uppercase and limited to 8 characters plus the
extension .TIF. Other formats may eventually work, but are not supported by ZyLAB in the long run.
On every first .tiff file that you create in your job ZySCAN creates in the field folder a field file (.fld) for
holding possible key field information. The name of this field file corresponds to the name of the first.tiff
file in your job. So if your first .tif file is named 000001.TIF, the corresponding .fld file is named 000001.FLD.
If use is made of document separators for assigning different field values to different (groups of)
documents, the .fld file names are identical to the name of the first .tif file in the group of documents that
the key field information belongs to. To illustrate this, imagine having the following sequentially named .tif
files in the tiff folder of your job:
000001.TIF
000002.TIF
.
.
.
000009.TIF
000010.TIF
Now you assign key fields to those .tif files per group of two files, the corresponding .fld filenames in the
fields' directory of your job are:
000001.FLD
000003.FLD
000005.FLD
000007.FLD
000009.FLD
Note that field values can be assigned per job, per document or per group of documents in a job. Text and
image files are related one-to-one, but this doesn't hold for field files. For instance, it is possible to have
only one .fld file in a job with multiple image and text files.
99
ZySCAN Manual
Job functions
If you create a job the container application creates the corresponding job functions. The four files that are
created to register job functions are:
•
fields.txt
•
language.txt
•
sequence.txt
•
settings.txt
The fields text file records the fields in a document, which are created during the Fields stage of a job. If a
job is linked to an index, no fields text file is created since the field definitions are then read from the index.
The language file records the language that is chosen to OCR a page. The sequence text file records the
sequence of the .tif files in a job. The settings text file registers the properties per tab. For example, it
stores which import filter and import directory to use for ZyIMPORT, what language to use in ZyOCR, the
output directory for ZyEXPORT, and so on. The changes you make to the job settings by pressing the
Settings button that is provided with each stage are recorded in the settings text file. The container
application activates the stages and passes the job settings from one stage to the other.
100
ZySCAN Manual
Work with Scan Profiles
Conditions
You want to create, edit or delete a scan profile. Scan profiles define Kofax scanner settings like page size,
resolution, color depth.
Instructions
1. Select the ZySCAN tab and select a job template with the ZySCAN stage and the Kofax scan interface
selected.
2. Select the Scan Profiles button.
If there are already Scan Profiles defined, you can select one.
3. To create a new Scan Profile, select the New button.
To delete a Scan Profile, make sure the correct profile is selected and click the Delete button.
4. Enter a new scan profile name.
5. Click OK.
If the new profile does not appear in the listbox, check if you are connected to the scanner.
6. Define the Scanner Properties. The Scanner Properties that can be defined depend on the type of
scanner you have. Usually the Paper Size and Resolution (DPI) can be defined.
101
ZySCAN Manual
7. Click the Options button.
The Source Properties will appear.
102
ZySCAN Manual
8. Click OK.
9. Click the Advanced button.
10. Click OK twice.
Result
You have created, edited or deleted a scan profile. A new profile can be selected for a job template via the
Template Wizard - ZySCAN dialog.
103
ZySCAN Manual
Using the Command line
ZySCAN has a command line option -j that can be used to create a job template (without starting up
ZySCAN) and optionally to add this job template to the command line parameters that are stored in the
registry and which are used by the ZySCAN NT Service. Because job template creation requires a lot of
parameters, here’s what the command line should conform to.
•
Start with -j, -J, /j or /J
•
Rest must be within square brackets
•
Within the square brackets the following “sections” may appear (not every section has to be defined)
Image Processing
ZySCAN
ZyIMPORT
ZyFIELD
ZyOCR
ZyEXPORT
Field Definitions File
Destiny (obligatory)
Registry
•
Each section consists of a section header (which must be exactly one of the names mentioned above),
followed by a colon, followed by a comma-separated list of values, and ended by a semicolon.
•
There are four types of values:
Boolean: “0” or “1”
Number: an unsigned number, sometimes restricted to certain values
String: a valid string for the value involved. If any white space appears in the string, the entire string
must be enclosed in quotes.
List: list of one of the other types, enclosed by square brackets and comma-separated
Image Processing section
Image enhancement
Boolean
Patch code recognition
Boolean
Bar code recognition
Boolean
Split at bar code
Boolean
Fill in bar code field
Boolean
Example: “ImageProcessing:0,0,0,0,0;”
104
ZySCAN Manual
ZySCAN section
Show done
Boolean
Split
Boolean
Split size
Boolean
Auto rotate
Boolean
Auto rotate angle
Number (must be 90 or
180 or 270)
Example: “ZySCAN:0,1,3,1,180;”
ZyIMPORT section
Import directory
String
Import filter
String (must be a valid
import filter name)
Delete source files
Boolean
Split
Boolean
Split size
Number
Auto rotate
Boolean
Auto rotate angle
Number (must be 90 or
180 or 270)
Example: “ZyIMPORT:"C:\Testing\Import",SinglePageTiff,1,1,3,1,180;”
ZyFIELD section
ZyFIELD in batch
Boolean
Example: “ZyFIELD:0;”
ZyOCR section
ZyOCR in batch
Boolean
Engine
String (must be a valid
engine name)
105
ZySCAN Manual
Language analyst
Boolean
Dot matrix
Boolean
Small text
Boolean
Auto-orientation
Boolean
Deskew
Boolean
WYHIWYG
Boolean
Check TIFF integrity
Boolean
Prevent punctuation
Boolean
OCR color
Boolean
Output XML
Boolean
Fixed language
Number (must be a
valid language number)
Auto language detection
Boolean
Language list for detection
List of numbers (must
all be valid language
numbers)
Detection mode
Number (must be 0, 1
or 2)
Detection test size
Number
White page recognition
using file size
Boolean
Maximum file size
Number
White page recognition
using char count
Boolean
Maximum char count
Number
Example:
106
ZySCAN Manual
“ZyOCR:0,"ZyLAB Professional
OCR",1,1,1,1,1,1,1,1,1,1,23,1,[17,19,23,24,29,30,34,43,54,,59,71,73],0,1,1,1024,1,10;”
ZyEXPORT section
ZyEXPORT in batch
Boolean
Export method
String
Text export directory
String
Image export directory
String
Recursive export
Boolean
Check export
Boolean
Delete job after export
Boolean
Check disk space before
export
Boolean
Minimum free disk space
Number
Start indexing after export
Boolean
Burn in fields
Boolean
Burn in fields in all pages
Boolean
Left margin for burn in
Number
Top margin for burn in
Number
Example: “ZyEXPORT:0,"ZyLAB Standard","C:\Text","C:\Tiff",1,1,1,1,1,0,1,0,10,10;”
Field Definitions File section
Location of field definitions String
file
Example: “FieldDefinitionsFile:"C:\Program Files\ZyLAB\Information Management
Platform\JobRoot\Templates\Example.fd";”
107
ZySCAN Manual
Destiny section
Location of new template
String
Example: “Destiny:"C:\Program Files\ZyLAB\Information Management
Platform\JobRoot\Templates\Example.job";”
Registry section
Add to registry command
line
Boolean
Example: “Registry:1;”
Complete example
“j[ImageProcessing:0,0,0,0,0;ZySCAN:0,1,3,1,180;ZyIMPORT:"C:\Testing\Import",SinglePageTiff,1,1,3,1,180;
ZyFIELD:0; ZyOCR:0," ZyLAB Professional
OCR",1,1,1,1,1,1,1,1,1,1,23,1,[17,19,23,24,29,30,34,43,54,,59,71,73],0,1,1,1024,1,10; ZyEXPORT:0,"ZyLAB
Standard","C:\Text","C:\Tiff",1,1,1,1,1,0,1,0,10,10;FieldDefinitionsFile:"C:\Program Files\ZyLAB\Information
Management Platform\JobRoot\Templates\Example.fd";Destiny:"C:\Program Files\ZyLAB\Information
Management Platform\JobRoot\Templates\Example.job";Registry:1;]”
Registry startup parameters
HKEY_LOCAL_MACHINE\Software\ZyLAB\ZySCAN\RunUnattended: can optionally contain a DWORD value
“TimeOut” (default is 300 seconds)
EntireJob: DWORD value “Run” (if > 0: Run Unattended Entire Job)
Templates: Contains string values for each template to run
OCR: DWORD value “Run” (if > 0: Run ZyOCR)
JobRoots: Contains string values for each job root to monitor. If empty: current job root.
Export: DWORD value “Run” (if > 0: Run ZyEXPORT)
JobRoots: Contains string values for each job root to monitor. If empty: current job root.
OCRAndExport: DWORD value “Run” (if > 0: Run ZyOCR & ZyEXPORT)
JobRoots: Contains string values for each job root to monitor. If empty: current job root.
Registry is checked in the order as above. So if you want to run OCR & Export, you have to make sure the
DWORD value “Run” is 0 in all the other subkeys.
ZySCANService Commandline Options
ZySCANService obtains its startup parameters either from the command line or from the registry. This is
because command line parameters can only be entered when the service is started manually from the
“Services” dialog (that can be invoked from the Control Panel). Command line parameters can not be
entered when the service is started automatically when the system boots. ZySCANService first checks if
108
ZySCAN Manual
valid command line parameters have been entered and, if this is not the case, then checks the registry for
valid startup parameters.
Put the command line parameters in the string value “commandline” under
HKEY_LOCAL_MACHINE\Software\ZyLAB\ZYSCAN\RunUnattended, “-u[ru.job,ALD.job] -t300”. If you
create a template with the ZySCAN -j option and use the option ‘Registry:1’, this will be done automatically.
With the command line option -d a template can be removed from the RunUnattended commandline
registry entry. Example given:
C:\Program files\ZyLAB\Information Management Platform\bin\zyscan -d[templatename]
Removes the template “templatename” from the registry entry. Just -d empties the entire RunUnattended\
commandline registry entry.
Registry startup parameters
Organized like this:
HKEY_LOCAL_MACHINE\Software\ZyLAB\ZySCAN\RunUnattended: can optionally contain a DWORD value
“TimeOut” (default is 300 seconds)
EntireJob: DWORD value “Run” (if > 0: Run Unattended Entire Job)
Templates: Contains string values for each template to run
OCR: DWORD value “Run” (if > 0: Run ZyOCR)
JobRoots: Contains string values for each job root to monitor. If empty: current job root.
Export: DWORD value “Run” (if > 0: Run ZyEXPORT)
JobRoots: Contains string values for each job root to monitor. If empty: current job root.
OCRAndExport: DWORD value “Run” (if > 0: Run ZyOCR & ZyEXPORT)
JobRoots: Contains string values for each job root to monitor. If empty: current job root.
Registry is checked in the order as above. So if you want to run OCR & Export, you have to make sure the
DWORD value “Run” is 0 in all the other subkeys.
109
ZySCAN Manual
About Final Bates Stamping
Final Bates Stamping: Bates numbers are finalized in a form that is always present (in viewing, printing,
exporting etc) and that is also searchable. With Final Bates Stamping it is possible to:
•
Search for Bates numbers (meta data and full-text). When a user searches for a specific bates number,
the exact page with this number will be shown.
•
View Bates numbers in the meta data and in the resultlist. The Bates number (including prefix) of the
first and last page in a document will be shown in the result list.
•
View documents using tiff2png, view as TIFF or view as PDF with the Bates number (including prefix) of
the page burned in the image.
•
View the Bates numbers on printed documents.
•
Use a maximum length of 20 characters for the prefix string.
It is not possible to change Bates numbers after they have been burned into the image.
110
ZySCAN Manual
Create Final Bates Stamping Job Template
Conditions
Full understanding of creating job templates in ZySCAN (refer to Create a job template (page 2)).
Instructions
1. Open ZySCAN.
2. Go to Template > New Template.
3. Select Define new job template.
4. Click Next.
5. If you want to store the processed files in an index (and use already defined fields), select External Link.
6. Click the Select button, to select an index.
7. Click Next.
8. Select ZyIMPORT (or ZySCAN), ZyFIELD, ZyOCR and ZyEXPORT.
9. Click Next.
10. Define the import directory, and the import filter.
11. Click Next.
12. In the Template Wizard - ZyFIELD dialog, select the Field Definitions button.
Click Add Definition.
Define a Name. For example, Bates number.
Make sure the Type is a Plain text field.
111
ZySCAN Manual
Click OK twice.
Select the Final Bates Stamping button.
The button is active only if a Bates Stamping Module License is present.
a) Select the option Add Bates stamp.
112
ZySCAN Manual
b) Define the Bates Prefix. This prefix will be followed by a bates number.
c) Define the location of the Bates Prefix File. This XML file is used to store the prefix and associated
offset (bates number).
d) Select a Field Definition (the Bates_Number field you just created) from the dropdown listbox. This
plain text field will be used to store the bates range for a document. When this job template is
saved, automatically a bates counter file is created in the job template folder containing offset zero.
See Note below.
e) Select a ZySCAN stage from the dropdown listbox. During this stage, the bates numbers are added.
For now, only ZyEXPORT can be selected.
f) Define the (X and Y) location where the bates number should be burned in the image.
g) Select the Foreground (bates number) color.
h) If you want to specify a background color, select the checkbox Background and select a color. Please
make sure that the colors do not conflict with each other. It is advised to test the readability of
exported documents.
Note: The foreground and background colors will be exported. However, if the original document is
B&W or grayscale, the bates stamp will also be B&W (so not in color!).
i)
Click OK.
j)
Please read the Attention dialog: "To prevent multiple instances of ZySCAN from concurrently using
the same Bates range, this job (template) will only work on this computer!".
k) Click OK.
Note: You can also choose NOT to define a Field Definition, but keep it set on <none>. The prefix and
bates numbers will in that case only be stored on the pages, making field search impossible. Also, you
cannot view the bates number range via the bates number field (displayed in the result list). Of course,
full text search will still work.
13. Click Next.
14. Define the Available languages.
15. Click Next.
16. Choose an Export method. Both Txt/TIFF and XML/TIFF can be used.
17. Make sure the option "Export to default data directory and modules of the index" is selected (if you
linked to an index. If not, choose your export directories).
18. Click Next.
19. Define a template name.
20. Click Finish.
Result
You have created a job template for Final Bates Stamping. During processing, bates numbers (including
prefix) will be added to the OCRed text and image. The numbers are exported in txt/TIFF or XML/TIFF
format, the start and end bates numbers are exported in plain text fields.
113
ZySCAN Manual
Processing Final Bates Stamping Job
Conditions
You have create a Final Bates Stamping Job Template. Now you want to process the job. When a job is
created based on a Final Bates Stamping template, the prefix is copied in the job as well as a link to the
bates counter file.
Instructions
1. Open ZySCAN.
2. Select New Job.
3. Select the Final Bates Stamping template.
4. Click OK.
5. Click Import (or Scan).
6. Click Yes.
The bates_number field is not yet filled. Bates numbers are added in the ZyEXPORT stage.
7. If there are any other fields, you can define them.
8. Click OK.
9. Click Yes.
10. Click Start OCR.
11. Click Yes.
In the Export stage the bates numbers are added.
12. Click Start Export.
13. Click Yes.
Result
You have processed a Final Bates Stamping job.
114
ZySCAN Manual
Searching for Bates Stamping Numbers
Instructions
1. Open ZyFIND.
2. Define a Bates Stamping Number.
3. Click Search.
The prefix and number are searchable via full-text (and with hit highlighting). However, searching in the
field that has been assigned as bates field is not possible (except with the numbers used for the first and
last page, because these numbers are used to specify the bates range in the Bates_Number field (for txt:
<bates_number>prefix 00000018-00000020</bates_number>, for XML: <field id="bates_number">prefix
00000018-00000020</bates_number>).
115