1
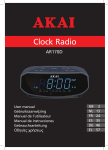
RADIO CU CEAS AR170D 1. SIGURANTA 1.1. FOLOSIRE Radio ceasul reda muzica de la radio. Functiile ceasului includ o alarma si un program de dormit. Cititi manualul cu atentie inainte de prima folosire. 1.2. Etichete folosite in manual ATENTIE O atentionare inseamna ca accidentarea sau moartea este posibila daca instructiunile nu sunt indeplinite. PRECAUTIE O precautie inseamna ca stricarea aparatului este posibila. O nota ofera informatii aditionale, de exemplu o procedura. 1.3. Instructiuni generale de siguranta ATENTIE Nu exercitati forta asupra aparatului. Aparatul poate cadea si suferi defecte. PRECAUTIE Nu varsati nici un fel de lichid pe aparat. ATENIE Nu introduceti nici un fel de obiect in gurile de ventilatie. PRECAUTIE Nu blocati gurile de ventilatie. NOTA: Acest aparat este dublu izolat; asadar nici un fir de impantare nu trebuie folosit. Intotdeauna verificati daca voltajul prizei corespunde cu cel al aparatului. 2. PREGATIREA PENTRU FOLOSIRE 2.1 Despachetarea Despachetati aparatul cu grija. Verificati daca pachetul contine toate accesoriile descrise mai jos. Daca lipseste vreun accesoriu, va rugam sa contactati vanzatorul. Indepartati etichetele de pe panoul frontal daca sunt prezente. Va recomandam sa pastrati ambalajul original si materialele de impachetare in cazul in care va sunt necesare pentru returnarea produsului pentru service. Aceasta este singura cale de a proteja produsul impotriva daunelor din timpul transportului. Daca aruncati ambalajul si materialele de impachetare, va reamintim sa le reciclati datorita grijii pentru mediu. 2.2. Contintul pachetului Urmatoarele accesorii sunt incluse in pachet: 1 Ceas cu radio 1 Manual de utilizare NOTA: Daca lipseste vreun accesoriu, va rugam contactati vanzatorul. 3. INSTALAREA Asezati aparatul pe o suprafata orizontata. Conectati aparatul la priza. PRECAUTIE Nu asezati aparatul langa o sursa de caldura Nu expuneti aparatul direct la razele soarelui. NOTA: Acest aparat este echipat cu picioare de cauciuc pentru a preveni miscarea. Picioarele sunt facute din materiale speciale pentru a nu lasa urme sau dungi pe mobila. Totusi, anumite tipuri de polish, conservanti pentru lemn sau spray-uri pentru curatat pot subtia cauciucul, acesta putand lasa urme sau reziduuri pe mobila si riscul ca suprafata sa sufere stricaciuni. Pentru a preveni stricaciuni pe suprafetele de lemn, recomandam sa aplicati banda adeziva pe cauciuc inainte de instalare. 3.1 BACKUP BATERII In cazul unei pene de curent, aparatul poate rula pe baterie. Pentru aceasta, aparatul foloseste o baterie de 9V. Aparatul tine minte ora, dar nu o afiseaza. Bateriile nu sunt incluse. Bateriile nu sunt necesare pentru folosirea normala. Instalarea bateriilor Deschideti compartimentul bateriei. Introduceti bateria potrivind polaritatea (+) si (-). Inchideti compartimentul bateriei. PRECAUTIE Instalarea incorecta poate duce la scurgerea si coroziunea bateriei care va afecta aparatul. Coroziunea, oxidarea,scurgerea bateriilor si orice defect de gen acid duce la pierderea garantiei. 4. FUNCTII 1. 2. 3. 4. 5. 6. 7. 8. 9. 10. 11. 5. Buton ON/OFF Buton SET Buton REV Buton FWD Buton SNOOZE Ecran Indicator ALARMA1 (ton) Indicator ALARMA1 (muzica) Buton reglare radio Indicator ALARMA2 (ton) Indicator ALARMA2 (muzica) 12.Indicator NAP 13.Comutator BAND 14.Buton TUNING (cautare) 15.Buton VOLUM 16.Buton WAKE1(trezire1) 17.Buton WAKE2(trezire2) 18.Buton SLEEP 19.Buton NAP 20.Antena FM OPERARE Pentru pornirea aparatului, apasati butonul ON/OFF (1). Pentru oprirea aparatului, apasati butonul ON/OFF (1) din nou. Pentru reglarea volumului, rotiti de butonul VOLUME (15) pana la nivelul dorit. 5.1. SETAREA TIMPULUI Conectati aparatul la priza. Timpul implicit (0:00) va clipi pe ecran. Puneti comutatorul SET (2) in pozitia TIME. Apasati butonul FWD (4) si butonul REV (3) pana ora dorita este setata. Puneti comutatorul SET (2) in pozitia LOCK pentru confirmarea setarilor. Pentru setarea timpului, nu este necesar sa porniti aparatul. In timpul penei de curent sau cand scoateti aparatul din priza, setarile timpului sunt pierdute, in cazul in care nu exista baterie instalata. 5.2. FUNCTIILE RADIO Pentru selectarea benzii radio, comutati butonul BAND (13) pe pozitia AM sau FM. Pentru selectarea frecventei sau postului radio, rotiti butonul TUNING (14) pana gasiti frecventa dorita. Pentru imbunatatirea receptiei FM, extindeti antena. Pentru imbunatatirea receptiei AM, miscati aparatul. 5.3. FUNCTIILE CEASULUI Setarea functiei SLEEP Selectati postul de radio preferat. Apasati butonul SLEEP (18). Butonul SLEEP este setat la 59 minute. Pentru reglarea timpului, tineti apasat butonul SLEEP (18). Apasati butonul FWD (4) si butonul REV (3) pana cand perioada dorita este setata (1-120 min). Aparatul se va opri din redare cand timpul selectat este scurs. Pentru revocarea functiei SLEEP, apasati butonul SNOOZE (5) sau butonul ON/OFF (1). 5.4. FUNCTIA ALARMA Aceasta functie este valabila in modul radio si ton. Pentru alarma radio: Porniti aparatul. Selectati postul de radio dorit. Reglati volumul. Opriti aparatul. Doua setari de alarma sunt disponibile (ALARM1 sau ALARM2). Pentru setarea ALARM1: Selectati modul de alarma (radio sau ton). Apasati butonul WAKE1 (16) o data pentru trezirea cu ton. Apasati butonul de doua ori pentru trezirea cu radio. - Pentru alarma cu ton, indicatorul (7) este ON. - Pentru alarma cu radio, indicatorul (8) este ON. Puneti comutatorul SET (2) in pozitia WAKE1. Apasati butonul FWD (4) sau butonul REV (3) pentru setarea timpului de alarma. Puneti comutatorul SET (2) in pozitia LOCK pentru confirmarea setarilor. Pentru revocarea alarmei, apasati butonul WAKE1 (16) o data. Pentru setarea ALARM2: Selectati modul de alarma (radio sau ton). Apasati butonul WAKE2 (17) o data pentru trezirea cu ton. Apasati butonul de doua ori pentru trezirea cu radio. - Pentru alarma cu ton, indicatorul (11) este ON. - Pentru alarma cu radio, indicatorul (10) este ON. Puneti comutatorul SET (2) in pozitia WAKE2. Apasati butonul FWD (4) sau butonul REV (3) pentru setarea timpului de alarma. Puneti comutatorul SET (2) in pozitia LOCK pentru confirmarea setarilor. Pentru revocarea alarmei, apasati butonul WAKE2 (17) o data. ALARMA SNOOZE Timpul implicit este de 9 minute. Pentru functia SNOOZE, apasati butonul SNOOZE (5) o data. Alarma va incepe din nou dupa timpul scurs. Pentru revocarea alarmei, apasati butonul ON/OFF (1). Alarma este setata automat pentru ziua urmatoare. SETAREA ALARMEI SNOOZE Tineti apasat butonul SNOOZE (5). Apasati butonul FWD (4) sau butonul REV (3) pentru setarea timpului (1-30 min). Eliberati butonul SNOOZE (5). Timpul SNOOZE este setat. SETARE FUNCTIEI NAP In aceasta functie alarma poate fi setata rapid pentru o perioada scurta de timp. Aceasta functie este valabila numai in modul ton. Apasati butonul NAP (19). Indicatoul NAP (12) clipeste. Apasati butonul FWD (4) sau butonul REV (3) pentru setarea timpului nap (10-120 min). Apasati butonul NAP (19) pentru confirmarea selectiei. Indicatorul NAP (12) este ON. Pentru revocarea functiei NAP, tineti apasat butonul NAP (19) pana cand indicatorul NAP (12) este OFF. 6. CURATAREA SI INTRETINEREA ATENTIE Inainte de orice curatare sau intretinere, opriti si scoateti din priza aparatul. 7. Curatati exteriorul aparatului cu o carpa moale. Cand aparatul este foarte murdar, inmuiati carpa usor in apa si intr-o solutie neutra. PROBLEME Probleme Actiune Nu afiseaza Porniti aparatul Conectati aparatul corespunzator Selectati functia corect cu comutatoul BAND (13) Fara sunet Conectati aparatul corespunzator Reglati volumul Reglati frecventa. 8. DATE TEHNICE Parametrii Voltaj Baterie Consum Consum in stand by Putere maxima Banda radio Dimensiune (W x H x D) Greutate Valoare 230 V AC - 50Hz 9V 2.3W 1.5W 1W AM/FM 162 x 68 x 135 mm 533g GAMA DE FRECVENTE Paramatrii Valoare Banda AM Banda FM 540 KHz - 1600 KHz 88 MHz - 108 Mhz AKAI Reciclarea echipamentelor electrice şi electronice uzate: Acest simbol prezent pe produs sau pe ambalaj semnifică faptul că produsul respectiv nu trebuie tratat ca un deşeu menajer obişnuit. Nu aruncaţi aparatul la gunoiul menajer la sfârşitul duratei de funcţionare, ci duceţi-l la un centru de colectare autorizat pentru reciclare. În acest fel veţi ajuta la protejarea mediului înconjurător şi veţi putea împiedica eventualele consecinţe negative pe care le-ar avea asupra mediului şi sănătăţii umane. Pentru a afla adresa celui mai apropiat centru de colectare: Contactaţi autorităţile locale; Accesaţi pagina de internet: www.mmediu.ro ; Solicitaţi informaţii suplimentare de la magazinul de unde aţi achiziţionat produsul. Clock Radio AR170D User manual Gebruiksaanwijzing Manuel de l’utilisateur Manual de instrucciones Gebrauchsanleitung Οδηγίες χρήσεως GB NL FR ES DE EL 2 13 24 35 46 57 Table of contents 1. 2. 3. 4. 5. Safety............................................................................ 3 1.1 1.2 1.3 Intended use.....................................................................3 Labels in this manual........................................................3 General safety instructions...............................................3 2.1 2.2 Unpacking.........................................................................4 Package contents.............................................................4 3.1 Battery backup..................................................................6 5.1 5.2 5.3 5.4 Set the time.......................................................................8 Radio functions.................................................................8 Clock functions.................................................................9 Alarm function...................................................................9 Preparations for use.................................................... 4 Installation.................................................................... 5 Functions...................................................................... 7 Operation...................................................................... 8 6. Cleaning and maintenance....................................... 10 7. Troubleshooting......................................................... 11 8. Technical data............................................................ 11 9.Disposal of used electrical and electronic equipment................................................................... 12 Copyright notice Design and specifications are subject to change without notice. AR170D 1. Safety 1.1 Intended use The Clockradio plays music from radio. The clock function includes an alarm and sleep program. Read the manual carefully before the first use. 1.2 WARNING A warning means that injury or death is possible if the instructions are not obeyed. CAUTION A caution means that damage to the equipment is possible. ! ! i 1.3 A note gives additional information, e.g. for a procedure. General safety instructions WARNING Do not put force on the appliance. The appliance can fall and can cause serious injury. CAUTION Do not spill any liquid on the appliance. WARNING Do not insert any objects in the ventilation holes. CAUTION Do not block the ventilation holes. This appliance is double insulated; therefore no earth wire is required. Always check that the mains voltage corresponds to the voltage on the rating plate. ! ! ! ! i Labels in this manual 3 2. Preparations for use 2.1 Unpacking ● Unpack the appliance carefully. ● Check the package contents as described below. If any item is missing, please contact your reseller. ● Remove the labels from the front panel carefully if present. i 2.2 We recommend that you retain the original carton and packing materials in case it ever becomes necessary to return your product for service. This is the only way to safely protect the product against damage in transit. If you do dispose of the carton and the packing materials, please remember to recycle with due care to the environment. Package contents The following items are included in the received package: 1 Clockradio 1 Operator manual i 4 If any item is missing, please contact your reseller. AR170D 3. Installation ● Put the appliance on a horizontal flat surface. ● Connect the appliance to the mains. ! CAUTION ● Do not put the appliance near a heat source. ● Do not expose the appliance to direct sunlight. i This appliance is equipped with rubber feet to prevent it from moving. The feet are made from non-migrating material specially formulated to avoid leaving any marks or stains on furniture. However, certain types of furniture polishes, wood preservatives or cleaning sprays cause the rubber to soften and leave marks or a residue on the furniture, and potentially risk the surface to become damaged. To prevent damage to wooden surfaces, we recommend that you apply self-adhesive pads to the bottom of the rubber feet before installation. 5 3.1 Battery backup In case of a power failure, the appliance relies on battery backup. For this purpose, the appliance uses one battery (9V). The appliance remembers the time, but does not display it. i ● Batteries are not included with this appliance. ● Batteries are not necessary for normal operation. Install batteries ● Remove the battery cover. ● Insert the batteries matching the (+) and (-) polarity markings. ● Re-install the battery cover. ! 6 CAUTION Incorrect installation can cause battery leakage and corrosion which will damage the appliance. Corrosion, oxidation, battery leakage and any other gradually acidic defect of this nature will invalidate the guarantee. AR170D 4. Functions 20 1 2 3 4 5 6 19 18 17 16 7 8 15 9 1 2 3 4 5 6 7 8 9 10 11 10 11 12 ON/OFF button SET switch REV button FWD button SNOOZE button Display ALARM1 indicator (tone) ALARM1 indicator (music) Radio tuning scale ALARM2 indicator (music) ALARM2 indicator (tone) 13 12 13 14 15 16 17 18 19 20 14 NAP indicator BAND switch TUNING dial VOLUME dial WAKE1 button WAKE2 button SLEEP button NAP button FM antenna 7 5. Operation ● To switch on the appliance, press the ON/OFF button (1). To switch off the appliance, press the ON/OFF button (1) again. ● To adjust the volume level, turn the VOLUME dial (15) until the desired level is set. 5.1 Set the time ● Connect the appliance to the mains. The default time (0:00) flashes on the display. ● Slide the SET switch (2) to the TIME position. ● Press the FWD button (4) and the REV button (3) until the desired time is set. ● Slide the SET switch (2) to the LOCK position to confirm the setting. i ● To set the time, it is not necessary to switch on the appliance. ● During a power failure, or when unplugging the appliance, the time settings are lost, unless backup batteries are installed. 5.2 Radio functions ● To select the radio band, slide the BAND switch (13) to the AM or FM position. ● To select a frequency or radio station, turn the TUNING dial (14) until the desired frequency is set. i 8 To improve the reception of the FM frequency, extend the aerial antenna. To improve the reception of the AM frequency, turn the appliance. AR170D 5.3 Clock functions Setting the SLEEP function ● Select the desired radio station as explained above. ● Press the SLEEP button (18). The sleep time is set at 59 minutes. ● To adjust the sleep time, hold the SLEEP button (18). Press the FWD button (4) and the REV button (3) until desired period is set (1 - 120 min). The appliance stops playing after the chosen time has elapsed. ● To cancel the SLEEP function, press the SNOOZE button (5) or the ON/OFF button (1). 5.4 Alarm function This function is available in radio and tone mode. For radio alarm: ● Switch on the appliance. ● Select the desired radio station. ● Adjust the volume. ● Switch off the appliance. Two time slots are available (ALARM1 and ALARM2). To set ALARM1: ● Choose the alarm mode (radio or tone). Press the WAKE1 button (16) once to wake up by tone. Press the button twice to wake up by radio. - For tone alarm, the indicator (7) is ON. - For radio alarm, the indicator (8) is ON. ● Slide the SET switch (2) to the WAKE1 position. ● Press the FWD button (4) or the REV button (3) to set the alarm time. ● Slide the SET switch (2) to the LOCK position to confirm the setting. ● To cancel the alarm, press the WAKE1 button (16) once. To set ALARM2: ● Choose the alarm mode (radio or tone). Press the WAKE2 button (17) once to wake up by tone. Press the button twice to wake up by radio. - For tone alarm, the indicator (11) is ON. - For radio alarm, the indicator (10) is ON. ● Slide the SET switch (2) to the WAKE2 position. ● Press the FWD button (4) or the REV button (3) to set the alarm time. ● Slide the SET switch (2) to the LOCK position to confirm the setting. ● To cancel the alarm, press the WAKE2 button (17) once. 9 Snooze alarm The default snooze time is: 9 minutes. ● To snooze the alarm, press the SNOOZE button (5) once. The alarm sounds again after the snooze time has elapsed. ● To stop the alarm, press the ON/OFF button (1). The alarm is automatically set for the next day. Set the snooze alarm ● Press and hold the SNOOZE button (5). ● Press the FWD button (4) or the REV button (3) to set the snooze time (1-30 minutes). ● Release the SNOOZE button (5). The snooze time is set. Set the NAP function In this function the alarm can be set quickly for a short period of time. This function is available in tone mode. ● Press the NAP button (19). The NAP indicator (12) flashes. ● Press the FF button (4) or the REV button (3) to set the nap time (10-120 minutes). ● Press the NAP button (19) to confirm the selection. The NAP indicator (12) is ON. ● To cancel the NAP function, hold the NAP button (19) until the NAP indicator (12) is OFF. 6. ! Cleaning and maintenance WARNING Before performing any cleaning or maintenance, switch off and unplug the appliance. ● Clean the outside of the appliance with a soft cloth. When the appliance is very dirty, dampen the cloth slightly with water and a neutral solution. 10 AR170D 7. Troubleshooting Trouble No display No sound 8. Action Switch on the appliance. Connect the appliance properly. Select the correct function with the BAND switch (13). Connect the appliance properly. Adjust the volume. Adjust the tuning control. Technical data Parameter Voltage Backup voltage Power consumption Standby power consumption Max power output Radio bands Dimensions (W x H x D) Weight Frequency range Parameter AM radio FM radio Value 230 VAC ~ 50 Hz. 9V 2.3 W 1.5 W 1W AM/FM 162 x 68 x 135 mm 533 g Value 540 kHz - 1600 kHz 88 mHz - 108 mHz 11 9. isposal of used electrical D and electronic equipment Z The meaning of the symbol on the material, its accessory or packaging indicates that this product shall not be treated as household waste. Please, dispose of this equipment at your applicable collection point for the recycling of electrical and electronic equipments waste. In the European Union and Other European countries which there are separate collection systems for used electrical and electronic product. By ensuring the correct disposal of this product, you will help prevent potentially hazardous to the environment and to human health, which could otherwise be caused by unsuitable waste handling of this product. The recycling of materials will help conserve natural resources. Please do not therefore dispose of your old electrical and electronic equipment with your household waste. For more detailed information about recycling of this product, please contact your local city office, your household waste disposal service or the shop where you purchased the product. For more information and warranty conditions, please visit: www.akai.eu 12 Clock Radio AR170D User manual Gebruiksaanwijzing Manuel de l’utilisateur Manual de instrucciones Gebrauchsanleitung Οδηγίες χρήσεως GB NL FR ES DE EL 2 13 24 35 46 57 Table of contents 1. 2. 3. 4. 5. Safety............................................................................ 3 1.1 1.2 1.3 Intended use.....................................................................3 Labels in this manual........................................................3 General safety instructions...............................................3 2.1 2.2 Unpacking.........................................................................4 Package contents.............................................................4 3.1 Battery backup..................................................................6 5.1 5.2 5.3 5.4 Set the time.......................................................................8 Radio functions.................................................................8 Clock functions.................................................................9 Alarm function...................................................................9 Preparations for use.................................................... 4 Installation.................................................................... 5 Functions...................................................................... 7 Operation...................................................................... 8 6. Cleaning and maintenance....................................... 10 7. Troubleshooting......................................................... 11 8. Technical data............................................................ 11 9.Disposal of used electrical and electronic equipment................................................................... 12 Copyright notice Design and specifications are subject to change without notice. AR170D 1. Safety 1.1 Intended use The Clockradio plays music from radio. The clock function includes an alarm and sleep program. Read the manual carefully before the first use. 1.2 WARNING A warning means that injury or death is possible if the instructions are not obeyed. CAUTION A caution means that damage to the equipment is possible. ! ! i 1.3 A note gives additional information, e.g. for a procedure. General safety instructions WARNING Do not put force on the appliance. The appliance can fall and can cause serious injury. CAUTION Do not spill any liquid on the appliance. WARNING Do not insert any objects in the ventilation holes. CAUTION Do not block the ventilation holes. This appliance is double insulated; therefore no earth wire is required. Always check that the mains voltage corresponds to the voltage on the rating plate. ! ! ! ! i Labels in this manual 3 2. Preparations for use 2.1 Unpacking ● Unpack the appliance carefully. ● Check the package contents as described below. If any item is missing, please contact your reseller. ● Remove the labels from the front panel carefully if present. i 2.2 We recommend that you retain the original carton and packing materials in case it ever becomes necessary to return your product for service. This is the only way to safely protect the product against damage in transit. If you do dispose of the carton and the packing materials, please remember to recycle with due care to the environment. Package contents The following items are included in the received package: 1 Clockradio 1 Operator manual i 4 If any item is missing, please contact your reseller. AR170D 3. Installation ● Put the appliance on a horizontal flat surface. ● Connect the appliance to the mains. ! CAUTION ● Do not put the appliance near a heat source. ● Do not expose the appliance to direct sunlight. i This appliance is equipped with rubber feet to prevent it from moving. The feet are made from non-migrating material specially formulated to avoid leaving any marks or stains on furniture. However, certain types of furniture polishes, wood preservatives or cleaning sprays cause the rubber to soften and leave marks or a residue on the furniture, and potentially risk the surface to become damaged. To prevent damage to wooden surfaces, we recommend that you apply self-adhesive pads to the bottom of the rubber feet before installation. 5 3.1 Battery backup In case of a power failure, the appliance relies on battery backup. For this purpose, the appliance uses one battery (9V). The appliance remembers the time, but does not display it. i ● Batteries are not included with this appliance. ● Batteries are not necessary for normal operation. Install batteries ● Remove the battery cover. ● Insert the batteries matching the (+) and (-) polarity markings. ● Re-install the battery cover. ! 6 CAUTION Incorrect installation can cause battery leakage and corrosion which will damage the appliance. Corrosion, oxidation, battery leakage and any other gradually acidic defect of this nature will invalidate the guarantee. AR170D 4. Functions 20 1 2 3 4 5 6 19 18 17 16 7 8 15 9 1 2 3 4 5 6 7 8 9 10 11 10 11 12 ON/OFF button SET switch REV button FWD button SNOOZE button Display ALARM1 indicator (tone) ALARM1 indicator (music) Radio tuning scale ALARM2 indicator (music) ALARM2 indicator (tone) 13 12 13 14 15 16 17 18 19 20 14 NAP indicator BAND switch TUNING dial VOLUME dial WAKE1 button WAKE2 button SLEEP button NAP button FM antenna 7 5. Operation ● To switch on the appliance, press the ON/OFF button (1). To switch off the appliance, press the ON/OFF button (1) again. ● To adjust the volume level, turn the VOLUME dial (15) until the desired level is set. 5.1 Set the time ● Connect the appliance to the mains. The default time (0:00) flashes on the display. ● Slide the SET switch (2) to the TIME position. ● Press the FWD button (4) and the REV button (3) until the desired time is set. ● Slide the SET switch (2) to the LOCK position to confirm the setting. i ● To set the time, it is not necessary to switch on the appliance. ● During a power failure, or when unplugging the appliance, the time settings are lost, unless backup batteries are installed. 5.2 Radio functions ● To select the radio band, slide the BAND switch (13) to the AM or FM position. ● To select a frequency or radio station, turn the TUNING dial (14) until the desired frequency is set. i 8 To improve the reception of the FM frequency, extend the aerial antenna. To improve the reception of the AM frequency, turn the appliance. AR170D 5.3 Clock functions Setting the SLEEP function ● Select the desired radio station as explained above. ● Press the SLEEP button (18). The sleep time is set at 59 minutes. ● To adjust the sleep time, hold the SLEEP button (18). Press the FWD button (4) and the REV button (3) until desired period is set (1 - 120 min). The appliance stops playing after the chosen time has elapsed. ● To cancel the SLEEP function, press the SNOOZE button (5) or the ON/OFF button (1). 5.4 Alarm function This function is available in radio and tone mode. For radio alarm: ● Switch on the appliance. ● Select the desired radio station. ● Adjust the volume. ● Switch off the appliance. Two time slots are available (ALARM1 and ALARM2). To set ALARM1: ● Choose the alarm mode (radio or tone). Press the WAKE1 button (16) once to wake up by tone. Press the button twice to wake up by radio. - For tone alarm, the indicator (7) is ON. - For radio alarm, the indicator (8) is ON. ● Slide the SET switch (2) to the WAKE1 position. ● Press the FWD button (4) or the REV button (3) to set the alarm time. ● Slide the SET switch (2) to the LOCK position to confirm the setting. ● To cancel the alarm, press the WAKE1 button (16) once. To set ALARM2: ● Choose the alarm mode (radio or tone). Press the WAKE2 button (17) once to wake up by tone. Press the button twice to wake up by radio. - For tone alarm, the indicator (11) is ON. - For radio alarm, the indicator (10) is ON. ● Slide the SET switch (2) to the WAKE2 position. ● Press the FWD button (4) or the REV button (3) to set the alarm time. ● Slide the SET switch (2) to the LOCK position to confirm the setting. ● To cancel the alarm, press the WAKE2 button (17) once. 9 Snooze alarm The default snooze time is: 9 minutes. ● To snooze the alarm, press the SNOOZE button (5) once. The alarm sounds again after the snooze time has elapsed. ● To stop the alarm, press the ON/OFF button (1). The alarm is automatically set for the next day. Set the snooze alarm ● Press and hold the SNOOZE button (5). ● Press the FWD button (4) or the REV button (3) to set the snooze time (1-30 minutes). ● Release the SNOOZE button (5). The snooze time is set. Set the NAP function In this function the alarm can be set quickly for a short period of time. This function is available in tone mode. ● Press the NAP button (19). The NAP indicator (12) flashes. ● Press the FF button (4) or the REV button (3) to set the nap time (10-120 minutes). ● Press the NAP button (19) to confirm the selection. The NAP indicator (12) is ON. ● To cancel the NAP function, hold the NAP button (19) until the NAP indicator (12) is OFF. 6. ! Cleaning and maintenance WARNING Before performing any cleaning or maintenance, switch off and unplug the appliance. ● Clean the outside of the appliance with a soft cloth. When the appliance is very dirty, dampen the cloth slightly with water and a neutral solution. 10 AR170D 7. Troubleshooting Trouble No display No sound 8. Action Switch on the appliance. Connect the appliance properly. Select the correct function with the BAND switch (13). Connect the appliance properly. Adjust the volume. Adjust the tuning control. Technical data Parameter Voltage Backup voltage Power consumption Standby power consumption Max power output Radio bands Dimensions (W x H x D) Weight Frequency range Parameter AM radio FM radio Value 230 VAC ~ 50 Hz. 9V 2.3 W 1.5 W 1W AM/FM 162 x 68 x 135 mm 533 g Value 540 kHz - 1600 kHz 88 mHz - 108 mHz 11 9. isposal of used electrical D and electronic equipment Z The meaning of the symbol on the material, its accessory or packaging indicates that this product shall not be treated as household waste. Please, dispose of this equipment at your applicable collection point for the recycling of electrical and electronic equipments waste. In the European Union and Other European countries which there are separate collection systems for used electrical and electronic product. By ensuring the correct disposal of this product, you will help prevent potentially hazardous to the environment and to human health, which could otherwise be caused by unsuitable waste handling of this product. The recycling of materials will help conserve natural resources. Please do not therefore dispose of your old electrical and electronic equipment with your household waste. For more detailed information about recycling of this product, please contact your local city office, your household waste disposal service or the shop where you purchased the product. For more information and warranty conditions, please visit: www.akai.eu 12