1
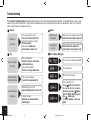
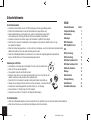
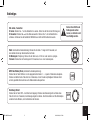
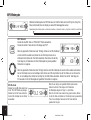
��������
������ ������ ���� ��� �����
Operating Instructions
Einbau- & Bedienungsanleitung
ZE-30MP3 Manual E
1
01.12.2003, 10:59 Uhr
Safety Information
Contents
PRECAUTIONS
Safety Information.............................Page2
Use only in a 12-volt DC negative-ground electrical system.
Disconnect the vehicle's negative battery terminal while mounting and connecting the unit.
When replacing the fuse, be sure to use one with an identical amperage rating.
Using a fuse with a higher amperage rating may cause serious damage to the unit.
DO NOT attempt to disassemble the unit. Laser beams from the optical pickup are dangerous to the eyes.
Make sure that pins or other objects do not get inside the unit; they may cause malfunctions,
or create safety hazards such as electrical shock or laser beam exposure.
If you have parked the car for a long time in hot or cold weather, wait until the temperature
in the car becomes normal before operating the unit.
Keep the volume at a level at which you can hear outside warning sounds (horns sirens, etc.).
Panel Controls...........................................3
Remote Controls ......................................4
Button Tips................................................5
MP3 Playback ..........................................6
MP3 Overview ..........................................7
RDS Basics ...............................................8
RDS (continued)........................................9
RDS (continued)......................................10
CD Notes
RDS Menu Function.................................11
Playing a defective or dusty CD can cause dropouts in sound.
Hold CDs as illustrated.
DO NOT touch the unlabeled side.
DO NOT attach any seal, label or data protection sheet to either side of a disc.
DO NOT expose a CD to direct sunlight or excessive heat.
Wipe a dirty CD from the center outward with a cleaning cloth.
Never use solvents such as benzine or alcohol.
This unit cannot play 3-inch ( 8cm ) CDs.
NEVER insert a 3-inch CD contained in the adapter or an irregularly shaped CD.
The unit may not be able to eject it, resulting in a malfunction.
RDS Menu Function (continued)..............12
Electrical Connections.............................13
Installation Guide....................................14
Anti-Theft System....................................15
Trouble Shooting.....................................16
Specifications.........................................33
Warranty.................................................34
Before operation
DO NOT raise the volume level too much, as this will block outside sounds, making driving dangerous.
Stop the car before performing any complicated operation.
CAUTION
DO NOT open covers and do not repair by yourself. Consult the dealer or an experienced technician for help.
* In addition to ordinary CDs, this unit can play
back a CD - R or CD - RW.
2
ZE-30MP3 Manual E
2
01.12.2003, 10:59 Uhr
Panel Controls
Power on : press any button on the panel except
and
to turn on the unit.
Press to tune in a preset station
Hold for more than 2 seconds to
store station
Radio
Traffic Announcements Identification
Radio Tune
Radio Preset
Disc Play
(when disc is in)
Track Seek
Remote Sensor
Panel Open / Close
Disc Eject
EJ
Press less than 2 seconds to mute
DN
Rotate the knob to
adjust volume level
VOL
TA
UP
Push to select VOL/BAS/
TRE/BAL/FAD Rotate the
knob to adjust level
BAND
SRC
TOP
DISP
1
INT
RPT
RDM
2
3
4
PWR
MUTE
Press more than 2 seconds to
Power off
PTY
Press once to enter MUSIC type or
press twice to enter SPEECH type.
SEARCH
5
6
PUSH SEL / MENU
COMPACT
AMS
AF
DIGITAL AUDIO
Reset switch
Push more than 2 seconds
to Menu mode
F M1
F M2
MW1
F M3
MW2
M P3 track+10 up
M P3 track-10 down
Track Random play
Track Repeat play
Band Switch
Alternative Frequency list
Intro play(10sec)
MP3 track / file search
Play / Pause
Top play ( press
more than 2 sec.)
Display switch
AMS
Radio Preset scan
Radio Auto preset
SEARCH
M P3 track / file search
Disc Playback
3
ZE-30MP3 Manual E
3
01.12.2003, 10:59 Uhr
Remote Controls
Power on : press any button on the remote controller to turn on the unit.
Radio Tune
Volume
Radio
Track Seek
Power on/off
Disc Play
(when disc is in)
Mute
Aux-in (optional)
Push to select VOL/BAS/
TRE/BAL/FAD , use Volume
button to adjust level
MUTE
SRC
VOL
Push more than 2 seconds
to Menu mode
Traffic Announcements
Identification
Play / Pause
Top play ( press
more than 2 sec.)
Disc Playback
SEL
AMS
SEARCH
1
/ TOP
AF/REG
PTY
BAND
2
INT
3
RPT
4
RDM
5
6
DISP
Radio Preset
Intro play (10 sec.)
Press to tune in
a preset station
Hold for more
than 2 seconds
to store station.
Track Repeat Play
Track Random Play
Radio Auto Preset
SEARCH
4
M P3 track / file search
Band Switch
F M1
F M2
F M3
Display switch
Program Type
Alternative Frequency list
Region
4
ZE-30MP3 Manual E
Radio Preset scan
(ZE-30MP3 ONLY)
MENU
TA
AMS
01.12.2003, 10:59 Uhr
MW1
MW2
Button Tips
Disc Load / Eject: Press
to slide down the panel.
DO NOT apply excessive
force to the panel.
It can cause DAMAGE.
Load: Insert the disc into the slot. Press
to close the panel.
Eject: Press
to eject the disc. Press
to close the panel.
DO NOT close the panel before disc is taken out.
Radio: Radio Tune step by step : press less than 0.5 se c.
Radio Seek automatically : press more than 0.5 sec.
Disc Playback: Track skip : press less than 0.5 second to go to the next or previous track.
Track seek : press more than 0.5 se cond and hold it to fast forward or reverse back the track.
AMS : Auto Memory Store
AMS
Press briefly to scan the preset station
for 5 seconds each. Hold more than 2 seconds, the 6
strongest available stations will be automatically saved in the memory of preset buttons
.
SET CLOCK
DN
Press DISP button, time displays. Press again more than 2 seconds, time display blinks.
Rotate the knob clockwise to set hours. Rotate the knob anticlockwise to set minutes.
DISP
VOL
UP
5
ZE-30MP3 Manual E
5
01.12.2003, 10:59 Uhr
MP3 Play back
While playing MP3 disc, the folder/file name and ID3 tag (Song title, Album and Artist) can entirely scroll
on the LCD display.
ALBUM
MUSIC
ARTIST
MP3
AMS
DN
Elapsed playing time & Track number
File name & number
MP3 Track search
previous
Press AMS button to select "TRACK SCH" mode.
Press the knob and LCD display will show "001".
Is displayed and searched if no button is pressed for
IF your desired track number is less than 100,
2 seconds.
rotate the knob to select the first digit and press it once again
and rotate set the tenth digit of the track number.
Press the knob again more than 0.5 second to play the track.
If there is no corresponding program type, NO PTY is
IF your desired track number is more than 100,
displayed.
rotate the knob to select the first digit and press it to confirm,
rotate the knob to select the tenth digit and press it to confirm,
rotate the knob to select the hundredth digit and press it to confirm,
Press the knob again to play the track.
VOL
UP
Folder name & number
MP3 File search
Press AMS button twice to
select "FILE SCH" mode.
Press the knob to enter.
Rotate the knob to select folder.
ALBUM
MUSIC
ARTIST
MP3
6
Album title
Artist name
ALBUM
MUSIC
ARTIST
MP3
ALBUM
MUSIC
ARTIST
MP3
* If the track number you enter is
beyond the maximum file number,
last song on disc will be played.
IF you just want to play songs of this folder, press the knob
more than 0.5 second to play the first track of the folder.
IF you want to play desired track of the folder, press the knob
and rotate to select the track you want.
Press the knob again to play the track.
10
6
ZE-30MP3 Manual E
Song title
01.12.2003, 10:59 Uhr
MP3Menu
Overview
RDS
Function
Note on MP3
MP3 is the acronym for MPEG Audio Layer 3 and refers to an audio compression technology standard.
Press the button more than 2 seconds to enter menu mode , then each press changes the mode as follows:
This product allows playback of MP3 files on CD-ROM (CD-R or CD-RW discs).
The unit can read MP3 files
written in theMASK
formatmode
compliant with
ISOmode
9660.
DSP
LOUD ON / OFF mode
BEEP ON / OFF
TA mode
P3 data
written by the
method
packet write. ST / MO mode
However it does not support the MVOL
LOCAL
/ DXofmode
SEEK1/2 mode (only in tuner mode)
mode
The unit can not read an MP3 file that has a file extension other than ".mp3 ".
If you play a non - MP3 file that has the " .mp3 " extension, you may hear some noise.
In this manual,we refer to what are called "MP3 file" and "folder " in PC terminology as "track" and "Album", respectively.
Maximum number of directory level is 8, including the root directory. Maximum number of files and folders per disc is 256 .
TA mode: Rotate the knob to choose TA ALARM or TA SEEK mode, When TA is turned on and no traffic program identification code
The unit may not play tracks in the order of track numbers.
hasthe
been
received
the contains
specifiedboth
time,audio
no TA/TP
displayed
and according to the MENU SELECT, alarm is set off,
The unit plays only
audio
tracksduring
if a disc
tracksisand
MP3 files.
When playing a or
disc
of
8k
bps
or
*VBR,
the
elapsed
playing
time
in
the
display
window
will not be correct and also the intro
TA SEEK is activated.
play may not function properly. *VBR: Variable Bit Rate.
TA ALARM mode : NO TA/TP is displayed and alarm is set off.
TA SEEK mode: TA SEEK is activated.
DN
VOL
UP
Note on creating your own CD-Rs or CD-RWs containing MP3 files
To enjoy high quality sound, we recommend converting to MP3 files with a sampling frequency of 44.1 kHz and a fixed bit rate of 128 kbps.
DO NOT store more than 256 M P3 files per disc.
For ISO 9660 - compliant format, the maximum allowable depth of nested folders is 8, including the root directory (folder).
When CD-R disc is used, playback is possible only for discs which have been finalized.
Make sure that when MP3 CD-R is burned that it is formatted as a data disc and NOT as an audio disc.
MASK DPI
MASKnon-MP3
mode: files or unneeded
modealong
: with MP3 files on the CD-R otherwise it takes a long time
You should not write
folders
until the unit starts
to
play
MP3
files.
Only the AF which has different program identification is masked.
rotate the knob
With some CD-R media, data may not be properly written depending on their manufacturing quality .
MASK ALL mode :
choose
MASK
DPI
In this case, datatomay
not be
reproduced
correctly. High quality CD-R discs are recommended.
The
AF ofwhich
has different
program
identification
NO RDS
Up to 16 characters
are
displayed
for
the
name
an Album
or a Track.
ID3TAG
version 1.xand
is required.
or MASK ALL mode.
withthat
highyou
field
strength
Note that the unit may not play tracks in signal
the order
wrote
themistomasked.
the disc.
ALBUM
ALBUM
MUSIC
MUSIC
ARTIST
ARTIST
ALBUM
MUSIC
ARTIST
DN
VOL
UP
ALBUM
MUSIC
ARTIST
7
11
ZE-30MP3 Manual E
7
01.12.2003, 10:59 Uhr
RDS ( Radio Data System )
RDS service availability varies with areas. Please understand if RDS service is not available in you area, the following service is not available,
either. The following functions are available when receiving RDS stations.
RDS Basics
AF( Alternative Frequency list ) When reception is poor, an RDS station broadcasting the same program is tuned in automatically.
PS Display ( Program Service name ) The name of station is displayed instead of frequency.
AF Mode : Press AF button less than 1 second to switch AF mode on and off.
AF indication on LCD will flash until RDS information is received.
ALBUM
MUSIC
ARTIST
REG Mode : Press AF button more than 1 second to switch REG mode on and off.
ALBUM
MUSIC
ON : The frequency is changed only for programs within the region.
ARTIST
OFF : The frequency is changed also for programs outside the region.
ALBUM
MUSIC
ARTIST
During FM mode when AF is on, radio seek, scan and AMS functions can only receive and save RDS program.
CT Service ( Clock Time )
When receiving an RDS station, the CT ( Clock Time ) service automatically adjusts the time.
EON
ALBUM
MUSIC
ARTIST
NO CT is displayed in areas where CT service is not available.
8
ZE-30MP3 Manual E
8
01.12.2003, 11:00 Uhr
RDS ( continued )
,
Traffic Announcements
Some RDS FM stations periodically
TP ( Traffice Program Identification )
TA ( Traffic Announcements Identification )
provide traffic information.
Broadcasting of traffic information
Radio announcements on traffic conditions
TA Mode: Press TA button to turn on / off TA.
When TA mode is on and TA indicator on LCD is displayed.
ALBUM
When traffic announcement is transmitted, regardless of the mode,
MUSIC
ARTIST
reception will begin at volume level 20 if volume level is below 20.
After the traffic announcement is over, it will return to previous mode and volume level.
When TA is turned on, SEEK, SCAN, AMS function can only be received or saved
when traffic program identification (TP) code is received.
EON ( Enhanced Other Networks )
When EON data is received, the EON indicator lights and the TA and AF functions are expanded as follows.
TA: Traffic information from the current and other network stations can be received.
AF: The frequency list of preset RDS stations is updated by EON data. EON enables the radio to make fuller use of RDS information.
It constantly updates the AF list of preset stations, including that currently tuned in to. If you preset a station for from home,
you will later be able to receive the same station at an alternative frequency, or any other station serving the same program,
EON also keeps track of locally available TP stations for quick receptions.
9
ZE-30MP3 Manual E
9
01.12.2003, 11:00 Uhr
MP3 Play back
While playing MP3 disc, the folder/file name and ID3 tag (Song title, Album and Artist) can entirely scroll
on the LCD display.
ALBUM
MUSIC
ARTIST
MP3
AMS
Elapsed playing time & Track number
Folder name & number
File name & number
MP3 Track search
previous
Press AMS button to select "TRACK SCH" mode.
Press the knob and LCD display will show "001".
Is displayed and searched if no button is pressed for
IF your desired track number is less than 100,
2 seconds.
rotate the knob to select the first digit and press it once again
and rotate set the tenth digit of the track number.
Press the knob again more than 0.5 second to play the track.
If there is no corresponding program type, NO PTY is
IF your desired track number is more than 100,
displayed.
rotate the knob to select the first digit and press it to confirm,
rotate the knob to select the tenth digit and press it to confirm,
rotate the knob to select the hundredth digit and press it to confirm,
Press the knob again to play the track.
Song title
Album title
Artist name
ALBUM
MUSIC
ARTIST
MP3
ALBUM
MUSIC
ARTIST
MP3
DN
VOL
UP
MP3 File search
Press AMS button twice to
select "FILE SCH" mode.
Press the knob to enter.
Rotate the knob to select folder.
ALBUM
MUSIC
ARTIST
MP3
* If the track number you enter is
beyond the maximum file number,
last song on disc will be played.
IF you just want to play songs of this folder, press the knob
more than 0.5 second to play the first track of the folder.
IF you want to play desired track of the folder, press the knob
and rotate to select the track you want.
Press the knob again to play the track.
10
6
ZE-30MP3 Manual E
10
01.12.2003, 11:00 Uhr
MP3Menu
Overview
RDS
Function
Note on MP3
MP3 is the acronym for MPEG Audio Layer 3 and refers to an audio compression technology standard.
Press the button more than 2 seconds to enter menu mode , then each press changes the mode as follows:
This product allows playback of MP3 files on CD-ROM (CD-R or CD-RW discs).
The unit can read MP3 files
written in the MASK
formatmode
compliant withDSP
ISOmode
9660.
LOUD ON / OFF mode
BEEP ON / OFF
TA mode
written by the
method
packet write. ST / MO mode
However it does not support the MPVOL
3 data
LOCAL
/ DXofmode
SEEK1/2 mode (only in tuner mode)
mode
The unit can not read an MP3 file that has a file extension other than ".mp3 ".
If you play a non - MP3 file that has the " .mp3 " extension, you may hear some noise.
In this manual,we refer to what are called "MP3 file" and "folder " in PC terminology as "track" and "Album", respectively.
Maximum number of directory level is 8, including the root directory. Maximum number of files and folders per disc is 256 .
TA mode: Rotate the knob to choose TA ALARM or TA SEEK mode, When TA is turned on and no traffic program identification code
The unit may not play tracks in the order of track numbers.
hasthe
been
received
the contains
specifiedboth
time,audio
no TA/TP
displayed
and according to the MENU SELECT, alarm is set off,
The unit plays only
audio
tracksduring
if a disc
tracksisand
MP3 files.
When playing a disc
of
8k
bps
or
*VBR,
the
elapsed
playing
time
in
the
display
window
will not be correct and also the intro
or TA SEEK is activated.
play may not function properly. *VBR: Variable Bit Rate.
TA ALARM mode : NO TA/TP is displayed and alarm is set off.
TA SEEK mode: TA SEEK is activated.
DN
VOL
UP
Note on creating your own CD-Rs or CD-RWs containing MP3 files
To enjoy high quality sound, we recommend converting to MP3 files with a sampling frequency of 44.1 kHz and a fixed bit rate of 128 kbps.
DO NOT store more than 256 M P3 files per disc.
For ISO 9660 - compliant format, the maximum allowable depth of nested folders is 8, including the root directory (folder).
When CD-R disc is used, playback is possible only for discs which have been finalized.
Make sure that when MP3 CD-R is burned that it is formatted as a data disc and NOT as an audio disc.
MASK DPI
MASK
mode: files or unneeded
modealong
: with MP3 files on the CD-R otherwise it takes a long time
You should not write
non-MP3
folders
until the unit starts
to
play
MP3
files.
Only the AF which has different program identification is masked.
rotate the knob
With some CD-R media, data may not be properly written depending on their manufacturing quality .
MASK ALL mode :
choose
MASK
DPI
In this case, datatomay
not be
reproduced
correctly. High quality CD-R discs are recommended.
The
AFofwhich
has different
program
identification
NO RDS
Up to 16 characters
are
displayed
for
the
name
an Album
or a Track.
ID3TAG
version 1.xand
is required.
or MASK ALL mode.
withthat
high
field
strength
Note that the unit may not play tracks in signal
the order
you
wrote
them istomasked.
the disc.
ALBUM
ALBUM
MUSIC
MUSIC
ARTIST
ARTIST
ALBUM
MUSIC
ARTIST
DN
VOL
UP
ALBUM
MUSIC
ARTIST
7
11
ZE-30MP3 Manual E
11
01.12.2003, 11:00 Uhr
�����������������������������
Button Tips
Disc Load / Eject:������������������������������������������������������
Press
to slide down
the panel.
��������������������������������������������������������
�����������������������������������������������������������
DO NOT apply excessive
Load: Insert the disc into the slot. Press
to close the panel.
force to the panel.
����������������������������������������������������
Eject: Press
to eject the disc. Press
to close the panel.
It can cause DAMAGE.
��
���
��
DO NOT close
the panel before disc is taken out.
������������������������������������������������������������������������
Radio: Radio Tune by step : press less than 0.5 se c.
������������������������������������������������������������������
Radio Seek automatically : press more than 0.5 sec.
������������������������������������������������������������������
Disc
Playback: Track skip : press less than 0.5 second to go to the next or previous track.
��������������������������������������������������������������������������������������������������������
�����
�����
������
Track seek : press more than 0.5 se cond and hold it to fast forward or reverse back the track.
�������������������������������������������������������������������������
AMS : Auto Memory Store
��������������������������������������������������������
Press briefly to scan the preset station
for 5 seconds each. Hold more than 2 seconds, the 6
strongest available station will be automatically saved in the memory of preset button
.
����������������������
����������������������������������������������������
����������������������������������������������
SET CLOCK
��������������������������������
Press DISP button, time displays. Press������
again������������������������������������������������
more than 2 seconds, time display blinks.
Rotate the knob clockwise to set hours. Rotate the knob anticlockwise to set minutes.
AMS
�����
�����
�����
�����
������
������
DISP
��
4
ZE-30MP3 Manual E
12
DN
01.12.2003, 11:00 Uhr
VOL
UP
���������������������
Electrical Connections
Wiring Diagram
�������������������������������
������������������������������������������������������������������������������������������������������
�����������������������������
������������������������������ ��������������������� �������������������������������������������������
��
���
��
Fuse 15A
Antenna
��������������������������������������������������������
������������������������������������������������������
Connector
�����������������������������������������������������������
���������������Pink
�����������������������������������������
Yellow
To car battery(+)
Continuous+12V DC
Tel. Mute
Ignition key
Red
��������������������������������������������������������
�������������������
Filter Box
+12V DC
Black
��������������������������������������������������������
������������������������������������������������������
When
ON/ACC
�����
�����
�����
�����
������
Motor/Electric Antenna relay control Lead
Amplifier relay control Lead
Blue
������
Ground Lead
R(Red)
Line-out Gray
L(White)
�����������������������������������������������������������������
Line-out Brown
������������������������������������������������������������������
��������������������������������������������������������������������������������������������������������
FRONT SP
White/Black Stripe
White
Gray
Gray/Black
Stripe
�����
�����
������
R(Red)
L(White)
REAR SP
Green/Black
Stripe
Green Purple/Black
Stripe
Purple
����������������������
����������������������������������������������������
����������������������������������������������
��������������������������������
Left Speaker
Right Speaker
Left Speaker
Right Speaker
������ ������������������������������������������������
�����
�����
������
(Front)
(Front)
(Rear)
�����
�����
������
(Rear)
�
13
ZE-30MP3 Manual E
13
01.12.2003, 11:00 Uhr
Panel
Controls
Installation
Guide
Power
on : pressProcedures
any button on the panel except
Installation
and
to turn on the unit.
First complete the electrical connections, and then check them for correctness.
Insert mounting collar into the dashboard, and
bend the mounting tabs out with a screwdriver.
Reset
Make sure that lock lever ( ) is flush with the
mounting collar. (not projecting outward)
Radio
Press the Reset button with a pointed object to reset the
unit to the
status.
Discoriginal
Play
Press to tune in a preset station
Hold for more than 2 seconds to
store station
Traffic Announcements Identification
Radio
lockTune
lever
Radio Preset
(when disc is in)
(
)
Track Seek
Remote Sensor
Disc Eject
Panel Open / Close
EJ
Press less than 2 seconds to mute
DN
Rotate the knob to
adjust volume level
VOL
TA
UP
SRC
BAND
1
INT
RPT
RDM
2
3
4
AMS
AF
DIGITAL AUDIO
(CM226 ONLY)
Reset switch
Alternative Frequency list
Mounting bolt
rubber cushion
14
AMS
Secure the rear of the unit.
Radio Preset scan
Radio Auto preset
P3 track / file fix
search
and power Mconnector,
the rear of
After fixing mounting bolt SEARCH
the unit to the car body by rubber cushion.
Insert trim plate.
14
2
ZE-30MP3 Manual E
Press once to enter MUSIC type or
press twice to enter SPEECH type.
COMPACT
6
M P3 track+10 up
(CM226 ONLY)
Disc Playback
M P3 track-10 down
This unit can be installed in any dashboard
MW1
MW2The
M1 opening
F M2 asF M3
having Fan
shown
above.
dashboard should be 4.75mm - 5.56mm
thick in order to be able to support the unit.
Track Random play
Band Switch
Track Repeat play
52mm
M P3 track / file search
Intro play(10sec)
Display switch
Press more than 2 seconds to
Power off
PTY
SEARCH
5
PUSH SEL / MENU
Push more than 2 seconds
Installation
to Menu mode Opening
183mm
TOP
DISP
Play / Pause
Top play ( press
more than 2 sec.)
Push to select VOL/BAS/
TRE/BAL/FAD Rotate the
knob to adjust level
PWR
MUTE
01.12.2003, 11:00 Uhr
Remote
Controls
Anti-Theft
System
This unit
equipped
with a on
motorized
slide-down
detachable
Power
on :ispress
any button
the remote
controller
to turn onpanel.
the unit.
Panel can be detached and taken with you, helping to deter theft.
Removing the panel
1.Press
Radio Tune
Volume
Radio
Track Seek
on/off
to slidePower
down
the panel.
Disc Play
(when disc is in)
2.Press PWR button more than 2 seconds to switch off the power of the unit.
Mute
3.Pull out the left part of the panel a little, then pull out the panel from the right.
Aux-in (optional)
FIRST
Later panel tray will retract automatically.
Push to select VOL/BAS/
4.Gently press
the button
of the panel case and open the cover.
TRE/BAL/FAD
, use Volume
MUTE
button to adjust level
SRC
Place the panel into the case and take it with you when you leave the car.
VOL
Push more than 2 seconds
to Menu mode
Install the panel
Traffic Announcements
Identification
1.Fit the panel
into the slot of the unit.
front
panel until it clicks
plate.
2.Push in thePlay
/ Pause
Disc into
Playback
Top play ( press
more than 2 sec.)
SEL
AMS
SEARCH
1
/ TOP
1.
2.
AF/REG
PTY
BAND
2
INT
3
RPT
4
RDM
5
6
DISP
Radio Preset
Intro unit
play(10 sec.)
Remove the
Press to tune in
a preset station
RemoveTrack
the Repeat
panelPlay
and the trim plate.
Hold for more
than 2of
seconds
Insert both T-Keys into hole in front
the set
to
store station.
Track Random Play
3. Pull out the unit.
Radio Preset scan
Radio Auto Preset
SEARCH
M P3 track / file search
Band Switch
F M1
F M2
F M3
Display switch
Program Type
until they lock.
THEN
(ZE-30MP3 ONLY)
MENU
TA
AMS
MW1
MW2
Alternative Frequency list
Region
3
15
ZE-30MP3 Manual E
15
01.12.2003, 11:01 Uhr
Trouble shooting
If You Suspect Something Wrong Immediately switch power off. Do not use the unit in abnormal condition, for example without sound, or with
smoke or foul smell can cause fire or electric shock, Immediately stop using it and call the store where you purchased it. Never try to repair the
unit yourself be cause it is dangerous to do so.
Radio
General
No power or
no sound
Car's engine switch is not on.
Turn your car's key to ACC or ON.
Cable is not correctly connected.
Check connection.
Fuse is burnt. Replace fuse.
Check volume or mute on / off.
no sound.
Disc sound skips,
tone quality is low.
Disc is upside down.
Place disc in the correct direction,
and the label side up.
Disc is dirty or damaged
Clean disc or change another disc.
Disc is dirty or damaged.
Clean CD or change another CD.
o
Sound skips due
to vibration.
Station is too far, or signals are too weak.
Select other stations of higher signal level.
Preset station
is reset.
Battery cable is not correctly connected.
Connect the battery cable to the
terminal that is always under current.
Error Display Messages
Disc
Disc is inside but
Much noise in
broadcasts
Mounting angle is over 30 .
o
Adjust mounting angle to less than 30 .
Instable mounting.
Mount the unit securely with the
mounting parts.
Disc is not CD or contains no MP3 files
Disc upside down
MP3 error, check the disc.
Disc mechanism error
Press
button to eject the disc.
In case that the disc cannot be
ejected by pressing
button,
press the RESET switch and press
the
button again.
If still not ejecting consult your
dealer.
16
ZE-30MP3 Manual E
16
01.12.2003, 11:01 Uhr
Safety Information
Contents
PRECAUTIONS
Safety Information.............................Page1
Use only in a 12-volt DC negative-ground electrical system.
Disconnect the vehicle's negative battery terminal while mounting and connecting the unit.
When replacing the fuse, be sure to use one with an identical amperage rating.
Using a fuse with a higher amperage rating may cause serious damage to the unit.
DO NOT attempt to disassemble the unit. Laser beams from the optical pickup are dangerous to the eyes.
Make sure that pins or other objects do not get inside the unit; they may cause malfunctions,
or create safety hazards such as electrical shock or laser beam exposure.
If you have parked the car for a long time in hot or cold weather, wait until the temperature
in the car become normal before operating the unit.
Keep the volume at a level at which you can hear outside warning sounds (horns sirens, etc.).
Remote Controls (optional).......................3
Button Tips................................................4
Menu Function (No RDS)...........................5
MP3 Playback ..........................................6
MP3 Overview ..........................................7
RDS (optional)...........................................8
RDS (continued)........................................9
CD Notes
RDS (continued)......................................10
Playing a defective or dusty CD can cause dropouts in sound.
Hold CDs as illustrated.
DO NOT touch the unlabeled side.
DO NOT attach any seal, label or data protection sheet to either side of a disc.
DO NOT expose a CD to direct sunlight or excessive heat.
Wipe a dirty CD from the center outward with a cleaning cloth.
Never use solvents such as benzine or alcohol.
This unit cannot play 3-inch ( 8cm ) CDs.
NEVER insert a 3-inch CD contained in the adapter or an irregularly shaped CD.
The unit may not be able to eject it, resulting in a malfunction.
RDS Menu Function.................................11
RDS Menu Function (continued)..............12
Electrical Connections.............................13
Installation Guide....................................14
Anti-Theft System....................................15
Trouble Shooting.....................................16
Specifications.........................................33
Before operation
DO NOT raise the volume level too much, as this will block outside sounds, making driving dangerous.
Stop the car before performing any complicated operation.
CAUTION
DO NOT open covers and do not repair by yourself. Consult the dealer or an experienced technician for help.
ZE-30MP3 Manual E
Panel Controls...........................................2
17
Warranty.................................................34
* In addition to ordinary CDs, this unit can play
back a CD - R or CD - RW.
01.12.2003, 11:01 Uhr
Sicherheitshinweise
Inhalt
Vorsichtsmassnahmen
• Das Gerät ist für den Betrieb an einer 12V Stromversorgung mit minus gegen Masse gedacht.
• Entfernen Sie die Batteriemasse, bevor das Gerät installiert und angeschlossen wird.
• Wenn die Gerätesicherung ersetzt werden muss, achten Sie auf identischen Ampere Wert.
Die Verwendung einer Sicherung mit höherem Wert kann zu Defekten am Gerät führen.
• Versuchen Sie niemals, das Gerät zu zerlegen! Der Diodenlaser ist gefährlich für die Augen!
• Stellen Sie sicher, dass keine Fremdobjekte ins Gerät gelangen, diese könnten die Funktion stören, oder gar
das Headunit beschädigen.
• Wenn das Fahrzeug lange geparkt war – in kalter oder heisser Umgebung – lassen Sie den Inneraum dementsprechend
abkühlen oder aufheizen, bevor das Gerät in Betrieb genommen wird.
• Halten Sie die Wiedergabelautstärke in einem Bereich, der es zulässt die Umgebungsgeräusche wahrzunehmen
(Hupen, oder Martinshorn von Polizei und Krankenwagen/Feuerwehr).
Bemerkungen zu CD Disks
•
•
•
•
•
•
•
•
•
Das Abspielen von dreckigen oder beschädigten CD’s kann zu Ton-Aussetzern führen.
Halten sie CD’s wie nebenan abgebildet.
Die ungelabelte Seite sollte nicht berührt werden!
Bringen Sie keine Sticker o.ä. auf keiner der beiden Seiten einer CD an. Dies führt zu einer
Unwucht, welche das Laufwerk oder die CD beschädigen kann.
Setzten Sie CD’s nicht extremen Temperaturen (Hitze) oder direktem Sonnenlicht aus.
Reinigen Sie eine dreckige CD durch wischen von innen nach aussen – niemals kreisförmig!
Verwenden Sier keine Reinigungsmittel wie Alkohol, Benzin etc. zur Reinigung.
Dieses Gerät kann 3“ (75mm) Single-CD’s nicht abspielen
Verwenden Sie auch keine 3“ Single-CD’s mit entsprechendem Adapter!
Sicherheitshinweise
Frontpanel Bedienung
3
Fernbedienung
4
Bedientipps
5
MP3 Wiedergabe
6
MP3 Überblick & Info’s
7
RDS
8
RDS (Fortsetzung)
9
RDS (Fortsetzung)
10
RDS Menu Funktionen Teil 1
11
RDS Menu Funktionen Teil 2
12
Elektrischer Anschluss
13
Montage
14
Diebstahlschutz
15
Störungsbehebung
16
Spezifikationen
33
Garantiebestimmungen
35
Vor Inbetriebnahme
• Halten Sie die Wiedergabelautstärke in einem sinnvollen Bereich, Sie gefährden sonst sich selbst und andere Verkehrsteilnehmer.
• Halten Sie das Fahrzeug an, um kompliziertere Einstellungen am Gerät vorzunehmen.
2
ZE-30MP3 Manual D
2
01.12.2003, 21:37 Uhr
Seite 2
Frontpanel Bedienung
Power on: Drücken Sie eine beliebige Taste ausser der @ und ` um das Gerät einzuschalten.
Drücken um einen abgespeicherten
Sender anzuwählen. Länger als 2 Sek.
drücken um einen Sender zu speichern
Radio
Traffic Announcements Identification
Radio Tune
Radio Preset
Disc Play
wenn Disk geladen
Track Seek
Remote Sensor
Panel Open / Close
Disk Auswurf
Länger als 2 Sek. drücken ➞ Mute
EJ
DN
Knopf drehen um
Lautstärke einzustellen
VOL
TA
UP
Drücken um VOL/BAS/
TRE/BAL/FAD zu wählen.
Einstellung mit Vol-Drehknopf
BAND
SRC
TOP
DISP
1
INT
RPT
RDM
2
3
4
PWR
MUTE
Länger als 2 Sek. drücken
➞ Power off
PTY
1 x drücken für Musik Typ
2 x drücken für SPRACHE Typ
SEARCH
5
6
PUSH SEL / MENU
COMPACT
AMS
AF
DIGITAL AUDIO
Reset
Länger als 2 Sek. drücken
➞ Menü Modus
F M1
F M2
F M3
MW1
MW2
M P3 track+10 up
M P3 track-10 down
Track Random play
Track Repeat play
Band Umschaltung
Alternative Frequenz Liste
Intro play(10sec)
MP3 Track / File Suche
Play / Pause
Top play ( press
more than 2 sec.)
Display switch
AMS
Radio Preset scan
Radio Auto preset
SUCHE
M P3 track / file search
Disc Playback
3
ZE-30MP3 Manual D
3
01.12.2003, 21:37 Uhr
Frontpanel Bedienung
Drücken Sie eine beliebige Taste auf der Fernbedienung.
Radio Tune
Volume
Radio
Track Seek
Power on/off
Disk Play
(wenn Disk geladen)
Mute
Aux-in (optional)
Drücken um VOL/BAS/TRE/
BAL/FAD zu wählen. Einstellung mit VOL-Drehknopf
SRC
AMS
SEL
AMS
SUCHE
MENU
SEARCH
MUTE
Radio Auto Preset
VOL
Länger als 2 Sek. gedrückt
halten ➞ Menü Modus
Traffic Announcements
Identification
TA
Play / Pause
Länger als 2 Sek.
drücken
Disc Playback
Radio Preset
1-6
Intro play (10 Sek.)
Drücken um gespeicherte Sender
anzuwählen. Taste
länger als 2 Sek.
gedrückt halten
um Sender abzuspeichern
Track Repeat Play
Track Random Play
1
/ TOP
AF/REG
PTY
BAND
2
INT
3
RPT
4
RDM
5
6
DISP
4
MP3 Track / File Suche
Band Umschaltung
F M1
F M2
F M3
Display Umschaltung
Programm Typ
Alternative Frequenz Liste
Region
4
ZE-30MP3 Manual D
Radio Preset scan
01.12.2003, 21:37 Uhr
MW1
MW2
Bedientipps
Disk Laden / Auswerfen
CD Laden: Drücken Sie ` um die Bedienfront zu senken. Führen Sie die Disk in den CD-Einzug ein.
CD Auswerfen: Drücken Sie @ um die Disk auszuwerfen. Drücken Sie ` um die Bedienfront zu
schliessen. Schliessen Sie die Bedienfront NIEMALS bevor nicht die DISK entnommen wurde.
Keine rohen Kräfte am
Bedienpanel walten
lassen, es könnte sonst
beschädigt werden.
Radio: Automatische Sendereinstellung: Drücken Sie die Taste ` länger als 0.5 Sekunden, um
den nächsten Sender per Sendersuchlauf zu finden.
CD-Wiedergabe: Titelsprung: Drücken Sie die Taste kurz, um Titel vor oder zurück zu springen.
Titelsuche: Drücken Sie die Taste länger als 0.5 Sekunden um vor- oder zurückzuspulen.
AMS: Auto Memory Store (Automatische Senderspeicherung)
Drücken Sie die Taste AMS kurz um die angespeicherten Sender ➀ – ➅ jeweils 5 Sekunden anzuspielen.
Drücken und halten Sie die Taste mehr als 2 Sekunden, um die 6 besten empfangbaren Stationen direkt
auf dem gewählten Band und den sechs Stationstasten abzuspeichern.
AMS
Einstellung Uhrzeit:
Drücken Sie die Taste DISP – die Uhrzeit wird angezeigt. Drücken anschliessend gleich nochmals diese
Taste für mehr als 2 Sekunden, die Zeitanzeige beginnt zu blinken. Durch linksdrehen des VOL-Drehknopfes
verstellen Sie die Minuten, durch rechstdrehen die Stunden.
DN
DISP
VOL
UP
5
ZE-30MP3 Manual D
5
01.12.2003, 21:37 Uhr
MP3(Fortsetzung)
Wiedergabe
RDS
Während der Wiedergabe einer MP3 Disk kann der Order/File Name und die ID3 Tag Info (Song Titel,
Album Type)
und Künstler) über das Display als Laufschrift wiedergegeben werden.
PTY Empfang (Program
ALBUM
MUSIC
ARTIST
MP3
Elapsed playing time & track number ➞Folder name & number ➞File name & number ➞Song title ➞Album title ➞Artist name
UKW Sender mit RDS Kennung enthalten eine PTY Information.
Zum Beispiel: News, Rock, Info, Sport, etc.
PTY Type Preset
Drücken Sie PTY einmal um den MUSIK Typ einzuMP3 Titelsuche
geben, oder 2 mal um den SPRACH Typ einzugeben.
cken SieSie
die die
AMPTY
S TaTaste
ste umum"Tdie
RACPTY
K SCFunktion
H" Modus anzuwählen.
PTY Modus:DrüDrücken
Benutzen Sie dann die Tasten 1 – 6 um den
n Sie die SEL Taste und das LCD-Display zeigt "001".
Drüc
zukeaktivieren.
gewünschten Programm Typ anhand der Liste
AMS
einzugeben.
WeDie
nn dvorangehende
ie gewünschtePTY
TiteAuswahl
lnummer wird
unterangezeigt
100 liegt,und
drehen sie den VOL-Drehknopf
MUSIK TYP
SPRACH TYP
umgesucht,
die erstewenn
Zahl zwährend
u wählen2uSekunden
nd drückenkeine
Sie dTaste
en VOL-Knopf erneut umPRESET
an- NO .
NEWS
POP M
schgedrückt
liessend wird.
durch drehen die 10er Reihe einzustellen. Nun drücken Sie die 1SEL
AFFAIRS
ROCK M
INFO
Taste länger als 0.5 Sekunden um mit der Wiedergabe der gerade gewählten
SPORT
M. O. R. M
TiteWenn
lnummkeine
er zuPTY
begiInfo
nnenempfangen
.
EDUCATE
2
wird,
ALBUM
MUSIC
ARTIST
MP3
ALBUM
MUSIC
ARTIST
MP3
DN
LIGHT
VOL
UP
MP3 File Suche
Drücken Sie die AMS Taste zweimal um
in den "FILE SCH" Modus zu gelangen.
Drücken Sie die SEL Taste und drehen
Sie den VOL-Drehknopf um den Ordner
auszuwählen
DRAMA
5
ALBUM
MUSIC
ARTIST
MP3
NATIONAL
6
M
SOCIAL
RELIGION
Wenn Sie nur Songs vom OLDIES
gewählMten Ordner spPHONE
ielenINwollen,
drücken Sie d6ie SEL Taste lFOLK
ängerM als 0.5 SekunTRAVEL
den.
HOBBIES
Die Wiedergabe beginnt mit SFOLK
ong 1 in dem ODOCUMENT
rdner.
Wenn Sie im Ordner einen anderen Song spielen wollen, drücken
Sie die SEL Taste und drehen den VOL-Knopf bis zum gewünschten
Track. Ein nochmaliger Druck auf die SEL Taste wählt den
gewünschten Song an.
6
10
ZE-30MP3 Manual D
M
zeigt das LCD-Display „NO PTY“ an.
CULTLURE
ie ersteM Zahl zu wäSCIENCE
hlen und drücken
Wenn die gewünschte Titelnummer über 100 liegt, drehen sie den VOL-Dre3hknopf um dCLASSIC
VARIEDdrücken Sie
Sie den VOL-Knopf erneut um zu bestätigen. Durch drehen vom VOL-Knopf stellen Sie dOTHER
ie 10eMr Reihe ein, nun
WEATHER
SEL um zu bestätigen. Nun drehen Sie den Knopf um die 100er Reihe einzu4 stellen. DrücJAZZ
ken SMie die SEL TaFINANCE
ste länger als
COUNTRY M
CHILDREN
0.5 Sekunden um mit der Wiedergabe der gewählten Titelnummer zu beginnen.
01.12.2003, 21:37 Uhr
R
DS M
enü (Teil &
1)Info's
MP3
Überblick
Bemerkungen zu MP3
• MP3 ist die Abkürzung für
DrMPEG
ücken Audio
Sie deLayer
n VOL3-Dund
rehkbeschreibt
nopf für mein
ehrDatenkompresionsverfahren.
als 2 Sekunden um in den Menü-Modus zu gelangen,
• Dieses Gerät ermöglicht die Wiedergabe von
MP3
Files
von
CD-ROM,
dann bewirkt jedes weitere CD-R
drückeoder
n dieCD-RW
AnwahDisks.
l folgender Modi:
• Das Gerät kann Files lesen, die mit dem ISO 9660 Format geschrieben wurden. Das Gerät kann Datenfiles die mit „Packet Write“ Verfahren auf Disk
TA Mode d MASK Mode d DSP Mode d LOUD ON / OFF Mode d BEEP ON / OFF Mode
gebrannt wurden nicht lesen!
VOL Mode j LOCAL / DX Mode j ST / MO Mode j SEEK 1/2 Mode
• Das Gerät kann MP3 Files mit einer anderen File-Extension wie *MP3 nicht lesen.
• Wenn Files mit anderem Inhalt aber *MP3 File Extension dem Gerät gefüttert werden, hören Sie nur Lärm!
• In diesem Manual werden für MP3 die Namenskonventionen File und Ordner verwendet, gemäss PC Terminologie entspricht dies Track und Album.
• Die maximale Anzahl Directories (Ordner) ist 8, einschliesslich des Root Directories. Die Maximale Anzahl Files pro Disk beträgt 256.
• Das Gerät spielt eventuell nicht alle Tracks in der Reihenfolge der Track-Nummern.
TA Modus: Drücken Sie die Taste SEL MENU länger als 2 Sekunden um ins Menu zu gelangen.
• Wenn eine gebrannte Disk Audio (*wav) Tracks und MP3 Tracks enthält, werden nur die Audio Tracks abgespielt!
Drehen Sie den VOL-Drehknopf um TA ALARM oder TA SEEK Modus auszuwählen.
• Für MP3 Files, die mit 8kBPS oder im VBR Format („Variable Bit Rate“) encodiert wurden, kann es sein, das die Intro Funktion und auch die Anzeige
Wenn TA aktiviert ist und keiner der Sender TA informationen beinhaltet zeigt das LCD-Display
der verstrichenen Spielzeit nicht korrekt wiedergegeben werden.
NO TA/TP an.
DN
VOL
UP
Hinweise zur Herstellung eigener MP3 Disks auf CD-R oder CD-RW Datenträgern
•
•
•
•
•
•
Um eine gute Klangqualität zu erreichen, sollten die Audio Files mit mindestens 128 kbps und 44.1 kHz encodiert werden.
Brennen Sie niemals mehr als 256 MP3 Files pro Disk.
Beachten Sie für volle ISO 9660 Kompatibilität: Die maximal zulässige Anzahl Ordner ist 8 einschliesslich des Hauptordners.
Es können nur „finalisierte“ CD-R Disks wiedergegeben werden.
Beim Brennen von MP3 Disks ist das „Datenformat“ zu wählen – und nicht „Audioformat“.
Vermeiden Sie das hinzufügen von leeren Ordnern beim Brennen von Disks – und beachten Sie auch, dass ALLE Files auf der Disk MP3 Files sind.
Ist dies nicht der M
Fall,
ASKMP3
DPITracks
Modusführen.
:
ASkann
K Modie
duszu
: sehr langen AnwählzeitenMder
• Verwenden Sie nur
beim Brennen – worauf die Wiedergabe der
Nur Disks
die Altführen
ernativzu
-Freiner
equensehr
zen hohen
mit andFehlerrate
erer
Drgute
ückenCD-R
Sie d/ iCD-RW
e SEL MDisks.
ENU Viele No-Name
Disk entweder garTanicht
funktioniert
–
oder
nur
mit
schlechtem
Klang
und
Aussetztern.
Programmidentifikation werden maskiert.
ste länger als 2 Sek. um
• Bis zu 16 Zeichenineines
Namens
das M
enu zu des
gelaAlbums
ngen. oder des Tracks können bei jedem Song angezeigt werden. Bedingung hierfür sind Files mit ID3Tag mit
Version 1.x
MASK ALL Modus: Die Alternativ-Frequenzen mit
Drehen Sie nun den VOL-Knopf
• Beachten Sie, dass
dieses
Gerät
eventuell
die
Tracks
nicht
ainndexakt
erer Pder
rogReihenfolge
rammidentispielt,
fikationwie
unsie
d ohauf
ne die
RDDisk
S gebrannt wurden.
um MASK DPI oder MASK ALL
Information werden maskiert.
auszuwählen.
ALBUM
ALBUM
MUSIC
MUSIC
ARTIST
ARTIST
ALBUM
MUSIC
ARTIST
DN
VOL
UP
ALBUM
MUSIC
ARTIST
11
7
ZE-30MP3 Manual D
7
01.12.2003, 21:38 Uhr
RDS (Radio Data System)
Die RDS Empfangssituation variiert je nach Empfangsgebiet. Wenn sich in Ihrem Empfangsgebiet keine RDS Sender befinden, können
Sie auch die im nachfolgenden beschriebenen RDS Funktionen nicht nutzen.
RDS Basisfunktionen
AF (Alternativ Frequenz-Liste): Wenn der Empfang eines Senders schlecht ist, wechselt der Tuner auf eine Alternativ-Frequenz, auf
welcher das gleiche Programm ausgestrahlt wird.
PS Display: Anstelle der Empfangsfrequenz wird der Sendername angezeigt.
ALBUM
MUSIC
AF Modus:
Drücken Sie die Taste nur kurz, um die AF Funktion an- oder auszuschalten.
Das AF Icon im LCD Display blinkt, bis RDS Information empfangen wird.
REG Modus:
Drücken Sie die Taste über eine Sekunde, um den REG Modus an- oder auszuschalten.
REG ON:
REG OFF:
Die Empfangsfrequenz wird nur gewechselt für Sender in der Region
Die Empfangsfrequenz wird auch für Sender ausserhalb gewechselt.
ARTIST
ALBUM
MUSIC
ARTIST
ALBUM
MUSIC
ARTIST
Mit aktiviertem AF bei UKW Empfang beschränken sich alle Funktionen (suchen etc.) auf RDS Sender!
CT Service - Clock Time (Uhrzeit)
Beim Empfang eines RDS Senders wird die eingebaute Uhr automatisch abgeglichen. In Gegenden
wo CT via RDS Sender nicht empfangen wird, wird auf dem LCD-Display „NO CT“ angezeigt.
8
ZE-30MP3 Manual D
8
01.12.2003, 21:38 Uhr
EON
ALBUM
MUSIC
ARTIST
RDS (Fortsetzung)
Traffic Announcements (Verkehrsdurchsagen)
Einige RDS-UKW Sender übertragen
wiederholt Verkehrsinfos.
TP ( Traffic Program Identification)
Die Durchsage von Verkehrsinfo’s.
TA (Traffic Announcements Identification)
Radiodurchsagen von Verkehrsinfo’s.
TA Modus: Drücken Sie die TA Taste um die TA Funktion zu aktivieren oder deaktivieren.
Die aktivierte TA Funktion wird durch das leuchtende TA Icon im LCD Display angezeigt.
Bei aktiviertem TA beginnt die Durchsage mit einer Lautstärke von 20, auch wenn der
eingestellte Level unter 20 liegt.
Nach der Durchsage kehrt der Lautstärkelevel wieder auf den vorherigen Wert zurück.
Bei aktivierter TA Funktion können die Funktionen SEEK, SCAN, AMS verwendet/empfangen/gespeichert werden,
wenn der TP Code empfangen wird.
TA Modus: Drücken Sie die Taste SEL MENU länger als 2 Sekunden um ins Menu zu gelangen.
ALBUM
MUSIC
ARTIST
EON (Enhanced Other Networks)
Wenn EON Daten empfangen werden, blinkt der EON Indikator im LCD-Display und die TA und AF Funktionen werden wie folgt erweitert:
TA: Verkehrsdurchsagen vom gegenwärtigen und auch anderen Sendern können empfangen werden.
AF: Die AF Senderliste wird durch die EON Daten ergänzt. EON ermöglicht dem Tuner die Ausweitung der RDS Funktionen.
D.h. die gespeicherten Sender werden laufend auf dem aktuellesten Stand gehalten (AF Liste) einschliesslich des gerade
wiedergegebenen Senders.
Wenn Sie z.B. einen Sender in Ihrem Empfangsgebiet abgespeichert haben, sucht der Tuner auch ausserhalb den gleichen Sender auf
einer anderen Empfangsfrequenz etc.
9
ZE-30MP3 Manual D
9
01.12.2003, 21:38 Uhr
MP3(Fortsetzung)
Wiedergabe
RDS
Während der Wiedergabe einer MP3 Disk kann der Order/File Name und die ID3 Tag Info (Song Titel,
Album Type)
und Künstler) über das Display als Laufschrift wiedergegeben werden.
PTY Empfang (Program
ALBUM
MUSIC
ARTIST
MP3
Elapsed playing time & track number ➞Folder name & number ➞File name & number ➞Song title ➞Album title ➞Artist name
UKW Sender mit RDS Kennung enthalten eine PTY Information.
Zum Beispiel: News, Rock, Info, Sport, etc.
PTY Type Preset
Drücken Sie PTY einmal um den MUSIK Typ einzuMP3 Titelsuche
geben, oder 2 mal um den SPRACH Typ einzugeben.
cken SieSie
die die
AMPTY
S TaTaste
ste umum"Tdie
RACPTY
K SCFunktion
H" Modus anzuwählen.
PTY Modus:DrüDrücken
Benutzen Sie dann die Tasten 1 – 6 um den
n Sie die SEL Taste und das LCD-Display zeigt "001".
Drüc
zukeaktivieren.
gewünschten Programm Typ anhand der Liste
AMS
einzugeben.
WeDie
nn dvorangehende
ie gewünschtePTY
TiteAuswahl
lnummer wird
unterangezeigt
100 liegt,und
drehen sie den VOL-Drehknopf
MUSIK TYP
SPRACH TYP
umgesucht,
die erstewenn
Zahl zwährend
u wählen2uSekunden
nd drückenkeine
Sie dTaste
en VOL-Knopf erneut umPRESET
an- NO .
NEWS
POP M
schgedrückt
liessend wird.
durch drehen die 10er Reihe einzustellen. Nun drücken Sie die 1SEL
AFFAIRS
ROCK M
INFO
Taste länger als 0.5 Sekunden um mit der Wiedergabe der gerade gewählten
SPORT
M. O. R. M
TiteWenn
lnummkeine
er zuPTY
begiInfo
nnenempfangen
.
EDUCATE
2
wird,
ALBUM
MUSIC
ARTIST
MP3
ALBUM
MUSIC
ARTIST
MP3
DN
LIGHT
VOL
UP
MP3 File Suche
Drücken Sie die AMS Taste zweimal um
in den "FILE SCH" Modus zu gelangen.
Drücken Sie die SEL Taste und drehen
Sie den VOL-Drehknopf um den Ordner
auszuwählen
DRAMA
5
ALBUM
MUSIC
ARTIST
MP3
NATIONAL
10
M
SOCIAL
RELIGION
Wenn Sie nur Songs vom OLDIES
gewählMten Ordner spPHONE
ielenINwollen,
drücken Sie d6ie SEL Taste lFOLK
ängerM als 0.5 SekunTRAVEL
den.
HOBBIES
Die Wiedergabe beginnt mit SFOLK
ong 1 in dem ODOCUMENT
rdner.
Wenn Sie im Ordner einen anderen Song spielen wollen, drücken
Sie die SEL Taste und drehen den VOL-Knopf bis zum gewünschten
Track. Ein nochmaliger Druck auf die SEL Taste wählt den
gewünschten Song an.
6
10
ZE-30MP3 Manual D
M
zeigt das LCD-Display „NO PTY“ an.
CULTLURE
ie ersteM Zahl zu wäSCIENCE
hlen und drücken
Wenn die gewünschte Titelnummer über 100 liegt, drehen sie den VOL-Dre3hknopf um dCLASSIC
VARIEDdrücken Sie
Sie den VOL-Knopf erneut um zu bestätigen. Durch drehen vom VOL-Knopf stellen Sie dOTHER
ie 10eMr Reihe ein, nun
WEATHER
SEL um zu bestätigen. Nun drehen Sie den Knopf um die 100er Reihe einzu4 stellen. DrücJAZZ
ken SMie die SEL TaFINANCE
ste länger als
COUNTRY M
CHILDREN
0.5 Sekunden um mit der Wiedergabe der gewählten Titelnummer zu beginnen.
01.12.2003, 21:38 Uhr
R
DS M
enü (Teil &
1)Info's
MP3
Überblick
Bemerkungen zu MP3
• MP3 ist die Abkürzung für
DrMPEG
ücken Audio
Sie deLayer
n VOL3-Dund
rehkbeschreibt
nopf für mein
ehrDatenkompresionsverfahren.
als 2 Sekunden um in den Menü-Modus zu gelangen,
• Dieses Gerät ermöglicht die Wiedergabe von
MP3
Files
von
CD-ROM,
dann bewirkt jedes weitere CD-R
drückeoder
n dieCD-RW
AnwahDisks.
l folgender Modi:
• Das Gerät kann Files lesen, die mit dem ISO 9660 Format geschrieben wurden. Das Gerät kann Datenfiles die mit „Packet Write“ Verfahren auf Disk
TA Mode d MASK Mode d DSP Mode d LOUD ON / OFF Mode d BEEP ON / OFF Mode
gebrannt wurden nicht lesen!
VOL Mode j LOCAL / DX Mode j ST / MO Mode j SEEK 1/2 Mode
• Das Gerät kann MP3 Files mit einer anderen File-Extension wie *MP3 nicht lesen.
• Wenn Files mit anderem Inhalt aber *MP3 File Extension dem Gerät gefüttert werden, hören Sie nur Lärm!
• In diesem Manual werden für MP3 die Namenskonventionen File und Ordner verwendet, gemäss PC Terminologie entspricht dies Track und Album.
• Die maximale Anzahl Directories (Ordner) ist 8, einschliesslich des Root Directories. Die Maximale Anzahl Files pro Disk beträgt 256.
• Das Gerät spielt eventuell nicht alle Tracks in der Reihenfolge der Track-Nummern.
TA Modus: Drücken Sie die Taste SEL MENU länger als 2 Sekunden um ins Menu zu gelangen.
• Wenn eine gebrannte Disk Audio (*wav) Tracks und MP3 Tracks enthält, werden nur die Audio Tracks abgespielt!
Drehen Sie den VOL-Drehknopf um TA ALARM oder TA SEEK Modus auszuwählen.
• Für MP3 Files, die mit 8kBPS oder im VBR Format („Variable Bit Rate“) encodiert wurden, kann es sein, das die Intro Funktion und auch die Anzeige
Wenn TA aktiviert ist und keiner der Sender TA informationen beinhaltet zeigt das LCD-Display
der verstrichenen Spielzeit nicht korrekt wiedergegeben werden.
NO TA/TP an.
DN
VOL
UP
Hinweise zur Herstellung eigener MP3 Disks auf CD-R oder CD-RW Datenträgern
•
•
•
•
•
•
Um eine gute Klangqualität zu erreichen, sollten die Audio Files mit mindestens 128 kbps und 44.1 kHz encodiert werden.
Brennen Sie niemals mehr als 256 MP3 Files pro Disk.
Beachten Sie für volle ISO 9660 Kompatibilität: Die maximal zulässige Anzahl Ordner ist 8 einschliesslich des Hauptordners.
Es können nur „finalisierte“ CD-R Disks wiedergegeben werden.
Beim Brennen von MP3 Disks ist das „Datenformat“ zu wählen – und nicht „Audioformat“.
Vermeiden Sie das hinzufügen von leeren Ordnern beim Brennen von Disks – und beachten Sie auch, dass ALLE Files auf der Disk MP3 Files sind.
Ist dies nicht der M
Fall,
ASKMP3
DPITracks
Modusführen.
:
ASkann
K Modie
duszu
: sehr langen AnwählzeitenMder
• Verwenden Sie nur
beim Brennen – worauf die Wiedergabe der
Nur Disks
die Altführen
ernativzu
-Freiner
equensehr
zen hohen
mit andFehlerrate
erer
Drgute
ückenCD-R
Sie d/ iCD-RW
e SEL MDisks.
ENU Viele No-Name
Disk entweder garTanicht
funktioniert
–
oder
nur
mit
schlechtem
Klang
und
Aussetztern.
Programmidentifikation werden maskiert.
ste länger als 2 Sek. um
• Bis zu 16 Zeichenineines
Namens
das M
enu zu des
gelaAlbums
ngen. oder des Tracks können bei jedem Song angezeigt werden. Bedingung hierfür sind Files mit ID3Tag mit
Version 1.x
MASK ALL Modus: Die Alternativ-Frequenzen mit
Drehen Sie nun den VOL-Knopf
• Beachten Sie, dass
dieses
Gerät
eventuell
die
Tracks
nicht
ainndexakt
erer Pder
rogReihenfolge
rammidentispielt,
fikationwie
unsie
d ohauf
ne die
RDDisk
S gebrannt wurden.
um MASK DPI oder MASK ALL
Information werden maskiert.
auszuwählen.
ALBUM
ALBUM
MUSIC
MUSIC
ARTIST
ARTIST
ALBUM
MUSIC
ARTIST
DN
VOL
UP
ALBUM
MUSIC
ARTIST
11
7
ZE-30MP3 Manual D
11
01.12.2003, 21:38 Uhr
Bedientipps
R
DS Menü (Teil 2)
DSP Modus: Drehen Sie den VOL-Drehknopf
POP
ROCK
CLASSICKeineFLAT
DSP OFF
rohen Kräfte
am
u
m den gewünschten DSP Soundeffekt auszuwählen.
Disk Laden / Auswerfen
Bedienpanel
walten
CD Laden: Drücken Sie ` um die Bedienfront zu senken. Führen Sie die Disk in den CD-Einzug ein.
hen Sie dSendereinstellung:
en VOL-DrehknopfDrücken
um LOUsie
D adie
n oTaste
der au`
s znur
u wählen (Loudness).lassen, es könnte sonst
LOUSie
D M@
odRadio:
us: DreManuelle
CD Auswerfen: Drücken
beschädigt werden.
kurz, um die Frequenz manuell zu verstellen.
BEEP ON / OFF Modus: Drehen Sie den VOL-Drehknopf um Beep an oder aus zu wählen (Tastenbeep).
DN
VOL
UP
tellen.
SEEKAutomatische
1 / 2 Modus: Sendereinstellung:
Drehen Sie den VOLDrücken
-DrehknSie
opf die
um Taste
den S`
uchlänger
modusals
de0.5
s TuSekunden,
ners einzusum
Radio:
EK 1: Dper
ie SSendersuchlauf
endersuche stozu
ppfinden.
t an der nächsten empfangbaren Station.
den nächstenSESender
:
D
i
e
S
e
n
d
e
r
s
u
c
h
e
s
t
o
p
p
t sTaste
obald kurz,
die Taum
ste Titel
: ovor
der oder
9 lozurück
sgelasszu
enspringen.
wird
S
E
E
K
2
CD-Wiedergabe: Titelsprung: Drücken Sie die
nddie
derTaste
nächlänger
ste Senals
der0.5
emSekunden
pfangen wum
ird.vor- oder zurückzuspulen.
Titelsuche: Drücken uSie
ALBUM
MUSIC
ARTIST
LO/DX Modus: Drehen Sie den VOL-Drehknopf um die Empfangsempfindlichkeit des Tuners anzupassen. LO = Local, DX = Distant
AMS: Auto Memory Store (Automatische Senderspeicherung)
en Sikurz
e denum
VOdie
L-Dangespeicherten
rehknopf um UKW
stereo➀(S–T➅
) ojeweils
der mon5oSekunden
(MO) auszanzuspielen.
uwählen.
ST/MOSie
Modie
dusTaste
: DrehAMS
Sender
Drücken
Drücken und halten Sie die Taste mehr als 2 Sekunden, um die 6 besten empfangbaren Stationen direkt
auf dem gewählten Band und den sechs Stationstasten abzuspeichern.
VOL LAST / ADJ MODUS
Drehen Sie den VOL-Drehknopf um VOL LAST auszuwählen.
Das Gerät geht nun beim Einschalten auf den zuletzt
Einstellung Uhrzeit:
tellten LauDrücken
tstärkeweanschliessend
rt. Wählen Sie gleich
VOL Anochmals
DJ und diese
ingesangezeigt.
Drücken Sie die Taste DISP – die Uhrzeitewird
s
t
e
l
l
e
n
S
i
e
d
e
n
g
e
w
ü
n
s
c
h
t
e
n
L
a
u
t
s
t
ä
r
k
e
w
e
r
t
e
i
n
r gilt nun
Taste für mehr als 2 Sekunden, die Zeitanzeige beginnt zu blinken. Durch linksdrehen des, eVOL-Drehknopfes
b
e
i
j
e
d
e
m
E
i
n
s
c
h
a
l
t
e
n
d
e
s
G
e
r
ä
t
e
s
.
verstellen Sie die Minuten, durch rechstdrehen die Stunden.
ALBUM
ALBUM
MUSIC
MUSIC
ARTIST
ARTIST
12
4
ZE-30MP3 Manual D
AMS
12
01.12.2003, 21:38 Uhr
DN
DISP
VOL
UP
M
Elektrischer
enü-FunktiAnschluss
onen
Wiring Diagram
DN
VOL
Drücken Sie die den VOL-Drehknopf länger als 2 Sekunden um in das Geräte-Menu zu kommen.
Jeder Druck auf die Taste wechselt das Menu wie folgt:
DSP Modus ➞BEEP ON/OFF Modus ➞ SEEK 1 / 2 Modus (nur bei Tunerweidergabe) ➞ VOL LAST / ADJ Modus
UP
Fuse 15A
ALBUM
MUSIC
ARTIST
AntennaDSP Modus: Drehen Sie den VOL-Drehknopf um den gewünschten DSP Soundeffekt auszuwählen.
AT ➞ DSP OFF
POP ➞ ROCK ➞ CLASSIC ➞ FLConnector
Yellow
To car battery(+)
Continuous+12V DC
Ignition key
Red
Filter Box
BEEPDCON/OFF M
odus:
+12V
Black
rehen Sie den VOL-Drehknopf um die Beepfunktion der TasGround
ten anLead
- oder abzuschalten.
When D
ON/ACC
ALBUM
MUSIC
ARTIST
Motor/Electric Antenna relay control Lead
Amplifier relay control Lead
Blue
R(Red)
Line-out Gray
SEEK 1 / 2 Modus: Drehen Sie den VOL-Drehknopf um den Suchmodus des Tuners einzustellen.
gbaren Station.
SEEK 1: Die Sendersuche stoppt an der nächsten empfanPink
Tel. Mute
ird undBrown
der nächste
SEEK 2: Die Sendersuche stoppt sobald die Taste : oder 9 losgelasen wLine-out
Sender empfangen wird.
FRONT SP
White/Black Stripe
White
Gray/Black
VOL LAStripe
ST /
Gray
L(White)
ALBUM
MUSIC
ARTIST
R(Red)
L(White)
REAR SP
Green/Black
ModusStripe
:
Green Purple/Black
Purple
ADJUST
Stripe
(Links): Drehen Sie den VOL-Drehknopf um VOL LAST auszuwählen.
Das Gerät geht beim Einschalten auf den zuletzt eingestellten Lautstärkewert.
(Rechts): Drehen Sie den VOL-Drehknopf um VOL ADJ
auszuwählen. Stellen Sie den gewünschten Lautstärkewert
LefteSpeaker
Right
Right Speaker
in, gilt bei jedem
EinSpeaker
schalten des GeräLeft
tesSpeaker
.
ALBUM
ALBUM
MUSIC
MUSIC
ARTIST
ARTIST
(Front)
(Front)
(Rear)
(Rear)
13
5
ZE-30MP3 Manual D
13
01.12.2003, 21:38 Uhr
Frontpanel
Montage Bedienung
Power
on: Drücken Sie eine beliebige Taste ausser der @ und ` um das Gerät einzuschalten.
Installations-Prozedur
Führen Sie die Blechhalterung vom Gerät in den
Schliessen Sie erst die Installation ab, dann vergewissern Sie sich
DIN Schacht ein, und biegen Sie die Blechnochmals dass alle Verbindungen korrekt ausgeführt sind!
Reset
Drücken um einen abgespeicherten
Sender anzuwählen. Länger als 2 Sek.
drücken um einen Sender zu speichern
Radio
Drücken Sie mit einer feinen Spitze auf den Reset-Knopf
Disc Play
rechts
an der Bedienfront.
wennunten
Disk geladen
Radio Preset
laschen mit einem Schraubenzieher um – um
die Halterung im Schacht zu arretieren.
Traffic Announcements Identification
Stellen Sie sicher, dass der Arretierungshebel im Rahmen
Radio
Tune
vorstehen.
anliegt. Er sollte nicht in den Rahmen
Track Seek (
Verriegelung
Remote Sensor
Disk Auswurf
)
Panel Open / Close
Länger als 2 Sek. drücken ➞ Mute
EJ
DN
Anmerkung:
Gerätum
wird nun auf seine Default-Einstellungen
KnopfDas
drehen
VOL
zurückgesetzt.
Lautstärke
einzustellenEin Reset löscht auch die abgespeicherten
Sender und die Uhrzeiteinstellung!
TA
UP
Drücken um VOL/BAS/
TRE/BAL/FAD zu wählen.
Einstellung mit Vol-Drehknopf
BAND
SRC
TOP
DISP
1
INT
RPT
RDM
2
3
4
PWR
MUTE
Länger als 2 Sek. drücken
➞ Power off
PTY
1 x drücken für Musik Typ
2 x drücken für SPRACHE Typ
SEARCH
5
6
PUSH SEL / MENU
COMPACT
AMS
AF
DIGITAL AUDIO
Reset
Länger als 2 Sek. drücken
Montage-Öffnung
➞ Menü Modus
M P3 track+10 up
Montage-Bolzen
mit Gummipuffer
AMS
Radio Preset scan
Radio Auto preset
Sichern Sie das Gerät hinten (optional), nach Anschluss
der ISO-Stecker. Der Montage-Stehbolzen hinten am Gerät kann
SUCHE
M P3 track / file search
mit einem Gummipuffer ausgestattet werden – der je nach
Fahrzeug in ein Loch hinten im DIN-Schacht passt.
Stecken Sie den Frontabdeckrahmen aus Kunststoff auf
das Gerät auf. Beachten Sie hierbei, dass der Rahmen nur in
14
2
ZE-30MP3 Manual D
Disc Playback
M P3 track-10 down
Dieses Gerät kann in jedem Fahrzeug
MW1
F M2welches
F M3 über
montiertF M1
werden,
einenMW2
1-DIN Schacht verfügt (siehe Abb.).
Track Random play
Band Umschaltung
Track Repeat play
183mm
Alternative Frequenz Liste
Intro play(10sec)
52mm
M P3 Track / File Suche
Play / Pause
Top play ( press
more than 2 sec.)
Display switch
einer Richtung einrastet (wegen der Clips am Rahmen).
14
01.12.2003, 21:39 Uhr
Frontpanel
Bedienung
Diebstahlschutz
Dieses Gerät
ist mit
einem Taste
motorisch
absenkbarem
und abnehmbaren Bedienteil ausgestattet.
Drücken
Sie eine
beliebige
auf der
Fernbedienung.
Die Bedienfront kann zum Schutz gegen Diebstahl abgenommen werden.
Radio Tune
Volume
Entfernen vom Bedienteil
Drücken um VOL/BAS/TRE/
BAL/FAD zu wählen. EinAnbringenstellung
vommit
Bedienteil
VOL-Drehknopf
Disk Play
(wenn Disk geladen)
Aux-in (optional)
ERST
MUTE
1. Halten Sie das Bedienteil gemäss Abbildung rechts vor das Gerät – und setzen
Sie das
VOL
Panel gerade
auf2 die
Länger als
Sek.Front.
gedrückt
SEL
➞ Menü
Modusohne verkanten nach hinten, bis es hörbar einrastet.
2. Drücken halten
Sie das
Bedienteil
MENU
Traffic Announcements
TA
EntfernungIdentification
vom Headunit
AF/REG
PTY
SRC
Intro play(10 Sek.)
Drücken um gespeicherte Sender
anzuwählen. Taste
länger als 2 Sek.
gedrückt halten
um Sender abzuspeichern
Track Repeat Play
Track Random Play
6
AMS
Radio Preset scan
Radio Auto Preset
DANN
(ZE-30MP3 ONLY)
AMS
SUCHE
M P3 Track / File Suche
SEARCH
BAND
1. Entfernen Sie die Bedienfront und den Kunstoffrahmen.
Play / Pause
Disc Playback
1
4
2. Führen Sie
beide
in die Öffnungen
links und rechts vom
GerätINT2– bis sieRPT3 einrasten.
Länger
als T-Schlüssel
2 Sek.
/ TOP
RDM
Radio
Preset
3. Ziehen Sie das
Gerät raus.
drücken
1-6
5
Radio
Track Seek
1. Drücken Sie die `Power
Tasteon/off
um die Bedienfront abzusenken.
2. Drücken Sie die PWR Taste länger als 2 Sekunden, um das Gerät auszuschalten.
3. Ziehen Sie am linken äusseren Teil der Bedienfront und nun ziehen Sie rechts –
Mute
die Front löst sich. Später fährt der Motorarm automatisch in Gerät zurück.
4. Legen Sie das Bedienteil in seine Kunststoffhülle – und nehmen es mit.
DISP
Band Umschaltung
F M1
F M2
F M3
Display Umschaltung
Programm Typ
MW1
MW2
Alternative Frequenz Liste
Region
15
3
ZE-30MP3 Manual D
15
01.12.2003, 21:39 Uhr
Störungsbehebung
Wenn Sie einen Fehler vermuten, schalten Sie das Gerät unverzüglich aus! Verwenden Sie das Gerät nicht wenn etwas nicht zu stimmen
scheint (kein Ton am Ausgang, verbrannter Geruch, Rauchentwicklung). Gehen Sie unverzüglich zum Fachhändler wo das Gerät gekauft
wurde! Versuchen Sie nie, das Gerät selbst zu reparieren.
Radio
G en e rel l
Kein Strom
oder kein Ton
Zündung vom Fahrzeug ist aus.
Zündung einschalten!
Die Kabel sind nicht korrekt angeschlossen.
Verkabelung überprüfen!
Sicherung ist durchgebrannt.
Sicherung ersetzen!
Lautstärke und Mute ON/OFF überprüfen!
CD springt, Tonqualität schlecht
Wählen Sie einen anderen Sender!
ISO Stecker falsch belegt (Dauerplus!)
Disk verkehrt herum eingeführt.
Disk ist keine CD, oder enthält keine
MP3 Files.
Die Disk ist verschmutzt oder beschädigt.
Disk verkehrt herum zugeführt.
Disk richtig einführen Labelseite oben!
Disk reinigen oder ersetzen!
Die Disk ist verschmutzt oder beschädigt.
Disk reinigen oder ersetzen!
Befestigungswinkel ist grösser als 30°
Tonaussetzer
wegen
Vibration
Abgespeicherte
Stationen sind
gelöscht.
Station zu weit entfernt, Signal zu schwach.
Fehlercodes LCD-Anzeige
Disk
CD ist geladen
aber kein Ton
Starkes Hintergrundrauschen
Befestigungswinkel muss < als 30° sein!
Schlechte Befestigung.
Das Gerät muss sicher fixiert werden
mit dem Montagezubehör!
MP3 Fehler, Disk schlecht gebrannt.
Laufwerk-Fehler!
Drücken Sie die @ Taste um die Disk
auszuwerfen. Wenn die Disk nicht ausgeworfen wird, drücken Sie die Reset
Taste und versuchen Sie es erneut.
Wenn die Disk immer noch nicht ausgeworfen wird, konsultieren Sie Ihren
Händler.
16
ZE-30MP3 Manual D
16
01.12.2003, 21:40 Uhr
Specifications
Sicherheitshinweise
MW Radio
General
Vorsichtsmassnahmen
Power supply:
Inhalt
Frequency range:
522-1620 KHz
12V DC(11V-16V)
Sicherheitshinweise
Seite 1
• Das Gerät ist für den Betrieb an einer
Stromversorgung
mitground
minus gegen Masse gedacht.
Usable sensitivity(S/N=20dB): 30 dB
voltage
14.4V, negative
Test12V
Frontpanel
Bedienung
2
•
Entfernen
Sie
die
Batteriemasse,
bevor
das
Gerät
installiert
und
angeschlossen
wird.
Maximum power output:
45Wx4 channels
•
Wenn
die
Gerätesicherung
ersetzt
werden
muss,
achten
Sie
auf
identischem
Ampere
Wert.
3
Fernbedienung
Continuous power output:
20Wx4 channels (4Ω, 10% T.H.D.)
Die Verwendung einer Sicherung mit höherem Wert kann zu Defekten am Gerät führen.
Disc Player
Suitable
speaker impedance:
4-8 ohms
Bedientipps
4
• Versuchen Sie niemals, das Gerät zu zerlegen! Der Diodenlaser ist gefährlich für die Augen!
Disc digital audio system
System:
Pre-Amp output voltage:
4.0V ( CD play mode: 1KHz, 0 dB)
Menu Funktionen
5
• Stellen Sie sicher, dass keine Fremdobjekte ins Gerät gelangen, diese könnten die Funktion stören, oder gar
20Hz - 20kHz
Frequency response:
Fuse:
15A
das Headunit beschädigen.
MP3 Wiedergabe
6
>86 dB
Signal/noise ratio:
Dimensions(WxHxD)
178x50x155mm
• Wenn das Fahrzeug lange gepart war – in kalter oder heisser Umgebung – lassen Sie den Inneraum enentsprechend MP3 Überblick & Info’s
7
Less than 0.20%(1 kHz)
Total harmonic distortion:
Weight:
1.7kg
abkühlen oder aufheizen, bevor das
Gerät in Betrieb genommen wird.
Below measurable limits
Wow and flutter:
RDS
8
• Halten Sie die Wiedergabelautstärke in einem Bereich, der es zulässt die Umgebungsgeräsche wahrzunehmen
>60
dB
Channel
separation:
RDS
9
(Hupen, oder martinshorn von Polizei und Krankenwage/Feuerwehr).
Bemerkungen
CD Disks
FM StereozuRadio
Components
• Das Abspielen von dreckigen oder beschädigten CD’s kann zu Ton-Aussetzern führen.
Mounting collar
Frequency
87.5 - 108.0 MHz
• Halten sierange:
CD’s wie nebenan abgebildet.
Tapping screws M5x6mm
Usable
sensitivity: Seite sollte nicht berührt
8 dB werden!
• Die ungelabelte
Quieting
12 dBder beiden Seiten einer CD an. Dies führt zu einerMounting bolt (50mm)
• Bringensensitivity(S/N=50dB):
Sie keine Sticker o.ä. auf keiner
Wire connector
Frequency
response:
Unwucht, welche das Laufwerk oder30Hz-15kHz
die CD Beschädigen kann.
Removable face plate case
• Setzten
Sie CD’s nicht extremen Temperaturen
Stereo
separation:
30dB (1kHz)(Hitze) oder direktem Sonnenlicht aus.
Trim plate
• Reinigen
Sie eine
dreckige CD durch50dB
wischen von innen nach aussen – niemals kreisförmig!
Image
response
ratio:
T-key
• response
Verwendenratio:
Sier keine Reinigungsmittel
IF
70dBwie Alkohol, Bezin etc. zur Reinigung.
Operating
instructions
• Dieses Gerät
kann 3“ (75mm) Single-CD’s
55dB nicht abspielen
Signal/noise
ratio
Rubber cushion
• Verwenden Sie auch keine 3“ Single-CD’s mit entsprechendem Adapter!
Remote Control
RDS
10
RDS Menu Funktionen Teil1
RDS Menu Funktionen Teil12
Elektrischer Anschluss 4
1
Montage
1
Diebstahlschutz
1
Störungsbehebung
1
2
Spezifikationen
1
Garantie
1
*
1
11
12
13
14
15
16
33
34
Vor Inbetriebnahme
• Halten Sie die Wiedergabelautstärke in einem sinnvollen Bereich, Sie gefährden sonst sich selbst und andere Verkehrsteilnehmer.
Note:
Specifications
and the
design
are subject
to change am
without
due to improvements in technology.
• Halten
Sie das Fahrzeug
an, um
kompliziertere
Einstellungen
Gerät notice
vorzunehmen.
172
ZE-30MP3 Manual D
17
01.12.2003, 21:40 Uhr
ZE-30MP3 Manual D
18
01.12.2003, 21:40 Uhr
Warranty Conditions / Garantie
2 YEARS LIMITED WARRANTY
2 JAHRE GARANTIE
Dear customer
Sehr geehrter Kunde,
Thank you for purchasing this ZENEC product. It is advisable to keep the
original packing material for any future transporting of the product.
Should your ZENEC product require warranty service, please return it to the
retailer from whom it was purchased or the distributor in your country.
This ZENEC product is warranted against defective materials or workmanship
for a period of TWO years from date of purchase at retail.
Vielen Dank, dass Sie sich zum Kauf dieses Produktes von ZENEC entschlossen haben. Wir bitten Sie, die Originalverpackung aufzuheben, z.B. für
den Transport bei einem Garantiefall.
Wenn Sie Garantie-Leistungen für dieses ZENEC Produkt beanspruchen,
wenden Sie sich bitte direkt an den Händler, bei dem das Gerät gekauft
wurde.
Dieses ZENEC Produkt ist durch eine Werksgarantie von 2 Jahren ab Kaufdatum im Fachhandel gegen Material- oder Herstellungsfehler geschützt.
Warranty Limitations
This warranty does not cover any damage due to:
1. Improper installation, incorrect audio or mains connection(s).
2. Exposure to excessive humidity, fluids, heat sun rays or excessive dirt
or dust.
3. Accidents or abuse, unauthorized repair attempts and modifications not
explicitly authorized by the manufacturer.
This warranty is limited to the repair or the replacement of the defective
product at the manufacturer’s option and does not include any other form
of damage, whether incidental, consequential or otherwise. The warranty
does not cover any transport costs or damages caused by transport or
shipment of the product. Warranty work will not be carried out unless this
warranty certificate is presented fully completed with model, serial number,
purchaser’s address, purchasing date and dealer stamp together with the
original sales slip!
Garantie-Einschränkungen
Nicht unter Garantie fallen Schäden infolge von:
1. Unsachgemässem Einbau oder inkorrektem Audio- oder Stromanschluss.
2. Einwirkung von übermässiger Feuchtigkeit, Flüssigkeit, Hitze,
Sonneneinstrahlung oder starker Verschmutzung.
3. Mechanischer Beschädigung durch Unfall, Fall oder Stoss; Schäden
durch nicht autorisierte Reparaturversuche und/oder Modifikationen.
Die Garantie dieses Produkts bleibt in jedem Fall auf die Reparatur bzw. den
Ersatz (Entscheidung beim Hersteller) des ZENEC Produktes beschränkt.
Transportschäden und die Kosten des Rücktransportes sind durch diese
Garantie nicht abgedeckt. Jeder über diese Garantie-Erklärung hinausgehende Anspruch und Haftung für direkte / indirekte Folgeschäden werden
ausdrücklich abgelehnt. Garantie-Ansprüche können nur mit einer korrekt und
vollständig ausgefüllten Garantie-Karte und dem Original-Kaufbeleg geltend
gemacht werden.
35
ZE-30MP3 Manual D
19
01.12.2003, 21:40 Uhr
Warranty Conditions / Garantie
ZENEC Model: ZE-30MP3
Dealer’s address & stamp
Serial Number: .............................................................................................
Date of Purchase: ........................................................................................
Name:..........................................................................................................
Address: ......................................................................................................
City:.............................................................................................................
State: ................................... ZIP or Postal Code .........................................
Country: .....................................................................................................
ZE-30MP3 Manual D
20
01.12.2003, 21:40 Uhr