1
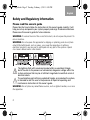
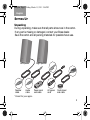
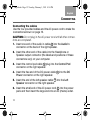
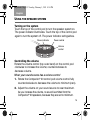
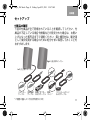
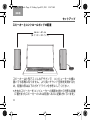
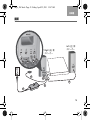
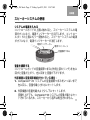
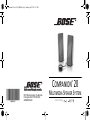
Companion 20 Cover_4.25x4_BKK.fm Page 1 Monday, April 25, 2011 9:13 AM
COMPANION 20
®
©2011 Bose Corporation, The Mountain,
Framingham, MA 01701-9168 USA
AM348605 Rev.00
MULTIMEDIA SPEAKER SYSTEM
Owner’s Guide |
Onyx.book Page 2 Tuesday, February 1, 2011 4:56 PM
English
Safety and Regulatory Information
Please read this owner’s guide
Please take the time to follow the instructions in this owner’s guide carefully. It will
help you set up and operate your system properly and enjoy its advanced features.
Please save this owner’s guide for future reference.
WARNING: To reduce the risk of fire or electrical shock, do not expose the product to
rain or moisture.
WARNING: Do not expose this apparatus to dripping or splashing, and do not place
objects filled with liquids, such as vases, on or near the apparatus. As with any
electronic products, use care not to spill liquids into any part of the system. Liquids
can cause a failure and/or a fire hazard.
The lightning flash with arrowhead symbol within an equilateral triangle
alerts the user to the presence of uninsulated, dangerous voltage within the
system enclosure that may be of sufficient magnitude to constitute a risk of
electrical shock.
The exclamation point within an equilateral triangle, as marked on the system,
is intended to alert the user to the presence of important operating and
maintenance instructions in this owner’s guide.
WARNING: Do not place any naked flame sources, such as lighted candles, on or near
the apparatus.
2
Onyx.book Page 3 Tuesday, February 1, 2011 4:56 PM
English
SAFETY AND REGULATORY INFORMATION
CAUTION: Make no modifications to the system or accessories. Unauthorized alterations
may compromise safety, regulatory compliance, and system performance.
CAUTION: Long-term exposure to loud music may cause hearing damage. It is best to
avoid extreme volume when using headphones, especially for extended periods.
CAUTION: Use only the power supply provided with the speaker system.
This product conforms to all EU Directive requirements as applicable
by law. The complete Declaration of Conformity can be found at
www.Bose.com/static/compliance.
Names and Contents of Toxic or Hazardous Substances or Elements
Toxic or Hazardous Substances and Elements
Part Name
Lead (Pb) Mercury (Hg) Cadmium (Cd)
Hexavalent
(CR(VI))
Polybrominated Biphenyl
(PBB)
Polybrominated
diphenylether (PBDE)
0
PCBs
X
0
0
0
0
Metal parts
X
0
0
0
0
0
Plastic parts
0
0
0
0
0
0
Speakers
X
0
0
0
0
0
Cables
X
0
0
0
0
0
O: Indicates that this toxic or hazardous substance contained in all of the homogeneous materials for this part is below the limit
requirement in SJ/T 11363-2006.
X: Indicates that this toxic or hazardous substance contained in at least one of the homogeneous materials used for this part is above the
limit requirement in SJ/T 11363-2006.
3
Onyx.book Page 4 Tuesday, February 1, 2011 4:56 PM
English
SAFETY AND REGULATORY INFORMATION
NOTES:
• The product label is located on the bottom of the product.
• The product is intended to be used only with the power supply provided.
• The product must be used indoors. It is neither designed nor tested for use outdoors,
in recreational vehicles, or on boats.
• Where the mains plug or appliance coupler is used as the disconnect device, such
disconnect device shall remain readily operable.
Additional safety information
See the additional instructions on the Important Safety Instructions sheet
(North America only) enclosed in the shipping carton.
iPod is a trademark of Apple Inc., registered in the U.S. and other countries.
©2011 Bose Corporation. No part of this work may be reproduced, modified, distributed, or
otherwise used without prior written permission.
4
Onyx.book Page 5 Tuesday, February 1, 2011 4:56 PM
English
SAFETY AND REGULATORY INFORMATION
Information about products that generate electrical noise
This equipment has been tested and found to comply with the limits for a Class B
digital device, pursuant to Part 15 of the FCC rules. These limits are designed to
provide reasonable protection against harmful interference in a residential
installation. This equipment generates, uses, and can radiate radio frequency
energy and, if not installed and used in accordance with the instructions, may cause
harmful interference to radio communications. However, this is no guarantee that
interference will not occur in a particular installation. If this equipment does cause
harmful interference to radio or television reception, which can be determined by
turning the equipment off and on, you are encouraged to try to correct the
interference by one or more of the following measures:
• Reorient or relocate the receiving antenna.
• Increase the separation between the equipment and receiver. Connect the
equipment to an outlet on a different circuit than the one to which the receiver
is connected.
• Consult the dealer or an experienced technician for help.
NOTE: Unauthorized modification of the system could void the user’s authority to
operate this equipment and may void the warranty.
This product complies with the Canadian ICES-003 Class B specifications.
For future reference
For convenience, enter the serial number (S/N located on the bottom of the right
speaker) below and on the Customer Warranty card.
Serial number: _____________________________________________________________
Purchased on: _____________________________________________________________
We suggest that you keep your purchase receipt and the limited warranty with
this guide.
5
Onyx.book Page 6 Tuesday, February 1, 2011 4:56 PM
English
6
Onyx.book Page 7 Tuesday, February 1, 2011 4:56 PM
English
CONTENTS
Introduction . . . . . . . . . . . . . . . . . . . . . . . . . . . . . . . . . . . . . . . . . . . 8
Setting Up . . . . . . . . . . . . . . . . . . . . . . . . . . . . . . . . . . . . . . . . . . . . 9
Unpacking . . . . . . . . . . . . . . . . . . . . . . . . . . . . . . . . . . . . . . 9
Positioning the speakers and control pod . . . . . . . . . . . . 10
Connecting . . . . . . . . . . . . . . . . . . . . . . . . . . . . . . . . . . . . . . . . . . 12
Connecting the cables . . . . . . . . . . . . . . . . . . . . . . . . . . . 12
Connecting an external music source . . . . . . . . . . . . . . . 14
Connecting headphones . . . . . . . . . . . . . . . . . . . . . . . . . . 14
Using the speaker system . . . . . . . . . . . . . . . . . . . . . . . . . . . . . . . 15
Turning on the system . . . . . . . . . . . . . . . . . . . . . . . . . . . 15
Controlling the volume . . . . . . . . . . . . . . . . . . . . . . . . . . . 15
Automatic standby . . . . . . . . . . . . . . . . . . . . . . . . . . . . . . 17
Troubleshooting . . . . . . . . . . . . . . . . . . . . . . . . . . . . . . . . . . . . . . . 17
Contacting Customer Service . . . . . . . . . . . . . . . . . . . . . . 19
Maintenance and Technical Information . . . . . . . . . . . . . . . . . . . . 20
Cleaning the system . . . . . . . . . . . . . . . . . . . . . . . . . . . . . 20
Technical Information . . . . . . . . . . . . . . . . . . . . . . . . . . . . 20
Limited Warranty . . . . . . . . . . . . . . . . . . . . . . . . . . . . . . . . . . . . . . 21
What you must do to obtain limited warranty service . . . . 21
7
Body.fm Page 8 Friday, March 25, 2011 9:31 AM
English
INTRODUCTION
®
Congratulations on your purchase of the Bose Companion® 20
multimedia speaker system. With these high-quality speakers,
you can enjoy:
• Full, natural sound from just two speakers whether sitting
directly in front of your computer or across the room.
• Sleek, space-saving design that complements the look of
your computer.
• A unique control pod that makes it easy to adjust or mute the
volume and connect headphones and other audio devices.
• Exclusive TrueSpace® stereo digital signal processing that
reproduces wide, natural sound from only two speakers,
bringing more life to music, games and videos.
• Proprietary digital signal processing that delivers crisp, clear
performance at all listening levels.
• Advanced port design and driver that produce powerful low
note performance and room-filling sound.
8
Body.fm Page 9 Friday, March 11, 2011 2:46 PM
English
SETTING UP
Unpacking
During unpacking, make sure that all parts shown are in the carton.
If any part is missing or damaged, contact your Bose dealer.
Save the carton and all packing materials for possible future use.
Left speaker
Speaker
cable
Audio
cable
Right speaker
Power pack
and cable
AC power
cord*
Control pod
and cable
*Correct for your region.
9
Onyx.book Page 10 Tuesday, February 1, 2011 4:56 PM
English
SETTING UP
Positioning the speakers and control pod
18 in – 32 in
46 cm – 81 cm
The size and shape of these speakers make it easy to position
them directly next to your computer. To provide an accurate
sound stage, you should observe the following guidelines:
• Place the left and right speakers (left and right speakers are
identified on each speaker back panel) an equal distance from
10
Onyx.book Page 11 Tuesday, February 1, 2011 4:56 PM
English
SETTING UP
•
•
•
•
the center of your computer monitor or screen. They should be
between 18 and 32 inches apart.
Avoid putting objects directly in front of the lower part of the
speaker grilles. This area is where the speaker driver is located.
Do not place the speakers too far behind your computer
monitor or screen because that will block the sound.
Place the control pod so it is within easy reach.
Keep the front of the speakers even with, or slightly forward of,
the front of the computer screen.
11
Onyx.book Page 12 Tuesday, February 1, 2011 4:56 PM
English
CONNECTING
Connecting the cables
Use the four provided cables and the AC power cord to make the
connections shown on page 13.
CAUTION: Do not plug in the AC power cord until all other connections are completed.
1. Insert one end of the audio in cable a into the Audio In
connector on the back of the right speaker.
2. Insert the other end of the cable into the Headphone or
Speaker output connector (the labels and positions of these
connectors vary) on your computer.
3. Insert the control pod cable b plug into the Control Pod
connector on the right speaker.
4. Insert the free end of the DC power cable c into the DC
Power connector on the right speaker.
5. Insert the end of the left speaker cable d into the Left
Speaker connector on the right speaker.
6. Insert the small end of the AC power cord e into the power
pack and then insert the large end into an AC (mains) outlet.
12
Onyx.book Page 13 Tuesday, February 1, 2011 4:56 PM
English
CONNECTING
Right
speaker
a
c
b
b
Left
speaker
d
a
d
c
e
13
Onyx.book Page 14 Tuesday, February 1, 2011 4:56 PM
English
CONNECTING
Connecting an external music source
You can connect an iPod, mp3 player, or other music source to
the control pod using a 3.5 mm plug (not supplied). The music
source audio and computer audio are mixed and will both play at
the same time.
To connect an external music source
Fully insert the 3.5 mm plug from the music source into the
Audio In connector on the control pod. To avoid hearing both the
computer and external music source, mute the computer audio.
Connecting headphones
Use headphones with a 3.5 mm plug. Fully insert the 3.5 mm plug
into the headphone connector on the control pod. Connecting
headphones to the Companion® 20 system mutes the sound from
the speakers.
Headphone
connector
14
Audio In
connector
Onyx.book Page 15 Tuesday, February 1, 2011 4:56 PM
English
USING THE SPEAKER SYSTEM
Turning on the system
Touch the top of the control pod to turn the speaker system on.
The power indicator illuminates. Touch the top of the control pod
again to turn the system off. The power indicator extinguishes.
Power indicator
Power control
Volume
control
Controlling the volume
Rotate the volume control (top outer band) on the control pod
clockwise to increase the volume; counterclockwise to
decrease volume.
When your sound source has a volume control
1. Rotate the Companion® 20 control pod volume control fully
counterclockwise to decrease the volume to minimum (zero).
2. Adjust the volume on your sound source to near maximum.
As you increase the volume, no sound is emitted from the
Companion® 20 speakers, because they are set to minimum.
15
Onyx.book Page 16 Tuesday, February 1, 2011 4:56 PM
English
USING THE SPEAKER SYSTEM
Note: You should never turn your sound source up to maximum
volume, as this could cause the sound to distort. A volume setting
of about 80% of maximum should be sufficient.
3. Rotate the Companion® 20 control pod volume control
clockwise until the sound reaches the desired listening level.
Automatic standby
The Companion® 20 system automatically goes into the standby
state after two hours when there is no audio signal or the volume
is turned all the way down. You can disable automatic standby so
the system is always on when connected to power.
To disable automatic standby
Lightly press and hold the top of the control pod (approximately six
seconds) until you hear two tones that chime from high to low.
To re-enable automatic standby
Lightly press and hold the top of the control pod again until you
hear two tones that chime from low to high.
16
Onyx.book Page 17 Tuesday, February 1, 2011 4:56 PM
English
TROUBLESHOOTING
Low volume settings (less than 2/3 maximum) on your computer or
media player reduce its output and can unnecessarily limit the
volume of the Companion® 20 system.
Computer volume controls often include:
• External buttons, which may operate independent of the
onscreen controls.
• Onscreen controls, provided on the computer.
• Various media player controls.
Try adjusting one or more of these controls if the sound from the
Companion® 20 system is too low.
17
Onyx.book Page 18 Tuesday, February 1, 2011 4:56 PM
English
TROUBLESHOOTING
Problem
No sound
What to do
• Make sure the speakers are turned on
(the power indicator on the control pod
is illuminated).
• Make sure the control pod volume control
is not turned fully counterclockwise (minimum).
• Make sure the computer is plugged in and
turned on, mute is turned off, and all volume
controls are turned up.
• Be sure the power pack is securely plugged
into the right speaker and into a power outlet
or surge protector.
• Be sure the AC power outlet is working. When
using a surge protector or power strip, be sure
it is turned on.
The Companion® 20 Decrease the volume of the sound source
system sound seems and increase the Companion® 20 speaker
volume using the control pod.
distorted
18
Onyx.book Page 19 Tuesday, February 1, 2011 4:56 PM
English
TROUBLESHOOTING
Problem
One speaker does
not play or sounds
distorted
Cannot control the
volume using the
control pod
No sound from
headphones
No sound from the
connected device
What to do
• Make sure the cable from the left speaker
is firmly inserted into the Left Speaker
connector on the back of the right speaker.
• Check the balance setting on your sound
source.
Make sure the control pod plug is fully
inserted into the connector on the rear of the
right speaker. Push the plug in using sufficient force to ensure that it is fully inserted
into the connector.
Contacting Customer Service
For additional help in solving problems, contact Bose® Customer
Service. Refer to the address sheet included in the carton, or visit
http://global.Bose.com
19
Onyx.book Page 20 Tuesday, February 1, 2011 4:56 PM
English
MAINTENANCE AND TECHNICAL INFORMATION
Cleaning the system
Wipe the speakers and control pod with a dry cloth.
• Do not use solvents or chemicals.
• Do not allow liquids or objects to enter the rear port of the
speakers, the speaker grilles, or any part of the control pod.
If the bottom of the control pod loses its adhesion to the tabletop,
use a lint-free cloth, slightly dampened with water, to clean the
control pod bottom surface.
Technical Information
Driver complement
Two 2.75 inch (70 mm) high excursion, wide-range transducers
Dimensions (approximate)
Speakers: 8.6"H x 3.5"W x 4.4"D (22.0 cm x 9.0 cm x 15.0 cm)
Control pod: 2.5"D x 1.125"H (6.3 cm x 2.8 cm)
Weight (approximate)
One speaker, unpacked: 2.5 lb (1.1 kg)
Control pod: 0.5 lb (0.2 kg)
20
Onyx.book Page 21 Tuesday, February 1, 2011 4:56 PM
English
LIMITED WARRANTY
This system is covered by a limited warranty. Details of the limited
warranty are provided on the Product Registration Card that
came with your system. Please fill out the information section on
the card and mail it to Bose. Failure to do so, however, will not
affect your limited warranty rights.
What you must do to obtain limited warranty service
Return the product, with proof of purchase from an authorized
Bose dealer, using the following procedures:
1. Contact the Bose organization in your country or region (visit
http://global.Bose.com for Bose contact information in your
country or region) for specific return and shipping instructions.
2. Label and ship the product, freight prepaid, to the address
provided by the Bose organization in your country.
3. Place any necessary return authorization number prominently
on the outside of the carton. Cartons not bearing a return
authorization number where required, will be refused.
21
Onyx_JAP.book Page 2 Friday, April 22, 2011 12:47 AM
日本語
Tab 5, 11
Tab 4, 10, Tab 3, 9, 15Tab 2, 8, 14 Tab 1, 7, 13
安全上の留意事項
このオーナーズガイドは必ずお読みください
オーナーズガイドの指示に注意し、慎重に従ってください。ご購入いただいたシス
テムを正しくセットアップして操作し、機能を十分にご活用いただくために役立ち
ます。また、必要な時にすぐにご覧になれるように、大切に保管しておくことをお
すすめいたします。
警告:火災や感電を避けるため、製品を雨にあてたり、湿度のある場所で使用しな
いでください。
警告:水漏れやしぶきがかかるような場所でこの製品を使用しないでください。ま
た、花瓶などの液体が入った物品を製品の上や近くに置かないでください。他の電
気製品と同様、システム内に液体が侵入しないように注意してください。液体が浸
入すると、故障や火災の原因となることがあります。
正三角形に矢印付き稲妻マークが入った表示は、製品内部に電圧の高い危険
な部分があり、感電の原因となる可能性があることをお客様に警告するもの
です。
正三角形に感嘆符が入った表示は、製品本体にも表示されている通り、この
取扱説明書の中で、取り扱い上およびメンテナンス上、重要な項目であるこ
とをお客様に警告するものです。
警告:火の付いたろうそくなどの火気を製品の上や近くに置かないでください。
2
Onyx_JAP.book Page 3 Friday, April 22, 2011 12:47 AM
Tab1, 7, 13 Tab 2, 8, 14 Tab 3, 9, 15 Tab 4, 10, Tab 5, 11
日本語
安全上の留意事項
注意:システムまたはアクセサリを改造しないでください。許可なく製品を改造する
と、システムの安全性と性能が損なわれるだけではなく、法令遵守の問題が生じ、製
品保証が無効となる場合があります。
注意:大きな音量で長時間続けて聞くと、聴力に悪い影響を与えることがあります。
ヘッドホンを長時間使用する場合は、過度な音量を避けるようにしてください。
注意:スピーカーシステムに付属の電源アダプターを使用してください。
This product conforms to all EU Directive requirements as applicable
by law. The complete Declaration of Conformity can be found at
www.Bose.com/compliance.
3
Onyx_JAP.book Page 4 Friday, April 22, 2011 12:47 AM
日本語
Tab 5, 11
Tab 4, 10, Tab 3, 9, 15Tab 2, 8, 14 Tab 1, 7, 13
安全上の留意事項
注記:
• 製品ラベルは本体下部にあります。
• この製品には付属の電源アダプターを使用してください。
• この製品は室内専用です。屋外、RV 車内、船上で使用するようには設計されてい
ません。また、このような使用環境におけるテストも行われていません。
• 万一の事故や故障に備えるために、電源プラグはよく見えて容易に手が届く位置
にあるコンセントに接続してください。
その他のご注意
その他の注意については、パッケージに同梱の『安全上の重要なご注意』
シートを参照してください(北米のみ)。
iPod は、米国および他の国々におけるApple Inc.の商標です。
©2011 Bose Corporation. 本書のいかなる部分も、書面による事前の許可のない複写、変更、配布、
その他の使用は許可されません。
4
Onyx_JAP.book Page 5 Friday, April 22, 2011 12:47 AM
Tab1, 7, 13 Tab 2, 8, 14 Tab 3, 9, 15 Tab 4, 10, Tab 5, 11
日本語
安全上の留意事項
Information about products that generate electrical noise
This equipment has been tested and found to comply with the limits for a Class B
digital device, pursuant to Part 15 of the FCC rules. These limits are designed to
provide reasonable protection against harmful interference in a residential
installation. This equipment generates, uses, and can radiate radio frequency energy
and, if not installed and used in accordance with the instructions, may cause harmful
interference to radio communications. However, this is no guarantee that
interference will not occur in a particular installation. If this equipment does cause
harmful interference to radio or television reception, which can be determined by
turning the equipment off and on, you are encouraged to try to correct the
interference by one or more of the following measures:
• Reorient or relocate the receiving antenna.
• Increase the separation between the equipment and receiver. Connect the
equipment to an outlet on a different circuit than the one to which the receiver
is connected.
• Consult the dealer or an experienced technician for help.
Note: Unauthorized modification of the system could void the user’s authority to
operate this equipment and may void the warranty.
This product complies with the Canadian ICES-003 Class B specifications.
今後のお問い合わせのために
製品に関するお問い合わせ等に必要となりますので、R 側スピーカーの底面に記載
されているシリアル番号を、下の欄と保証書に記入してください。
シリアル番号:_____________________________________________________________
購入日:___________________________________________________________________
このガイドとともに、ご購入時の領収証と保証書を保管することをお勧めします。
5
Onyx_JAP.book Page 6 Friday, April 22, 2011 12:47 AM
日本語
Tab 5, 11
安全上の留意項目
6
Tab 4, 10, Tab 3, 9, 15Tab 2, 8, 14 Tab 1, 7, 13
Onyx_JAP.book Page 7 Friday, April 22, 2011 12:47 AM
Tab1, 7, 13 Tab 2, 8, 14 Tab 3, 9, 15 Tab 4, 10, Tab 5, 11
日本語
安全上の留意項目
確実に差す
7
Onyx_JAP.book Page 8 Friday, April 22, 2011 12:47 AM
日本語
Tab 5, 11
安全上の留意項目
音を小さく
8
Tab 4, 10, Tab 3, 9, 15Tab 2, 8, 14 Tab 1, 7, 13
Onyx_JAP.book Page 9 Friday, April 22, 2011 12:47 AM
Tab1, 7, 13 Tab 2, 8, 14 Tab 3, 9, 15 Tab 4, 10, Tab 5, 11
日本語
目次
はじめに . . . . . . . . . . . . . . . . . . . . . . . . . . . . . . . . . . . . . . . . . . . . 10
セットアップ . . . . . . . . . . . . . . . . . . . . . . . . . . . . . . . . . . . . . . . . . 11
付属品の確認 . . . . . . . . . . . . . . . . . . . . . . . . . . . . . . . . . . . 11
スピーカーとコントロールポッドの配置 . . . . . . . . . . . . . 12
接続 . . . . . . . . . . . . . . . . . . . . . . . . . . . . . . . . . . . . . . . . . . . . . . . . 14
ケーブルの接続 . . . . . . . . . . . . . . . . . . . . . . . . . . . . . . . . . 14
外部機器の接続 . . . . . . . . . . . . . . . . . . . . . . . . . . . . . . . . . 16
ヘッドホンの接続 . . . . . . . . . . . . . . . . . . . . . . . . . . . . . . . 16
スピーカーシステムの使用 . . . . . . . . . . . . . . . . . . . . . . . . . . . . . . 17
システムの電源を入れる . . . . . . . . . . . . . . . . . . . . . . . . . . 17
音量を調節する . . . . . . . . . . . . . . . . . . . . . . . . . . . . . . . . . 17
自動スタンバイ . . . . . . . . . . . . . . . . . . . . . . . . . . . . . . . . . 18
故障かな?と思ったら . . . . . . . . . . . . . . . . . . . . . . . . . . . . . . . . . . 19
お問い合わせ先 . . . . . . . . . . . . . . . . . . . . . . . . . . . . . . . . . 22
お手入れ方法と仕様 . . . . . . . . . . . . . . . . . . . . . . . . . . . . . . . . . . . 23
システムのお手入れについて . . . . . . . . . . . . . . . . . . . . . . 23
仕様 . . . . . . . . . . . . . . . . . . . . . . . . . . . . . . . . . . . . . . . . . . 23
保証 . . . . . . . . . . . . . . . . . . . . . . . . . . . . . . . . . . . . . . . . . . . . . . . . 24
9
Onyx_JAP.book Page 10 Friday, April 22, 2011 12:47 AM
日本語
Tab 5, 11
Tab 4, 10, Tab 3, 9, 15Tab 2, 8, 14 Tab 1, 7, 13
はじめに
この度は Bose® Companion® 20 マルチメディアスピーカーシス
テムをお買い上げいただき、誠にありがとうございます。このス
ピーカーシステムには、次の特長があります。
• デスクトップからお部屋全体まで、2 台のスピーカーだけで豊
かで自然なサウンドが広がります。
• どんなコンピューターにもマッチする、流麗でコンパクトな
デザインです。
• 音量調節/ミュート機能およびヘッドホンジャック/外部入力端
子が集約されたコントロールポッドが付属しています。
®
• 独自の TrueSpace ステレオデジタルプロセッシング回路を搭
載し、2 台のスピーカーだけで広がりのある自然なサウンドを
実現しています。ライブ感溢れる空間で音楽、ゲーム、ビデ
オをお楽しみください。
• デジタルシグナルプロセッシング回路は、音量の大小にかか
わらず引き締まったクリアなサウンドを再生する、当社独自
の機能です。
• 新設計のポートおよびドライバーにより、力強い重低音と豊
かな奥行き感を再現しています。
10
Onyx_JAP.book Page 11 Friday, April 22, 2011 12:47 AM
Tab1, 7, 13 Tab 2, 8, 14 Tab 3, 9, 15 Tab 4, 10, Tab 5, 11
日本語
セットアップ
付属品の確認
下図の付属品が全て同梱されていることを確認してください。付
属品が不足している場合や損傷などが発見された場合は、お買い
上げになった販売店までご連絡ください。箱と梱包材は、輸送用
として後日使用する場合のために処分せずに保管しておくことを
おすすめします。
Right ( 右 ) 側スピーカー
Left ( 左 ) 側スピーカー
スピーカー
ケーブル
音声接続
ケーブル
電源アダプター
およびケーブル
*ご使用の国によって形状が異なります。
電源
コード *
コントロールポッド
およびケーブル
11
Onyx_JAP.book Page 12 Friday, April 22, 2011 12:47 AM
日本語
Tab 5, 11
Tab 4, 10, Tab 3, 9, 15Tab 2, 8, 14 Tab 1, 7, 13
セットアップ
スピーカーとコントロールポッドの配置
46 cm 〜 81 cm
(18 インチ〜 32 インチ )
スピーカーは小型でスリムなデザインで、コンピューターの横に
置いても邪魔になりません。より良いサウンド空間を実現するた
め、配置の際は以下のガイドラインを参考にしてください。
• 左右のスピーカーをコンピューターの画面中央から均等な距離
に置きます(スピーカーの LR は背面パネルに記載されています)。
12
Onyx_JAP.book Page 13 Friday, April 22, 2011 12:47 AM
Tab1, 7, 13 Tab 2, 8, 14 Tab 3, 9, 15 Tab 4, 10, Tab 5, 11
日本語
セットアップ
•
•
•
•
スピーカー同士の距離は 46 cm から 81 cm の間にしてくだ
さい。
スピーカーグリルの前面下部を直接さえぎる場所に物を置かな
いでください。この位置にスピーカードライバーが配置されて
います。
コンピューターのモニターに音がさえぎられるほど後方にス
ピーカーを置かないでください。
コントロールポッドは操作しやすい場所に置きます。
スピーカーの前面とコンピューターの画面が真横に並ぶくらい
の位置か、画面よりやや手前にスピーカーを置きます。
13
Onyx_JAP.book Page 14 Friday, April 22, 2011 12:47 AM
日本語
Tab 5, 11
Tab 4, 10, Tab 3, 9, 15Tab 2, 8, 14 Tab 1, 7, 13
接続
ケーブルの接続
付属のケーブルと電源コードを、15 ページの図のとおりに接続
します。
注意:電源コードは、他のケーブルの接続を終えた後に接続して
ください。
1. 音声接続ケーブル a の片側を Right ( 右 ) 側スピーカー背面の
Audio In 端子に差し込みます。
2. 音声接続ケーブルのもう片側をコンピューターのヘッドホン
出力またはスピーカー出力 ( 表記と位置は機種によって異なり
ます)に差し込みます。
3. コントロールポッドのケーブル b のプラグを Right ( 右 ) 側ス
ピーカーの Control Pod 端子に差し込みます。
4. 電源アダプターの DC ケーブル c を Right ( 右 ) 側スピーカー
の DC Power 端子に差し込みます。
5. Left (左)側スピーカーのケーブル d を Right (右)側スピーカー
の Left Speaker 端子に差し込みます。
6. 電源コードのアダプター側プラグ e を電源アダプターに差し
込んでから、電源コードのプラグを電源コンセントに差し込み
ます。
14
Onyx_JAP.book Page 15 Friday, April 22, 2011 12:47 AM
Tab1, 7, 13 Tab 2, 8, 14 Tab 3, 9, 15 Tab 4, 10, Tab 5, 11
日本語
接続
Right ( 右 ) 側
スピーカー
a
c
b
b
Left ( 左 ) 側
スピーカー
d
a
d
c
e
15
Onyx_JAP.book Page 16 Friday, April 22, 2011 12:47 AM
日本語
Tab 5, 11
Tab 4, 10, Tab 3, 9, 15Tab 2, 8, 14 Tab 1, 7, 13
接続
外部機器の接続
コントロールポッドには、3.5 mm プラグ付きケーブル ( 別売 ) を
使用して iPod や MP3 プレーヤーなどの外部機器を接続できま
す。外部機器の音声は、コンピューターからの音声と混合されて
同時に聞こえます。
外部機器を接続するには:
外部機器に接続された 3.5 mm プラグ付きケーブルをコントロー
ルポッドの外部入力端子に差し込みます。外部機器の音声がコン
ピューターの音声と混合されないようにするには、コンピュー
ターの音声をミュートします。
ヘッドホンの接続
3.5 mm ステレオミニプラグ付きヘッドホンを接続できます。3.5 mm
プラグ付きケーブルをコントロールポッドのヘッドホン端子に差
し込みます。Companion® 20 システムにヘッドホンを接続する
と、スピーカーからは音声が再生されなくなります。
16
ヘッドホン端子
外部入力端子
Onyx_JAP.book Page 17 Friday, April 22, 2011 12:47 AM
Tab1, 7, 13 Tab 2, 8, 14 Tab 3, 9, 15 Tab 4, 10, Tab 5, 11
日本語
スピーカーシステムの使用
システムの電源を入れる
コントロールポッドの上面に触れると、スピーカーシステムの電
源がオンになり、電源インジケーターが点灯します。コントロー
ルポッドの上面にもう一度触れると、スピーカーシステムの電源
がオフになり、電源インジケーターが消灯します。
電源インジケーター
電源コントロール
音量調節つまみ
音量を調節する
コントロールポッドの音量調節つまみ ( 外側上部のリング ) を右に
回すと音量が上がり、左に回すと音量が下がります。
外部機器に音量調節機能が付いている場合:
1. Companion ® 20 システムの音量調節つまみをいっぱいまで
左に回し、音量を最小(ゼロ)にセットします。
2. 外部機器の音量を最大より少し下にセットします。
音量を上げても、Companion® 20 システムの音量が最小にセッ
トされているため、スピーカーから音声は再生されません。
17
Onyx_JAP.book Page 18 Friday, April 22, 2011 12:47 AM
日本語
Tab 5, 11
Tab 4, 10, Tab 3, 9, 15Tab 2, 8, 14 Tab 1, 7, 13
スピーカーシステムの使用
注意:音声が歪む恐れがあるので、外部機器の音量は最大にし
ないでください。最大音量の 80% 程度にセットするだけで十分
です。
3. Companion® 20 システムの音量調節つまみを右に回し、お好
みの音量の位置で止めます。
自動スタンバイ
音声信号を受信しないまま、または音量が最小にセットされたま
ま 2 時間経過すると、Companion® 20 システムは自動的にスタン
バイ状態に移ります。自動スタンバイを無効にして、電源に接続
されている間は常にシステムをオンにしておくこともできます。
自動スタンバイを無効にするには:
コントロールポッドの上面 ( 電源インジケーター付近 ) を、高音と
低音のビープ音が聞こえるまでおよそ 6 秒間軽く長押しします。
自動スタンバイを有効に戻すには:
コントロールポッドの上面 ( 電源インジケーター付近 ) を、低音と
高音のビープ音が聞こえるまで軽く長押しします。
18
Onyx_JAP.book Page 19 Friday, April 22, 2011 12:47 AM
Tab1, 7, 13 Tab 2, 8, 14 Tab 3, 9, 15 Tab 4, 10, Tab 5, 11
日本語
故障かな?と思ったら
コンピューターや外部機器の音量を下げ過ぎると ( 最大音量の
2
/3 未満 )、出力が小さくなり過ぎて、Companion® 20 システムの音
量が十分に上げられなくなる場合があります。
コンピューターの音量調節は、以下の方法で行います。
• コンピューター本体に付属のスイッチやボリュームで操作し
ます。
• 画面上でコンピューターの OS から操作します。
• メディアプレーヤーソフトウェアなどの音量調節部を操作し
ます。
Companion® 20 システムの音量が小さすぎる場合は、いずれかの方
法による音量調節をお試しください。
19
Onyx_JAP.book Page 20 Friday, April 22, 2011 12:47 AM
日本語
Tab 5, 11
Tab 4, 10, Tab 3, 9, 15Tab 2, 8, 14 Tab 1, 7, 13
故障かな?と思ったら
トラブル
対処方法
音が出ない
• スピーカーの電源がオンになっている ( コント
ロールポッドの電源インジケーターが点灯して
いる)ことを確認します。
• コントロールポッドの音量調節つまみが左に
いっぱい ( 最小 ) まで回されていないことを確認
します。
• 接続されているコンピューターの電源がオンに
なっていて、音量が上がっており、ミュートさ
れていないことを確認します。
• 電源アダプターが Right (右)側スピーカーと電源
コンセントまたは避雷器に接続されていること
を確認します。
• 電源コンセントに電源が供給されていることを
確認します。避雷器またはテーブルタップを使
用している場合は、電源がオンになっているこ
とを確認します。
Companion® 20 シス
テムの音声が歪む
外部機器の音量を下げ、Companion® 20 システ
ムのコントロールポッドを使用してスピーカー
の音量を上げます。
20
Onyx_JAP.book Page 21 Friday, April 22, 2011 12:47 AM
Tab1, 7, 13 Tab 2, 8, 14 Tab 3, 9, 15 Tab 4, 10, Tab 5, 11
日本語
故障かな?と思ったら
トラブル
片側のスピーカーか
ら音が聞こえない、
または音が歪む
コントロールポッド
を使用して音量を操
作できない
ヘッドホンから音が
聞こえない
接続された機器から
の音が出ない
対処方法
• Left (左)側スピーカーのケーブルが Right (右)側
スピーカー背面の Left Speaker 端子にしっかり
と接続されていることを確認します。
• 再生機器のバランス設定をチェックします。
コントロールポッドのプラグが Right ( 右 ) 側ス
ピーカー背面の端子にしっかりと接続されてい
ることを確認します。プラグを差し込む際に
は、十分な力を加えて押し込み、プラグを端子
にしっかり接続してください。
21
Onyx_JAP.book Page 22 Friday, April 22, 2011 12:47 AM
日本語
Tab 5, 11
Tab 4, 10, Tab 3, 9, 15Tab 2, 8, 14 Tab 1, 7, 13
故障かな?と思ったら
お問い合わせ先
22
Onyx_JAP.book Page 23 Friday, April 22, 2011 12:47 AM
Tab1, 7, 13 Tab 2, 8, 14 Tab 3, 9, 15 Tab 4, 10, Tab 5, 11
日本語
お手入れ方法と仕様
システムのお手入れについて
スピーカーとコントロールポッドを乾いた布で拭きます。
• 溶剤や化学薬品などは使用しないでください。
• スピーカーの背面開口部、スピーカーグリル、コントロールポッ
ドの端子などに液体や異物が入らないようにしてください。
コントロールポッドの底面がデスク上に吸着しなくなったら、糸
くずの出ない布を水で湿らせて、コントロールポッドの底面を拭
いてください。
仕様
ドライバーユニット
70 mm (2.75 インチ)ハイエクスカーション、ワイドレンジトラン
スデューサー
※ 本機の詳細寸法につきましては、弊社 Web サイト、ならびに
Web サイト上に掲載される仕様書をご参照ください。
23
Onyx_JAP.book Page 24 Friday, April 22, 2011 12:47 AM
日本語
Tab 5, 11
Tab 4, 10, Tab 3, 9, 15Tab 2, 8, 14 Tab 1, 7, 13
保証
保証の内容および条件につきましては、付属の保証書をご覧くだ
さい。
24
Companion 20 Cover_4.25x4_BKK.fm Page 1 Monday, April 25, 2011 9:13 AM
COMPANION 20
®
©2011 Bose Corporation, The Mountain,
Framingham, MA 01701-9168 USA
AM348605 Rev.00
MULTIMEDIA SPEAKER SYSTEM
Owner’s Guide |