1
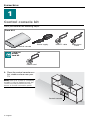
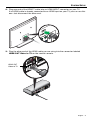
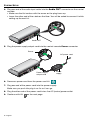
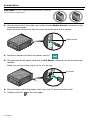
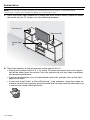
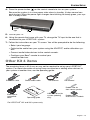
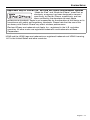
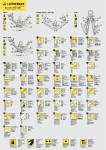
2011 Bose Corporation, The Mountain,
Framingham, MA 01701-9168 USA
AM350577 Rev 00
LIFESTYLE® V35/V25 HOME ENTERTAINMENT SYSTEMS
LIFESTYLE® T20/T10 HOME ENTERTAINMENT SYSTEMS
Setup Guide |
SAFETY INFORMATION
Please read this guide
Please take the time to follow the instructions in this guide carefully. They will help you set up and
use your system properly so you can enjoy its advanced features. Please save this guide for future
reference.
The lightning flash with arrowhead symbol within an equilateral triangle alerts the user to
the presence of uninsulated, dangerous voltage within the system enclosure that may be
of sufficient magnitude to constitute a risk of electric shock.
The exclamation point within an equilateral triangle alerts the user to the presence of
important operating and maintenance instructions in this guide.
WARNINGS:
• To reduce the risk of fire or electrical shock, do not expose the product to rain or moisture.
• Do not expose this apparatus to dripping or splashing, and do not place objects filled with liquids,
such as vases, on or near the apparatus. As with any electronic products, use care not to spill
liquids into any part of the system. Liquids can cause a failure and/or a fire hazard.
• Do not place any naked flame sources, such as lighted candles, on or near the apparatus.
• Keep the remote control battery away from children. It may cause a fire or chemical burn if
mishandled. Do not recharge, disassemble, heat above 100ºC (212ºF), or incinerate. Dispose
of used batteries promptly. Replace only with a battery of the correct type and model number.
• Contains small parts that may be a choking hazard. Not suitable for children under
age 3.
CAUTIONS:
• Make no modifications to the system or accessories. Unauthorized alterations may compromise
safety, regulatory compliance, and system performance, and may void the warranty.
• Long-term exposure to loud music may cause hearing damage. It is best to avoid extreme volume
when using headphones, especially for extended periods.
Notes:
• Where the mains plug or appliance coupler is used as the disconnect device, such disconnect device
shall remain readily operable.
• The product must be used indoors. It is neither designed nor tested for use outdoors, in recreation
vehicles, or on boats.
• This product is intended to be used only with the power supply provided.
• The product label is located on the bottom of the product.
Please dispose of used batteries properly, following any local regulations. Do not incinerate.
Additional safety information
See the additional instructions on the Important Safety Information sheet enclosed in the shipping
carton.
Class B emissions
This device complies with FCC and Industry Canada RF radiation exposure limits set forth for
general population. It must not be co-located or be operating in conjunction with any other
antennas or transmitters.
This product conforms to all EU Directive requirements as applicable by law. The complete
Declaration of Conformity can be found at www.Bose.com/compliance.
2 – English
SYSTEM SETUP
Welcome
Thank you for choosing a Bose® LIFESTYLE® system for your home. This guide provides
step-by-step instructions for setting up your new system. There are two phases to the
setup process:
Physical setup phase: Placing the system components and connecting them
together.
Interactive setup phase: Completing your setup following the interactive steps on
your TV screen provided by the UNIFY® intelligent integration system.
Unpacking
The parts of your new system are packaged in four numbered kits plus a small box
containing the appropriate power cords:
•
•
•
•
•
11 Control console kit
2 Acoustimass module kit
3 Speaker kit
4 Interactive kit
®
Power cord kit (used with kits 1 and 2)
Starting with Kit 1, unpack each kit and set up its contents before unpacking the next
one.
Be sure to save all of the packing materials. These provide the safest means for any
necessary shipping or transporting.
If any part appears damaged, do not attempt to use it. Notify Bose or your authorized
Bose dealer immediately. For Bose contact information, refer to the address sheet
included in Kit 4.
English – 3
SYSTEM SETUP
11
Control console kit
What you need for the following steps:
From Kit 1
Power supply
HDMI™ cable
Control console
From the
power
cord kit
Power cord
1. Place the control console on a
flat, stable surface near your
TV.
Note: Until your system is completely
installed, it may be helpful to keep the
control console positioned for easy
access to its rear connection panel.
Control console
4 – English
Audio input
cable
SYSTEM SETUP
2. Plug one end of the HDMI™ cable into an HDMI INPUT connector on your TV.
If an HDMI cable is already connected to an HDMI input on your TV, you can use this
one. Just disconnect the other end.
3. Plug the other end of the HDMI cable you are using into the connector labeled
HDMI OUT Video to TV on the control console.
HDMI OUT
Video to TV
English – 5
SYSTEM SETUP
4. Plug one end of the audio input cable into the Audio OUT connector on the control
console.
• Make sure the flat surface with the arrow on the plug faces up.
• Leave the other end of the cable on the floor. You will be asked to connect it while
setting up the next kit.
Audio OUT
5. Plug the power supply output cord into the control console Power connector.
Power
AC power cord
Power supply
output cord
Power
supply
6. Remove a power cord from the power cord kit.
7. Plug one end of the power cord into the power supply.
Make sure you push the plug in as far as it can go.
8. Plug the other end of the power cord into a live AC (mains) power outlet.
9. Continue with Kit
6 – English
2
on the next page.
SYSTEM SETUP
2
Acoustimass® module kit
What you need for the following steps:
From the
power
cord kit
From Kit 2
Power cord
Acoustimass module
1. Place the Acoustimass
module on the floor at the
same end of the room as
the TV. Make sure there is
a live AC outlet nearby.
Acoustimass
module
2. Lay the module on its
side and locate the
connector panel.
Connector panel
English – 7
SYSTEM SETUP
CAUTION: DO NOT stand the Acoustimass® module
on its front or back end.
3. Plug the free end of the audio input cable into the Media Center connector on the
Acoustimass module.
Make sure the flat surface with the arrow faces the front of the module.
Media Center
4. Remove a power cord from the power cord kit.
5. Plug one end of the power cord into the AC Power connector on the Acoustimass
module.
Make sure you push the plug in as far as it can go.
AC Power
6. Plug the other end of the power cord into a live AC (mains) power outlet.
7. Continue with Kit
8 – English
3
on the next page.
SYSTEM SETUP
3
Speaker kit
What you need for the following steps:
From Kit 3: System speakers (one set of the three types shown)
Jewel Cube®
speakers
(1) Center front
speaker
Direct/Reflecting®
cube speaker
arrays
Virtually Invisible®
single cube
speakers
(1) Center front
speaker
(5) Left or right, front
or rear, and center
front speaker
(4) Left or right,
front or rear
speaker
(4) Left or
right, front or
rear speaker
Front speaker cables
Left front (L)
White
Rear speaker cables
Right front (R)
Light blue
Left rear (LR)
Light green
Right rear (RR)
Purple
Center front (C)
Brown
English – 9
SYSTEM SETUP
Note: You can place system speakers on wall brackets or floor stands. To purchase these
accessories, contact your local Bose dealer or visit www.Bose.com.
1. Place the center front speaker on a stable and level surface directly above or below
the center of your TV screen as in the following example.
Left front (L)
Right front (R)
Center front
(C)
2. Place one speaker to the left and one to the right of the TV.
• Keep each speaker within 3 ft (1 m) of the TV screen to prevent too much separation of the sound from the picture. Vary this distance to suit your room conditions
and personal preference.
• If placing the speakers in an enclosed bookcase shelf, position them at the front
edge of the shelf.
• If you have Jewel Cube® or Direct/Reflecting® cube speakers, rotate the cubes so
that one cube of each speaker points forward into the room and the other points at
a side wall to create reflected sound.
10 – English
SYSTEM SETUP
3. Place the rear speakers toward the
back of the room behind the
viewers at ear height (when
seated) or higher, if possible.
• Make sure the 50 ft (15.2 m)
rear speaker cables will reach
from the speakers to the
Acoustimass® module.
Left rear
(LR)
Right rear
(RR)
• Aim the speakers away from the
listeners to prevent them from
pinpointing the exact location of
the sound source.
• If you have Jewel Cube® or
Direct/Reflecting® cube speakers, rotate the cubes so that one
cube of each speaker points
forward into the room and the
other points at a side wall to
create reflected sound.
4. Locate the colored connectors on the bottom panel of the Acoustimass module.
Colored connectors
5. Plug the speaker cables into the Acoustimass module connectors. Be sure to match
each cable plug to each connector by the color code.
English – 11
SYSTEM SETUP
6. Locate the speaker position markings on the free ends of the speaker cables.
Speaker position marking (L, C, R, LR, or RR)
7. Using the speaker position markings, run each cable out to its respective speaker as
in the following setup example of a room.
FRONT
SPEAKERS
REAR
SPEAKERS
12 – English
SYSTEM SETUP
8. Connect the speaker cable to the type of speaker you have.
Jewel Cube® speakers:
Insert the plug into the speaker
connector.
Direct/Reflecting® and Virtually Invisible®
single cube speakers:
Press the button and insert the wires. Connect the
red-collared wire to the red connector. Connect
the other wire to the black connector.
Note: The rear speaker
cables are webbed together.
You can pull them apart as
needed.
9. Put the Acoustimass® module in its final position:
• Upright (BEST) or on either side
(ALTERNATE).
• With the front opening facing into the
room.
• At least 18 in (45 cm) from any TV to
avoid magnetic interference with the
TV image. Move it farther away if you
still notice interference.
BEST
ALTERNATE
CAUTION: Do not put electronic media, such as video or audio tapes, on or next to the
module for long periods of time. The magnetic field surrounding the module may erase
some or all of the recorded material.
CAUTION: DO NOT BLOCK the ventilation openings on
the module. This can cause it to overheat.
10.Continue with Kit
4
on the next page.
English – 13
SYSTEM SETUP
4
Interactive kit
What you need for the following steps:
From Kit 4
Remote control
with batteries
ADAPTiQ® audio calibration headset
Congratulations! At this point you have set up the control console, the Acoustimass®
module, and the speakers. You are now ready to turn on your system and enter the
interactive phase of the setup process using the UNIFY® intelligent integration system.
IMPORTANT!
• Before you start, make sure your speakers and Acoustimass module are in
their final positions.
• Do not connect any devices to the control console at this time. The
instructions provided on your TV will tell you when to do this.
1. Slide the battery compartment cover off the back of the remote control.
AA (IEC LR6) batteries (4)
Battery compartment cover
2. Install four AA (IEC LR6) batteries, matching the polarity markings (+ and –) to the
markings inside the battery compartment.
3. Slide the battery cover back into place.
14 – English
SYSTEM SETUP
4. Press the power button (
) on the control console to turn on your system.
Because the system is in a low power state when in standby, it takes several seconds to start. When the power light changes from blinking to steady green, your system is ready to use.
Power
light
5. Turn on your TV.
6. Using the remote that came with your TV, change the TV input to the one that is
connected to your LIFESTYLE® system.
7. Follow the instructions on your TV screen. You will be prompted to do the following:
• Select your language.
• Optimize the audio from your system using the ADAPTiQ® audio calibration system.
• Connect audio/video devices to the control console.
• Configure your Bose® remote to control your
connected devices.
Other Kit 4 items
The remaining items in Kit 4 may or may not be required to set up your LIFESTYLE®
system. For more information on using these accessories or adding other devices to
your system at another time, see the operating guide.
IR emitter cable
Stereo audio cable
AM antenna*
FM antenna*
Rubber feet for
front center speaker
®
®®®®
H
5 HH
225 00
VV 11
5// //TT
335 00
VV TT22
LLEE EE
YY YYLL
STT TT
EES ESS
IIFF IIFFE
LL
LL
®
®®®®
nnonn
ioioioi
atlsiatsatat
iliilsilsi
utututut
d’d’d’d’
de
uideuide
GuiGui
||G|G|
riorioriorio
uaua
ususuaua
lluslusl
dede
adeade
uíauía
GuíGuí
||G|G|
dededede
uiuiuiui
GGGG
gggg
tintintintin
rararara
pepe
OOOpeO
OOOM
M
MEEE
NNNTE
OOOM
TE
TERT
M
MEEE
RT
RTAA
AIN
IN
INM
HHHEA
M
EA
MEN
EATE
EN
ENTT
TE
TERRR
T
YYYST
YYYST
ST
STEM
ST
STEM
EM
EMS
EM
EMS
SS
SS
H
EE
TT
SS
SS
iPod/iPhone
compatible
dock*
Operating guide
USB flash drive (for
system updating
only)
Rubber feet for
Acoustimass® module
*For LIFESTYLE® V25 and V35 systems only.
English – 15
SYSTEM SETUP
Applying rubber feet
When placing the Acoustimass® module on bare floors, you can attach the included
rubber feet to the bottom of the module for greater stability and to protect your floor.
Rubber feet for
Acoustimass
module
Bottom panel
Vibration can cause speakers to move, particularly if placed on a smooth surface like
glass or highly polished wood. If you are placing the center speaker on such a surface,
you can attach the included rubber feet to the bottom of the speaker for greater stability.
Rubber feet for
front center
speaker
Bottom panel of
center speaker
If you have setup problems
If you experience any difficulties during the setup process, such as an unrecognized
device remote or a connection error, you can reactivate the interactive setup mode at
any time and correct or change part of your system setup. See “Using the Setup Mode”
in your system operating guide.
For help in trying to resolve any problems, see the troubleshooting table in your system
operating guide.
Contacting customer service
For additional help in solving problems, contact Bose® Customer Service. See the
address sheet included in Kit 4.
16 – English
SYSTEM SETUP
Applicable only for LIFESTYLE® V25 and V35 home entertainment systems
“Made for iPod” and “Made for iPhone” mean that an
electronic accessory has been designed to connect
specifically to iPod or iPhone, respectively, and has
been certified by the developer to meet Apple
performance standards. Apple is not responsible for the operation of this device or its
compliance with safety and regulatory standards. Please note that the use of this
accessory with iPod or iPhone may affect wireless performance.
iPod and iPhone are trademarks of Apple, Inc., registered in the U.S. and other
countries. All other marks are registered trademarks and trademarks of Bose
Corporation.
HDMI and the HDMI Logo are trademarks or registered trademarks of HDMI Licensing
LLC in the United States and other countries.
English – 17
安全上の留意項目
このガイドは必ずお読みください。
ガイドの指示に注意して、慎重に従ってください。ご購入いただいたシステムを正しくセットアッ
プして操作し、機能を十分にご活用いただくために役立ちます。また、必要なときにすぐにご覧に
なれるように大切に保管しておくことをおすすめします。
正三角形に矢印付き稲妻マークが入った表示は、製品内部に電圧の高い危険な部分があり、
感電の原因となる可能性があることをお客様に警告するものです。
正三角形に感嘆符が入った表示は、製品本体にも表示されている通り、この取扱説明書の中
で、取り扱い上およびメンテナンス上、重要な項目であることをお客様に警告するものです。
警告:
• 火災や感電を避けるため、製品を雨にあてたり、湿度のある場所で使用しないでください。
• 水漏れやしぶきがかかるような場所でこの製品を使用しないでください。また、花瓶などの液体が
入った物品を製品の上や近くに置かないでください。他の電気製品と同様、システム内に液体が侵
入しないように注意してください。液体が侵入すると、故障や火災の原因となることがあります。
• 火の付いたろうそくなどの火気を製品の上や近くに置かないでください。
• 子供がリモコンの電池に手を触れないようにしてください。取り扱いを誤ると、火災や火傷の原
因となることがあります。電池を充電したり、分解したり、100ºC を超える熱を与えたり、焼却
したりしないでください。使用済みの電池は速やかに処分してください。交換する場合は、正し
い種類と型番の電池を使用してください。
• のどに詰まりやすい小さな部品が含まれています。3歳未満のお子様には適していません。
注意:
• システムまたはアクセサリーを改造しないでください。許可なく製品を改造すると、システム
の安全性と性能が損なわれるだけではなく、法令遵守の問題が生じ、製品保証が無効となる場
合があります。
• 大きな音量で長時間続けて聞くと、聴力に悪い影響を与えることがあります。ヘッドホンを長
時間使用する場合は、過度な音量を避けるようにしてください。
注記:
• 万一の事故や故障に備えるために、電源プラグはよく見えて容易に手が届く位置にあるコンセ
ントに接続してください。
• この製品は室内専用です。屋外、RV 車内、船上で使用するようには設計されていません。また、
このような使用のテストもされていません。
• この製品には付属の電源アダプターを使用してください。
• 製品ラベルは本体下部にあります。
使用済みの電池は、お住まいの地域の条例に従って正しく処分してください。焼却しない
でください。
その他のご注意
その他の注意については、パッケージに同梱の『安全上の重要なご注意』シートを参照してくださ
い(北米のみ)。
Class B emissions
This device complies with FCC and Industry Canada RF radiation exposure limits set forth for
general population. It must not be co-located or be operating in conjunction with any other
antennas or transmitters.
This product conforms to all EU Directive requirements as applicable by law. The complete
Declaration of Conformity can be found at www.Bose.com/compliance.
2 – 日本語
システム設定
はじめに
Bose® LIFESTYLE® systemをご購入いただき、ありがとうございます。このガイドでは、
ご購入いただいたシステムをセットアップする方法について、順を追ってご説明いたし
ます。システムのご購入時は、まずこちらの「①設置ガイド」を先にお読みください。
セットアップ手順は次の2段階に分かれています。
システムの設置と接続: システムコンポーネントを設置し、相互に接続します。
システムの初期設定 : UNIFY 設定サポートシステムにより、テレビ画面に表示される手
順に従ってセットアップを完了します。
付属品の確認
システムの内容物は 4 つのキットに分かれています。その他に、電源コードが収納され
た小さな箱があります。
•
•
•
•
11 コンソールキット
2 アクースティマスモジュールキット
3 スピーカーキット
4 インタラクティブキット
•
電源コードキット(キット1と2で使用)
次ページ以降の説明に従い、まずキット 1 から順にパッケージを開けて、セットアップ
を行います。セットアップを終えるまで次のキットは開けないでください。
箱や梱包材は、後日修理やメンテナンス等が必要になった場合のために保管しておくこ
とをおすすめします 。
もし、開梱時に損傷などが発見された場合や内容物が不足している場合は、そのままの
状態を保ち、 直ちにお買い上げになった販売店までご連絡ください。そのままでのご
使用はおやめください。
注意:
本製品は、HDMI 入力端子が装備されたテレビにのみ接続することができます。
説明の便宜上、取扱説明書に描かれたイラストは実物と異なる場合があります。
日本語 – 3
システム設定
11
コンソールキット
この手順で必要となるもの
キット1の内容物
電源アダプター
HDMI™ケーブル
コンソール
電源コードキットの
内容物
電源コード
1. コンソールは、テレビに近い
安定した場所に水平に設置し
ます。
注記:システムの設置が完了するま
で、コンソールはひとまず背面パネル
にある接続部に手が届きやすい場所に
仮置きすることをおすすめします。
コンソール
4 – 日本語
音声入力
ケーブル
システム設定
2. HDMI™ケーブルの片側をテレビのHDMI入力端子に差し込みます。
テレビのHDMI入力にHDMIケーブルを接続済みの場合は、 接続されているケーブル
をそのまま使用するため、反対側を抜いてください。
3. HDMI ケーブルの反対側を、コンソールの [HDMI OUT Video to TV] 端子に差し込
みます。
HDMI OUT
Video to TV
日本語 – 5
システム設定
4. 音声入力ケーブルの片側をコンソールの [Audio OUT] 端子に差し込みます。
• 矢印が表示された平らな面を上に向けてプラグを差し込んでください。
• ケーブルの反対側は床に垂らしておきます。次のキットをセットアップする際に、
このケーブルの接続が必要となります。
Audio OUT
5. 電源アダプター出力ケーブルをコンソールの[Power]端子に差し込みます。
Power
電源コード
電源アダプター
出力ケーブル
電源アダプター
6. 電源コードキットから電源コードを取り出します。
7. 電源コードの片側を電源アダプターに
奥までしっかりと差し込みます 。
8. 電源コードの反対側を、壁のコンセントに差し込みます。
9. 次のページのキット 2 の手順に進みます。
6 – 日本語
システム設定
2
アクースティマスモジュールキット
この手順で必要となるもの
電源コードキットの
内容物
キット2の内容物
電源コード
アクースティマスモジュール
1. アクースティマスモジュー
ルは、室内にテレビが置か
れている側の床面に設置し
ます。電源コンセントが近
くにある場所に設置してく
ださい。
アクースティマスモ
ジュール
2. ア ク ー ス テ ィ マ ス モ
ジュールを横に倒して、
端子パネルの位置を確
認します。
端子パネル
日本語 – 7
システム設定
注意:アクースティマスモジュールは、前面または
背面を下にして置かないでください。
3. 音声入力ケーブルの接続されていない側を、アクースティマスモジュールの [Media
Center] 端子に差し込みます。
矢印が表示された平らな面をアクースティマスモジュールの前面方向に向け、プラ
グを差し込んでください。
Media Center
4. 電源コードキットから電源コードを取り出します。
5. 電源コードの片側を、アクースティマスモジュールの [AC Power] 端子に
奥までしっかり差し込みます。
AC Power
6. 電源コードの反対側を、壁のコンセントに差し込みます。
7. 次のページのキット 3 の手順に進みます。
8 – 日本語
システム設定
3
スピーカーキット
この手順で必要となるもの
キット3: システムスピーカー(下図の3種類のうちいずれか)
Jewel Cube®
スピーカー
フロントセンター
スピーカー 1台
フロント左右、
およびリア左右
スピーカー 4台
Direct/Reflecting®
キューブスピーカー
アレイ
Virtually Invisible®
シングルキュー
ブスピーカー
フロントセンタース
ピーカー 1台
フロント左右、
リア左右、および
フロントセンタース
ピーカー 5台
フロント左右、
およびリア左右
スピーカー
4台
フロントスピーカー用ケーブル
フロント左(L)
白
リアスピーカー用ケーブル
フロント右(R)
ライトブルー
リア左(LR)
ライトグリーン
リア右(RR)
紫
フロントセンター(C)
茶
日本語 – 9
システム設定
注記:システムスピーカーは天井吊り・壁掛けブラケットまたはフロアスタンドにも設置できま
す。これらのアクセサリーにつきましては、 お近くのボーズ製品販売店、または弊社ユーザーサ
ポートセンターまでお問い合わせください。なお弊社 Web サイトにおきましても、各種アクセサ
リーをご紹介しております。
1. フロントセンタースピーカーを、テレビの中心線の真上または真下の安定した場所
に水平に設置します。下の例をご参照ください。
フロント左(L)
フロント右(R)
フロントセンター
(C)
2. フロント左/右スピーカーを、テレビの両側に1台ずつ設置します。
• スピーカーは、音声が映像から離れすぎないように、テレビ画面の端から1 m以内
のところに設置することをおすすめします。部屋の状況やお好みに応じて、スピー
カーの距離を決めてください。
• 本棚のような囲まれた場所にスピーカーを置く場合は、棚の前面端に合わせて設
置してください。
• Jewel Cube® またはDirect/Reflecting® キューブスピーカーをご使用の場合は、反射
音成分を得るため、 各スピーカーのキューブ 1 つを後方の壁に向けてまっすぐ
に、もう1つが横の壁に向くようにキューブを回転させてください。
10 – 日本語
システム設定
3. リアスピーカーは、お部屋の後方、リス
ナーの後ろに設置します。可能であれ
ば、座った時の耳の高さと同じか、それ
より高い位置に設置してください。
• リアスピーカー用ケーブル ( 長さおよ
そ 15 m) が、スピーカーからアクース
ティマスモジュールまで届くことを
確認してください。
リア左
(LR)
リア右
(RR)
• スピーカーがあまりリスナーに近す
ぎると、スピーカーからの直接音が強
く意識され過ぎ、臨場感が失われま
す。スピーカーは席から少々離して設
置してください。
• Jewel Cube® または Direct/Reflecting®
キューブスピーカーをご使用の場合
は、反射音成分を得るため、各スピー
カーのキューブ 1 つを前方正面に向
け、もう 1 つが横の壁に向くように
キューブを回転させてください。
4. アクースティマスモジュールの端子パネルにある色分けされた端子の位置を確認し
ます。
色分けされた端子
5. スピーカーケーブルを、アクースティマスモジュールの端子に差し込みます。各ケー
ブルのプラグの色と端子の色を合わせてください。
日本語 – 11
システム設定
6. スピーカーケーブルのもう一方の端にあるスピーカー位置表示を確認します。
スピーカー位置表示(L、C、R、LR、RR)
7. スピーカー位置表示を見て、各ケーブルを対応するスピーカーまで延ばします。次
の図の例をご参照ください。
フロント
スピーカー
リア
スピーカー
12 – 日本語
システム設定
8. 使用するスピーカーに合わせて、スピーカーケーブルを接続します。
Jewel Cube® スピーカー:
スピーカー端子にプラグを差し
込みます。コネクターは突起が
ある面が上です。
Direct/Reflecting® お よ び Virtually Invisible®
シングルキューブスピーカー:
ボタンを押して先バラ線を差し込みます。赤い
表示のあるコードを赤の端子に、もう 1 本のコー
ドを黒の端子に接続してください。
注記:2 本のリアスピーカー
用ケーブルが 1 本にまとまっ
ています。2 本を引き離して
広げ、ご使用ください。
9. アクースティマスモジュールを使用する場所に置きます。
• 縦に置く方法が最適ですが、横に倒
して置いても構いません。
• 前面の開口部を室内に向けます。
• ブラウン管式テレビをお使いの場合
は、磁力によってテレビ画面が乱れな
いように、アクースティマスモジュー
ルをテレビから45 cm以上離して設置
してください。画面が乱れる場合は、
さらに離してみてください。
最適な設置方法
別の設置方法
注意:アクースティマスモジュールは、非防磁スピーカーです。ビデオテープやカセッ
トテープなど、磁気メディアをアクースティマスモジュールの上や横などに長時間放置
しないでください。アクースティマスモジュールの磁気が影響して、記録の一部または
全部が消去される場合があります。
注意:アクースティマスモジュール背面換気用の開口部
をふさがないでください。過熱して火災の原因になる場
合があります。
10.次のキット 4 の手順に進みます。
日本語 – 13
システム設定
4
インタラクティブキット
この手順で必要となるもの
キット4の内容物
リモコンおよび
電池
ADAPTiQ® 自動音場補正システム用
ヘッドセット
ここまでの手順で、コンソール、アクースティマスモジュール、スピーカーの設置およ
び接続が完 了 しま し た。次 に シ ステ ム の 電 源を 入 れ て、ナビゲーションシステム
UNIFY® によるセットアップを開始します。
重要:
• セットアップを始める前に、スピーカーとアクースティマスモジュールを必ず使用す
る場所に設置してください。
• コンソールには、まだ他の機器を接続しないでください。テレビ画面に表示される手
順に従って、機器を接続してください。
1. リモコンの裏側にあるバッテリーカバーをスライドして外します。
単三形アルカリ乾電池4本
バッテリーカバー
2. 電池ケースに表示されている+と - の向きと乾電池の+と - の向きを正しく合わせて
単三形アルカリ乾電池4本を入れます。
3. バッテリーカバーを元通りにスライドして閉じます。
14 – 日本語
システム設定
4. コンソールの電源ボタン(
)を押して、システムの電源を入れます。
電源投入時は省電力状態から復帰するため、起動までに数秒∼十数秒間を要します。
電源ランプの点滅が緑の点灯に変わると、システムが使用可能な状態になります。
電源ランプ
5. テレビの電源を入れます。
6. テレビのリモコンまたはテレビ本体のボタンを使用して、テレビ入力を LIFESTYLE®
systemを接続したHDMI入力に切り替えます。
7. テレビ画面に表示される手順に従い、
UNIFY® によるセットアップを完了します。セッ
トアップの流れは、以下の通りです。
• 言語を選択します。
• ADAPTiQ® デジタル自動音場補正システムによる、室内の音場補正を行います。
• コンソールにAV機器を接続します。
• Bose® リモコンで接続機器を操作できるように設定します。
キット4に含まれているその他の内容物
キット 4 に含まれている内容物の一部は、LIFESTYLE® system の初期セットアップでは
使用しません。これらの内容物の使用方法、または他の機器を後で追加する方法につい
ては、操作ガイドの「セットアップモードの使用」を参照してください。
IR(赤外線)
エミッター
ステレオ音声ケーブル
AMアンテナ*
FMアンテナ*
ゴム足(フロントセン
タースピーカー用)
®
®®®®
5
225 00
VV 11
5// //TT
335 00
VV TT22
LLEE EE
YY YYLL
STT TT
EES ESS
IIFF IIFFE
LL
LL
®
®®®®
nnonn
ioioioi
atlsiatsatat
iliilsilsi
utututut
d’d’d’d’
de
uideuide
GuiGui
||G|G|
riorioriorio
uaua
ususuaua
lluslusl
dede
adeade
uíauía
GuíGuí
||G|G|
dededede
uiuiuiui
GGGG
gggg
tintintintin
rararara
pepe
OOOpeO
iPod/iPhone
用ドック*
HHHOOO
M
M
ME
HHHOOO EEEEENNNTE
TE
TERT
M
M
MEEE
RTAA
AIN
TTTHHHEA RT
IN
INM
M
EA
MEN
EATE
EN
EN
TE
TERRR
SSSYYYST TTTSSSYYYST
ST
ST
ST
STEM
EM
EMS
SS
EM
EM
EMS
SS
操作ガイド
USBドライブ
(システムアップ
デート専用)
ゴム足(アクースティマ
スモジュール用)
* LIFESTYLE® V35/V25システムのみ
日本語 – 15
システム設定
ゴム足の取り付け方法
アクースティマスモジュールを床に直接置く場合は、安定性の向上と床の保護のため、
アクースティマスモジュールの下に付属のゴム足を取り付けることをおすすめします。
ゴム足(アクー
スティマスモ
ジュール用)
底面
ガラス面やワックスのかかった木材の床に設置している場合、振動によってスピーカー
の位置がずれることがあります。センタースピーカーをそのような面に設置する場合
は、付属のゴム足を取り付けることをおすすめします。
ゴム足(フロン
トセンタース
ピーカー用)
センタースピーカーの
底面
製品のゴム足について
注意:
• ゴム足は素材の性質から、設置面の塗料によっては、移行または汚染を示す可能性が
あります。事前にご確認のうえご使用ください。
• 付属のゴム足は高摩擦性を有している分、塗装面との接触面に密着しやすい性質を
持っております。接触面の一部を剥がしてしまう可能性も有りますので、事前にご確
認のうえご使用ください。
セットアップ時のトラブル
機器がリモコンに反応しない場合や接続に障害がある場合など、セットアップ中にトラ
ブルが発生したときは、 いつでもセットアップモードに戻って、システム設定を修正
または一部変更することができます。詳しくは操作ガイドの「セットアップモードの使
用」を参照してください。
トラブルが発生した場合の解決方法については、操作ガイドの「故障かな?と思った
ら」を参照してください。
お問合せ先
トラブル解決のための詳細情報については、ボーズ株式会社ユーザーサポートセンター
にお問い合わせください。お問い合わせ先は、操作ガイドをご覧ください。
16 – 日本語
システム設定
LIFESTYLE® V25およびV35ホームエンターテイメントシステムにのみ適用されます
「Made for iPod」および「Made for iPhone」とは、それ
ぞれiPodあるいはiPhone専用に接続するよう設計され、
アップルが定める性能基準を満たしているとデベロッ
パによって認定された電子アクセサリーであることを
示します。アップルは、本製品の機能および安全および規格への適合について一切の
責任を負いません。このアクセサリーをiPodまたはiPhoneと使用すると、無線の性能
に影響する可能性がありますのでご注意ください。
iPodおよびiPhoneはApple, Inc.の商標であり、アメリカ合衆国および他の国々で登録
されています。その他全ての商品名はBose Corporationの登録商標および商標です。
HDMI および HDMI のロゴは HDMI Licensing, LLCの米国および他の国々における商標ま
たは登録商標です。
日本語 – 17