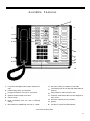
1
AT&T
MERLIN
™
COMMUNICATIONS SYSTEM
ADMINISTRATION MANUAL:
MODELS 206,410, AND 820
WITH FEATURE PACKAGE 2
Table of Contents
Introduction
The Control Unit
The Three Types of Cartridges
Features and Benefits
Fixed Features
2
4
6
7
Programmable Features
8
11
System Features
14
Optional Features and Equipment
15
Basic Administration
The Administrator/Attendant Voice Terminal
16
16
Setting Switches on the Control Unit
16
Entering Administration Mode
17
Line Administration
18
Connecting Lines to the Control Unit
Assigning Lines to Line Buttons
Initial Features Assignments
Customizing Other Options in the System
18
18
19
23
Call Restrictions
23
System Speed Dial
Group Paging
24
24
Transfer Return
25
Button-Free Line Operation
25
Instructions for Button-Free Line Operation
System Reset
Programming Individual Voice Terminals to Meet Office Priorities
26
27
28
Programmable Line Ringing
28
Automatic Line Selection
28
Programming Individual Voice Terminals to Meet Personal
Priorities
30
Feature Programming Chart
30
Programming Tips for the 34-Button Voice Terminals
32
Programming Tips for the 10-Button Voice Terminals
32
Programming Tips for the 5-Button Voice Terminals
32
Transferred Calls
Special lnformation for the System Attendant
33
34
Ringing Patterns
34
Transferring Calls
34
Intercom Auto Dial
35
Send Message
Headset
35
35
Troubleshooting Chart
36
Index
38
Quick Reference Guide to Administration Procedures
39
1
Introduction
Most people can effectively use their MERLIN communications system voice terminal by reading the User's Guide: Models 206, 410, and 820 with Feature Package 2.
As administrator, however, you will want more detailed information about all the
options available with Feature Package 2. This manual provides you with information
on how to customize the MERLIN system to meet the needs of your business.
Complete customization of your MERLIN system involves a series of administration
procedures at the control unit, at the administrator/attendant voice terminal, and at
individual voice terminals. To begin customizing the system, you set some switches
on the control unit. You then give the system further information by using the
administrator/attendant voice terminal. Here are the administration procedures you
can perform:
● administer lines
● connect telephone lines to jacks in the control unit
● assign lines to voice terminals
● set call restrictions
— outward call restriction
— toll call restrictions
• program System Speed Dial
● program System Speed Dial with Restriction Override
● set up Group Paging zones
● program Transfer Return Ringing
● administer phones for Button-Free Line Operation
● system reset
2
Available Features
7
1
8
2
3
9
4
10
11
5
12
6
13
14
1 . Line buttons with lights make it easy to keep track of
calls.
2 . Flexible calling within your business.
8. One-touch dialing of numbers you call often.
9. Convenient access to your frequently called intercom
numbers.
3 . Program the features you want on your phone.
10. Easy transfer of calls to someone else.
4 . Speak to several people at one time.
11. Frequently used features like Hold are designed for
easy access.
5 . Volume control.
6 . Know immediately when you have a message
waiting.
12. One-touch redialing of busy numbers.
7 . Most features are available with the touch of a button.
14. Use this for Centrex and PBX features.
13. Speaker.
...And There Are Even More
3
The Control Unit
The control unit is the center of the MERLIN system in that, one way or another,
everything connects to it.
Feature Package 2, which contains the software that enables you to customize your
MERLIN system, is a cartridge that plugs into your control unit. It can be used with
the control unit for Models 206,410, or 820. These models differ from one another in
the number of outside lines and voice terminals (MERLIN system telephones) that
they support.
The diagrams on the next two pages show the parts of your control unit. The diagram
of the Model 410 control unit serves to illustrate both Model 410 and Model 206.
1. Red Warning Light
The red Iight warns you about problems in the system. (See "Troubleshooting Chart,"
pages 36-37.)
2. Green Power Light
The green light indicates that power is on.
3. Admin/Normal Switch
When you administer the system, set this switch to Admin. You can leave it in the
Admin position permanently, even during normal operation, if you wish. However, to
ensure that no accidental administration takes place, you may want to set it back to
Normal (see page 17).
4. ToII Prefix/Area Code Switch
If you use a 1 or 0 as a prefix when dialing long-distance calls, set this switch to Toll
Prefix. If you do not use a prefix, set the switch to Area Code (see page 16).
5. Tone/Pulse Switch
If you have Touch-Tone service, set this switch to Tone. If you have rotary pulse lines
from your telephone company, set it to Pulse.
6. Auxiliary Power
The Auxiliary Power Unit plugs in here to provide the auxiliary power you need if you
have an unusual number of accessories, for example, Hands-Free Units or 34-button deluxe voice terminals.
7. On/Off Switch (Model 820 only)
Controls electrical power to the MERLIN system.
8. AC Power Input (Model 820 only)
The electrical power cord plugs in here.
4
9. Line and Voice Terminal Modules (Model 820 only)
These modules contain jacks for telephone company lines and jacks for voice
terminals. Three types are available: 2 lines/5 voice terminals, 0 lines/5 voice
terminals, and 2 lines/0 voice terminals. You can have as many as four modules for a
maximum of eight lines and twenty phones. The drawing of the control unit on page
6 shows a system with two modules installed.
10. Voice Terminal Jacks
The MERLIN system voice terminals plug in here. The number of the jack is the
same as the intercom number of the phone.
11. Telephone Company Line Jacks
Your lines from the telephone company plug in here. The letters next to the jacks–
A,B,C,D,E,F,G,H—correspond to the line buttons on voice terminals. (See "Initial
Feature Assignments," page 19.)
1
2
3
4
5
6
12
13
10
14
11
MERLIN COMMUNICATIONS SYSTEM CONTROL UNIT
MODEL 410
5
THE THREE TYPES OF CARTRIDGES
12. Type I Cartridges Give You Custom Features
Feature cartridges contain the software that enables you to customize your system.
You have Feature Package 2, one of a family of feature cartridges designed for the
Type I slot.
13. Type II Cartridges Give You Audio Options
Two different cartridges are available for this slot. One enables you to have Musicon-Hold. When this cartridge is connected to a music source, callers you put on hold
will hear music. A second cartridge provides an interface for Music-on-Hold, background music, and Loudspeaker Paging. When a loudspeaker paging system is
connected to this cartridge, users can make announcements over it. For the paging
system to work, set Paging Signal On/Off switch to On.
14. Type III Cartridges Give You Line-Associated Options
This cartridge supports two separate features: Power Failure Transfer and Extra
Alert. Power Failure Transfer provides jacks for two basic Touch-Tone or rotary
telephones. In case of a commercial power failure, with the Power Failure Transfer
feature, telephone service is automatically switched to the backup phones. The
Extra Alert jack enables you to connect a loud bell or horn for noisy or remote
locations where the regular telephone ring can’t be heard.
1
2
9
3
4
5
12
10
6
13
7
8
14
11
MERLIN COMMUNICATIONS SYSTEM CONTROL UNIT
MODEL 820
6
Features and Benefits
This section describes all the features available with Feature Package 2. As system
administrator, you will make decisions about how the system should operate and
about which features best meet the needs of your business. To operate the features,
consult the User’s Guide: Models 206, 410, and 820 with Feature Package 2.
Feature Package 2 includes both fixed features that are built into the system and
custom features that can be programmed by anyone in your office. There are also
system-wide features that only you can administer.
7
Fixed Features
FEATURE
8
DESCRIPTION
BENEFITS
Call Pickup
Makes it possible for someone
who hears a voice terminal ringing
to answer it from another voice
terminal.
• Answer another person’s phone
without leaving desk.
• People who move around from one
place to another can answer calls
conveniently.
Call Waiting
Provides brief ring or voice announcement from speaker and flashing
green light to indicate that another
call has come in for person.
• Employees do not have to worry
about missing important calls
while on telephone.
• Reduces need for taking messages.
Conference
Enables person to join two outside
lines to make a three-way conference call. Two additional inside people can join the conference by lifting
their handsets and touching the
busy line button.
• Have a question answered by
adding another person to call—no
need for time-wasting callbacks.
• If two outside people want to talk
to each other, originator of call can
conference them together, put
them on hold, and be free to do
other business.
• Employee who is working at home
and wants to make a long distance
call can call the office and be conference to WATS line.
Distinctive Ringing
Voice terminal rings differently for
incoming, transferred, and intercom
calls.
• Know where call is coming from
and answer accordingly.
Drop
Disconnects a person from a
conference call.
• Drop a person from a conference
call while maintaining contact with
others in privacy.
• Drop a busy or unanswered
line that has been added to a
conference call.
Group Listening
Turning on the speaker lets everyone in the room hear the person on
the other end.
• Eliminates extra calls because
other people in room can hear both
sides of conversation.
Hold
Makes it possible to keep someone
on the line without communication.
Green light next to line button that is
on hold flashes rapidly. Green lights
next to line buttons on which others
are holding calls flash at slower
rate. (See also Music-on-Hold.)
• Answer a second call or attend to
another matter.
• Have confidential conversation
without person on hold hearing it.
• Distinguish line button on
which you are holding a call from
buttons on which other people are
holding calls.
Fixed Features (continued)
FEATURE
DESCRIPTION
BENEFITS
Automatic Hold Release
Automatically opens line when
person on hold hangs up. Green
light next to button goes off.
• Know immediately when person
on hold hangs up.
• Unused line is not kept busy
unnecessarily.
Automatic Hold Reminder
Beeps every minute as a reminder
that a person is on hold.
• Held calls are not forgotten.
Intercom
Makes it possible for people in the
same system to call each other.
(See also Voice Announcement
Disable.)
• Call any person in office using an
abbreviated number.
• Signal others by ringing or voice
without interrupting active calls.
• Attendant can announce calls
before transferring them.
Line Request
Requests a line that is busy,
and returns a tone when the line
becomes available.
• Allows more efficient use of lines.
• No need to keep checking line.
Hear beep when line becomes
available.
Message Waiting
Message
Green light lets person know that
message is waiting. (See also Send
Message.)
• Learn of message immediately
upon return to desk.
• Can be turned off by attendant or
person receiving message.
• Messages are not lost.
Monitor-on-Hold
Speaker
If put on hold, turn on speaker and
hang up handset until other person
returns to call. (See also HandsFree Unit.)
• No need to hold handset. Person is
free to do other work.
On-Hook Dialing
Speaker
Turning on the speaker lets a
person dial an outside or intercom
call without lifting handset. (See
also Hands-Free Unit.)
• Keep both hands free until someone answers.
• Keep trying busy number without
lifting handset.
Privacy Alert
Red and green lights flash alternately next to line button if someone
joins the line.
• Know immediately if someone has
joined the line you are using.
9
Fixed Features (continued)
FEATURE
10
DESCRIPTION
BENEFITS
Recall
Provides a timed switchhook flash
for use of MERLIN system with
Centrex or PBX systems. Also
allows people without Centrex or
PBX to disconnect calls without
hanging up.
• Access features of Centrex or PBX
system without having to worry
about timing a "flash."
• Recall can be programmed into an
Auto Dial sequence as the first
character along with feature codes
for one-touch access to PBX or
Centrex features.
Ringing Line Selection
Automatically selects ringing line
when call comes in.
• Just lift handset to answer any
call. No need to touch any buttons.
Send Message
Enables attendant to notify person
that a message is waiting.
• Attendant does not have to call or
leave console to give people
messages.
• Attendant can keep track of who
has a message at a glance.
Transfer
Makes it possible to pass outside
calls to any voice terminal in the
system. Person to whom call is
transferred hears the distinctive
ring of a transferred call. Calls may
be transferred with or without an
intercom announcement. Unanswered calls return to the person
who transferred them.
• Anyone in the office can pass calls
to the right people efficiently.
• Attendant can screen calls on
intercom as part of transfer.
• Calls do not go unanswered.
Transfer Return
If transferred call is not answered,
it rings again at originating voice
terminal. The return time is
programmable.
• Transferred calls are not lost.
Voice Terminal Programming
Makes it possible to program voice
terminals for custom features.
• Customize each voice terminal in
accordance with priorities of business and needs of individual.
Voice Terminal Testing
Makes it possible to determine
whether all lights and ringers are
working by moving a switch on the
side of the voice terminal.
• Easy troubleshooting.
• Verify that voice terminal has been
installed properly.
Volume Control
Makes it possible to adjust sound
level of voice terminal ring and
speaker.
• Each person can control loudness
of ring and speaker.
• Reduces office noise.
Programmable Features
FEATURE
DESCRIPTION
BENEFITS
Auto Answer-Intercom
Automatically turns on the optional
Hands-Free Unit when receiving an
intercom call.
• No need to touch a button to
answer an intercom call.
Automatic Line Selection
Automatically selects a free line
when you lift handset to make call.
• No need to find a free line or touch
a button.
• Program voice terminal to select
long distance lines in most economical order—for example, WATS
line first, then regular service.
Do Not Disturb
Prevents voice terminal from ringing
for a temporary period. While Do
Not Disturb is in effect, callers get a
busy signal.
• Work or have meetings in the
office without being interrupted
by ringing telephone.
Group Paging
Anyone connected to the MERLIN
system can make an announcement to a group of up to three
phones simultaneously. (The
administrator can specify up to
ten different groups.)
• Saves the time of making two or
three separate intercom calls.
Intercom Auto Dial
Makes it possible to program
buttons with intercom numbers
for quick dialing.
• Dial a frequently called intercom
number easily.
• No need to remember intercom
numbers—buttons can be labeled
with names.
• Green light next to button lets
attendant know when line is busy,
and take a message instead of
transferring calls.
Manual Signaling
Touching an Intercom Auto Dial
button causes a beep at the voice
terminal represented by the button.
• Buttons can be used to signal
other people even when they are
busy on the telephone. For
example, boss and secretary may
signal each other.
Last Number Redial
Automatically stores last number
dialed. Person can redial number by
pressing button. (People with 5- or
10-button voice terminals can
access this feature by dialing #24.)
• No need to keep redialing an
outside number that is busy or
isn’t answered.
• No need to remember or look up
number each time.
11
Programmable Features (continued)
FEATURE
12
DESCRIPTION
BENEFITS
Outside Auto Dial
Touching a programmed button
automatically dials the outside
number it represents.
• Saves time in dialing.
• Dial a frequently called outside
number with one-touch
convenience.
• No need to remember or look up
numbers.
• Prevents errors in dialing.
Personal Speed Dial
Makes it possible to store outside
numbers so that each number can
be dialed by using a three-character
code. The stored numbers may be
different for each voice terminal.
This feature is available on 5- and
10-button voice terminals. (See also
Outside Auto Dial.)
• Saves time in dialing.
• Employees whose voice terminals
have no room for Auto Dial buttons
can simplify dialing of frequently
called numbers or lengthy numhers such as those that include
area and access codes.
Privacy
Prevents others from joining calls.
• Make confidential calls in private.
• No one can interrupt call.
Personalized Ringing
Allows selection of one of eight
ringing signals for any voice
terminal.
• Employees who work close to one
another can distinguish ringing of
their own voice terminals.
Programmable Line Ringing
(Coverage)
Individual lines can be programmed
to ring immediately, after a delay, or
not at all on incoming calls. This
does not apply to transferred or
intercom calls.
• Flexible call coverage.
• Program a second voice terminal
to ring for that line when the person to whom the call is directed
does not answer.
• Voice terminals in lobby and
conference rooms can be programmed not to ring at all on
incoming calls.
• Program lines on voice terminals
to ring according to personal preference and needs of business.
Saved Number Redial
Touching a button stores a dialed
number for later redialing. The
stored number remains the same
until replaced with another number.
Person can redial number after
making other calls by touching
button again. People with 5- or
10-button voice terminals can
access this feature by dialing # 23.
Any voice terminal may be programmed with more than one
Saved Number button.
• Comes in handy when person is
trying to make outside call and
gets busy signal or no answer.
• Make other calls and try number
again later simply by touching
button.
• No need to remember or look up
number again.
• Store several numbers.
Programmable Features (continued)
FEATURE
DESCRIPTION
BENEFITS
Touch-Tone Enable
Generates Touch-Tone signals on
rotary lines.
• Businesses that use rotary lines
can access alternate longdistance services, banking-byphone, credit card authorization,
and other electronic services that
require Touch-Tone dialing.
• Can be programmed into Auto Dial
sequence using Transfer button.
Voice Announcement Disable
Blocks intercom voice announcements on individual voice terminals,
which ring automatically instead to
signal intercom calls.
• People who do not want to be
interrupted by voice announcements can receive intercom ringing
instead.
• Administrator may program voice
terminals in public places such as
lobbies and conference rooms
with this feature.
13
System Features—For Administrator Only
FEATURE
BENEFITS
Button-Free Line Operation
Enables users to have access to all
lines without using up buttons.
• Gives users of 5-button voice
terminals more buttons for custom
features.
Call Restriction
Enables administrator to adjust any
voice terminal so that no outside
calls can be made on it or so that no
toll calls can be made on it.
• Prevents telephone abuse.
• Voice terminals in public places
can be restricted to inside or local
calls only.
• Controls telephone costs.
Line Administration
Makes it possible for administrator
to assign any combination of lines
to any voice terminal.
• Line assignments can be customized to control costs.
• Personal lines can be assigned to
appropriate people.
• Lines can be reassigned easily.
System Reset
Enables administrator to set system
back to initial feature assignments.
• All administration and programming is erased and initial
feature assignments are reset on
voice terminals.
System Speed Dial
Enables administrator to enter up to
40 different numbers so that each
number can be dialed by using a
three-character code. The same set
of numbers is available to users at
all voice terminals. Only the administrator can program System Speed
Dial numbers.
• Gives each person in the system
access to frequently called numbers.
• Employees can access authorization codes administrator does not
want to divulge.
• Phones otherwise restricted from
placing long-distance calls can still
use System Speed Dial.
Makes it possible for MERLIN systern to work with either Touch-Tone
or rotary lines.
• Convenience of push-button
dialing with less expensive
rotary lines.
Outward Call Restriction
Toll Call Restriction
System Speed Dial with Restriction
Override
Touch-Tone/Rotary Option
14
DESCRIPTION
Optional Features and Equipment
FEATURE
DESCRIPTION
BENEFITS
Provides a connection for alerting
devices such as bells, horns, or
strobe lights in up to three different
areas of building. Your business
must supply alerting devices.
• Alert people in noisy areas that
telephone is ringing.
General Purpose Adapter
Connects telephone accessories to
any MERLIN system telephone.
• Modem can be added for data
communication with computer.
• Cordless telephone or basic
Touch-Tone or rotary telephone
can be added.
Hands-Free Unit
Provides full speakerphone capability. Requires programmable
button on voice terminal.
• Hands-free telephone conversation from anyplace in room.
• Hands-free answering on intercom.
• One-touch answering of outside
calls.
• On-hook dialing.
• Monitor-on-hold.
• Teleconferencing—other people
in room can participate in
conversation.
Headset and Headset Adapter
Enables attendant to handle calls
without lifting handset.
• Hands-free speaking and listening.
Loudspeaker Paging
Makes it possible to page others on
loudspeaker system. Your business
must supply paging system.
• Attendant can quickly locate
people who are away from their
desks or normal work areas.
Makes it possible to provide callers
with music when they are put on
hold. Your business must provide
music source, such as tape player
or FM radio.
• People on hold know they have not
been forgotten and are willing to
hold on longer.
• Projects pleasant business image.
Makes it possible to have telephones
off premises connected to MERLIN
system. Auto-dial telephones such
as the TOUCH-A-MATIC® 7104 are
recommended for this purpose.
User instructions are supplied with
Off-Premises Interface.
• Telephones in remote locations
may be connected to MERLIN
system.
• Selected employees may have
telephone at home connected to
system.
Permits connection of two basic
Touch-Tone or rotary telephones to
which the system automatically
switches service if power fails.
• Telephone service continues
despite power failure.
Extra Alert
Required Equipment:
• Type III cartridge in control unit
Required Equipment:
• Type II cartridge in control unit
Music-On-Hold
Required Equipment:
• Type II cartridge in control unit
Off-Premises Telephone Interface
Required Equipment:
• Basic Touch-Tone telephone off
premises
Power Failure Transfer
Required Equipment:
• Type III cartridge in control unit
15
Basic Administration
This section guides you through the administration procedures required to get your
MERLIN system up and running. A later section tells you how to customize your
system further.
Complete customization of your MERLlN system involves a series of administration
procedures at the control unit, at the administrator/attendant voice terminal, and at
individual voice terminals. However, to get your system up and running in a simple,
basic configuration, just follow the steps in this chapter: set a few switches on the
control unit, connect telephone company lines to the control unit, and assign these
lines to line buttons on voice terminals.
In many businesses, further customization is not necessary because the MERLIN
system comes with a preassigned set of features, called initial feature assignments.
After just a few simple procedures, the MERLIN system voice terminals will have
the initial feature assignments, which you can choose to change or leave in place.
These are discussed on page 19.
Before you start administering your system, keep the following in mind:
1. It is best to do administration when the system is not is use, but this is not a
requirement. The system automatically alerts you with a single, low-pitched ring if
you try to administer a part of it that is in use.
2. Make sure the Feature Package 2 cartridges firmly seated in the slot at the upper
right hand corner of the control unit.
WARNING: ALWAYS TURN OFF POWER TO lNSERT OR REMOVE CARTRIDGE.
3. When you turn the system on, the green Power light should go on and the red
Warning light should be off.
4. Check that your MERLIN system voice terminals are plugged into the numbered
jacks on the control unit. These jack numbers correspond to intercom numbers.
THE ADMINISTRATOR/ATTENDANT VOICE TERMINAL
The voice terminal plugged into Intercom 10 (intercom 0 on Model 206) serves double
duty. In normal day-to-day operation, it is the attendant’s voice terminal-the place
where most of the calls to your business are answered. During administration,
however, it becomes the administration voice terminal, the place where you enter
information into the system.
You will use the administrator/attendant voice terminal to assign lines to line buttons
on voice terminals as well as to customize other features of your system (if you
choose to do so).
For best results, the administrator/attendant voice terminal should be a 34-button
deluxe voice terminal. The diagram on page 22 shows the button labels that are
useful during administration. In addition, tear-out labels for use with a 34-button
deluxe voice terminal during administration are found in the feature cartridge box.
SETTING SWITCHES ON THE CONTROL UNIT
The first thing you need to do is to turn on the system and set a few switches on the
control unit.
1. Plug the control unit power cord into a grounded (3-prong) ac outlet that is not
controlled by a wall switch.
2. Turn the On/Off switch on the control unit to On (Model 820 only).
3. Set the Toll Prefix/Area Code switch to Toll Prefix if you use a 1 or a 0 as a prefix
when dialing Iong distance calls. If you do not use a prefix, setthe switch to Area
Code.
16
NOTE: If you have a Model 820, the name of the Toll Prefix/Area Code switch is
engraved on the faceplate of the control unit. If you have a Model 206 or 410, a plastic
label that identifies this switch is supplied with the Feature Package 2 cartridge.
4. Set the Tone/Pulse switch to Tone if you have Touch-Tone service. Otherwise, set
it to Pulse.
Now enter administration mode using the following procedure:
ENTERING ADMINISTRATION MODE:
The Admin/Normal switch on the control unit is used to put you into administration
mode. While in administration mode, you use the administrator/attendant voice
terminal (jack 10 or jack 0 on Model 206) to enter information into the system. Before
administering the system, tear out the administration labels provided in the box your
Feature Package 2 cartridge came in, and slide them into the button label slots in the
administrator/attendant voice terminal. Here is how you enter administration mode:
• At the control unit, set Admin/Normal switch to Admin.
• At the administrator/attendant voice terminal, slide the T/P switch to P.
• Touch Administer (Send Message) (red light comes on).
• Perform one or more administration tasks. (If someone is using the part of the
system that you want to administer, the administrator/attendant voice terminal
gives a single, low-pitched ring. When you hear this ring, wait a few minutes then
try again.)
We recommend that you use a 34-button deluxe voice terminal for administration. If
you do not, the procedure is slightly different. For the third step, instead of touching
Administer, you dial #01.
While in administration mode, you can perform one or more of the following administration procedures:
• administer lines
—connect telephone lines to jacks in the control unit (see page 18)
—assign outside lines to voice terminals (see page 18)
—add and remove lines (see page 18)
—assign personal lines (see page 19)
• set call restrictions
—outward call restriction (see page 23)
—toll call restriction (see page 23)
• program System Speed Dial (see page 24)
• program System Speed Dial with Restriction Override (see page 24)
• setup Group Paging Zones (see page 24)
• program Transfer Return Ringing (see page 25)
• administer phones for Button-Free Line Operation (see page 25-26)
• system reset (see page 27)
For a simple, basic configuration that takes advantage of the initial feature assignments, all you need to do is line administration.
If you choose to do more administration, stay in administration mode until you are
finished.
Leave administration mode by:
• sliding the T/P switch back to center position at the administrator/attendant
voice terminal and by
• setting the Admin/Normal switch back to Normal at the control unit.
NOTE: You only need to switch back to Normal for security reasons (so no accidental
administration occurs).
17
LINE ADMINISTRATION
Connecting Lines to the Control Unit
Once you have set control unit switches and entered administration mode, you are
ready to connect telephone lines to your control unit. Simply plug the lines into the line
jacks labeled A, B, C, etc. on the control unit. These jacks correspond to buttons on
the phones. So, deciding which line to plug into which jack on the control unit begins
to determine which line goes on which button on every telephone in the MERLIN
system. (The section following this one will show you how to fine-tune the process of
assigning lines to line buttons on voice terminals.)
Here are a couple of tips to consider when plugging lines into the control unit line
jacks:
•If you have fewer than eight lines, plug the lines into the control unit so that there’s
no gap in the sequence. For instance, if your system has 5 lines, use A, B, C,
D, and E.
• If you have a model 820 and some 5-button voice terminals, there are some
additional considerations you might want to keep in mind. The 5-button voice
terminals can show only four lines, regardless of the number of lines in your
system. To accommodate users of 5-button phones, you may have to plug the
lines into the control unit jacks in a special order. For more details, see the section
called "PROGRAMMING TIPS FOR 5-BUTTON VOICE TERMINALS" on page
32.
Assigning Lines to Line Buttons
You should at this point have a firm plan in mind about which of your lines should
appear on the line buttons of each of the voice terminals in your system. This section
will show you how to use the administrator/attendant voice terminal to assign lines to
line buttons on voice terminals.
For Square Systems
You may have decided to configure lines in your system for "square" operation.
Square operation means that each voice terminal has all of the lines in the system
appearing on it, and each line is on a separate button.
Square is simple and easy for everyone in the system to understand. This form of
operation is familiar to many people who have worked with key telephone systems in
the past, for example, COM KEY ® systems. The buttons and lights for all these lines
help you keep track of your calls.
If you want all lines to appear on all telephones, use the following procedure on the
administrator/attendant voice terminal:
•Enter administration mode at the administrator/attendant voice terminal if you
haven’t already done so (page 17).
•Dial ✱ 4 plus the total number of lines in your system.
•If you do not want to administer other options, leave administration mode by
sliding the T/P switch back to the center position at the administrator/attendant
voice terminal and by setting the Admin/Normal switch back to Normal at the
control unit. Otherwise, continue administration procedures.
If you have configured your system square, turn now to page 19 to see the features
which are preassigned to the MERLIN system voice terminals.
18
For Non-Square Systems
You may not want your system to be "square". For instance, you may have a WATS line
that you want to appear only on a few voice terminals. Or you may want a line to serve
as a personal line for someone’s exclusive use. For cases like these, you will first
assign all the lines that will appear on all voice terminals in the system (fewer than the
total number of lines). Then, you will use a different procedure to assign the remaining
lines to particular voice terminals.
Here’s the procedure to assign the lines that will appear on all voice terminals in the
system:
• Enter administration mode at the administrator/attendant voice terminal if you
haven’t already done so (see page 17).
• Dial ✱ 4 plus the number of lines in your system that you want to appear on all
voice terminals, making cetain these lines are the first ones to be plugged into
the control unit.
Now you can add the remaining unassigned lines to particular voice terminals using
the following procedure:
• At the administrator/attendant voice terminal, select the voice terminal to be administered by touching the Intercom Auto Dial button (or dialing the intercom number)
of that particular voice terminal.
• After you’ve dialed the number, green lights will be on next to line buttons
corresponding to assigned lines on the phone being administered. Line buttons
corresponding to unassigned lines will not have green lights next to them.
• Touch the button corresponding to the line you want to add to the voice terminal.
• When the green light comes on, the line has been added to the voice terminal.
• Repeat this procedure for each phone.
• If you do not want to administer other options, leave administration mode by
sliding the T/P switch back to the center position at the administrator/attendant
voice terminal and by setting the Admin/Normal switch back to Normal at the
control unit. Otherwise continue administration procedures.
You can also remove a line from a voice terminal by using the same procedure. The
green light will go off next to the line button.
When you remove a line from a telephone, the corresponding button becomes an
Outside Auto Dial button at that telephone.
Your MERLIN system is now ready for use!
INITIAL FEATURE ASSIGNMENTS
The system automatically preassigns a set of features to each voice terminal in the
system when you turn it on for the first time.
The buttons above the dial pad on a MERLIN system voice terminal represent either
lines or features. Buttons to the right of the dial always represent features. The
following diagrams illustrate the initial features that are present on MERLIN
system phones. lf you are satisfied with the combination of line buttons and features,
as they appear in the diagrams, you do not need to do any further administration or programming.
If you would like to customize your system further, go to "Customizing Other Options
in the System," page 23.
19
Initial Feature Assignments
Model 206 Voice Terminals 1-5
Model 410 and 820 Voice Terminals 11-29
34-Button
10-Button
5-Button
Do Not Disturb
Or Line D
Privacy
Or Line H
Outside
Auto Dial
Outside
Auto Dial
Outside
Auto Dial
Or Line C
Outside
Auto Dial
Or Line G
Outside
Auto Dial
Outside
Auto Dial
Line B
Intercom
Auto Dial 10
Or Line F
Outside
Auto Dial
Outside
Auto Dial
Line A
Outside
Auto Dial
Or Line E
Outside
Auto Dial
Outside
Auto Dial
Outside
Auto Dial
Outside
Outside
Auto Dial
Outside
Auto Dial
Outside
Auto Dial
Outside
Auto Dial
Outside
Auto Dial
Outside
Auto Dial
Outside
Auto Dial
Outside
Auto Dial
Outside
Auto Dial
Outside
Auto Dial
Saved
Number
Outside
Auto Dial
Last
Number
Outside
Auto Dial
Intercom
Intercom/
Model 410 and 820
Auto Dial
Outside Auto
Dial/Model 206
20
Initial Feature Assignments
Administrator/Attendant Voice Terminal
Voice Terminal 0 on Model 206
Voice Terminal 10 on Model 410 and 820
Normal Mode
Outside
Auto Dial
Or Line D
Privacy
Or Line H
Intercom
Auto Dial
19
Intercom
Auto Dial
29
Outside
Auto Dial
Or Line C
Outside
Auto Dial
Or Line G
Intercom
Auto Dial
18
Intercom
Auto Dial
28
Line B
Outside
Auto Dial
Or Line F
Intercom
Auto Dial
17
Intercom
Auto Dial
27
Line A
Outside
Auto Dial
Or Line E
Intercom
Auto Dial
16
Intercom
Auto Dial
26
Intercom/Model
410 and 820
Outside Auto
Dial/Model 206
Intercom
Auto Dial
15
Intercom
Auto Dial
2 5
Intercom
Auto Dial
14
Intercom
Auto Dial
24
Intercom
Auto Dial
13
Intercom
Auto Dial
23
Intercom
Auto Dial
12
Intercom
Auto Dial
22
Intercom
Auto Dial
11
Intercom
Auto Dial
21
Intercom
Auto Dial
10
Intercom
Auto Dial
20
Saved
Number
Outside
Auto Dial
Last
Number
Send
Message
Intercom
21
Administrator/Attendant Voice Terminal
Voice Terminal 0 on Model 208
Voice Terminal 10 on Model 410 and 820
Administration
Mode
Line
D
Line H
Intercom
Auto Dial
19
Intercom
Auto Dial
29
Line
C
Line G
Intercom
Auto Dial
18
Intercom
Auto Dial
28
Line
B
Line F
Intercom
Auto Dial
17
Intercom
Auto Dial
27
Line A
Line E
Intercom
Auto Dial
16
Intercom
Auto Dial
26
Intercom
Auto Dial
15
Intercom
Auto Dial
25
Intercom
Auto Dial
14
Intercom
Auto Dial
24
Intercom
Auto Dial
13
Intercom
Auto Dial
23
Intercom
Auto Dial
12
Intercom
Auto Dial
22
Intercom
Auto Dial
11
Intercom
Auto Dial
21
Intercom
Auto Dial
10
Intercom
Auto Dial
20
Restrict
Administer
22
Customizing Other Options in the System
As the person who administers the MERLIN system, you will know more about its
capabilities than anyone else in your office. With good planning on your part, the
system can be fine-tuned to work with maximum efficiency both for the business as
a whole and for each individual user.
This section of the manual is divided into three parts. The first part concerns features
that are administered from the administrator/attendant voice terminal—the voice terminal plugged into intercom jack 0 or 10. Use the administration labels provided in
the feature cartridge box. The second part concerns features that are for the overall
good of the business but that need to be programmed separately at each individual
telephone and which you, the administrator, may want to do yourself. The
third part deals with voice terminal features that are primarily for the benefit of individuals including a few special considerations for users of 5-button phones.
In developing your pIan, consider the following:
• how to ensure that all calls get answered
• who picks up which phone under which circumstances
• what features would best suit the needs of your business.
With these considerations in mind, you can choose among the following options to:
set call restrictions
—outward call restriction
—toll call restriction
• program System Speed Dial
• program System Speed Dial with Restriction Override
• set up Group Paging zones
• program Transfer Return Ringing
• administer phones for Button-Free Line Operation
• reset system.
CALL RESTRICTIONS
Each phone in the MERLIN system can be either unrestricted, outward restricted,
or toll restricted. If the phone is unrestricted, the user can dial any number. If the
phone is outward restricted, the user can dial intercom calls but not outside calls.
If the phone is toll restricted, the user can dial intercom and local calls, but not longdistance calls.
Here’s how to change the restriction status of a phone:
• Enter administration mode if you haven’t already done so (page 17).
• Select the voice terminal to be restricted by touching the Intercom Auto Dial
button (or dialing the intercom number) for that particular voice terminal.
• Touch Restrict repeatedly (the left Intercom button) until the green light indicates the restriction status you want that voice terminal to have:
= No Outside Calls (Outward Call Restriction)
GREEN OFF
GREEN FLASHING = Toll Restricted
= No Restriction
GREEN ON
•If you are finished with administration, leave administration mode by sliding the
T/P switch back to center position at the administrator/attendant voice terminal
and by setting the Admin/Normal switch back to Normal at the control unit.
Otherwise continue administration procedures.
A phone that has been restricted can still use System Speed Dial if you program
Restriction Override for the Speed Dial. See System Speed Dial (page 24). Therefore,
users can have access to particular long-distance numbers that you’ve programmed
into System Speed Dial, even though, in general, they can’t dial toll calls.
23
SYSTEM SPEED DIAL
System Speed Dial numbers are numbers that you, the administrator, program into
the MERLIN system memory. Users can access them by dialing a three-character
code. The codes are #60 to #99.
You may program System Speed Dial in order to give all users in the system access
to numbers frequently dialed at your business, such as a warehouse number or a
branch office. System Speed Dial is particularly useful when you want to give users
access to a certain number but don’t want to divulge that number—for example, an
authorization code for an alternate long-distance service.
The MERLIN system memory can hold up to forty such numbers, each of which
contains up to 16 digits (characters). Among the 16 characters, you can include
pause, stop, flash and Touch-Tone enable. Pause and stop are useful when accessing computer-based services such as banking or alternate long-distance services.
Put flash in the sequence for Centrex/PBX features. Use Touch-Tone enable if you
have rotary service and want to switch from rotary signals to Touch-Tone signals.
To enter a number into the System Speed Dial list:
• enter administration mode if you haven’t already done so (see page 17)
• dial a code from #60 through #99
• dial * 90 plus the telephone number.
To enter pause, stop, flash or Touch-Tone enable into a System Speed Dial sequence:
PAUSE: Touch Hold (pause)
STOP: Touch Drop (stop)
FLASH: Touch Recall
Touch Hold (pause)
TOUCH-TONE ENABLE: Touch Transfer
• If you’re finished with administration, leave administration mode by sliding the
T/P switch back to the center position at the administrator/attendant voice
terminal and by setting the Admin/Normal switch back to Normal at the control
unit. Otherwise continue administration procedures.
You can program System Speed Dial with or without Restriction Override. With
Restriction Override, a number can be used at any voice terminal if that terminal has
been restricted. if you want a particular System Speed Dial number to have Restriction Override, dial ✱ 92 instead of ✱ 90 in the above instructions.
You can change a System Speed Dial number at anytime. Simply repeat the above
procedure with a different telephone number.
Some users in your business may enjoy the convenience of one-touch access to
system Speed Dial numbers. if people in your business want to program a System
Speed Dial number on an Outside Auto Dial button, they should follow the regular
programming procedure for storing an Outside Auto Dial number.
While in program mode, they dial ✱ 95xx where xx represents one of the System
Speed Dial codes 60 through 99.
GROUP PAGING
Group Paging lets anyone at your business make an announcement over the voice
terminal speaker of up to three phones at once. A person receiving a Group Paging
message can lift the handset and speak back. If more than one person tries to speak
back at the same time, the MERLIN system will automatically select the first
person. This feature is distinct from Loudspeaker Paging, in which messages are
announced over an optional loudspeaker paging system.
24
The MERLIN system has preassigned paging groups, each consisting of three voice
terminals. Voice terminals 11, 12, and 13 constitute the first group, 14, 15, and 16 the
second group, etc. You need not administer group paging if the preassigned groups
are satisfactory.
Your business can be divided into ten paging groups. The groups can overlap. That is,
a given phone can be in more than one group if you choose to administer it that way.
Here’s how to assign a phone to a group:
• Enter administration mode if you haven’t already done so (see page 17).
• Dial ✱ 70 to ✱ 79 depending on which of the ten groups you want to administer. A
green light will come on next to the Intercom Auto Dial button for any phones
already assigned to the paging group.
• Touch the Intercom Auto Dial button for the telephones to be removed from the
group (green light goes out).
• Touch the Intercom Auto Dial button for the phone(s) you want to assign to the
paging group (the maximum is three phones per group) (green light comes on). If
the page group already has 3 phones in it, an attempt to add a fourth will be
denied. The green light next to the button will not come on.
• Touch Administer (Send Message) when finished with that group.
• Administer a different group by entering ✱ 70 to ✱ 79 (above).
• If you’re finished with administration, leave administration mode by sliding the
T/P switch back to center position at the administrator/attendant voice terminal
and by setting the Admin/Normal switch back to Normal at the control unit.
Otherwise continue administration procedures.
If someone in the MERLIN system transfers a call and it is not answered, it will return
to the sender with a distinctive ring. You, as the administrator, can determine how
many rings must elapse before a call returns to its sender; the preset initial setting is
for three rings. You can program from one to nine rings. Here’s how to do it:
• Enter administration mode if you haven’t already done so (page 17).
• Dial ✱ 21 to ✱ 29, where ✱ 21 gives you one ring and ✱ 29 gives you nine rings. You
can turn off Transfer Return by dialing ✱ 20.
If you’re finished with administration, leave administration mode by sliding the
T/P switch back to center position at the administrator/attendant voice terminal
and by setting the Admin/Normal switch back to Normal at the control unit.
Otherwise continue administration procedures.
BUTTON-FREE LINE OPERATION
(For 5-Button Voice Terminals:
Model 820 With More Than Four Lines)
If you have 5-button voice terminals in your MERLIN system, you may want to
consider an administration option called button-free line operation. This procedure
can be applied on larger voice terminals, but it is generally not needed because of the
greater number of buttons for both lines and features. Button-free line operation
makes lines "invisible". Lines that have been previously administered to a voice
terminal are no longer represented on buttons. The buttons are used for features
instead.
Button-free line operation is ideal for people who need access to all the lines in the
system and who don’t do very much call handling—that is, are not frequently dealing
with two calls at the same time. It is not suitable when a person needs access to more
than one type of line. So, if a person uses both regular lines and WATS lines, do not
assign the button-free operation.
25
In button-free line operation, there are no visual indicators to help keep track of
incoming calls. You do not know which lines calls come in on. But it’s still easy to place
and receive calls. To place a call, just lift the handset. TheMERLIN system selects a
free line for you. If your phone rings, lift the handset and the MERLIN system
automatically connects you to the ringing line.
If you choose this option for anyone in your business, be aware of the following
considerations:
1. The Automatic Line Selection sequence and Line Ringing cannot be programmed on button-free phones.
2. Button-free line operation allows transferring, conferencing, and putting calls on
hold even with the absence of the buttons. But, naturally, such call handling is
more convenient with red and green lights. So, people who do a lot of call handling will prefer having lines assigned to buttons.
3. Before administering a phone to have button-free lines, make sure that all lines
assigned to the phone are of the same type. Do not mix regular central office
lines, WATS lines, and a personal line on the same phone. See "LINE ADMINISTRATION," page 18.
You can administer any phone to be button-free, leaving other phones in the system
unaffected. Here’s how to do it:
Enter administration mode if you haven’t already done so (page 17).
Specify the phone you want to administer by touching the Intercom Auto Dial
button (or dialing the intercom number) representing that phone (green light
comes on).
Dial ✱ 31 if you want the phone to ring (green light flashes rapidly).
Dial ✱ 32 if you don’t want the phone to ring (green light flashes slowly).
If you’re finished with administration, leave administration mode by sliding the
T/P switch back to center position at the administrator/attendant voice terminal
and by setting the Admin/Normal switch back to Normal at the control unit.
Otherwise, continue administration procedures.
Any lines previously assigned to that phone become invisible and the buttons
become available for features.
To return a phone to "square’’ operation, that is, a button for each line, follow the same
procedure but dial ✱ 34. The green light will come on steadily.
People with button-free line operation will need some special instructions, which are
shown below.
Instructions for Button-Free Line Operation
You have button-free line operation on your phone. This means that you have access
to lines in the MERLIN system but you do not have buttons or lights representing
those lines. Instead, your buttons are used for convenient features like Outside Auto
Dial.
It’s easy to place and receive calls. To place a call, just lift the handset and dial.
Automatic Line Selection will select a free line for you. If your phone rings, lift the
handset and you will automatically be connected to the ringing line.
26
You can access most MERLIN features in the same way everybody else does, but
for call handling, note the following:
• If you want to hold a call, touch Hold.
• To return to a held call, dial # ✱ .
• You can program # ✱ onto a button by entering program mode, touching the
button you want to program and dialing ✱ 95 ✱ .
• You can hold only one call at a time.
• If someone’s phone is ringing across the room, you have to use Call Pickup to
answer it. Dial #3 plus the intercom number of ringing phone.
SYSTEM RESET
The code ✱ 99 sets the entire system memory to the initial feature assignments. It also
erases any programmed speed dial numbers. You may never need to use this
procedure. The only reason for using it is if you want to change your system radically
or start administration from scratch.
Because System Reset wipes out any programming of the MERLIN system, the
procedure has been made deliberately cumbersome to avoid an accident. Although
you can perform System Reset from the administrator/attendant voice terminal at
the attendant’s desk, you may find it more convenient to bring the phone to the
control unit, plug it into jack 0 or 10, and perform the procedure there.
At the control unit, set the Admin/Normal switch to Admin.
At the administrator/attendant voice terminal, slide the T/P switch to P.
Touch Administer (Send Message).
At the control unit, set the Admin/Normal switch to Normal
At the administrator/attendant voice terminal, dial ✱ 99. (If you hear a two-beep
signal, you know the reset worked. However, if you hear a single, low-pitched
ring, the reset did not work—probably because your system was in use. Wait until
no one is using a phone and repeat the procedure. The system does not let you
perform any other administrative procedures while you are waiting.)
At the control unit, turn power off, then on.
At the administrator/attendant voice terminal, return the T/P switch to center
position.
NOTE: The Administer (Send Message) button is the lower right button on a
34-button voice terminal. If you do not have a 34-button deluxe voice
terminal for administration, dial #01.
27
Programming Individual Voice
Terminals to Meet Office Priorities
After you have finished adjusting the control unit and administering features from the
administrator/attendant voice terminal, you can then turn to more specific features
that depend on how you run your office. If you wish, you may program individual
telephones to coordinate with your office’s systems and priorities. For example, is
the boss going to answer his or her own phone or is someone else going to screen
the calls? Is the receptionist going to answer all the calls that come in or will some
calls be routed directly to the sales department? When the sales manager makes
outside calls, are they always long distance calls made on your company’s WATS
lines or will there be many local calls as well? Each office has its own special
channels and priorities and the MERLIN system can be customized to meet these
needs.
You may also choose to leave voice terminal programming up to the individuals using
the voice terminals. Refer them to the User’s Guide: Models 206, 410, and 820 with
Feature Package 2.
PROGRAMMABLE LINE RINGING
With Feature Package 2, you can program how each outside line rings on each
phone when a call comes in. You can have some lines ring at one telephone and other
lines at other phones. As a result, calls not only get answered, they get answered
by the right person.
• When the system is first installed, all lines on all telephones ring for every
incoming call.
• People responsible for answering incoming calls–usually receptionists or
secretaries-should have the lines on their telephones programmed to Ring. (See
"Special Information for the System Attendant" page 34.)
• People who do not normally answer incoming calls should have their lines
programmed to No Ring. The phone will ring, however, for transferred and
intercom calls specifically directed to that telephone.
• Provide backup coverage by having a line ring only after it has rung somewhere
else first and not been answered there.
Here’s how to program line ringing:
• go to the voice terminal whose line ringing you want to program
• slide T/P switch toward you
• touch a line button (note red lights)
• touch the button again until correct code appears:
RED ON
= Ring
RED FLASH = Delayed Ring
RED OFF = No Ring
• repeat this procedure for each line
• return T/P switch to center position.
NOTE: This does not affect ringing on intercom calls or transferred calls.
AUTOMATIC LINE SELECTION
This is a nice feature for two reasons. First, you have the convenience of lifting the
handset and getting a free line without pressing a button. Second, you never intrude
on someone else’s call.
28
When first installed, your MERLIN system automatically selects the first available
line for every telephone in the order A, B, C, D, E, F, G, H. Through programming, you
can make the Automatic Line Selection feature even more useful by configuring it to
meet the particular needs of your business. Automatic Line Selection is programmed for each telephone on an individual basis.
• If all your lines are local and you don't care which one people get when they pick
up the handset, you may not want to program this feature at all. The MERLIN
system will automatically select the first available line for you.
• If you’re connected to a PBX or Centrex system, all your lines are the same. If the
various lines are shared, there is no need to program Automatic Line Selection.
But, if each telephone has a different personal line, Automatic Line Selection
should be programmed for that line only.
• lf you have two or more types of lines, you'll probably want to program Automatic
Line Selection. It enables each person in the office automatically to get the type of
line he or she most often uses. As a general rule, it is best to have only one type of
line in the Automatic Line Selection sequence. For example, a business might
have a WATS line, an FX line, and five regular lines. The five general-purpose lines
would probably be included in everyone’s Automatic Line Selection sequence, but
not the other lines.
• If there is a person in your office whose calls consist mainly of long-distance
calls, program the Automatic Line Selection sequence to select only the WATS
lines. Leave the local lines out of the Automatic Line Selection sequence so that
the person will have to select them manually.
• Another person might have the authority to make a long-distance call on a
regular line when the WATS lines are busy. This person would program the
Automatic Line Selection sequence for WATS lines first, followed by local lines. In
other words, this person has the authority to make a higher-priced long-distance
call over a regular line when all the WATS lines are busy. Of course, this person
would want WATS lines first only if most calls are long-distance calls.
• If you have usage-sensitive rates on your local telephone company lines, it may
be to your advantage to spread telephone usage evenly across the lines you have.
You can accomplish this by assigning different people different sequences for
Automatic Line Selection.
• If someone has a personal line, you may choose to have it selected first or
selected last, depending on the way you do business. Having it selected first helps
ensure that most outgoing calls from that telephone are billed to that line. Having it
selected last helps ensure that the personal line will always be free to receive
incoming calls.
• If a secretary shares a personal line for purposes of answering calls, it should not
be in the Automatic Line Selection sequence at the secretary’s phone.
You can specify all, some, or none of a telephone’s line buttons for Automatic Line
Selection. Follow this procedure:
• go to the voice terminal that you want to program with Automatic Line Selection
• sIide T/P switch to P position
• dial ✱✱
• Touch line buttons in desired order
• Return T/P switch to center position.
If no lines are touched, intercom will automatically be selected. You might program
intercom to be automatically selected on a phone intended for inside calls only.
29
Programming Individual Voice Terminals to Meet
Personal Priorities
As system administrator, you may have to decide which custom features certain voice terminals should have, taking into consideration the individual’s needs and the capabilities of the voice terminal. The initial features diagram on page 20 shows
what features are automatically assigned to the voice terminals, and the Feature Programming Chart below lists the programming codes you need in order to assign other features to programmable buttons. Before you begin the programming process,
read the following programming instructions and review the Feature Programming Chart.
To program custom features onto programmable buttons on individual voice terminals, follow the procedure below.
• Go to the voice terminal you want to program.
• Label the button you want to program with the name of the custom feature.
• Slide the T/P (Test/Program) switch on the left side of the voice terminal to P (Program).
The voice terminal rings every 5 seconds to remind you it is in program mode.
• Touch the button that you want to program with the custom feature.
• Dial the appropriate feature programming code and any additional required numbers and characters listed in the Feature
Programming Chart. If you make a mistake, touch the button again and redial the information.
• If you have more features to program on the voice terminal, repeat the last two steps.
• When you are finished programming, slide the T/P switch to the center position.
Feature Programming Chart
Feature
(Suggested Button Label)
Auto Answer-Intercom
Auto Answer
Call Pickup
Description
Programming
Code
Notes
Have a Hands-Free Unit
go on automatically
when you receive ringing
intercom calls.
Dial ✱ 70.
Used only with a Hands-Free Unit. Requires
a button with lights.
Pick up a call ringing at
another voice terminal.
Dial ✱ 85.
To use this feature you can also dial #3 and
the intercom number of the ringing call.
Temporarily prevent calls
from ringing at your voice
terminal.
Dial ✱ 71.
Requires a button with lights.
Place ringing intercom
calls with one touch.
Dial ✱ 6 + a 2-digit intercom number.
A button with lights is recommended but not
required. The green light goes on whenever
the other person is using his or her voice terminal or is using the Do Not Disturb feature.
Redial the number you
dialed most recently.
Dial ✱ 73.
If you have a 5- or 10-button voice terminal,
you can dial #24 rather than program a button to use this feature.
Use your business’ loudspeaker paging system
to make announcements
to someone in your
organization.
Dial ✱ 66.
Used only with loudspeaker equipment. To
use this feature you can also touch lntercom and dial 6. A button with lights IS recommended but not required.
Call Pickup
Do Not Disturb
Do Not Disturb
Intercom Auto Dial
Name or
Location
Last Number Redial
Last Number
Loudspeaker Paging
Loudspeaker
Page
30
Feature Programming Chart (continued)
Feature
(Suggested Button Label)
Outside Auto Dial
Name or
Location
Privacy
Description
Programming
Code
Notes
Dial outside numbers or
PBX or Centrex feature
codes with one touch.
Dial ✱ 90 + an outside number.
Prevent people from joining your calls.
Dial ✱ 72.
Requires a button with lights.
Save a number indefinitely for later
redialing.
Dial ✱ 74.
If you have a 5- or 10- button voice terminal,
you can dial #23 rather than program a button to use this feature.
If you program System
Speed Dial codes for frequently dialed numbers,
you can assign any of the
codes to buttons for onetouch dialing.
Dial ✱ 95 + a System
Speed Dial code (60
through 99).
Assign System Speed Dial codes to frequently dialed numbers so everyone in your
MERLIN system can use those codes for
quick dialing. It is not necessary to assign
these codes to buttons.
If your system has lines
that carry rotary pulse
signals, you can switch to
Touch-Tone signals to use
services such as alternate long-distance or
credit card authorization.
Dial ✱ 76.
Privacy
Saved Number Redial
Saved Number
System Speed Dial
Name or
Location
Touch-Tone Enable
Touch-Tone
Enable
31
PROGRAMMING TIPS FOR 34-BUTTON VOICE TERMINALS
How you program a 34-button voice terminal depends on the person for whom you’re
programming it. If it’s for an attendant, refer to specific information on page 33 of
this manual. If you are programming for someone other than an attendant, here’s
some information that may be helpful.
There is only one difference between a standard 34-button voice terminal and a
34-button deluxe voice terminal. On the deluxe voice terminal, the 24 programmable
buttons on the right have lights next to them. On the regular 34-button voice terminal,
the buttons do not have lights.
The 34-button voice terminal comes equipped with a Last Number button, a Saved
Number button, and at least 22 Outside Auto Dial buttons. Other features such as
Privacy, Do Not Disturb, etc. may also be assigned depending on how many lines
appear on the voice terminal. (See Initial Feature Assignments diagram, page 20.)
Here is a strategy to help decide whether or not to reprogram any of these buttons.
1.
The user will probably want to have either the Last Number Redial feature or the
Saved Number Radial feature, but may not want both.
2. If the user has a Hands-Free Unit, program an Auto Answer button with a light.
3. If the user needs Privacy or Do Not Disturb, program the feature to a button with
a light (if available).
4. Have the user decide which people at your business will be called frequently, and
program an Intercom Auto Dial button for each.
5. If the person frequently uses the loudspeaker paging system, program a Page
button.
6. Use all remaining buttons for Outside Auto Dial and store frequently called
numbers on them.
PROGRAMMING TIPS FOR 10-BUTTON VOICE TERMINALS
A 10-button voice terminal has ten buttons above the dial for both lines and features.
Depending on how many lines you have in your system–and how you have administered them to a particular 10-button voice terminal–it may have anywhere from 0 to 9
programmable buttons; except for the smaller number of buttons available, the
advice for 34-button voice terminals applies here also.
In addition to the button features, 10-button voice terminal users have access to 22
Personal Speed Dial codes that they can program themselves and up to 40 System
Speed Dial codes that are programmable by the administrator. The Last Number
Radial feature is available via code #24 or can be programmed to a button, if
available. Similarly, Saved Number Redial can be accessed via code #23 or programmed to a button.
PROGRAMMING TIPS FOR 5-BUTTON VOICE TERMINALS
If You Have a Model 820 With More Than Four Lines
A typical MERLIN system consists of a mixture of 5-,10-, 34- and 34-button deluxe
voice terminals. On phones with 10 or 34 buttons, all outside lines can show up on
line buttons. On 5-button voice terminals, only the left column of buttons (lines A, B,
C, D) is present. If any of the people in your office have 5-button telephones, you may
need to answer some questions for them or give them some special help. However,
you can ignore most of the special considerations discussed here if you have four or
fewer lines.
Buttons not assigned to intercom or outside lines are programmable. Both Personal
Speed Dial and System Speed Dial are available to 5-button phone users, as is Last
Number Redial (#24) and Saved Number Redial (#23).
32
As already explained, people with 5-button voice terminals have buttons and lights
for a maximum of four outside lines corresponding to the left column of a larger voice
terminal. The system may have more outside lines than can show up on a phone
with five buttons. In this case, the user can access most MERLIN system features
in the same way everybody else does, except for transferred calls.
Transferred Calls
If someone with a 10- or 34-button voice terminal answers a call on a Iine in the
right-hand column of buttons, and then transfers that call to a person with a 5-button
voice terminal, the person with the 5-button voice terminal will hear the call ringing
and be able to answer it, but won’t be able to "see" it. Because the call was
transferred on a line that doesn’t show up on the 5-button voice terminal, the person
won’t see a light beside a line button. The transferred call, however, can be answered
simply by lifting the handset. If it’s necessary to put the transferred call on hold, the
person may do so by touching the Hold button, and can get back to the held call by
dialing # ✱ . This person may also want to program the # ✱ sequence onto a programmable feature button and use, the button to return to held calls. To program
this, enter program mode, touch the button to be programmed, and dial ✱ 95 ✱ .
You may choose to give employees with 5-button voice terminals the button-free line
option (see page 25). If you do not choose the button-free line option, you can
maximize the usefulness of 5-button voice terminals by following these rules:
1. If users of 5-button voice terminals are expected to answer calls from outside
(either directly or via Transfer), connect telephone lines to the jacks on the control
unit so that most incoming calls come in on A, B, C, or D.
2. If users of 5-button voice terminals need to place many outside calls, you can
increase the likelihood that lines A, B, C, and D are available for their use by
programming Automatic Line Selection on larger telephones "backwards"’—that
is, E, F, G, H before A, B, C, D. This means that for people with the 10- and
34-button voice terminals, the system would select lines on the right-hand
column of buttons first, making it less likely that all the lines in the left-hand
column would be in use at any given time.
3. If 5-button voice terminal users need access to a special line (such as WATS, FX,
etc.), be sure that line is assigned to A, B, C, or D. If it’s plugged into E, F, G, or H, it
won’t appear on 5-button voice terminals.
4. If an incoming call on lines E, F, G, or H is to be transferred to a 5-button voice
terminal, use the normal transfer procedure (using Transfer, not Hold). The
5-button voice terminal will ring with transfer-ringing and can be answered
simply by lifting the handset. Advise 5-button voice terminal users that calls on
lines E, F, G, or H, however, will be invisible-no button, no red light, no green light.
5. Users with 5-button voice terminals who have calls on "invisible" lines ( E, F, G, H)
can actually use all of the MERLIN system features with those lines. But
because visual feedback is important for correct call handling, it is not advisable
to do so.
33
Special Information for the System Attendant
Many businesses have a system attendant, a person who answers most calls and
passes them along to other people in the office. An attendant can also take
messages and place outside calls.
The main attendant voice terminal (0 or 10) also serves as an administration voice
terminal. For administrative purposes, it is important that all lines appear on
this phone, so do not remove lines from voice terminal 0 or 10. Also, the
administrator/attendant voice terminal should have complete Intercom Auto Dial
capability-one button with lights for each telephone in the system.
The system attendant-or receptionist-has responsibility for making the MERLIN
system work effectively for the people in your office. The attendant voice terminal,
therefore, has a Send Message button to let people know they have a message
waiting, and an Intercom Auto Dial button (with a green light that tells when someone’s phone is busy) for each person in the system.
If your business has an attendant, make sure he or she has the information on the
following pages.
RINGING PATTERNS
All the telephones in the office, including the attendant’s, come pre-set to ring
immediately on all incoming calls. Therefore, if all calls should ring on all phones, no
programming would be necessary. Since the attendant answers most of the calls
that come into the office, however, it is probably best to have other phones programmed either to no ring or delayed ring.
For example, some businesses have one attendant and no backup, so that if the
attendant is away from the desk, there is no one to answer calls. If this is your
situation, set all the other phones in the office to delayed ring, so that when the
attendant is away, calls will automatically be forwarded to the other phones in the
office.
On the other hand, if you do have someone to cover, you’ll want calls to be routed to
that person and not go through to any other phones in the office. Program the phone
of the backup person to delayed ring and program all other phones in the office to no
ring.
The programming procedure is so simple that you or the attendant can change call
coverage and ringing patterns on an as-needed basis. For example, if the usual
backup person is taking the afternoon off, it’s a simple matter to reprogram his or her
phone to no ring and program someone else’s phone to delayed ring for the afternoon. The point is that you don’t want to think of programming as carved in stone. It is
flexible and easily changed. For details, see User’s Guide: Models 206,410, and 820
with Feature Package 2.
TRANSFERRING CALLS
Since the attendant normally answers all calls in the office, those calls must be
passed onto the proper individuals.
There are three ways to transfer calls:
1. Directly.This is the quickest and simplest way of transferring a call. Simply,
• touch Transfer
• touch the Intercom Auto Dial button for the person to whom the call is being
transferred (or dial the intercom number)
• hang up.
34
The person to whom the call is transferred hears a distinctive transfer-ringing and
lifts the handset. If the call is not picked up, it returns to the attendant’s phone.
2. With voice announcement. To let the person to whom the call is being transferred
know who’s calling.
To announce a transferred call,
• touch Transfer
• touch Intercom
• touch the Intercom Auto Dial button (or dial the intercom number)
• make the announcement
• hang up.
The person to whom the call is transferred will hear the announcement and will be
connected to the outside call simply by lifting the handset.
3. With Hold and intercom consultation. This method allows the attendant to
discuss the call with the person to whom it is being transferred.
For instance, someone may want to get a certain file out of the file cabinet before
taking the call. For that matter, the person may not want to take the call at all, or may
want the attendant to advise the caller of something specific. If, for whatever reason,
the call must be discussed before it is passed on, use this method:
• touch Hold
• touch Intercom
• touch the Intercom Auto Dial button (or dial the Intercom number)
• discuss the call with the person
• tell the person what line to pick up.
NOTE: If the person receiving the call doesn’t have a button for that line, tell the
person to hangup and then transfer the call to yourself by touching the line button for
the held call and then using the direct transfer procedure described above.
If there’s a second call ringing after you have transferred a call by methods 1,2, 3–just
touch the flashing line button.
INTERCOM AUTO DIAL
You can increase the efficiency of the Transfer feature with Intercom Auto Dial
buttons that allow an attendant to use the button instead of dialing the intercom
number. There should be one Intercom Auto Dial button for each person on the
MERLIN system. The green light next to the button tells if that person is busy on the
telephone–information an attendant needs when handling incoming calls.
SEND MESSAGE
The attendant can turn on the Message light at phones in the MERLIN system to
let people know they have a message waiting.
To do it, touch Send Message and touch the Intercom Auto Dial button for the phone
of the person the message is for. A red light turns on at the attendant voice terminal
next to the Intercom Auto Dial button when the message light is lit at the remote voice
terminal. Repeating the above procedure turns off the message light.
To take full advantage of the Send Message feature, the attendant voice terminal
must be a 34-button deluxe voice terminal.
HEADSET
Finally, an attendant with a heavy call-handling load may find it advisable to use a
headset with the optional Headset Adapter rather than lifting and holding the handset throughout the day.
35
Troubleshootlng Chart
If something goes wrong in the operation of your MERLIN system, use the following troubleshooting chart to determine the
possible cause of the problem. In many cases, you can clear the trouble yourself without the need for a service call.
Possible Cause
Do This
The problem may be the telephone
company lines.
• Plug a standard modular telephone into the
telephone company wall jack for your incoming line that has the trouble.
• If you experience the same problem when
you use the standard modular phone,
report the trouble to your local telephone
company.
The Outward Calls switches on the
control unit are set to No (down).
• Set Outward Calls switches to Yes (up).
The Tone/Pulse switch on control unit
is not set correctly.
• Set the Tone/Pulse switch to Pulse. If you
purchase Touch-Tone service from the
telephone company, set the switch to Tone.
All connections may not be secure.
• Check the connections plugged into each
voice terminal, the control unit, and the
telephone company line jacks.
• If there are any loose connections, make
them secure.
There is no power to the control unit.
• Make certain that the On/Off switch is set
to the On position.
• If the green light on the control unit is off,
plug something else into the ac outlet to
see if it is supplying power. (Make sure the
control unit is not plugged into a switchcontrolled outlet.)
The red warning light on the control
unit is lit.
The cartridges may be loose.
• Unplug the control unit.
• Make sure that all cartridges are firmly
seated in the control unit slots.
• Plug in the control unit.
• Wait for a full five minutes.
• If the red light goes out (and stays out), the
trouble is cleared up.
• If the red light remains on, call your equipment supplier.
The voice terminals do not ring.
The volume control is turned off.
• Turn up the volume.
The lines are programmed not to ring.
• Program line ringing as desired.
The Do Not Disturb feature is activated.
• Touch Do Not Disturb to deactivate the
feature. (The green light goes off.)
• If the buttons on your voice terminal are not
labeled, check each programmable button
to see if the green light next to it is on; the
Do Not Disturb feature should be on one
of those buttons. Then, reprogram those
buttons.
Trouble
You cannot make an outside call.
All voice terminals are dead; that is,
there are no lights, no dial tone.
36
Troubleshooting Chart (continued)
Trouble
Possible Cause
Do This
The voice terminal will not stop ringing.
The T/P switch may be set to P
(Program).
• Slide the T/P switch to the center position.
One custom feature does not work, but
the others do.
The feature was not programmed
correctly.
• Reprogram the feature to the same button.
The feature is not being used correctly.
• Review the description of the feature’s use
in the User’s Guide: Models 206, 410 and
820 with Feature Package 2.
All lines are busy.
• Make the call later.
The Automatic Line Selection feature
has not been programmed correctly.
• Reprogram the Automatic Line Selection
sequence.
The line is programmed for either
delayed ring or no ring.
• Program the line to ring immediately.
The system does not automatically
select a free line when you lift the
handset.
The line with the flashing green light is
not automatically selected when the
handset is lifted.
37
Index
Administration Mode, 17, 22
Administrator/Attendant Voice
Terminal, 16, 21
Administration Mode, 22
Automatic Answer-Intercom, 11
Automatic Line Selection, 11, 28-29
Button-Free Line Operation, 25-27
Call Pickup, 8
Call Restrictions, 23
Call Waiting, 8
Conference, 8
Control Unit, 4-6, 16-17, 18
Connecting Lines, 18
Diagrams, 5, 6
Model 410, 5
Model 820, 6
Setting Switches, 16-17
Distinctive Ringing, 8
Do Not Disturb, 11
Drop, 8
Extra Alert, 15
Feature Cartridges, 6
Feature Programming Chart, 30-31
Fixed Features, 8-10
General Purpose Adapter, 15
Group Listening, 8
Group Paging, 11, 24-25
Hands-Free Unit, 15
Headset, 15, 35
Headset Adapter, 15
Hold, 8, 27, 33, 35
Automatic Hold Release, 9
Automatic Hold Reminder, 9
Initial Feature Assignments, 19-22
Model 206, 410, and 820 Voice
Terminals, 20
Administrator/Attendant Voice
Terminal, Administration Mode,
22
Administrator/Attendant Voice
Terminal, Normal Mode, 21
Intercom, 9
Intercom Auto Dial, 11, 34
Manual Signaling, 11
38
Last Number Redial, 11
Line Administration, 18
Line Request, 9
Loudspeaker Paging, 15
Message Waiting, 9, 35
Monitor-on-Hold, 9
Music-on-Hold, 15
Off-Premises Telephone Interface, 15
On-Hook Dialing, 9
Optional Equipment, 15
Optional Features, 15
Outside Auto Dial, 12
Personal Speed Dial, 12
Personalized Ringing, 12
Power Failure Transfer, 15
Privacy, 12
Privacy Alert, 9
Programmable Features, 11-13
Programmable Line Ringing, 12, 28
Recall, 10
Ringing Line Selection, 10
Ringing Patterns, 34
Saved Number Redial, 12
Send Message, 10, 34, 35
Speaker, 9
System Attendant,
Special Information for, 34-35
System Features, 14
System Reset, 14, 27
System Speed Dial, 14, 24
with Restriction Override, 24
Touch-Tone Enable, 13
Touch-Tone/Rotary Option, 14
Transfer, 10, 13, 33, 34-35
Transfer Return, 10, 25
Troubleshooting, 36-37
Voice Announcement Disable, 13
Voice Terminal Programming, 10
Voice Terminal Testing, 10
Volume Control, 10
Quick Reference Guide to
Administration Procedures
This chart summarizes the administrative procedures described in this manual. If you need more information about a procedure, refer to the pages listed.
Before you perform any of the following procedures, enter administration mode by following these steps:
• At the control unit, set Admin/Normal switch to Admin.
• At the administrator/attendant voice terminal, slide the T/P (Test/Program) switch to P.
• Touch Administer (Send Message). (If you don’t have a 34-button voice terminal, dial #01.)
When you finish administering your system, leave administration mode by following these steps:
• At the administrator/attendant voice terminal, slide the T/P switch back to the center position.
• At the control unit, set the Admin/Normal switch back to Normal.
Procedure
Instructions For Use
BASIC ADMINISTRATION
Programming Square Operation
• Dial ✱ 4 plus the total number of lines in your system.
(See page 18.)
Programming Non-Square Operation
(See page 19.)
Assign lines that will appear on all voice terminals in the
system:
• Dial ✱ 4 plus the total number of lines that you want to appear on all voice terminals.
Then, add the remaining unassigned lines to particular voice
terminals:
• Touch the Intercom Auto Dial button or dial the intercom
number of the particular voice terminal to which you want
to add the line.
Green light on = line has been assigned
Green light off = line has not been assigned
• Touch the button corresponding to the line you want to add
to the voice terminal.
• Repeat this procedure for each voice terminal in the
system.
ADMINISTERING OTHER SYSTEM OPTIONS
Call Restrictions
(See page 23.)
System Speed Dial
(See page 24.)
• Touch the Intercom Auto Dial button or dial the intercom
number of the voice terminal to be restricted.
• Touch Restrict (the left Intercom button) repeatedly until
the green light indicates the kind of restriction you want that
voice terminal to have:
Green light off = outward calls restricted (intercom calls only)
Green light flashing = toll calls restricted (local and
intercom calls only)
Green light on = unrestricted (all calls permitted)
• Dial a System Speed Dial code (#60 through #99).
• Dial ✱ 90 plus the telephone number. (Dial ✱ 92 and the
telephone number if you want a particular System Speed
Dial number to have Restriction Override.)
39
Quick Reference Guide (continued)
Instructions For Use
Procedure
ADMINISTERING OTHER SYSTEM OPTIONS (continued)
Group Paging
(See page 24.)
Transfer Return
(See page 25.)
Button-Free Line Operation
(Use with Model 820 5-button voice terminals with five or
more lines.)
(See page 25.)
• Dial a Group Page code ( ✱ 70 through ✱ 79) depending on which
of the ten groups you want to administer. (You can assign no more
than three phones to each group.)
• Touch the intercom Auto Dial button for the voice terminals you
want to include or do not want to include in the group:
Green light off = voice terminal is in the group
Green light on = voice terminal is not in the group
• Touch Administer (Send Message) when you are finished with
that group.
• Administer a different group by repeating the above procedure
again.
• Dial a code ( ✱ 21 through ✱ 29), where ✱ 21 gives you one ring
and ✱ 29 gives you nine rings. You can turn off Transfer Return
by dialing ✱ 20.
To administer a voice terminal to be button-free:
• Touch the Intercom Auto Dial button of the voice terminal you want
to administer. (The green light next to the button comes on.)
• If you want the button-free voice terminal to ring, dial ✱ 31 (the
green light flashes rapidly). If you don’t want the voice terminal
to ring, dial ✱ 32 (the green light flashes slowly).
To return a voice terminal to "square" operation:
• Touch the Intercom Auto Dial button of the voice terminal you want
to administer.
• Dial ✱ 34.
System Reset
(See page 27.)
40
• At the control unit, set the Admin/Normal switch to Admin.
• At the administration/attendant voice terminal, slide the T/P switch
to P .
• Touch Administer (Send Message).
• At the control unit, set the Admin/Normal switch to Normal.
• At the administrator/attendant voice terminal, dial ✱ 99.
(If you hear a two-beep signal, the reset worked; if you hear a
single, low-pitched ring, the reset did not work.)
• Once the system is reset, turn the power off at the control unit,
then on again.
AT&T
MERLIN is a trademark of AT&T.
COM KEY and TOUCH-A-MATIC are registered trademarks of AT&T.
© Copyright 1985 AT&T. Printed in U.S.A.
999-504-136 IS
Issue 2
September 1985