1
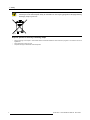
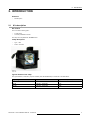
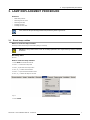
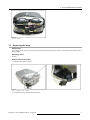
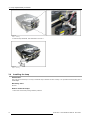
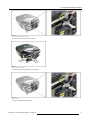
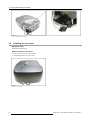
SIM 5 series Lamp Kit
Installation manual
R9841842
R59770361/01
04/12/2013
Factory: Barco nv, Simulation Division
Noordlaan 5, B-8520 Kuurne
Phone: +32 56.36.82.11
Fax: +32 56.36.84.86
Support: www.barco.com/esupport
Visit us at the web: www.barco.com
Printed in Belgium
Changes
Barco provides this manual ’as is’ without warranty of any kind, either expressed or implied, including but not limited to the implied warranties or merchantability and fitness for a particular purpose. Barco may make improvements and/or changes to the product(s) and/or the
program(s) described in this publication at any time without notice.
This publication could contain technical inaccuracies or typographical errors. Changes are periodically made to the information in this
publication; these changes are incorporated in new editions of this publication.
The latest edition of Barco manuals can be downloaded from the Barco web site www.barco.com or from the secured Barco web site
https://www.barco.com/en/signin.
Copyright ©
All rights reserved. No part of this document may be copied, reproduced or translated. It shall not otherwise be recorded, transmitted or
stored in a retrieval system without the prior written consent of Barco.
Disposal Information
Waste Electrical and Electronic Equipment
This symbol on the product indicates that, under the European Directive 2012/19/EU governing waste from electrical and electronic
equipment, this product must not be disposed of with other municipal waste. Please dispose of your waste equipment by handing it over to
a designated collection point for the recycling of waste electrical and electronic equipment. To prevent possible harm to the environment
or human health from uncontrolled waste disposal, please separate these items from other types of waste and recycle them responsibly
to promote the sustainable reuse of material resources.
For more information about recycling of this product, please contact your local city office or your municipal waste disposal service.
For details, please visit the Barco website at: http://www.barco.com/en/AboutBarco/weee
Guarantee and Compensation
Barco provides a guarantee relating to perfect manufacturing as part of the legally stipulated terms of guarantee. On receipt, the purchaser
must immediately inspect all delivered goods for damage incurred during transport, as well as for material and manufacturing faults Barco
must be informed immediately in writing of any complaints.
The period of guarantee begins on the date of transfer of risks, in the case of special systems and software on the date of commissioning,
at latest 30 days after the transfer of risks. In the event of justified notice of complaint, Barco can repair the fault or provide a replacement
at its own discretion within an appropriate period. If this measure proves to be impossible or unsuccessful, the purchaser can demand a
reduction in the purchase price or cancellation of the contract. All other claims, in particular those relating to compensation for direct or
indirect damage, and also damage attributed to the operation of software as well as to other services provided by Barco, being a component
of the system or independent service, will be deemed invalid provided the damage is not proven to be attributed to the absence of properties
guaranteed in writing or due to the intent or gross negligence or part of Barco.
If the purchaser or a third party carries out modifications or repairs on goods delivered by Barco, or if the goods are handled incorrectly,
in particular if the systems are commissioned operated incorrectly or if, after the transfer of risks, the goods are subject to influences not
agreed upon in the contract, all guarantee claims of the purchaser will be rendered invalid. Not included in the guarantee coverage are
system failures which are attributed to programs or special electronic circuitry provided by the purchaser, e.g. interfaces. Normal wear as
well as normal maintenance are not subject to the guarantee provided by Barco either.
The environmental conditions as well as the servicing and maintenance regulations specified in the this manual must be complied with by
the customer.
Mercury Notice
Hg
LAMP CONTAINS MERCURY,
DISPOSE ACCORDING TO
STATE/LOCAL LAW.
This Barco product consists of materials that may contain mercury, which must be recycled or disposed
of in accordance with local, state, or country laws:
•
Within this system, the lamps in the device contain mercury
Trademarks
Brand and product names mentioned in this manual may be trademarks, registered trademarks or copyrights of their respective holders.
All brand and product names mentioned in this manual serve as comments or examples and are not to be understood as advertising for
the products or their manufacturers.
Table of contents
TABLE OF CONTENTS
1. Safety . .. .. .. .. .. .. .. .. .. .. .. .. .. .. .. .. .. .. .. .. .. .. .. .. .. .. .. .. .. .. .. .. .. .. .. .. .. .. .. .. .. .. .. .. .. .. .. .. .. .. .. .. .. .. .. . 3
1.1
1.2
Safety guidelines . . . . . . . . . . . . . . . . . . . . . . . . . . . . . . . . . . . . . . . . . . . . . . . . . . . . . . . . . . . . . . . . . . . . . . . . . . . . . . . . . . . . . . . . . . . . . . . . . . . . . . . . . . . . . . . . . . . . 3
Recycling guidelines. . . . . . . . . . . . . . . . . . . . . . . . . . . . . . . . . . . . . . . . . . . . . . . . . . . . . . . . . . . . . . . . . . . . . . . . . . . . . . . . . . . . . . . . . . . . . . . . . . . . . . . . . . . . . . . . . 3
2. Introduction . .. .. .. .. .. .. .. .. .. .. .. .. .. .. .. .. .. .. .. .. .. .. .. .. .. .. .. .. .. .. .. .. .. .. .. .. .. .. .. .. .. .. .. .. .. .. .. .. .. .. .. . 5
2.1
Kit description. . . . . . . . . . . . . . . . . . . . . . . . . . . . . . . . . . . . . . . . . . . . . . . . . . . . . . . . . . . . . . . . . . . . . . . . . . . . . . . . . . . . . . . . . . . . . . . . . . . . . . . . . . . . . . . . . . . . . . . . 5
3. Lamp replacement procedure.. .. .. .. .. .. .. .. .. .. .. .. .. .. .. .. .. .. .. .. .. .. .. .. .. .. .. .. .. .. .. .. .. .. .. .. .. .. .. .. .. . 7
3.1
3.2
3.3
3.4
3.5
Reset lamp runtime . . . . . . . . . . . . . . . . . . . . . . . . . . . . . . . . . . . . . . . . . . . . . . . . . . . . . . . . . . . . . . . . . . . . . . . . . . . . . . . . . . . . . . . . . . . . . . . . . . . . . . . . . . . . . . . . . . 7
Removing the rear cover . . . . . . . . . . . . . . . . . . . . . . . . . . . . . . . . . . . . . . . . . . . . . . . . . . . . . . . . . . . . . . . . . . . . . . . . . . . . . . . . . . . . . . . . . . . . . . . . . . . . . . . . . . . . 8
Removing the lamp . . . . . . . . . . . . . . . . . . . . . . . . . . . . . . . . . . . . . . . . . . . . . . . . . . . . . . . . . . . . . . . . . . . . . . . . . . . . . . . . . . . . . . . . . . . . . . . . . . . . . . . . . . . . . . . . . . 9
Installing the lamp . . . . . . . . . . . . . . . . . . . . . . . . . . . . . . . . . . . . . . . . . . . . . . . . . . . . . . . . . . . . . . . . . . . . . . . . . . . . . . . . . . . . . . . . . . . . . . . . . . . . . . . . . . . . . . . . . . . 10
Installing the rear cover . . . . . . . . . . . . . . . . . . . . . . . . . . . . . . . . . . . . . . . . . . . . . . . . . . . . . . . . . . . . . . . . . . . . . . . . . . . . . . . . . . . . . . . . . . . . . . . . . . . . . . . . . . . . . 12
R59770361 SIM 5 SERIES LAMP KIT 04/12/2013
1
Table of contents
2
R59770361 SIM 5 SERIES LAMP KIT 04/12/2013
1. Safety
1. SAFETY
1.1
Safety guidelines
WARNING: Hot Surface and Risk of Explosion: Switch the projector to stand by and let it cool down for at least
15 minutes. These lamps consist of a quartz arc tube operating at very high temperature and high pressure
which may explode suddenly. There is a risk of personal injury and property damage from hot quartz arc tube
particles if handled incorrectly.
WARNING:
Risk of Electrical Shock: Power down the projector and unplug the power cord from the wall
outlet. Once the projector is cooled down and the power is off, continue with the procedure.
WARNING: Lamp Runtime Warning: Do not exceed the indicated maximum total lifetime of the lamp for safe
operation in normal power mode. Do not use it longer ! Always replace the lamp with the BARCO lamp kit.
WARNING: UV Radiation Exposure : Never light the lamp if the rear cover (lamp cover) of the projector is
removed, unless you wear UV radiation eye and skin protection.
WARNING: :
CAUTION:
1.2
Do not operate the projector longer than one minute with the rear cover removed.
: Never operate the projector with only one lamp installed.
Recycling guidelines
WARNING: Do not break or crush lamps because this may pose health and environmental risks when mercury
vapors are released.
CAUTION: To avoid breaking the lamps, repack carefully when storing and transporting them.
R59770361 SIM 5 SERIES LAMP KIT 04/12/2013
3
1. Safety
CAUTION:
Lamps may not be disposed as normal household trash.
Contact your local waste disposal facility for information on the recycling program for HID (High Intensity
Discharge ) lamps in your area.
Image 1-1
Disposal options for mercury-containing lamps
•
4
Recycle through a municipal or solid waste district household hazardous waste collection program in accordance with local
regulations.
•
Direct shipment to lamp recycler
•
Shipment through a hazardous waste transporter
R59770361 SIM 5 SERIES LAMP KIT 04/12/2013
2. Introduction
2. INTRODUCTION
Overview
•
2.1
Kit description
Kit description
Kit content
The kit contains following parts :
•
2 UHP lamps;
•
This lamp installation manual.
The lamps are compatible with all SIM 5 series.
Lamp description
•
Type : UHP
•
Power: 250 Watt
Image 2-1
Lamp view
Typical lifetime of the lamp
The typical lifetime, monitored in projector software (NOT GUARANTEED!) is mentioned in the table below.
Projector type
Projector article numbers
Typical lifetime (in hours)
SIM 5+
R9040380 – R9240380
1500
SIM 5R
R9040381 – R9240381
1500
SIM 5W
R9040395 – R9240395
3000
R59770361 SIM 5 SERIES LAMP KIT 04/12/2013
5
2. Introduction
6
R59770361 SIM 5 SERIES LAMP KIT 04/12/2013
3. Lamp replacement procedure
3. LAMP REPLACEMENT PROCEDURE
Overview
•
Reset lamp runtime
•
Removing the rear cover
•
Removing the lamp
•
Installing the lamp
•
Installing the rear cover
Resetting the lamp runtime requires access to the hidden menu of the projector. Select More... in the Lamps
menu, and enter the password (by default 0000) followed by Enter to get access.
3.1
Reset lamp runtime
When to reset the lamp runtime?
The lamp runtime should only be reset when placing a new lamp.
WARNING:
Lamp runtime reset as well as the lamp replacement can only be done by a Barco authorized
technician.
Necessary tools
No tools.
How to reset the lamp runtime?
1. Press MENU to activate the tool bar
2. Press → to select the Lamps item
3. Press ↓ to pull down the Lamps menu
4. Use ↑ or ↓ to select Reset Runtime
5. Press → to open the Reset Runtime menu
6. Use ↑ or ↓ to select the lamps to be reset
Image 3-1
7. Press ENTER
R59770361 SIM 5 SERIES LAMP KIT 04/12/2013
7
3. Lamp replacement procedure
A dialog box is displayed
Image 3-2
8. Use ←or →, the numeric keys on the remote, or the keypad to change the serial number of the lamp (serial number 0000000 will
not be accepted).
9. Select Accept to reset the lamp runtime and to confirm the serial number of the new lamp
3.2
Removing the rear cover
WARNING: Before removing a cover, switch off the mains power and unplug the mains power cord from the
wall outlet.
Necessary tools
Crosshead screwdriver Ph2
How to remove the rear cover
1. Remove the cover lock screw
Image 3-3
Rear cover: fixing screw
2. Remove the rear cover
8
R59770361 SIM 5 SERIES LAMP KIT 04/12/2013
3. Lamp replacement procedure
Image 3-4
Rear cover removed
3.3
Removing the lamp
Introduction
This projector has two lamps. The way to remove the lamp is identical for each of lamps. The procedure below describes how to
remove lamp 1.
Necessary tools
No tools.
How to remove the lamp?
1. Unplug the lamp power connector
Image 3-5
Lamp 1: unplugging the power connector
2. Pull the lamp locking handle to release the lamp
R59770361 SIM 5 SERIES LAMP KIT 04/12/2013
9
3. Lamp replacement procedure
Image 3-6
Lamp 1: unlocking
3. Slide the lamp sidewards, then backwards to remove it
Image 3-7
Lamp 1: removing
3.4
Installing the lamp
Introduction
This projector has two lamps. The way to install the lamp is identical for each of lamps. The procedure below describes how to
install lamp 1.
Necessary tools
No tools.
How to install the lamp?
1. Make sure that the lamp locking handle is pulled out
10
R59770361 SIM 5 SERIES LAMP KIT 04/12/2013
3. Lamp replacement procedure
Image 3-8
Lamp 1 locking system must be unlocked
2. Slide in the lamp into its correct position
Image 3-9
Lamp 1: sliding it in its position
3. Push the lamp locking handle to lock the lamp
Image 3-10
Lamp 1: locking
4. Plug in the lamp power connector
R59770361 SIM 5 SERIES LAMP KIT 04/12/2013
11
3. Lamp replacement procedure
Image 3-11
Lamp 1: make the power connection
3.5
Installing the rear cover
Necessary tools
Crosshead screwdriver Ph2
How to install the rear cover
1. Put the rear cover into its correct position
2. Insert and tighten the cover lock screw
Image 3-12
Rear cover: fixing screw
12
R59770361 SIM 5 SERIES LAMP KIT 04/12/2013