1
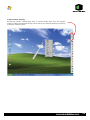
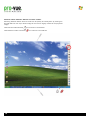
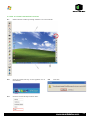
User Guide
Introduction
The new Pro-Vue Interactive provides a whole new dimension to interactive teaching and presentation; all the benefits of an interactive
whiteboard... without the whiteboard!
The Pro-Vue features integrated infrared technology which means that virtually any white (or light coloured) surface can be used as an
interactive screen! From a conventional wipe-clean whiteboard, to retractable tripod screens - or simply walls, ceilings or even floors!
- any surface can be used as a fully interactive screen. In addition, the size of your interactive ‘screen’ is only limited to the space
available (imagine how big the screen could be using a simple, clear wall in the school hall?).
... And your interactive projector is fully portable. Easily stored/transported in a lightweight canvas bag, Pro-Vue Interactive can be
taken anywhere your interactive presentation needs to go; whether it be room-to-room, city-to-city or even international travel (imagine
trying to transport any conventional interactive whiteboard setup on your next flight?!)
Contents
Contents of the Accessory Bag
02
Accessories Introduction
03
Good Practice use of E-Tools
04
Operation Guide for Windows OS
05
Operation Guide for Mac OS
12
Troubleshooting
Warrenty
16~17
17
Contents of the Accessory Bag
Please make sure that following items are included in the Accessory Bag. If any items are missing, contact your dealer.
1. Accessory Bag
2. E-Wand
3. E-Pen
4. Remote Control
5. Batteries (AAA)
6. Batteries (AA)
7. Hanging String
02
Accessories Introduction
Function of the “E-Wand”
When the silver button on the E-Wand body is pressed,
an infrared signal is emitted, which is detected by the IR
Sensor integrated within the Projector (when the button is
pressed and an IR signal emitted, the LED on the E-Wand
lights red).
LED Lamp
Button: Mouse Left Key
Before using the Wand.
Screw the Telescopic Rod into the Wand body firmly.
How to use:
1) Extend the telescopic E-Wand to the required length.
2) Position the tip of the E-Wand on the ‘screen’.
3) Push the E-Wand button to click the target as in ‘mouse’
function, or click and hold the button to draw or write in
‘pen’ function.
Pen tip with touch sensor
Back
Front
Function of the “E-Pen”
How to use:
When the tip of the E-Pen is pressed (such as onto the
‘screen’ area), an infrared signal is emitted, which is
detected by the IR sensor integrated within the Pro-Vue
Projector.
1) Position the tip of the E-Pen on the ‘screen’
2) Press the E-Pen on the screen to click the target as in
‘mouse’ function; press and drag to draw or write in ‘pen’
function.
PLEASE NOTE: As the sensor is located in the
tip of the E-Pen, it is very important to ensure the
E-Pen is switched off when not in use to avoid
unnecessary battery consumption.
Power switch
Back
Front
03
Good Practice use of the E-Pen & E-Wand when presenting/teaching:
Please note that as the Pro-Vue functions using infrared light, a ‘line-of-sight’ between the E-Pen/E-Wand and the Projector
is essential for effective use.
Therefore, good-practice use requires the presenter/teacher to ensure the E-Pen/E-Wand is used out of any shadow area,
which may occur dependent on your positioning of the projector to screen. Ceiling-mounting the projector, or use of the
E-Wand (as opposed to the E-Pen) in portable/temporary applications, will significantly reduce the possibility of shadow.
8
With your back to the audience, the E-Pen is
most likely to be in shadow.
Facing side-on to the screen and your audience
will significantly reduce shadow.
4
Using the E-Wand will all but eliminate any
‘in-shadow’ issues.
04
4
Operation Guide for Windows OS
Interactive function is provided by “LightPenII” software.
1. System Requirements
To ensure the interactive functions of your Pro-Vue Projector
work properly, please check your computer to ensure it
meets the following specifications.
Note: for Windows Vista
(a) Click mouse right key on “LightPenII.exe” or the
short-cut icon for “LightPenII.exe” and then click mouse
left key to select “Properties”.
System Requirements
OS Required
Microsoft Window XP(SP2)/
Vista/Windows 7
Processor Type
Core Duo or above
RAM
512 MB above
Min. Free disk space
30 MB
2. LightPenII Software Installation
Step 1:Insert the Owner’s Manual CD-ROM into the
CD drive.
Step 2:Copy the “LightPen Software for Windows” folder
from the CDROM to your PC’s hard disk drive.
Step 3:Remove the CD-ROM from the CD drive.
Step 4:Create a short-cut icon for the “LightPenII.exe”,
and put it on the desktop for your ease of use.
Note: The software cannot be executed from CD-ROM.
(b)
Select “Compatibility” sheet and add check marks
to the following. “Run this program in compatibility
mode for:Windows XP (Service Pack 2)”, “Disable
desktop composition”. Then select “Apply”.
Latest versions of the Lightpen II software,
including latest upgrades and amendments,
are available for free download from
www.cleverlittlebox.com
05
3. Initial Setup for Interactive Function
3.1
Connect the supplied USB & VGA cables between
Pro-Vue projector and PC.
3.2
Execute the “LightPenII” software by double-clicking
the “LightPenII.exe” or the short-cut icon for the
“LightPenII.exe”. Then the icon for the “LightPenII”
appears in the task bar and the tool bar appears
on the right side of the screen.
3.3 Select Distance
Step 1:Click left mouse button on the “LightPenII” in the
task bar.
Step 2:Select “Projection Distance”.
Step 3:Choose the projection distance from pop-up menu
(>3m,>2m,<2m) and then select “OK”.
06
3.4. Calibration
3.5 StartUp
Step 1:Click the left mouse button on the “LightPenII” in
the task bar.
Step 1:Click the mouse left key on the “LightPenII” icon in
the task bar.
Step 2:Select “Calibration”.
Step 2:Select the “StartUp”, then the “ 4 ” mark appears
in the pop-up menu.
Step 3:Push the button on the “E-Wand” or press the tip
of the “E-Pen” on the center of each green target.
The colour of target changes black from green as
it appears. Then next green target appears on the
upper middle area of the screen. Repeat the same
until all 13 targets change black.
Note:
If you set the “StartUp” function, the “LightPenII.exe”
will be executed automatically when you launch
Windows next time.
In order to carry out the calibration smoothly, be
sure to expose the tip of the “E-Wand” or “E-Pen”
to the Pro-Vue’s IR Sensor with a clear line of
sight.
Note: If the screen and projector stay where they are and
the same PC is used with the same resolution, Distance
and Calibration settings need be repeated.
07
4. How To Use Interactive Functions
Function of each Icon in the Toolbar
Change location of the tool bar:
To position tool bar on the right or left side of screen
Switch to mouse function:
To change function to Computer Mouse
Mouse function - right click:
To change function to Computer Mouse Right Key
Mouse function - double click:
To change function to Computer Mouse Double Click
Change the pen width:
To select the fineness of pen
Change the pen colour:
To select the colour of pen
Hot key to change pen to red:
To change function to red pen
Hot key to change pen to green:
To change function to green pen
Hot key to change pen to blue:
To change function to blue pen
Hot key to change pen to black:
To change function to black pen
Hot key to change pen
to yellow highlighter
Eraser:
To erase drawing
Erase all:
To erase all drawings on the screen at once
Recall last erased items:
To recall the previous drawing (or erasing) you have made
Save file:
To save the current page to a file
Page up:
Previous page/Scroll up
Page down:
Next page/Scroll down
08
In Mouse Mode (default)
By selecting ‘Mouse’, ‘Mouse Right Click’ or ‘Mouse Double Click’ from the Lightpen
Toolbar, the E-Pen and E-Wand will fully interact with all your standard software, functioning
as would a standard mouse.
09
Shortcut switch between ‘Mouse’ and ‘Pen’ modes:
Switching between Mouse and Pen mode can be quickly and easily done by clicking the
E-Pen/E-Wand on the top or bottom edge of the ‘screen’ slightly outside of the projected
image.
When Mouse mode selected,
When Red Pen mode is selected,
10
icon is shown in the task bar.
icon is shown in the task bar.
5. How to close Interactive function
5.1
Select “Mouse” mode by clicking “Mouse” icon in the tool bar.
5.2
Click the mouse left key on the LightPen icon in
the task bar.
5.3
Click the mouse left key to select “Exit”.
5.4
Click ‘OK’.
11
Operation Guide for Mac OS
Interactive function is provided by “LightPen” software.
1. System Requirements
To ensure the interactive functions of your Pro-Vue Interactive Projector work properly,
please check your computer to ensure it meets the following specifications.
System Requirements
OS Required
Mac OS X v10.4.11- v10.5 or above
Processor Type
Intel processor or Power PC
RAM
512 MB RAM or above
Hard Disk
At least 10 MB of hard disk space
Media Device
At least 4x CD-ROM or DVD-ROM At
least USB 2.0
2. LightPen Software Installation
Step 1:Insert the ‘Owner’s Manual’ CD-ROM into the CD drive.
Step 2:Copy the “LightPen Software for Mac OS” folder from the CDROM to your
computer’s hard disk drive.
Step 3:Remove the CD-ROM from the CD drive.
Step 4:Create the short-cut icon for the “LightPenII.exe”, and put it on the desktop for
your ease of use.
Note: The software cannot be executed from CD-ROM.
12
3. Initial Setup for Interactive Function
3.1
Connect the supplied USB and VGA* cables between Pro-Vue projector and
the PC.
3.2
Execute “LightPen” software by clicking the “LightPen” or the shortcut icon for the
“LightPen”. The icon for “LightPen” appears in the task bar and the tool bar appears
on the right hand side of the screen.
* (Requires Apple Mini DVI to VGA Adapter)
3.3 Select Distance
Step 1:Click the mouse key on the “LightPen” in the menu bar.
Step 2:Select the “Projection Distance”.
Step 3:Choose the projection distance from pop-up menu (>3m,>2m,<2m), and then
select “OK”.
13
3.4 Calibration
Step 1: Click the mouse key on “LightPen” in the task bar.
Step 2: Select the “Calibration”.
Step 3:Push the button on the E-Wand or press the tip of the E-Pen on the center of each
green target. The colour of target changes black from green. The next green target
appears on the upper middle area of the screen. Repeat the same until all 9 targets
change black. In order to carry out the calibration smoothly be sure to expose the
tip of the E-Tool to Pro-Vue’s IR Sensor with a clear line of sight.
Note: If the screen and projector stay where they are and the same computer is used with
the same resolution, Distance and Calibration settings need not be repeated.
14
4. How To Use Interactive Functions
Function of each icon in the Toolbar
Tool bar position:
To position tool bar on the right or left side of screen
Switch to mouse function:
To change function to Computer Mouse
Pen:
To change function to Pen
Eraser:
To erase drawn line
Change the pen width:
To select the fineness of pen
Change the pen colour:
To select the color of pen
Eraser all:
To erase all drawings on the screen at once
Save file:
To save the current page to a file
Redraw:
To recall the previous drawing (or erasing) you’ve made
Virtual keyboard:
To open virtual keyboard
15
Troubleshooting
1. Q: Why does it show “No LightPen
found”?
Reasons for this might be:
1
The USB cable is not properly connected.
Check cable connections at computer and
Pro-Vue Projector.
Should the Lightpen icon appear with a red cross
in your Toolbar, the USB cable may have been
disconnected at computer/projector. Check
connections are correct and secure.
2. Q: Why can I not execute calibration
on the green cross target?
Please check E-Pen/E-Wand are functioning:
1.1 Please check if E-Pen/E-Wand batteries or battery
cap is loose.
1.2
When using E-Pen or E-Wand, be sure to locate
the tip in the sight of the CMOS sensor in front of
the projector. If the sensor cannot see it, the
Interactive system does not work.
2
The ambient light may be too strong. Take the
light out of the sight of the CMOS sensor. Strong
ambient light is usually caused by the following:
Sunlight through the windows near the screen.
2.1
2.2 Light source working close to the sensor or
the screen.
3
*
Some Anti-virus programs will disable the USB
port. Please make sure the USB port is not
disabled.
2
Please check if the USB port of the PC supports
USB 2.0 or not.
3
You may have the wrong USB cable. Ensure to
use the cable supplied with your Pro-Vue Projector.
Should you require a longer lead, please contact
your dealer.
4
USB port on computer malfunctions. Please check
if the USB port is functioning correctly. If not,
please consult with IT engineer.
Some notebook computers will disable USB ports
when the battery is low. Please use AC power whenever
possible. Some notebook computers do not provide
standard 500mA to the USB port or the USB converter
is not working properly. In such case, please use our
standard USB cable.
16
In Windows Vista system, one of the green cross
targets may be hidden by “start” square of
computer/notebook computer. Please point to the
position as shown for calibration.
3. Q: The cursor is not at the same
position as the E-Pen/E-Wand is
pointing:
Possible reasons for this are:
1
The system is not calibrated well. Try to point to the
“center” of green cross target when you run
calibration.
2
The position of the projector, screen or projection
size has been changed.
3
The image resolution has been changed. Running
the calibration procedure again will solve the
problem.
4. Q: Why is the cursor jumping?
This may be caused by strong ambient light
interference. Try to avoid strong ambient light
interference, especially strong sunlight directly
projected on the screen. (Please refer to Question 2.)
5. Q: Why is the LightPen not working
after the computer wakes up from
standby?
In some cases, if the computer goes into standby
mode, the computer will shut the USB port.
In such case, please wake up computer,
unplug and insert the USB cable again.
(Please refer to Question 1)
6. Q: There are ‘blank spots’ where
I am writing/drawing with the
E-Pen/E-Wand:
1
Ensure your E-Pen/E-Wand is not ‘shadowed’ from
line-of-sight with the Projector (see ‘Good Practice’
guidelines on Page 04)
2
You may be writing/drawing over an animated
graphic (eg. animated gif/flash file in a web page).
In such cases the computer sees this as redrawing
over the previous screen. Avoid animated graphic
areas when drawing/writing with the E-Tools.
Warranty Statement
PVI2600 is supplied with a 3 year warranty package, comprising of:1 Year full parts and labour, plus a further 2 Years parts only*
All warranties are provided on a RTB basis**.
* Excludes lamp assemblies which carry an independent 2000 hour operational life span and Accessories (e.g. Lightpen
and Wand) which carry a 1 Year warranty only.
** It is the responsibility of the user/installer to return any PVI2600 to CIE for validation and inspection of any warranty
claim.
17
Take a look at our new website for details on our
full range of Clever Little Box products at:
CIE-Group Widdowson Close Blenheim Industrial Estate Bulwell Nottingham NG6 8WB
T: 0115 9770075 F: 0115 9770081 E: [email protected] W: www.cie-group.com