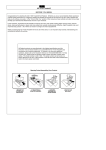
1
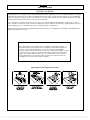
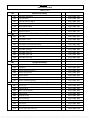
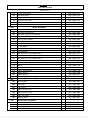
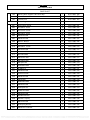
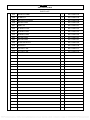
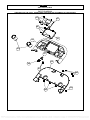
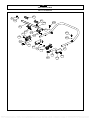
GOLD TREADMILL AG-11302
fit for life
with Roger Black
PDF compression, OCR, web optimization using a watermarked evaluation copy of CVISION PDFCompressor
1
AG-11302 Treadmill
BEFORE YOU BEGIN
Congratulations for selecting the AG-11302 Treadmill from Reebok. Whether you are an accomplished athlete seeking to
maintain peak performance or a beginner realizing the benefits of exercise for the first time, the AG-11302 Treadmill will
help you to achieve your goals. In the “Hints to Help You” section of this manual we have outlined some tips that we hope
will help you maximize the effectiveness and fun of your workouts.
In the meantime, remember that the benefits of exercise are many and varied including higher energy levels, reduced
stress, improved self-esteem, clearer and more radiant skin, greater cardiovascular efficiency, higher metabolic rate, and
improved body posture – all of which can result in a longer and more enjoyable life.
While purchasing the AG-11302 Treadmill will not do all of this alone, it is an important step towards understanding and
achieving the benefits of exercise.
All Reebok products are manufactured to the highest specifications and this
instruction manual should enable you to assemble the AG-11302 Treadmill and
commence your workout programme. If, however, you have any additional
questions, please call out UK Customer Service on +44 (0) 845 600 0464. To help
us assist you, please quote the product model number and batch number when
calling. The model number is AG-11302. The serial number can be found on a
sticker attached to the Reebok AG-11302 (located on the left hand side of the
treadmill base next to the mains power cord inlet).
Opening Carton/Assembling Your Product
PDF compression, OCR, web optimization using a watermarked evaluation copy of CVISION PDFCompressor
2
AG-11302 Treadmill
CONTENTS
Before you Begin
01
Precautions
03
Hardware Pack
04
Parts List
05
Exploded Diagrams/Part Identification
09
Assembly Instructions
16
Folding instructions
21
Unfolding instructions
22
Transport instructions
23
Computer instructions
24
Stretching routine
28
Training with reebok university
30
How to maintain the AG-11302 treadmill
31
Troubleshooting
33
Ordering replacement parts / limited warranty
34
Warning
Before beginning this or any exercise programme, consul your physician. This is especially important for persons who
have not exercised regularly before or persons with pre-existing health problems. Read all instructions before using.
Reebok® assumes no responsibility for personal injury or property damage sustained by or through the use of this product.
Questions?
As a manufacturer, we are committed to providing complete customer satisfaction. If you have any questions, or if parts
are missing or damaged, we guarantee complete satisfaction.
TO AVOID UNNECESSARY DELAYS, PLEASE CALL OUR CUSTOMER HOTLINE DIRECT. The trained technicians on
our customer hotline will provide immediate assistance free of charge.
UK Customer Hotline: 0845 600 0464
UK Customer Services: RFE International Ltd.; DFDS House, Maidstone Road; Kingston, Milton Keynes MK10 0AJ
UK Email: [email protected]
Caution
Read all precautions and instructions in this manual before using this equipment. Keep this manual for future reference.
Model No: AG-11302
Serial No: for example : AG-11302/0507/000001
Write the serial number and mfr date in the space above for future reference. (Located on the left hand side of the treadmill
base next to the mains power cord inlet.)
PDF compression, OCR, web optimization using a watermarked evaluation copy of CVISION PDFCompressor
3
AG-11302 Treadmill
PRECAUTIONS
WARNING: To reduce the risk of burns, fire, electric shock, or injury to persons, read the following important precautions
and information before operating the treadmill.
1.
2.
3.
4.
5.
6.
7.
8.
9.
10.
11.
12.
13.
14.
15.
16.
17.
18.
19.
20.
21.
22.
23.
It is the responsibility of the owner to ensure that all users of this treadmill are adequately informed of all warnings and
precautions.
Use the treadmill only as described in this manual.
Place on a level surface, with 2m of clearance behind it. To protect the floor or carpet from damage, place a mat under
the treadmill.
When choosing a location for the treadmill make sure that the location and position permit access to a plug.
Keep the treadmill indoors, away from moisture or dust. Do not put the treadmill in a garage or covered patio, or near
water.
Do not operate the treadmill where aerosol products are used or where oxygen is being administered.
Keep children under the age of 12 and pets away from the treadmill at all times.
The treadmill should not be used by persons weighing more than 110kg.
Never allow more than one person on the treadmill at a time.
Wear appropriate exercise clothing when using the treadmill. Do not wear loose clothing that could become caught in
the treadmill. Athletic support clothes are recommended for both men and women. Always wear athletic shoes. Never
use the treadmill with bare feet, wearing only stockings, or in sandals.
When connecting the power cord, plug the power cord into an earthed circuit. When replacing the fuse, an ASTA
approved BS 1362 type should be fitted to the fuse carrier. A 13 amp fuse should be used. No other appliance should
be on the same circuit.
If you need an extension cord, use only 14 gauge cord of 1.5m or less in length.
Keep the power cord away from heated surfaces.
Never move the walking belt while the power is turned on. Do not operate the treadmill if the power cord or plug is
damaged, or if the treadmill is not working properly. (See “Troubleshooting” Page43. If the treadmill is not working
properly.)
Never start the treadmill while you are standing on the walking belt. Stand on the side rails hold the handrails start the
unit at a low speed and then step on to the unit, when comfortable increase the speed to one that you’re comfortable
with..
The treadmill is capable of high speeds. Adjust the speed in small increments to avoid sudden jumps in speed.
The pulse sensor is not a medical device. Various factors, including the user’s movement, may affect the accuracy of
the heart rate readings. The pulse sensor is intended only as an exercise aid in determining heart rate trends in
general.
Never leave the treadmill unattended while it is running. Always remove the safety key when the treadmill is not in use.
Do not attempt to raise, lower, or move the treadmill until it’s properly assembled. (See Page 17 “Assembly” and Page
25 “Folding the Treadmill”)
Do not change the incline of the treadmill by placing objects under the treadmill.
When folding or moving the treadmill make sure the “power fold switch is fully engaged” (See Page 25 “Folding”)
Inspect and tighten all parts of the treadmill regularly. (See page 38 “Maintenance”)
Never drop or insert any object into any opening in/on the treadmill.
PDF compression, OCR, web optimization using a watermarked evaluation copy of CVISION PDFCompressor
4
AG-11302 Treadmill
HARDWARE COMPARISON CHART
Hardware chart:
For your convenience, we have identified the hardware used in the assembly of this product. This chart is provided to help
you identify those items that may be unfamiliar to you.
NO.
DESCRIPTION
805
Φ4x14mm Screw
6
806
M8x47mm Bolt
2
808
Φ8 mm Washer
8
814
M8x52mm Bolt
2
817
M8x18mm Bolt
4
105
Water Bottle Holder
2
106
Safety Key
1
402
Upright-Cover
2
207
Hand Bar Cover-LL
1
208
Hand Bar Cover-LR
1
209
Hand Bar Cover-RL
1
210
Hand Bar Cover-RR
1
A
Allen Wrench 6mm
1
B
Phillips Head Wrench
1
C
Power Cord
1
QTY.
805
806
105
106
402
817
207
210
209
208
A
814
808
B
C
MILIMETERS
PDF compression, OCR, web optimization using a watermarked evaluation copy of CVISION PDFCompressor
5
AG-11302 Treadmill
PARTS LIST
Console Assembly
100
101
Computer PC Board
1
AG-11302 -101
102
Console Plate
1
AG-11302 -102
103
Console Housing-Upper
1
AG-11302 -103
104
Console Housing-Bottom
1
AG-11302 -104
105
Water Bottle Holder
2
AG-11302 -105
106
Safety Key
1
AG-11302 -106
107
Safety Key Base
1
AG-11302 -107
Handle Bar Assembly
200
201
Hand Bar
1
AG-11302 -201
202
Hand Pulse Tube
1
AG-11302 -202
203
Hand Pulse Sensor
2
AG-11302 -203
204
Hand Pulse Sensor Plastic Cover
2
AG-11302 -204
205
Hand Bar Foam Grip
2
AG-11302 -205
206
Hand Bar End Cap
2
AG-11302 -206
207
Hand Bar Cover-LL
1
AG-11302 -207
208
Hand Bar Cover-LR
1
AG-11302 -208
209
Hand Bar Cover-RL
1
AG-11302 -209
210
Hand Bar Cover-RR
1
AG-11302 -210
1
AG-11302 -301
Upright Assembly
300
301
Upright-L
302
Upright-R
303
Power Switch Plate Base
1
AG-11302 -303
304
Power Switch Plate
1
AG-11302 -304
305
Power Switch
1
AG-11302 -305
306
Power Breaker
2
AG-11302 -306
307
Power Cord Switch Plate
2
AG-11302 -307
AG-11302 -302
Base Frame Assembly
400
401
Base Frame
1
AG-11302 -401
402
Upright-Cover
2
AG-11302 -402
403
Front Caster Holder
2
AG-11302 -403
404
Front Caster
2
AG-11302 -404
405
Fold Up Locker
1
AG-11302 -405
406
Torsional Spring
1
AG-11302 -406
407
Rear Caster Holder
2
AG-11302 -407
408
Rear Caster
2
AG-11302 -408
409
Foot Locker
1
AG-11302 -409
410
Transportation Wheel Bracker
1
AG-11302 -410
PDF compression, OCR, web optimization using a watermarked evaluation copy of CVISION PDFCompressor
6
AG-11302 Treadmill
PARTS LIST
411
Transportation Wheel
1
AG-11302 -411
412
Torsional Spring
1
AG-11302 -412
414
Rubber Cushion
4
AG-11302 -414
415
protective rod holder
1
AG-11302 -415
416
protective plastic rod
1
AG-11302 -416
417
protective spring
1
AG-11302 -417
Motor Assembly
500
501
Motor Hood Top
1
AG-11302 -501
502
Elevation Support Tube
1
503
Elevation Support Tube End Cap
4
AG-11302 -502
AG-11302 -503
504
Plastic Clamp- Top
2
AG-11302 -504
505
Plastic Clamp- Bottom
2
AG-11302 -505
506
Elevation Support
2
AG-11302 -506
507
508
Motor Holder
1
AG-11302 -507
Driving Motor
1
AG-11302 -508
509
Driving Belt
1
AG-11302 -509
510
Control Board
1
511
Elevation Gear sleeve holder-upper
1
AG-11302 -510
AG-11302 -511
512
Elevation Gear Sleeve
1
AG-11302 -512
513
Elevation Gear sleeve holder-lower
1
AG-11302 -513
514
Elevation Motor
1
515
Fold Up Support Tube
1
AG-11302 -514
AG-11302 -515
516
Shock
1
AG-11302 -516
518
Plastic Wheel
1
AG-11302 -518
519
520
Motor Holder Bottom
Motor Holder -L
1
1
AG-11302 -519
AG-11302 -520
521
Motor Holder-R
1
522
Motor Bottom Cover
1
AG-11302 -521
AG-11302 -522
600.
Running Deck Assembly
601
Running Belt
1
AG-11302 -601
602
Side Rail-L
1
AG-11302 -602
603
Side Rail-R
1
AG-11302 -603
604
Side Rail End Cap-L
1
AG-11302 -604
605
Side Rail End Cap-R
1
AG-11302 -605
606
Side Rail Guider
8
AG-11302 -606
607
Running Deck
1
AG-11302 -607
1
1
1
1
AG-11302 -701
AG-11302 -702
AG-11302 -703
AG-11302 -704
700
701
702
703
704
Deck Frame Assembly
Deck Frame
Front Roller Tube+Shaft
Rear Roller Tube+Shaft
Running Deck Support Tube
PDF compression, OCR, web optimization using a watermarked evaluation copy of CVISION PDFCompressor
7
AG-11302 Treadmill
PARTS LIST
705
Running Deck Support Tube Foam Grip
1
AG-11302 -705
706
Rear Caster
2
AG-11302 -706
707
Cushion Pad
8
AG-11302 -707
800
Fastening
801
Φ3.5x14mm Screw
8
AG-11302 -801
803
Φ3x10mm Screw
4
AG-11302 -803
804
Φ3x14 mm Screw
2
AG-11302 -804
805
Φ4x14mm Screw
42
AG-11302 -805
806
M8x47mm Bolt
2
AG-11302 -806
807
M8x36mm Bolt
2
AG-11302 -807
808
Φ8 mm Washer
23
AG-11302 -808
811
M8 x10 mm Bolt
2
AG-11302 -811
812
Φ4x19mm Screw
14
AG-11302 -812
813
M3x10mm Bolt
2
AG-11302 -813
814
M8x52mm Bolt
5
AG-11302 -814
815
Φ5x14mm Bolt
2
AG-11302 -815
817
M8x18mm Bolt
4
AG-11302 -817
818
M8x 46mm Bolt
2
AG-11302 -818
819
M8 Nylon Nut
7
AG-11302 -819
820
M16x90mm Bolt
2
AG-11302 -820
821
Φ16Washer
2
AG-11302 -821
823
M8x20mm Bolt
1
AG-11302 -823
824
5x14mm Screw
6
AG-11302 -824
825
M8x45mm Bolt
2
AG-11302 -825
830
M8x38 Bolt
1
AG-11302 -830
831
M10x44mm Bolt
1
AG-11302 -831
833
M8x30mm Bolt
10
AG-11302 -833
834
M10 Nylon Nut
3
AG-11302 -834
835
M10x67mm Bolt
1
AG-11302 -835
836
M8x30mm Bolt
8
AG-11302 -836
839
Φ8x26x3 Washer
2
AG-11302 -839
840
Φ8x24x11 Spring
1
AG-11302 -840
841
M8x12mm Bolt
2
AG-11302 -841
842
Φ10 Spring Washer
2
AG-11302 -842
843
M8x85mm Fixed Bolt
1
AG-11302 -843
PDF compression, OCR, web optimization using a watermarked evaluation copy of CVISION PDFCompressor
8
AG-11302 Treadmill
PARTS LIST
844
M8x48 Fixed Bolt
1
AG-11302 -844
848
Φ10Washer
4
AG-11302 -848
849
M8x116mm Fixed Bolt
1
AG-11302 -849
850
M8x45mm Bolt
3
AG-11302 -850
851
Φ6Washer
3
AG-11302 -851
852
M10x22mm Bolt
2
AG-11302 -852
855
M10x30mm Bolt
1
AG-11302 -855
856
M10x26mm Bolt
1
AG-11302 -856
863
M5x10mm Bolt
2
AG-11302 -863
867
M6x14mm Bolt
2
AG-11302 -867
868
Φ18x6.5x2 Washer
1
AG-11302 -868
870
Φ5 Washer
3
AG-11302 -870
871
Φ4x12mm Bolt
4
AG-11302 -871
872
Φ3x14mm Bolt
1
AG-11302 -872
PDF compression, OCR, web optimization using a watermarked evaluation copy of CVISION PDFCompressor
9
AG-11302 Treadmill
PARTS DIAGRAM
A MAJORITY OF THE PARTS SHOWN HERE HAVE BEEN PRE-ASSEMBLED AT THE FACTORY.
801
101
801
102
103
105
107
104
106
804
805
805
805
PDF compression, OCR, web optimization using a watermarked evaluation copy of CVISION PDFCompressor
10
AG-11302 Treadmill
PARTS DIAGRAM
A MAJORITY OF THE PARTS SHOWN HERE HAVE BEEN PRE-ASSEMBLED AT THE FACTORY
203
807
808
807
806
808
202
808
805
204
806
207
805
805
808
205
206
208
805
201
209
205
805
206
210
PDF compression, OCR, web optimization using a watermarked evaluation copy of CVISION PDFCompressor
11
AG-11302 Treadmill
PARTS DIAGRAM
A MAJORITY OF THE PARTS SHOWN HERE HAVE BEEN PRE-ASSEMBLED AT THE FACTORY.
811
302
811
301
303
305
306
304
307
812
813
PDF compression, OCR, web optimization using a watermarked evaluation copy of CVISION PDFCompressor
12
AG-11302 Treadmill
PARTS DIAGRAM
A MAJORITY OF THE PARTS SHOWN HERE HAVE BEEN PRE-ASSEMBLED AT THE FACTORY.
808
817
808
814
818
402
803
805
820
403
402
808 823
821
404
405
824
819
805
414
417
407
808 409
818
404
401
819
821
820
819
411
403
814
414
808 819
805
803
808
416 815 805
415
408
817
819
406
825
808
414
808
407
830
410
408
805
825
831
814
412
PDF compression, OCR, web optimization using a watermarked evaluation copy of CVISION PDFCompressor
13
AG-11302 Treadmill
PARTS DIAGRAM
A MAJORITY OF THE PARTS SHOWN HERE HAVE BEEN PRE-ASSEMBLED AT THE FACTORY.
805
501
504
503
503
502
505
834
506
808
508
507
844
843
846
808
808
839
505
835
819
833
503
506
503
808
871
808
841
842
852
511
855
510
833
840
848
512
849
834
513
509
856
514
852
516
519
848
852
520
863
870 518
805
805
805
805
515
521
522
805
805
805
805
PDF compression, OCR, web optimization using a watermarked evaluation copy of CVISION PDFCompressor
14
AG-11302 Treadmill
PARTS DIAGRAM
A MAJORITY OF THE PARTS SHOWN HERE HAVE BEEN PRE-ASSEMBLED AT THE FACTORY.
602
604
601
603
824
836
605
836
812
606
812
836
812
606
606
812
836
812
812
607
606
PDF compression, OCR, web optimization using a watermarked evaluation copy of CVISION PDFCompressor
15
AG-11302 Treadmill
PARTS DIAGRAM
A MAJORITY OF THE PARTS SHOWN HERE HAVE BEEN PRE-ASSEMBLED AT THE FACTORY.
850
851
707
702
707
701
870
703
705
851
704
850
868
706
851
867
868
850 867
706
PDF compression, OCR, web optimization using a watermarked evaluation copy of CVISION PDFCompressor
16
AG-11302 Treadmill
ASSEMBLY INSTRUCTIONS
Before you Begin
•
Clear your work area.
•
Make sure that you’ve cleared a large enough area in order to assemble the treadmill.
•
Make sure there is nothing in the area that may cause injury during assembly.
•
Make sure there’s enough space for you to move around the treadmill after assembly.
•
Remove all components from the boxes before you start assembling the treadmill.
Tools
Before you begin to assemble your treadmill please look at the hardware diagram and familiarize yourself with the parts you
need to assemble and the tools you’ll need.
Make sure you can get hold of the tools easily when assembling your treadmill.
Note
The treadmill has some parts that are fairly heavy. It may be an idea if you have someone that could help you to assemble
it.
Make sure that the treadmill is not plugged in before you start assembly.
Make sure the treadmill is on a flat surface.
Dispose of all packing material at a recycling center when ever possible.
Retain this manual for future reference.
PDF compression, OCR, web optimization using a watermarked evaluation copy of CVISION PDFCompressor
17
AG-11302 Treadmill
ASSEMBLY INSTRUCTIONS
STEP 1:
Remove the contents from the shipping box.
Rotate the uprights into position.
Secure from the sides using one M8 x 52 mm Bolt and one Φ8 mm Washer. Secure from the front using two
M8 x 18 mm Bolts and two Φ8 mm Washers.
302
301
808
808
814
817
817
808
814
808
PDF compression, OCR, web optimization using a watermarked evaluation copy of CVISION PDFCompressor
18
AG-11302 Treadmill
ASSEMBLY INSTRUCTIONS
STEP 2:
Attach upright base cover to the rear of the upright, Secure with one Φ4 x 15 mm screw.
Rotate the handlebar into position.
Secure from the upside using one M8 x 45 mm Bolt and one Φ8 mm Washer.
806
103
808
806
808
402
805
805
402
PDF compression, OCR, web optimization using a watermarked evaluation copy of CVISION PDFCompressor
19
AG-11302 Treadmill
ASSEMBLY INSTRUCTIONS
STEP 3:
Attach handle bar cover to the upper of right upright ,and secure from two sides using two Φ4 x 15 mm screws.
Then attach handle bar cover to the upper of left upright and secure from two sides using two Φ4 x 15 mm
screws .
805
207
210
805
208 805
301
209
302
PDF compression, OCR, web optimization using a watermarked evaluation copy of CVISION PDFCompressor
20
AG-11302 Treadmill
ASSEMBLY INSTRUCTIONS
STEP 4:
Attach the water bottle holder to the console housing-upper and push down until snap in place.
105
103
PDF compression, OCR, web optimization using a watermarked evaluation copy of CVISION PDFCompressor
21
AG-11302 Treadmill
FOLDING INSTRUCTIONS
How to fold up the treadmill:
CL
IC
K
Your treadmill can be folded up for space saving storage. To do this follow the instructions here:
PDF compression, OCR, web optimization using a watermarked evaluation copy of CVISION PDFCompressor
22
AG-11302 Treadmill
UNFOLDING INSTRUCTIONS
How to unfold the treadmill:
To unfold the treadmill for use follow the instructions here:
Release Lever
PDF compression, OCR, web optimization using a watermarked evaluation copy of CVISION PDFCompressor
23
AG-11302 Treadmill
TRANSPORT INSTRUCTIONS
To fold the treadmill for transport first be sure that the deck is at the lowest incline level. Simply lift the
deck up from the rear of the treadmill and fold up as shown in figure T1 until it locks in place. Then you can
transport the home exercise as shown in figure T2. Make sure the treadmill on correct position when
you want to unfold it as shown in figure T3.
T1
T2
T3
PDF compression, OCR, web optimization using a watermarked evaluation copy of CVISION PDFCompressor
24
AG-11302 Treadmill
COMPUTER INSTRUCTIONS
COMPUTER INSTRUCTIONS
PDF compression, OCR, web optimization using a watermarked evaluation copy of CVISION PDFCompressor
25
AG-11302 Treadmill
COMPUTER OPERATION
SPEED UP
A
B
START
STOP/ENTER
C
D
SPEED DOWN
SAFETY KEY
E
F
POWER ELEVATION SWITCH
BUTTONS:
START
Press to start exercise at initial speed 0.8 km/ 0.5ml.
STOP / ENTER
1. Press to confirm program and preset function values under setting mode.
2. Press to quit preset program and function value after complete single program
3. Setting procedure: returns to beginning of setting mode before pressing the START key.
4. Press to stop exercise during workout time.
SPEED UP / SPEED DOWN
1. Press to increase/decrease exercise speed by 0.1km/ ml.
2. Hold the button to increase/decrease rapid speed by 0.5km/ ml per second and release the button to stop the
function.
3. Press to select programs and preset related function value.
POWER ELEVATION SWITCH:
- To change the elevation press up to increase and down to decrease.
IMPORTANT
•
The console display will turn itself off automatically about five minutes after the belt has stopped moving.
•
The pulse function is for reference only, and not to be used for medical purposes.
SAFETY KEY
The safety key must be inserted into the slot on the console in order to operate the treadmill. Always insert the safety key
and attach the clip to your clothing at your waist before beginning your workout.
If you should encounter problems and need to stop the motor quickly, simply pull on the cord to disengage the safety key
from the console. To continue operation simply turn the power switch to off, set the speed controller to stop and then
reinsert the safety key into the console.
PDF compression, OCR, web optimization using a watermarked evaluation copy of CVISION PDFCompressor
26
AG-11302 Treadmill
COMPUTER OPERATION
COMPUTER OPERATION
Power on monitor full display for 2 seconds. “P1” (manual) will blink in the upper right window, press SPEED UP / DOWN
keys for desired program. Press STOP / ENTER to confirm selected program or press the START key directly to start
exercise without a function value.
Please see instructions next for different program options.
PROGRAM 1 – MANUAL
1.
2.
Press STOP / ENTER to confirm the program and press START key to start exercise.
Press STOP / ENTER before starting exercise to run presetting procedure, with “P1” blinking.
-TIME:
-DISTANCE:
-CALORIES:
-SPEED:
Accumulates and displays workout time from start of exercise.
Accumulates and displays workout distance from start of exercise.
Accumulates and displays calories consumed during workout time.
Displays current speed.
PROGRAM 2 – DISTANCE
1.
2.
Press STOP / ENTER to confirm the program.
Press STOP / ENTER before starting exercise to run preset procedure with “P2” blinking.
-DISTANCE:
-DISTANCE:
-TIME:
-CALORIES:
-SPEED:
Press SPEED UP/ DOWN to preset the distance target values and press START.
Count down from preset target value. While distance counts down to 0 (zero), speed goes down to
0 (zero) by 0.5km/ per second (preset target reached).
Accumulates and displays workout time from start of exercise.
Accumulates and displays calories consumed during workout time.
Displays current speed.
PROGRAM 3 – TIME
1.
2.
Press STOP / ENTER to confirm the program.
Press STOP / ENTER before starting exercise to run preset procedure with “P3” blinking.
-TIME:
Press SPEED UP / DOWN keys to preset time target value and press START.
-TIME:
Count down from preset target value when starting exercise. While time counts down, the speed
goes down to 0 (zero) by 0.5km/ per second (preset target reached).
Accumulates and displays workout distance from start of exercise.
Accumulates and displays calories consumed during workout time.
Displays current speed.
-DISTANCE:
-CALORIES:
-SPEED:
PROGRAM 4 – CALORIES
1.
2.
Press STOP / ENTER to confirm the program.
Press STOP / ENTER before starting exercise to run preset procedure with “P4” blinking.
-CALORIES:
-CALORIES:
-TIME:
-DISTANCE:
-SPEED:
Press SPEED UP / DOWN keys to preset calories target value and press START.
Counts down from preset target value. While the distance counts down to 0 (zero), the speed goes
down to 0 (zero) by 0.5km/ per second (preset target reached).
Accumulates and displays workout time from start of exercise.
Accumulates and displays workout distance from start of exercise.
Displays current speed.
PDF compression, OCR, web optimization using a watermarked evaluation copy of CVISION PDFCompressor
27
COMPUTER INSTRUCTIONS
COMPUTER OPERATION
PROGRAM 5 – 15 MINUTES PRESET SPEED
1.
2.
Press STOP / ENTER to confirm the program.
Press START key to start the exercise, or press STOP / ENTER before starting exercise to run preset procedure
with “P5” blinking.
-TIME:
-DISTANCE:
-PULSE:
-CALORIES:
-SPEED:
Accumulates and displays workout time from start of exercise.
Accumulates and displays workout distance from start of exercise.
Detects and displays current heart rate.
Accumulates and displays calories consumed during workout time.
Displays current speed.
PROGRAM 6 – 30 MINUTES PRESET SPEED
1.
2.
Press STOP / ENTER to confirm the program.
Press START key to start exercise or Press STOP / ENTER before starting exercise to run preset procedure with
“P6” blinking.
-TIME:
-DISTANCE:
-PULSE:
-CALORIES:
-SPEED:
Accumulates and displays workout time from start of exercise.
Accumulates and displays workout distance from start of exercise.
Detects and displays current heart rate.
Accumulates and displays calories consumed during workout time.
Displays current speed.
PROGRAM 7 – 45 MINUTES PRESET SPEED
1.
2.
Press STOP / ENTER to confirm the program.
Press START key to start exercise or Press STOP / ENTER before starting exercise to run preset procedure with
“P7” blinking.
-TIME:
-DISTANCE:
Accumulates and displays workout time from start of exercise.
Accumulates and displays workout distance from start of exercise.
-CALORIES:
-SPEED:
Accumulates and displays calories consumed during workout time.
Displays current speed.
PDF compression, OCR, web optimization using a watermarked evaluation copy of CVISION PDFCompressor
28
COMPUTER INSTRUCTIONS
03 enjoy your workout!
what is exercise?
‘What is exercise’ sounds like a silly question, but did you know that there are four aspects of exercise?
1. Cardiovascular fitness (the fitness level of your heart, lungs, veins and arteries)
2. Muscular strength (the fitness of muscles in your legs, arms, buttocks etc, which are vital to perform
fundamental movements of everyday life, such as carrying your shopping or doing the vacuuming)
3. Muscular endurance (the stamina required by your muscles to be able to do more vacuuming!)
4. Flexibility (the range of movement at a joint where two or more bones meet, to allow you to do
simple tasks easily, like bending your knee to tie your shoes)
Different exercises (and in turn different exercise products) target these aspects of exercise.
For example, a treadmill is good for cardiovascular fitness, whilst a bike is better for muscular strength
and endurance. HOW you train is also vitally important.
cardiovascular fitness
The muscle (your heart) and vital organs (your lungs, veins and arteries) form your cardiovascular
system. Your cardiovascular system is responsible for processing and transporting oxygen to your
muscles. Your heart contracts to pump blood around your body and provide your muscles with the
oxygen they need. As your cardiovascular fitness improves, your heart will become more efficient, being
able to pump blood with fewer contractions. Thus, a slower heart rate usually means a fit heart!
Like any other muscle, you can strengthen your heart by exercising it. This means doing any activity that
makes your heart beat quickly and you breathe deeply. This type of exercise is called aerobic exercise.
How fast should your heart beat during aerobic exercise? Fast enough to reach and stay in its “target
zone,” a range of beats per minute that is largely determined by your age and physical condition.
To make sure your heart is beating in its target zone, you'll need to know how to monitor your heart
rate. The easiest way is to feel the pulse in the carotid artery on either side of your neck, between the
windpipe and the large neck muscles. Count the number of beats in ten seconds, and then multiply that
number by six. This gives you the number of beats per minute. To determine your target zone, consult
the chart opposite. As you exercise, monitor your heart rate and try to keep it within your target zone.
Heart Rate Chart key:
ADVANCED
Sports, athletic conditioning or interval training
FITNESS
Optimal training, aerobic or cardiovascular
HEALTH
Beginner, low intensity with long duration produces fat burning
PDF compression, OCR, web optimization using a watermarked evaluation copy of CVISION PDFCompressor
29
COMPUTER INSTRUCTIONS
muscular strength and endurance
Muscles are important for a healthy lifestyle. We MAINTAIN our muscles just by going about our
everyday lives, but to IMPROVE them we need to exercise. The best way to improve muscular strength
and endurance is to perform resistance-based exercises more often. Those focusing on ‘weight’ loss will
be pleased to note that muscular tissue uses more calories than inactive tissue!
Your treadmill will help you to develop primarily lower body muscle groups:
A. Shoulder muscles
B. Pectoral muscles
C. Bicep muscle
D. Abdominal muscles
E. Forearm muscles
F. Quadricep muscles
G. Calf muscles
H. Trapezius muscles
I. Tricep muscles
J. Back muscles
K. Gluteal muscles
L. Hamstring muscles
PDF compression, OCR, web optimization using a watermarked evaluation copy of CVISION PDFCompressor
30
COMPUTER INSTRUCTIONS
03 enjoy your workout!
Flexibility
Flexibility is the range of movement at a joint, where one or more bones meet. By maintaining your
joints and improving your flexibility, you will be less susceptible to injury or joint-related illnesses. You
should aim to improve flexibility gently, with a few simple stretches, which should always form part of
your warm-up and cool-down routine. You can then continue to increase your flexibility in your main
workout.
warm up and cool down
A successful exercise programme consists of a warm-up, aerobic exercise, and a cool-down. Do the
entire programme at least two and preferably three times a week, resting for a day between workouts.
After several months, you can increase your workouts to four or five times per week.
Warming up is an important part of your workout, and should begin every session. It prepares
your body for more strenuous exercise by heating up and stretching out your muscles, increasing
your circulation and pulse rate, and delivering more oxygen to your muscles. At the end of your
workout, repeat these exercises to reduce sore muscle problems. Try the following warm up
and cool down exercises.
TOE TOUCH
Slowly bend forward from your waist, letting your back and shoulders relax
as you stretch toward your toes. Reach down as far as you can and hold for
15 counts.
SHOULDER LIFT
Lift your right shoulder up toward your ear for one count. Then lift your left
shoulder up for one count as you lower your right shoulder.
HAMSTRING STRETCH
Sit with your right leg extended. Rest the sole of your left foot against your
right inner thigh. Stretch toward your toe as far as possible. Hold for 15
counts. Relax and then repeat with left leg extended.
SIDE STRETCH
Open your arms to the side and continue lifting them until they are over your
head. Reach your right arm as far upward toward the ceiling as you can for
one count. Feel the stretch up your right side. Repeat this action with your
left arm.
PDF compression, OCR, web optimization using a watermarked evaluation copy of CVISION PDFCompressor
31
COMPUTER INSTRUCTIONS
CALF-ACHILLES STRETCH
Lean against a wall with your left leg in front of the right and your arms
forward. Keep your right leg straight and the left foot on the floor; then bend
the left leg and lean forward by moving your hips toward the wall. Hold, and
then repeat on the other side for 15 counts.
HEAD ROLL
Rotate your head to the right for one count, feeling the stretch up the left
side of your neck. Next, rotate your head back for one count, stretching your
chin to the ceiling and letting your mouth open. Rotate your head to the left
for one count, and finally, drop your head to your chest for one count.
Further questions?
I hope you enjoy your new treadmill and your new healthier and fitter lifestyle!
Should you need further information on fitness, please visit www.rogerblackfitness.co.uk
For technical assistance, contact the Roger Black Technical Support Line on 0845 600 0464
or email [email protected]
LIMITED WARRANTY
This product is warranted to be free from defects in workmanship and material, under normal use and service
conditions, for a period of (2) two years from the date of purchase. This warranty extends only to the original
purchaser. This warranty is limited to replacing or repairing, at the manufacturer’s option, the product through one of
its authorised service centres. All repairs for which warranty claims are made must be pre-authorised by the
manufacturer. This warranty does not extend to any product or damage to the product caused by or attributable to
freight damage, abuse, misuse, improper or abnormal usage or repairs not provided by an authorised service
centre, products used for commercial or rental purposes, or products used as store display models. No other
warranty beyond that specifically set forth above is authorised.
The manufacturer is not responsible or liable for indirect, special or consequential damages arising out of or in
connection with the use of performance of the product or damages with respect to any economic loss, loss of
property, loss of revenues or profits, loss of enjoyment or use, costs of removal, installation or other consequential
damages of whatsoever nature.
The warranty extended hereunder is in lieu of any and all other warranties and any implied warranties of
merchantability or fitness for a particular purpose is limited in its scope and duration to the terms set forth within.
This warranty gives you specific legal rights.
©2005. Roger Black Fitness.
PDF compression, OCR, web optimization using a watermarked evaluation copy of CVISION PDFCompressor
32
COMPUTER INSTRUCTIONS
HOW TO MAINTAIN THE AG-11302 TREADMILL
HOW TO MAINTAIN THE MOMENTUM AG-11302 TREADMILL:
Proper maintenance is very important to ensure your treadmill is always in top working condition. Improper maintenance
could cause damage or shorten the life of your treadmill and exceed the LIMITED WARRANTY coverage.
•
Important: Never use abrasives or solvents to clean the treadmill. To prevent damage to the computer, keep
liquids away and keep it out of direct sunlight.
•
Inspect and tighten all parts of the treadmill regularly. Replace any worn parts immediately.
BELT ADJUSTMENT:
Belt adjustment and tension performs two functions: adjustment for tension and centering. The running belt has been
adjusted properly at the factory. However transportation, uneven flooring or other unpredicted reasons could cause the belt to
shift off center resulting in the belt rubbing with the plastic side rail or end caps and possibly causing damage. To adjust the
belt back to it’s proper position please follow the directions below:
1.
•
Walking belt has shifted to the left: First unplug the power cord from the surge protector. Using the hex key
provided, turn the left rear roller adjustment bolt 1/4 turn in the clockwise direction. Plug the power cord back into
the surge protector and run the treadmill at 2.5 mph. You should see the belt start to correct itself, moving back
towards the center. Repeat the above procedure until the walking belt is centered. It may be necessary to set
walking belt tension once you have completed this procedure if the belt feels like it is slipping while walking. Refer
below to the "Walking belt slipping" instructions.
•
Walking belt has shifted to the right: First unplug the power cord from the surge protector. Using the hex key
provided, turn the right rear roller adjustment bolt 1/4 turn in the clockwise direction. Plug the power cord back into
the surge protector and run the treadmill at 2.5 mph. You should see the belt start to correct itself, moving back
towards the center. Repeat the above procedure until the walking belt is centered. It may be necessary to set
walking belt tension once you have completed this procedure if the belt feels like it is slipping while walking. Refer
below to the "Walking belt slipping" instructions.
•
Walking belt is slipping: First unplug the power cord from the surge protector. Using the hex key provided, turn
both the left and right rear roller adjustment bolts the same distance, usually a 1/4 turn in the clockwise direction.
Plug the power cord back into the surge protector and run the treadmill at 2.5 mph. You should now walk on the belt
to determine if the belt is still slipping. Repeat the above procedure until the walking belt is not slipping. The tension
should be just tight enough not to slip.
WARNING! Do not over tighten rollers! This will cause premature roller bearing failure!
PDF compression, OCR, web optimization using a watermarked evaluation copy of CVISION PDFCompressor
33 33
COMPUTER INSTRUCTIONS
HOW TO MAINTAIN THE AG-11302 TREADMILL
CLEANING:
Routine cleaning of your treadmill will extend the product's life.
•
Warning: To prevent electrical shock, be sure the power to the treadmill is OFF and the power cord is unplugged
from the wall electrical outlet before attempting any cleaning or maintenance.
•
Important: Never use abrasives or solvents to clean the treadmill. To prevent damage to the computer, keep
liquids away and keep it out of direct sunlight.
•
After each workout: Wipe off the console and other treadmill surfaces with a clean, water dampened soft cloth to
remove excess perspiration.
•
Weekly: Use of a treadmill mat is recommended for ease of cleaning. Dirt from your shoes contacts the belt and
eventually makes it to underneath the treadmill. Vacuum underneath treadmill once a week.
DECK LUBRICATION:
The walking belt has been pre-lubricated at the factory. However, it is recommended that the walking board be checked
periodically for lubrication to ensure optimal treadmill performance. Your treadmill should not have to be lubricated usually
within the first 400 hours of use.
Every 2 months of operation lift the sides of the walking belt and feel the top surface of the walking board as far as you can
reach. If you feel signs of silicone, no further lubrication is required. If it feels dry to the touch, follow the instructions below.
Please use 100% Silicon Oil to lubricate your treadmill deck.
To apply lubricant to the walking belt:
1.
Position the walking belt so that the seam is located on top and in center of the walking board.
2.
Insert the spray nozzle into the spray head of the lubricant can.
3.
While lifting the side of the walking belt, position the spray nozzle between the walking belt and the board
approximately 6" from the front of the treadmill. Apply the silicone spray to the walking board, moving from the front
of the treadmill to the rear. Repeat this on the other side of the belt. Spray approximately 4 seconds on each side.
Allow the silicone to "set" for 1 minute before using the treadmill.
PDF compression, OCR, web optimization using a watermarked evaluation copy of CVISION PDFCompressor
34
AG-11302 Treadmill
TROUBLESHOOTING
Troubleshooting
NOTE: Do not touch any internal electric wires without consulting the technical support team.
No display on the Computer LCD, after the power is switched on.
1.
2.
3.
Make sure the power cord has been plugged in properly to the power switch on the base frame and mains power socket.
Make sure the safety key is inserted properly into the safety key slot on the console. Try pulling it in and out several
times until the LCD lights up.
If there is still no power on the computer, call the technical support team for help.
Computer LCD lights up but the running belt has no movement.
1.
2.
3.
Follow the console operating instructions for the P1 manual programme then press the Start button to see if the belt will
move. The belt should move at 0.8km/hour.
If the belt still does not move, press the Speed Up button and see if the speed LCD window indicates the speed
increasing. If you are still having difficulty please call the technical support team.
If when you press the speed button the speed LCD window indicates the speed increasing, but the belt still does not
move please call the technical support team for help.
Computer LCD does not show the pulse.
1.
2.
First, please press the Start button to start the treadmill. Place both hands on the heat rate contact sensors on the
handlebars. Then check if the LCD shows a blinking heart symbol. If the blinking heart symbol is displayed then the
computer is sensoring your pulse properly. Keep your hands on the sensors until the actual pulse number is displayed
on the LCD.
If when holding the contact sensors on the handlebars the heart symbol is not displayed, please disassemble the
handlebars and check to make sure both sensor wires are assembled correctly. Disconnect and then reconnect them
again. Then try the heart rate contacts again. If they still do not work properly, please call the technical support team for
help.
Contact Number
If you have any other problems please call the following number:
UK TECHNICAL SUPPORT TEAM 0845 600 0464
PDF compression, OCR, web optimization using a watermarked evaluation copy of CVISION PDFCompressor
35
AG-11302 Treadmill
ORDERING REPLACEMENT PARTS / LIMITED WARRANTY
How to Order Replacement Parts
If you encounter any problems with the product, or need to order replacement parts, call our UK Customer Service
Department on +44 (0) 845 600 0464. To help us assist you, please be prepared to give us the following information:
The Model Number of the product (AG-11302)
The Name of the product (GOLD TREADMILL)
The Serial Number/Manufacturing Date of the product
The Description of the part(s)
Limited Warranty – UK Only
This product is warranted to be free from defects in workmanship and material, under normal use and service conditions, for
a period of (2) two years for parts and labor. This warranty extends only to the original purchaser. This warranty is limited to
replacing or repairing, at the manufacturer’s option, the product through one of its authorized service centers. All repairs for
which warranty claims are made must be pre-authorized by the manufacturer. This warranty does not extend to any product
or damage to the product caused by or attributed to freight damage, abuse, misuse, improper or abnormal usage or repairs
not provided by an authorized service centre, products used for commercial or rental purposes, or products used as store
display models. No other warranty beyond that specifically set forth above is authorized.
RFE is not responsible or liable for indirect, special or consequential damages arising out of or in connection with the use of
performance of the product or damages with respect to any economic loss, loss of property, loss of revenues or profits, loss
of enjoyment or use, costs of removal, installation or other consequential damages of whatsoever nature.
The warranty extended hereunder is in lieu of any and all other warranties and any implied warranties of merchantability or
fitness for a particular purpose is limited in its scope and duration to the terms set forth herein.
This warranty gives you specific legal rights.
PDF compression, OCR, web optimization using a watermarked evaluation copy of CVISION PDFCompressor
GOLD TREADMILL AG-1 1302
User manual, 1st edition.
The rogerblack medal series comprises:
Platinum treadmill
Gold treadmill
Silver treadmill
AG-11303
AG-11302
AG-11301
Gold bike
Medal bike
AG-11203
AG-11201
Silver semi-recumbent bike
AG-11207
Gold cross-trainer
Silver cross-trainer
AG-11212
AG-11211
Gold rower
Silver maxi-rower
AG-11402
AG-11401
For information on Roger Black Medal
Series visit www.rogerblackfitness.co.uk
For technical support call the Roger Black
Technical Support Line on 0845 600 0464,
or email [email protected]
PDF compression, OCR, web optimization using a watermarked evaluation copy of CVISION PDFCompressor