1
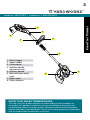
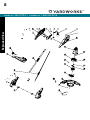
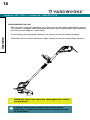
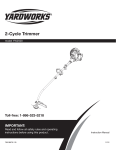
Electric Grass Trimmer & Edger
model number 060-2279-2 | contact us: 1.866.523.5218
IMPORTANT:
Read and follow all safety rules and operating
instructions before using this product.
Instruction
Manual
2
Specifications
Table of Contents
model no. 060-2279-2 | contact us: 1.866.523.5218
Specifications
KNOW YOUR Trimmer
Symbols
Safety Information
electrical information
Exploded View
Parts List
Assembly
operation
MAINTENANCE
Troubleshooting
Warranty
Type:
Input:
Feed:
Speed:
Line diameter:
Cutting path:
Weight:
2
3
4
5
7
8
9
10
12
16
17
18
Electric
120V, 60Hz, 5 amps
Automatic dual line
8000 RPM (no load)
0.065” (1.65 mm)
14” (35.6 cm)
5 lb 12 oz (2.6 kg)
3
Know Your Trimmer
model no. 060-2279-2 | contact us: 1.866.523.5218
1
2
3
5
4
6
1. Switch trigger
2. Upper handle
3. Cord retainer
4. Auxiliary handle
adjustment knob
5. Auxiliary handle
6. Split and telescoping
shaft
7. Edger guide
8. Grass deflector
7
8
KNOW YOUR GRASS TRIMMER/EDGER
The safe use of this product requires an understanding of the information on
the product, this operator’s manual as well as a knowledge of the project you
are attempting. Before use of this product, familiarize yourself with all operating
features and safety rules.WARNING: The use of any other accessory or attachment
with this product may increase the risk of injury.
4
model no. 060-2279-2 | contact us: 1.866.523.5218
Symbols
Some of the following symbols may be used on this product. Please study them and learn their
meaning. Proper interpretation of these symbols will allow you to operate the product safely.
Symbol
Name
Designation/Explanation
V
Volts
Voltage.
A
Amperes
Current.
Hz
Hertz
Frequency (cycles per second).
W
Watts
Power.
min
Minutes
Time.
Alternating Current
Type of current.
Direct Current
Type or a characteristic of current.
/min
Per Minute
Class II Construction
No Load
Speed
Revolutions, strokes, surface speed, orbits etc., per
minute.
Double-insulated construction.
Rotational speed, at no load.
Wet Conditions Alert
Do not expose to rain or use in damp locations.
Read The Operator’s
To reduce the risk of injury, user must read and understand
Manual
operator’s manual before using this product.
Eye Protection
Wear eye protection when operating this equipment.
Safety Alert
Precautions that involve your safety.
Long Hair
Loose Clothing
Keep Bystanders Away
Failure to keep long hair away from the air inlet could
result in personal injury.
Failure to keep loose clothing from being drawn into air
intake could result in personal injury.
Keep all bystanders at least 50’ (15 m) away.
5
model no. 060-2279-2 | contact us: 1.866.523.5218
Safety Information
GENERAL SAFETY RULES
• This grass trimmer is designed for cutting grass and similar soft vegetation and for trimming
grass edges in private and hobby garden areas which are not accessible with a lawnmower.
• The device is not designed for use in public gardens, parks, sports centres or at roadsides,
nor in agriculture or forestry applications.
• This grass trimmer/edger is not designed to be used for cutting or chopping hedges, shrubs,
bushes or flowers, or for composting purposes:
- Hedges, shrubs and bushes,
- Flowers,
- Or for composting purposes
• This device is not intended for use by persons (including children) with reduced physical,
sensory or mental capabilities, or lack of experience and knowledge, unless they have been
given supervision or instruction concerning use of the appliance by a person responsible
for their safety.
• Children should be supervised to ensure that they do not play with the device.
• If the power cord is damaged, it must be replaced by the manufacturer, its service agent or
similarly qualified persons in order to avoid a hazard.
• Wear protective glasses or goggles.
• Never allow children or people unfamiliar with the instructions to use the device.
• Turn off the device while people, especially children, or pets are nearby.
• Only use the device in daylight or good artificial light.
• Before using the device and after any impact, check for signs of wear or damage and repair
as necessary.
• Never operate the device with damaged guards or without the guards in place.
• Keep hands and feet away from the trimmer cutting line at all times and in particular when
switching on the motor.
• Take care against injury from any device fitted for trimming the cutting line length. After
extending new cutting line always return the device to its normal operating position before
switching on.
• Never fit metal cutting elements.
• Never use replacement parts or accessories not provided or recommended by the
manufacturer.
• Disconnect the device from the power supply before checking, cleaning or repairing and
when it is not in use.
• Always ensure that ventilation openings are kept clear of debris.
• Failure to comply with these requirements could lead to personal injury.
6
model no. 060-2279-2 | contact us: 1.866.523.5218
Safety Information
ADDITIONAL SAFETY INSTRUCTIONS FOR YOUR GRASS TRIMMER
•
•
•
•
•
•
•
•
•
Do not expose to moisture.
Use with only on AC power supply voltage shown on the product rating label.
Avoid operating your trimmer in wet grass, where feasible.
Take care not to lose your footing in wet grass.
On slopes, be extra careful not to slip, and wear nonslip footwear.
Do not walk backwards when trimming as you could trip.
Walk never run.
Switch off before pushing the trimmer over surfaces other than grass.
Never pick up or carry a trimmer by the power cable.
!
WARNING: When using this device, safety precautions
must be followed. For your own safety and that of
bystanders, please read these instructions before
operating the device. Do not use the device without
reading the instruction sheet. Please keep the instructions
safe for later use.
7
GUIDELINES FOR USING EXTENSION CORDS
• USE THE PROPER EXTENSION CORD. Make sure your extension cord is in good condition.
When using an extension cord, be sure to use one heavy enough to carry the current your
product will draw. An undersized cord will cause overheating. The table below shows the
correct size to use depending on cord length and nameplate ampere rating. If in doubt, use
the next heavier gauge. The smaller the gauge number, the heavier the cord.
Minimum Gauge for Extension Cords (AWG)
(when using 120 V only)
Ampere Rating
More Than Not More Than
Total Length of Cord in Feet (meters)
25' (7.6 m)
50' (15 m)
100' (30.4 m)
150' (45.7 m)
0
6
18
16
16
14
6
10
18
16
14
12
10
12
16
16
14
12
12
16
14
12
Not Recommended
• Make sure your extension cord is properly wired and in good electrical condition. Always
replace a damaged extension cord or have it repaired by a qualified person before use.
Keep extension cords away from sharp objects, excessive heat and damp or wet areas.
• Use a separate electrical circuit for your tools. This circuit should comprise a wire of at least
12 gauge and should be protected with a 15 A time-delayed fuse. Before connecting the
motor to the power line, make sure the switch is in the OFF position and the electric current
is identical to that stamped on the motor nameplate. Running at a lower voltage will damage
the motor.
!
CAUTION: Always make sure that your outlet is properly
grounded. If you are uncertain, have it checked by a certified
electrician.
!
WARNING: This grass trimmer is for outdoor use only. Do
not expose to rain or use in damp locations.
!
WARNING: Although this device is double-insulated, the
extension cord and receptacle must still be grounded
while in use to protect the operator from electric shock.
Electrical Information
model no. 060-2279-2 | contact us: 1.866.523.5218
8
Exploded View
model no. 060-2279-2 | contact us: 1.866.523.5218
9
Item
Description
Drawing
Qty
1
Plate
34103336
1
2
Cross-head screw ST4*12-F
3220313
18
3
Waterproof plug
36401504
1
4
Wire proof sheath
34201161
1
5
B-terminal
3650135
3
6
Trigger
34102719-1
1
7
Button spring
33401178
1
8
Jogging switch
36303152
1
9
Protecting jacket
34903161
2
10
Terminal
36503163
2
11
Left handle
34101717-1
1
12
Tube
31102725
1
13
Assist handle knob
34101185-2
1
14
Assist handle
31103725
1
15
Spring
36901720
1
16
Housing
31301719-2
1
17
Rubber ferrule
34101719
2
18
Edge guard
33301880
1
19
Cross-head screw
3220905
1
Parts List
model no. 060-2279-2 | contact us: 1.866.523.5218
10
Parts List
model no. 060-2279-2 | contact us: 1.866.523.5218
Item
Description
Drawing
Qty
20
Blade
33301865
1
21
Guard
34101880
1
22
Spool guard
3101176A-3
1
23
Auto-spool
31104178
1
24
Dc-release spool spring
3340646
1
25
Release spool fan
34107178B
1
26
Motor
36101504B
1
27
Shaft sleeve
33102178
1
28
Hole
33200178
2
29
End cap
34111504
1
30
Ac-auto release button
3410368
1
11
model no. 060-2279-2 | contact us: 1.866.523.5218
Assemble the two halves of the
• Insert the lower shaft (2) into upper shaft (1).
• Turn the upper shaft (1) until lock button (1)
clicks into place.
• Turn the lower shaft (2) collar until locked into
place.
1
2
AUXILIARY HANDLE
2
1
• Turn the handle lock knob (1)
counterclockwise several turns to loosen
the auxiliary handle (2).
• Adjust the handle position to provide the
best level of balance and control for the
operator.
• Securely lock the handle in position by
turning the knob clockwise.
• Before operating the grass trimmer, make
sure the auxiliary handle is tightly locked
into position.
Assembly
SHAFT
12
model no. 060-2279-2 | contact us: 1.866.523.5218
Assembly
Guard
• Stop the trimmer.
• Invert the grass trimmer to access the
trimmer head.
• Using a cross-head screwdriver, remove the
pre-installed screws (1) from the trimmer
head.
• Place the guard (2) on to the trimmer head
and turn the guard 45° following the track on
the head.
• Align the screw hole on the guard with the
screw hole on the trimmer head.
• Insert the screw into the trimmer head,
fastening the guard in place.
CORD WARP
SWITCH TRIGGER
1
2
SECURE THE PLUG
• Attach the outlet end of an extension cord to
the plug on the rear of the string trimmer.
• Route the extension cord through the slot
located on the rear of the string trimmer
housing and place underneath the cord
retainer.
OUTLET
END
!
WARNING: To avoid injury, adjust the auxiliary handle for
optimum control and balance. Do not overreach when
operating the grass trimmer. Keep proper balance at all
times for better control of the tool in unexpected situations.
!
NOTE: Use only approved outdoor extension cords.
13
model no. 060-2279-2 | contact us: 1.866.523.5218
The Cutting Line
• A double-wound spool of monofilament cutting line is pre-installed on the grass trimmer.
When the cutting line needs replacing, install a new spool. Use Yardworks® 60-2269-6
replacement spools.
REPLACE THE SPOOL
• Replace the spool (2) with a new pre-wound spool.
• Insert the end of one line through the opening (4) in the spool housing. Insert the other side
of the line through the other opening (5).
• Align the tabs on the spool cover with the slots in the spool housing on the trimmer head.
• Push down on the spool cover, locking it to the spool housing.
• To advance the line when initially installed, you must pull both sides of the line while
pressing the black line release button on the side of the spool housing (6).
1
2
5
3
6
4
!
WARNING: Do not grasp the exposed cutting line when
picking up or holding the grass trimmer. Before connecting
your grass trimmer to the extension cord, always turn the
switch to the off position. Failure to do so could result in
accidental startup causing serious injury.
Assembly
remove the spool
• Unplug the extension cord.
• Turn the grass trimmer over to access the spool (2).
• Remove the spool cover by pressing on two tabs parallel to each other on the side of the
cover (1).
• Remove the spool (2) from the spool housing (3).
14
model no. 060-2279-2 | contact us: 1.866.523.5218
Operation
refill the spool
If you are unable to purchase a new pre-wound spool, you may purchase 0.065” (1.65 mm)
nylon monofilament cutting line and refill the spool that was supplied with your grass trimmer.
• Remove the spool from the trimmer head.
• Cut a length of cutting line to approximately 20’ (6.1 m) long and fold it in half.
• Loop the “V” end of the cutting line into the small notch on the inner rail of the spool to anchor
the line.
• Wind the line evenly and tightly in a counterclockwise direction. Make sure each section of the
spool contains a separate thread.
• Do not wind the line beyond the edge of the cutting spool.
15
model no. 060-2279-2 | contact us: 1.866.523.5218
To Turn On/Off
Operation
• Release the trigger switch (1).
• Allow at least 5 seconds for the cutting spool to stop rotating.
• Disconnect the extension cord if leaving unattended.
1
!
CAUTION: Allow 5 seconds or more for the grass trimmer
to stop rotating after releasing the switch.Do not invert
the grass trimmer or place your hands under the guard
until the grass trimmer has come to a complete stop.
16
model no. 060-2279-2 | contact us: 1.866.523.5218
Edging function
Operation
This trimmer is equipped with an edging feature for use on sidewalks or walkways, patios and/
or driveways to clear over-grown grass from manicured surfaces.
• Pull up edging coupler and turn handle end counterclockwise.
• Release edging shaft coupler when handle has been rotated 180°.
• Flip the edging guide down until it locks into place.
REAR HANDLE
PULL UP
BUTTON TO ROTATE
EDGER GUIDE
17
model no. 060-2279-2 | contact us: 1.866.523.5218
Split and telescoping tube
Operation
The shaft can be extended or shortened for ease of use.
• Unscrew telescoping shaft coupler and slide to desired position.
• Tighten telescoping shaft coupler.
SPLIT AND TELESCOPING
SHAFT
18
model no. 060-1721-4 | contact us: 1.866.523.5218
Lengthening the Line
• While the grass trimmer is operating, the cutting line gets worn down and becomes shorter.
This trimmer is equipped with an automatic lowercase, which automatically feeds additional
line to the correct length as it wears down.
Operation
• If the line does not automatically advance, the trimmer line may be tangled or empty.
• To advance the line, restart the trimmer. Upon starting, the line will automatically advance.
!
WARNING: Risk of eye injury. Use safety glassed or similar
eye protection.
!
CAUTION: Wear proper clothing and footwear during
operations to reduce the risk of injury that may be caused
by flying debris.
19
model no. 060-2279-2 | contact us: 1.866.523.5218
Before each use
• Make sure the protective guard is tightly installed. Tighten the guard screws.
• Before trimming, inspect the area for string, wire, branches, or other material that may
become entangled in the cutting line or thrown.
Operation
During use
• Trim only when the grass and weeds are dry.
• Do not trim the grass at night. Always make sure you have adequate lighting.
• Hold the grass trimmer by both the switch handle and the auxiliary handle for greater control
and balance.
• Stand with the cutting head tipped down at an angle in front, guiding the grass trimmer in a
semi-circular motion around you.
• If possible, guide the grass trimmer to the left to cut. The line will cut as soon as it leaves the
guard, and the clippings are thrown away from you.
• To produce a smoothly trimmed area, move the grass trimmer in and out of the area being
cut with a consistent speed and height.
• Use only the tip of the cutting line to do the trimming, especially near walls and fences.
Trimming with the side of the cutting line may overload the motor, wear out the line faster,
and break the line more often.
• Do not rest the grass trimmer spool on the ground while trimming. This will cause spool
wear.
• If the grass is higher than 6” (15 cm), trim in small stages.
• When the grass trimmer is stopped and the spool stops rotating, the cutting line will grow
slack and may retract. Feed extra cutting line before storing the trimmer to prevent losing
the line into the spool.
• If the grass trimmer is not cutting correctly, the cutting line may not be feeding properly.
Remove and rewind the line spool.
20
model no. 060-2279-2 | contact us: 1.866.523.5218
Maintenance
General MAINTENANCE
Keep your grass trimmer clean and in good repair for maximum performance and service life.
Before each use, inspect the switch and cord for damage. Check for damaged, missing, or
worn parts. Check for loose screws, misalignment, moving parts that are jammed, or any other
conditions that may affect the operation. If abnormal vibration or noise occurs, turn off the tool
immediately and have the problem corrected before further use. Do not use the grass trimmer
until it is properly repaired or replaced.
CLEANING
Wipe the outside of the grass trimmer with a dry soft cloth. Do not hose down or wash the grass
trimmer with water. Scrape the guard and spool area to remove dried clippings and mud. Brush
or blow dust, debris, and grass clippings out of the air vents. Keep the vents free of obstruction.
Cutting line
Replace the cutting line only with nylon monofilament line on pre-wound spools.
Always wind the line in the same direction as the arrow on the spool.
Use Yardworks® 60-2269-6 replacement spools.
Lubrication
No lubrication is needed.
!
CAUTION: Do not use strong solvents or detergents
on the plastic housing or plastic components.Certain
household cleaners may cause damage and may also
cause a shock hazard.
!
WARNING: Turn off the tool and unplug the extension
cord from the outlet before performing any maintenance
on the grass trimmer.
21
model no. 060-2279-2 | contact us: 1.866.523.5218
Tool runs slowly
• Check that the spool housing can rotate freely. Carefully clean it if necessary.
• Check that the cutting line does not protrude more than 4 1/2” (11 cm) from the spool
housing. If it does, cut it off so that it just reaches the line trimming blade.
Automatic line feed does not work.
• Press the tabs and remove the spool cover from the housing.
• Pull the cutting line until it protrudes 4 1/2” (11 cm) from the housing. If insufficient cutting
line is left on the spool, install a new spool of cutting line as instructed in the Maintenance
section of this lowercase.
• Align the tabs on the spool cover with the cutouts in the housing.
• Push the cover onto the housing until it snaps securely into place.
• If the cutting line protrudes beyond the trimming blade, cut it off so that it just reaches
the blade.
• If the automatic line feed still does not work or the spool is jammed, try the following
suggestions:
• Carefully clean the spool cover and housing.
- Remove the spool and check if the lever can move freely.
- Remove the spool and unwind the cutting line, then wind it on neatly again as
described above. Replace the spool as instructed.
!
WARNING: Before proceeding, switch off and unplug.
Troubleshooting
If your device is not operating properly, follow the instructions below. If this does not solve
the problem, please contact your local repair agent.
22
model no. 60-2279-2
060-2279-2
| contact
| contact
us:us:
1.866.523.5218
1.866.523.5218
TWO-YEAR LIMITED WARRANTY
Warranty
For TWO YEARS from the date of purchase
within Canada, Yardworks CANADA will, at
its option, repair or replace for the original
purchaser, free of charge, any part or
parts found to be defective in material or
workmanship.
This warranty does not cover:
• Any part that has become inoperative
due to misuse, commercial use, abuse,
neglect, accident, improper maintenance,
or alteration;
• The unit, if it has not been operated and/or
maintained in accordance with the owner’s
manual;
• Normal wear, except as noted below;
• Routine maintenance items such as
lubricants, blade sharpening; or
• Normal deterioration of the exterior finish
due to use or exposure.
Full One Hundred Twenty Days (120)
Warranty on Normal Wear Parts:
Normal wear parts are defined as blade
adaptors, blades, grass bags and tires.
These parts are warranted to the original
purchaser to be free from defects in material
and workmanship for a period of one hundred
twenty (120) days from the date of retail
purchase.
unit unless prior written permission has been
extended by Yardworks CANADA.
Transportation Charges:
Transportation charges for the movement
of any power equipment unit or attachment
are the responsibility of the purchaser. The
purchaser must pay transportation charges for
any part submitted for replacement under this
warranty unless such return is requested in
writing by Yardworks CANADA.
Other Warranties:
All other warranties, express or implied,
including any implied warranty of
merchantability is limited in its duration to that
set forth in this express limited warranty. The
provisions as set forth in this warranty provide
the sole and exclusive remedy of Yardworks
CANADA obligations arising from the sale of
its products.
Made in China
Imported by
Yardworks Canada Toronto, Canada M4S 2B8
How to Obtain Service:
Warranty service is available by calling the
toll-free helpline, at 1.866.523.5218. The
factory will not accept the return of a complete
Yardworks CANADA will not be liable for incidental or
consequential loss or damage.