1
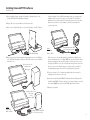
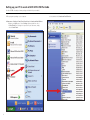
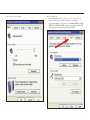
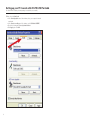
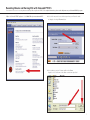
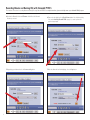
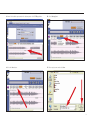
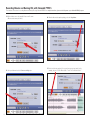
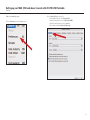
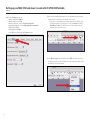
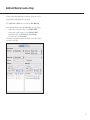
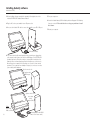
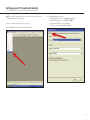
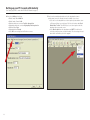
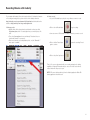
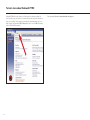
AT-LP2D-USB Turntable
Software Guide
AT-LP2D-USB Turntable
Contents
A note about software ………………………………………………………………..................2
System requirements ………………………………………………………………...................2
Cakewalk PYRO
Installing Cakewalk PYRO software (for PC use only) ………………................................3
Setting up your PC to work with AT-LP2D-USB Turntable …………...............................4
Recording Albums and Burning CDs with Cakewalk PYRO 5 …………......................... 7
Audacity
Installing Audacity software (for Mac OSX and above) ………………...........................14
Setting up your Mac (OSX and above) to work with AT-LP2D-USB Turntable.............15
Additional Macintosh audio settings ……………………………………............................17
Installing Audacity software (for PC) ……………………………………............................18
Setting up your PC to work with Audacity ……………………………….........................19
Recording albums with Audacity …………………………………………...........................21
To learn more ………………………………………………………………………....................22
A note about software
Your Audio-Technica AT-LP2D-USB turntable is supplied with Cakewalk PYRO and Audacity
recording software for your convenience. Please note that other third-party recording
software packages are also compatible with this turntable.
Cakewalk PYRO is provided as our recommended PC software because of its ease of use
and recording versatility. It allows you to create MP3, WAV, and WMA files, as well as
remove clicks, pops, and crackles from noisy LPs with DeClicker; clean hiss, hum, and other
annoyances from LPs with DeNoiser; and design full-color CD-labels and jewel case inserts.
Audacity, provided for Mac users (also works with Windows), is free software, distributed
under the GNU General Public License (GPL). More information and open source code is on
the included Audacity CD and on the Audacity web site: http://audacity.sourceforge.net. For
tutorials, visit http://audacity.sourceforge.net/help/tutorials.
2
System Requirements
PC or Mac with an available USB port (USB1.1 or higher)
CD-R or CD-RW writer for burning CDs & installation
Cakewalk PYRO™ requires:
PC running Windows 2000/XP
1 GB free disk space
Note: PYRO is not compatible with Mac or Apple-based computers,
or with Windows 98/98SE/Me/95 or NT or Vista
Audacity requires:
Mac running OSX or above or
PC running Windows (XP and above)
Installing Cakewalk PYRO software
(for PC use only)
1. Before installing software, assemble the turntable, following directions in the
included AT-LP2D-USB Turntable Owners Manual.
2. Plug the AC cord on your turntable into an AC power outlet.
Using the supplied 3.5 mm-to-RCA female adapter cable, you can plug a pair of
headphones directly into the line output of your turntable. This will allow an
additional means of monitoring while recording, although you will not be able to
adjust the level (volume) of your headphones, because the turntable has a
constant output level.
3. Next, use the included USB cable to connect the turntable to your PC's USB port.
USB
AC
RCA
USB cable (included)
4. Make certain your self-powered speakers are plugged into the line-out RCA plugs
of the AT-LP2D-USB turntable, and that the Phono/Line switch on your turntable is
switched to Line.
Typical connection for:
Speakers with
RCA inputs
Cables
Red to Red
White to Black
Included adapter cable (RCA
to 3.5 mm stereo female
Either connection to the turntable (speakers or headphones) will allow you to
monitor the album that you're recording. NOTE: the system will operate without
speakers or headphones, but you will be unable to monitor the music as you're
recording it. (PYRO 5 does not offer a software play-through feature that would
allow you to listen to the album through your computer while recording. The
included Audacity program does offer this software play-through feature.)
5. Turn your computer on. The computer may display a detection message for
indicating that a new device is connected.
6. Insert the included Cakewalk PYRO CD. A Cakewalk window will appear. Click
Install Cakewalk PYRO 5. Follow the directions on the pop-up windows to install
the software. (NOTE: You may also install PYRO's label-maker software.)
7. Re-start your computer.
Speakers with 3.5 mm
stereo input
(using
adapter cable)
Cables
Red to Red
White to White
Included adapter cable (RCA
to 3.5 mm stereo male)
3
Setting up your PC to work with AT-LP2D-USB Turntable
(for either PYRO or Audacity software packages included with your turntable)
1. Close programs operating on your computer.
2. Start menu > Settings > Control Panel (classic view) > Sounds and Audio Devices
• Begin at your Start menu. Select Settings (if present) and then select
Control Panel. Or, if Settings is not present in your Start menu, simply
select Control Panel.
4
• Select (double-click) Sounds and Audio Devices.
3. The following screen will pop up:
4. Select the Voice tab.
• In the Voice playback area of the window, select your computer's internal
sound card (not USB Audio CODEC; not Microsoft Sound Mapper).
• In the Voice recording area of the window, select USB Audio CODEC. Click Apply.
NOTE: If the “USB Audio CODEC” option does not appear, check the USB
cable to ensure it is properly connected to the USB port.
5
Setting up your PC to work with AT-LP2D-USB Turntable
(for either PYRO or Audacity software packages included with your turntable)
5. Next, select the Audio tab.
• In the Sound playback area of the window, select your computer's internal
sound card.
• In the Sound recording area of the window, select USB Audio CODEC.
• Check the following box: Use only default devices.
• Click Apply; then click OK.
6
Recording Albums and Burning CDs with Cakewalk PYRO 5
These are basic instructions for recording albums and burning CDs using Cakewalk PYRO 5. For complete instructions, please see the Help menu on your Cakewalk PYRO 5 program.
1. Open the Cakewalk PYRO 5 application. Select Make CDs of your cassettes and LP's.
2. Select a file name, and choose the directory where you will save the audio
recording by selecting the Browse button.
3. Select a directory, enter a file name and then select Save.
A good choice for a file name is the album or artist name plus Side 1.
7
Recording Albums and Burning CDs with Cakewalk PYRO 5
These are basic instructions for recording albums and burning CDs using Cakewalk PYRO 5. For complete instructions, please see the Help menu on your Cakewalk PYRO 5 program.
8
4. Note that the Record to folder: and Filename: should reflect the folder and
filename you entered.
6. Please notice the Audio level in the Check Volume window. You should see activity.
If not, review Installing Cakewalk PYRO on page 3 , to ensure you have the
system set up properly.
5. Begin playing your album and select the Start recording button.
7. When the album side has finished playing, select the Stop button.
8. A wave file should be represented in the bottom portion of the PYRO application.
10. Select Save project.
9. Select the Save button.
11. Enter a project name and select Save.
9
Recording Albums and Burning CDs with Cakewalk PYRO 5
These are basic instructions for recording albums and burning CDs using Cakewalk PYRO 5. For complete instructions, please see the Help menu on your Cakewalk PYRO 5 program.
12. Flip the album over on the turntable. Enter a new file name.
(Album or artist name plus Side 2.)
13. Start your album and select the Start recording button.
10
14. When the album side completes playing, select the Stop button.
15. Notice in the bottom portion of the screen there are now two tracks. In this
example, they are: ”No Fun Allowed Side 1” and “No Fun Allowed Side 2.”
16. Select the Save button.
18. NOTE: At this point, you can burn a CD of your recording. The CD would contain
two tracks, Side 1 and Side 2. To burn the CD, insert a blank audio CD, select
Burn CD and follow the instructions. If you would like to add additional tracks,
do so before burning your CD, and continue with the next step.
19. Notice in the wave form in the bottom portion of the PYRO application, it is
evident where one song ends and another begins. This is where you will want
to add a track marker. (NOTE: When only viewing the wave form, you could
misidentify the end of a song in songs with very quiet moments. You may want
to replay the end of the track to ensure the end of the song has been identified.)
17. Select Save project.
11
Recording Albums and Burning CDs with Cakewalk PYRO 5
These are basic instructions for recording albums and burning CDs using Cakewalk PYRO 5. For complete instructions, please see the Help menu on your Cakewalk PYRO 5 program.
20. Notice the area just below the wave form containing Track 1 and Track 2.
This is where you will add additional track markers.
12
21. Place your cursor in the gray bar (below the area containing the wave form)
where you want to place a track marker and left click the mouse. A track
indicator and track number will be added. Continue to place track markers
between each song. When finished, save the project (see step 17 on page 11).
22. Insert a blank audio CD, select Burn CD and follow the instructions.
NOTE: Cakewalk PYRO offers many features for filtering and / or editing recordings.
These features are described in great detail within the Cakewalk PYRO 5 application
Help window. For help with these features consult the online help or contact
Cakewalk at www.cakewalk.com/support.
13
Installing Audacity software
(instructions for Mac OSX and above)
1. Before installing software, assemble the turntable, following directions in the
included AT-LP2D-USB Turntable Owners Manual.
2. Plug the AC cord on your turntable into an AC power outlet.
3. Next, use the included USB cable to connect the turntable to your Mac’s USB port.
USB
AC
RCA
USB cable (included)
4. If you have external self-powered speakers, make certain they are plugged into
your computer's audio input or into the line-out RCA plugs of the AT-LP2D-USB
turntable, and that the Phono/Line switch on your turntable is switched to Line.
(Audacity offers a software play-through feature that allows you to listen to the
album through your computer while recording, even if you don't have external
speakers.) If your computer has a headphone output, you can choose to monitor
your recording with headphones.
Typical connection for:
Speakers with
RCA inputs
Speakers with 3.5 mm
stereo input
(using
adapter cable)
Cables
Red to Red
White to White
14
Included adapter cable (RCA
to 3.5 mm stereo male)
5. Turn your computer on.
6. Insert the included Audacity CD in your Mac's CD drive. Open the CD icon on your
desktop. Drag the installation folder for Audacity to your applications folder.
When the files have been copied, eject the CD.
Setting up your MAC (OSX and above) to work with AT-LP2D-USB Turntable
(Audacity)
1. Open the Audacity program.
2. Select Preferences from the Audacity menu.
3. Select Audio I/O tab at the top left.
• Under Playback, Device, select Built-in Audio.
• Under Recording, Device, select USB Audio CODEC.
• Under Recording, Channels, select 2 (Stereo).
• Check the box marked Software Playthrough.
15
Setting up your MAC (OSX and above) to work with AT-LP2D-USB Turntable
(Audacity)
4. Next, select Quality tab at the top.
• Default Sample Rate: 44100 Hz.
• Default Sample Format: 16-bit.
• Real-time sample rate converter: Fast Sinc Interpolation.
• High-quality sample rate converter: High-quality Sinc Interpolation.
• Real-time dither: None.
• High-quality dither: Triangle.
• Select OK to save settings and exit Preferences menu.
5. Next, from the main Audacity window, select the drop-down box (arrow pointing
down) next to the microphone at the right side of your screen.
• If you don't see the drop-down box or the microphone pictured above, return
to Preferences Menu (see step 2, page 15). Select the Interface tab. Check
Enable Meter Toolbar. This will allow you to see the microphone with the
drop-down box on your main screen.
6. Select Monitor Input from the drop-down menu. NOTE: You will need to select
this setting every time you launch Audacity. The other settings selected above will
be saved when you exit the program.
16
Additional Macintosh audio settings
We have set the Audacity playback and record settings. Now it's time to set the
separate Macintosh audio playback and record settings.
1. Go to Applications > Utilities > then select and open Audio MIDI Setup.
2. In the Audio Midi window under the tab Audio Devices, select the following:
• Under System Settings, Default Input, select USB Audio CODEC.
• Under System Settings, Properties For, select USB Audio CODEC.
• Under Default output, select Built-in Audio, or Built-in Output.
• For System output, select Built-in Audio.
This will allow other programs (in addition to Audacity) to use your Mac's internal
sound card for audio output.
17
Installing Audacity software
(instructions for PC)
1. Before installing software, assemble the turntable, following directions in the
included AT-LP2D-USB Turntable Owners Manual.
2. Plug the AC cord on your turntable into an AC power outlet.
5. Turn your computer on.
6. Insert the included Audacity CD. An Audacity window will appear. Click Audacity
Setup icon to install. Follow the directions on the pop-up windows to install
the software.
3. Next, use the included USB cable to connect the turntable to your PC's USB port.
7. Re-start your computer.
USB
AC
RCA
USB cable (included)
4. If you have external self-powered speakers, make certain they are plugged into
your computer's audio input or into the line-out RCA plugs of the AT-LP2D-USB
turntable, and that the Phono/Line switch on your turntable is switched to Line.
(Audacity offers a software play-through feature that allows you to listen to the
album through your computer while recording, even if you don't have external
speakers.) If your computer has a headphone output, you can choose to monitor
your recording with headphones.
Typical connection for:
Speakers with
RCA inputs
Speakers with 3.5 mm
stereo input
(using
adapter cable)
Cables
Red to Red
White to White
18
Included adapter cable (RCA
to 3.5 mm stereo male)
Setting up your PC to work with Audacity
(See Setting up your PC to work with AT-LP2D-USB Turntable on page 6.)
NOTE: See page 6 for important instructions on how to setup your PC to work with
AT-LP2D-USB turntable before continuing.
1. Launch the Audacity program from your Start menu.
3. Select Audio I/O tab at the top left.
• Under Playback, Device, select your internal sound card.
• Under Recording, Device, select USB Audio CODEC.
• Under Recording, Channels, select 2 (Stereo).
• Check the box marked Software Playthrough.
2. Select Preference from the Edit tab in the Audacity Menu.
19
Setting up your PC to work with Audacity
(See Setting up your PC to work with AT-LP2D-USB Turntable on page 6.)
4. Next, select Quality tab at the top.
• Default Sample Rate: 44100 Hz.
• Default Sample Format: 16-bit.
• Real-time sample rate converter: Fast Sinc Interpolation.
• High-quality sample rate converter: High-quality Sinc Interpolation.
• Real-time dither: None.
• High-quality dither: Triangle.
• Select OK to save settings and exit Preferences menu.
20
5. Next, from the main Audacity window, select the drop-down box (arrow
pointing down) next to the microphone near the middle of your screen.
• If you don't see the drop-down box or the microphone pictured above, return
to Preferences Menu (see step 2, page 19). Select the Interface tab. Check
Enable Meter Toolbar. This will allow you to see the microphone with the
drop-down box on your main screen.
• Select Monitor Input from the drop-down menu. NOTE: You will need to
select this setting every time you launch Audacity. The other settings selected
above will be saved when you exit the program.
Recording Albums with Audacity
To get started with Audacity, follow the instructions below. For in-depth information
on recording and saving projects, please visit the on-line Audacity manual at
http://audacity.sourceforge.net/manual-1.2/index.html and the detailed on-line
tutorials at http://audacity.sourceforge.net/help/tutorials.
1. Saving a project
• Audacity writes all the changed and recorded audio to a directory called
Projectname_data, which is located right where you saved the project file
itself.
• Thus, select Save project as from your Audacity File tab and choose a
location and filename for your project.
• Please note that when you startup Audacity fresh, only the “Save As...”
menu option is available.
2. How to record
• Set your USB turntable up to play the song or album you want to record.
• Click on the red Record button
to begin recording.
• Lower tone arm on USB turntable onto album and track you want to record.
• Click on the blue Pause button
again to continue.
to pause the recording. Press it
• Click on the yellow Stop button.
That's it. You can now play around with your recording and explore the editing
capabilities of Audacity. Remember that you can use the Undo function almost
without limits while the project is open.
NOTE: CD's cannot be burned directly from the Audacity application. Other CD
burning applications should be used.
21
To learn more about Cakewalk PYRO
Cakewalk PYRO offers many features for filtering and / or editing recordings, like
removing clicks, pops, and crackles, or cleaning hisses, hums, and other annoyances
from your recordings. These features are described in great detail within the User's
Guide found in the Cakewalk PYRO 5 Help window (this is on the PYRO CD included
with the AT-LP2D-USB turntable).
22
For help contact Cakewalk at www.cakewalk.com/support.
To learn more about Audacity
For in-depth information on using Audacity, please visit the on-line Audacity manual
at http://audacity.sourceforge.net/manual-1.2/index.html and the detailed on-line
tutorials at http://audacity.sourceforge.net/help/tutorials.
23
Audio -Technica U.S., Inc.
1221 Commerce Drive, Stow, Ohio 44224 (330) 686-2600
www.audio-technica.com
P51999 ©2007 Audio -Technica U.S., Inc. Printed in China