1
Comodo
Endpoint Security Manager
SME Edition
Software Version 2.1
Administrator Guide
Guide Version 2.1.111114
Comodo Security Solutions
1255 Broad Street
Clifton, NJ 07013
Comodo Endpoint Security Manager - SME - Administrator Guide
Table of Contents
1.Introduction to Endpoint Security Manager - SME..................................................................................................................4
1.1.Software Components and System Requirements..............................................................................................................6
1.2.Removing Incompatible Products........................................................................................................................................8
1.3.Installing and Configuring the Service ..............................................................................................................................10
1.4.Key Concepts....................................................................................................................................................................16
1.5.Best Practices...................................................................................................................................................................17
1.6.Quick Start Guide..............................................................................................................................................................18
2.The Administrative Console....................................................................................................................................................26
2.1.Logging-in to the Administrative Console..........................................................................................................................27
2.2.The Dashboard Area.........................................................................................................................................................28
2.2.1.Adding and Re-configuring Tiles..............................................................................................................................30
2.2.1.1.Quick Actions Tiles..........................................................................................................................................31
2.2.1.2.Policy Status Tile.............................................................................................................................................35
2.2.1.3.Endpoint Updates Tile.....................................................................................................................................37
2.2.1.4.Endpoint Infections Tile...................................................................................................................................38
2.2.1.5.Connectivity Tile..............................................................................................................................................40
2.2.1.6.Getting Started Tile.........................................................................................................................................41
2.2.1.7.System Status Tile..........................................................................................................................................42
2.2.1.8.License Status Tile..........................................................................................................................................46
2.2.1.9.Software Tile...................................................................................................................................................49
2.3.The Computers Area.........................................................................................................................................................51
2.3.1.Adding Endpoint Computers to ESM........................................................................................................................52
2.3.1.1.Importing Computers by Automatic Installation of Agent.................................................................................52
2.3.1.2.Adding Computers by Manual Installation of Agent and CIS...........................................................................67
2.3.1.3.Updating Comodo Software on Managed Computers.....................................................................................72
2.3.2.Creating Endpoint Groups........................................................................................................................................80
2.3.3.Viewing Endpoints....................................................................................................................................................84
2.3.4.Updating Endpoints..................................................................................................................................................96
2.4.The Policies Area............................................................................................................................................................102
2.4.1.Viewing Policies.....................................................................................................................................................104
2.4.2.Creating a New Policy............................................................................................................................................126
2.5.The Reports Area............................................................................................................................................................133
2.5.1.Reports Gallery......................................................................................................................................................134
2.5.1.1.Computer Details Report...............................................................................................................................137
2.5.1.2.CIS Configuration Report..............................................................................................................................142
2.5.1.3.Computer Infections Report..........................................................................................................................146
2.5.1.4.Quarantined Items Report.............................................................................................................................148
2.5.1.5.Antivirus Updates Report..............................................................................................................................152
2.5.1.6.CIS Log Report.............................................................................................................................................156
2.5.1.7.Policy Compliance Report.............................................................................................................................164
2.5.1.8.Policy Delta Report.......................................................................................................................................168
2.5.1.9.Malware Statistics Report.............................................................................................................................172
2.5.1.10.Top Ten Malware Report.............................................................................................................................179
2.5.2.Report Explorer......................................................................................................................................................184
2.5.3.Report Settings......................................................................................................................................................185
Endpoint Security Manager - SME Administrator Guide | © 2013 Comodo Security Solutions Inc. | All rights reserved
2
Comodo Endpoint Security Manager - SME - Administrator Guide
2.6.About...............................................................................................................................................................................185
2.7.Logging out of ESM Console...........................................................................................................................................188
3.How To... Tutorials..................................................................................................................................................................189
3.1.How to Connect CIS to ESM at the Local Endpoint.........................................................................................................189
3.2.How to configure CIS Policies - An Introduction..............................................................................................................191
3.3.How to Setup External Access from Internet...................................................................................................................195
3.4.How to Install CIS............................................................................................................................................................198
Appendix 1 The Service Configuration Tool...........................................................................................................................202
Start and Stop the ESM Service............................................................................................................................................203
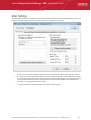
Main Settings........................................................................................................................................................................204
Server Certificate..................................................................................................................................................................205
Internet and Mail Settings......................................................................................................................................................206
Caching Proxy Settings.........................................................................................................................................................207
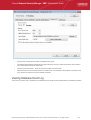
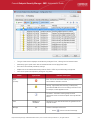
Viewing Database Event Log................................................................................................................................................208
About Comodo...........................................................................................................................................................................211
Endpoint Security Manager - SME Administrator Guide | © 2013 Comodo Security Solutions Inc. | All rights reserved
3
Comodo Endpoint Security Manager - SME - Administrator Guide
1.Introduction to Endpoint Security
Manager - SME
Endpoint Security Manager (ESM) SME is designed to help administrators of corporate networks deploy,
manage and monitor Comodo endpoint security software on managed networked computers.
Total Protection for networked computers
ESM allows administrators to leverage and maximize the protection offered by Comodo's endpoint security solutions. These
products can now be centrally managed and administered to ensure a workforce that is protected by best-of-breed solutions
such as Comodo Internet Security (including Firewall and Antivirus). If installed individually, each product delivers superior
protection against its specific threat vector. If installed as a full suite of packages, they provide a level of total endpoint security
that is unrivaled in the industry.
More efficient, effective and easier management
This ability to roll out and centrally manage security policies to a network that is protected with a proven and fully integrated
security suite can save thousands of man-hours per year. Administrator time that would otherwise be lost to repetitive
configuration and vendor interoperability problems can be re-directed towards more productive and profitable core business
interests. Furthermore, because ESM policies can be deployed immediately across all protected nodes, administrators can
respond more quickly to protect an entire network against the latest, zero hour threats. Furthermore, ESM's dashboard provides
fingertip access to tasks wizards, important network and task related data and support resources. The Administrator can add
endpoint computers, install agents, create new policies and do much more quickly by using the wizards via the web interface.
Endpoint Security Manager - SME Administrator Guide | © 2013 Comodo Security Solutions Inc. | All rights reserved
4
Comodo Endpoint Security Manager - SME - Administrator Guide
Features:
•
New web browser-based panorama style user interface compatible with touch-screen computers
•
New Dashboard interface with Active Tiles™ and configurable email alerts
•
New policy-based Comodo Internet Security configuration management
•
New Internet policy supports different CIS configuration for laptops
•
Integration with the latest Comodo Internet Security
•
New Active Reports™ with built in drill down to computers
Guide Structure
This guide is intended to take you through the configuration and use of Endpoint Security Manager - SME and is broken down
into the following main sections.
Dashboard Area - Features a set of highly configurable, dynamic tiles that let system administrators create the control panel of
their choice.
•
Dashboard area gives an immediate heads-up on network, virus and policy status
•
Serves as a launchpad for common tasks such as antivirus scans or database updates
•
Highly customizable - tiles can be dragged, dropped and re-arranged as admin sees fit
•
Dynamic - admins can change the type of information that is shown on any particular tile
•
Additional Active Tiles™ with extra functionality can be dragged onto the dashboard by clicking the ellipsis
button on the settings bar at the lower left of the interface
Computers Area - Plays a key role in the ESM Administrative Console interface by providing system administrators with the
ability to import, view and manage networked computers.
•
View complete details of the endpoints that are managed by ESM
•
Add/Import computers to ESM for centralized management
•
Create computer Groups for easy administration
•
Apply security policies to computers and groups
•
Download the latest version of the agent and deploy agents to target computers
Policies Area - Allows administrators to import and manage security policies for endpoint machines.
•
View a list of all policies along with their descriptions and the CIS component covered by the policy
•
View and modify the details of any policy - including name, description, CIS components, target computers and
whether the policy should allow local configuration
•
Add or remove policies as per requirements
•
Export any policy to .xml file
•
Create a new policy by importing settings from another computer, using another pre-existing policy or from a saved
xml file
Reports Area - Generate highly informative, graphical summaries of the security and status of managed endpoints.
•
Drill-down reports can be ordered for anything from a single machine right up to the entire managed network
•
Each report type is highly customizable according to administrator's requirements
•
Report archiving enables to compare reports generated at various time points
•
Reports can be exported to .pdf and .xls formats for printing and/or distribution
•
Available reports include endpoint CIS configuration, policy compliance, malware statistics, policy delta, CIS logs,
quarantined items and more
Endpoint Security Manager - SME Administrator Guide | © 2013 Comodo Security Solutions Inc. | All rights reserved
5
Comodo Endpoint Security Manager - SME - Administrator Guide
1.1.Software Components and System Requirements
Software Components
ESM consist of three interdependent software components:
•
The Administrative Console
•
The Central Service
•
The Remote Agent
Administrative Console
The Administrative Console provides access to all functionality of Endpoint Security Manager through a friendly and highly
configurable interface. Administrators can use the console to deploy, manage and monitor Endpoint security software on
networked computers.
•
Click here to go to the Admin console help pages
•
Click here for system requirements for endpoint machines that run the administrative console
•
Click here to read about logging into the console
Central Service
The Central Service is the main functional module responsible for performance of all ESM system tasks. Central Service also
keeps and updates information on all current and past system's activities.
•
Click here for a guide that explains how to install Central Service
•
Click here for system requirements for machines that run the central service
•
Click here to read about the central service configuration tool
Remote Agents
Remote Agents are intermediaries between remotely managed PC's and ESM Central Service and must be installed on every
managed PC. ESM Remote Agents are responsible for receiving tasks and requests from the Central Service and executing
those tasks on the Managed Computers. ('Tasks' from Central Service include operations such as installing or uninstalling
software, fetching report information and applying security policy). Endpoints imported into a ESM service can be managed only
by the same ESM service - meaning the agent cannot be reconfigured to connect to any other ESM service - a feature which
increases security.
•
Click here for system requirements for endpoint machines that run the agent
•
Click here to read how to install and deploy the agent
System Requirements
ESM Central Service Computer (the PC that will run the Endpoint Security Manager software)
CENTRAL SERVICE COMPUTER - SYSTEM REQUIREMENTS
Hardware
Component
32 bit
64-Bit
Processor
1 GHz 32 bit processor
1 GHz 64 bit processor
Memory
1 GB RAM minimum (2 - 4 GB recommended)
1 GB RAM minimum (2 - 4 GB recommended)
Hard Disk
16 GB
20 GB
Display
Super VGA (1024x768) or higher resolution video
adapter and monitor
Super VGA (1024x768) or higher resolution video
adapter and monitor
Software
Endpoint Security Manager - SME Administrator Guide | © 2013 Comodo Security Solutions Inc. | All rights reserved
6
Comodo Endpoint Security Manager - SME - Administrator Guide
CENTRAL SERVICE COMPUTER - SYSTEM REQUIREMENTS
Operating
System
The following operating systems are supported:
The following operating systems are supported:
Windows Server 2003 - SP 1 or higher
Windows Server 2003 - SP1 or higher
Small Business Server
Small Business Server
Windows Server 2008 - SP2 or higher
Small Business Server
Windows Server 2008 - SP2 or higher
Small Business Server R2
Small Business Server
Small Business Server R2
Microsoft Windows Client Family:
Windows 7
Windows Vista
Windows XP
Windows Server 2011
Small Business Server
Microsoft Windows Client Family:
Windows 7
Windows Vista
Windows XP
Software
Environment
Database
Other
Requirements
Microsoft .NET Framework 4.0
Microsoft .NET Framework 4.0
Microsoft ReportViewer 2010 SP1
Microsoft ReportViewer 2010 SP1
(Note - The above components will be installed
automatically if not present)
(Note - The above components will be installed
automatically if not present)
Microsoft SQL Server Compact 4.0
Microsoft SQL Server Compact 4.0
(Note - The above component will be installed
automatically if not present)
(Note - The above component will be installed
automatically if not present)
The ESM program modules (Console, Service and Agent) may require Windows Firewall and/or personal
firewall configuration changes in order to operate successfully.
By default, the ESM Central Service is assigned:
•
•
TCP Port 9901 open to the Internet for inbound connections from Agents on portable computers
TCP Ports 57193, 57194 open to the Internet for inbound http: and https: console connections
These ports can be opened in Windows Firewall by opening the control panel, selecting 'Windows
Firewall > Exceptions > Add Port...' then specifying each of the ports above in turn.
ESM Administrative Console computer - (PCs that will run the browser-based interface for configuring and managing the
ESM Central Service (this computer may also be the Central Service PC)
ADMINISTRATIVE CONSOLE COMPUTER - SYSTEM REQUIREMENTS
Hardware
Component
Display
32 bit
64-Bit
Minimum 1024x600 Netbook display with browser
set to full-screen at this resolution
Minimum 1024x600 Netbook display with browser set
to full-screen at this resolution
Minimum 1024x768 display with windowed
browser
Minimum 1024x768 display with windowed browser
Touch capable display interface and operating
system (optional)
Touch capable display interface and operating system
(optional)
Endpoint Security Manager - SME Administrator Guide | © 2013 Comodo Security Solutions Inc. | All rights reserved
7
Comodo Endpoint Security Manager - SME - Administrator Guide
ADMINISTRATIVE CONSOLE COMPUTER - SYSTEM REQUIREMENTS
Software
Browsers and
software
Other
Requirements
Microsoft Silverlight 4.0
Microsoft Silverlight 4.0
Microsoft Internet Explorer 7.0 or higher
Microsoft Internet Explorer 7.0 or higher
Mozilla Firefox 3.0 or higher
Mozilla Firefox 3.0 or higher
Google Chrome 4.0 or higher
Google Chrome 4.0 or higher
Comodo Dragon 15.0 or higher
Comodo Dragon 15.0 or higher
•
TCP Ports 57193,57194 will be used for http: and https: connections
Endpoint Computer - (a managed PC that will run Comodo Internet Security and the Agent)
ENDPOINT COMPUTER - SYSTEM REQUIREMENTS
Hardware
Component
32 bit
64-Bit
Processor
recommended
1 GHz 32 bit processor
1 GHz 64 bit processor
Memory
recommended
1 GB RAM
2 GB RAM
Software
Operating
System
Other
Requirements
The following operating systems are supported:
The following operating systems are supported:
Windows XP - SP2 or later
Windows XP - SP2 or later
Windows Vista - SP1 or later
Windows Vista - SP1 or later
Windows 7
Windows 7
The ESM program modules (Console, Service and Agent) may require Windows Firewall and/or personal
firewall configuration changes in order to operate successfully.
By default, the ESM Central Service is assigned:
•
TCP Port 9901 for connections with the ESM Agent
These ports can be opened in Windows Firewall by opening the control panel, selecting 'Windows
Firewall > Exceptions > Add Port...' then specifying each of the ports above in turn.
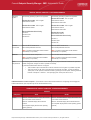
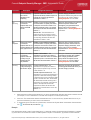
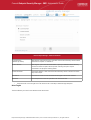
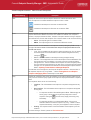
1.2.Removing Incompatible Products
For Comodo Internet Security to operate correctly, incompatible security software must first be removed from endpoint
machines.
•
During the installation process, ESM can detect and automatically remove some brands of incompatible software
•
However, certain software can be detected by ESM, but must be removed manually
•
The following table contains a list of incompatible software and states whether ESM can detect and remove it or only
detect it
Endpoint Security Manager - SME Administrator Guide | © 2013 Comodo Security Solutions Inc. | All rights reserved
8
Comodo Endpoint Security Manager - SME - Administrator Guide
Vendor
Product Name
Uninstall Type
Detect only
Components
AVAST Software
avast! Free Antivirus
avast! Free Antivirus
Symantec Corporation
Symantec Endpoint Protection Automatic
Symantec Endpoint Protection
Agnitum
Outpost Security Suite Pro 7.1 Detect only
Outpost Security Suite Pro 7.1
Sophos Limited
Sophos Endpoint Security and
Automatic
Control
Sophos AutoUpdate
Sophos Anti-Virus
Sophos Client Firewall
McAfee SecurityCenter 11.0
McAfee VirusScan 15.0
McAfee Personal Firewall 12.0
McAfee SiteAdvisor 3.3
McAfee Total Protection
Detect only
McAfee Anti-Spam 12.0
McAfee Parental Controls 13.0
McAfee Anti-Theft File Protection 2.0
McAfee Online Backup 3.0
McAfee QuickClean and Shredder 11.0
McAfee, Inc.
McAfee SecurityCenter 11.0
McAfee VirusScan 15.0
McAfee Personal Firewall 12.0
McAfee Internet Security
Detect only
McAfee Anti-Spam 12.0
McAfee Parental Controls 13.0
McAfee Online Backup 3.0
McAfee QuickClean and Shredder 11.0
ESET
McAfee VirusScan Enterprise Automatic
McAfee VirusScan Enterprise
ESET Smart Security
ESET Smart Security
Automatic
Dr.Web anti-virus for Windows
Detect only
6.0 (x86/x64)
Dr.Web anti-virus for Windows 6.0
(x86/x64)
Dr.Web Security Space 6.0
(x86/x64)
Detect only
Dr.Web Security Space 6.0 (x86/x64)
Avira GmbH
Avira AntiVir Premium
Detect only
Avira AntiVir Desktop
AVG Technologies
AVG Internet Security
Detect only
AVG 2011
Kaspersky Lab.
Kaspersky Antivirus
Detect only
Kaspersky Antivirus
Comodo Group
COMODO Internet Security
4.1, 5.8
Automatic
Doctor Web, Ltd.
COMODO Internet Security
If your product is detected but not automatically removed, please consult your vendor’s documentation for precise uninstallation
guidelines.
However the following steps will help most Windows users:
•
Click the Start button to open the Windows Start menu
Endpoint Security Manager - SME Administrator Guide | © 2013 Comodo Security Solutions Inc. | All rights reserved
9
Comodo Endpoint Security Manager - SME - Administrator Guide
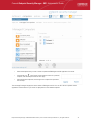
•
Select Control Panel > Programs and Features (Win 7, Vista); Control Panel > Add or Remove Programs (XP)
•
Select your current antivirus or firewall program(s) from the list
•
Click Remove/Uninstall button
•
Repeat process until all required programs have been removed
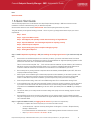
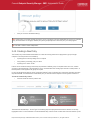
1.3.Installing and Configuring the Service
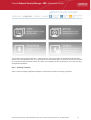
1. Downloading and running the installer
Download and save the ESM setup file to the computer that will be used for the Central Service.
You have a choice of two installation files, 'CESM_Setup_2.1.<version>.exe' or 'CESM_Setup_2.1.<version>_Full.exe'
The '..._Full.exe' file is a larger file that also contains additional, required software (.net Framework 4, SQL Server Compact 4.0
and Microsoft Report Viewer 10.0).
The other file does not contain this additional software but will download it from the Internet if it is not detected on your server.
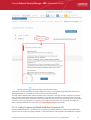
To start the installation, double click on the setup file. The installer welcome screen will be displayed.
Click 'Next'.
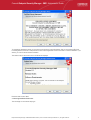
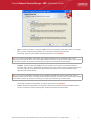
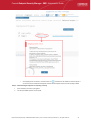
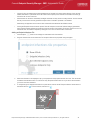
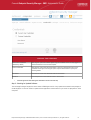
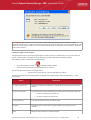
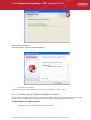
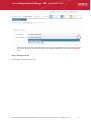
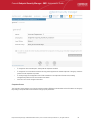
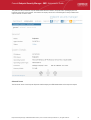
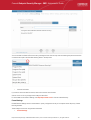
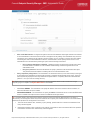
2. License Agreement
The End-User License Agreement will be displayed:
Endpoint Security Manager - SME Administrator Guide | © 2013 Comodo Security Solutions Inc. | All rights reserved
10
Comodo Endpoint Security Manager - SME - Administrator Guide
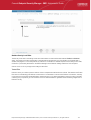
To complete the initialization phase you must read and accept to the License Agreement. After you have read the End-User
License Agreement, check the 'I accept the terms in the License Agreement' box and click 'Next' to continue installation. If you
decline, you cannot continue with the installation.
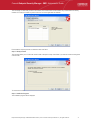
The release notes for the current version of ESM will be displayed.
Read the notes and click 'Next'.
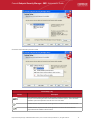
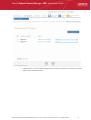
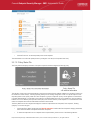
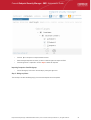
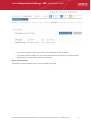
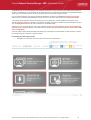
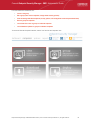
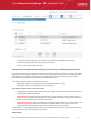
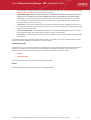
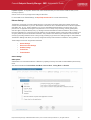
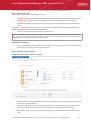
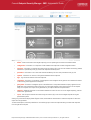
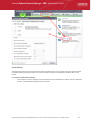
3. Choosing Installation Preferences
The next stage is to choose the setup type:
Endpoint Security Manager - SME Administrator Guide | © 2013 Comodo Security Solutions Inc. | All rights reserved
11
Comodo Endpoint Security Manager - SME - Administrator Guide
•
Typical - Installs most common components (ESM Server and Documentation) to the default location of C:\Program
Files > Comodo > Endpoint Security Manager. This is the option recommended for most users.
On selecting 'Typical' and clicking 'Next', the setup progress will move to finalization.
Note: If you choose to install ESM in Typical mode, after installation the ESM server will automatically apply a free 3endpoint/1 year first-time-use license. If you have already obtained a license key, it is best to use the Custom option; otherwise
you will need to replace it and provide your license key by clicking the License tile in the Console interface.
•
Complete - Installs all components (ESM Server, Documentation and Proxy Server) to the default location of
C:\Program Files > Comodo > Endpoint Security Manager. Proxy server is used as antivirus updates caching service
and CIS on endpoints can update from here without the need for endpoints to connect to the Internet, which
significantly reduces Internet traffic.
Note: If you choose to install ESM in Complete mode, after installation the ESM server will automatically apply a free 3endpoint/1 year first-time-use license. If you have already obtained a license key, it is best to use the Custom option; otherwise
you will need to replace it and provide your license key by clicking the License tile in the Console interface.
On selecting 'Complete' and clicking 'Next', the setup progress will move to finalization.
•
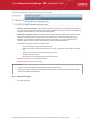
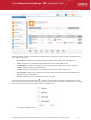
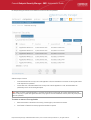
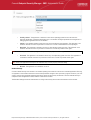
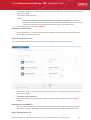
Custom - Enables the administrator to choose which components are installed and modify the installation path if
required. On selecting Custom and clicking 'Next', the Custom Setup dialog will be displayed:
Endpoint Security Manager - SME Administrator Guide | © 2013 Comodo Security Solutions Inc. | All rights reserved
12
Comodo Endpoint Security Manager - SME - Administrator Guide
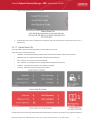
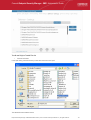
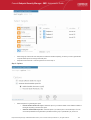
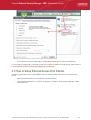
Choose the components that you want to install.
Custom Setup - Key
Control
Description
Icons with the ▼ symbol to the right are the currently selected installation option. Clicking this icon
will open a menu allowing the user to select alternative installation options. These alternative
installation options are explained in the next four rows of this table.
Indicates that the component named to the right of the icon will be installed on the local drive
Indicates that the component named to the right of the icon and all of its associated subcomponents will be installed on the local drive.
Endpoint Security Manager - SME Administrator Guide | © 2013 Comodo Security Solutions Inc. | All rights reserved
13
Comodo Endpoint Security Manager - SME - Administrator Guide
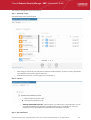
Custom Setup - Key
Indicates that the component named to the right of the icon will be installed as and when the user
requires. Choosing this option will create a shortcut to the Comodo folder on the Windows start
menu - allowing the feature to be installed when the shortcut is selected.
Indicates that the component named to the right of the icon will not be installed.
Browse....
The 'Browse...' button allows to select another location folder for ESM to be installed.
Reset
The 'Reset' button allows to roll back to default installation options.
Disk Usage
The combined disk space that will be taken up if the currently selected components are installed.
Back
The 'Back' button allows to roll back to 'Release Notes' dialog.
Next
The 'Next' button confirms your choices and continues onto the next stage of the installation
process.
Cancel
The 'Cancel' button annuls the installation and quits the installation wizard.
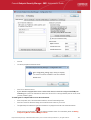
Click the 'Browse...' button to change installation directory (default = 'C:\Program Files\COMODO\EndpointSecurityManager').
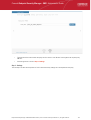
Click 'Next' and provide a valid license key.
Note: If you do not provide a key, the ESM server will automatically apply a free 3-endpoint/1 year first-time-use license.
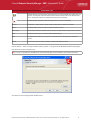
Click 'Next' and choose the appropriate database server.
Endpoint Security Manager - SME Administrator Guide | © 2013 Comodo Security Solutions Inc. | All rights reserved
14
Comodo Endpoint Security Manager - SME - Administrator Guide
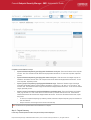
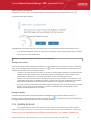
Click 'Next' then 'Install' to begin the installation process.
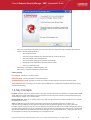
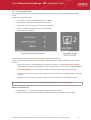
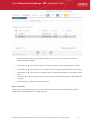
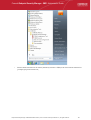
4. Finalizing the Installation
Once installation is complete the finish dialog is displayed - offering admins the opportunity to either finish and exit the installer
or finish and start the configuration tool.
Endpoint Security Manager - SME Administrator Guide | © 2013 Comodo Security Solutions Inc. | All rights reserved
15
Comodo Endpoint Security Manager - SME - Administrator Guide
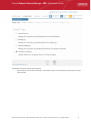
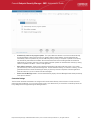
•
Select the 'Launch ESM Configuration Tool' check box to open the configuration utility immediately after exiting the
installer. This utility will allow admins to:
•
Start or Stop the service
•
View and configure hostnames or IP addresses that will connect to the server
•
View and configure console and agent ports
•
View and configure Internet (proxy) and mail server settings
•
Manage SSL server certificates for the administrative console
•
View a log of database events
Click here for more details on ESM Configuration Tool.
Click 'Finish' to complete installation and exit the wizard.
Further reading:
Key Concepts - Definitions of key terms in ESM.
Quick Start Guide - Importing endpoints to central management.
The Administrative Console - Explains how to use the console to manage endpoints, view reports and deploy tasks.
The Configuration Tool - This utility is used to start or stop the ESM service, configure port and address settings and specify
internet and mail settings.
1.4.Key Concepts
Endpoint - Endpoint refers to any desktop, laptop or any other computing device that is connected to a corporate network. ESM
allows network and system administrators to install, manage and monitor the security software Comodo Internet Security (CIS)
at each endpoint, remotely, from a central location.
Managed Endpoint - Refers to any desktop, laptop or any other computing device that is running the Agent and CIS, managed
by the ESM central service.
Agent - A ESM agent is a client program to be installed on each and every managed endpoint for connection and
communication to the ESM server. The agent is responsible for receiving tasks like applying security policy to CIS at the
managed computer, running AV scans etc. from the central Service and executing them on the managed computer. The agent is
also responsible for gathering reports as requested by the central service and to pass them to the central service. The endpoints
imported into a ESM service by installing the agent can be managed only by the same ESM service - meaning the agent cannot
be reconfigured to connect to any other ESM service, increasing the security.
Endpoint Security Manager - SME Administrator Guide | © 2013 Comodo Security Solutions Inc. | All rights reserved
16
Comodo Endpoint Security Manager - SME - Administrator Guide
Groups - ESM allows computer groups to be created as required by the structure of the corporate organization. Once groups
have been created sorting the computers in the network, admins can run tasks (such as applying security policy, running AV
scans and deploying agents) as required for specific groups.
Policy - A policy is the security configuration of Comodo Internet Security (CIS) deployed on an endpoint or a group of
endpoints. Each policy determines the antivirus settings, Internet access rights, firewall traffic filtering rules, sandbox
configuration and Defense+ application control settings for an endpoint. For creating new policies, the administrator has to
configure CIS at an endpoint in local mode and then import it as a policy into ESM. The imported policy can be applied to
computer groups or individual endpoints as required. Although ESM cannot apply policy or run tasks like AV scans on an
endpoint that is in 'local administration' mode, it can still fetch data from such machines for generating real time reports.
Local Mode - When an endpoint is in ‘Local Mode’, CIS settings are considered as being locally administered and ESM will not
enforce (although it will continue to report on) policy compliance (the endpoint will continue to use the security configuration
already in effect on that machine). Administrators should enable ‘Local Mode’ (or apply the ‘Locally Configured’ policy) and leave
it in this mode while editing policy on the local machine using the endpoint's CIS interface. If returned to 'Remote Mode', ESM
will automatically re-apply assigned policy overwriting administrator's change. While in ‘Local Mode’, the endpoint will continue
to report connectivity and virus outbreak details.
Remote Mode - ESM can apply a security policy and can run tasks like AV scans and database updates only if CIS in an
endpoint is maintained in Remote Management Mode (i.e., it is being remotely administered through ESM).
Unassigned Group - The 'Unassigned' group is the default computer group in ESM. Any target computer, imported into ESM by
installing the agent automatically through the ESM admin console or manually, will be first placed in the 'Unassigned' group and
will be assigned the 'Locally Configured' Policy. The administrator can create new groups as required and import computers into
those groups from the 'Unassigned' group.
'Locally Configured' Policy - 'Locally Configured' is a security policy that allows CIS settings to be changed by the local user
without being monitored for compliance with settings policy.
Reports - ESM allows the administrators to generate highly informative, real-time and active graphical summaries of the security
and status of managed endpoints. Each type of report is fully customizable and can be ordered for anything from a single
machine right up to the entire managed environment.
Next:
Best Practices
Quick Start Guide
1.5.Best Practices
1.
In ESM, security policies should be applied to 'groups' of computers rather than individual endpoints. So the
administrator should first create computer groups that mirror their organization from the administrative console, before
importing policy. See Creating Endpoint Groups for explanation on creating new groups.
2.
It is recommended to maintain the default group 'Unassigned' with the policy 'Locally Configured' until all the required
endpoints in the network are imported. This will prevent ESM from overwriting existing CIS security settings on a new
endpoint at the instant it becomes managed after deploying the agent.
3.
Policy is implemented in a typical PC environment 'imaging' strategy - just as a PC is 'imaged' for replicating it to
others. A policy can be created or edited at an endpoint and tested to ensure it works as required before creating an
image. The image can then be imposed on other endpoints. The purpose of the administrative console is to alert,
centrally deploy software and enforce policy.
4.
If the policy of a remote computer is to be changed, it can be pushed to a special test/imaging PC or any nearby PC.
The CIS on the test/imaging computer can be set to local administration mode in order to edit its configuration. The
configuration can be then and imported as a new policy for application to remote computers. If needed the
test/imaging computer can be reverted to its original policy.
5.
An endpoint serving as a test/imaging computer can be left in 'Local Administration Mode' so that administrators can
easily use it to create/modify and import new policies. Even if the PC has an assigned policy other than 'Locally
Configured', the endpoint will not be overwritten with policy from the ESM console until it is returned to remote
management mode (even if the PC reboots).
6.
Regardless of whether the agent and CIS are installed automatically from the administrative console or manually at
the endpoints using the 'Manage this Endpoint' feature of CIS 2012 or offline deployment, they should be updated
only through ESM.
Endpoint Security Manager - SME Administrator Guide | © 2013 Comodo Security Solutions Inc. | All rights reserved
17
Comodo Endpoint Security Manager - SME - Administrator Guide
Next:
Quick Start Guide
1.6.Quick Start Guide
This tutorial briefly explains how an administrator can setup Endpoint Security Manager - SME then install and monitor
installations of Comodo Internet Security (CIS) on networked computers.
We recommend admins to have read the 'Best Practices' section before putting this tutorial into practice.
The guide will take you through the following processes - click on any link to go straight to that section as per your current
requirements.
Step 1 - Install
Step 2 - Login to the Admin Console
Step 3 - Install Agents (and optionally Comodo Internet Security) on Target Machines
Step 4 - Open the dashboard - check that target endpoints are reporting correctly
Step 5 - Create Groups of computers
Step 6 - Import security policy from an endpoint and apply to groups
Step 7 - Viewing Active Reports™
Step 1 - Install Endpoint Security Manager - SME (see Installing and Configuring the Service if you need more help with
this)
1.
Download and run the ESM setup file. A link to this file is provided in your license confirmation email. This file will
install the central service on the machine you intend to use as the ESM server. Supported Operating Systems are Win
XP SP3, Win Vista SP2, Win 7 and Windows Server 2003/2008.
There is a choice of two setup files. The '..._FULL.exe' file contains all additional, required software (.net Framework 4,
SQL Server compact 4.0 and Microsoft Report Viewer 10.0). The other is a lightweight web installer that does not
contain this additional software but will download it from the Internet if it is not detected on your server.
2.
Run the setup file. Any missing software components will be automatically installed (ESM requires .NET, SQL server
compact and Microsoft report viewer).
3.
Select 'Typical' as the installation type for fastest setup experience; after installation you will need to provide a valid
license key by clicking the License tile using the Console interface. Select 'Custom' if you wish to change install
location or select which components are installed; you will be required to provide your license during setup.
4.
At the setup finalization dialog, make sure 'Launch ESM Configuration Tool' is selected before clicking 'Finish'.
5.
In the configuration tool, take note of the hostname/IP address of the server and the port settings. You will need these
if you wish to access the console from remote machines and if you want to setup protection for laptops and other
computers that are outside the local network (you will also need to open these ports to the Internet on your enterprise
firewall).
6.
This tool also allows you to modify Internet connection settings and specify mail server settings (required for email
notifications).
7.
Since the ESM console can be accessed via the Internet, you may desire to obtain an SSL certificate and apply it
using the Configuration Tool or you can distribute the self-signed certificate already installed to computers that you will
use to administer ESM.
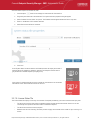
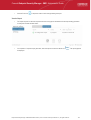
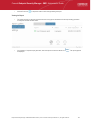
Step 2 - Login to the Admin Console (see logging into the console if you need more help with this)
1.
After setup is complete, there are two ways that you can access the admin console:
•
On the server itself - open the console by clicking 'Start > All Programs > Comodo > Endpoint Security
Manager > ESM Console'
From remote machines via Internet browser - use the following address format to access the console:
•
https://<your server hostname or IP address>:57194
Endpoint Security Manager - SME Administrator Guide | © 2013 Comodo Security Solutions Inc. | All rights reserved
18
Comodo Endpoint Security Manager - SME - Administrator Guide
Tip: You can find the server hostname/IP and the ESM port numbers by opening the configuration tool on the server. Click
'Start > All Programs > Comodo > Endpoint Security Manager > ESM Configuration Tool'.
2.
Login to the console using the Windows administrator user ID and password of the system that ESM was installed on
to begin using your software.
3.
To log out of the console, close the browser window or tab containing the console, or press the 'Refresh' button or click
the 'Logout' link at the top right of the interface below the username.
Note on using the interface
The recommended navigational technique in the administrative console is to swipe the screen in the direction you wish to move
as if you are 'dragging' the screen (for example, when you want to move onto the next step in a wizard, you can just drag the
screen to the left).
'Swiping' is done by holding down the left mouse button in white space and dragging the mouse in the required direction. For
example, if you wish to move onto the next step of a wizard, you would left click + hold then drag the mouse the left. If you
wanted to move back to the previous step, left click + hold then drag the mouse to the right.
If you have a touch-sensitive screen then you can swipe between screens with your finger.
A third alternative is to click the plain arrows in the middle on the left and right of the interface.
For the best experience, use the browser in full-screen mode (click 'F11' on Internet Explorer).
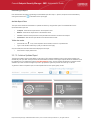
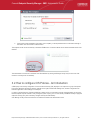
Step 3 - Install Agents (and optionally Comodo Internet Security) on Target Machines
In order for ESM to centrally manage an endpoint, the endpoint must have two elements installed - (i) Comodo Internet Security
software (ii) The ESM agent. The agent is a small piece of software that facilitates communication between the endpoint and the
ESM server. The next stage of setup is to install this agent.
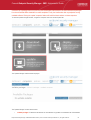
There are three methods to accomplish this:
•
Remotely, using a console wizard to automatically push the agent and (optionally) CIS onto target machines. This
wizard is started by clicking the 'deploy' tile in the 'Computers' section of the console.
•
Locally. You can install the agent and bring endpoints under central management by clicking the 'Manage this
endpoint' link in the CIS interface. A walk-through using this method can be found at How to Connect CIS to ESM at
the Local Endpoint.
•
Locally. You can download the agent setup file from the admin console, transfer the file to the endpoints to be
managed through any media like DVD, CD, USB memory and install the agent at the endpoints. Detailed explanation
on using this method can be found in Adding Computers by Manual Installation of Agent and CIS.
Endpoint Security Manager - SME Administrator Guide | © 2013 Comodo Security Solutions Inc. | All rights reserved
19
Comodo Endpoint Security Manager - SME - Administrator Guide
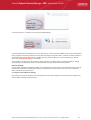
The remainder of this step describes the first method - remote installation.
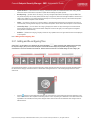
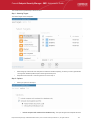
1.
Click 'computers' in the top navigation (2nd link from the left) to open the 'computers' area.
2.
Click the 'deploy' tile from the 'computers' area to start the wizard (by default, the tile is positioned bottom right).
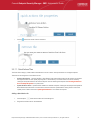
3.
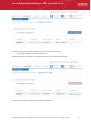
The first stage is to choose how you want to import (Target Type). Computers can be imported using one of three
methods: Active Directory, Workgroup or by Network Address. Administrators should, of course, repeat this wizard
until they have imported all computers in their network.
4.
Select the appropriate import method then swipe the screen to the move to the next stage. 'Swiping' is done by holding
left-click button down in white space and dragging the mouse to the left. If you have a touch-sensitive screen then you
can swipe between screens with your finger. A third alternative is to click the plain arrows in the middle on the left and
right side of the interface.
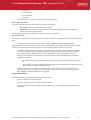
•
If you chose 'Active Directory', you next have to choose whether to import from the current domain or a
custom domain. The 'current' domain means whichever domain the ESM server is a member of - not the
current domain of the endpoint being used to manage the server. If you choose 'custom domain' then you
will need to enter the IP or name of the domain controller and the administrator username and password for
that domain.
•
If you chose 'Workgroup', you next have to specify which workgroup to import from. You can specify
manually by typing the workgroup name or use the 'Find workgroups' option to have the wizard present you
with a choice of workgroups detected on the server machine's local network. You can only import from one
workgroup at a time so you may have to repeat this wizard.
•
If you chose 'Network Addresses', you next have to specify the IP, IP range, host name or subnet of the
target machines. Click the 'add' button to confirm your choice. Repeat until you have added all IP addresses
or ranges that you wish to import.
Swipe left (or click the right arrow button) to continue.
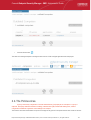
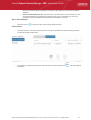
5.
The next stage, 'Select Targets', allows you to choose those imported computers onto which you want to install the
Agent and Comodo Internet Security. Select the check-boxes next to your intended targets and swipe the screen left to
continue (or click the right arrow button).
6.
The next step 'Target Summary' provides you the summary such as status, IP address of the endpoint(s) that you want
to install the agent or CIS. Select the check box beside the computer that you want to install the packages. If you want
Endpoint Security Manager - SME Administrator Guide | © 2013 Comodo Security Solutions Inc. | All rights reserved
20
Comodo Endpoint Security Manager - SME - Administrator Guide
to select all the computers, select the check box beside the 'target computer'. Swipe left (or click the right arrow
button) to move onto the next step.
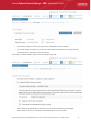
7.
Credentials. Next up is to choose whether the agent has to be installed under the currently logged in user account or
the network administrator account. If you choose 'Custom Credentials', enter the user name and password of an
account with administrative privileges on the machine - such as Administrator, machinename\administrator,
domain\administrator as the login ID. Swipe left (or click the right arrow button) to move onto the next step.
8.
The next stage 'Packages' displays the version details of ESM Agent and CIS. You can also check for updates of these
applications and download it in your server for deployment on to the end-points.
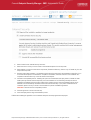
9.
The final step prior to deployment is to decide whether you also want to install Comodo Internet Security (CIS) at this
time.
•
If you want to continue with this process and install CIS now then make sure 'Install Comodo Internet
Security' is enabled and:
(1) Click 'Check for updates' then If any newer versions are available, you can choose to download them to
the ESM server by clicking 'download'.
(2) Choose the CIS version you wish to install from the drop down (most recent is recommended in virtually
all cases).
(3) Choose components to install - Firewall, Antivirus or All Components.
(4) Check 'Suppress Reboot' if you do not want the target endpoint to automatically restart after installation.
Reboot is required to complete installation, but you may want to postpone this until later.
(5) 'Uninstall all incompatible third-party products' - Check this option to uninstall select third party antivirus,
firewall and other desktop security software from the endpoints, prior to the installation of CIS. Performing
this step will remove potentially incompatible products and thus enable CIS to operate correctly. Some
incompatible products can be detected, but not automatically uninstalled and must be removed manually. If
your product is detected but not uninstalled, please consult your vendor’s documentation for precise
uninstallation guidelines.
Click Here to see the full list of incompatible products.
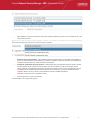
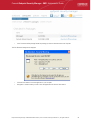
•
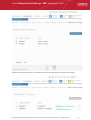
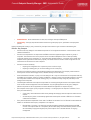
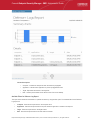
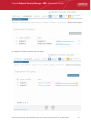
To move onto the deployment stage, click 'start deployment'. You will see installation progress per-endpoint.
Once installation is complete, you should see a results screen similar to the following screenshot.
Endpoint Security Manager - SME Administrator Guide | © 2013 Comodo Security Solutions Inc. | All rights reserved
21
Comodo Endpoint Security Manager - SME - Administrator Guide
•
If deployment fails, click on the words 'Deployment Failed' to discover the reason. The info box also contains
advice that may remediate the issue.
Endpoint Security Manager - SME Administrator Guide | © 2013 Comodo Security Solutions Inc. | All rights reserved
22
Comodo Endpoint Security Manager - SME - Administrator Guide
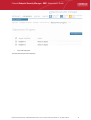
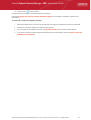
•
Once deployment is successful, click the 'Finish' icon
at the base of the interface to exit the wizard. If
you have chosen to install both the agent & CIS then those endpoints should now be reporting to ESM.
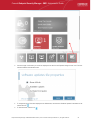
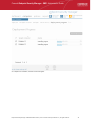
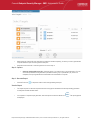
Step 4 - Check that target endpoints are reporting correctly
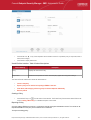
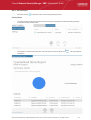
1.
Click 'dashboard' from the top navigation.
2.
This will open ESM's dynamic control panel:
Endpoint Security Manager - SME Administrator Guide | © 2013 Comodo Security Solutions Inc. | All rights reserved
23
Comodo Endpoint Security Manager - SME - Administrator Guide
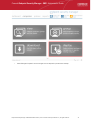
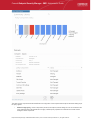
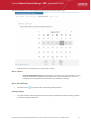
3.
Tiles on the dashboard display real-time information regarding connectivity, virus outbreaks and security policy
compliance. Other tiles allow you to quickly launch common tasks such as updating virus databases and running antivirus scans. In this first instance, click the 'Total Online' and 'Non-reporting' tiles to check that the import process went
according to plan.
•
After checking that all computers are reporting correctly, it is a good idea to make sure the latest virus
databases are installed. Click the 'Outdated' tile to begin this process.
•
After updating, we advise running a virus scan on all computers. Click the 'Antivirus Scan' tile to do this.
Note - real-time AV protection is already running on all endpoints. If any malware is discovered, it will be
brought to your attention via the 'Malware Found' tile.
•
A full description of the dashboard interface. The meaning of each tile and how to add more tiles can be
found in The Dashboard Area.
•
General advice regarding navigation and other functional areas can be found in The Administrative
Console.
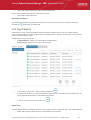
Step 5 - Create Groups of computers
In ESM, security policies are applied to 'groups' of computers rather than individual endpoints. Once a group has been created,
admins can run tasks on entire groups of computers (such as applying policy, running AV scans, deploying agents, updating AV
databases and more). 'Policies' are the security configuration of CIS and are imported from specific, already configured,
endpoints then applied to groups (we will cover this in step 6).
•
By default, all newly imported computers are placed into a group named 'Unassigned' and inherit that group's security
policy of 'Locally Configured'. Effectively, this means remote management is not in operation and the endpoints will
continue to use the security policy that is already in effect on the endpoint. If needed, the administrator can assign a
policy to 'Unassigned' group so that the policy will be applied to any imported computer and remote management is
enabled immediately.
•
We advise admins to create groups corresponding to the structure of their organization THEN import policy (from an
endpoint) and apply it to selected groups. Policies can also later be changed for individual computers in a group,
overriding group policy defaults.
Endpoint Security Manager - SME Administrator Guide | © 2013 Comodo Security Solutions Inc. | All rights reserved
24
Comodo Endpoint Security Manager - SME - Administrator Guide
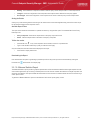
•
To start, click the 'computers' link from the top navigation followed by the 'group' tile. Select required computers, leave
policy as (Locally Configured), type a name for the group then finish.
•
If you wish to create multiple groups, repeat the previous step until all computers have been assigned.
•
See 'Creating Endpoint Groups' if you need help with this wizard. See 'The Computers area' for an overview of
functionality.
Step 6 - Import security policy from an endpoint and apply to groups
A policy is the security configuration of Comodo Internet Security (CIS) deployed on a group of endpoints. Each policy
determines the antivirus settings, Internet access rights, firewall traffic filtering rules, sandbox configuration and Defense+
application control settings for an endpoint. Policies are imported from already tested and configured endpoint machines then
applied to groups. In the previous step, you assigned computers into groups but left the policy as 'Locally Configured' - which
means remote management is effectively switched off (ESM will not enforce policy compliance and each endpoint in the group
will simply continue to use the CIS settings it is currently using).
The next tasks are to import a policy from a tested and configured endpoint, apply the policy to a group and (optionally), switch
on remote management for computers in that group.
•
To set the parameters of a particular security policy, you need to place the endpoint in 'locally managed' mode by
selecting 'Manage Locally' in CIS settings on the endpoint itself - either by physically sitting at the machine or by a
remote connection. See How to Configure CIS Policies - An Introduction for general advice with this.
•
Once you have set and tested the policy at the endpoint, you should return to the ESM console and prepare to import
this policy. Note - leave the endpoint in locally managed mode while doing this.
•
At the console, click 'policies' then the 'create' tile to start the policy import and deployment wizard. Select 'A
Computer' as source type then choose the specific computer from which you want to import. Modify 'Settings' and
'Agent Settings' if required.
•
For 'targets', choose which groups you want to apply the policy to and how you want it applied. 'for local policy' and 'for
Internet policy' are the policies to be used depending on whether the machine connects from inside or outside of the
VPN. Also, select 'Override individual computer's policy' to make sure this policy is applied correctly.
•
Selecting 'Force target computers to be managed remotely upon policy assignment' means ESM will engage 'Remote
Mode' and thus enforce policy compliance on the selected endpoint. if the policy becomes altered, ESM will
automatically re-apply it. If not selected, the endpoints will remain in locally managed mode (although your policy will
still be applied, it could become changed over time at the local level).
•
Finally, give the policy a name and description and select 'Apply policy after finish' to immediately implement. Do not
select this if you wish to deploy later.
Please see Policies - Key Concepts for more explanation of policies - including how to create, import, export and
deploy.
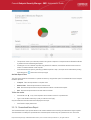
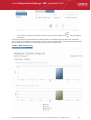
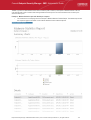
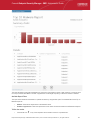
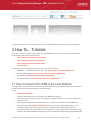
Step 7 – Viewing Active Reports™
The reports area contains a wealth of valuable information for administrators. Each report is an 'Active Report' that allows
admins to launch relevant tasks from within the report itself. Admins can also drill-down to individual endpoints from any report.
Reports can be exported, printed and cover the following categories:
•
Computer Details
•
CIS Configuration
•
Computer Infections
•
Quarantined Items
•
Antivirus Updates
•
CIS Log
•
Policy Compliance
•
Policy Delta
•
Malware Statistics
•
Top 10 Malware
Click here to read more about reports.
Endpoint Security Manager - SME Administrator Guide | © 2013 Comodo Security Solutions Inc. | All rights reserved
25
Comodo Endpoint Security Manager - SME - Administrator Guide
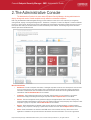
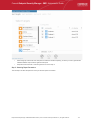
2.The Administrative Console
The Administrative Console is the nerve center of Endpoint Security Manager, allowing administrators to
deploy, manage and monitor Comodo endpoint security software on networked computers.
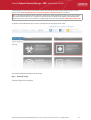
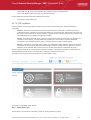
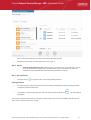
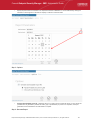
Built using the latest Microsoft® Silverlight technology, the main interface consists of four main areas that you navigate by
clicking the title, swiping or clicking the left/right arrows - 'Dashboard', 'Computers', 'Policies' and 'Reports'- as well as additional
functions in View License, About and Logout and on the settings bar at the bottom of the interface. Within each area is a set of
task-specific 'tiles' which provide fast access to the main functionality of the software. The following image shows the admin
interface open at the 'Dashboard' area:
Main Functional Areas
•
Dashboard - Provides a snapshot of the status of managed computers and serves as a launchpad for common tasks
such as running antivirus scans and updates. Tiles on the dashboard can be reconfigured to display precisely the
information an administrator finds most effective for their environment. Some tiles can also generate alerts for the
administrator. See The Dashboard Area for more details.
•
Computers - View, manage and add groups of computers. Specify policies on a per-computer or group basis.
Download and deploy the ESM agent onto target computers See The Computers Area for more details.
•
Policies - View and manage the security policies that apply to managed endpoints. Also contains a step-by-step
wizard that enables administrators to import a policy from existing endpoints, modify that policy, then re-export to other
computers or groups of computers. See The Policies Area for more details.
•
Reports - Allows administrators to generate a wide range of reports for managed endpoints - including malware
statistics, policy compliance, activity logs, update status, infections and more. See The Reports Area for more details.
•
About - Allows administrators to view the current ESM version and a download link if any newer version of the
application is available. It also provides the server information and license information. You can also upgrade the
Endpoint Security Manager - SME Administrator Guide | © 2013 Comodo Security Solutions Inc. | All rights reserved
26
Comodo Endpoint Security Manager - SME - Administrator Guide
license in this screen. See 'About' section for more details.
•
Logout - Allows administrators to logout of the ESM Console.
•
Settings Bar - Allows administrators to add Active Tiles™ to the dashboard area by clicking the ellipsis
button
and dragging to the dashboard. Refer to the section Adding and Reconfiguring Tiles for more details. The settings
bar also allows the administrators to zoom-in or zoom-out and reset the Active Tile layout to default settings.
Note: Reports and wizards having multiple pages or screens often display navigation arrows to the left and/or right of the main
screen area that can be used for navigating through the areas, apart from swiping or dragging.
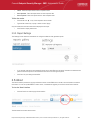
2.1.Logging-in to the Administrative Console
After installing ESM central service on a Windows server, admins can access the console in the following ways:
•
On the server itself by opening:
Start > All Programs > Comodo > Endpoint Security Manager >ESM Console
•
Via web-browser from any other machine
Use the following address convention to access the console
https://<server hostname or IP address>:57194
•
Where <server hostname or IP address> is the server upon which ESM central service is installed.
•
57194 is the DEFAULT https port configured for the service. If you changed this port number during
installation or by using the Configuration Tool then modify the address accordingly.
•
If you wish to check which server names, IP addresses and port numbers are currently in use, please open
the Configuration Tool on the server by opening.
•
Start > All Programs > Comodo > Endpoint Security Manager >CESM Configuration Tool
Note: If you receive a browser security error, you have not installed an SSL certificate from a Certification Authority. If you
will not be installing a custom certificate, you can download the self-signed certificate in your browser by clicking 'Get server
certificate' at the bottom of the login screen. You can then install the certificate in the Trusted Root Certification Authorities
section on machines which will be accessing the console to eliminate the browser warning.
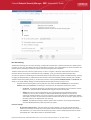
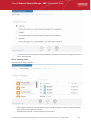
•
If the console is opened for the first time from the server in which it is installed or any machine in the local network,
Internet Explorer displays a warning message indicating that the Intranet Settings are disabled.
•
•
Performance-wise, ESM works fine with either Intranet or Internet settings. 'Internet settings' provide a more
secure connection to the ESM server than 'Intranet settings' but, if the connection is within your internal
network anyway, this may not be necessary. Click the alert bar if you wish to switch on 'Intranet settings'.
Close the alert bar to keep 'Internet settings'.
Login to the console using the Windows administrator user ID and password of the system that ESM was installed on
to begin using your software. The context of the login is that of the server computer on which the ESM Server service
is running (not the computer running the administrative console). If the ESM Service is running on a domain, use the
domain\username syntax to specify the user name (e.g. contoso\administrator).
Endpoint Security Manager - SME Administrator Guide | © 2013 Comodo Security Solutions Inc. | All rights reserved
27
Comodo Endpoint Security Manager - SME - Administrator Guide
Next - The Dashboard Area.
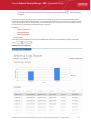
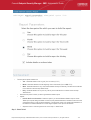
2.2.The Dashboard Area
Active Tiles™ are classified according to category, with each category of tile capable of displaying multiple information types.
Tiles can be added or removed according to your preference. See 'Default Tiles' section below if you would like to see quick
explanations of the tiles on the default layout.
Tile Categories:
•
Quick Actions - Tiles that launch specific tasks. A 'Quick Action' tile can be configured to launch 'Antivirus Scan
Action' or 'Update AV Bases Action'. Refer to 'Quick Actions Tile' for more details.
•
Policy Status - Tiles that display the compliance status of endpoints with their assigned CIS security policy. The
specifics of each policy are set in the Comodo Internet Security software installed on a endpoint machine. Display
options include 'Compliant Only', 'Non-compliant Only', 'Pending Only' or 'Show All Info'. Refer to Policy Status Tile
for more details.
•
Updates - Tiles that inform the admin how many endpoints are using the latest version of the antivirus database and
how many need to be updated. Display options are 'Up to Date Computers', 'Outdated Computers', 'Unknown
Computers' and 'Show All Info'. Refer to Endpoint Updates Tile for more details.
•
Infections - Tiles that display the number of managed endpoints with a specific malware infection status. Infection
statuses that can be shown on these tiles are 'Endpoint Infections Only', 'Not Infected Endpoints Only', 'Unknown
Endpoints Only' or 'Show All Info'. Refer to Endpoint Infections Tile for more details.
•
Connectivity - Tiles that display the number of managed endpoints with a specific connectivity status. Display options
are 'Local Online Only' (managed computers on the local network), 'Internet Online Only' (managed computers
connected to ESM over the Internet), 'Offline Only' (managed endpoints that have not checked in and have an
unknown state), 'Total Online' (managed computers on the local network and over the Internet connected to ESM) or
'Show All Info'. Refer to Connectivity Tile for more details.
•
Getting Started - Tiles that display shortcuts to online help for common tasks and questions. Examples include 'How
to Install CIS' and 'How to configure CIS policies'. Refer to Getting Started Tile for more details.
•
System Status - Tiles that display important network, virus and system information. System Status tiles can be
configured to display:
•
# Malware Outbreaks - Informs you of a potential virus outbreak on your network by turning red and indicating the
Endpoint Security Manager - SME Administrator Guide | © 2013 Comodo Security Solutions Inc. | All rights reserved
28
Comodo Endpoint Security Manager - SME - Administrator Guide
number of endpoints on which virus or malware was found within the defined threshold. See Outbreak
configurable parameters on System Status Tile page for more details.
•
# Malware found - Displays the number of malware identified and not handled by the local CIS installation in the
endpoint(s). See Malware Found configurable parameters on System Status Tile page for more details.
•
# Non-reporting endpoints - Displays the number of connected endpoints that do not report to the ESM console.
See Non-reporting configurable parameters on System Status Tile page for more details.
•
# Non-compliant endpoints - Displays the number of connected endpoints that are not compliant with the CIS
policy applied to them. See Non-Complaint configurable parameters on System Status Tile page for more
details.
•
# Outdated Endpoints - Displays the number of connected endpoints which are currently using an outdated
antivirus (AV) database. See Outdated configurable parameters on System Status Tile page for more details.
•
License Information - Displays the number of days remaining for the license to expire. See Licensing details on
System Status Tile page for more details.
•
All of the above - Creates a tile that displays all possible 'System Status' information explained above. See
System Status Tile Configurable Parameters table on System Status Tile page for more details. This tile will
indicate by turning red and highlighting in bold the monitored settings have an active warning.
The administrator can add any number of System Status tiles to display information as required. Alternatively, a single
tile can be set to display all information. Admins can configure any tile in this category to indicate a warning by turning
red, which will also generate an email notification when configured. (for example, send a notification if malware is
found on computer or send a notification when there is only 30 days remaining on the license). Refer to System
Status Tile for more details.
•
License Status - Displays a summary of license information (the number of endpoints covered and the expiry date).
Refer to for more License Status Tile details.
•
Software - Displays if newer versions of agent and CIS are available and the number of computers that need to be
updated.
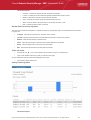
Default Tiles: By default, eleven tiles are displayed in the dashboard area. The following descriptions are for those default tiles.
Administrators should note that each tile is capable of displaying multiple information types and that more tiles can be added as
per requirements.
•
Total Online - ('Connectivity' tile category) Displays a summary of all network endpoints that are currently online and
connected to ESM. Administrators can re-configure this tile to show only computers connected via the Internet, only
show number of endpoints that are connected to ESM via local network, only show number of endpoints that are
offline (i.e., not connected to ESM) or elect to show all connected and offline endpoints on a single tile. Admins can
add more 'Connectivity' tiles if they wish to see, for example, 'Local', 'Internet', 'Offline' and 'All' connected and offline
machines on separate tiles.
•
Non-Compliant - ('System Status' tile category) Displays a summary of endpoints that are not compliant with their
assigned security policy. The specifics of each policy are set in the Comodo Internet Security software and can be
imported from one machine and applied to other machines. If the endpoint is in 'Remote Mode' then non-compliance is
'auto-corrected' by ESM as soon as it is detected (it will push the correct policy back onto the machine). If the endpoint
is in 'Local Mode' then it will retain non-compliant status until the administrator switches back to remote mode. The
endpoints applied with 'Locally Configured' policy will always be retained in Compliant status as ESM does not enforce
any policy compliance on to them.
•
Getting Started - ('Getting Started ' tile category) Display shortcuts to online help for common tasks and questions.
Examples include 'How to Install CIS' and 'How to configure CIS policies'.
•
Malware Found - ('System Status' tile category) Displays the total number of viruses identified on all managed
endpoints. 'Malware Found' shows number of malware discovered during the scans and not handled successfully
(deleted, disinfected or quarantined) locally by CIS. The number will remain until next scan and clean on the affected
computer(s). Clicking this tile will open 'View All Computers' interface with 'Infected' category preselected, which lists
the names of the malware found, the endpoints and the endpoints that were affected.
•
Antivirus Scan – ('Quick Actions' tile category) Launch an on-demand antivirus scan on selected computers or groups
of computers. After clicking this tile the admin will be asked to choose target endpoints, choose a scan profile ('My
Computer' or 'Critical Areas') before launching the scan.
•
Outdated – ('System Status' tile category) Displays the number of endpoints using an outdated virus signature
database. Clicking this tile will open 'View All Computers' interface with 'Outdated bases' category preselected.
Administrators can remotely update the relevant machines (the 'Update' AV button is along the bottom of the screen or
the 'update antivirus database' icon at the far end of the endpoint list).
Endpoint Security Manager - SME Administrator Guide | © 2013 Comodo Security Solutions Inc. | All rights reserved
29
Comodo Endpoint Security Manager - SME - Administrator Guide
•
Update AV Bases – ('Quick Actions' tile category) Launches the update virus database wizard. After clicking the tile,
admins will need to select which computers to update before initiating the update process.
•
Non-Reporting – ('System Status' tile category) Lists any managed endpoints that are failing to report to ESM. This
may be because they are currently offline, because they no longer have CIS and/or the agent installed or because of a
network error. ESM can only manage machines that report to it. Clicking this link will jump to the 'View All Computers'
screen where offline computers can be reviewed.
•
Offline - ('Connectivity' tile category) Lists the number of managed endpoints that have not checked in and have an
unknown state). Clicking this link will jump to the 'View All Computers' screen where offline endpoints can be reviewed.
•
License Exp. Days – ('License Status' tile category) Displays the number of days remaining on the current license.
Clicking this tile will display current license details. Swipe this screen to the right (or click the right hand navigation
arrow) to enter a new license key.
•
Available – ('Software' tile category) Displays if there are any updated versions of agent and CIS that can be deployed
on to endpoints.
Next - Adding and Re-configuring Tiles
2.2.1. Adding and Re-configuring Tiles
Active Tiles™ can be added to your dashboard by clicking the ellipsis
button at the left of the settings bar then dragging
the required category tile up into the main workspace. The new tile will then display the properties dialog, allowing the
administrator to choose its information and behavior. See the sections that follow for available settings for each category tile.
Once added to the interface, any tile can be reconfigured to display specific information by clicking or tapping the lower edge of
the tile below the category name at the bottom of the tile then clicking the 'Edit' icon. The following image shows the 'Quick
Actions' tile.
•
Clicking
will open a dialog that allows the admin to choose the type of information that should be displayed. In this
case, a 'Quick Actions' tile is capable of launching antivirus scans or updating virus databases. If the admin wants both
capabilities to be available, then they should drag two 'Quick Actions' tiles onto the dashboard and configure each for
different actions.
Endpoint Security Manager - SME Administrator Guide | © 2013 Comodo Security Solutions Inc. | All rights reserved
30
Comodo Endpoint Security Manager - SME - Administrator Guide
•
Clicking
will remove the tile from the dashboard.
2.2.1.1. Quick Actions Tiles
The Quick Action category of tiles enables administrators to launch common and important tasks on managed endpoints.
Tasks that can be assigned to a Quick Action tile are:
•
Antivirus Scan Action - Launches the 'Run a Scan Wizard' when clicked. After clicking this tile, admins should select
the target machines and scan profile ('My Computer' or 'Critical Areas'). The results of the scan can be viewed by
clicking the 'Computer Infections' tile from the 'Reports' area and selecting the endpoints. See Running An Antivirus
Scan on Muliple Endpoints for a quick tutorial.
•
Update AV Bases Action - Updates the AV database on selected computers. Clicking this tile will open the Update AV
Bases Wizard where the admin can select which machines should be updated before clicking 'Finish' to launch the
update process. Refer to the section Updating AV databases if more details are required.
Adding a Quick Action tile
1.
Click the ellipsis
button at the bottom left of the settings bar.
2.
Drag the Quick Action tile into the dashboard.
Endpoint Security Manager - SME Administrator Guide | © 2013 Comodo Security Solutions Inc. | All rights reserved
31
Comodo Endpoint Security Manager - SME - Administrator Guide
The 'quick actions tile properties' dialog will appear.
3.
Choose the type of action you want to see on the tile at the properties dialog.
You can add as many Quick Action tiles as as you wish for different actions.
Endpoint Security Manager - SME Administrator Guide | © 2013 Comodo Security Solutions Inc. | All rights reserved
32
Comodo Endpoint Security Manager - SME - Administrator Guide
To change the type of information displayed in the Quick Actions tile, click the words 'Quick Actions' at the bottom of the tile then
the icon: . To remove the tile, click the icon
:
Running An Antivirus Scan on Multiple Endpoints
Clicking the Antivirus Scan tile will open step 1 of the scanning wizard. The remaining steps are displayed below the blue title
bar with the current step in bold. To move backwards or forwards between steps, use the arrows in the middle of the interface on
either side (or left click and drag to swipe the screens left or right).
Step 1 - Select Targets
•
Choose the category from the left side pane.
•
Choose the groups from which you want to select the endpoints.
•
Choose the endpoints on which you wish to run the antivirus scan by selecting the check boxes beside them.
•
Click the filter icon
in the 'computer' column header to search for a particular endpoint.
•
Click the filter icon
in the 'cis mode' column header to search for endpoints' CIS that are in remote mode.
•
Click the filter icon
in the 'cis status' column header to search for endpoints' CIS status. The filters available are:
Endpoint Security Manager - SME Administrator Guide | © 2013 Comodo Security Solutions Inc. | All rights reserved
33
Comodo Endpoint Security Manager - SME - Administrator Guide
•
•
Actual CIS
•
Unsupported CIS
•
No CIS Installed
•
No Antivirus
Click the right arrow to confirm your selection and move to the next step.
Step 2 - Select Scan Profile
The 'Scan Profile' defines the areas and folders to be scanned in the endpoints.
•
My Computer - All drives on the endpoint will be scanned.
•
Critical Areas - Only "Windows", "Program Files" and "Document and Settings" folders on the endpoints
operating system drive will be scanned.
Click the profile you wish to execute then click the right arrow to move to the next step.
Step 3 - Run the Scan
If the selections made in the previous steps need to be re-checked or modified, the administrator can go back by clicking the left
arrow.
•
Once satisfied with your settings, click the Finish icon
(or swipe left) to begin the scanning process.
The wizard will then move to the 'View All Computers' screen which will display scan progress beneath the name of the target
computers. This screen can be accessed at any time by clicking 'Computers' then the 'View All Computers' tile.
•
If malware is discovered during the scan that is not handled (deleted, disinfected or quarantined) then the 'Malware
Found' and/or 'Infections' tiles on the dashboard will turn red (as appropriate) and display the number of samples
and/or affected endpoints. Malware that is successfully dealt with will not show on the 'Malware Found' tile.
•
Admins can elect to receive email notifications upon malware discovery. Email notifications are set up by editing
the''Malware Found' tile:
•
•
Click 'Dashboard' and locate the 'Malware Found' tile. Click the words 'System Status' at the bottom of the
tile.
•
Click the 'Edit' icon to open the properties dialog. Enable the 'Send Email Notifications' checkbox (make sure
'Malware Found' is displayed in the drop down box).
The results of the scan can be viewed as an 'Infection report' from the 'Reports' area - click 'Reports' then the
'Computer Infections' tile. The report can also be exported as a pdf file or a spreadsheet file for printing purposes.
Refer to Reports > Computer Infections for more details.
Updating AV databases
Clicking the Update AV Bases tile will start the 'Update AV Bases' wizard.
•
Choose the category from the left side pane.
•
Choose the groups from which you want to select the endpoints.
•
Choose the endpoints on which the antivirus signature database has to be updated by selecting the check boxes
beside them.
Endpoint Security Manager - SME Administrator Guide | © 2013 Comodo Security Solutions Inc. | All rights reserved
34
Comodo Endpoint Security Manager - SME - Administrator Guide
•
Click the Finish icon to start the update process in the endpoints.
The administrator can confirm the update process by clicking the 'view' tile (click 'computers' then 'view').
2.2.1.2. Policy Status Tile
The 'Policy Status' tile displays the status of endpoint compliance with their assigned CIS security policy.
The specifics of each policy manage the settings in the Comodo Internet Security software installed on an endpoint. Policies can
be created in a number of ways - including importing directly from an existing configuration of CIS on a specific endpoint. Once
imported, policies can be quickly rolled out to other endpoints or groups of endpoints. A policy can be applied to a machine that
is in either 'Remote Mode' or 'Local Mode'. If the endpoint is in 'Remote Mode' then policy non-compliance is 'auto-corrected' by
ESM as soon as it is detected (it will push the correct policy back onto the machine). If the endpoint is in 'Local Mode' then it will
retain non-compliant status until the administrator switches to remote mode.
The Policy Status tile can be configured to display the number of endpoints that are 'Compliant', 'Non-compliant', 'Pending
(analysis)' or can show all types.
•
Clicking the 'Policy Status' tile will open the 'View All Computers' interface with 'Non-Compliant' category preselected,
which shows the details of endpoints that are Non-Complaint.
•
To switch the endpoints from non-complaint status complaint status, please use one of the following methods:
Endpoint Security Manager - SME Administrator Guide | © 2013 Comodo Security Solutions Inc. | All rights reserved
35
Comodo Endpoint Security Manager - SME - Administrator Guide
•
Click any of the Policy Status tile in the dashboard to open the 'View All Computers' screen.
•
OR
Click 'computers' from the top menu, select the 'view' tile to open the 'View All Computers' screen.
•
Select 'Non-Complaint' category from the left side pane and in the right side a list of Non-Complaint'
endpoints will be displayed.
•
Click the 'reapply current policy' icons under the 'policy' column for the endpoints that you want to be
'Complaint.
•
If you wish to view the specific reasons that an endpoint fell out of compliance, please run a 'Policy Delta' report.
•
Policies are discussed in more detail in the 'Policies' chapter. Click the following links to go to the section you would
like help with:
•
Policy Overview and Key concepts
•
How to create and deploy a policy
•
How to view and modify policies
Adding a Policy Status Tile
1.
Click the ellipsis
button at the bottom left of the interface.
2.
Drag the 'Policy Status' tile into the dashboard. The 'policy status tile properties' dialog will appear.
3.
Choose the type of information you want to be displayed in the tile from the Properties dialog and click 'save' The new
tile will be added to the dashboard area. You can add as many Policy Action tiles as as you wish for the information
you wish to see in the dashboard.
4.
To change the type of information displayed in the Policy Status tile, click the words 'Policy Status' at the bottom of the
tile then the icon: . To remove the tile, click the icon:
Endpoint Security Manager - SME Administrator Guide | © 2013 Comodo Security Solutions Inc. | All rights reserved
36
Comodo Endpoint Security Manager - SME - Administrator Guide
2.2.1.3. Endpoint Updates Tile
Displays a summary of endpoints that are updated, outdated or unknown. The tile can configured to display:
•
Up-to-date Computers - Displays number of endpoints that have up-to-date AV database
•
Outdated Computers - Displays number of endpoints whose AV database is outdated and needs to be
updated
•
Unknown Computers - Displays the number of endpoints for which database information is not available
•
Show All Info - Displays all of the above on a single tile
Tiles will turn red if ESM detects endpoints that are using old databases. The administrator can add any number of Updates
tiles, each showing different information as required.
•
Clicking any of the Virus Database tile opens the 'View All Computers' screen with 'Outdated bases' preselected, which
shows the details of endpoints that require AV base updates.
•
To update outdated computers, please use one of the following methods:
•
Click any of the Virus Database tile in the dashboard to open the 'View All Computers' screen.
•
Select the endpoints that you want to update from the list.
•
Click the 'update AV' icon at the bottom of this screen or the icon at the far end of the entry to initiate an
update task on all outdated computers.
OR
•
Click 'computers' > 'view ' tile.
•
Select 'Outdated bases' category from the left side pane.
•
Select the endpoints that you want to update from the list.
•
Click the 'update AV' icon at the bottom of this screen or the icon at the far end of the entry to initiate an
update task on all outdated computers.
Adding an Endpoint Updates Tile
1.
Click the ellipsis
button at the bottom left of the settings bar.
2.
Drag the 'Updates' tile into the dashboard. The 'virus database tile properties' dialog will appear.
Endpoint Security Manager - SME Administrator Guide | © 2013 Comodo Security Solutions Inc. | All rights reserved
37
Comodo Endpoint Security Manager - SME - Administrator Guide
3.
Select the information to be displayed as per your requirement in the properties tile and click 'save'. The new tile will
be added to the dashboard area. You can add as many 'Updates' tiles as as you wish for the information you wish to
see in the dashboard.
4.
To change the type of information for a particular tile, click the words 'Virus Database' at the bottom of the tile then the
icon: . To remove the tile, click the icon:
.
2.2.1.4. Endpoint Infections Tile
Displays the number of endpoints on which malware was detected to be present. If no malware is detected then the tile is gray
colored but will turn red if malware is found. The tile can be configured to display the number of 'Infected Endpoints', 'Not
Infected Endpoints', 'Infection Status Unknown' and all data.
Endpoint Security Manager - SME Administrator Guide | © 2013 Comodo Security Solutions Inc. | All rights reserved
38
Comodo Endpoint Security Manager - SME - Administrator Guide
•
'Infections' refers to malware that has been detected but not 'handled' by Comodo Internet Security (it has not been
deleted, disinfected or quarantined and is still located on the endpoint). If the malware was handled successfully by
CIS then it will not show on this tile.
•
Administrators are advised to immediately investigate machines currently shown as hosting malware. Comodo Internet
Security can be used to manually quarantine suspicious files if automatic quarantine is not enabled.
Alternatively, the application can be used to clean and disinfect the malware at the affected machine.
•
Clicking the 'Endpoint Infections' tile will open the 'View All Computers' screen with 'Infected' category preselected,
which lists the endpoints affected along with the name and location of the malware. From here, admins can run an ondemand AV scan on selected computers by clicking the 'run a scan' icon at the bottom of the screen.
Adding an Endpoint Infections Tile
1.
Click the ellipsis
button on the settings bar at the bottom left of the interface.
2.
Drag the 'Infections' tile into the dashboard. The 'endpoint infections tile properties' dialog will appear.
3.
Select the information to be displayed as per your requirement in the properties tile and click 'save'. The new tile will
be added to the dashboard area. You can add as many 'Endpoint Infections' tiles as as you wish for the information
you wish to see in the dashboard.
4.
To change the type of displayed information for a particular tile, click the words 'Endpoint Infections' at the bottom of
the tile then the icon: . To remove the tile, click the icon:
.
Endpoint Security Manager - SME Administrator Guide | © 2013 Comodo Security Solutions Inc. | All rights reserved
39
Comodo Endpoint Security Manager - SME - Administrator Guide
2.2.1.5. Connectivity Tile
The Connectivity tile displays of the number of endpoints that are currently online and can be controlled through the ESM
console.
The tile can be configured to display:
•
'Local Online' - endpoints connected through the local network
•
'Internet Online' - endpoints connected through the Internet
•
'Total Online' - endpoints connected via Internet and local network
•
'Offline' - managed endpoints that are not connected to ESM
•
All of the above on a single tile
As with all dashboard tiles, administrators can add as many connectivity tiles as they wish.
Clicking a connectivity tile will open the 'View All Computers' interface with 'Online' category preselected. From this screen,
admins can:
•
View an overall summary of details pertaining to computers on the network - including security policy, CIS mode
(locally administrated or Remote administrated) and last action performed such as run a scan or updated AV database.
See Viewing Endpoints for an overview of the information available from the 'View All Computers' interface.
•
Launch various tasks such as creating a new computer group and running AV scans or database updates on selected
computers
Click Here for a list and explanation of the tasks that can be launched from the 'View All Computers' interface.
Tip: The View All Computers interface can also be opened by clicking the 'View ' tile in the 'Computers' area.
Adding a Connectivity Tile
1.
Click the ellipsis
button on the settings bar at the lower left of the interface.
2.
Drag the 'Connectivity' tile into the dashboard. The 'endpoint connectivity tile properties' dialog will appear.
Endpoint Security Manager - SME Administrator Guide | © 2013 Comodo Security Solutions Inc. | All rights reserved
40
Comodo Endpoint Security Manager - SME - Administrator Guide
3.
Select the information to be displayed as per your requirement in the properties tile and click 'save'. The new tile will
be added to the dashboard area. You can add as many 'Connectivity' tiles as as you wish for the information you wish
to see in the dashboard.
4.
To change the type of displayed information for a particular tile, click the words 'Connectivity' at the bottom of the tile
then the icon: . To remove the tile, click the icon:
.
2.2.1.6. Getting Started Tile
The 'Getting Started' tile provides handy links for new ESM – SME administrators to Help Guide pages which contain guidance
on common tasks.
•
Using the administrative console
•
Quick start guide
•
Best practices guide
•
How to connect Comodo Internet Security (CIS) to ESM at the local endpoint
•
How to setup external access from the Internet
•
How to Install CIS
•
How to configure CIS policies
Adding Getting Started Tile
1.
Click the ellipsis
button on the settings bar at the lower left of the interface.
Endpoint Security Manager - SME Administrator Guide | © 2013 Comodo Security Solutions Inc. | All rights reserved
41
Comodo Endpoint Security Manager - SME - Administrator Guide
2.
Drag the 'Getting Started' tile into the dashboard.
3.
Click the right or left arrows to navigate for more help links. The arrow will turn blue in color when the mouse cursor is
placed over it.
2.2.1.7. System Status Tile
The 'System Status' tiles provide real time updates on critical network security data.
There are six types of 'System Status' tile:
•
'Outbreaks'- # of endpoints affected by malware within a threshold that indicates a potential virus outbreak
•
'Malware Found' - # managed computers with unhandled malware detections
•
'Non - reporting' - # of computers not reporting to ESM
•
'Non- compliant' - # computers that are not compliant with their assigned security policy
•
'Outdated' - # computers whose antivirus (AV) database is outdated
•
'Licensing' - # Number of days remaining on current license
Each tile will turn red as a warning if certain thresholds are exceeded. For example, if the number of non-compliant computers is
Endpoint Security Manager - SME Administrator Guide | © 2013 Comodo Security Solutions Inc. | All rights reserved
42
Comodo Endpoint Security Manager - SME - Administrator Guide
greater than the defined values (default = 1).
When you drag a system status tile onto the dashboard (See 'Adding a System Status Tile') you will be asked to:
•
Choose the type of tile (select from the list of six types described above. Alternatively, select 'All').
•
Specify an alert threshold number. The parameters of the threshold will vary depending on the type of tile. If the
threshold is exceeded then the tile will turn red.
•
Optional - specify that an email notification is sent should the threshold be reached.
The next section explains how to add a system status tile; contains a table that describes each tile and what happens when
you click each tile and concludes with a quick example showing how to configure a system status tile.
Adding a System Status Tile
1.
Click the ellipsis
button on the settings bar at the lower left of the interface.
2.
Drag the 'System Status' tile into the dashboard. The 'system status tile properties' dialog will appear.
3.
Select the information to be displayed in the new tile from the 'Show:' drop-down.
Endpoint Security Manager - SME Administrator Guide | © 2013 Comodo Security Solutions Inc. | All rights reserved
43
Comodo Endpoint Security Manager - SME - Administrator Guide
Since the System Status tile also serves as an alert to indicate the occurrence of events that require immediate attention of the
administrator, the administrator should configure the maximum permissible values for the parameters while adding the tile. See
the System Status Tile - Table of Information Displayed and Configurable Parameters.
The administrator can also configure for ESM to send automated emails on occurrence of such events. If the check box 'Send
email notifications' is selected, ESM will automatically send an alert email to the administrator on the occurrence of the events
as specified.
Note – if you select 'All' from the drop-down list you will need to go into each tab and specify thresholds.
System Status Tile - Table of Information Displayed and Configurable Parameters
Information
Description
Configurable Parameters
All
Creates a tile that
displays all possible
'System Status'
information. The tile
turns red to alert the
administrator if one or
more monitored
settings (indicates as
bold) exceeded the
set permissible value.
The administrator has to configure the
maximum permissible values for all the
items. Refer to the rows below for more
details.
Outbreak
Displays the number
of endpoints infected
by virus or other
malware.
Number of PC's have to be infected The administrator can specify the number
of endpoints so that if the number of
endpoints infected by malware equals to or
exceeds this value, the tile alerts the
administrator. Default = 1
Shortcut to...
NA
Clicking the 'Outbreak' tile will open the
'Computer Infections Report' which lists the
endpoints affected along with the name
and location of the malware. Refer to
Computer Infections Report for more
explanation of these reports.
Infections occur within total number of
minutes - The administrator can specify
the period (in minutes) for generating the
alert after the first infection. Default = 15
Malware
Found
Displays the number
of malware identified
Number of infected computers - The
administrator can specify the number of
Clicking the 'Malware Found' tile will open
the 'View All Computers' interface with
Endpoint Security Manager - SME Administrator Guide | © 2013 Comodo Security Solutions Inc. | All rights reserved
44
Comodo Endpoint Security Manager - SME - Administrator Guide
Information
NonReporting
Description
Configurable Parameters
Shortcut to...
and not handled by
the local CIS
installation in the
endpoint(s).
endpoints so that if the number of
endpoints infected by malware equals to or
exceeds this value, the tile alerts the
administrator. Default = 1
'Infected' category preselected, which lists
the endpoints affected along with the name
and location of the malware. Refer to
Viewing Endpoints for more details.
Displays the number
of connected
endpoints that do not
report to the ESM
console.
Number of non-reporting computers The administrator can specify the number
of endpoints so that if the number of nonreporting endpoints equals to or exceeds
this value, the tile alerts the administrator.
Default = 1
Clicking the 'Non-Reporting' tile opens the
'View All Computers' interface with
'Unassigned' group preselected which
displays a list of all non-reporting
endpoints. Refer to Viewing Endpoints for
more details.
Minutes idle - The administrator can
specify the period (in minutes) for which
ESM can wait after the endpoint has gone
non-reporting, before the tile alerts the
administrator. Default = 1020.
NonCompliant
Displays the number
of connected
endpoints that are not
compliant with the CIS
policy applied to them.
Number of non-compliant computers The administrator can specify the number
of endpoints so that if the number of noncompliant endpoints equals to or exceeds
this value, the tile alerts the administrator.
Default = 1
Clicking the 'Non-Compliant' opens the
'View All Computers' interface with 'NonComplaint' category preselected, which
displays a list of all non-compliant
endpoints Refer to Viewing Endpoints for
more details.
Outdated
Displays the number
of connected
endpoints which are
currently using an
outdated antivirus
(AV) database
Number of AV outdated – The
administrator can specify the number of
endpoints so that if the number of outdated
endpoints equals to or exceeds this value,
the tile alerts the administrator. Default = 1
Clicking the 'Outdated' tile opens the 'View
All Computers' interface with 'Outdated
bases' category preselected, which
displays the list of endpoints whose
antivirus bases are outdated. Refer to
Viewing Endpoints for more details.
Licensing
Displays the number
of days remaining for
the license to expire.
License expiration days - The
administrator can specify the number of
days before the expiration day for the tile
to alert. Default = 30.
Clicking the 'Licensing' tile will start the
License Upgrade Wizard that allows you to
view and change you license.
Unused endpoints threshold, % - The
administrator can specify the percentage of
endpoints so that if the remaining number
of endpoints that can be connected to ESM
equals or exceeds this value, the tile alerts
the administrator that the licensing limit is
approaching. For example, if the license is
valid for 100 endpoints and when 90
endpoints are added, the tile alerts the
administrator if the threshold is set at 10%.
Default = 10
4.
Select the check box 'Send email notification' if you wish to generate email notification when certain conditions are met
(for example, if a virus is detected or if a machine does not report for a certain period of time).
5.
Click 'save'. The new tile will be added to the dashboard area. You can add as many 'System Status' tiles as as you
wish for the information you wish to have, to the dashboard.
6.
To change the type of information for a particular tile, click the words 'System Status' at the bottom of the tile then the
icon: . To remove the tile, click the icon:
.
Example:
If the administrator wishes to add a 'System Status' tile to (1) display the number of endpoints whose AV database is outdated,
(2) for the tile to turn red when the number of outdated systems is equal to or exceeds two, (3) Receive an email notification
Endpoint Security Manager - SME Administrator Guide | © 2013 Comodo Security Solutions Inc. | All rights reserved
45
Comodo Endpoint Security Manager - SME - Administrator Guide
when the number equals to or exceeds two, then:
1.
Click the ellipsis
button on the settings bar at the lower left of the interface.
2.
Drag the System Status tile to the dashboard. The 'system status tile properties' dialog will appear.
3.
Select 'Outdated' from the 'Show:' drop-down. The 'Outdated' tab will appear beneath the 'Show:' drop-down.
4.
Enter 2 in the Number of 'AV outdated:' text field.
5.
Select 'Send email notifications' checkbox.
6.
Click 'save'.
A new 'System Status' tile will be added to the Dashboard which will display the number of
endpoints whose AV database is outdated in real time. The example to the left shows a
gray tile with zero outdated endpoints (everything's fine).
If the number of outdated endpoints equals or exceeds two, the tile will turn red to alert the
administrator and an email notification will also be sent out.
2.2.1.8. License Status Tile
The 'License Status' tile displays a summary of the number of endpoints permitted by your license and the license expiry date.
•
This tile will turn red if the total number of detected endpoints exceeds the licensed number. Admins can use the
'Connectivity' tile to present to the total number of networked computers.
•
This tile will turn red if the license has expired.
•
Related to this tile is the 'Licensing' Tile which provides a highly visual reminder of the number of days remaining on a
license.
Endpoint Security Manager - SME Administrator Guide | © 2013 Comodo Security Solutions Inc. | All rights reserved
46
Comodo Endpoint Security Manager - SME - Administrator Guide
•
Click anywhere on the tile to open the license details and upgrade wizard.
Upgrading Your License
1.
Navigate to Dashboard area. The License Status tile will display the number of endpoint covered by and the validity
period of your current license.
2.
Click the 'License Status' tile. The details of your current license are displayed.
3.
Click the 'Upgrade license' link to move to the next step - Entering the new license key.
Endpoint Security Manager - SME Administrator Guide | © 2013 Comodo Security Solutions Inc. | All rights reserved
47
Comodo Endpoint Security Manager - SME - Administrator Guide
4.
Enter the license activation key you received via email.
Note: If you do not have a new license key, click the 'Get new License Key online' link to purchase it online from Comodo
website.
5.
Swipe the screen to the left or click the right arrow to move to the next step - New License. The details of your new
license will be displayed.
6.
Swipe the screen to left or click 'Finish' to activate the new license and exit the wizard.
Adding a License Status Tile
1.
Click the ellipsis
button on the settings bar at the lower left of the interface.
2.
Drag the 'License Status' tile into the dashboard.
Endpoint Security Manager - SME Administrator Guide | © 2013 Comodo Security Solutions Inc. | All rights reserved
48
Comodo Endpoint Security Manager - SME - Administrator Guide
2.2.1.9. Software Tile
The ‘Software Updates’ tile quickly informs the administrator when updated versions of Comodo Internet Security or the ESM
agent are available. It also shows the number of endpoints running outdated software. Note - even if no new updates are
available, it is still possible for computers to be running outdated software if previously downloaded updates have not yet been
installed.
•
Updates Available - Displays number of packages that are available
•
Outdated Computers - Displays number of computers that have to be updated.
Adding a Software tile
1. Click the ellipsis
button at the bottom left of the settings bar.
2. Drag the Software tile into the dashboard.
Endpoint Security Manager - SME Administrator Guide | © 2013 Comodo Security Solutions Inc. | All rights reserved
49
Comodo Endpoint Security Manager - SME - Administrator Guide
3.
Choose the type of information you want to be displayed in the tile from the Properties dialog and click 'save'. The new
tile will be added to the dashboard area.
4.
To change the type of information displayed in the Software tile, click the words 'Software Updates' at the bottom of the
tile then the icon: .
5.
To remove the tile, click the icon:
.
Endpoint Security Manager - SME Administrator Guide | © 2013 Comodo Security Solutions Inc. | All rights reserved
50
Comodo Endpoint Security Manager - SME - Administrator Guide
2.3.The Computers Area
The 'Computers' area plays a key role in the ESM Administrative Console interface by providing system
administrators with the ability to import, view and manage networked computers.
The 'computers' area allows the administrator to:
•
View the list of endpoints that are managed by ESM
•
Add/Import computers to ESM for centralized management
•
Create computer Groups for easy administration
•
Apply security policies to computers and groups
•
Download the latest version of the agent and deploy agents to target computers
Once the agent is installed, the endpoint computer is added into ESM and is ready to be managed through ESM. See the
section 'Adding Endpoint Computers to ESM' for complete instructions.
There are five tiles:
•
View - Enables administrators to view all the endpoints/endpoint groups added to ESM. Also allows to view the details
of individual computers or groups.
•
Group - Enables administrator to create new endpoint groups, add endpoints into them, and apply security policies for
the endpoint security software as per the administration requirements.
•
Download - Enables administrator to download the agent for installation on to the endpoints.
•
Deploy - Enables the administrator to import/add computers from the local network into the ESM console by installing
the ESM agent onto discovered endpoints. Computers can be imported from Active Directory, Workgroup or by
entering IP addresses. Once imported/added by installing the agent, the endpoint computer is ready to be managed
through ESM.
•
Update - Enables the administrators to check and update the software on the outdated computers and initiate an
update task with the latest version of CIS embedded into the package on all outdated computers. Once package is
available, the endpoint computer is ready up-to-date.
Endpoint Security Manager - SME Administrator Guide | © 2013 Comodo Security Solutions Inc. | All rights reserved
51
Comodo Endpoint Security Manager - SME - Administrator Guide
Adding an endpoint to ESM requires an agent to be installed in it. The agent can be installed in two ways:
•
Install agent while importing computers
•
Download and Install agent 'manually' on endpoint computers
Once the agent is installed, the endpoints can communicate with and be managed by ESM.
2.3.1. Adding Endpoint Computers to ESM
Each managed endpoint requires a small software agent to be installed to facilitate communication between it and the ESM
console. Depending on the method by which the agent is installed, the endpoints can be imported into ESM in two ways:
•
Installing the agent directly from the ESM Admin Console and importing computers from Active Directory, Workgroup
or by specifying the IP addresses or host names. This method is suitable for computers in the local network. Refer to
Importing Computers by Automatic Installation of Agent.
•
Downloading the agent as an executable and installing manually, transferring it onto media such as DVD, CD, USB
memory or uploading it to a network share then installing onto the endpoint computers. This method is more suitable
for computers connected through external networks like Internet. Refer to Adding Computers by Manual Installation
of Agent.
Once the agent is installed, the endpoint computer is automatically discovered and added into ESM to the 'Unassigned' group
where it will be applied with the configured policy (see 'The Policies Area' for more details) and is then ready to be managed.
Alternatively, Comodo Internet Security (CIS) can be installed in endpoint computers separately and from the CIS interface the
endpoints can be connected to ESM. For more details refer the sections, How to Install CIS and How to Connect CIS to ESM
at the Local Endpoint.
The 'Computers' area also allows the administrators to arrange the added computers into 'Groups' as per the structure of the
organization for easy administration. Once created administrators can run tasks on entire groups of computers (such as applying
security policy for CIS, running AV scans, deploying agents, updating AV databases and more). Refer to Creating Endpoint
Groups for more details.
2.3.1.1. Importing Computers by Automatic Installation of Agent
The 'Deploy' wizard will install the ESM agent software on network endpoints that can be reached from the ESM service
computer. Computers can be imported from Active Directory, from a Workgroup or by specifying individual IP addresses or host
names. The wizard also allows to update installed Comodo software in managed computers. See 'Updating Comodo Software
on Managed Computers' for more details.
To import endpoints
•
Click the 'deploy' tile from the 'computers' area to start the wizard:
Endpoint Security Manager - SME Administrator Guide | © 2013 Comodo Security Solutions Inc. | All rights reserved
52
Comodo Endpoint Security Manager - SME - Administrator Guide
Step 1 - Select the Target Type
Computers can be imported into ESM in the following ways:
•
Active Directory - imports computers from an Active Directory Domain.
•
Workgroup - imports computers from a Workgroup.
•
Network Addresses - imports individual computers specified by their IP Addresses or Host Names.
•
Managed Computers - allows to update installed Comodo software in managed computers. See 'Updating
Comodo Software on Managed Computers' for more details.
Note: Targets are contacted by the ESM service computer and its network connection, not the computer running the
management console.
ESM SME can manage a large number of networked computers so, administrators should repeat this process until all computers
for which management is required have been successfully imported.
Note: In most editions, licenses are required for each computer you wish to manage.
Explanations of importing using the sources can be found below in the sections that follow: Import from Active Directory,
Import from Workgroup and Netwrok Addresses.
•
Select the appropriate method to import the computers from Active Directory or Workgroup or select Network
Addresses if you want to import computers by specifying their IP addresses or DNS names.
Endpoint Security Manager - SME Administrator Guide | © 2013 Comodo Security Solutions Inc. | All rights reserved
53
Comodo Endpoint Security Manager - SME - Administrator Guide
Importing from Active Directory
•
Choose 'Active Directory' and move to the next step by swiping to left or clicking the right arrow.
Step 2 - Domain Name
•
Select Current Domain or Custom Domain. Current Domain should be chosen if the ESM service computer is currently
a member of the domain you wish to use to target for installation. If you select Custom Domain, you have to enter the
details of domain controller, an administrator user name and password.
Endpoint Security Manager - SME Administrator Guide | © 2013 Comodo Security Solutions Inc. | All rights reserved
54
Comodo Endpoint Security Manager - SME - Administrator Guide
Domain Import Settings - Table of Parameters
Current Domain
(Selected by default)
Selecting this option will import any computers from the Active Directory domain that the
ESM service computer is a member of.
Custom Domain
Selecting this option allows the administrator to specify an alternative Active Directory
domain from which computers will be imported. Choosing this option requires
administrators to specify the following details:
Domain Controller:
Enter the IP address or host name of the Active Directory domain controller from which
they wish to import.
User Name:
Enter the user-name of a user with administrative rights to the domain controller.
Password:
Enter the password of the user specified in the 'User Name' field.
•
Swipe to the left or click the right arrow. The wizard moves to next step to select the target endpoints.
Select Targets
The Active Directory structure for the selected domain will be listed.
Endpoint Security Manager - SME Administrator Guide | © 2013 Comodo Security Solutions Inc. | All rights reserved
55
Comodo Endpoint Security Manager - SME - Administrator Guide
•
Click the
icon to expand or collapse the tree structure
•
Select the target endpoints onto which you wish to install the agent and import into ESM
•
Click the right arrow or swipe left to move to step 3 to select the endpoints
Importing Computers from Workgroup
•
Choose 'Workgroup' and move to the next step by clicking the right arrow.
Step 2 - Workgroup Name
The next step is to select the Workgroup(s) from which the endpoints are to be imported.
Endpoint Security Manager - SME Administrator Guide | © 2013 Comodo Security Solutions Inc. | All rights reserved
56
Comodo Endpoint Security Manager - SME - Administrator Guide
ESM enables the administrator to specify the workgroup name in two ways:
•
Find Workgroups - Makes ESM to search for the workgroups associated with the network and enables administrator
to select the workgroup(s) from which the endpoints are to be imported in the next step.
Note: The Workgroup is discovered from the local area network attached to the ESM service computer.
•
•
Select the workgroup(s) and click the right arrow to move to step 3 to select the endpoints.
Specify Workgroup manually - allows the administrator to enter the name of the Workgroup from which the
endpoints are to be imported in the 'Workgroup:' text box.
Endpoint Security Manager - SME Administrator Guide | © 2013 Comodo Security Solutions Inc. | All rights reserved
57
Comodo Endpoint Security Manager - SME - Administrator Guide
•
Enter the name of a network Workgroup and click the right arrow to move to step 3 to select the endpoints.
Importing Computers by Specifying Network Addresses
•
Choose 'Network Addresses' and move to the next step by swiping to the left or clicking the right arrow.
Step 2 - Adding IP Addresses
The next step is to add the target computers by specifying their IP address(es) or Host Names.
Endpoint Security Manager - SME Administrator Guide | © 2013 Comodo Security Solutions Inc. | All rights reserved
58
Comodo Endpoint Security Manager - SME - Administrator Guide
Computers can be added in four ways:
•
Import individual computers by specifying their IP addresses one-by-one - Enter the IP address of the computer
and click 'Add'. The IP address will be added and displayed below the text box. To add more computers, repeat the
process.
•
Import individual computers by specifying their names one-by-one - Enter the name of the target computer as
identified in the network and click 'Add'. The computer name will be added and displayed below the text box. To add
more computers, repeat the process.
•
Import a group of computers by specifying their IP Address range - Enter the IP Address range of the target
computers with the Start address and End address separated by a hyphen (e.g. 192.168.111.111-192.168.111.150)
and click 'Add'. The entered IP address range will be added and displayed below the text box. To add more IP address
ranges, repeat the process.
•
Import a group of computers by specifying IP Addresses and Subnet mask - Enter the IP Address and Subnet
mask (e.g. 192.168.111.111/24 or 192.168.111.111/255.255.255.0) in the text field and click 'Add'. The entered IP
address/subnet mask will be added and displayed below the text box. To add more IP address/subnet mask, repeat
the process.
•
To remove a computer/computer group added by mistake, select the computer/computer group from the text box
and click 'Remove'.
•
Swipe to the left or click the right arrow to move to the next step.
Note: IP addresses are specified relative to the ESM service computer.
Step 3 – Targets Summary
In this step, all the endpoints included in the previous Step 2 will be displayed.
Endpoint Security Manager - SME Administrator Guide | © 2013 Comodo Security Solutions Inc. | All rights reserved
59
Comodo Endpoint Security Manager - SME - Administrator Guide
•
Select the endpoint(s) that you want to deploy the agent and CIS to. You can use the filter option to select the
endpoints from the list displayed.
•
Click the filter icon
in the 'Target Computer' column header to search for a particular endpoint and click 'Apply'
•
Click the filter icon
in the 'IP address' column header to search for endpoints with particular IP(s) and click 'Apply'
•
Click the filter icon
'Apply'
in the 'Status' column header to search for endpoints that are 'Ready' or 'Unavailable' and click
•
Click the filter icon in the 'Is Managed' column header to search for endpoints that are 'Managed' or 'Not Managed' and
click 'Apply'
•
Click the right arrow or swipe left to move to the next step
Step 4 – Credentials
The next step is to select the administrative account (login) credentials that will be used to remotely upload the installation
package using the administrative share on all target computer(s).
Endpoint Security Manager - SME Administrator Guide | © 2013 Comodo Security Solutions Inc. | All rights reserved
60
Comodo Endpoint Security Manager - SME - Administrator Guide
Credentials - Table of Parameters
Current User Credentials
(Selected by default)
Selecting this option will install the agent using the credentials of the currently logged - in
ESM administrator account in each endpoint.
Custom Credentials
Selecting this option allows the administrator to specify an administrative account for
installation of the agent. Choosing this option requires administrators to specify the
following details:
User Name:
Enter the user-name of the dedicated network administrator.
Password:
Enter the password of the dedicated network administrator.
•
Click the right arrow after entering the credentials to move to the next step
Step 5 - Checking for Updated Software
The next stage 'Packages' displays the version details of ESM Agent and CIS. If any updates are available for the packages, it
will be displayed. You can also check for updates of these applications and download it in your server for deployment on to the
end-points.
Endpoint Security Manager - SME Administrator Guide | © 2013 Comodo Security Solutions Inc. | All rights reserved
61
Comodo Endpoint Security Manager - SME - Administrator Guide
•
Click 'Check for Updates' to find out if any newer version of ESM Agent and CIS are available
•
If any newer versions are available, you can choose to download them to the ESM server by clicking 'Download'
•
Swipe to the left or click the right arrow to move to the next step
Step 6 - Internet Security
The next step is to choose installation options for Comodo Internet Security (CIS):
Endpoint Security Manager - SME Administrator Guide | © 2013 Comodo Security Solutions Inc. | All rights reserved
62
Comodo Endpoint Security Manager - SME - Administrator Guide
•
Select 'Install Comodo Internet Security' check box if you wish CIS to be installed along with the agent.
Note: If the option to install CIS is not be selectable, your license for Comodo Endpoint Security Manager did not include CIS
software.
•
Select the version of CIS you wish to install on the selected endpoints from the drop-down. Note – the drop-down will
be empty the first time ESM is run. You must first click 'Check For Updates' then 'Update' to populate the drop-down as
explained in the previous Step 5 - Checking for Updated Software.
•
Select whether you want to include all the components (Firewall and Antivirus), Antivirus only or Firewall only from the
Components drop-down.
Endpoint Security Manager - SME Administrator Guide | © 2013 Comodo Security Solutions Inc. | All rights reserved
63
Comodo Endpoint Security Manager - SME - Administrator Guide
•
Suppress reboot after installation - CIS installation will restart of the endpoints for the installation to take effect. If
you do not want the endpoints to be restarted on completion of installation, select this check box. CIS installation will
complete but will take effect only on the next restart of the endpoint.
•
Uninstall all incompatible products - Selecting this option uninstalls select third party antivirus, firewall and other
desktop security software from the endpoints, prior to the installation of CIS. Performing this step will remove
potentially incompatible products and thus enable CIS to operate correctly. Some incompatible products can be
detected, but not automatically uninstalled and must be removed manually. If your product is detected but not
uninstalled, please consult your vendor’s documentation for precise uninstallation guidelines.
However the following steps will help most Windows users:
•
Click the Start button to open the Windows Start menu
•
Select Control Panel > Programs and Features (Win 7, Vista); Control Panel > Add or Remove Programs
(XP)
•
Select your current antivirus or firewall program(s) from the list
•
Click Remove/Uninstall button
•
Repeat process until all required programs have been removed
Click Here to see the full list of incompatible products.
•
Click the right arrow to move to the next step.
Tip: You can also:
•
Install CIS manually onto endpoint computers. Refer to How to Install CIS; and
•
Import stand-alone CIS application pre-installed at the endpoints under the management of ESM. Refer to How to
connect CIS to ESM at local endpoint.
Step 7 - Deployment Progress
•
Click 'Start Deployment'.
Endpoint Security Manager - SME Administrator Guide | © 2013 Comodo Security Solutions Inc. | All rights reserved
64
Comodo Endpoint Security Manager - SME - Administrator Guide
ESM will start installing the agent/CIS on to the selected endpoints and the progress per endpoint will be displayed.
Endpoint Security Manager - SME Administrator Guide | © 2013 Comodo Security Solutions Inc. | All rights reserved
65
Comodo Endpoint Security Manager - SME - Administrator Guide
If any of the selected endpoints have older versions of CIS than the one selected in the previous Step 6, they will be
automatically uninstalled and the selected version will be installed.
Step 8 - Deployment Complete
On completion of installation, the results screen will appear.
•
If deployment fails, click on the words 'Deployment Failed' to discover the reason. The info box also contains advice
that may re-mediate the issue.
Endpoint Security Manager - SME Administrator Guide | © 2013 Comodo Security Solutions Inc. | All rights reserved
66
Comodo Endpoint Security Manager - SME - Administrator Guide
•
Click the Finish icon
or swipe the screen to the left to exit the wizard.
The endpoints selected in Step 3 are now added to ESM and are ready for management through ESM. Refer to the section
'Viewing Endpoints' for more details on how to view the list of imported endpoints.
The newly added computers will be added to the default group 'Unassigned'. If this group has been changed to use a specific
policy, that policy will be applied after the agent installation is completed. The administrator can create and name new groups
according to the structure of the organization and move the added computers into them from 'Unassigned' group. Once created,
admins can run tasks on entire groups of computers (such as applying security policy to CIS, running AV scans, deploying
agents, updating AV databases and more). Refer to Creating Endpoint Groups for more details.
2.3.1.2. Adding Computers by Manual Installation of Agent and CIS
Installing the ESM agent locally is an alternative way of establishing connectivity between an endpoint and the ESM Central
Service server. This is useful for scripting installation, or should the endpoint not be reachable from the ESM server’s network.
Endpoint Security Manager - SME Administrator Guide | © 2013 Comodo Security Solutions Inc. | All rights reserved
67
Comodo Endpoint Security Manager - SME - Administrator Guide
The ESM setup file can be downloaded as an executable from the admin console. The file can be transferred onto media such
as DVD, CD, USB memory so that the agent can be installed manually onto target machines rather than via the ESM interface. A
single copy of the installation files can be used to install the agent on any number of target machines.
Upon successful installation of the agent it automatically establishes connection to the ESM Central Service Server and the
endpoint can be controlled by the Administrator in the same way as it would if it were imported via the deployment wizard.
The endpoint security software, Comodo Internet Security (CIS) is typically also manually installed in the endpoint can be
remotely managed by ESM once installation of the Agent is completed. If the Agent is installed first (with the endpoint having no
CIS), the deployment wizard can be used to install CIS via the installed Agent.
Alternatively, Comodo Internet Security (CIS) can be installed in endpoint computers separately and from the CIS interface the
endpoints can be connected to ESM. For more details refer the sections, How to Install CIS and How to Connect CIS to ESM
at the Local Endpoint.
The newly added computer will be included to the default group 'Unassigned'. The administrator can then import the computer
into the required group to which the computer is allotted.
Downloading the Offline Agent Installer
1.
Navigate to the 'computers' area of the admin console and click 'download' tile.
2.
Click 'Save' in the 'File Download' dialog and save the file in the location of your choice.
Endpoint Security Manager - SME Administrator Guide | © 2013 Comodo Security Solutions Inc. | All rights reserved
68
Comodo Endpoint Security Manager - SME - Administrator Guide
Important Note: Web browsers run on server OS may not allow downloading files through it by default, due to policy
restrictions. For this reason, in order to download the agent setup file through the ESM admin console accessed through a web
browser like Internet Explorer installed on a server, the local computer policy of the server has to be configured to disable the
file download restrictions.
Installing the Agent onto the Endpoint
The agent setup file can be copied to the target endpoint computer from DVD, CD, USB memory or by any other means and
saved in a desired location. The agent can also be deployed using a third-party software distribution package.
The installation process can be started in the following ways:
•
By double clicking the setup file
to start the installation wizard.
•
From the Windows CMD line. Command line options are as follows:
The command should be entered in the following format:
<file path in which agent setup file is stored>/ AgentSetup.exe /Options
The options are explained in the following table. Some Options have multiple notations. These are separated by ' | ' in the
following table.
Option
Description
/s | /server <Server Host>
Pointing the endpoint to the ESM service computer/server by specifying its host name or
address
/p | /port <port number>
To specify the port number of the ESM service computer/server. Default port numbers are:
•
57194 for connecting using HTTPS port
•
57193 for connecting using HTTP port
/l | /log <logfile.log>
To specify the path and file name to store the log file.
/q | /quiet
To agent the agent in silent mode. The agent installation will not require any user
interaction.
/help
Display the help information on installing the agent
Endpoint Security Manager - SME Administrator Guide | © 2013 Comodo Security Solutions Inc. | All rights reserved
69
Comodo Endpoint Security Manager - SME - Administrator Guide
Option
Description
Step 1 - Welcome Screen
The welcome screen of the agent installation wizard will be displayed.
Click 'Next' to continue.
Step 2 – Specifying Server Address and Port
In the next step you must enter the host or IP address of the server in which ESM is installed and the port number the endpoint
should be connected. By default, these fields will be populated with the details of the server from which the agent is downloaded.
If you want to connect the endpoint to another ESM service computer or server, enter that server host or IP address and the port
number and click 'Next'.
Step 3 - Selecting Products to be Installed
Endpoint Security Manager - SME Administrator Guide | © 2013 Comodo Security Solutions Inc. | All rights reserved
70
Comodo Endpoint Security Manager - SME - Administrator Guide
The next stage is to select the products to be installed. The installer will first check whether any of these items are already
installed. You must first uninstall any older versions of CIS or the Agent that are detected.
Ensure that the required products are selected in then click 'Next'.
Step 4 - Ready to Install
The next step allows you to confirm the choices made in the previous step. Click 'Back' if you want to review and change the
choices made.
To commence the installation, click 'Install'.
Step 5 - Installation Progress
The installation progress will be displayed.
Endpoint Security Manager - SME Administrator Guide | © 2013 Comodo Security Solutions Inc. | All rights reserved
71
Comodo Endpoint Security Manager - SME - Administrator Guide
Step 6 - Installation Complete
Upon setup completion, the 'Finish' dialog will be displayed:
•
Click 'Finish' to exit the wizard.
The agent will now automatically establish the connection to your ESM service computer or server.
2.3.1.3. Updating Comodo Software on Managed Computers
Once an endpoint is managed, ESM allows you to update the ESM agent as well as CIS using the Deploy wizard. The managed
endpoints can also be updated using the 'Update' tile. Refer to the section 'Updating Endpoints' for more details.
To update software on managed computers
•
Click the 'deploy' tile from the 'Computers' area to start the wizard:
Endpoint Security Manager - SME Administrator Guide | © 2013 Comodo Security Solutions Inc. | All rights reserved
72
Comodo Endpoint Security Manager - SME - Administrator Guide
•
Select 'Managed Computers' and click the right arrow or swipe left to proceed to the next step.
Endpoint Security Manager - SME Administrator Guide | © 2013 Comodo Security Solutions Inc. | All rights reserved
73
Comodo Endpoint Security Manager - SME - Administrator Guide
The 'Managed Computers' interface will be displayed.
•
Select the group from the left hand side pane. The member endpoints of the selected group will be listed in the right
hand side pane.
Endpoint Security Manager - SME Administrator Guide | © 2013 Comodo Security Solutions Inc. | All rights reserved
74
Comodo Endpoint Security Manager - SME - Administrator Guide
•
Select the endpoints that you want to check and update the ESM Agent and CIS application from the list.
•
Click the filter icon
in the 'Name' column header to search for a particular
endpoint, enter the endpoint name and click 'Apply'.
•
After selecting the endpoints, click the right arrow or swipe left to proceed to
the next step.
The next stage 'Packages' displays the version details of ESM Agent and CIS. You can also check for updates of these
applications and download it in your server for deployment on to the selected endpoints.
Endpoint Security Manager - SME Administrator Guide | © 2013 Comodo Security Solutions Inc. | All rights reserved
75
Comodo Endpoint Security Manager - SME - Administrator Guide
•
Click 'Check for Updates' to find out if any newer version of ESM Agent and CIS are available
•
If any newer versions are available, you can choose to download them to the ESM server by clicking 'Download'
•
Click the right arrow or swipe left to move to the next step
The next step is to choose installation options for Comodo Internet Security (CIS):
•
Select 'Install Comodo Internet Security' check box if you wish CIS to be installed along with the agent.
•
Select the version of CIS you wish to install on the selected endpoints from the drop-down.
Endpoint Security Manager - SME Administrator Guide | © 2013 Comodo Security Solutions Inc. | All rights reserved
76
Comodo Endpoint Security Manager - SME - Administrator Guide
•
Select whether you want to include all the components (Firewall and Antivirus), Antivirus only or Firewall only from the
Components drop-down.
•
Suppress reboot after installation - CIS installation will restart of the endpoints for the installation to take effect. If
you do not want the endpoints to be restarted on completion of installation, select this check box. CIS installation will
complete but will take effect only on the next restart of the endpoint.
•
Uninstall all incompatible third-party products - Selecting this option uninstalls select third party antivirus, firewall
and other desktop security software from the endpoints, prior to the installation of CIS. Performing this step will
remove potentially incompatible products and thus enable CIS to operate correctly. Some incompatible products can
be detected, but not automatically uninstalled and must be removed manually. If your product is detected but not
uninstalled, please consult your vendor’s documentation for precise uninstallation guidelines.
Click Here to see the full list of incompatible products.
•
Click the right arrow to move to the next step.
The next stage moves to deployment progress.
Endpoint Security Manager - SME Administrator Guide | © 2013 Comodo Security Solutions Inc. | All rights reserved
77
Comodo Endpoint Security Manager - SME - Administrator Guide
•
Click 'Start Deployment'
The deployment progress will be displayed.
Endpoint Security Manager - SME Administrator Guide | © 2013 Comodo Security Solutions Inc. | All rights reserved
78
Comodo Endpoint Security Manager - SME - Administrator Guide
On completion of installation, the results screen will appear.
Endpoint Security Manager - SME Administrator Guide | © 2013 Comodo Security Solutions Inc. | All rights reserved
79
Comodo Endpoint Security Manager - SME - Administrator Guide
•
Click the Finish icon
or swipe the screen to the left to exit the wizard
Note: If you have selected 'Suppress reboot after installation' checkbox, the endpoints that were updated have to be restarted
for the update to take effect.
2.3.2. Creating Endpoint Groups
Creating groups of computers allows the administrator to split large networks up into convenient and/or logical groupings. For
example, an administrator may create groups of computers called 'Sales Department', 'Accounts Department' , 'Vista
Workstations' , 'XP Workstations', 'Domain Controllers', '64 bit Machines' or 'All Managed Computers'. Once created, the
administrator can manage all machines belonging to that group together. Some of the benefits of grouping the computers are:
•
The CIS security policies can be applied to the endpoints belonging to various groups as per their requirements
•
Antivirus (AV) scans can be run on endpoints in a group together
•
The AV signature database in the endpoints can be updated together
•
Various reports can be generated for the endpoints belonging to a group as a single file
The 'group' tile in the 'computers' area enables the administrator to define groups and to add previously imported endpoint
computers into them as desired.
ESM SME is shipped with a default group 'Unassigned'. All the computers which are imported into ESM and yet to be assigned
to other groups, will be added to the 'Unassigned' group.
To create a new group
•
Navigate to 'computers' area and click the 'group' tile.
Endpoint Security Manager - SME Administrator Guide | © 2013 Comodo Security Solutions Inc. | All rights reserved
80
Comodo Endpoint Security Manager - SME - Administrator Guide
The Create Group wizard will start with Step 1 - Select Computers. The remaining steps are displayed below the blue title bar
with the current step highlighted in blue. To move backwards or forwards between steps, use the arrows on either side of the title
bar (or left click and drag to swipe the screens left or right). To move between previous and next steps, you can also click steps
displayed below the title bar.
Step 1 - Selecting Computers
All the computers managed by ESM will be displayed as a list with their IP address and existing group details.
Endpoint Security Manager - SME Administrator Guide | © 2013 Comodo Security Solutions Inc. | All rights reserved
81
Comodo Endpoint Security Manager - SME - Administrator Guide
•
Click the filter icon
in the 'name' column header to search for a particular endpoint and click 'Apply'
•
Click the filter icon
in the 'IP' column header to search for endpoints with particular IP(s) and click 'Apply'
•
Click the filter icon
'Apply'
in the 'group' column header to search for a particular endpoint in a particular gropu and click
•
Select the endpoint computers to be added to the new group and click the right arrow/swipe the screen left to move to
the next step
Step 2 - Selecting Security Policy
The next step is to assign a security policy for the CIS installations in the endpoints of the newly created group.
The specifics of each policy are set in the Comodo Internet Security software in one endpoint and can be imported and applied
to other endpoints. The 'Select Policy' step allows the administrator to assign a local security policy and Internet security policy
for the CIS installations in the endpoints of the group from the policies that are previously imported into ESM. Refer to Creating
a New Policy for more details on importing policies into ESM from the configurations made in the individual endpoints.
Endpoint Security Manager - SME Administrator Guide | © 2013 Comodo Security Solutions Inc. | All rights reserved
82
Comodo Endpoint Security Manager - SME - Administrator Guide
•
Select the Local Security Policy and Internet Security Policy for the CIS installations from the respective drop-downs
and click the right arrow to move to the next step. For more details on ESM policies, see the section 'The Policies
Area'.
Step 3 - Naming the Group
The next step is to name the created group.
Endpoint Security Manager - SME Administrator Guide | © 2013 Comodo Security Solutions Inc. | All rights reserved
83
Comodo Endpoint Security Manager - SME - Administrator Guide
•
Enter a name as the group has to identified by ESM in the 'Name' text field.
•
Enter a short description for the created group in the 'Description' text field. This description will appear in the 'View All
Computers' Interface.
•
Click the right arrow to move to the next step.
Step 4 - Finish
•
Upon completion, click the 'Finish' icon
(or swipe the screen left) to exit the wizard
The new group will be created with the endpoints selected in Step 1 as members. The CIS installations in all the member
endpoints will be applied with the security policy as chosen in step 2.
Note: The policy can be changed for individual endpoints as desired from the 'View All Computers' interface in the section
that follows.
2.3.3. Viewing Endpoints
The 'View All Computers' interface plays a key role by providing system administrators with the ability to view and manage
networked computers and their groups that have the agent installed. The interface displays all defined groups and the managed
endpoints within each group. See Adding Endpoint Computers to ESM for help deploying the Agent.
Endpoint Security Manager - SME Administrator Guide | © 2013 Comodo Security Solutions Inc. | All rights reserved
84
Comodo Endpoint Security Manager - SME - Administrator Guide
From this interface the administrator can:
•
Create a new group
•
Edit a group (add / remove endpoints, change default security policies)
•
View and manage individual endpoints (security policies, CIS management mode and quarantined items)
•
Remove groups or endpoints
•
Launch antivirus scans on groups or individual endpoints
•
Launch database updates on groups or individual endpoints
To access the 'View All Computers' interface, click the 'view ' tile from the 'computers' area.
The 'View All Computers' interface will open.
Endpoint Security Manager - SME Administrator Guide | © 2013 Comodo Security Solutions Inc. | All rights reserved
85
Comodo Endpoint Security Manager - SME - Administrator Guide
The left hand column contains a list of pre-set and user defined groups. Clicking on any group will display all endpoints in that
group. The preset groups are:
•
All Computers - Displays the list of all the endpoints managed by ESM in the right hand side (RHS) pane.
•
Online - Displays a list of endpoints that are currently online and connected to ESM console.
•
Outdated Bases - Displays a list of endpoints in which virus database is outdated. This is useful to initiate virus
database updates only onto the outdated endpoints.
•
Infected - Displays a list of endpoints in which malware and virus are discovered during AV scans.
•
Non-Compliant - Displays a list of endpoints in which CIS installations are currently non-compliant with the policy
applied for the groups they belong to.
•
Groups - Displays the list of only the member endpoints of the group.
You can filter the list of endpoints by clicking the
icon next to the column label. For example, clicking the filter icon in the
'name' column will allow you to search for a particular endpoint. Clicking the filter icon in the ‘status’ column allows you to display
only those endpoints that have 'Online', 'Offline', 'Infected' or 'Outdated' status:
•
Click ‘Apply’ to implement your chosen filter or click ‘Reset’ to clear the filter.
Endpoint Security Manager - SME Administrator Guide | © 2013 Comodo Security Solutions Inc. | All rights reserved
86
Comodo Endpoint Security Manager - SME - Administrator Guide
View All Computers Interface - Table of Column Descriptions
Column Heading
name
Description
Displays the name of the Endpoint computers with their IP address beneath the name.
Also, the endpoint icon indicates whether the endpoint is online or offline.
- Indicates that the endpoint is online and connected to ESM
- Indicates that the endpoint is offline and not connected to ESM
status
cis
Indicates whether the endpoints are online or offline. The current state of the computer that
requires administrator's attention like, the the virus database is outdated or the computer is
infected, is displayed beneath the status. The status of endpoints with the warning is displayed
with a different color from the other endpoints. The connection status can be one of the following:
•
Online - The endpoint agent is connected to ESM
•
Offline - The endpoint agent is not connected to ESM at this moment
Indicates whether the CIS installation in the endpoint is remotely managed by ESM or locally
managed. The version number of CIS installed at the endpoint is displayed beneath the mode.
The CIS mode can be:
•
Local - The CIS installation at the endpoint is being managed locally. You can directly
force the endpoints in local administration mode to remote management mode by
clicking the
•
•
•
icon.
Remote - The CIS installation at the endpoint is being managed remotely.
Unknown - The management mode of CIS at the endpoint cannot be established. This
may be because CIS is not installed; is not active or because of network problems.
Unsupported CIS – The CIS installation at the endpoint cannot be managed by ESM.
This may be because the endpoint has an older version of CIS that cannot be remotely
managed. You can update the CIS installation from the Managed Endpoints interface.
Refer to Updating Comodo Software at Managed Endpoints.
The CIS Mode can be changed from the 'Computer Properties' interface > 'Advanced View' of
the respective endpoint or by using 'Details....'. Refer to Viewing Details of an Endpoint
Computer and Applying Policies Individually for more details.
policy
Displays the compliance status of the CIS installation on the endpoint with the applied security
policy. The local connection policy applied for the endpoint is displayed beneath the compliance
status.
The compliance status can be one of the following:
•
Compliant - The CIS installation at the endpoint is compliant to the applied security
policy.
•
Non-Compliant - The CIS installation at the endpoint is not compliant to the applied
security policy.
•
For endpoints with CIS in Remote Management Mode - ESM will apply the
security policy to the endpoint during the next polling time to make it
compliant. Clicking the
icon will forcibly reapply the security policy
immediately.
•
•
For endpoints with CIS in Local Administration Mode - CIS has to be
switched to Remote mode at the endpoint or by using '...Details' to make it
compliant. Alternatively, a new policy can be applied to make it compliant.
Pending - The compliance status of the CIS installation at the endpoint is yet to be
assessed.
For further reading on 'Policies', please see 'The Policies Area'.
Endpoint Security Manager - SME Administrator Guide | © 2013 Comodo Security Solutions Inc. | All rights reserved
87
Comodo Endpoint Security Manager - SME - Administrator Guide
actions
Displays the progress of currently executed action or last completed action on the endpoint like
running an Antivirus scan or virus database updates. The action column also displays shortcut
icons for running an Antivirus scan and updating virus database on the endpoint.
- Clicking this icon starts a full computer Antivirus scan on the endpoint if it is online.
- Clicking this icon starts virus database update on the endpoint if it is online.
Creating a New Group
•
Click the Add Group icon
from the bottom of the interface. The Create Group Wizard will be started. Refer to the
section Creating Endpoint Groups for a detailed description on the wizard.
Viewing and Editing a Group
The 'Group Properties' interface displays the details like the local connection and Internet connection security policies applied to
its member endpoints. You can change the name of the group and the policies applied from this interface. The 'Group Properties'
It also allows you to add newly imported endpoints from the 'Unassigned' group or move endpoints from other groups into it and
to remove existing member endpoints.
The 'Group Properties' interface can be opened by three ways:
•
Selecting a group from the Left Hand Side (LHS) pane and clicking 'View Details' link from the Right Hand Side (RHS)
pane
•
•
Selecting the group from the LHS pane and clicking the details icon
Selecting the group from the LHS pane and double clicking on it
The interface contains two screens:
•
General Screen - Displays the name, description and default policies assigned to the group and enables the
administrator to edit those details.
•
Computers Screen - Displays the list of all endpoint computers added to ESM, with the members of the group
preselected, allowing administrator to add more computers to the group and remove existing members. Computers
that are removed from a specific group but are not re-assigned to another named group, will be automatically added to
the 'Unassigned' group.
The administrator can switch between these two areas by clicking the tabs at the top, swiping through the interface or by using
the left and right arrows on both sides of the interface.
General Screen
The 'general' screen displays the name, description, assigned local and Internet connection security policies of the group.
Endpoint Security Manager - SME Administrator Guide | © 2013 Comodo Security Solutions Inc. | All rights reserved
88
Comodo Endpoint Security Manager - SME - Administrator Guide
•
To change the name and description, directly edit the respective text fields
•
To change the Local and Internet connection security policies applied to the member endpoints of the group, select the
policies from the respective drop-downs
•
To forcibly change the management mode of CIS installations in the endpoints to Remote mode, enabling
management by ESM, click the 'force remote mode' button
•
Click 'Save' icon for the changes to take effect
Computers Screen
The 'computers' screen displays a list of all the computers added to ESM along with the details of their IP Address and the group
they belong to. Endpoints that are the members of the group are preselected.
Endpoint Security Manager - SME Administrator Guide | © 2013 Comodo Security Solutions Inc. | All rights reserved
89
Comodo Endpoint Security Manager - SME - Administrator Guide
•
To add more computers to the group, simply select the check-boxes beside the desired computer names
•
To remove the existing member endpoints, simply uncheck the items
•
Click 'Save' icon for the changes to take effect
Viewing Details of an Endpoint Computer, Applying Policies Individually and Managing Quarantined Items
The 'Computer Properties' interface displays the system details like the name, hardware configuration, OS version, group details
like group name, local connection and Internet connection security policies applied, warranty status and CIS details like version
of CIS application and its installed components. You can change the applied security policies individually for this endpoint,
enable warranty and manage suspicious files identified and quarantined by CIS in it.
The 'Computer Properties' interface can be opened by three ways:
•
•
Selecting the computer from the right hand side pane and clicking the details icon
Selecting the computer from the RHS pane and double clicking on it
The 'Computer Properties' interface contains three screens:
•
General Screen - Displays the general system details like IP address, Computer Name, Hardware Configuration and
Operating System details of the endpoint.
•
Advanced Screen - Displays ESM connection details like Group to which it belongs, current connection mode, and
current security policies applied. The administrator can view the details of the policies and change Local network and
Internet connection security policies of the endpoint individually.
•
Internet Security Screen – Displays the details of the CIS application and the details of virus signature database. The
Internet Security screen also allows you to update the virus signature database and run antivirus scans on the
endpoint individually and manage the suspicious items quarantined by the CIS in the endpoint.
The administrator can navigate between these screens by clicking respective links at the top left, swiping through the interface
or by using the left and right arrows on both sides of the interface.
General Screen
Endpoint Security Manager - SME Administrator Guide | © 2013 Comodo Security Solutions Inc. | All rights reserved
90
Comodo Endpoint Security Manager - SME - Administrator Guide
The 'general' screen provides the computer related details like the IP Address, Computer name, Operating System and
Hardware configuration of the endpoint. The interface also displays the version of the ESM agent currently installed at the
endpoint and the connection status.
Advanced Screen
The 'Advanced' screen of the Computer Properties interface displays the ESM related details of the endpoint computer.
Endpoint Security Manager - SME Administrator Guide | © 2013 Comodo Security Solutions Inc. | All rights reserved
91
Comodo Endpoint Security Manager - SME - Administrator Guide
The 'Group Details' the details of the Group to which the endpoint belongs:
•
Member of Group - Name of the group. Clicking the Name of the group will open the 'Group Properties' interface of
the group. Refer to Viewing and Editing a Group for more details on this interface.
•
Group Local Policy - Displays the Local network connection security policy assigned for the group. Clicking the policy
name will open the 'Policy Properties' interface of the policy. Refer to Viewing Details, Editing and Applying a
Policy to Endpoints for more details on this interface.
•
Group Internet Policy - Displays the Internet connection security policy assigned for the group. Clicking the policy
name will open the 'Policy Properties' interface of the policy. Refer to Viewing Details, Editing and Applying a
Policy to Endpoints for more details on this interface.
The 'Policy Details' displays the details on security policies currently applied to the endpoint and their compliancy status. You
can change the security policy applied to the endpoint individually or reapply the policy corresponding to the Group to which the
endpoint belongs.
•
Current Policy - Displays the current security policy applied to the endpoint as per the current connection mode.
Endpoint Security Manager - SME Administrator Guide | © 2013 Comodo Security Solutions Inc. | All rights reserved
92
Comodo Endpoint Security Manager - SME - Administrator Guide
Clicking the policy name will open the 'Policy Properties' interface of the policy. Refer to Viewing Details, Editing and
Applying a Policy to Endpoints for more details on this interface.
•
Current Policy Status - Displays whether the endpoint is in complaint or non-compliant to the policy of the group it
belongs. If it is non-complaint, you can click the 'Reapply Policy' button to apply the group's policy to the endpoint.
•
Local Policy - The drop-down displays the current local network connection security policy applied to the endpoint.
You can change it by selecting the required policy from the drop-down so that the selected policy is applied to this
endpoint irrespective of policy of the Group.
•
Internet Policy - The drop-down displays the current Internet connection security policy applied to the endpoint. You
can change it by selecting the required policy from the drop-down so that the selected policy is applied to this endpoint
irrespective of policy of the Group.
•
Current Connection Mode - Indicates whether the endpoint is connected to ESM through local network or Internet,
which determines whether the computer will be using the Local Policy or Internet Policy.
•
Last Poll Time - Indicates the date and time at which the connection and policy compliancy states of the endpoint was
last assessed.
The 'Warranty Details' displays the warranty status of the endpoint. If it is disabled, you can click the 'Enable' button to enable
warranty. The warranty is eligible as per the license you have purchased.
Internet Security Screen
The 'internet security' screen displays the details on CIS application and virus signature database update status installed in the
endpoint. It also enables you to run antivirus scans and manage files and programs identified as suspicious by the CIS
application and moved to quarantine at the endpoint. The 'internet security' screen contains two screens:
•
General
•
Quarantined Items
You can switch between these two screens by clicking the respective tabs
General
The General tab displays the details of CIS and the virus signature database
Endpoint Security Manager - SME Administrator Guide | © 2013 Comodo Security Solutions Inc. | All rights reserved
93
Comodo Endpoint Security Manager - SME - Administrator Guide
The 'General' details provides the version of CIS installed, its mode of management and the components like Antivirus only,
Firewall only and All Components installed. If the CIS is in local administration mode, you can switch it to remote management
mode by the ESM, by clicking the 'force remote mode' button.
The Virus Signature Database details provides the version of the virus signature database in the endpoint and its update status.
If the database is outdated, you can click the 'update' button to start updating it.
The 'Antivirus Scan' enables you to run antivirus scans at the endpoint with the selected scan profile. To run a scan, select the
scan profile from the drop-down and click the 'run a scan' button. The Scan Status field will display the progress of the scan.
Quarantined Items
The 'Quarantined Items' tab displays a list if programs, applications and files identified as suspicious by the CIS installation at
Endpoint Security Manager - SME Administrator Guide | © 2013 Comodo Security Solutions Inc. | All rights reserved
94
Comodo Endpoint Security Manager - SME - Administrator Guide
the endpoint during its real-time and on-demand scans and moved to its quarantine.
After the analysis of the list:
•
If the administrator finds an entry to be a safe application or file, the administrator can restore it to the original location
in the endpoint from quarantine
•
On the other hand, if the administrator finds an entry to be a harmful application or a file, the administrator can
permanently remove it from the target endpoint
Note: When you restore a quarantined item to a computer, the file will be scanned again by Comodo Internet Security and,
unless a new policy or update was applied otherwise, it may again be found to be malware, at which point it will just be placed
back into quarantine.
To restore or remove a file or application
1.
Select the checkbox in the left end of the row(s) of the entry(ies) to be removed or restored.
2.
Click 'Delete' or 'Restore' from the top right of the interface as required.
Endpoint Security Manager - SME Administrator Guide | © 2013 Comodo Security Solutions Inc. | All rights reserved
95
Comodo Endpoint Security Manager - SME - Administrator Guide
Removing Groups or Endpoints
Administrators can remove groups or individual endpoints by simply selecting them and clicking the 'Remove' icon
.
A confirmation dialog will be displayed:
The ESM agents in the member endpoints of the selected group or the selected endpoint(s) will be automatically removed.
•
If you want the CIS installations also to be removed from the endpoints, select 'Uninstall CIS before removal' checkbox
•
Click 'Yes' to remove the selected item(s).
Tip: Press and hold Shift or Ctrl key on the keyboard to select multiple items.
Running Antivirus Scans
The 'View All Computers' interface allows the administrator to run full computer Antivirus (AV) scans on Group(s) or Endpoint(s)
directly just by selecting them then clicking the 'Run a Scan' icon
displayed under the status column of the target computer(s).
. The scan will start immediately and the progress will be
•
If malware is discovered during the scan that is not handled successfully (deleted, disinfected or quarantined) then the
'Malware Found' and/or 'Infections' tiles on the dashboard will turn red and display the number of samples and/or
affected endpoints. Malware that is successfully dealt with will not show on the 'Malware Found' tile.
•
Admins can also receive email notifications upon malware discovery. To set up notifications, click 'Dashboard' > Click
'System Status' at the bottom of the 'Malware Found' tile > Click the 'Edit' icon to open 'System Status Tile Properties >
Select 'Send Email Notifications' checkbox (make sure 'Malware Found' is displayed in the drop down box).
•
The results of the scan can be viewed as an Infection report from the Reports area - click 'Reports' then the 'Computer
Infections' tile. The report can also be exported as a pdf file or a spreadsheet file for printing purposes. Refer to
Reports > Computer Infections for more details.
Running AV Updates
The View All Computers interface allows the administrator to update Antivirus (AV) signature database on Group(s) or
Endpoint(s) directly just by selecting them and clicking the 'Update AV' icon
. The update process will start immediately and
the progress will be displayed under the state column of the target computers.
2.3.4. Updating Endpoints
The 'Updates Manager' allows administrators to quickly check for and download any available software
updates. This includes items such as new versions of Comodo Internet Security and the ESM agent. If updates are
available, they can be downloaded to the local ESM service computer/server. The ‘Checked-in Packages’ area
Endpoint Security Manager - SME Administrator Guide | © 2013 Comodo Security Solutions Inc. | All rights reserved
96
Comodo Endpoint Security Manager - SME - Administrator Guide
contains a list of packages that have previously been downloaded. Administrators can download selected packages
from here to facilitate offline installation to remote endpoints. Finally, the interface also lists any endpoints running
outdated software. Clicking the ‘update’ computers’ button will install the latest versions on these computers.
To view the Updates manager interface, navigate to 'computers' area and click the 'Update' tile.
The 'Updates Manager' interface will be displayed.
The 'Updates Manager' contains three screens:
•
available packages - Enables the administrator to check whether any updates are available to the CIS installation
Endpoint Security Manager - SME Administrator Guide | © 2013 Comodo Security Solutions Inc. | All rights reserved
97
Comodo Endpoint Security Manager - SME - Administrator Guide
packages loaded to the ESM server
•
checked-in packages - Enables the administrator to view the versions of the ESM agent and CIS package loaded to
ESM server for deployment onto endpoints
•
outdated computers - Enables the administrator to check whether any of the endpoints are running with outdated
version of CIS application and to update them to the latest version available in the checked-in packages
The administrator can navigate between these screens by clicking respective links at the top left, swiping through the interface
or by using the left and right arrows on both sides of the interface.
Available Packages
On opening the 'available packages' screen, ESM automatically checks whether any updates are available...
… and displays the result.
•
You can click 'Check for updates' link to ensure the update available is the latest one.
•
If any updates are available, click 'Download updates' to download the applications from Comodo website. The
updated version of the CIS application will be downloaded to the to ESM SME service computer/server.
Checked-in-Packages
The 'checked-in packages' screen displays the details of the versions of the ESM agent and CIS packages available in the ESM
server. It also enables the administrator to downloaded the agent and application installation files to their local computer, for later
deployment on to other endpoints by means of other media such as USB, DVD etc.
Endpoint Security Manager - SME Administrator Guide | © 2013 Comodo Security Solutions Inc. | All rights reserved
98
Comodo Endpoint Security Manager - SME - Administrator Guide
•
Click 'Download offline package' beside the package you want to download to the local computer.
The 'File Download' dialog will be displayed.
•
Click the 'Save' button to save the application in your computer.
•
Navigate to a location where you want to save the application and click the 'Save' button.
Endpoint Security Manager - SME Administrator Guide | © 2013 Comodo Security Solutions Inc. | All rights reserved
99
Comodo Endpoint Security Manager - SME - Administrator Guide
The selected application will be download and saved in your computer.
Outdated Computers
In the 'Outdated Computers' screen displays the details of the computers that require update of the ESM agent, CIS application
or both.
Endpoint Security Manager - SME Administrator Guide | © 2013 Comodo Security Solutions Inc. | All rights reserved
100
Comodo Endpoint Security Manager - SME - Administrator Guide
If the version number of CIS or Agent is displayed in red color, it means that it is outdated.
•
Click 'update computer(s)' to begin the update process.
ESM will start installing the agent/CIS on to the selected endpoints and the progress will be displayed.
On completion of installation, the status of the installation will be displayed.
Endpoint Security Manager - SME Administrator Guide | © 2013 Comodo Security Solutions Inc. | All rights reserved
101
Comodo Endpoint Security Manager - SME - Administrator Guide
•
Click the refresh button
.
The status of all managed endpoints including the latest versions of CIS and Agent applications will be displayed.
2.4.The Policies Area
A policy is the security configuration of Comodo Internet Security (CIS) deployed on an endpoint or a group of
endpoints. Each policy determines the antivirus settings, Internet access rights, firewall traffic filtering rules, sandbox
configuration and Defense+ application control settings for an endpoint.
The 'Policies' area allows administrators to import and manage security polices for endpoint machines and consists of two tiles:
Endpoint Security Manager - SME Administrator Guide | © 2013 Comodo Security Solutions Inc. | All rights reserved
102
Comodo Endpoint Security Manager - SME - Administrator Guide
•
View All Policies - Allows administrators to view, add, reconfigure and export ESM polices
•
Create Policy - A step-by-step wizard that takes admins through the policy import, specification and deployment
process
Before proceeding with creating a policy, read the 'Key Concepts' section below to gain a baseline understanding first.
Policies - Key concepts
•
Policies are security settings for the installed components of CIS configured and tested on a local machines via the
standard CIS interface.
•
Policies can be imported from an endpoint into the ESM console then applied to target computers or groups of
computers. The machine chosen for this purpose can be considered a template of sorts for other equivalently
configured machines in the organization (i.e. having the same hardware/software – a computer used to image other
endpoints in the organization is ideal for this purpose). This allows admins to create a 'model' configuration on one
machine that can be rolled out to other computers.
•
Policies can also be created by:
•
Importing CIS configuration from a previously saved .xml file or image.
•
Importing an existing policy to use as the starting point for a new policy.
•
Policies can be named according to criteria deemed suitable by the administrator. For example, policies based on
security levels could be named 'Highly Secure', 'Medium Security' and 'Low Security'.
•
At the administrator's discretion, a policy can cover settings for all or only some of the three CIS components that may
be installed on an endpoint:- Antivirus, Firewall, and Defense + settings. A policy which excludes settings for one of the
CIS components installed on the endpoint receiving policy is considered as locally configured (see below) for the
settings of that component.
•
The ESM agent installed at each endpoint is responsible for connecting the target machine to the respective ESM
server and the remote management of the CIS installation. Only the agent applies the security policy settings to
different components of the CIS application and checks whether the application is compliant to policy.
•
Each endpoint has two types of policy assigned to it:directly, or via the group that an endpoint is a member, 'Local
Policy' and 'Internet Policy':
•
•
A 'local policy' which describes the CIS security settings that will apply when the endpoint is within the local
network.
•
An 'Internet policy' which is automatically applied when the endpoint connects to ESM from an IP address
outside the local network.
Policy and CIS Mode are independent of each other. 'CIS Mode' can be either 'Local' or 'Remote' and this determines
whether or not ESM will enforce policy compliance on an endpoint:
•
Remote Mode - The policy of an endpoint in remote management mode will be determined by the ESM
console. If the endpoint falls out of compliance (because CIS settings have been altered) then the console
will automatically re-apply the assigned policy to the endpoint. This is the ideal situation for ongoing
management.
Endpoint Security Manager - SME Administrator Guide | © 2013 Comodo Security Solutions Inc. | All rights reserved
103
Comodo Endpoint Security Manager - SME - Administrator Guide
Exception - if the policy is 'Locally Configured' then remote mode have no effect (see below).
•
•
•
Local Mode - An endpoint that is locally managed effectively takes the machine 'offline' so ESM will not
automatically re-apply assigned policy if an endpoint falls out of compliance. This allows administrators to
change a policy at the local machine without having ESM constantly re-apply the 'old' policy in the
background. Once policy specification is complete, the admin can return to the console, import the new
policy and deploy it to target machines. The source machine can then, optionally, be returned to remote
mode.
Policy, as mentioned earlier, refers to the actual security configuration of CIS. An endpoint can have any chosen
policy and can be in either 'Remote' or 'Local' mode.
'Locally Configured' policy. 'Locally Configured' policy means that CIS settings can be managed by the local user and
policy compliance will not be enforced by ESM. Machines or groups with this policy will always report compliance
status of 'OK'. Changes made to the CIS settings on to the machine with 'Locally Configured' policy are dynamically
stored in the policy. If a machine is switched back to 'Locally Configured' policy from an applied security policy, the last
stored local CIS configuration settings will be restored to it.
2.4.1. Viewing Policies
The 'View All Policies' interface enables the administrator to:
•
View a list of all policies along with their descriptions and the CIS component covered by the policy
•
View and modify the details of any policy - including name, description, CIS components, target computers and
whether the policy should allow local configuration
•
Configure various settings such as Antivirus settings, Firewall settings, Defense+ settings, General CIS settings and
Agent settings of any policy
•
Add or remove policies as per requirements
•
Export any policy to .xml file
To open the interface, click the 'view' tile from the 'policies' interface:
The 'View All Policies' interface will open with the default view being a list of all policies:
Endpoint Security Manager - SME Administrator Guide | © 2013 Comodo Security Solutions Inc. | All rights reserved
104
Comodo Endpoint Security Manager - SME - Administrator Guide
•
Click the filter icon
in any of the respective column header to search for a particular policy or component, enter or
select and click 'Apply'
•
Click 'Reset' to display all the items
View All Policies Interface - Table of Column Descriptions
Column Heading
Description
Policy
Displays the name of the Policy.
Components
Indicates the components of CIS for which the policy applies the configuration settings.
The 'View All Policies' interface also allows the administrator to:
•
Create a new policy
•
Export a policy into an xml file for importing to ESM at a later time
•
View details, edit and apply policies to groups or selected endpoints individually
•
Remove policies
Creating a Policy
•
Click the Add Policy icon
from the bottom of the interface. The 'Create Policy' Wizard will be started. Refer to the
section Creating a New Policy for a detailed description on the wizard.
Exporting a Policy
Any policy added to ESM can be saved as a .xml file to the computer running the administration console. The .xml file can be
imported into ESM and a new policy can be created from it at a later time.
To export an existing policy
Endpoint Security Manager - SME Administrator Guide | © 2013 Comodo Security Solutions Inc. | All rights reserved
105
Comodo Endpoint Security Manager - SME - Administrator Guide
•
Select the policy by clicking or touching the desired policy from 'View All Policies' interface to highlight it. Click the
Export icon
•
. The Windows 'Save As' dialog will appear.
Select the destination in the computer from which you are accessing ESM, provide a file name and click 'Save'.
The policy will be saved as an xml file. The file can be imported into ESM at any time.
Viewing Details, Editing and Applying a Policy to Endpoints
Selecting a policy and clicking the Details icon
opens the 'Policy Properties' interface. The interface allows administrators to
configure Antivirus settings, Firewall settings, Defense+ settings, General CIS settings and Agent settings for the selected policy.
•
General View - Displays the general system details like name and description of the policy. The administrator can edit
these details directly.
•
Policy Targets - Enables the administrator to select target endpoint group(s) on which the selected policy has to be
applied.
•
Antivirus Settings - Enables the administrator to configure Antivirus settings for the policy.
•
Firewall Settings - Enables the administrator to configure Firewall settings for the policy.
•
Defense+ Settings - Enables the administrator to configure Defense+ settings for the policy.
•
General CIS Settings - Enables the administrator to configure General CIS settings for the policy.
•
Agent Settings - Enables the administrator to configure the ESM agent deployed onto the endpoints as per the policy.
The administrator can switch between these areas by swiping through the interface or by using the left and right arrows on both
sides of the interface.
'General' Screen
The General screen shows the name and description of the policy as well as the CIS components for that policy.
Endpoint Security Manager - SME Administrator Guide | © 2013 Comodo Security Solutions Inc. | All rights reserved
106
Comodo Endpoint Security Manager - SME - Administrator Guide
To change these details, the administrator can directly edit the respective text boxes in the upper pane and click the 'Save' icon
at the bottom of the page. The lower pane displays the details of the security settings. You can change the security settings in
this screen or in the 'antivirus settings', 'firewall settings' and 'defense+ settings' screens.
Policy Targets Screen
The 'policy targets' screen displays the computer groups to which the policy is applied for local network connection and Internet
connection. It also enables the administrator to:
•
Apply the policy to other groups
•
Remove the policy from already applied groups
See Step 5 - Selecting Targets in the section Creating a New Policy for a detailed description of this interface.
•
Click the 'save' icon for any changes to the settings to take effect
Antivirus Settings
The Antivirus Settings configuration screen allows an administrator to customize various options related to Real Time Scanning
(On-Access Scanning), Manual Scanning, Scheduled Scanning and Exclusions (a list containing the files you considered safe
and ignored the alert during a virus scan).
The options that can be configured in the Antivirus settings screen are:
•
Real Time Scanning - To set the parameters for on-access scanning
•
Manual Scanning - To set the parameters for manual Scanning (Run a Scan)
•
Scheduled Scanning - To set the parameters for scheduled scanning
•
Exclusions - To add trusted files and applications for excluding from a virus scan
Endpoint Security Manager - SME Administrator Guide | © 2013 Comodo Security Solutions Inc. | All rights reserved
107
Comodo Endpoint Security Manager - SME - Administrator Guide
Real Time Scanning
The Real time Scanning (aka 'On-Access Scanning') is always ON and checks files in real time when they are created, opened
or copied. (as soon as a user interacts with a file, Comodo Antivirus checks it). This instant detection of viruses assures the user,
that the system is perpetually monitored for malware and enjoys the highest level of protection.
The Real Time Scanner also scans the system memory on start. If a program or file which creates destructive anomalies is
launched, then the scanner blocks it and alerts the user immediately - giving you real time protection against threats.
You also have options to automatically remove the threats found during scanning and to update virus database before scanning.
It is highly recommended that you enable the Real Time Scanner to ensure the endpoints remains continually free of infection.
The Real Time Scanning setting allows you to switch the On Access scanning between Disabled, Stateful and On Access and
allows you to specify detection settings and other parameters that are deployed during on-access scans.
•
Drag the real time Scanning slider to the required level. The choices available are Disabled (not recommended),
Stateful (default) and On Access. The setting you choose here are also displayed in the Summary screen.
•
On Access - Provides the highest level of On Access Scanning and protection. Any file opened is scanned
before it is run and the threats are detected before they get a chance to be executed.
•
Stateful - Not only is Comodo Internet Security one of the most thorough and effective AV solutions
available, it is also very fast. CIS employs a feature called Stateful File Inspection for real time virus
scanning to minimize the effects of on-access scanning on the system performance. Selecting the 'Stateful'
option means CIS scans only files that have not been scanned since the last virus update - greatly improving
the speed, relevancy and effectiveness of the scanning.
•
Disabled - The Real time scanning is disabled. Antivirus does not perform any scanning and the threats
cannot be detected before they impart any harm to the system.
Detection Settings
•
Do not show antivirus alerts - This option allows to configure whether or not to show antivirus alerts when
malware is encountered. Choosing 'Do not show antivirus alerts' will minimize disturbances but at some loss of
user awareness. If you choose not to show alerts then you have a choice of default responses that CIS should
automatically take – either 'Block Threats' or 'Quarantine Threats'.
Endpoint Security Manager - SME Administrator Guide | © 2013 Comodo Security Solutions Inc. | All rights reserved
108
Comodo Endpoint Security Manager - SME - Administrator Guide
•
Automatically update virus database - When this check box is selected, Comodo Internet Security checks for
latest virus database updates from Comodo website and downloads the updates automatically, on system startup and subsequently at regular intervals.
•
Show notification messages - Alerts are the pop-up notifications that appear in the lower right hand of the
screen whenever the on-access scanner discovers a virus on your system. These alerts are a valuable source of
real-time information that helps the user to immediately identify which particular files are infected or are causing
problems. Disabling alerts does not affect the scanning process itself and Comodo Antivirus still continues to
identify and deals with threats in the background.
•
Heuristics Scanning Level - Comodo AntiVirus employs various heuristic techniques to identify previously
unknown viruses and Trojans. 'Heuristics' describes the method of analyzing the code of a file to ascertain
whether it contains code typical of a virus. If it is found to do so then the application deletes the file or
recommends it for quarantine. Heuristics is about detecting virus-like behavior or attributes rather than looking for
a precise virus signature that matches a signature on the virus blacklist.
This is a quantum leap in the battle against malicious scripts and programs as it allows the engine to 'predict' the
existence of new viruses - even if it is not contained in the current virus database.
The drop-down menu allows you to select the level of Heuristic scanning from the four levels:
• Off - Selecting this option disables heuristic scanning. This means that virus scans only uses the 'traditional'
virus signature database to determine whether a file is malicious or not.
•
Low - 'Lowest' sensitivity to detecting unknown threats but will also generate the fewest false positives. This
setting combines an extremely high level of security and protection with a low rate of false positives. Comodo
recommends this setting for most users.
•
Medium - Detects unknown threats with greater sensitivity than the 'Low' setting but with a corresponding
rise in the possibility of false positives.
•
High - Highest sensitivity to detecting unknown threats but this also raises the possibility of more false
positives too.
•
Do not scan files larger than - This box allows to set a maximum size (in MB) for the individual files to be scanned
during on-access scanning. Files larger than the size specified here, are not scanned.
•
Do not scan script files larger than - This box allows to set a maximum size (in MB) for the script files to be scanned
during on-access scanning. Files larger than the size specified here, are not scanned.
Click the 'save' icon for the changes to the settings to take effect.
Manual Scanning
The Manual Scanning setting allows an administrator to set the properties and parameters for Run a Scan (On Demand Scan).
Endpoint Security Manager - SME Administrator Guide | © 2013 Comodo Security Solutions Inc. | All rights reserved
109
Comodo Endpoint Security Manager - SME - Administrator Guide
•
Scan archive files - When this check box is selected, the Antivirus scans archive files such as .ZIP and .RAR files.
You are alerted to the presence of viruses in compressed files before you even open them. These include RAR,
WinRAR, ZIP, WinZIP, ARJ, WinARJ and CAB archives.
•
Automatically update virus database before scanning - Instructs Comodo Internet Security to check for latest virus
database updates from Comodo website and download the updates automatically before starting an on-demand
scanning.
•
Heuristics Scanning Level - Comodo Internet Security employs various heuristic techniques to identify previously
unknown viruses and Trojans. 'Heuristics' describes the method of analyzing the code of a file to ascertain whether it
contains code typical of a virus. If it is found to do so then the application deletes the file or recommend it for
quarantine. Heuristics is about detecting virus-like behavior or attributes rather than looking for a precise virus
signature that matches a signature on the virus blacklist.
This is a quantum leap in the battle against malicious scripts and programs as it allows the engine to 'predict' the
existence of new viruses - even if it is not contained in the current virus database.
The drop-down menu allows you to select the level of Heuristic scanning from the four levels:
•
•
Off - Selecting this option disables heuristic scanning. This means that virus scans only uses the 'traditional'
virus signature database to determine whether a file is malicious or not.
•
Low - 'Lowest' sensitivity to detecting unknown threats but will also generate the fewest false positives. This
setting combines an extremely high level of security and protection with a low rate of false positives.
Comodo recommends this setting for most users.
•
Medium - Detects unknown threats with greater sensitivity than the 'Low' setting but with a corresponding
rise in the possibility of false positives.
•
High - Highest sensitivity to detecting unknown threats but this also raises the possibility of more false
positives too.
Do not scan files larger than - This box allows to set a maximum size (in MB) for the individual files to be scanned
during manual scanning. Files larger than the size specified here, are not scanned.
Click the 'save' icon for any changes to the settings to take effect.
Scheduled Scanning
Endpoint Security Manager - SME Administrator Guide | © 2013 Comodo Security Solutions Inc. | All rights reserved
110
Comodo Endpoint Security Manager - SME - Administrator Guide
The Scheduled Scanning setting screen allows an administrator to customize the scheduler that lets you timetable scans
according to your preferences.
•
Scan archive files - When this check box is selected, the Antivirus scans archive files such as .ZIP and .RAR files
during any scheduled scan. You are alerted to the presence of viruses in compressed files before you even open
them. These include RAR, WinRAR, ZIP, WinZIP, ARJ, WinARJ and CAB archives.
•
Automatically clean threats found during scanning - When this check box is selected, the Antivirus removes
malware files found during scanning.
•
Automatically update virus database before scanning - When this check box is selected, Comodo Internet Security
checks for latest virus database updates from Comodo website and downloads the updates automatically, before the
start of every scheduled scan.
Click the 'save' icon for any changes to the settings to take effect.
Exclusions
In the Exclusions area, you can specify files and folders that you trust and want to exclude them from all future scans of all
types.
Endpoint Security Manager - SME Administrator Guide | © 2013 Comodo Security Solutions Inc. | All rights reserved
111
Comodo Endpoint Security Manager - SME - Administrator Guide
You can add files and folders in Exclusions list by selecting the folder from the drop-down and entering the path in the text field
or enter the entire path in the field after selecting 'None' in the drop-down.
•
Click the 'add' button.
If you want to remove an item from the list, select it and click the 'remove' button.
Click the 'save' icon for any changes to the settings to take effect.
For more details on the Antivirus Settings, see http://help.comodo.com/ for Comodo Internet Security.
Firewall Settings
Firewall Behavior Settings allows an administrator to quickly configure the security of an endpoint and the frequency of alerts
that are generated.
These settings can be done using the tabs listed below.
•
General Settings
Endpoint Security Manager - SME Administrator Guide | © 2013 Comodo Security Solutions Inc. | All rights reserved
112
Comodo Endpoint Security Manager - SME - Administrator Guide
•
Alert Settings
General Settings
In the General Settings tab, an administrator can customize firewall security by using the Firewall Security Level slider to change
preset security levels.
The choices available are:
•
Block All
•
Custom Policy
•
Safe Mode
•
Training Mode
•
Disabled
•
Block All Mode: The firewall blocks all traffic in and out of a computer regardless of any user-defined configuration
and rules. The firewall does not attempt to learn the behavior of any applications and does not automatically create
traffic rules for any applications. Choosing this option effectively prevents a computer from accessing any networks,
including the Internet.
•
Custom Policy Mode: The firewall applies ONLY the custom security configurations and network traffic policies
specified by the administrator. New users may want to think of this as the 'Do Not Learn' setting because the firewall
does not attempt to learn the behavior of any applications. Nor does it automatically create network traffic rules for
those applications. The user will receive alerts every time there is a connection attempt by an application - even for
applications on the Comodo Safe list (unless, of course, the administrator has specified rules and policies that instruct
the firewall to trust the application's connection attempt).
If any application tries to make a connection to the outside, the firewall audits all the loaded components and checks
each against the list of components already allowed or blocked. If a component is found to be blocked, the entire
application is denied Internet access and an alert is generated. This setting is advised for experienced firewall users
that wish to maximize the visibility and control over traffic in and out of their computer.
•
Safe Mode: While filtering network traffic, the firewall automatically creates rules that allow all traffic for the
components of applications certified as 'Safe' by Comodo, if the checkbox Create rules for safe applications is
selected. For non-certified new applications, the user will receive an alert whenever that application attempts to access
Endpoint Security Manager - SME Administrator Guide | © 2013 Comodo Security Solutions Inc. | All rights reserved
113
Comodo Endpoint Security Manager - SME - Administrator Guide
the network. The administrator can choose to grant that application Internet access by selecting 'Treat this application
as a Trusted Application' at the alert. This deploys the predefined firewall policy 'Trusted Application' onto the
application.
'Safe Mode' is the recommended setting for most users - combining the highest levels of security with an easy-tomanage number of connection alerts.
•
Training Mode : The firewall monitors network traffic and create automatic allow rules for all new applications until the
security level is adjusted. The user will not receive any alerts in 'Training Mode' mode. If you choose the 'Training
Mode' setting, we advise that you are 100% sure that all applications installed on endpoints are assigned the correct
network access rights.
Tip: Use this setting temporarily while playing an online game for the first time. This suppresses all alerts while the firewall
learns the components of the game that need Internet access and automatically create 'allow' rules for them. You can switch
back to your previous mode later.
•
Disabled: Disables the firewall and makes it inactive. All incoming and outgoing connections are allowed irrespective
of the restrictions set by the user. Comodo strongly advise against this setting unless you are sure that you are not
currently connected to any local or wireless networks.
Check box options
Create rules for safe applications
Comodo Firewall trusts the applications if:
•
The application/file is included in the Trusted Files list under Defense+ Tasks;
•
The application is from a vendor included in the Trusted Software Vendors list under Defense+ Tasks;
•
The application is included in the extensive and constantly updated Comodo safelist.
By default, CIS does not automatically create 'allow' rules for safe applications. This helps saving the resource usage, simplifies
the rules interface by reducing the number of 'Allowed' rules in it, reduces the number of pop-up alerts and is beneficial to
beginners who find difficulties in setting up the rules.
Enabling this checkbox instructs CIS to begin learning the behavior of safe applications so that it can automatically generate the
'Allow' rules. These rules are listed in the Network Security Policy > Application Rules interface of CIS. The Advanced users can
edit/modify the rules as they wish.
Background Note: Prior to version 4.x , CIS would automatically add an allow rule for 'safe' files to the rules interface. This
allowed advanced users to have granular control over rules but could also lead to a cluttered rules interface. The constant
addition of these 'allow' rules and the corresponding requirement to learn the behavior of applications that are already
considered 'safe' also took a toll on system resources. In version 4.x and above, 'allow' rules for applications considered 'safe'
are not automatically created - simplifying the rules interface and cutting resource overhead with no loss in security. Advanced
users can re-enable this setting if they require the ability to edit rules for safe applications (or, informally, if they preferred the
way rules were created in CIS version 3.x).
Alert Settings
Administrators can configure the amount of alerts that Comodo Firewall generates, using the slider on this tab. Raising or
lowering the slider changes the amount of alerts accordingly. It should be noted that this does not affect your security, which is
determined by the rules you have configured (for example, in 'Network Security Policy'). For the majority of users, the default
setting of 'Low' is the perfect level - ensuring you are kept informed of connection attempts and suspicious behaviors whilst not
overwhelming you with alert messages.
The Alert settings refer only to connection attempts by applications or from IP addresses that you have not (yet) decided to trust.
For example, you could specify a very high alert frequency level, but not receive any alerts at all if you have chosen to trust the
application that is making the connection attempt.
Endpoint Security Manager - SME Administrator Guide | © 2013 Comodo Security Solutions Inc. | All rights reserved
114
Comodo Endpoint Security Manager - SME - Administrator Guide
•
•
Very High: The firewall shows separate alerts for outgoing and incoming connection requests for both TCP and UDP
protocols on specific ports and for specific IP addresses, for an application. This setting provides the highest degree of
visibility to inbound and outbound connection attempts but leads to a proliferation of firewall alerts. For example, using
a browser to connect to your Internet home-page may generate as many as 5 separate alerts for an outgoing TCP
connection alone.
High: The firewall shows separate alerts for outgoing and incoming connection requests for both TCP and UDP
protocols on specific ports for an application.
•
Medium: The firewall shows alerts for outgoing and incoming connection requests for both TCP and UDP protocols for
an application.
•
Low: The firewall shows alerts for outgoing and incoming connection requests for an application. This is the setting
recommended by Comodo and is suitable for the majority of users.
•
Very Low: The firewall shows only one alert for an application.
Check box options
This computer is an internet connection gateway (i.e. an ICS server) - An Internet Connection Sharing Server (ICS) is a
computer that shares its connection to the Internet with other computers that are connected to it by LAN. i.e. the other
computers access the Internet through this computer.
Designating a computer as an ICS server can be useful in some corporate and home environments that have more than one
computer but which have only one connection to the Internet. For example, you might have two computers in your home but only
one connection. Setting one as an ICS server allows both of them to access the Internet.
•
Leave this box unchecked if no other computers connect to your computer via Local Area Network to share your
connection. This is the situation for the vast majority of home and business users.
•
Check this option if this computer has been configured as an Internet Connection Sharing server through which
other computers connect to the Internet.
Note: If your computer is indeed an ICS server but you leave this box unchecked then you are likely to see an increase in
Firewall alerts. Selecting this checkbox does not decrease the security but tells the firewall to handle ICS requests too. So it
just activates some additional functionality and helps reduce the number of alerts.
Enable alerts for TCP requests / Enable alerts for UDP requests / Enable alerts for ICMP requests/ Enable alerts for
Endpoint Security Manager - SME Administrator Guide | © 2013 Comodo Security Solutions Inc. | All rights reserved
115
Comodo Endpoint Security Manager - SME - Administrator Guide
loopback requests - In conjunction with the slider, these checkboxes allow you to fine-tune the number of alerts you see
according to protocol.
Click the 'save' icon for any changes to the settings to take effect.
For more details on the Firewall Settings, see http://help.comodo.com/ for Comodo Internet Security.
Defense+ Settings
The Defense+ component of Comodo Internet Security is a host intrusion prevention system that constantly monitors the
activities of all executable files on your PC. With Defense+ activated, the user is warned EVERY time an unknown application
executable (.exe, .dll, .sys, .bat etc) attempts to run. The only executables that are allowed to run are the ones you give
permission to. An application can be given such permission to run in a variety of ways including; manually granting them
execution rights in Computer Security Policy; by deciding to treat the executable as trusted at a Defense+ alert or simply
because the application is on the Comodo safe list. Defense+ also automatically protects system-critical files and folders such
as registry entries to prevent unauthorized modification. Such protection adds another layer of defense to Comodo Internet
Security by preventing malware from ever running and by preventing any processes from making changes to vital system files.
The Defense+ Settings area allows you to quickly configure the security level and behavior of Defense+ during operation.
These settings can be done using the tabs listed below.
•
General Settings
•
Execution Control Settings
•
Sandbox Settings
•
Trusted Files
•
Trusted Vendors
General Settings
Slider Options
Administrators can customize the behavior of Defense+ by adjusting a Security Level slider to switch between preset security
levels.
The choices available are: Paranoid Mode, Safe Mode, Clean PC Mode, Training Mode and Disabled.
Endpoint Security Manager - SME Administrator Guide | © 2013 Comodo Security Solutions Inc. | All rights reserved
116
Comodo Endpoint Security Manager - SME - Administrator Guide
•
Paranoid Mode: This is the highest security level setting and means that Defense+ monitors and controls all
executable files apart from those that you have deemed safe. Comodo Internet Security does not attempt to learn the
behavior of any applications - even those applications on the Comodo safe list and only uses your configuration
settings to filter critical system activity. Similarly, the Comodo Internet Security does automatically create 'Allow' rules
for any executables - although you still have the option to treat an application as 'Trusted' at the Defense+ alert.
Choosing this option generates the most amount of Defense+ alerts and is recommended for advanced users that
require complete awareness of activity on their system.
•
Safe Mode: While monitoring critical system activity, Defense+ automatically learns the activity of executables and
applications certified as 'Safe' by Comodo. It also automatically creates 'Allow' rules these activities, if the checkbox
'Create rules for safe applications' is selected. For non-certified, unknown, applications, you will receive an alert
whenever that application attempts to run. Should you choose, you can add that new application to the safe list by
choosing 'Treat this application as a Trusted Application' at the alert. This instructs the Defense+ not to generate an
alert the next time it runs. If your machine is not new or known to be free of malware and other threats as in 'Clean PC
Mode' then 'Safe Mode' is recommended setting for most users - combining the highest levels of security with an easyto-manage number of Defense+ alerts.
•
Clean PC Mode: From the time you set the slider to 'Clean PC Mode', Defense+ learns the activities of the
applications currently installed on the computer while all new executables introduced to the system are monitored and
controlled. This patent-pending mode of operation is the recommended option on a new computer or one that the user
knows to be clean of malware and other threats. From this point onwards Defense+ alerts the user whenever a new,
unrecognized application is being installed. In this mode, the files in 'My Pending Files' are excluded from being
considered as clean and are monitored and controlled.
•
Training Mode: Defense+ monitors and learn the activity of any and all executables and create automatic 'Allow' rules
until the security level is adjusted. You do not receive any Defense+ alerts in 'Training Mode'. If you choose the
'Training Mode' setting, we advise that you are 100% sure that all applications and executables installed on your
computer are safe to run.
Tip: This mode can be used as the 'Gaming Mode'. It is handy to use this setting temporarily when you are running an
(unknown but trusted) application or Games for the first time. This suppresses all Defense+ alerts while Comodo Internet
Security learns the components of the application that need to run on your machine and automatically create 'Allow' rules for
them. Afterward, you can switch back to 'Train with Safe Mode' mode).
•
Disabled: Disables Defense+ protection. All executables and applications are allowed to run irrespective of your
configuration settings. Comodo strongly advise against this setting unless you are confident that you have an
alternative intrusion defense system installed on your computer.
Checkbox Options
•
Block all unknown requests if the application is closed - Selecting this option blocks all unknown execution
requests if Comodo Internet Security is not running/has been shut down. This is option is very strict indeed and in
most cases should only be enabled on seriously infested or compromised machines while the user is working to
resolve these issues. If you know your machine is already ‘clean’ and are looking just to enable the highest CIS
security settings then it is OK to leave this box unchecked.
•
Create rules for safe applications - Automatically creates rules for safe applications in Computer Security Policy.
Note: Defense+ trusts the applications if:
•
The application/file is included in the Trusted Files list
•
The application is from a vendor included in the Trusted Software Vendors list
•
The application is included in the extensive and constantly updated Comodo safelist.
By default, CIS does not automatically create 'allow' rules for safe applications. This helps saving the resource usage, simplifies
the rules interface by reducing the number of 'Allowed' rules in it, reduces the number of pop-up alerts and is beneficial to
beginners who find difficulties in setting up the rules.
Enabling this checkbox instructs CIS to begin learning the behavior of safe applications so that it can automatically generate the
'Allow' rules. These rules are listed in the Computer Security Policy interface. Administrators can edit / modify the rules as they
wish.
Execution Control Settings
Endpoint Security Manager - SME Administrator Guide | © 2013 Comodo Security Solutions Inc. | All rights reserved
117
Comodo Endpoint Security Manager - SME - Administrator Guide
Image Execution Control is an integral part of the Defense+ engine. If the Defense+ Security Level is set to 'Training Mode' or
'Clean PC Mode', then it is responsible for authenticating every executable image that is loaded into the memory.
Comodo Internet Security calculates the hash of an executable at the point it attempts to load into memory. It then compares this
hash with the list of known / recognized applications that are on the Comodo safe list. If the hash matches the one on record for
the executable, then the application is safe. If no matching hash is found on the safelist, then the executable is 'unrecognized'
and you receive an alert.
This area allows you to quickly determine how proactive the monitor should be and which types of files it should check.
Background note: In this context, an 'image' means an 'Executable Image'. An executable image is a variation on file
compression, such as ZIP or RAR files. For example, most program installers are contained in executable images.
Image Execution Control Level Slider
The control slider in the settings screen allows you to switch the Image Execution settings between Enabled and Disabled
states. The Image Execution Control is disabled irrespective of the settings in this slider, if Defense+ is permanently deactivated
in the General Settings from the Defense+ Settings interface of CIS in the endpoints.
•
Enabled - This setting instructs Defense+ to intercept all the files before they are loaded into memory and also
Intercepts prefetching/caching attempts for the executable files.
•
Disabled - No execution control is applied to the executable files.
Check Box Options
Treat unrecognized files as - This has five options and the unrecognized files will be run as per the option selected.
Endpoint Security Manager - SME Administrator Guide | © 2013 Comodo Security Solutions Inc. | All rights reserved
118
Comodo Endpoint Security Manager - SME - Administrator Guide
•
Partially Limited - The application is allowed to access all the Operating system files and resources like
clipboard. Modification of protected files/registry keys is not allowed. Privileged operations like loading drivers or
debugging other applications are also not allowed.
•
Limited - Only selected operating system resources can be accessed by the application. The application is not
allowed to execute more than 10 processes at a time and is run with out Administrator account privileges.
•
Restricted - The application is allowed to access very few operating system resources. The application is not
allowed to execute more than 10 processes at a time and is run with very limited access rights.
Note: Some of the applications like computer games may not work properly under this setting.
•
Untrusted - The application is not allowed to access any of the Operating system resources. The application is
not allowed to execute more than 10 processes at a time and is run with very limited access rights.
Note: Some of the applications that require user interaction may not work properly under this setting.
•
Blocked - The application is not allowed to run at all.
Sandbox Settings
Comodo Internet Security's new sandbox is an isolated operating environment for unknown and untrusted applications. Running
an application in the sandbox means that it cannot make permanent changes to other processes, programs or data on your 'real'
system. Comodo have integrated sandboxing technology directly into the security architecture of Comodo Internet Security to
complement and strengthen the Firewall, Defense+ and Antivirus modules.
The Sandbox Settings area allows administrators to configure the security level and the overall behavior of the sandbox.
Endpoint Security Manager - SME Administrator Guide | © 2013 Comodo Security Solutions Inc. | All rights reserved
119
Comodo Endpoint Security Manager - SME - Administrator Guide
Sandbox Security Level Slider
The Security Level slider in the settings screen allow administrators to switch the Sandbox between Enabled and Disabled
states. The programs included in the Sandbox is executed with the set restrictions only if the Sandbox is in Enabled state. If
disabled, the programs is run normally without any restrictions. The Sandbox is disabled irrespective of the settings in this slider,
if Defense+ is permanently deactivated in the General Settings from the Defense+ Settings interface of CIS in endpoints.
Click the 'save' icon for any changes to the settings to take effect.
Trusted Files
Defense+ allows you to define a personal safe list of files to complement the default Comodo safe list. Files added to the Trusted
Files area are automatically given Defense+ trusted status. If an executable is unknown to the Defense+ safe list then, ordinarily,
it and all its active components generate Defense+ alerts when they run. By adding executables to this list (including sub folders
containing many components) you can reduce the amount of alerts that Defense+ generates whilst maintaining a higher level of
Defense+ security.
Endpoint Security Manager - SME Administrator Guide | © 2013 Comodo Security Solutions Inc. | All rights reserved
120
Comodo Endpoint Security Manager - SME - Administrator Guide
To add new file(s) to Trusted Files list
•
Click the 'add' button
In the 'Open' dialog, select the file that you want add to the list and click 'Open'.
The selected file will be added to the list.
Endpoint Security Manager - SME Administrator Guide | © 2013 Comodo Security Solutions Inc. | All rights reserved
121
Comodo Endpoint Security Manager - SME - Administrator Guide
If you want remove a file from the list, select it and click the 'remove' button.
•
Click 'yes' to confirm removal of the selected file from the list.
Click the 'save' icon for any changes to the settings to take effect.
Trusted Vendors
In Comodo Internet Security, there are two basic methods in which an application can be treated as safe. Either it has to be part
of the ‘Safe List’ (of executables/software that is known to be safe) OR that application has to be signed by one of the vendors in
the 'Trusted Vendor List'.
A software application can be treated as a 'Trusted' one if it is published by a Trusted Software publisher/vendor. To ensure the
authenticity, the publisher/vendor digitally sign their software using a code signing certificate obtained from a Trusted Certificate
Authority (CA). Ensuring whether a software/application is signed by a vendor ensures that the software is trusted. Refer to the
Background details given below for more information.
Background
Many software vendors digitally sign their software with a code signing certificate. This practice helps end-users to verify:
•
Content Source: The software they are downloading and are about to install really comes from the publisher that
signed it.
•
Content Integrity: That the software they are downloading and are about to install has not be modified or corrupted
since it was signed.
In short, users benefit if software is digitally signed because they know who published the software and that the code hasn't
been tampered with - that are are downloading and installing the genuine software.
The 'Vendors' that digitally sign the software to attest to it's probity are the software publishers. These are the company names
you see listed in the first column in the graphic above.
However, companies can't just 'sign' their own software and expect it to be trusted. This is why each code signing certificate is
counter-signed by an organization called a 'Trusted Certificate Authority'. 'Comodo CA Limited' and 'Verisign' are two examples
of a Trusted CA's and are authorized to counter-sign 3rd party software. This counter-signature is critical to the trust process and
a Trusted CA only counter-signs a vendor's certificate after it has conducted detailed checks that the vendor is a legitimate
company.
If a file is signed by a Trusted Software Vendor and the user has enabled 'Trust Applications that are digitally signed by Trusted
Software Vendors' then it will be automatically trusted by Comodo Internet Security (if you would like to read more about code
signing certificates, see http://www.instantssl.com/code-signing/).
One way of telling whether an executable file has been digitally signed is checking the properties of the .exe file in question.
•
Browse to the folder containing the .exe file.
•
Right click on the .exe file.
•
Select 'Properties' from the menu.
•
Click the tab 'Digital Signatures (if there is no such tab then the software has not been signed).
This displays the name of the CA that signed the software.
Select the certificate and click the 'Details' button to view digital signature information. Click 'View Certificate' to inspect the
Endpoint Security Manager - SME Administrator Guide | © 2013 Comodo Security Solutions Inc. | All rights reserved
122
Comodo Endpoint Security Manager - SME - Administrator Guide
actual code signing certificate.
To add trusted vendors
•
Enter the name of the vendor as given in the code signing certificate in the text field.
•
Click the 'add' button.
The vendor will be added to the list.
If you want to remove a vendor from the list, select it and click the 'remove' button.
Click the 'save' icon for any changes to the settings to take effect.
For more details on the Defense+ Settings, see http://help.comodo.com/ for Comodo Internet Security.
General CIS Settings
In the General CIS Settings screen, administrators can configure various options related to the operation of Comodo Internet
Security.
These settings can be done using the tabs listed below.
•
General
•
Connection
•
Update
General Settings
The 'General Settings' tab allows administrators to configure the general behavior of Comodo Internet Security.
Endpoint Security Manager - SME Administrator Guide | © 2013 Comodo Security Solutions Inc. | All rights reserved
123
Comodo Endpoint Security Manager - SME - Administrator Guide
•
Automatically check for the program updates - This option determines whether or not Comodo Internet Security
should automatically contact Comodo servers for updates. With this option selected, Comodo Internet Security
automatically checks for updates every 24 hours AND every time you start your computer. If updates are found, they
are automatically downloaded and installed. We recommend that users leave this setting enabled to maintain the
highest levels of protection. Users who choose to disable automatic updates can download them manually by clicking
'Check for Updates' in the 'More...' section in CIS application.
•
Show balloon messages - These are the notifications that appear in the bottom right hand corner of your screen just above the tray icons. Usually these messages like ' Comodo Firewall is learning ' or 'Defense+ is learning ' and are
generated when these modules are learning the activity of previously unknown components of trusted applications.
Clear this check box if you do not want to see these messages.
•
Enable Comodo Message Center - Comodo Internet Security displays Comodo Message Center window periodically
if this option is selected.
Connection Settings
The Connection tab allows administrators to configure how Comodo Internet Security should connect to Comodo servers for
receiving program updates etc. If you are using a Proxy server in your network and if you want CIS to use the Proxy Server, the
Proxy settings can be configured through this settings interface.
Endpoint Security Manager - SME Administrator Guide | © 2013 Comodo Security Solutions Inc. | All rights reserved
124
Comodo Endpoint Security Manager - SME - Administrator Guide
•
Select 'Use http proxy' if you want Comodo Internet Security to use the Proxy Server. Enter the proxy server IP
address or name in the 'Server' text box and enter the port number in the 'Port' text box.
•
If your Proxy Server needs authentication, Select 'Proxy server requires authorization'. Type your Login ID in
the 'Login' text box and enter the password in the 'Password' text box.
Update Settings
The Update tab allows administrators to enable/disable the CIS program updates and to select the host from which the updates
are to be downloaded. By default, the URL of the Comodo Server is entered as an available host.
Endpoint Security Manager - SME Administrator Guide | © 2013 Comodo Security Solutions Inc. | All rights reserved
125
Comodo Endpoint Security Manager - SME - Administrator Guide
•
If you want to download the updates always from the Comodo servers, you can leave the setting as it is.
•
If CIS program and antivirus updates are available at an HTTP Server or at any of the other computers in your
network running Comodo Offline Updater, you can add the HTTP server or the computer as hosts in this area
Note: Comodo Offline Updater allows users to configure a local HTTP server to download and provision updates to networked
machines. Administrators can download the utility from http://enterprise.comodo.com/security-solutions/endpointsecurity/endpoint-security-manager/free-trial.php
•
To add a host click 'Add' and enter the url or IP address of the host in the next row that appears.
•
Repeat the process for adding multiple hosts.
•
CIS will automatically check the host specified here and download the updates from the host even when you
are offline.
Note: CIS program updates can also be checked manually. Click More Options > Check For Updates if you wish to update
manually.
Click the 'save' icon for any changes to the settings to take effect.
For more details on the General CIS Settings, see http://help.comodo.com/ for Comodo Internet Security.
Agent Settings
The agent settings interface allows the administrator to configure how these agents should behave on application of the policy.
See Step 4 - Agent Settings in the section Creating a New Policy for a detailed description of this interface.
•
Click the 'save' icon for any changes to the settings to take effect
Removing Policies
The administrator can remove one or more unwanted policies by simply selecting them by clicking or touching the desired policy
to highlight it and clicking the 'remove' icon.
A confirmation dialog will be displayed.
Endpoint Security Manager - SME Administrator Guide | © 2013 Comodo Security Solutions Inc. | All rights reserved
126
Comodo Endpoint Security Manager - SME - Administrator Guide
•
Click 'yes' to remove the selected item(s)
Note: Policies which are currently applied and used by groups or endpoints cannot be deleted. Before removing an unwanted
policy, the administrator has to apply a different policy to the groups/endpoints to which this policy is currently applied.
Tip: Hold Shift or CTRL to select multiple items.
2.4.2. Creating a New Policy
The 'Create Policy' wizard enables administrators to create new security policies and to apply them to groups of target
computers. The new policies can be created by:
•
Importing the local security settings from a computer
•
Using another, pre-existing, policy as a base
•
Importing from a saved .xml file
Policies can be created according to the security requirements of different groups of computers which are in turn, created
according to the requirements of the organization. So it is recommended to first create groups and then to create policies, so
that the policies can be applied to the groups as required.
It is also recommended to retain the group 'Unassigned' with the 'Locally Configured' policy until all the computers have been
imported into ESM, so that ESM will not overwrite the policy on new discovered computers once the agent is installed in it.
To start the 'Create Policy' wizard
•
Click the 'create' tile from the 'policies' area
The wizard will start with Step 1- Source Type. The remaining steps are displayed below the title bar with the current step
highlighted in bold. To move backwards or forwards between steps, use the arrows on either side of the main interface (or left
Endpoint Security Manager - SME Administrator Guide | © 2013 Comodo Security Solutions Inc. | All rights reserved
127
Comodo Endpoint Security Manager - SME - Administrator Guide
click and drag to swipe the screens left or right) or click a step with a click-able active link below the title bar.
Step 1 - Select Source Type
The new policies can be created from three types of sources:
•
Computers - Imports the security settings configured locally from a selected source computer to create a new policy.
•
Another Policy - Enables to choose an existing policy and use it as the starting point to create a new policy.
•
A saved Policy XML file - Imports the policy from the policy xml file from the computer running the administration
console.
Explanations on importing from different source types can be found in the following sections: Importing from Computers,
Importing from Another Policy and Importing from XML File.
•
Select the source type and click the right arrow to move to step 2
Tip: You might create a policy from another policy if you want to exclude a CIS component from policy but use the settings in
other components, or change the agent-specific settings of the policy(such as to have a different compliance polling interval, or
to disallow local mode access) for a particular endpoint or group.
Importing from Computers
•
Choose 'A Computer' if you wish to import the security settings from a target endpoint as the new policy and click the
right arrow to move to Step 2 - Selecting Source Computer
Step 2 - Selecting Source Computer
All endpoint computers added to ESM will be displayed.
•
Select the category or group from the left hand side pane. The member endpoints of the selected category/group will
be listed in the right hand side pane.
•
Select the computer from which you wish to import the settings. The computer should have CIS installed and be in
local mode, configured as per requirements, and should be online to enable ESM to import the settings.
•
Click the filter icon
'Apply'.
in the 'status' column header to search for a particular endpoint, select the status and click
Endpoint Security Manager - SME Administrator Guide | © 2013 Comodo Security Solutions Inc. | All rights reserved
128
Comodo Endpoint Security Manager - SME - Administrator Guide
•
Click the filter icon
in the 'cis mode' column header to search for endpoints with CIS in Local, Remote or Unknown
mode and click 'Apply'.
•
Click 'Reset' to display all the items.
•
Options:
•
•
Force source computer to be remotely managed after policy import is complete - To configure the
settings locally, the source computer would have been switched to local administration mode. If you wish the
computer to be switched to Remote administration mode after policy is read, select this option.
Click the right arrow to move to Step 3 - Settings.
Importing from Another Policy
•
Choose 'Another Policy' if you wish to import the security settings from an existing Policy and click the right arrow to
move to Step 2 - Selecting Source Policy
Step 2 - Selecting Source Policy
A list of all the existing policies with their descriptions and the CIS components configured by them is displayed.
•
Click the filter icon
in any of the respective column header to search for a particular policy or component, enter or
select and click 'Apply'
•
Click 'Reset' to display all the items
•
Select the source policy from which you wish to create a new policy and click the right arrow to move to Step 3 –
Settings
Importing from a saved XML File
•
Choose 'A saved Policy XML file' if you wish to import the security settings from a previously saved policy xml file in
the computer running the administration console. Click the right arrow to move to Step 2 - Selecting Source File.
Step 2 - Selecting Source File
Endpoint Security Manager - SME Administrator Guide | © 2013 Comodo Security Solutions Inc. | All rights reserved
129
Comodo Endpoint Security Manager - SME - Administrator Guide
•
Type the path of the location where the policy xml file is saved or click 'Browse' and navigate to the required policy
XML file
•
Click the right arrow to move to Step 3 - Settings
Step 3 - Settings
The next step is to select the components of CIS for which the security settings are to be imported into the policy.
Endpoint Security Manager - SME Administrator Guide | © 2013 Comodo Security Solutions Inc. | All rights reserved
130
Comodo Endpoint Security Manager - SME - Administrator Guide
•
All Available Settings - Imports all the settings from the source selected in the chosen step 2, above
•
Custom components settings - Enables the administrator to select the components of CIS so that only those
settings corresponding to the selected components are imported into the policy from the source selected in step 2
•
•
Antivirus Settings - Imports the settings relevant to the Antivirus component
•
Firewall Settings - Imports the settings relevant to the Firewall component
•
Defense+ Settings - Imports the settings relevant to the Defense+ component
•
Include Trusted Vendors - Imports trusted vendors, if any, from the source policy
•
Include Trusted Files - Imports trusted files, if any, from the source policy
Make your selections and click the right arrow to move to step 4 - Agent Settings
Step 4 - Agent Settings
The next step allows the administrator to configure the ESM agent installed at the target computers, for which the policy has to
be applied.
Endpoint Security Manager - SME Administrator Guide | © 2013 Comodo Security Solutions Inc. | All rights reserved
131
Comodo Endpoint Security Manager - SME - Administrator Guide
•
•
Allow Local Administration - Configures the agent to allow the CIS installation at the target machine to be switched
to local administration mode should the user desire to change the security settings. The administrator may choose to
not allow the user to alter the security settings in his/her computer, so as to not lead to a security hole in the network.
On selecting the 'Allow Local Administration' check box, the administrator should specify how the access to local
administration has to be restricted by selecting an option from the following check boxes:
•
Using computer administrator credentials - Selecting this option will require the computer user to either
have administrative credentials or enter credentials while switching CIS at the target machine to local
administration mode.
•
Using local password - Allows the administrator to specify a password in the text box below this option.
This password should be entered for switching the CIS to local administration mode.
Policy compliance polling interval - The administrator can set the time interval (in hours and minutes) for the agent
to periodically check whether the CIS at the target computer is compliant with the applied security policy. The result
will be dynamically displayed in the Policy Status tile and System Status - Compliancy status tile on the dashboard.
(Default = 1 hour, up to but not including 24 hours).
Tip: ESM can also be configured to alert the administrator by sending automated emails on the occurrence of a target
computer going non-compliant. See System Status Tiles for more details.
•
Local Server Address - The administrator can specify the address of the server machine in the local network, on
which the ESM central service is installed.
•
Internet Server Address - The administrator can specify the address of the external server on which the ESM central
service is installed if the endpoint should connect to the ESM server through Internet.
Tip: Local Server Address and Internet Server Address values are used by the Agent to determine when Local Policy or
Internet Policy should be applied. What's more, these addresses have a priority over addresses that are in the Server Network
Addresses list specified in the Configuration Tool such that:
1.
The Local Server Address value, mandatory in policy settings, specifies that if this connection is established Local
Policy should be applied.
2.
Internet Server Address value is optional in policy settings. If specified it is tried to be reached ONLY if the specified
local address connection fails. Internet Policy should be applied.
Endpoint Security Manager - SME Administrator Guide | © 2013 Comodo Security Solutions Inc. | All rights reserved
132
Comodo Endpoint Security Manager - SME - Administrator Guide
If none of these addresses succeeded or if Internet Server Address value wasn't specified, the Agent will try the remaining
hosts in the Server Network Addresses list, applying the corresponding policy based upon analysis per RFC 3330 of a
connection succeeding via a special use address as indicating Local policy, and a public address indicating Internet policy.
•
Click the right arrow to move to the step 5 - Selecting Targets.
Step 5 - Selecting Targets
The administrator can select the target computer group(s) onto which the created policy has to be applied.
•
Click the check box for 'Assign policy to groups after finish' if you to apply the newly created policy after it is imported
to an existing group. You can also assign this policy at a later stage to groups if you do not want to do so now. See
Viewing Policies section for more details.
•
For the group(s) of computers connected through the local network you wish to apply the new policy, select 'For Local
Policy' checkbox.
•
For the group(s) of computers connected through the Internet you wish to apply the new policy, select 'For Internet
Policy' checkbox.
•
Options:
•
•
Override individual computers policy - Selecting this option will apply the new policy onto target
computers in the selected groups that currently have individual policies that differ from the group policy,
thereby reverting their policies to come from their group membership.
•
Force target computers to be remotely managed upon policy assignment - Selecting this option will
forcibly switch the CIS installations in the selected target endpoints to remote management mode on
assigning the new policy, irrespective of their current management mode.
Make your selections and click the right arrow to move to step 6 - Importing the Settings and Creating the Policy.
Step 6 - Importing the Settings and Creating the Policy
The next step requires the administrator to specify a name and provide a description for the policy created.
Endpoint Security Manager - SME Administrator Guide | © 2013 Comodo Security Solutions Inc. | All rights reserved
133
Comodo Endpoint Security Manager - SME - Administrator Guide
•
Name - Enter a name according to criteria deemed suitable to the security settings.
•
Description - Enter short text that best describes the policy.
•
Options:
•
Apply Policy after Finish - The newly created policy will be only be applied to the target endpoints
immediately if this checkbox is selected. If not selected, the endpoints will pick up the new policy when they
check in at the next policy poll.
Note: This option will be available only if you had selected 'Assign policy to groups after finish' checkbox in the previous step 5.
•
Make your selection and click the Finish icon
On completion:
•
or swipe the screen to left to complete the policy creation process.
The 'View All Policies' interface will open with the new policy added.
The new policy will be applied to the target computers selected in step 5 as per the options selected in the same.
2.5.The Reports Area
ESM Active Reports TM are highly informative, graphical summaries of the security and status of managed
endpoints. Each type of report is fully customizable and can be drilled-down to specific endpoints. ESM maintains an
archive of reports enabling the administrator to compare the reports generated at various time points.
Reports can be exported to .pdf or spreadsheet format for printing and archiving purposes.
ESM also maintains and archive of reports generated previously and allows the administrator to view and download them if they
need to compare the reports generated at different time points.
To view the Reports interface, click 'reports'
Endpoint Security Manager - SME Administrator Guide | © 2013 Comodo Security Solutions Inc. | All rights reserved
134
Comodo Endpoint Security Manager - SME - Administrator Guide
The 'reports' area contains three screens:
•
reports gallery - Enables the administrator to generate, view and download different types of real-time reports
•
reports explorer - Enables the administrator to view and download previously generated reports
•
settings - Enables the administrator to configure archival of reports
The administrator can navigate between these screens by clicking respective links at the left hand side navigation.
2.5.1. Reports Gallery
The 'Reports Gallery' screen enables the administrator to different types of reports by clicking the respective tiles.
Endpoint Security Manager - SME Administrator Guide | © 2013 Comodo Security Solutions Inc. | All rights reserved
135
Comodo Endpoint Security Manager - SME - Administrator Guide
Available report types are:
•
details - General information about target endpoint(s) such as operating environment and hardware details.
•
configuration - Information on components of CIS installed at the endpoints and their configuration status.
•
infections - Information on malware discovered during the antivirus (AV) scans and not handled successfully (deleted,
disinfected or quarantined) locally by CIS and the endpoints affected by them.
•
quarantine - Information on virus and other malware identified by AV scans and quarantined locally by CIS.
•
updates - Information on versions of AV signature databases at the endpoints.
•
logs - Logs of events related to CIS at the endpoints.
•
compliance - A summary of compliance of the endpoints to their assigned security policies and a detailed information
on the security policies applied to the endpoints.
•
policy delta - Provides a investigation report on the differences in components between the policy applied from the
ESM server side and the actual state of the policy as in the target endpoint side to analyze reasons for an endpoint
being non-compliant. This report can be generated only for endpoint with Non-Compliant status.
•
statistics - Statistical information on the malware detected at various AV scans run on the target endpoint(s), with the
actions taken against them.
•
top 10 - A list of top-ten malware discovered during the antivirus (AV) scans from the target endpoints during the
specified time period.
Clicking any of the tiles will display Select Targets screen, that enables the administrator to select the endpoints for which the
report has to be generated.
To select the endpoints, select the predefined or user defined groups to which the endpoints belong and select the endpoints
from the right hand side pane.
Endpoint Security Manager - SME Administrator Guide | © 2013 Comodo Security Solutions Inc. | All rights reserved
136
Comodo Endpoint Security Manager - SME - Administrator Guide
Sorting the Endpoints
Clicking on the arrow in the middle of the 'Name' column header sorts the endpoints in ascending/descending order of their
names.
Filtering the Entries
You can filter the list of endpoints by clicking the icon
next to the column label. For example, clicking the filter icon in the
'name' column will allow you to search for a particular endpoint. Clicking the filter icon in the 'cis status' column allows you to
display only those endpoints that have 'Actual CIS', 'Unsupported CIS' and 'No CIS Installed' status:
•
Click ‘Apply’ to implement your chosen filter or click ‘Reset’ to clear the filter.
Downloading the Report
If you had opted for generating a downloadable report file in step 2 - Options, the report can be downloaded by clicking the
Endpoint Security Manager - SME Administrator Guide | © 2013 Comodo Security Solutions Inc. | All rights reserved
137
Comodo Endpoint Security Manager - SME - Administrator Guide
download link in the report explorer page. You can choose the printable file to be generated in portable document (.pdf) or
spreadsheet (.xls) format.
Viewing the Report
On completion of generation of any report, the interface will automatically open the 'Reports Explorer' from where you can view
the report. The reports explorer displays a list of all the reports generated previously along with the current report and enables
you to compare the reports generated at various time points. You can also download a selected report if you had opted for
generating a downloadable report in .pdf or .xls format.
The following sections explain each of these report types in detail.
2.5.1.1. Computer Details Report
The 'Computer Details' report provides information on the hardware configuration, network addresses, Operating System (OS)
installed and installed programs (optional) of the selected target computer(s) in several pages. It also gives a comparison on OS
versions installed, if you select multiple endpoints.
To generate a 'Computer Details' report, click the 'details' tile from the 'reports gallery' screen.
The 'Create Computer Details Report' wizard will start.
Step 1 - Selecting Targets
The 'Select Targets' screen will be displayed.
Endpoint Security Manager - SME Administrator Guide | © 2013 Comodo Security Solutions Inc. | All rights reserved
138
Comodo Endpoint Security Manager - SME - Administrator Guide
•
Select the group from the left hand side pane and select the member endpoint(s) for which you wish to generate the
computer details report from the right hand side pane.
•
Swipe the screen to the left or click the right arrow to move to step 2.
Step 2 – Options
•
Select the options for generating the report:
•
Include software details into report - Select this option if you want the details on the software installed on
the target computer(s) included in the report.
•
Generate downloadable report file - Select this option if you need to print or archive the report. You can
choose the printable file to be generated in portable document (.pdf) or spreadsheet (.xls) format. On
Endpoint Security Manager - SME Administrator Guide | © 2013 Comodo Security Solutions Inc. | All rights reserved
139
Comodo Endpoint Security Manager - SME - Administrator Guide
completion, the report generated can be downloaded to the administrator's computer.
•
Swipe the screen to the left or click Finish icon
to start generating the report.
View the Report
The 'reports explorer' screen will be opened with the running reports tab selected. All the reports being generated currently will
be listed with their status.
On completion of required report generation, select the report and click the details icon
displayed.
•
. The report page will be
The report contains several pages depending on the number of endpoints chosen in step 1. The administrator can
move through the pages by clicking the left and right arrows or by swiping through the window. If the administrator had
opted for generating a printable report file in step 2, the report can be downloaded by clicking the Download icon
at the bottom of the report page.
•
The first page of the report will contain pie charts providing a comparison of versions of Operating Systems (OS) of the
selected target endpoints.
Endpoint Security Manager - SME Administrator Guide | © 2013 Comodo Security Solutions Inc. | All rights reserved
140
Comodo Endpoint Security Manager - SME - Administrator Guide
•
The successive pages will contain network addresses, hardware details, software details and so on of the endpoint
computers, with each page dedicated for an endpoint. To move to the successive pages, swipe the window to left or
right or click the left and right arrows at the sides of the interface.
Endpoint Security Manager - SME Administrator Guide | © 2013 Comodo Security Solutions Inc. | All rights reserved
141
Comodo Endpoint Security Manager - SME - Administrator Guide
Endpoint Security Manager - SME Administrator Guide | © 2013 Comodo Security Solutions Inc. | All rights reserved
142
Comodo Endpoint Security Manager - SME - Administrator Guide
Available Report Filters
The report screen allows the administrator to optimize the search by using the filter option. The available filters for the Computer
Details report are:
•
Installed software
•
Version of the software
•
Publisher of the software
To filter the results:
•
Click the filter icon
in any of the respective column header to search for a particular item
The filter drop-down will appear.
•
Type or enter the filter criteria fully or partly and click 'Apply
Only the entries that match the criteria will be displayed in the report.
•
Click 'Reset' to display all the items
2.5.1.2. CIS Configuration Report
The 'CIS Configuration' report provides information on components of CIS installed and enabled on the target computers
according to their applied policies.
To generate a CIS Configuration report, click the 'configuration' tile from the 'reports gallery' screen.
Endpoint Security Manager - SME Administrator Guide | © 2013 Comodo Security Solutions Inc. | All rights reserved
143
Comodo Endpoint Security Manager - SME - Administrator Guide
The 'Create CIS Configuration report' wizard will start.
Step 1 - Selecting Targets
The 'Select Targets' screen will be displayed.
•
Select the group from the left hand side pane and select the member endpoint(s) for which you wish to generate the
CIS configuration report from the right hand side pane.
•
Swipe the screen to the left or click the right arrow to move to step 2.
Step 2 – Options
•
Generate downloadable report file - Select this option if you need to print or archive the report. You can
choose the printable file to be generated in portable document (.pdf) or spreadsheet (.xls) format. On
completion, the report generated can be downloaded to the administrator's computer.
Step 3 - Generate Report
Endpoint Security Manager - SME Administrator Guide | © 2013 Comodo Security Solutions Inc. | All rights reserved
144
Comodo Endpoint Security Manager - SME - Administrator Guide
•
Click the Finish icon
or swipe the screen to left to start generating the report.
View the Report
•
The 'reports explorer' screen will be opened with the running reports tab selected. All the reports being generated
currently will be listed with their status.
•
On completion of required report generation, select the report and click the details icon
be displayed.
Endpoint Security Manager - SME Administrator Guide | © 2013 Comodo Security Solutions Inc. | All rights reserved
. The report page will
145
Comodo Endpoint Security Manager - SME - Administrator Guide
•
If you have opted for generating a downloadable report file in Step 2 - Options, the report can be downloaded by
clicking the Download icon
at the bottom of the report page.
Available Report Filters
The report screen allows the administrator to optimize the search by using the filter option. The available filters for the CIS
Configuration report are:
•
Computer
•
CIS Version
To filter the results:
Endpoint Security Manager - SME Administrator Guide | © 2013 Comodo Security Solutions Inc. | All rights reserved
146
Comodo Endpoint Security Manager - SME - Administrator Guide
•
Click the filter icon
appear.
in any of the respective column header to search for a particular item. The filter drop-down will
•
Type or enter the filter criteria fully or partly and click 'Apply'.
Only the entries that match the criteria will be displayed in the report.
•
Click 'Reset' to display all the items.
2.5.1.3. Computer Infections Report
The 'Computer Infections' report provides information on the number of target computers infected by malware. It details the
malware detected by AV scans that have not been successfully handled (deleted, disinfected or quarantined) by the local
installation of CIS.
To generate a 'Computer Infections' report, click the 'infections' tile from the 'reports gallery' screen.
The 'Create Computer Infections Report' wizard will start.
Step 1 - Selecting Targets
The 'Select Targets' screen will be displayed:
Endpoint Security Manager - SME Administrator Guide | © 2013 Comodo Security Solutions Inc. | All rights reserved
147
Comodo Endpoint Security Manager - SME - Administrator Guide
•
Select the group from the left hand side pane and select the member endpoint(s) for which you wish to generate the
computer infections report from the right hand side pane.
•
Swipe the screen to the left or click the right arrow to move to step 2.
Step 2 – Options
•
Generate downloadable report file - Select this option if you need to print or archive the report. You can
choose the printable file to be generated in portable document (.pdf) or spreadsheet (.xls) format. On
completion, the report generated can downloaded to the administrator's computer.
Step 3 - Generate Report
•
Click the Finish icon
or swipe the screen to left to start generating the report.
View the Report
•
The 'reports explorer' screen will be opened with the running reports tab selected. All the reports being generated
currently will be listed with their status.
•
On completion of required report generation, select the report and click the details icon
be displayed.
Endpoint Security Manager - SME Administrator Guide | © 2013 Comodo Security Solutions Inc. | All rights reserved
. The report page will
148
Comodo Endpoint Security Manager - SME - Administrator Guide
•
The report will contain a pie chart that provides an at-a-glance comparison of computers that are affected/not affected
by malware from the selected target endpoints.
•
Following this is a list of affected computers along with their IP addresses, online/offline statuses and the name and
location of malware detected on that computer.
•
If the administrator had opted for generating a printable report file in step 1, the report can be downloaded by clicking
the Download icon
at the bottom of the report page.
Available Report Filters
The report screen allows the administrator to optimize the search by using the filter option. The available filters for the Computer
Infections report are:
•
Computer - Filters the report based on computer name
•
Malware Name - Filters the report based on malware name
•
Path - Searches the report based on the path where the malware is located in the endpoint.
•
Date - Searches the report based on the start date and end date
To filter the results:
•
Click the filter icon
in any of the respective column header to search for a particular item.
•
Type or enter the filter criteria fully or partly or select and click 'Apply'.
Only the entries that match the criteria will be displayed in the report.
•
Click 'Reset' to display all the items.
2.5.1.4. Quarantined Items Report
The 'Quarantined Items' report provides details on the malware detected and successfully quarantined at the target computers.
The administrator can identify the quarantined items and the endpoints in which they are quarantined and can remove the
Endpoint Security Manager - SME Administrator Guide | © 2013 Comodo Security Solutions Inc. | All rights reserved
149
Comodo Endpoint Security Manager - SME - Administrator Guide
quarantined items or restore them to their original locations after analyzing the report from the Computer details > Internet
Security screen. Refer Viewing Endpoints > Computer Properties > Internet Security for more details.
Note: For the local CIS installations at the endpoints to quarantine the threats detected during scanning, the policy applied to
them should have been derived from a computer in which CIS has been configured to automatically quarantine the threats
identified from various scans. For more details on configuring CIS refer to the online help guide at http://help.comodo.com/.
To generate a 'Quarantined Items' report, click the 'quarantine' tile from the 'reports gallery' screen.
The 'Create Quarantined Items Report' wizard will start.
Step 1 - Selecting Targets
The 'Select Targets' screen will appear:
Endpoint Security Manager - SME Administrator Guide | © 2013 Comodo Security Solutions Inc. | All rights reserved
150
Comodo Endpoint Security Manager - SME - Administrator Guide
•
Select the group from the left hand side pane and select the member endpoint(s) for which you wish to generate the
Quarantined Items report from the right hand side pane.
•
Swipe the screen to the left or click the right arrow to move to step 2.
Step 2 – Options
•
Select your options for the report:
•
Generate downloadable report file - Select this option if you need to print or archive the report. You can
choose the printable file to be generated in portable document (.pdf) or spreadsheet (.xls) format. On
completion, the report generated can downloaded to the administrator's computer.
Endpoint Security Manager - SME Administrator Guide | © 2013 Comodo Security Solutions Inc. | All rights reserved
151
Comodo Endpoint Security Manager - SME - Administrator Guide
Step 3 - Generate Report
•
Click the Finish icon
or swipe the screen to left to start generating the report.
View the Report
•
The 'reports explorer' screen will be opened with the running reports tab selected. All the reports being generated
currently will be listed with their status.
•
On completion of required report generation, select the report and click the details icon
be displayed.
Endpoint Security Manager - SME Administrator Guide | © 2013 Comodo Security Solutions Inc. | All rights reserved
. The report page will
152
Comodo Endpoint Security Manager - SME - Administrator Guide
Downloading the Report
If the administrator had opted for generating a downloadable report file in step 2 - Options, the report can be downloaded by
clicking the download icon
at the bottom of the report page.
Available Report Filters
The report screen allows the administrator to optimize the search by using the filter option. The available filters for the
Quarantined Items report are:
•
Computer - Searches the report based on the computers' name
•
Malware - Searches the report based on the malware's name
•
Location - Searches the report based on the path where the malware is located in the endpoint
•
Quarantined - Searches the report based on the start date and end date
To filter the results:
•
Click the filter icon
in any of the respective column header to search for a particular item
•
Type or enter the filter criteria fully or partly or select and click 'Apply'
Only the entries that match the criteria will be displayed in the report.
•
Click 'Reset' to display all the items
2.5.1.5. Antivirus Updates Report
The Antivirus Updates report provides details on the antivirus (AV) signature database versions in the target computers and
whether they are up-to-date. The report assists the administrators to decide on the target computers whose AV databases are to
be updated and to run update tasks from the View All Computers screen. Comodo advises administrators to maintain the AV
databases up-to-date in all the managed end-points to get protection against any threats discovered by our AV labs.
To generate a 'Antivirus Updates' report, click the 'Updates' tile from the 'reports gallery' screen.
Endpoint Security Manager - SME Administrator Guide | © 2013 Comodo Security Solutions Inc. | All rights reserved
153
Comodo Endpoint Security Manager - SME - Administrator Guide
The 'Create Antivirus Updates Report' wizard will start.
Step 1 - Selecting Targets
The 'Select Targets' screen will appear:
•
Select the group from the left hand side pane and select the member endpoint(s) for which you wish to generate the
virus signature database updates report from the right hand side pane.
•
Swipe the screen to the left or click the right arrow to move to step 2.
Step 2 – Options
•
Select your options for the report
•
Include computers with outdated virus databases only - The report will ignore the endpoints that have
Endpoint Security Manager - SME Administrator Guide | © 2013 Comodo Security Solutions Inc. | All rights reserved
154
Comodo Endpoint Security Manager - SME - Administrator Guide
the most up-to-date AV signature database in the report and give details only on those having outdated
databases.
•
Generate downloadable report file - Select this option if you need to print or archive the report. You can
choose the printable file to be generated in portable document (.pdf) or spreadsheet (.xls) format. On
completion, the report generated can downloaded to the administrator's computer.
Step 3 - Generate Report
•
Click the Finish icon
or swipe the screen to left to start generating the report.
View the Report
•
The 'reports explorer' screen will be opened with the running reports tab selected. All the reports being generated
currently will be listed with their status.
•
On completion of required report generation, select the report and click the details icon
be displayed.
Endpoint Security Manager - SME Administrator Guide | © 2013 Comodo Security Solutions Inc. | All rights reserved
. The report page will
155
Comodo Endpoint Security Manager - SME - Administrator Guide
•
The report will contain a summary pie chart and an at-a-glance comparison report on numbers of computers that have
outdated/up-to-date AV databases as compared to the latest database version indicated.
•
Following the summary, details of each computer, with their IP Addresses and the installed AV database versions are
displayed.
Downloading the Report
If the administrator had opted for generating a printable report file in step 2, the report can be downloaded by clicking the
Download icon
at the bottom of the report page.
Available Report Filters
The report screen allows the administrator to optimize the search by using the filter option. The available filters for the Antivirus
Updates report are:
•
Computer - Searches the report based on the computers' name
•
IP Address - Filters the report based on the IP Address of the endpoints
•
db Version - Filters the report based on the virus database version
•
Status - Filters the report based on either Up-To-Date, Outdated or Unknown criteria of the endpoints
•
Update Date - Searches the report based on the start date and end date
To filter the results:
Endpoint Security Manager - SME Administrator Guide | © 2013 Comodo Security Solutions Inc. | All rights reserved
156
Comodo Endpoint Security Manager - SME - Administrator Guide
•
Click the filter icon
in any of the respective column header to search for a particular item
•
Type or enter the filter criteria fully or partly or select and click 'Apply'
Only the entries that match the criteria will be displayed in the report.
•
Click 'Reset' to display all the items
2.5.1.6. CIS Log Report
The CIS installation in each target computer maintains a log of events for each of the Antivirus, Firewall and Defense+
components.
•
Antivirus - The Antivirus component documents the results of all actions it performed in an extensive but easy to
understand log report. A detailed scan report contains statistics of all scanned objects, settings used for each task and
the history of actions performed on each individual file. Log entries are also generated during real-time protection, and
after updating the anti-virus database and application modules.
•
Firewall - The Firewall component records a history of all events/actions taken. Firewall 'Events' are generated and
recorded for various reasons - including whenever an application or process makes a connection attempt that
contravenes a rule in the Network Security Policy, or whenever there is a change in Firewall settings.
•
Defense+ - The Defense+ component records a history of all events/actions taken. Defense+ 'Events' are generated
and recorded for various reasons. Examples include changes in Defense+ settings, when an application or process
attempts to access restricted areas or when an action occurs that contravenes the Computer Security Policy.
The CIS Log report shows the log of events stored in the target computers for the selected component. The administrator can
generate different log report for each of the component for viewing and printing/archival purpose.
To generate a 'CIS Log' report, click the 'logs' tile from the 'reports gallery' screen.
The 'Create CIS Log Report' wizard will start.
Step 1 - Select Report Type
The first step is to choose the CIS component for which you want to generate a log report.
Endpoint Security Manager - SME Administrator Guide | © 2013 Comodo Security Solutions Inc. | All rights reserved
157
Comodo Endpoint Security Manager - SME - Administrator Guide
•
Choose the component from Antivirus, Firewall and Defense+ and swipe the screen or click the right arrow to move to
step 2 - Selecting targets
Step 2 - Selecting Targets
The 'Select Targets' screen will appear:
•
Select the group from the left hand side pane and select the member endpoint(s) for which you wish to generate the
CIS Log report from the right hand side pane.
•
Swipe the screen to the left or click the right arrow to move to step 2.
Endpoint Security Manager - SME Administrator Guide | © 2013 Comodo Security Solutions Inc. | All rights reserved
158
Comodo Endpoint Security Manager - SME - Administrator Guide
Step 3 - Selecting the Report Period
The next step is to choose the time period, that the report should include the log saved during it.
•
Specify the period start and end dates in the respective text fields in MM/DD/YYYY format. Alternatively, clicking the
calendar icon at the right end of the text box displays a calendar to select the dates.
Endpoint Security Manager - SME Administrator Guide | © 2013 Comodo Security Solutions Inc. | All rights reserved
159
Comodo Endpoint Security Manager - SME - Administrator Guide
Step 4 - Options
•
Generate downloadable report file - Select this option if you need to print or archive the report. You can
choose the printable file to be generated in portable document (.pdf) or spreadsheet (.xls) format. On
completion, the report generated can be downloaded to the administrator's computer.
Step 5 - Generate Report
•
Click the Finish icon
or swipe the screen to left to start generating the report.
Viewing the Report
•
The 'reports explorer' screen will be opened with the running reports tab selected. All the reports being generated
currently will be listed with their status.
Endpoint Security Manager - SME Administrator Guide | © 2013 Comodo Security Solutions Inc. | All rights reserved
160
Comodo Endpoint Security Manager - SME - Administrator Guide
•
On completion of required report generation, select the report and click the details icon
be displayed.
. The report page will
The report will contain a bar-graph summary of actions taken and the list of log entries for the component selected in step 1,
recorded at the target endpoints selected at step 2 for the time period selected in step 3. If more than one computer is selected
in step 2, the log reports are given for them one by one. The administrator can move through the successive pages by clicking
the right arrow or the required page number at the bottom of the report.
Examples of:
•
Antivirus Log Report
•
Firewall Log Report
•
Defense+ Log Report
... are shown below.
At the bottom of each computer report, there may be additional log entries that can be displayed by clicking the pagination
control
.
Viewing Antivirus Log Report
Endpoint Security Manager - SME Administrator Guide | © 2013 Comodo Security Solutions Inc. | All rights reserved
161
Comodo Endpoint Security Manager - SME - Administrator Guide
Column Descriptions
•
Computer – Indicates the endpoint at which the threat was detected
•
Location - Indicates the location where the application detected with a threat is stored.
•
Malware - Name of the malware event that has been detected.
•
Action - Indicates action taken against the malware through Antivirus.
•
Status - Gives the status of the action taken. It can be either 'Success' or 'Fail'.
•
Date - Indicates the date and time of the event.
Available Filters for Antivirus Log Report
The report screen allows the administrator to optimize the search by using the filter option. The available filters for the Antivirus
Log report are:
•
Computer - Searches the report based on the name of the computer
•
Location - Searches the report based on the path where the malware is located in the endpoint
•
Malware - Filters the report based on malware name
•
Action - Filters the report based on the action taken whether detected or quarantined
•
Status - Filters the report based on the result of the action taken
•
Date - Searches the report based on the start date and end date
To filter the results:
•
Click the filter icon
in any of the respective column header to search for a particular item
•
Type or enter the filter criteria fully or partly or select and click 'Apply'
Only the entries that match the criteria will be displayed in the report.
•
Click 'Reset' to display all the items
Viewing Firewall Log Report
Column Descriptions
Endpoint Security Manager - SME Administrator Guide | © 2013 Comodo Security Solutions Inc. | All rights reserved
162
Comodo Endpoint Security Manager - SME - Administrator Guide
•
Application - Indicates which application or process propagated the event.
•
Action - Indicates how the firewall has reacted to the connection attempt.
•
Protocol - Represents the Protocol application attempted to use to create the connection. This is usually
TCP/IP or UDP - which are the most heavily used networking protocols.
•
Source IP - States the IP address of the host that made the connection attempt. This is usually the IP
address of your computer for outbound connections.
•
Source Port - States the port number on the host at the source IP which was used to make this connection
attempt.
•
Destination IP - States the IP address of the host to which the connection attempt was made. This is usually
the IP address of your computer for inbound connections.
•
Destination Port - States the port number on the host at the destination IP to which the connection attempt
was made.
•
Date - Contains precise details of the date and time of the connection attempt.
Available Filters for Firewall Log Report
The report screen allows the administrator to optimize the search by using the filter option. The available filters for the Firewall
Log report are:
•
Application - Searches the report based on the application name
•
Action - Filters the report based on action taken whether 'Blocked' or 'Asked'
•
Protocol - Filters the report based on the Protocol
•
Source IP - Searches the report based on source IP entered
•
Source Port – Filters the report based on the source port entered
•
Destination IP - Searches the report based on the destination IP
•
Destination Port - Filters the report based on the destination port entered
•
Date - Searches the report based on the start date and end date
To filter the results:
•
Click the filter icon
in any of the respective column header to search for a particular item
•
Type or enter the filter criteria fully or partly or select and click 'Apply'
Only the entries that match the criteria will be displayed in the report.
•
Click 'Reset' to display all the items
Viewing Defense+ Log Report
Endpoint Security Manager - SME Administrator Guide | © 2013 Comodo Security Solutions Inc. | All rights reserved
163
Comodo Endpoint Security Manager - SME - Administrator Guide
Column Descriptions
•
Computer – Indicates the endpoint at which the event has propagated
•
Application - Indicates which application or process propagated the event
•
Target - Represents the location of the target file
•
Date - Contains precise details of the date and time of the access attempt
Available Filters for Defense+ Log Report
The report screen allows the administrator to optimize the search by using the filter option. The available filters for the Defense+
Log report are:
•
Computer - Searches the report based on the computer name
•
Application - Searches the report based on the path where the application is located in the endpoint
•
Target - Filters the report based on the target location
•
Date - Searches the report based on the start date and end date
Endpoint Security Manager - SME Administrator Guide | © 2013 Comodo Security Solutions Inc. | All rights reserved
164
Comodo Endpoint Security Manager - SME - Administrator Guide
To filter the results:
•
Click the filter icon
in any of the respective column header to search for a particular item
•
Type or enter the filter criteria fully or partly or select and click 'Apply'
Only the entries that match the criteria will be displayed in the report.
•
Click 'Reset' to display all the items
Downloading the Report
If the administrator had opted for generating a printable report file in step 4, the report can be downloaded by clicking the
Download icon
at the bottom of the report page.
2.5.1.7. Policy Compliance Report
Each target computer in ESM can receive a security policy that dictates the security settings of each of the antivirus, firewall and
Defense+ components of CIS installed at the target computer. The CIS installation at the target endpoint will automatically be
configured as per the applied policy when CIS is in remote management mode.
If the end-user or the network administrator changes any of the security settings in their local installation of CIS by switching it to
local administration mode, the computer becomes 'non-compliant' with its designated (or 'applied') policy. If the computer is
switched back to remote management mode, its designated policy will be automatically reapplied at next polling time (as per the
agent settings made to the policy) and the computer's status will return to 'compliant'.
The target computer will be retained in Non-Compliant status under the following conditions:
•
CIS on the target computer is maintained in local administration mode and settings were modified
•
CIS on the target computer was switched to Remote Management mode but the policy has not yet been applied
because ESM has not yet polled the computer
The target computers applied with the 'Locally Configured' policy will always be retained in 'Compliant' status as ESM does not
enforce any policy compliance on to them. Also, 'Locally Configured' policy allows the user to change the CIS configuration
settings locally and stores the changes dynamically. If the target computer is switched back to Local Configuration policy from
any other ESM applied security policy, the last stored configuration is restored on to it.
Tip: To ensure a new configuration is applied permanently, leave the endpoint in local administration mode, import the
configuration as a new policy into ESM and apply it to the required target computer(s) (including the one from which the
settings are imported). See 'Creating a New Policy' for more details.
Administrators are advised to regularly check whether imported computers are compliant with their assigned policy. Noncompliance can indicate changes in management mode and/or unauthorized changes to CIS security settings.
The Policy Compliance report provides a summary of the compliance of the target computers and details of computers which are
non-compliant to the policy.
To generate a Policy Compliance report, click the 'compliance' tile from the 'reports gallery' screen.
Endpoint Security Manager - SME Administrator Guide | © 2013 Comodo Security Solutions Inc. | All rights reserved
165
Comodo Endpoint Security Manager - SME - Administrator Guide
The Create 'Policy Compliance Report' wizard will be started.
Step 1 - Selecting Targets
The 'Select Targets' screen will appear:
Endpoint Security Manager - SME Administrator Guide | © 2013 Comodo Security Solutions Inc. | All rights reserved
166
Comodo Endpoint Security Manager - SME - Administrator Guide
•
Select the group from the left hand side pane and select the member endpoint(s) for which you wish to generate the
'Policy Compliance' report from the right hand side pane.
•
Swipe the screen to the left or click the right arrow to move to step 2.
Step 2 - Options
The next step allows the administrator to choose the options for the report:
Endpoint Security Manager - SME Administrator Guide | © 2013 Comodo Security Solutions Inc. | All rights reserved
167
Comodo Endpoint Security Manager - SME - Administrator Guide
•
•
Include only non-compliant computers - The report will contains details of only the computers that are
non-compliant
•
Generate downloadable report file - Select this option if you need to print or archive the report. You can
choose the printable file to be generated in portable document (.pdf) or spreadsheet (.xls) format. On
completion, the report generated can downloaded to the administrator's computer.
Swipe the screen or click the right arrow to move to next step.
Step 4 - Generating the Report
•
Click the Finish icon
or swipe the screen to left to start generating the report.
Viewing the Report
•
The 'reports explorer' screen will be opened with the running reports tab selected. All the reports being generated
currently will be listed with their status.
•
On completion of required report generation, select the report and click the details icon
be displayed.
•
The report will contain a summary pie chart providing at-a-glance comparison on numbers of computers that are
compliant, non-compliant and are pending to be applied with the policy.
•
Following the summary, details of each computer, with their associated group, IP addresses, applied Policy,
compliancy status, last compliancy checked time, when the non-compliant computers went non-compliant are
displayed.
•
Clicking the Policy name from the list opens the 'Policy Properties' interface of it. The interface allows the administrator
to edit the policy and reapply it to the respective targets. Refer to Viewing Policies for more details.
. The report page will
Available Report Filters
Endpoint Security Manager - SME Administrator Guide | © 2013 Comodo Security Solutions Inc. | All rights reserved
168
Comodo Endpoint Security Manager - SME - Administrator Guide
The report screen allows the administrator to optimize the search by using the filter option. The available filters for the Policy
Compliance report are:
•
Computer - Searches the report based on the computers' name
•
IP Address - Filters the report based on the IP Address of the endpoints
•
Group - Searches the report based on the group's name
•
Status - Filters the report based on the status of policy whether it is pending, non-complaint or OK
•
Current Policy - Searches the report based on the policy name
•
Last Poll - Searches the report based on poll period start and poll period end
•
Next poll - Filters and displays endpoints based on their next polling time
To filter the results:
•
Click the filter icon
in any of the respective column header to search for a particular item
•
Type or enter the filter criteria fully or partly or select and click 'Apply'
Only the entries that match the criteria will be displayed in the report.
•
Click 'Reset' to display all the items
Downloading the Report
If the administrator had opted for generating a printable report file in step 2, the report can be downloaded by clicking the
Download icon
at the bottom of the report page.
2.5.1.8. Policy Delta Report
The Policy Delta report provides a summary of the changes in the configuration of components of CIS at the 'Non-Compliant'
endpoints, with respect to the security policy applied to them. During report generation, ESM compares two configurations
(source policy on the server side and target policy on the endpoint) component by component and provides details on the
components that are unchanged, changed or missing from the applied policy. The details in the report are helpful to the
administrator for investigating the changes made to CIS settings in the target computer and the reason(s) the computer received
its non-compliant status.
To generate a 'Policy Delta' report click the 'policy delta' tile from the 'reports gallery' interface.
Endpoint Security Manager - SME Administrator Guide | © 2013 Comodo Security Solutions Inc. | All rights reserved
169
Comodo Endpoint Security Manager - SME - Administrator Guide
The 'Create Policy Delta Report' wizard will start.
Step 1 - Selecting Targets
The 'Select Targets' screen will be displayed:
Endpoint Security Manager - SME Administrator Guide | © 2013 Comodo Security Solutions Inc. | All rights reserved
170
Comodo Endpoint Security Manager - SME - Administrator Guide
•
Select the group from the left hand side pane and select the member endpoint(s) indicated as 'non-compliant' for
which you wish to generate the 'Policy Delta' report from the right hand side pane.
•
Swipe the screen to the left or click the right arrow to move to step 2.
Step 2 - Options
•
Generate downloadable report file - Select this option if you need to print or archive the report. You can
choose the printable file to be generated in portable document (.pdf) or spreadsheet (.xls) format. On
completion, the report generated can downloaded to the administrator's computer.
Step 3 - Generate Report
•
Click the Finish icon
or swipe the screen to left to start generating the report.
Viewing the Report
•
The 'reports explorer' screen will be opened with the running reports tab selected. All the reports being generated
currently will be listed with their status.
•
On completion of required report generation, select the report and click the details icon
be displayed.
. The report page will
The report will contain bar-graph summary of the policy compliance status and a list of 'Non-Compliant' computers with the
status of each component of CIS in the computer.
Endpoint Security Manager - SME Administrator Guide | © 2013 Comodo Security Solutions Inc. | All rights reserved
171
Comodo Endpoint Security Manager - SME - Administrator Guide
The status of each component indicates the difference in configuration of the component with respect to the actual setting as per
the policy applied.
•
Absent in target policy - means component is present on the endpoint, but the settings for it are not contained in the
policy applied by ESM. The administrator can apply a different policy imported from a different source that contains
settings for all the components.
Endpoint Security Manager - SME Administrator Guide | © 2013 Comodo Security Solutions Inc. | All rights reserved
172
Comodo Endpoint Security Manager - SME - Administrator Guide
•
Missing - means either the component is absent on both the policy and the endpoint sides or on the endpoint side.
•
Changed - means the configuration of the component in the endpoint side is different from the policy applied.
•
Not Changed - means the configuration of the component is the same on both the policy and the endpoint sides.
Sorting the Entries
Clicking any column heading switches the sorting of the entries based on the ascending/descending order of the entries as per
the information displayed in the respective column.
Available Report Filters
The report screen allows the administrator to optimize the search by using the filter option. The available filters for the Policy
Delta report are:
•
Policy Component - Searches the report based on the policy component's name
•
Status - Filters the report based on the status of the policy component
To filter the results:
•
Click the filter icon
in any of the respective column header to search for a particular item
•
Type or enter the filter criteria fully or partly or select and click 'Apply'
Only the entries that match the criteria will be displayed in the report.
•
Click 'Reset' to display all the items
Downloading the Report
If the administrator had opted for generating a printable report file in step 2, the report can be downloaded by clicking the
Download icon
at the bottom of the report page.
2.5.1.9. Malware Statistics Report
The Malware Statistics report provides a graphical representation of the total malware identified at the target endpoints and the
actions taken against them by CIS during a selected period and a list of those malware with details on the target computers from
which they are identified. The report enables the administrator to learn the trend of malware attacks that have occurred during a
certain period of time.
To generate a 'Malware Statistics' report click the 'statistics' tile from the 'reports gallery' screen.
Endpoint Security Manager - SME Administrator Guide | © 2013 Comodo Security Solutions Inc. | All rights reserved
173
Comodo Endpoint Security Manager - SME - Administrator Guide
The 'Create Malware Statistics Report' wizard will start.
Step 1 - Select Targets
The 'Select Targets' screen will appear:
Endpoint Security Manager - SME Administrator Guide | © 2013 Comodo Security Solutions Inc. | All rights reserved
174
Comodo Endpoint Security Manager - SME - Administrator Guide
•
Select the group from the left hand side pane and select the member endpoint(s) for which you wish to generate the
'Malware Statistics' report from the right hand side pane.
•
Swipe the screen to the left or click the right arrow to move to step 2.
Step 2 - Selecting Report Parameters
The next step is to select the period for which you wish the report to be created.
Endpoint Security Manager - SME Administrator Guide | © 2013 Comodo Security Solutions Inc. | All rights reserved
175
Comodo Endpoint Security Manager - SME - Administrator Guide
•
The time period options available are:
•
Year - Generates statistics from any year (from 1st January YYYY).
•
Month - Generates statistics from the beginning of the current month (from 1st MM YYYY).
•
Week - Generates statistics for any of the weeks between Sunday and Saturday. The week can be selected
from a calendar in the next step 'Select Period'.
•
Daily - Generates statistics for any one day. The day can be selected from a calendar in the next step
'Select Period'.
•
Select the time period for which you wish to generate the statistics report
•
Options:
•
Include details on actions taken - Select this option if you want the Malware Statistics report t contain
'Details per computer' that gives details on each and every malware detected, its detection location and time
and the action taken on it by CIS at the endpoint(s). The report will contain only graphical representations of
the statistics of malware detected from various target computers if this option is not selected.
•
Swipe the screen or click the right arrow to move to step 3 - Select Period.
Step 3 - Select Period
Endpoint Security Manager - SME Administrator Guide | © 2013 Comodo Security Solutions Inc. | All rights reserved
176
Comodo Endpoint Security Manager - SME - Administrator Guide
The next screen allows you to choose the specific time period as per the selection made in step 2.
•
Swipe the screen or click the right arrow to move to step 4 - Options
Step 4 – Options
•
Generate downloadable report file - Select this option if you need to print or archive the report. You can
choose the printable file to be generated in portable document (.pdf) or spreadsheet (.xls) format. On
completion, the report generated can be downloaded to the administrator's computer.
Step 5 - Generate Report
•
Click the Finish icon
or swipe the screen to left to start generating the report.
Viewing the Report
•
The 'reports explorer' screen will be opened with the running reports tab selected. All the reports being generated
currently will be listed with their status.
Endpoint Security Manager - SME Administrator Guide | © 2013 Comodo Security Solutions Inc. | All rights reserved
177
Comodo Endpoint Security Manager - SME - Administrator Guide
•
On completion of required report generation, select the report and click the details icon
be displayed.
. The report page will
The report will contain a bar-graph representation malware statistics of the selected target computers for the selected time
period. If the option 'Include details on actions taken' is chosen in step 2, the report will also contain 'Details per Computer' with
granular details on the malware found at each endpoint and the action taken against them.
Example 1 - Malware Statistics only:
Endpoint Security Manager - SME Administrator Guide | © 2013 Comodo Security Solutions Inc. | All rights reserved
178
Comodo Endpoint Security Manager - SME - Administrator Guide
'Deleted', 'Ignored' and 'Quarantined' are the decisions taken by CIS in reaction to each piece of detected malware. The first
chart indicates that a total of malware alerts were generated in the time period. The 2nd chart breaks down 10 alerts by the
decisions taken by CIS.
Example 2 - Malware Statistics report with Details per Computer:
•
The screenshot on the next page shows an example of 'Malware Statistics' Detailed Report. The detailed report shows
the comparison graphs and details on the malware identified from the selected endpoints.
Endpoint Security Manager - SME Administrator Guide | © 2013 Comodo Security Solutions Inc. | All rights reserved
179
Comodo Endpoint Security Manager - SME - Administrator Guide
Available Report Filters
The report screen allows the administrator to optimize the search by using the filter option. The available filters for the Malware
Statistics report are:
•
Malware - Searches the report based on the malware's name
•
Location - Searches the report based on the path where the malware is located in the endpoint
•
Date/Time - Searches the report based on the action taken date and time
•
Action - Filters the report based on the action taken
To filter the results:
•
Click the filter icon
in any of the respective column header to search for a particular item
•
Type or enter the filter criteria fully or partly or select and click 'Apply'
Only the entries that match the criteria will be displayed in the report.
•
Click 'Reset' to display all the items
Downloading the Report
If the administrator had opted for generating a printable report file in step 4, the report can be downloaded by clicking the
Download icon
2.5.1.10.
at the bottom of the report page.
Top Ten Malware Report
The 'Top Ten Malware' report provides information on the malware that has most affected the selected endpoints in the network.
ESM ranks the malware identified at various target computers based on their number of appearances. The 'Top Ten Malware'
report gives details on the malware that are at the first ten positions. The report enables the administrator to learn on what type
of malware the network is prone to and to take necessary actions to safeguard the network against them.
To generate a 'Top Ten Malware' report click the 'top 10' tile from the 'reports gallery' screen.
Endpoint Security Manager - SME Administrator Guide | © 2013 Comodo Security Solutions Inc. | All rights reserved
180
Comodo Endpoint Security Manager - SME - Administrator Guide
The 'Create Top 10 Malware Report' wizard will start.
Step 1 - Selecting Targets
The 'Select Targets' screen will appear:
•
Select the group from the left hand side pane and select the member endpoint(s) for which you wish to generate the
'Top 10 Malware' report from the right hand side pane.
•
Swipe the screen to the left or click the right arrow to move to step 2.
Step 2 - Selecting the Report Period
The next step is to choose the time period for which the report should include the top 10 malware identified.
Endpoint Security Manager - SME Administrator Guide | © 2013 Comodo Security Solutions Inc. | All rights reserved
181
Comodo Endpoint Security Manager - SME - Administrator Guide
•
Specify the period start and end dates in the respective text fields in MM/DD/YYYY format. Alternatively, clicking the
calendar icon at the right end of the text box displays a calendar to select the dates.
Step 3 – Options
•
Generate downloadable report file - Select this option if you need to print or archive the report. You can choose the
printable file to be generated in portable document (.pdf) or spreadsheet (.xls) format. On completion, the report
generated can be downloaded to the administrator's computer.
Step 4 - Generate Report
Endpoint Security Manager - SME Administrator Guide | © 2013 Comodo Security Solutions Inc. | All rights reserved
182
Comodo Endpoint Security Manager - SME - Administrator Guide
•
Click the Finish icon
or swipe the screen to left to start generating the report.
Viewing the Report
•
The 'reports explorer' screen will be opened with the running reports tab selected. All the reports being generated
currently will be listed with their status.
•
On completion of required report generation, select the report and click the details icon
be displayed.
Endpoint Security Manager - SME Administrator Guide | © 2013 Comodo Security Solutions Inc. | All rights reserved
. The report page will
183
Comodo Endpoint Security Manager - SME - Administrator Guide
The report will display a bar graph representation of comparison of the malware in terms of their number of occurrences and a
list of top 10 malware with details on number of appearances and the target computer(s) at which the malware is detected.
Available Report Filters
The report screen allows the administrator to optimize the search by using the filter option. The available filters for the Top 10
Malware report are:
•
Malware - Searches the report based on the malware's name.
•
Number of appearances - Filters the report based on the number of times the malware has affected the endpoints..
To filter the results:
•
Click the filter icon
in any of the respective column header to search for a particular item.
Endpoint Security Manager - SME Administrator Guide | © 2013 Comodo Security Solutions Inc. | All rights reserved
184
Comodo Endpoint Security Manager - SME - Administrator Guide
•
Type or enter the filter criteria fully or partly or select and click 'Apply'.
Only the entries that match the criteria will be displayed in the report.
•
Click 'Reset' to display all the items.
Downloading the Report
If the administrator had opted for generating a printable report file in step 2, the report can be downloaded by clicking the
Download icon
at the bottom of the report page.
2.5.2. Report Explorer
ESM maintains a history of reports generated at different time points and displays them as a list in the 'Reports Explorer'
screen. The administrator can view the full reports and if a downladable report is available, the administrator can download the
report from the report explorer screen.
The Report Explore screen has two tabs:
•
•
Completed Reports - Displays a list of generated and available reports
Running reports - Displays a list of reports under processing
•
To view a report, double click it or select and click the details icon
•
To download the report file, click 'download' beside the required report. The download link will be available only for the
reports generated with the option for downloadable report selected.
•
To remove a report, select it and click 'remove' icon
.
.
Report Filters
The report explorer allows the administrator to filter and search specific reports by using the filter option. The available filters are:
•
report - Filters the reports based on the full or partly entered name of the report
Endpoint Security Manager - SME Administrator Guide | © 2013 Comodo Security Solutions Inc. | All rights reserved
185
Comodo Endpoint Security Manager - SME - Administrator Guide
•
status - Filters the reports based on their completion status
•
date requested - Filters the reports based on their requisition date
•
date completed - Filters the reports based on their completion date
To filter the results:
•
Click the filter icon
in any of the respective column header.
•
Type the filter criteria fully or partly or select and click 'Apply'.
Only the entries that match the criteria will be displayed in the report.
•
Click 'Reset' to display all the items.
2.5.3. Report Settings
The 'Settings' screen allows the administrator to configure the lifetime of the generated reports.
•
If you want the older reports to be deleted from the server, select 'Remove old reports' checkbox and select the time
period for which the reports can be maintained in the server from the 'Age' drop-down.
•
Click 'Save' for your settings to take effect.
2.6.About
The 'About' interface provides the copyright information and the current ESM version number, server information and license
information. You can also update ESM to a newer version, if available and upgrade your license from the 'About 'interface
To view the 'About' interface
•
Click the 'About' link at the top right of the interface.
The About Interface contains three screens:
Endpoint Security Manager - SME Administrator Guide | © 2013 Comodo Security Solutions Inc. | All rights reserved
186
Comodo Endpoint Security Manager - SME - Administrator Guide
•
about
•
server information
•
license information
You can navigate within these screens by clicking the respective links at the top left, swiping the screen and clicking the left and
right arrows.
About
The 'About' screen displays the current ESM SME version.
•
If any newer version of the application is available, you can download it by clicking the 'Download version...' link.
•
End-user license agreement - Click this link to read the full end user license agreement.
•
Online help - Opens the online help guide of ESM SME. The ESM help guide contains detailed explanations of the
functionality and usage of the application.
•
Support forums - Click this link to get further assistance on ESM by posting your question on Comodo Forums, a
message board exclusively created for our users to discuss anything related to our products.
Server Information
A snapshot of the ESM server configuration information is displayed. Refer Appendix 1 for more information on the service
configuration tool.
Endpoint Security Manager - SME Administrator Guide | © 2013 Comodo Security Solutions Inc. | All rights reserved
187
Comodo Endpoint Security Manager - SME - Administrator Guide
License Information
The license information screen displays the details of the current license information. If you want to include more endpoints than
is allowed for your current license and manage them, you can upgrade your license by clicking the 'upgrade license' link . Refer
to License Status Tile section for more information on upgrading your license.
Endpoint Security Manager - SME Administrator Guide | © 2013 Comodo Security Solutions Inc. | All rights reserved
188
Comodo Endpoint Security Manager - SME - Administrator Guide
2.7.Logging out of ESM Console
Administrators can logout of the ESM console by clicking the 'logout' link at the top right of the interface.
Endpoint Security Manager - SME Administrator Guide | © 2013 Comodo Security Solutions Inc. | All rights reserved
189
Comodo Endpoint Security Manager - SME - Administrator Guide
Closing the browser window or tab containing the console or pressing the 'Refresh' button will also logout the administrators.
3.How To... Tutorials
The 'How To...' section of the guide contains guidance on using ESM effectively. Click on the links below to go the respective
tutorial page for guidance of the respective feature.
•
How to connect CIS to ESM at the local endpoint
•
How to configure CIS policies - an introduction
•
How to set up external access from the Internet
•
How to install CIS
We also have a set of video walkthroughs to guide you through some common tasks:
•
ESM SME 2.1. Installation (with Caching Proxy) - http://www.youtube.com/watch?v=xLMDpGhnzxw
•
Endpoint Updates Management - http://www.youtube.com/watch?v=u4gbM0ePmog
•
Policy Editing - http://www.youtube.com/watch?v=PxExyj9sHcU
•
Scan/Update Progress - http://www.youtube.com/watch?v=Rgt9nELtDHE
3.1.How to Connect CIS to ESM at the Local Endpoint
This page explains how computers that have standalone Comodo Internet Security (CIS) installed on them can be connected to
the ESM service via the CIS interface (directly from the endpoint itself).
In short:
•
Open CIS on the endpoint.
•
Click 'More' at the top right corner of the interface; then 'Manage This Endpoint'.
•
Specify the hostname / IP address and port of the ESM server (default to be entered = 57193 unless changed in the
Configuration Tool).
•
The ESM agent will be installed on the local machine and a connection will be established with the ESM server.
•
Connection details will be displayed at the bottom left of the main interface in the 'Managed Client' area. The
machine will initially be placed in the 'Unassigned' group in ESM and will inherit that group's security Policy.
The default parameter for the 'Unassigned' group is security policy = 'Locally configured'. Because the policy is 'Locally
Configured', this means that ESM will not enforce policy on the endpoint and the endpoint will use the CIS settings that
Endpoint Security Manager - SME Administrator Guide | © 2013 Comodo Security Solutions Inc. | All rights reserved
190
Comodo Endpoint Security Manager - SME - Administrator Guide
are currently in place.
•
Endpoints can be moved into groups in the 'Computers' area. See 'Creating Endpoint Groups' for more
details.
•
Policies can be specified and assigned to groups/individual computers in the 'Policies' area. See 'Creating a
New Policy' and 'The Policies Area - Key Concepts' for more details.
•
Switch between local and remote administration modes at the local endpoint by using the 'Manage
Remotely/Manage Locally' link underneath 'Managed Client'.
Expanded version of the process
1.
On the endpoint to be managed, open the CIS interface using one of the following methods:
•
Windows Start Menu - Start > All Programs > COMODO > COMODO Internet Security > Comodo Internet
Security
•
Double-click the desktop shortcut or tray icon
The CIS Summary screen will display details of the connection on the bottom left pane of the interface only after the installation
of the ESM agent.
2.
Click the 'More' button at the top of the navigation. Click 'Manage This Endpoint'.
3.
Enter the hostname / IP address of the server in which the ESM service is installed in the ESM Server field. These
details, if required, can be found by opening the configuration ESM tool on the server (Start > All Programs >
COMODO > Endpoint Security Manager > CESM configuration tool). See Configuration Tool for more details.
4.
Do not change the port number from 57193 in the ESM Server Port field unless the administrator changed the port
using the Configuration Tool.
Endpoint Security Manager - SME Administrator Guide | © 2013 Comodo Security Solutions Inc. | All rights reserved
191
Comodo Endpoint Security Manager - SME - Administrator Guide
5.
Click 'Install' to begin installation of the agent. Once complete, you will be presented with a confirmation message in
the 'Status' area. Click 'Close' to exit the wizard.
The endpoint should now be successfully connected to ESM service. Connection details can be viewed at the bottom left of the
interface:
The administrator can switch to 'Local Mode' from 'Remote Mode' by clicking the 'Manage Locally' link (and vice versa if the
machine is currently under 'Local Mode').
3.2.How to configure CIS Policies - An Introduction
A ESM policy is the security configuration of Comodo Internet Security (CIS) deployed on an endpoint or a group of endpoints.
Each policy determines the antivirus settings, Internet access rights, firewall traffic filtering rules, sandbox configuration and
Defense+ application control settings for an endpoint.
In order to configure Antivirus, Firewall and Defense+ settings in CIS on an endpoint computer, the administrator has to ensure
that the endpoint computer is either 'Locally Configured' (it has no policy) or it is in local mode (or ESM will remotely re-apply the
endpoint's security policy and override any changes made by the administrator).
Click 'Manage Locally' at the lower left of the CIS interface to enable local administration mode:
Endpoint Security Manager - SME Administrator Guide | © 2013 Comodo Security Solutions Inc. | All rights reserved
192
Comodo Endpoint Security Manager - SME - Administrator Guide
Once the machine is in 'Local Mode', the link will be 'Manage Remotely':
Once the administrator has created the policy on the new machine, it can be imported in ESM from this machine then applied to
target computers as required (including the one from which the settings are imported). Note - remember to keep the machine in
'Local Mode' until import and deployment is complete. After policy has been deployed, it can be switched back to 'Remote
Mode'. See 'Creating a New Policy' for more details.
The remainder of this page is a quick primer to key areas within CIS for modifying Antivirus, Firewall and Defense+ settings
along with links to the appropriate section in the dedicated CIS user-guide should further help be required.
Antivirus Settings
Comodo Antivirus leverages multiple technologies, including Real-time/On-Access Scanning, On Demand Scanning and a fully
featured Scan Scheduler to immediately start cleaning or quarantining suspicious files from your hard drives, shared disks,
emails, downloads and system memory.
To configure Antivirus Behavior Settings
Click 'Antivirus' from the top navigation of the CIS interface and click 'Scanner Settings' from the Antivirus tasks interface. The
Antivirus Behavior Settings interface will open.
Endpoint Security Manager - SME Administrator Guide | © 2013 Comodo Security Solutions Inc. | All rights reserved
193
Comodo Endpoint Security Manager - SME - Administrator Guide
Firewall Settings
The firewall component of Comodo Internet Security offers the highest levels of security against inbound and outbound threats,
can stealth endpoint ports against hackers and can prevent malicious software from transmitting confidential data over the
Internet.
To configure Firewall Behavior Settings
•
Click 'Firewall' from the top navigation of the CIS interface and click 'Firewall Behavior Settings' from the Firewall tasks
interface. The Firewall Behavior Settings interface will open.
Endpoint Security Manager - SME Administrator Guide | © 2013 Comodo Security Solutions Inc. | All rights reserved
194
Comodo Endpoint Security Manager - SME - Administrator Guide
Defense+ Settings
The Defense+ component of Comodo Internet Security is a host intrusion prevention system that constantly monitors the
activities of all executable files on endpoint PCs. With Defense+ activated, the only executables that are allowed to run are the
ones you give permission to. The Defense+ area also allows admins to configure sandbox settings.
To configure Defense+ Settings
•
Click 'Defense+' from the top navigation of the CIS interface and click 'Defense+ Settings' from Defense+ Tasks
interface. The Defense+ Settings interface will open.
Endpoint Security Manager - SME Administrator Guide | © 2013 Comodo Security Solutions Inc. | All rights reserved
195
Comodo Endpoint Security Manager - SME - Administrator Guide
•
If more details are required for these settings, see http://help.comodo.com/ for Comodo Internet Security.
For more details on installing CIS in an endpoint computer and connecting it to ESM from the CIS interface, refer the sections
How to Install CIS and How to Connect CIS to ESM at the Local Endpoint.
3.3.How to Setup External Access from Internet
The following guide explains how to configure ESM so that it can remotely manage endpoints that are connected via the
Internet:
•
Make sure that the ESM server has an externally accessible IP address
•
Open the ESM configuration tool - click 'Start > All Programs > COMODO > Endpoint Security Manager > CESM
Configuration Tool'
Endpoint Security Manager - SME Administrator Guide | © 2013 Comodo Security Solutions Inc. | All rights reserved
196
Comodo Endpoint Security Manager - SME - Administrator Guide
•
Add the Internet reachable server IP address (alternatively hostname or FQDN) to the 'Server network addresses' list
(just begin typing in the first blank row)
Endpoint Security Manager - SME Administrator Guide | © 2013 Comodo Security Solutions Inc. | All rights reserved
197
Comodo Endpoint Security Manager - SME - Administrator Guide
•
Click OK.
•
You will be prompted to restart the service.
•
Click 'Yes' to restart the service.
•
If your network is equipped with a router or other similar device, it should be configured with ESM ports
forwarding (list of ports to be forwarded are listed in the 'Server Ports' on the right. Default ports are 57193, 57194
(console) and 9901 (agent).
To install agents on endpoints that are not on the local network
•
At the 'Computers' area of the administrative interface, click the 'Download Agent' tile.
•
Click 'Save' in the 'File Download' dialog and save the file in the location of your choice.
•
The Agent Setup file enables the agent to be installed on any laptops that will be used outside the network.
•
Double clicking on the setup file
will start the installation wizard. For more details, please see Adding
Computers by Manual Installation of Agent and CIS.
Endpoint Security Manager - SME Administrator Guide | © 2013 Comodo Security Solutions Inc. | All rights reserved
198
Comodo Endpoint Security Manager - SME - Administrator Guide
OR
•
Install CIS on the local machine then click the 'Manage This Endpoint' link. This will start a connection wizard. On
specifying the Internet reachable IP address or hostname of the ESM server the wizard starts installation of the agent
and establishes the connection between the endpoint and the ESM server. This process can be carried out by the
administrator or by end-users if the endpoint is already in a remote location outside of the network. See 'How to
connect CIS to ESM at the local endpoint' for more details on this process.
Applying Policy for Endpoints Connected in Local Network and for Endpoints Connected via Internet
An administrator can create two policies for applying to a group of endpoints, where some endpoints are connected in local
network and some are connected via the Internet. For example, the group may be named as 'HR Department' and the
administrator can create two policies named as 'Policy for HR department - High Security' and 'Policy for HR department Medium Security'. Now the administrator can select 'Policy for HR department - Medium Security' as Local Policy and 'Policy for
HR department - High Security' as Internet Policy for this group.
The endpoints in the 'HR Department' group that connect to ESM through local network will be applied 'Policy for HR department
- Medium Security' and for endpoints that connect via Internet will be applied 'Policy for HR department - High Security'.
•
See section Creating Endpoint Groups for more details on creating endpoint groups
•
See section Creating a New Policy for more details on creating a new policy
•
See section Key Concepts to know about ESM Key Concepts
•
See section 'Best Practices' to know how to use ESM effectively
3.4.How to Install CIS
An Administrator can install CIS in endpoint computers either by using the ESM interface during agent deployment or manually
by downloading the latest CIS setup file.
•
Installing CIS via ESM
•
Manually installing CIS in endpoint computers.
To install CIS using the ESM interface:
1.
Click the 'deploy' tile from the 'computers' area to start the wizard.
2.
Select the Target Type from Active Directory, Workgroup or Network Addresses and click the right arrow.
3.
Specify the parameters for the chosen target type, then in the next step, a summary of endpoints will be displayed.
4.
Select the endpoints onto which you wish to install the agent and CIS and click the right arrow.
5.
The next step is to select whether the agent and CIS has to be installed under the currently logged in user account or
the network administrator account.
The next step allows you to check for newer versions of ESM agent and CIS. Click 'Check for updates' and download
if the screen displays updates are available.
The next step is opting for installation of Comodo Internet Security (CIS) on to the selected endpoints.
6.
7.
Endpoint Security Manager - SME Administrator Guide | © 2013 Comodo Security Solutions Inc. | All rights reserved
199
Comodo Endpoint Security Manager - SME - Administrator Guide
8.
Select 'Install Comodo Internet Security' check box.
9.
Select the version of CIS you wish to install on the selected endpoints from the drop-down.
10. Select whether you want to include all the components (Firewall and Antivirus), Antivirus only or Firewall only from the
Components drop-down.
11. Suppress reboot after installation - CIS installation will restart of the endpoints for the installation to take effect. If you
do not want the endpoints to be restarted on completion of installation, select this check box. CIS installation will
complete but will take effect only on the next restart of the endpoint.
12. Uninstall all incompatible products - Selecting this option will uninstall select third party antivirus, firewall and other
desktop security software from the endpoints, prior to the installation of CIS. Performing this step will remove
potentially incompatible products and thus enable CIS to operate correctly. Some incompatible products can be
detected, but not automatically uninstalled and must be removed manually. If your product is detected but not
uninstalled, please consult your vendor’s documentation for precise uninstallation guidelines.
Click Here to see the full list of incompatible products.
13. Click the right arrow to move to the next step.
14. Click 'start deployment' to begin the installation process.
ESM will start installing the agent/CIS on to the selected endpoints and the progress will be displayed.
Endpoint Security Manager - SME Administrator Guide | © 2013 Comodo Security Solutions Inc. | All rights reserved
200
Comodo Endpoint Security Manager - SME - Administrator Guide
On completion of installation, the result screen will appear.
Endpoint Security Manager - SME Administrator Guide | © 2013 Comodo Security Solutions Inc. | All rights reserved
201
Comodo Endpoint Security Manager - SME - Administrator Guide
15. Click Finish icon
to exit the wizard.
The agent and CIS are installed in the selected endpoints successfully.
See section 'Importing Computers by Automatic Installation of Agent' for more details on installation of agent and CIS
automatically.
To install CIS in endpoint computers manually
1.
Download the latest version of CIS and copy the setup file in the endpoint computer that you want to install the CIS.
2.
Double-click 'cispremium_installer.exe' to begin the setup process.
3.
For more details on the installation procedure, see http://help.comodo.com/ for Comodo Internet Security.
4.
If you wish to connect the endpoint computer to ESM directly from the CIS interface, please see How to Connect CIS
to ESM at the Local Endpoint.
Endpoint Security Manager - SME Administrator Guide | © 2013 Comodo Security Solutions Inc. | All rights reserved
202
Comodo Endpoint Security Manager - SME - Administrator Guide
Appendix 1 The Service Configuration Tool
The Service Configuration Tool enables the administrator to start and stop the ESM central service, change server and agent
ports settings, change database connection settings and view a log of database events.
The tool is installed as a separate application and can be accessed from the Windows Start Menu.
To open the Service Configuration Tool, Click Start > All Programs > COMODO > Endpoint Security Manager > CESM
Configuration Tool.
Endpoint Security Manager - SME Administrator Guide | © 2013 Comodo Security Solutions Inc. | All rights reserved
203
Comodo Endpoint Security Manager - SME - Administrator Guide
The main interface of the tool will be opened. It contains four areas:
•
Service Status Area - Indicates the current service ESM status and allows administrator to start or stop the service
•
Main Settings - Enables the administrator to view and modify the connection and port settings
•
Server Certificate - Enables the administrators to manage server SSL certificates
•
Internet and Mail Settings - Enables the administrator to view and modify proxy server and outgoing mail settings
•
Event Log - Enables the administrator to view the log of database events
•
Caching Proxy Settings - Enables administrators to manage access to resources.
Start and Stop the ESM Service
The Service Status area at the top of the interface displays the current running status of the ESM Service as 'Running' or
'Stopped'.
•
To stop the running service, simply click the 'Stop' button
Endpoint Security Manager - SME Administrator Guide | © 2013 Comodo Security Solutions Inc. | All rights reserved
204
Comodo Endpoint Security Manager - SME - Administrator Guide
•
To start the service, simply click the 'Start' button
Main Settings
The Main Settings page displays the ESM server IP addresses and/or hostnames in the 'Server Network Addresses' field and
Database connection settings, Console Port, Secure Console Port and Agent Ports at the right.
•
To add an IP or Hostname, simply begin typing in the blank row beneath those already listed. Click 'OK' to confirm
•
To change port numbers, simply type the new port number in the appropriate field. Computers that have standalone
Comodo Internet Security (CIS) installed on them can be connected to the ESM service via the CIS interface (directly
from the endpoint itself) through this port. See section 'How to Connect CIS to ESM at the Local Endpoint' for
information on connecting endpoints locally to ESM.
•
To change the database connection settings, click 'Change connection settings'
Endpoint Security Manager - SME Administrator Guide | © 2013 Comodo Security Solutions Inc. | All rights reserved
205
Comodo Endpoint Security Manager - SME - Administrator Guide
•
Edit the parameters directly in the 'Connection Properties' dialog
•
To test whether the connections settings are appropriate click 'Test Connection'
•
Click OK for your changes to take effect
•
You will need to enter the hostname/IP and console port in the address bar of your browser to connect to the ESM
server. For example, https://192.168.111.111:57194 will open the ESM console hosted at that IP address using the
secure console port
•
To facilitate external connections, you may have to open the listed port numbers on your corporate firewall.
Server Certificate
The Server Certificate tab allows administrators to manage server certificate such as to view the details of current certificate
installed on the server, import new certificate, create certificate signing request and install new SSL certificate.
Endpoint Security Manager - SME Administrator Guide | © 2013 Comodo Security Solutions Inc. | All rights reserved
206
Comodo Endpoint Security Manager - SME - Administrator Guide
•
To view the details of the currently installed server certificate, click the 'View' button.
•
If multiple SSL certificates are used in the server, a certificate name error may occur when a HTTPS connection is
established. To avoid this, bind the required certificate using the 'Bind Other Certificate' option.
•
To import certificates from other locations, click the 'Import' button.
•
To create a certificate signing request for your server, click the 'Create Certificate Signing Request' button and fill in the
required details in the 'Request Certificate' dialog.
•
Click the 'Install SSL Certificate' button to install new SSL certificate in the server.
•
Click the 'Get a Free SSL Certificate from Comodo' link to download a free SSL certificate from Comodo.
Internet and Mail Settings
The Internet and Mail Settings tab allows administrators to specify mail settings for receiving alerts from ESM and to specify any
Internet proxy connection settings.
Endpoint Security Manager - SME Administrator Guide | © 2013 Comodo Security Solutions Inc. | All rights reserved
207
Comodo Endpoint Security Manager - SME - Administrator Guide
The email alerts will appear to come from ESM Server by default if the 'From' field contains a simple email address. Your
personal mail configuration may be useful in completing the mail server section.
To locate mail settings in:
•
Outlook 2003 - Start Outlook 2003 and click Tools > Email Accounts > select the email account for which you want to
view the settings and click Change... > More Settings...
•
Outlook 2007 - Start Outlook 2007 and click Tools > Account Settings > on the E-mail tab, select the email account for
which you want to view the settings and click Change... > More Settings...
•
Outlook 2010 - Start Outlook 2010 and click Tools > Account Settings > on the E-mail tab, select the email account for
which you want to view the settings and click Change... > More Settings...
•
Thunderbird - Start Thunderbird and click Tools > Account Settings...
Caching Proxy Settings
The Caching Proxy tab allows administrators to specify the proxy server settings for storing cache content. The proxy server will
store antivirus updates. CIS on endpoints that are configured to connect to this proxy server will receive the latest updates,
which will be considerably reduce Internet traffic.
Endpoint Security Manager - SME Administrator Guide | © 2013 Comodo Security Solutions Inc. | All rights reserved
208
Comodo Endpoint Security Manager - SME - Administrator Guide
•
Click the 'Start' or Stop' button to enable or disable the proxy server.
•
The settings panel allows the administrator to configure the proxy server port, validity period of the cache content in
hours and to define a path for the cache folder.
•
Click the 'Clean Cache Folder...' button to remove the content in the cache folder.
•
Select the check box 'Provide cached content if content source is not available' for the endpoints to update from the
proxy server if the content source is not available via Internet.
Viewing Database Event Log
The 'Event Log' contains a list of notifications from ESM central service that may assist administrators to troubleshoot problems.
Endpoint Security Manager - SME Administrator Guide | © 2013 Comodo Security Solutions Inc. | All rights reserved
209
Comodo Endpoint Security Manager - SME - Administrator Guide
•
The type of alerts that are displayed can be filtered by clicking the 'Errors', 'Warnings' and 'Information' buttons
•
Alternatively, type a specific search term into the text field then click the 'Apply Filter' button
•
Each cell can be individually selected by clicking it
•
Multiple cells can be selected whilst holding down the 'Shift' or 'CTRL' keys and left-clicking on target cells
•
Cells can be copied to the clipboard by clicking the 'Copy' button
Column
Types/Format
Type
(of event)
Definition / Description
Error - 'Errors' are those events whereby the ESM Central
Service failed to execute a command.
Warning - High severity errors that may (or already have)
prevented the ESM service from connecting to the data source.
For example, a critical application crash.
Information - 'Information' events typically inform the
administrator of the successful completion of task by the ESM
service.
Time
Message
MM/DD/YYY
HH:MM:SS
Text
Displays the precise time that the event was generated on the
endpoint machine.
Contains a description of the event.
•
Use the
control to view the full message.
Endpoint Security Manager - SME Administrator Guide | © 2013 Comodo Security Solutions Inc. | All rights reserved
210
Comodo Endpoint Security Manager - SME - Administrator Guide
Column
Control
Types/Format
Definition / Description
•
Use the
control to view a condensed version of
the message (this is the default view).
•
Use the
control to copy the contents of the
message to the clipboard.
Control Type
Description
Filter by event
Click this button to add or remove events of type 'Error' from the
displayed list.
Filter by event
Click this button to add or remove events of type 'Warning' from
the displayed list.
Filter by event
Click this button to add or remove events of type 'Information'
from the displayed list.
Remove filters and refresh list
Clears any active filters so all event types are displayed. Also
loads the latest event entries.
Filter by string
Allows the administrator to filter events by typing a specific text
string. Administrator should then click the 'Apply Filter' button.
Apply Filter
Implements the filter typed into the text field.
Selects a particular event row. Once selected, clicking the
'Expand Rows' control will highlight the information pertaining to
this event.
Select Event
Expand Rows
Displays the complete 'Message' for all event rows. The event row
that is selected using the 'Select Event' control will be highlighted.
Information of this detail level may be required for troubleshooting
purposes.
Contract Rows
Displays the condensed 'Message' (all events). This is the default
view.
Copy
Copies the contents of the selected cells to the clipboard.
Endpoint Security Manager - SME Administrator Guide | © 2013 Comodo Security Solutions Inc. | All rights reserved
211
Comodo Endpoint Security Manager - SME - Administrator Guide
About Comodo
The Comodo companies are leading global providers of Security, Identity and Trust Assurance services on the Internet. Comodo
CA offers a comprehensive array of PKI Digital Certificates and Management Services, Identity and Content Authentication
(Two-Factor - Multi-Factor) software, and Network Vulnerability Scanning and PCI compliance solutions. In addition, with over
10,000,000 installations of its threat prevention products, Comodo Security Solutions maintains an extensive suite of endpoint
security software and services for businesses and consumers.
Continual innovation, a core competence in PKI and a commitment to reversing the growth of Internet-crime distinguish the
Comodo companies as vital players in the Internet's ongoing development. Comodo, with offices in the US, UK, China, India,
Romania and the Ukraine, secures and authenticates the online transactions and communications for over 200,000 business
customers and millions of consumers, providing the intelligent security, authentication and assurance services necessary for
trust in on-line transactions.
Comodo Security Solutions, Inc.
1255 Broad Street
Clifton, NJ 07013
United States
Tel: +1.888.256.2608
Tel: +1.703.637.9361
Email: [email protected]
For additional information on Comodo - visit http://www.comodo.com.
Endpoint Security Manager - SME Administrator Guide | © 2013 Comodo Security Solutions Inc. | All rights reserved
212