1
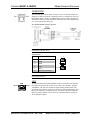
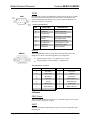
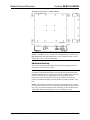
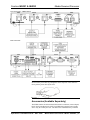
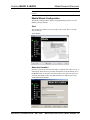
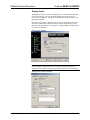
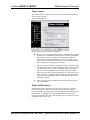
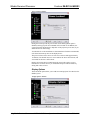
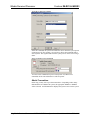
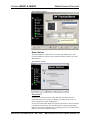
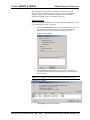
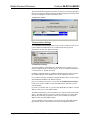
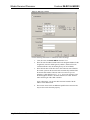
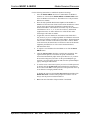
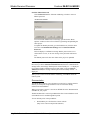
Crestron IM-RX1 & IM-RX3
iMedia Receiver/Processor
Operations & Installation Guide
This document was prepared and written by the Technical Documentation department at:
Crestron Electronics, Inc.
15 Volvo Drive
Rockleigh, NJ 07647
1-888-CRESTRON
All brand names, product names and trademarks are the property of their respective owners.
©2005 Crestron Electronics, Inc.
Crestron IM-RX1 & IM-RX3
iMedia Receiver/Processor
Contents
iMedia Receiver/Processor: IM-RX1 & IM-RX3
1
Introduction ..........................................................................................................1
Features and Functions...........................................................................1
The iMedia System ................................................................................2
Specifications .........................................................................................4
Physical Description...............................................................................6
Industry Compliance ............................................................................11
Setup...................................................................................................................11
Network Wiring ...................................................................................11
Mounting..............................................................................................11
Hardware Hookup ................................................................................12
Accessories (Available Separately)......................................................13
System Configuration.........................................................................................14
Earliest Version Software Requirements for the PC ............................14
iMedia Wizard Configuration ..............................................................15
Problem Solving .................................................................................................30
Troubleshooting ...................................................................................30
Further Inquiries...................................................................................30
Future Updates .....................................................................................30
Return and Warranty Policies.............................................................................31
Merchandise Returns / Repair Service .................................................31
CRESTRON Limited Warranty ...........................................................31
Operations & Installation Guide – DOC. 6384
Contents • i
Crestron IM-RX1 & IM-RX3
iMedia Receiver/Processor
iMedia Receiver/Processor:
IM-RX1 & IM-RX3
Introduction
Features and Functions
The IM-RX1 and IM-RX3 are part of the Crestron® iMedia line of network
devices, room control systems and signal routing solutions. The Instant Media
(IM) devices currently include two receivers, IM-RX1 and IM-RX3, and three
transmitters, IM-WCC, IM-TCC, and IM-FTCC-B. The IM-RX1 has one IM
input, and the IM-RX3 has three IM inputs.
NOTE: The IM-RX1 and IM-RX3 are not Cresnet® devices.
Functional Summary
•
One RS-232 COM port
•
One Computer port for configuration
•
One IR port
•
Four digital inputs for sensors
•
Two relay outputs for screen and/or lift control
•
A 10/100 Ethernet LAN port
•
A Built-in web server
•
Power supply module included (18V @ 3A)
•
One RGBHV output
•
One stereo audio balanced/unbalanced line level output
•
Frequency compensation adjustment(s)
•
Volume control with bass/treble/balance (single bass/treble/balance
control for all three inputs on IM-RMX3)
•
20 W amplifier speaker outputs (10W per channel, into 8 Ohms only)
Operations & Installation Guide – DOC. 6384
iMedia Receiver/Processor: IM-RX1 & IM-RX3 • 1
IMedia Receiver/Processor
Crestron IM-RX1 & IM-RX3
This device employs iMedia (IM) technology, which utilizes a single
CresCAT-IM cable to transmit computer RGB and stereo audio signals to a
single projector or plasma display. The IM-RX1 and IM-RX3 provide a
frequency compensation adjustment that enables the transmission of a typical
XGA signal (1024 X 768 pixels at 60Hz) up to 84 feet. Higher resolutions up to
1600 x 1200 can be handled over shorter distances. Audio is transmitted
digitally at a 20-bit, 48 kHz resolution. The IM-RX1 and IM-RX3 are designed
to mount at the projector or plasma display to provide local display control,
LAN connectivity, and signal management.
The iMedia System
Through Crestron's exclusive IM port, the IM-RX1 and IM-RX3 decodes the
media, linking computer video (RGBHV) to the display device from IM wall
units, table units or flip top centers. Stereo program audio is delivered to a builtin 20-Watt (2 X 10 W) amplifier or line-level balanced/unbalanced output.
Onboard professional digital audio processing provides volume, balance, treble
and bass control.
The power for the remote transmitter(s) is provided from the IM-RX1 or
IM-RX3 receiver over the audio circuit of the UTP cable, allowing for a onecable solution that connects the receiver with the remote source(s).
Routing CresCAT-IM cable is less expensive and much simpler than routing
multi-colored, multi-conductor coax cable. All Crestron products using the
iMedia transport system are capable of sending and receiving iMedia signals via
CresCAT-IM cable. Installation of any iMedia device is as simple as installing
one set of iMedia wires from output to input. Installations are flexible,
affordable, and fast.
Up to three iMedia transmitters can be installed in an iMedia system. Pressing
the SELECT button on any iMedia transmitter makes that input active,
overriding the previously selected input. Holding the SELECT button for five
seconds powers down the system.
The pin assignment is based on the EIA/TIA 568B RJ-45 Jack standard.
To determine which pin is number 1, hold the cable so that the end of the eight
pin modular jack is facing you, with clip down and copper side up. When
looking down at the copper connections, pin 1 is on the far right.
iMedia Pin Assignment
RJ-45 Male Connector
2 • iMedia Receiver/Processor: IM-RX1 & IM-RX3
RJ-45
Pin
Number
Wire Colors
iMedia
Assignment
RGB and Audio
1
White/Orange
- RGB Red
2
Orange
+ RGB Red
3
White/Green
- RGB Green
4
Blue
+ Audio/Power
5
White/Blue
- Audio/Power
6
Green
+ RGB Green
7
White/Brown
- RGB Blue
8
Brown
+ RGB Blue
Operations & Installation Guide - DOC. 6384
Crestron IM-RX1 & IM-RX3
iMedia Receiver/Processor
IM System Diagram
Audio
Two amplified outputs providing up to 20 W of audio power (10 W per channel
into 8 Ω speakers only) are also included. Line level balanced/unbalanced
outputs are also included for connection to an external amplifier. The amplifier
and line level outputs are volume controlled.
Display Device
The display device (e.g., projector) can be addressed via the COM or IR port for
control. On/off discrete power switching commands are available from the
extensive database.
Screen and Lift Control
Screen and projector lift control are included. You can choose from the
extensive database of manufacturers or design an interface for a particular serial
device. Two 2-pin isolated relay connectors are provided.
Room Sensor and RoomView™
The room options allow you to link your iMedia system with Crestron's
RoomView software, and allow you to include an XPanel interface for remote
administration. Four digital inputs are provided.
Video Resolution and Cable Length
The receiver can accomplish frequency compensation on each input to achieve
correct operation. This compensation scheme is effective for Crestron Certified
Wiring as long as the maximum skew of 15 nanoseconds per 100 meters is not
exceeded. Refer to the following table.
Operations & Installation Guide – DOC. 6384
iMedia Receiver/Processor: IM-RX1 & IM-RX3 • 3
IMedia Receiver/Processor
Crestron IM-RX1 & IM-RX3
Maximum Resolution and Cable Length
RESOLUTION
REFRESH
RATE
(HZ)
PIXEL
RATE
(MHZ)
VGA
60
25.18
39.7
218.5
(640 X 480)
72
31.50
31.7
174.6
85
36.00
27.8
152.8
SVGA
56
36.00
27.8
152.8
(800 X 600)
72
50.00
20.0
110.0
85
56.25
17.8
97.8
XGA
60
65.00
15.4
84.6
(1024 X 768)
70
75.00
13.3
73.3
85
94.50
10.6
58.2
SXGA
60
108.00
9.3
50.9
(1280 X 1024)
75
135.00
7.4
40.7
85
157.50
6.3
34.9
UXGA
60
162.00
6.2
34.0
(1600 X 1200)
70
189.00
5.3
29.1
85
229.50
4.4
24.0
PIXEL
TIME
(NS)
MAX
LENGTH
(FEET)
Specifications
Specifications for the IM-RX1 and IM-RX3 are given in the following table.
IM-RX1/RX3 Specifications
SPECIFICATION
DETAILS
Power Requirements
54 Watts (3A @ 18 VDC) from included power
supply (PW-1830RU)
Front Panel Connectors
IM-RX1 (1) RJ-45 CAT5E/CAT6 with Peaking
Control Adjuster
iMedia Input(s)
IM-RX3 (3) RJ-45 CAT5E/CAT6 with Peaking
Control Adjusters
Audio (Line Level)
(1) 5-pin Mini-Terminal Block Connector
Speaker Outputs
(2) 2-Pin Connectors
Rear Panel Connectors
18 VDC, 3.0A
(1) Power Adaptor Connector
Relay Output
(2) Relay Control Ports
Digital Input
(4) Digital Input Ports
IR
(1) 3.5mm TRS Mini Phone Jack
Computer
(1) RJ-11 Connector
LAN
(1) RJ-45 Ethernet Connector with Link and
Activity LEDs
COM
(1) DB9 9-Pin Male Connector
RGBHV
(1) Female DB15HD Connector
Ground
(1) Ground Terminal
Continued on the following page
4 • iMedia Receiver/Processor: IM-RX1 & IM-RX3
Operations & Installation Guide - DOC. 6384
Crestron IM-RX1 & IM-RX3
iMedia Receiver/Processor
IM-RX1/IM-RX3 Specifications (continued)
SPECIFICATION
DETAILS
Video Formats
RGBHV (VGA), RGBS, RGsB
RGB Video
R/G/B: 0 dB (Unity gain, 75 Ω termination), for
1.0 V p-p max input. Input Impedance 75 Ohms.
Gain / Bandwidth
Supports videos up to XGA @ 60 Hz vertical
rate with maximum cable length of 84 feet and
maximum compensation at receiver. For higher
pixel resolutions (up to 1600 X 1200 pixels at 60
Hz vertical rate) refer to the chart on page 3.
H and V Sync
5 V p-p max into 1 K Ohm
Audio
Line Level Output
Maximum balanced output: 4 Vrms (per channel)
Maximum unbalanced output: 2 Vrms (per
channel)
Output balanced impedance: 200 Ω
Output unbalanced impedance: 100 Ω
SNR 20 Hz – 20 KHz A-weighted 82 dB
THD+N 20 Hz – 20 KHz 0.05%
Frequency Response 20Hz – 20 KHz,
+/- 0.5 dB
Amplified Audio
10 W maximum per channel into 8 Ω only (Use
of 4 Ω speakers may cause the amplifier
protection to trigger at high volume settings)
SNR 20Hz – 20 KHz A-weighted 80 dB
THD+N max 20 Hz – 20 KHz 0.7%
Frequency Response 20 Hz – 20 KHz, +/- 1 dB
On-Board Memory
16 MB RAM, 4 KB EEPROM
4 MB Flash Memory
Operating Temperature and
Humidity
41º to 104º F (5º to 40º C)
10 to 90% relative humidity (non-condensing)
Dimensions and Weight
Width: 8.60 in (21.85 cm)
Height: 1.62 in (4.10 cm)
Depth: 7.58 in (19.24 cm)
Weight: 1.75 lbs (0.80 kg)
Accessories
(4) Mounting Brackets (included)
Pipe Mounting Kit, QM-FTCMK (not included)
STIRP - IR Probe (not included)
CNXRMCS - Current Sensor (not included)
Operations & Installation Guide – DOC. 6384
iMedia Receiver/Processor: IM-RX1 & IM-RX3 • 5
IMedia Receiver/Processor
Crestron IM-RX1 & IM-RX3
Physical Description
The IM-RX1 and IM-RX3 are housed in metal enclosures, and have ports on the
front and rear sides. Refer to the physical views shown below.
IM-RX1 – Front View
IM-RX3 – Front View
IM-RX1 & IM-RX3 – Rear View
Physical Dimensions – Front View IM-RX1
Physical Dimensions – Front View IM-RX3
6 • iMedia Receiver/Processor: IM-RX1 & IM-RX3
Operations & Installation Guide - DOC. 6384
Crestron IM-RX1 & IM-RX3
iMedia Receiver/Processor
Physical Dimensions - Top View
Rear View
Ports and Controls (Front)
IM
8
1
This eight-pin RJ-45 transport port is the input connection of the iMedia cable. It
carries audio and video signals over CresCAT-IM cable from an IM transmitter
(such as the IM-FTCC-B, IM-TCC, or IM-WCC).
NOTE: Always use CresCAT-IM cable to make iMedia connections.
Maximum cable delay skew is 15 nanoseconds per 100 meters.
Peaking Control
The peaking control is used during setup for video cable length compensation.
Refer to “iMedia Wizard Configuration” on page 15 for additional details.
Operations & Installation Guide – DOC. 6384
iMedia Receiver/Processor: IM-RX1 & IM-RX3 • 7
IMedia Receiver/Processor
Crestron IM-RX1 & IM-RX3
AUDIO
This 5-pin detachable terminal block audio output connector provides
balanced/unbalanced line-level left and right audio for application to an external
amplifier.
Maximum line-level output: 4 VRMS per channel balanced, 2 VRMS per channel
unbalanced.
Output impedance: 200 Ω balanced, 100 Ω unbalanced.
SPEAKER
L
SPEAKER
+ -
R
+ -
The left and right speaker connectors (two 2-pin detachable terminal block
connectors, 5 mm spacing) provide 20 Watts of amplified audio (10 Watts per
channel) into 8 Ω speakers.
NOTE: Use of 4 Ω speakers may cause the amplifier protection to trigger at
high volume settings.
Ports (Rear)
18 VDC, 3 A (Power Supply Input)
18VDC 3A
This 3-pin, 2 mm connector is used to supply 18 VDC power to the
IM-RX1 and IM-RX3 from the external power supply (included).
CAUTION: Use only Crestron power supplies for Crestron equipment. Failure
to do so could cause equipment damage or void the Crestron warranty.
NOTE: Pull back the snap lock of the power supply connector to unlock it from
the input when removing the connector.
Relay Outputs and Digital Inputs
A nine-pin detachable terminal block is provided for relay and digital inputs.
Two 2-pin isolated relay connectors on the left side of this connector are
provided for controlling low voltage contact closure devices such as drapes,
screens and lifts. Each connector is rated 2 A @ 50 VDC, MOV arc suppression.
The remaining five pins of this connector provide four software programmable
digital inputs plus ground. The inputs are Schmidt trigger type (nominal 2.5 V
threshold) with 24 V input tolerance. Digital inputs are rated 0 – 24 VDC,
2K ohms input impedance. Input logic threshold is 2.5 VDC nominal.
IR
The 3.5 mm TRS mini phone jack is used for controlling display devices via IR.
Connects to a STIRP IR emitter probe (sold separately).
Infrared output is rated up to 1.2 MHz.
8 • iMedia Receiver/Processor: IM-RX1 & IM-RX3
Operations & Installation Guide - DOC. 6384
Crestron IM-RX1 & IM-RX3
iMedia Receiver/Processor
COMPUTER
This 6-position RJ-11 mates with a serial port of a PC; connecting cable is not
supplied. Use this port for direct connection to the PC to load files. In the event
that modular cables or an RJ-11 to DB9F adapter is not available, the diagram
and table that follows provide information so that the cable can be fabricated on
site. Can be used as the console port.
PC to IM-RX1/IM-RX3 Cable Specifications
NOTE: If you do not have this cable, you can use a crossover Ethernet cable to
communicate with this device.
RS-232 Pinouts
PIN
DESCRIPTION
1
CTS
2
GND
3
RXD
4
TXD
5
RTS
6
N/C (Not connected)
1
6
1
6
Top
Front
NOTE: This cable is the Crestron STCP-502, and is included in the ST-PK
programming cable kit.
LAN
LAN
Yellow
Green
8
1
An 8-position RJ-45 port (labeled LAN) is used for connection to the Ethernet,
providing local area network or Web access (cable is not supplied). Supports
10/100BaseT. The port also contains two light-emitting diodes (LEDs). The
green LED on the left side of the port is a link status LED and illuminates when
the card is connected to a working network. The yellow LED on the right side
flashes to indicate Ethernet activity. Refer to “Set IP Information” on page 25
for the default IP address.
Operations & Installation Guide – DOC. 6384
iMedia Receiver/Processor: IM-RX1 & IM-RX3 • 9
IMedia Receiver/Processor
Crestron IM-RX1 & IM-RX3
COM
COM
One DB9 (male) software programmable, bi-directional serial port is available
specifically for RS-232 bi-directional communication, with hardware and
software handshaking and modem control, and to control the display device.
Speeds are rated up to 115,200 bps.
Standard COM DB9 Pinout
PIN
DIRECTION
DESCRIPTION
1
To IM-RX1/3
(DCD) Data Carrier Detect
2
To IM-RX1/3
(RXD) Receive Data
3
From IM-RX1/3
(TXD) Transmit Data
4
From IM-RX1/3
(DTR) Data Terminal Ready
5
Common
(SG) Signal Ground
6
From IM-RX1/3
(DSR) Data Set Ready
7
From IM-RX1/3
(RTS) Request To Send
8
To IM-RX1/3
(CTS) Clear To Send
9
To IM-RX1/3
(RI) Ring Indicator
RGBHV
RGBHV
This female DB15HD connector is used for connecting RGB video to the
display device. Refer to the following table for pin-assignments.
•
Maximum input voltage 1 Vp-p (R/G/B), 5.0 Vp-p (H/V)
•
Input Impedance 75 Ohms (R/G/B), 1 k Ohms (H/V)
RGB DB15HD Pin Assignments
PIN
FUNCTION
PIN
FUNCTION
1
Red Video
9
No Connect
2
Green Video
10
Ground
3
Blue Video
11
No Connect
4
Reserved
12
Monitor Sense 1
5
Ground
13
Horizontal Sync
6
Red Ground
14
Vertical Sync
7
Green Ground
15
Monitor Sense 2
8
Blue Ground
Indicators
PWR (Power)
This green LED illuminates when the unit is connected to and receives 18 VDC
power from an external power supply.
INPUT
This red LED indicates digital input port activity of devices connected to these
IM input ports.
10 • iMedia Receiver/Processor: IM-RX1 & IM-RX3
Operations & Installation Guide - DOC. 6384
Crestron IM-RX1 & IM-RX3
iMedia Receiver/Processor
IR
This red LED indicates IR port output activity when sending out control
commands.
COM
This red LED indicates COM port activity when sending or receiving
commands.
Industry Compliance
As of the date of manufacture, the IM-RX1 and IM-RX3 have been tested and
found to comply with specifications for CE marking and standards per EMC and
Radiocommunications Compliance Labelling.
NOTE: This device complies with part 15 of the FCC rules. Operation is
subject to the following two conditions: (1) this device may not cause harmful
interference, and (2) this device must accept any interference received, including
interference that may cause undesired operation.
Setup
Network Wiring
CAUTION: In order to ensure optimum performance over the full range of
your installation topology, Crestron Certified Wire, and only Crestron Certified
Wire, should be used. Failure to do so, may incur additional charges if support is
required to identify performance deficiencies as a result of using improper wire.
CAUTION: Use only Crestron power supplies for Crestron equipment. Failure
to do so could cause equipment damage or void the Crestron warranty.
Mounting
The IM-RX1 and IM-RX3 can be mounted using the included four mounting
brackets. Attach the included brackets using the existing cover screws located on
the sides of the IM-RX1/IM-RX3 as shown in the following diagram.
Operations & Installation Guide – DOC. 6384
iMedia Receiver/Processor: IM-RX1 & IM-RX3 • 11
IMedia Receiver/Processor
Crestron IM-RX1 & IM-RX3
Mounting Bracket Locations - Example: IM-RX1
NOTE: The MK-QM-RMCRX mounting kit is available for mounting the
IM-RX1 or IM-RX3 to a pipe. Details can be found in the latest version of the
MK-QM-RMCRX Installation Guide (Doc. 6247), available from the Crestron
website (http://www.crestron.com/manuals).
Hardware Hookup
Refer to the following hookup diagram and, aside from attaching power last,
complete the connections in any order.
NOTE: To prevent overheating, do not operate this product in an area that
exceeds the environmental temperature range listed in the specifications table.
Consideration must be given if installed in a closed or multi-unit rack assembly,
inside a closed desk, or in a closed podium since the operating ambient
temperature of these environments may be greater than the room ambient.
Contact with thermal insulating materials should be avoided on all sides of the
unit.
NOTE: The maximum continuous current from equipment under any external
load conditions shall not exceed a current limit that is suitable for the minimum
wire gauge used in interconnecting cables. The ratings on the connecting unit's
supply input should be considered to prevent overloading the wiring.
12 • iMedia Receiver/Processor: IM-RX1 & IM-RX3
Operations & Installation Guide - DOC. 6384
Crestron IM-RX1 & IM-RX3
iMedia Receiver/Processor
Front Connections – IM-RX3 Shown
Rear Connections
NOTE: the power supply cable is equipped with a snap lock connector. Always
disconnect the power cable by pulling back on the snap lock of the connector.
Never pull the power cable by the cord.
Accessories (Available Separately)
The STIRP contains an infrared (IR) LED housed in a miniature, mouse-shaped,
black, injection molded plastic shell. The STIRP shell emits IR control signals
sent to it by the control processor. The shell can be installed directly on the IR
Operations & Installation Guide – DOC. 6384
iMedia Receiver/Processor: IM-RX1 & IM-RX3 • 13
IMedia Receiver/Processor
Crestron IM-RX1 & IM-RX3
sensor window of the controlled device or at a nearby suitable location, while
the other end plugs into the IR output port. For additional information, refer to
the latest version of “Infrared Emitter” (Doc. 5674).
The CNXRMCS provides true power status feedback (on or off) for high power
AC devices such as TV monitors and video projectors. It contains an AC plug
on one side and an AC outlet on the other, along with a cable that attaches to the
digital input of the IM-RX1 or IM-RX3. For additional information, refer to the
latest version of “Current Sensor for Room Solution Boxes” (Doc. 8175).
System Configuration
Have a question or comment about Crestron software?
Answers to frequently asked questions (FAQs) can be viewed in the Online Help
section of the Crestron website. To post a question or view questions you have
submitted to Crestron’s True Blue Support, log in at http://support.crestron.com.
First-time users will need to establish a user account.
The iMedia system is configured with an easy to use wizard tool that consists of
nine simple steps. The wizard utilizes several other programs that run in the
background and are unseen and inaccessible.
Earliest Version Software Requirements for the
PC
NOTE: Crestron recommends that you use the latest software to take advantage
of the most recently released features. The latest software is available from the
Crestron website
NOTE: Crestron software and any files on the website are for Authorized
Crestron dealers and Crestron Authorized Independent Programmers (CAIP)
only. New users are required to register to obtain access to certain areas of the
site (including the FTP site).
The following are the earliest useable software version requirements for the PC:
•
iMedia Wizard version 2.0 or later (included with SystemBuilder 2.0).
•
SystemBuilder version 2.0 or later.
•
SystemBuilder Touchpanel Templates version 2.0 or later.
•
SIMPL Windows version 2.06.20 or later. Library 345 and SIMPL+
Cross Compiler version 1.1 are required.
•
Crestron Database version 17.2.0 or later. Required by SIMPL
Windows.
•
Crestron Toolbox version 1.1.2 or later.
•
Crestron RoomView version 6.0 or later (only required if using
RoomView)
•
VT Pro-e version 3.3.3.5 or later
NOTE: All configuration is completed within the iMedia wizard only. This
system cannot be configured in SystemBuilder or SIMPL Windows.
14 • iMedia Receiver/Processor: IM-RX1 & IM-RX3
Operations & Installation Guide - DOC. 6384
Crestron IM-RX1 & IM-RX3
iMedia Receiver/Processor
NOTE: For additional programming information, refer to the iMedia Wizard
help file.
iMedia Wizard Configuration
The iMedia wizard provides a step-by-step programming tool that covers all
iMedia system possibilities.
Start
The opening screen links to a preview image of the system. There is no data
entry in this step.
“Start” Window
Name And Location
Enter the system name and choose the folder in which the files will be saved. A
default name and location are provided, click Next to accept the defaults or use
the Browse button to navigate to a desired location. The processor selection is
automatic; depending on how many IM transmitters are added in a later step.
“Name and Location” Window
Operations & Installation Guide – DOC. 6384
iMedia Receiver/Processor: IM-RX1 & IM-RX3 • 15
IMedia Receiver/Processor
Crestron IM-RX1 & IM-RX3
Display Device
The display device driver is the most important piece of information required to
get a system running. You can choose the display device driver from the
Crestron or User database. The driver will be added to the appropriate serial or
IR port automatically.
Once a driver is selected, a dropdown list is presented which allows the user to
select the command that switches the display device to the RGB or PC input.
Since IM only supports this one video type it is important that the display device
is always set to this input.
“Display Device” Window
NOTE: When some display devices are selected, an additional Properties
button will appear that permits access to a general properties page, the I/O
assignment (serial address settings), and particular properties (ex. poll settings).
“Display Device Properties” Window
16 • iMedia Receiver/Processor: IM-RX1 & IM-RX3
Operations & Installation Guide - DOC. 6384
Crestron IM-RX1 & IM-RX3
iMedia Receiver/Processor
Power Control
The “Power Control” window allows you to determine how the display device
will be turned on and off.
“Power Control” Window
You can select from one of the following options.
•
Discrete: This is the recommended setting, as the display device should
provide discrete commands for turning power on and off. The Wizard
will attempt to find the standard power commands. If the Wizard
cannot find the standard commands they will be unassigned, and you
must select the commands from the lists. Do not use this setting if the
device only provides a toggle power command.
•
Power Sensing: Use this setting if the device only has one toggle power
command. The system will send commands to toggle the power on and
off, depending on the power state of the display device. This option
requires a Crestron CNXRMCS power sensor, which uses a digital
input to report the power state of the display device. The power sensor
plugs in into the AC wall outlet and the display device plugs into the
power sensor. The CNXRMCS sensor provides a digital closure when
the current is sensed.
•
None: The device will be turned on and off manually by the end user
(not recommended).
Power On/Off Lockout
Normally this is only needed for projectors since they may have a warm-up
and/or cool-down time. The lockout period is the minimum time allowed
between sending Power On and Power Off commands to prevent damage to the
projector bulb. Your display device should support discrete Power On and
Power Off commands. This ensures that the display device remains in sync with
the iMedia system's power state.
Operations & Installation Guide – DOC. 6384
iMedia Receiver/Processor: IM-RX1 & IM-RX3 • 17
IMedia Receiver/Processor
Crestron IM-RX1 & IM-RX3
“Power Lockout” Window
During the lockout period, the power button on the IM origination point is
disabled, and any projector lift commands will be locked out. In addition, the
system will notify the RoomView help desk of the projector power state (if you
enable RoomView monitoring).
You should refer to the manufacturer's documentation to find the recommended
cool-down and warm-up time for the display device.
The power lockout values can be set from zero to 999 seconds (approximately
15 minutes). The default values are 30 seconds for the Power On Lockout, and
30 seconds for the Power Off Lockout.
Display devices that do not contain lamps do not typically require a power
lockout time. For these devices you can disable the power lockout feature by
setting both values to zeros.
Display Options
These advanced options allow you to add screen and projector lift controls to the
iMedia system.
“Display Options” Window
18 • iMedia Receiver/Processor: IM-RX1 & IM-RX3
Operations & Installation Guide - DOC. 6384
Crestron IM-RX1 & IM-RX3
iMedia Receiver/Processor
To add screen control, select the Include Screen Control check box. To add
projector lift control, select the Include Lift Control check box. When the
checkbox is clicked, the Choose button appears. Click the Choose button to
select a device from the following window.
“Select a Device” Window – Lift Control Example
You can browse for devices by Manufacturer or Type, from the Crestron or User
Databases. If you select the Crestron Database and you are connected to the
Internet, you can click the Web button
to go to the manufacturer's website.
The available screen and lift selections in the “Select a Device” window include
a predetermined list of database entries for control. There are only two generic
relay control entries available in the database for screens and lifts. Depending
on the lift or screen model, a momentary closure, sustained closure, or two
relays may be required.
“Control Options” Window
When you have selected the device click OK.
If the specific device you require is not listed, you can right-click a similar serial
device and open the “Properties” window. This enables you to design the
appropriate interface for your device, based on the manufacturer’s
specifications.
Operations & Installation Guide – DOC. 6384
iMedia Receiver/Processor: IM-RX1 & IM-RX3 • 19
IMedia Receiver/Processor
Crestron IM-RX1 & IM-RX3
“Serial Device Properties” Window
Select the commands the system will send to the device when the system powers
on and powers off. For example, you can select a Power On command such as
Screen_Down. This signifies that when the system powers on the screen will go
down.
Power ON and Power OFF Commands
You must select commands for power on and power off; otherwise no
commands will be sent and the devices will not operate.
iMedia Transmitters
In this step you may select up to three transmitters. Depending on how many
IM transmitters are added to the system, the appropriate IM-RX1 or IM-RX3
will be selected. An information box displays the system receiver in the system.
20 • iMedia Receiver/Processor: IM-RX1 & IM-RX3
Operations & Installation Guide - DOC. 6384
Crestron IM-RX1 & IM-RX3
iMedia Receiver/Processor
“IM Transmitters” Window
Room Options
The “Room Options” window allows you to link your iMedia system with
Crestron's RoomView software, and to include an XPanel interface for remote
administration.
“Room Options” Window
RoomView™
RoomView is Crestron's interactive help desk tool that collects real-time
information from control systems via Ethernet, providing facility-wide AV
device management, control and diagnostics.
You can select the Include RoomView Interface check box to create an interface
to the RoomView help desk. This will automatically connect the appropriate
signals for interaction with RoomView, including system on/off, system lockout,
lamp life, device theft, and help messages.
Operations & Installation Guide – DOC. 6384
iMedia Receiver/Processor: IM-RX1 & IM-RX3 • 21
IMedia Receiver/Processor
Crestron IM-RX1 & IM-RX3
To enhance RoomView's scheduling, lockout and interactive features, you can
click Include occupancy sensing, which adds a motion sensor to the logic
program and enables RoomView to monitor room occupancy.
XPanel
To enable the XPanel project for remote administration select the Include
XPanel Interface check box. Administrators can use XPanel to set up the room
and audio settings.
The XPanel password restricts access to the XPanel setup pages. Anyone
attempting to access the setup pages will be prompted to provide the password.
To set the XPanel password, enter the alphanumeric code into the text field. The
password can consist of up to 20 characters.
Finish
This last step uploads the configuration and does the last few things required to
get the system fully installed.
“Finish” Window
You can use the “Finish” window to:
•
Generate the configuration and XPanel project.
•
Upload configuration files to the IM-RX receiver.
•
Adjust audio settings in real time. (This option is only available if the
program has already been uploaded to the processor.)
•
Adjust the video signal with the provided video test patterns.
•
Generate and print documentation.
•
Export system and zip the entire system to an archive.
22 • iMedia Receiver/Processor: IM-RX1 & IM-RX3
Operations & Installation Guide - DOC. 6384
Crestron IM-RX1 & IM-RX3
iMedia Receiver/Processor
Before program upload, you have to establish a valid connection to the
processor (refer to “Hardware Hookup” on page 12 and “Communication
Settings” on page 24). You should also install and connect the iMedia
equipment and display device you added to your project.
Upload System
Before you can upload configuration, you must establish communications. Refer
to “Communication Settings” on page 24.
1.
Click the Upload System button to first generate the XPanel project (if
any) and then the control system logic program. The Wizard will
display information about each file as it is being generated.
“System Creation” Window
2.
Click Continue to upload the files to the processor. If the control
system has a valid connection (and thus can receive files) both items
will be selected.
NOTE: You can double-click an item to view the communication settings.
“Upload Devices” Window
3.
Click Upload to begin the file transfer.
Operations & Installation Guide – DOC. 6384
iMedia Receiver/Processor: IM-RX1 & IM-RX3 • 23
IMedia Receiver/Processor
Crestron IM-RX1 & IM-RX3
The Wizard will then begin the file transfer. A progress bar will be displayed as
the files are transferred. After transfer the Wizard will display information about
each file, including the filename and transfer status.
“Upload Status” Window
Communication Settings
The Communications Settings button on the “Finish” window provides access
to three additional adjustments areas, Communication Settings, Set IP
Information, and Set/Clear XPanel Password.
Communication Settings…
You must establish a valid connection to the IM-RX receiver before you can
upload configuration files or XPanel projects. This is accomplished using either
a serial (RS-232) or TCP/IP connection.
For RS-232 communication, use a DB9 straight-through serial cable to connect
the COMPUTER port on the IM-RX to one of the COM ports on the PC.
For a TCP/IP connection, use Ethernet straight-through cables to connect the PC
and the IM-RX1/IM-RX3 to the Ethernet network.
Once your connection is in place, you can click the Communication Settings…
button on the “Finish” window to open the Address Book and start a session
with the IM-RX.
If you have not already done so, you must first add the RS-232 address or the IP
address of the receiver to the Address Book.
The Address Book allows you to maintain a list of control systems and network
devices. The address book is saved as an .adr file, allowing you to easily share
address files with other programmers, edit or remove addresses, and import
addresses into an existing Address Book.
You can establish a session with any or all of the devices in the Address Book
(provided the PC has a valid connection to the Cresnet/Ethernet network).
24 • iMedia Receiver/Processor: IM-RX1 & IM-RX3
Operations & Installation Guide - DOC. 6384
Crestron IM-RX1 & IM-RX3
iMedia Receiver/Processor
“Address Book” Window
To open an existing Address Book, click the Communication Settings button
and select the desired .adr file from the Current Address list.
To create a new Address Book, click the Communication Settings button on
the “Finish” window. Click Open/New and type a name for the new Address
Book (you can also browse to the directory where you want to save the .adr file)
and click Open.
To import an Address Book, with the current address book open, click the
Import button. Locate the .adr file you want to import and click Open. This will
import the entries into the current address book.
Set IP Information…
If you intend to communicate with the IM-RX receiver via Ethernet you have to
configure the processor's IP information.
Because this device has a default IP address (192.168.0.99), you can connect
directly using a crossover cable then configure the IP settings of the IM-RX1 or
IM-RX3 for subsequent connections over Ethernet.
NOTE: If more than one IM receiver is on the network, you must change the IP
address to avoid a conflict.
Click the Communication Settings… button on the Finish screen, then choose
the Set IP Information command. The “Ethernet Addressing” window appears.
Select the Enable Ethernet check box to enable the Ethernet card and view the
available IP settings. If you clear (de-select) this check box, the dialog will be
grayed out.
NOTE: The IM-RX1 and IM-RX3 are preset with the following IP address
information.
●
●
●
IP Address: 192.168.0.99
IP Mask: 255.255.255.0
Default Router: 0.0.0.0
Operations & Installation Guide – DOC. 6384
iMedia Receiver/Processor: IM-RX1 & IM-RX3 • 25
IMedia Receiver/Processor
Crestron IM-RX1 & IM-RX3
“Ethernet Addressing” Window
Use the following instructions to establish the static IP settings.
1.
Clear (de-select) the Enable DHCP checkbox if set.
2.
Enter the static IP address and IP mask in the designated address fields.
If applicable, enter the default gateway address. (If data will not be
routed outside the LAN, the default gateway can be left blank.)
3.
Enter the host name in the Host Name field. The host name identifies
the control system on the network and is automatically translated into
the numerical IP address. The host name can consist of up to 64
characters. Valid characters are 0 – 9, A – Z (not case-sensitive), and
the dash (hyphen character). No other characters are valid. The host
name cannot begin with a dash or number.
Given a host name, you can enter this host name instead of the IP
address in the address book.
4.
The Domain Name field is an additional qualifier that some networks
may need to resolve the name properly.
26 • iMedia Receiver/Processor: IM-RX1 & IM-RX3
Operations & Installation Guide - DOC. 6384
Crestron IM-RX1 & IM-RX3
iMedia Receiver/Processor
Use the following instructions to establish the dynamic IP settings.
1.
Select the Enable DHCP check box to enable DHCP for Windows
2000 Server. Select both the Enable DHCP and Enable WINS check
boxes for Windows NT 4.0 Server. The DHCP server will provide the
WINS server address.
2.
Enter the fully qualified domain name (FQDN) of the IM-RX1 or
IM-RX3 into the Host Name field. The host name identifies the control
system on the network and is automatically translated into the
numerical IP address. The hostname can consist of up to 64 characters.
Valid characters are 0 – 9, A – Z (not case-sensitive), and the dash
(hyphen character). No other characters are valid. The host name
cannot begin with a dash or number.
3.
If applicable, enter the domain into the Domain Name field. This is
only necessary if you are configuring DHCP on an Ethernet connection
to a control system that currently has a static address. The domain name
will be used to reconnect to the control system after it reboots. With a
serial connection, the domain does not need to be entered. The domain
supplied by the DHCP server will overwrite the domain that is
indicated in this field.
4.
To request a new IP address from the DHCP server click the Renew
DHCP button.
5.
Click the Auto-negotiate check box to enable auto-negotiation. This
signifies that the processor will detect the speed of the Ethernet
network and automatically adjust to that speed. However, if you know
the network settings and you want to set the speed and duplex type
explicitly, you can clear the check box and select the speed and duplex
type by clicking the radio buttons.
6.
To restrict access to the control system you can set a TCP/IP password.
To do this click the Set Password button and enter the password into
the text field. Click OK to set the password. Valid passwords can be up
to 20 characters in length (printable ASCII).
To disable the password, click the Set Password button and then click
Disable Password. Click Yes when prompted to confirm. You can
always reset the password as described above.
7.
Port: Enter the CTP and/or CIP port number if not default.
Operations & Installation Guide – DOC. 6384
iMedia Receiver/Processor: IM-RX1 & IM-RX3 • 27
IMedia Receiver/Processor
Crestron IM-RX1 & IM-RX3
Set/Clear XPanel Password
Click Set Password on the “Ethernet Addressing” window to enter an
XPanel password.
“Set Password” Window
You can send the XPanel Password settings (specified in the “Room
Options” window) to the receiver without re-generating and uploading the
entire project.
To update the XPanel password, go to the Finish Screen, click the down
arrow next to Communication Settings and click Set/Clear XPanel
Password.
This will display a confirmation message that the password was set or
cleared in the receiver, or an error message if the password could not be
sent.
The XPanel password is also sent whenever the project is uploaded.
NOTE: If you enable the XPanel password (on the “Room Options” window),
then when you choose Set/Clear XPanel Password, from the communications
settings button, the message "XPanel password successfully set...." is displayed.
If you did not enable an XPanel password, then when you press Set/Clear
XPanel Password, the message "XPanel password successfully cleared..." is
displayed.
When you are satisfied with the Ethernet addressing, click OK to reboot the
control system.
Documentation
The iMedia Wizard allows you to document your project by creating attractive
and easy to read reports for presentations or use as a reference during
construction and installation.
When you generate a report it is saved as an HTML file in the \Documentation
subfolder for your project.
The Bill of Materials is an Excel spreadsheet that lists Crestron hardware such
as the iMedia receiver and IM origination points.
You can include prices in the spreadsheet.
1.
Download the price list from the Crestron website
(http://www.crestron.com/pricelist/usdealer/).
28 • iMedia Receiver/Processor: IM-RX1 & IM-RX3
Operations & Installation Guide - DOC. 6384
Crestron IM-RX1 & IM-RX3
iMedia Receiver/Processor
2.
Enter your email address and password, and then follow the screen
instructions to download the price list from the SystemBuilder area.
The filename will be pricelist.xml.
3.
Save the pricelist.xml file in the SystemBuilder | Reports subfolder.
The Connection Sheet lists the network devices that are connected to each slot
on the control system.
1.
Click the Documentation button on the Finish screen.
2.
Select the desired report and click Create | View. This will launch the
default Web browser.
3.
Use the Print button to print the report.
Audio Settings
Use the Audio Settings screen to adjust volume, treble, bass and balance in real
time. Before starting real-time mode the program should be uploaded to the
processor and all iMedia and audio equipment should be installed. If no program
has been uploaded the Wizard will attempt build and upload the system.
Use the Bass and Treble sliders to set the bass and treble for audio in the room.
The bass and treble are applied equally to the left and right channels and are
adjustable from 0% to 100%. This maps to a range of -12dB to +12dB.
You can use the sliders to adjust the values up and down, or you can enter
values directly. If you type an out of range value, this will set the level to 0% or
100%.
Click the Reset button to set the bass or treble to 50%. This signifies a flat level
corresponding to 0dB.
Use the Balance slider to set the balance between the left and right speakers.
Click the Center button to position the slider in the center, indicating an even
distribution between the left and right speakers.
Use the Room Volume slider to adjust the overall audio volume level in the
room.
The volume is adjustable from 0% (minimum volume) to 100% (maximum
volume). Use this feature to set the usable volume range.
You can use the slider to adjust the volume up and down, or you can enter a
value directly. If you type an out of range value, this will set the volume to 0%
or 100%.
You can click the Mute button to mute the room audio.
Video Test Pattern
The “Video Test Pattern” window allows you to analyze and maintain the
quality of the video signal.
Use the video test pattern as a reference while you adjust the video using the
peaking control potentiometer (located on the IM receiver).
Specifically, take note of the right side of the black box in the video test pattern:
any white or black streaking will be noticeable there. The adjustment
instructions are displayed on the test pattern image.
Operations & Installation Guide – DOC. 6384
iMedia Receiver/Processor: IM-RX1 & IM-RX3 • 29
IMedia Receiver/Processor
Crestron IM-RX1 & IM-RX3
Problem Solving
Troubleshooting
The following table provides corrective action for possible trouble situations. If
further assistance is required, please contact a Crestron customer service
representative.
IM-RX1/IM-RX3 Troubleshooting
TROUBLE
PWR LED
does not
illuminate.
POSSIBLE
CAUSE(S)
CORRECTIVE ACTION
Not receiving power.
Verify that the power supply cable
and power supply connection to the
AC are properly attached.
Incorrect power supply.
Only use a Crestron power supply.
No video
output
displayed.
Incorrect cable
connection.
Verify display device connection.
Video from
source is
garbled or no
output.
Incorrect cable
connections.
Verify iMedia cable connections.
Peak adjustment
incorrect.
Readjust peak control.
Not controlling
the display
device.
Incorrect wiring.
Check wiring and connectors
between the IM-RX1/3 and the
display device.
Verify iMedia output cable
connection is secure.
Verify maximum iMedia cable
length.
Further Inquiries
If you cannot locate specific information or have questions after reviewing this
guide, please take advantage of Crestron's award winning customer service team
by calling the Crestron corporate headquarters at 1-888-CRESTRON
[1-888-273-7876]. For assistance in your local time zone, refer to the Crestron
website (www.crestron.com) for a listing of Crestron worldwide offices.
You can also log onto the online help section of the Crestron website to ask
questions about Crestron products. First-time users will need to establish a user
account to fully benefit from all available features.
Future Updates
As Crestron improves functions, adds new features, and extends the capabilities
of the IM-RX1 or IM-RX3, additional information may be made available as
manual updates. These updates are solely electronic and serve as intermediary
supplements prior to the release of a complete technical documentation revision.
Check the Crestron website periodically for manual update availability and its
relevance. Updates are identified as an “Addendum” in the Download column.
30 • iMedia Receiver/Processor: IM-RX1 & IM-RX3
Operations & Installation Guide - DOC. 6384
Crestron IM-RX1 & IM-RX3
iMedia Receiver/Processor
Return and Warranty Policies
Merchandise Returns / Repair Service
1.
No merchandise may be returned for credit, exchange, or service without prior
authorization from CRESTRON. To obtain warranty service for CRESTRON products,
contact the factory and request an RMA (Return Merchandise Authorization) number.
Enclose a note specifying the nature of the problem, name and phone number of contact
person, RMA number, and return address.
2.
Products may be returned for credit, exchange, or service with a CRESTRON Return
Merchandise Authorization (RMA) number. Authorized returns must be shipped freight
prepaid to CRESTRON, 6 Volvo Drive, Rockleigh, N.J. 07647, or its authorized
subsidiaries, with RMA number clearly marked on the outside of all cartons. Shipments
arriving freight collect or without an RMA number shall be subject to refusal.
CRESTRON reserves the right in its sole and absolute discretion to charge a 15%
restocking fee, plus shipping costs, on any products returned with an RMA.
3.
Return freight charges following repair of items under warranty shall be paid by
CRESTRON, shipping by standard ground carrier. In the event repairs are found to be
non-warranty, return freight costs shall be paid by the purchaser.
CRESTRON Limited Warranty
CRESTRON ELECTRONICS, Inc. warrants its products to be free from manufacturing defects in
materials and workmanship under normal use for a period of three (3) years from the date of
purchase from CRESTRON, with the following exceptions: disk drives and any other moving or
rotating mechanical parts, pan/tilt heads and power supplies are covered for a period of one (1)
year; touchscreen display and overlay components are covered for 90 days; batteries and
incandescent lamps are not covered.
This warranty extends to products purchased directly from CRESTRON or an authorized
CRESTRON dealer. Purchasers should inquire of the dealer regarding the nature and extent of the
dealer's warranty, if any.
CRESTRON shall not be liable to honor the terms of this warranty if the product has been used in
any application other than that for which it was intended, or if it has been subjected to misuse,
accidental damage, modification, or improper installation procedures. Furthermore, this warranty
does not cover any product that has had the serial number altered, defaced, or removed.
This warranty shall be the sole and exclusive remedy to the original purchaser. In no event shall
CRESTRON be liable for incidental or consequential damages of any kind (property or economic
damages inclusive) arising from the sale or use of this equipment. CRESTRON is not liable for
any claim made by a third party or made by the purchaser for a third party.
CRESTRON shall, at its option, repair or replace any product found defective, without charge for
parts or labor. Repaired or replaced equipment and parts supplied under this warranty shall be
covered only by the unexpired portion of the warranty.
Except as expressly set forth in this warranty, CRESTRON makes no other warranties, expressed
or implied, nor authorizes any other party to offer any warranty, including any implied warranties
of merchantability or fitness for a particular purpose. Any implied warranties that may be imposed
by law are limited to the terms of this limited warranty. This warranty statement supercedes all
previous warranties.
Trademark Information
All brand names, product names, and trademarks are the sole property of their respective owners. Windows is a registered
trademark of Microsoft Corporation. Windows95/98/Me/XP and WindowsNT/2000 are trademarks of Microsoft
Corporation.
Operations & Installation Guide – DOC. 6384
iMedia Receiver/Processor: IM-RX1 & IM-RX3 • 31
Crestron Electronics, Inc.
15 Volvo Drive Rockleigh, NJ 07647
Tel: 888.CRESTRON
Fax: 201.767.7576
www.crestron.com
Operations & Installation Guide – DOC. 6384
(2013232)
07.05
Specifications subject to
change without notice.