1
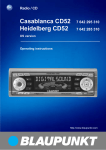
Audio System Handbook
Blaupunkt 520
1
2
1
;
<
2
3
4
5
=
6 7
8
9
:
>
?
3
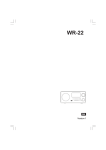
LHS Steering Remote Control
4
RHS Steering Remote Control
@
C
A
D
B
E
Security Code
The PIN code should also be written down
and kept with other important documents.
Your radio includes an electronically coded
security system. This security system relies
on an unique PIN code to enable operation
of your radio. The number only needs to be
entered if the car's battery has been
disconnected or if the radio has been
removed from the car. Please refer to the
security release procedure.
If your card is lost, and the PIN code is not
recorded elsewhere, the PIN can be
requested from your Holden Retailer, after
supplying the requested ownership
information. There may be a charge for this
service.
If an incorrect PIN code is entered, the radio
will not operate, and there will be a time
delay before the PIN code can be re-entered.
Please note:
For added security a small red light on the
radio blinks while the ignition is off.
Security Release Procedure
DO NOT SWITCH OFF THE RADIO
DURING THE WAITING TIME.
Radio PIN Code:
The waiting time is approximately 10
seconds for the first 2 attempts, then 10
minutes, and up to 11 hours by the tenth
attempt. The number of attempts remaining
is shown in the display.
2. Switch on the radio, if turned off.
After the tenth attempt 'DEALER' appears in
the display and the set is blocked. Contact
your Holden Retailer to put the set back into
operation.
Because the PIN code is the only means of
enabling operation of the radio, we
recommend that the Security Card is kept in
a safe location.
1. Switch on ignition.
3. The display shows 'CODE'.
Example:
If the PIN code belonging to the radio is
3650.
Display:
Press preset button 1 4 times 10 3 _ _ _
Press preset button 2 7 times 10 3 6 _ _
Press preset button 3 6 times 10 3 6 5 _
Press preset button 4 1 time
10 3 6 5 0
6. Press AS button 8 until a beep is heard
and the radio starts operating.
If a wrong PIN code has been entered
the display will show '9 SAFE'. After the
waiting time '9 _ _ _ _' will be shown on
the display indicating that there are nine
attempts left. The correct code should
now be entered.
4. Press and hold AS button 8, until a
beep is heard and release the AS-button.
The display shows '10 _ _ _ _', which
indicates that you have ten attempts left
at entering the correct PIN code.
5. Enter the PIN code (see Security Card)
with preset buttons 1, 2, 3 and 4.
DO NOT LEAVE IT IN THE GLOVEBOX
OF YOUR CAR.
1
In Car
Entertainment
Contents
This handbook contains all the information
you will need to operate the in-car
entertainment equipment fitted in your
Holden car. It is recommended that you read
this handbook as this will greatly assist in
obtaining the best performance from your
system.
In Car
Entertainment ............................................ 2
There are also sections on radio reception
and care and maintenance of your CD's. We
wish you many hours of pleasurable
listening.
Tone Control .............................................. 4
Security Code ............................................ 1
Contents .................................................... 2
Overview .................................................... 3
Switching on/off ......................................... 4
Volume Control .......................................... 4
Radio ......................................................... 5
Storing Stations ......................................... 6
Radio Reception ........................................ 7
CD Operation ............................................ 8
Steering Wheel
Mounted Remote Controls ...................... 11
Additional Features .................................. 12
Car Telephone ......................................... 13
Master Reset ........................................... 14
2
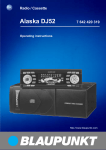
Overview
= [1] - [6]
Memory Preset stations
1 to 6
Steering Wheel Mounted
Remote Controls (if fitted)
Controls
> -
Volume control: Turn
Audio menu: Push (Bass /
Treble / Fader / Balance
selector)
No. Symbol Function
No. Symbol
Function
1
CD eject
2 CD
CD on / Pause selector
3 TR SCN
CD mode: Track scan
4 TR RPT
CD mode: Track repeat
5 TR RDM
CD mode: Random track play
6 -
CD loading slot
7 LOC
Radio mode:
Local/Distance selector
8 AS
Radio mode:
Automatic storing of radio
stations
9 AM
FM
AM /FM Band selection
: ON
Press to switch radio on/off
; <TUNE/
TRACK>
Radio mode: Manual tuning
CD mode: Track selection
? -
@
Radio mode:
Seek tuning upwards
CD mode:
Select next track / cue
A
Radio mode:
Seek tuning downwards
CD mode:
Select previous track / review
B ↑
Radio mode:
Station preset selection
CD mode:
Restart CD at beginning
C
+
Increase volume,
Audio menu: Increase setting
D
-
Decrease volume,
Audio menu: Decrease setting
Security indicator light
E O
Source select:
FM1 - FM2 - AM - CD - FM1
etc. (or FM AS - AM AS - CD FM AS etc. respectively)
Audio menu:
Bass - Treble - Fader - Balance
< <<SEEK>> Radio mode: Seek tuning
3
Switching on/off
Volume Control
Balance
On/Off (using ignition key)
Volume
When the car's ignition is switched off and
the key removed, the radio (if operating) will
be switched off. When the ignition is
switched on again the radio will also be
switched on.
Turning the knob > clockwise will increase
the level, turning it anticlockwise will
decrease the level.
To shift the sound towards the right or the
left press the audio selector (Volume knob)
four times, to select the Balance mode.
On/Off (without ignition key)
The radio can also be switched on and off
without using the car's ignition key by
pressing the on/off button :. The radio will
operate for approximately 1 hour. Once this
period has elapsed the radio automatically
switches off and will not operate until the
on/off button : is pressed again.
The radio can be turned on (if off) with the
following buttons/operation:
•
ON button :
•
AM FM button 9
•
CD
•
CD insertion
button 2
Press knob > to activate and change
Audio mode (Bass - Treble - Fader Balance). The active mode will be shown on
the display. After 2 seconds the display will
return to former mode.
Please note:
When the radio is turned on, it will return to
the volume level that was last used, unless
this level exceeds a factory predetermined
limit, in which case it will resume at this limit.
This predetermined limit can be changed by
your Holden retailer.
Fader Control
To shift sound towards the rear or front,
press the audio selector (Volume knob) three
times, to select the Fader mode. This will be
confirmed on the display by 'FADER' with
the current setting. While in this mode, turn
selector knob clockwise or anti-clockwise to
shift the sound towards the front or rear.
After 2 seconds the display will return to the
former mode.
If there are only front speakers fitted to the
vehicle (check with your retailer) then
adjusting the fader function to the rear will
not produce any sound.
4
This will be confirmed on the display by
'BALANCE' with the current setting. While in
this mode, turn selector knob clockwise or
anti-clockwise to shift the sound towards
the right or left. After 2 seconds the display
will return to the former mode.
Tone Control
Independent Tone Memories
This radio is equipped with Independent
Tone Memories. Bass and Treble can be
independently set for each listening mode
such as AM, FM, CD and Telephone.
In addition, volume, fader and balance can
be adjusted in Telephone mode without
affecting these settings in Radio or CD
mode.
Bass
Press the audio selector (Volume knob)
once, to select the Bass mode. This will be
confirmed on the display by 'BASS' with the
current setting. While in this mode, turn the
selector knob clockwise or anti-clockwise to
adjust the bass to the desired level. After 2
seconds the display will return to the former
mode.
Treble
Press the audio selector (Volume knob)
twice, to select the Treble mode. This will be
confirmed on the display by 'TREBLE' with
the current setting. While in this mode, turn
the selector knob clockwise or anticlockwise to adjust the treble to the desired
level. After 2 seconds the display will return
to the former mode.
Radio
Automatic Seek Tuning
Selecting Waveband
AM Band:
Press AM/FM button 9 to select AM band.
FM Band:
Press AM/FM button 9 to select FM band
or to switch between FM1, FM2 and AM.
AM
1017
Station on AM Band
FM
105.9
This function seeks radio stations
automatically. Press button SEEK>> <
to automatically select the next higher
frequency radio station. Press button
<<SEEK < to automatically select the next
lower frequency radio station. During this
operation, the radio is muted. As the radio
can seek weak and noisy distant radio
stations, it is recommended to switch the
radio to 'local' mode.
To do this, press LOC button 7. The
current mode ('LOCAL ON' or 'LOCAL OFF')
is displayed. Press the LOC button 7 again
to switch between 'LOCAL ON' or
'LOCAL OFF' mode.
LOCAL ON
Station on FM Band
Stereo Broadcast:
When a stereo broadcast is received on FM,
the stereo indicator ' ' appears in the
display. In case of poor field-strength the
radio automatically switches to mono but
the ' ' indicator may still be shown on the
display.
Tuning-in a station
You can tune-in stations in different ways:
• Automatic seek
• Manual seek
•
In LOCAL ON mode, the radio will first
search for strong stations. If no strong
station can be found it will search for
any receivable station.
•
In LOCAL OFF mode the radio will
search for any receivable station (useful
in areas where there are no strong
stations).
The LOCAL ON/OFF setting does not affect
the AS function (refer to section 'Automatic
Storing' elsewhere in this handbook).
• Auto-store (AS)
5
Manual tuning
To tune-in stations of which the frequency is
known, press and hold one of the tuning
buttons TUNE> ; or <TUNE ;.
Fast tuning starts and will continue until you
release the button. During this operation the
radio is muted.
Briefly tap tuning button TUNE> ; or
<TUNE ; to move in steps of 9 kHz for AM
or 0.1 MHz for FM until the right frequency is
displayed.
Storing Stations
Storage locations for 30 stations are
available.
•
6 x FM1
•
6 x FM2
•
6 x AM
•
6 x FM AS
(Automatically-Stored FM stations)
•
6 x AM AS
(Automatically-Stored AM stations)
Storing a Radio Station into a
Preset
1. Select the required waveband, AM, FM1
or FM2 by button AM/FM 9.
2. Tune to the desired station by means of:
• Automatic seek tuning or
• Manual tuning
6
3. Press and hold the desired preset
buttons 1 to 6 (=) until the radio is
briefly muted or beep is heard (if beeps
are turned on), indicating that the chosen
radio station is stored into the preset.
During the storing process the currently
stored station is shown.
P1
101.4
Programming by Automatic Storing
Select the desired waveband with the AM/
FM button 9.
Press AS button 8 for at least 2 seconds
until the audio is briefly muted or beep is
heard (if beeps are turned on). Search tuning
starts. 'AS' appears in the display.
AS
103.7
AS
FM Station stored on Preset 1
The previously stored station is then
replaced and the selected preset number
'1 to 6' appears in the display.
4. Program the other preset buttons in the
same way.
5. Repeat the above mentioned operation
for the other wavebands AM, FM1 and
FM2.
Automatic Storing (AS)
This feature allows the storage of an extra 6
AM and 6 FM radio stations. It is of great
benefit when away from the home location,
as the strongest radio stations can be
stored without knowing their frequency, and
does not delete the stations already stored
on FM1, FM2 or AM bands.
Search tuning during Auto-Store
After the Auto-Store process has finished,
the six strongest stations in this reception
area are stored. The radio will play the
station stored on preset 1.
If you have travelled beyond the range of the
stored stations, you may wish to repeat the
process again to store new strong stations.
To alternate between the AS radio stations
and your normally stored radio stations (on
FM1, FM2 or AM), briefly press the button
AS 8.
Whenever you are using the AM AS or the
FM AS bands, 'AS' will also be shown in the
display.
P4
103.7
AS
Station on FM AS Stored on Preset 4
You can also store stations manually on the
AS storage locations (see 'Storing a Radio
Station into a Preset' elsewhere in this
handbook).
Range:
AM broadcasts tend to follow the earth's
curvature and also reflect from the upper
atmosphere, in which enables long range
reception, especially after sunset.
Recalling Stored Stations
FM transmissions are basically line-of-sight
(similar to TV signals) and are reflected by
buildings, mountains etc., but not by the
upper atmosphere.
Select waveband AM or FM with the button
AM/FM 9.
Press the desired preset button.
To select one of the stations stored with
Auto-Store, select waveband AM or FM,
then briefly press AS button 8 and press
the desired preset button.
Radio Reception
Due to varying reception locations, car
radios have performance limitations that
may on occasions create the impression
that your radio is malfunctioning. To assist
you in understanding what can be expected
from your radio, we have set out below how
reception may vary from time to time and
under certain conditions.
AM and FM:
There are two types of radio broadcasts in
Australia. AM or Amplitude Modulation in
which the amplitude of the signal is varied to
produce the sound and FM or Frequency
Modulation in which the frequency is varied
to produce the sound.
Interference:
Interference is caused by either natural or
man made electrical disturbances. This can
affect the amplitude of the signal being
received. AM signals are more prone to this
type of interference than FM signals. This
type of interference has little or no effect on
the frequency of the received signal, thus
AM is susceptible to interference from power
lines, fluorescent lighting, neon signs, traffic
light control circuits, overhead tram wires
and electrical storms. With FM reception,
these amplitude variations are filtered out,
leaving a relatively clear signal (refer to
'Peculiarities of FM Mobile Reception),
making this one of the major advantages of
FM broadcasts.
Peculiarities of FM Mobile
Reception:
A mobile FM radio cannot be expected to
continously provide the quality of FM
reception you may have experienced on
your home radio. Contrary to popular
opinion, FM broadcasts are not static free,
and although your new radio has a built-in
electronic interference absorption circuit,
some static will be evident from time to time,
especially in areas without a direct line of
sight to the transmitter.
Your radio is also equipped with a soft mute
function. The purpose of this is to attenuate
the treble and audio level in weak signal
areas to reduce the very annoying
background hiss, which is customary to
weaker FM reception. There are two phenomena peculiar to FM reception.
• Flutter - As FM signals reflect off solid
objects, it is possible to pass through
areas of 'SHADOW' caused by tall
buildings and/or hilly terrain, which
effectively blocks out the signal. As the
car passes in and out of shadow areas,
the level of signal will vary at a rapid rate,
creating a flutter type of interference to
the signal.
• Distortion (Multipath) - Distortion
may occur when the direct signal from the
transmitter and a reflected signal reach
the antenna at the same time and either
cancel or aid each other, like ghosting on
a TV. This results in intermittent distortion
of the signal whilst moving or constant
distortion when stationary, such as at a
traffic light or when parked. Should this
distortion occur while stationary, moving
the car approximately 1 or 2 metres
would on most occasions correct the
problem. Circuitry has also been included
in this radio to reduce this type of
distortion.
7
To reduce the effects of interference and/or
poor signal strength, several features have
been included within the radio which work
automatically when needed:
• Noise Blanking Circuit
(FM interference suppression) - To reduce
pulse interference, a Noise Blanking
Circuit is included.
• Soft Muting Circuit - The built-in Soft
Muting Circuit will reduce the FM stereo
separation and treble response if the
signal from the radio station diminishes.
This effectively lessens the amount of hiss
and background noise that is usually
heard with weaker FM signals.
• Multipath Detection Circuit - If
repeated multipath signals are received,
the circuitry will switch the radio into
MONO mode and slightly reduce the
treble response. It will gradually return to
STEREO with full treble response when
multipath conditions are no longer being
experienced.
CD Pausing
CD Operation
CD Loading
Ensure that the CD entry slot 6 is clear.
Insert the CD (lettered side up) into the slot
until the CD is automatically received and
taken.
The CD operation will automatically override
the radio. The display shows 'CD'.
After the CD has been accepted, the player
begins with the first track on the CD. Initially
the total number of tracks on the CD is
shown as 'TxxCD' followed by:
TRACK
01
DISC IN
CD
After the last track has been played,
playback of the CD begins again, starting
with the first track.
If the CD has been inserted incorrectly, the
display will show 'CD ERROR'.
Please note:
It is possible to insert and load a CD while
the car's ignition is turned off. Playback will
commence immediately after the CD is
loaded.
CD Selection
Press CD button 2 to activate the CD
mode.
If you select the CD mode and there is no
CD in the radio the display shows 'NO
DISC' for 2 seconds. The radio will continue
playing.
8
Pressing the CD button 2 while playing a
disc will pause the CD.
The display will show:
PAUSE
To resume the playing of the CD press
button 2 again.
Track Selection
You can select a desired track on a CD by
briefly pressing button ; <TUNE/TRACK>
Press button TRACK> ; to go on the next
track or press repeatedly until desired track
appears in the display.
Press button <TRACK ; to go back to the
start of the current track or press repeatedly
until desired track appears in the display. If
the track has been playing for less than 3
seconds and button <TRACK ; is pressed,
the previous track will be played. If you
press button <TRACK ; after the first 3
seconds, the current track is restarted.
Fast Forward / Fast Back (Track
Cue/Review)
Press button ; <TUNE/TRACK> for more
than 2 seconds to rapidly move forward or
backwards within the current track. The CD
is played at a faster speed and at a lower
volume. The display shows the number of
the track and the elapsed time of the track
in minutes and seconds.
Track Scan
Random Play
Press the TR SCN button 3 to sequentially
sample the first 10 seconds of all tracks on
the CD. During the track scan the display
shows:
When this feature is selected, all tracks on
the CD will be played randomly.
TRACK
DISC IN
10 SCAN
To switch on the random play, press
TR RDM button 5 during CD playback.
Random play will be confirmed by the
following display:
TRACK
12
The track number is flashing.
Press the TR SCN button 3 again to stop
scanning and listen to the current track.
Track Repeat
Press the TR RPT button 4 to replay the
current track. The track repeat will be
confirmed by the following display:
TRACK
05
DISC IN
RPT
Press the button TR RPT 4 again to stop
the repeating or press button ; <TUNE/
TRACK> to go to the next or previous (refer
to section headed 'Track Selection'
elsewhere in this handbook).
RDM
DISC IN
CD
To switch off the random play press the
TR RDM button 5 again during CD
playback.
If button ; <TUNE/TRACK> is pressed
whilst in random play mode, the next
random selection will play.
Once all tracks on the CD have been
randomly played, the display will show
'RANDOM RPT' and the CD will be
randomly played again.
CD Eject
Press the button 1 to eject the CD.
The radio will display 'EJECT CD' then revert
to radio mode.
If the CD is not removed within 10 seconds
of being ejected, it is automatically reloaded
into CD player again (to protect the CD from
accidental damage). In this case, the radio
will remain in radio mode.
Please note:
It is possible to eject the CD when the car's
ignition is turned off.
Stopping CD playback
Press the the button AM/FM 9 briefly to
stop CD playback and resume in radio
mode or press the button ON : to switch
the radio off.
Error Messages from the CD
Deck
In some cases it may happen that the deck
is not able to play or load a specific CD.
Then the following error messages are
shown in the display:
CD ERROR
1. 'CD ERROR' (after CD loading): A CD is
caught in the deck mechanism.
2. 'CD ERROR' (during CD playback): The
deck mechanism is too hot. Allow the CD
deck to cool down before resuming
operation.
3. 'CD ERROR' (constantly after selecting
CD mode): Internal control error.
The display shows the symbol 'DISC IN'.
9
4. 'CD ERROR' (after CD loading): CD
cannot be read anymore; after displaying
'CD ERROR' the radio ejects the CD.
Check if CD was loaded upside down
(the label surface should be facing
upwards). This message may also be
displayed if a CD is dirty or scratched.
Inspect the CD surface for problems and
clean if necessary. "CD ERROR" will also
be seen when try to play e.g. MP3 CD,
Video CD, DVD or CD-ROM.
The radio switches back to radio mode.
Notes on Compact Discs
• Handle the CD by its edge and avoid
touching the playing surface.
• Do not stick paper or tape or write on
either surface.
Consult your Holden Retailer, if you read any
of the error messages.
Please note:
• For trouble free CD operation, ensure that
no foreign objects are inserted through
the CD opening.
• Do not insert and force two CD's into the
opening at the same time, they will jam
and not play.
• If a CD is already in the mechanism, a
second CD cannot be inserted.
• Also refer to the section headed 'Notes
on Compact Discs' elsewhere in this
handbook.
10
• Do not expose the CD to direct sunlight
or a heat source such as a hot air duct.
• Before inserting into the radio, clean the
CD with a cleaning cloth. Wipe the CD
from the centre outwards, rather than in
a circular motion. See diagram
• Do not use solvents such as petrol,
thinners etc. Use commercially available
CD cleaners.
Steering Wheel
Mounted Remote
Controls (if fitted)
To increase driving safety and to improve
ease of operation, some of the radio
functions can be controlled by the remote
controls on the steering wheel.
The following functions are available (for
illustration see fold-out page):
Overview
No. Symbol Function
@
Radio mode:
Seek tuning upwards
CD mode:
Select next track / cue
A
Radio mode:
Seek tuning downwards
CD mode:
Select previous track / review
B ↑
C
+
D
–
E O
Source select:
FM1 - FM2 - AM - CD - FM1
etc. (or FM AS - AM AS - CD FM AS etc. respectively)
Audio menu:
Bass - Treble - Fader - Balance
Preset Station and CD select
Briefly pressing the button ↑ B on the
steering wheel remote will perform the
following functions:
Radio – Advances to the next stored radio
stations on the current AM or FM band in
increasing preset number.
CD – Restarts playing at the beginning of
the CD.
Search Radio Station or Track
Select
Briefly pressing the button @ on the
steering wheel remote will perform the
following functions:
Briefly pressing the button A on the
steering wheel remote will perform the
following functions:
• Radio – Searches for the next receivable
radio station on the current AM or FM
band in decreasing frequency.
• CD – Returns to the start of the current
track, or previous track.
Pushing and holding this button for
2 seconds:
• CD – Rapidly moves backward within the
track (review).
Volume Adjustment
The button + C or button – D adjusts the
volume up or down respectively. The
buttons can either be pressed and held until
the desired volume is reached, or briefly
pressed several times to raise or lower the
volume gradually.
Source Selection
Radio mode:
Station preset selection
CD mode:
Restart CD at beginning
Increase volume,
Audio menu: Increase setting
• Radio – Searches for the next receivable
radio station on the current AM or FM
band in increasing frequency.
Press the button O E to scroll through all of
the sources in the following order:
• CD – Advances to the next track on the
CD.
Or, if the AS indicator is shown on the
display:
Decrease volume,
Audio menu: Decrease setting
Pushing and holding this button for
2 seconds or more:
FM AS - AM AS - CD - FM AS etc.
FM1 - FM2 - AM - CD - FM1etc.
• CD – Rapidly moves forward within the
track (cue).
11
Audio Menu Adjustment
Additional Features
Press the volume control > to activate and
select audio menu.
Speed dependent volume control
When any of the audio menu (Bass/Treble/
Fader/Balance) is on the display, you can
select the next menu by pressing the button
O E once or as many times as required.
Increase or decrease the setting by pressing
the button + C or - D.
The speed dependent volume control
adjusts the volume depending on the vehicle
speed. As the vehicle increases in speed,
the volume of the radio also increases to
compensate for the associated speed
noises.
Please note:
This feature will not always compensate for
the driving noise. There are other variable
factors such as road surface, wind noise,
windows open, engine speed etc. that may
alter the interior noise for any given road
speed.
For this reason there are five different levels
of compensation available to allow you to
find the level of compensation that best suits
your average driving conditions.
You can select the compensation curves
between 0 (off) and 5 (maximum compensation) as follows:
12
1. Press button LOC 7 for at least 3
seconds until you hear a confirmation
beep (no beep if 'BEEP OFF' previously
set). The display shows the current
setting, for eg. 'SD-VOL 2'.
2. Press tuning buttons (;) within
8 seconds to select the desired setting
between 'SD-VOL 0' and 'SD-VOL 5'.
3. To store the selected setting, press
button LOC 7 again for at least 3
seconds until you hear a confirmation
beep (no beep if 'BEEP OFF' previously
set).
SD-VOL 2
Display during setting for speed dependent
volume control.
If you don't store the new setting within
8 seconds after the last press of a button, it
will not be stored. To turn this feature off,
select and save 'SD-VOL 0'.
Confirmation Beeps
Audible beeps are used to confirm various
actions of the radio such as storing a radio
station or an automatic store is started. The
beeps can be turned on or off as follows.
1. Switch off the radio by pressing button
ON :.
2. Press preset buttons 3 and 5 (=)
together and keep pressed.
3. Switch on the radio and keep preset buttons 3 and 5 (=) pressed until the
display shows 'BEEP OFF' or
'BEEP ON'.
4. Select 'BEEP ON' or 'BEEP OFF' with
the tuning buttons (;).
5. To store the new setting press preset
buttons 3 and 5 (=) again for at least 3
seconds until you hear a confirmation
beep.
BEEP ON
Display during adjustment of confirmation
beep.
Car Telephone
Important
This radio includes a telephone input facility.
If a mobile phone hands-free kit with suitable
features (such as a mute line and wiring for
separate speaker) has been connected to it,
the radio will be muted when the phone
rings and the voice of the caller will be heard
through the car’s speakers. When the call
ends the radio will return to the previous
mode.
When this feature is used for the first time,
the volume may need to be adjusted on the
phone as well as the radio. This should be
done while a call is being made. Firstly,
adjust the phone’s volume to a medium level
using the volume control on the phone itself.
The radio’s volume may now be adjusted as
required to compensate for variations in the
mobile phone signal quality or changes in
the background noise within the car e.g. if
the window is wound down.
During a call 'PHONE' will be shown on the
display.
If the radio system is off, it will turn on for
the telephone call if the car’s accessories or
ignition is already switched on.
If a call is in progress when the accessories
are turned off and keys are removed from
ignition, the radio will remain turned on in
Telephone mode until the phone call is
completed, i.e. does not interrupt your
phone conversation.
Please Note:
If the call sounds unusually distorted, the
volume setting on the phone itself may need
to be adjusted until the sound quality is
improved.
Please contact your Holden Retailer or
Blaupunkt for further information.
Volume, Bass, Treble, Fader and Balance
can all be adjusted in the Telephone mode
without affecting these settings in radio or
CD mode.
If you don't store the setting within 8
seconds after the last press of a key, the
new setting will not be stored.
13
Master Reset
The radio has a reset function built in to
enable you to instantly reset all adjustment
to the factory standard. This feature is most
useful when adjustments have been made
that affect the sound quality or operation of
the radio and you are unsure of how to
return the original neutral settings. Master
Reset will reset the followings:
• Bass, Treble, Fader, Balance to standard
• Volume
• Confirmation Beeps
• Phone volume
Performing the Master Reset
1. Turn off the radio.
2. Simultaneously press and hold the
preset button 4 = and the button ON
: for 3 seconds.
After the reset this radio will turn on with the
standard settings, no message will be
displayed.
14
NOTES:
15
NOTES:
16
Please note, that all information, illustrations and specifications in this Handbook are based
on the latest production information available at the time of printing.
Holden reserves the right to make changes at any time without notice and without incurring any obligation.
© 2002 Holden Ltd.
Reproduction in whole or in part is prohibited without written approval from
Holden Ltd., ABN 84 006 893 232.
5
U1E
Holden Part No: 92057925
Bosch Part No: 8 622 403 494
6